原理
基础使用
https://eggjs.org/zh-cn/intro/quickstart.htm
安装
mkdir egg-democd egg-demonpm inpm run dev访问http://127.0.0.1:7001
添加视图
// 添加路由router.get('/stu', controller.stu.index);// app/controller/stu.jsclass StuController extends Controller {async index() {const { ctx } = this;ctx.body = '<h1>hello, Lucy</h1>';}}// 访问 http://127.0.0.1:7001/stu
访问静态资源
创建/public/index.html, 并访问http://127.0.0.1:7001/public/index.html
路由控制
控制器:
- 直接相应数据/渲染模板
- 接受用户的输入
- 与路由建立对应关系
路由:
- 获取query参数
- 获取params参数
获取query参数
class StuController extends Controller {async index() {const { ctx } = this;const query = ctx.request.query;ctx.body = `this is page: ${query.page}`;}}// 访问 http://127.0.0.1:7001/stu?page=3// this is page: 3
获取params参数 (需要修改路由)
// 添加路由router.get('/stu/:page', controller.stu.getPage);// 控制器添加方法async getPage() {const { ctx } = this;const params = ctx.params;ctx.body = `this is page: ${params.page}`;}// 访问 http://127.0.0.1:7001/stu/9// this is page: 9
允许伪造访问
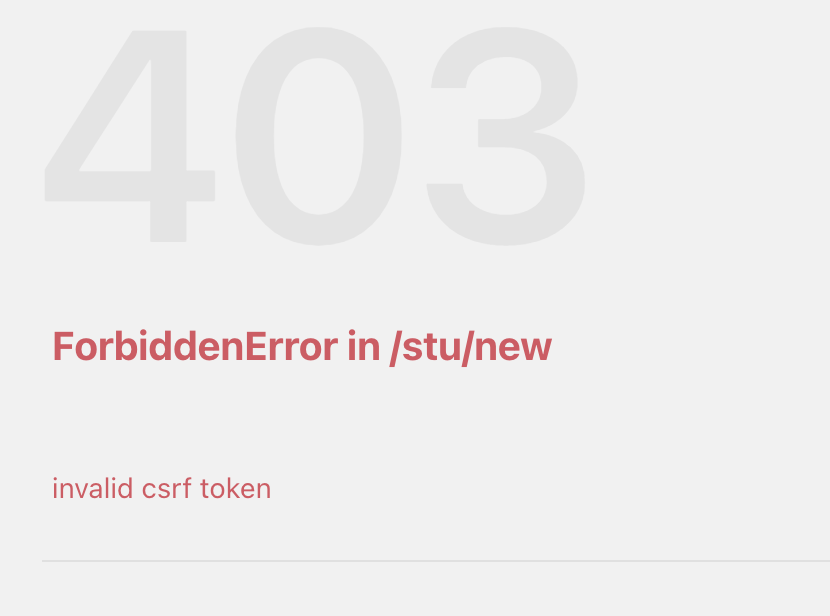
// config/config.default.jsconfig.security = {csrf: {enable: false,},};
RESTful风格
https://eggjs.org/en/basics/router.html#restful-style-url-definition
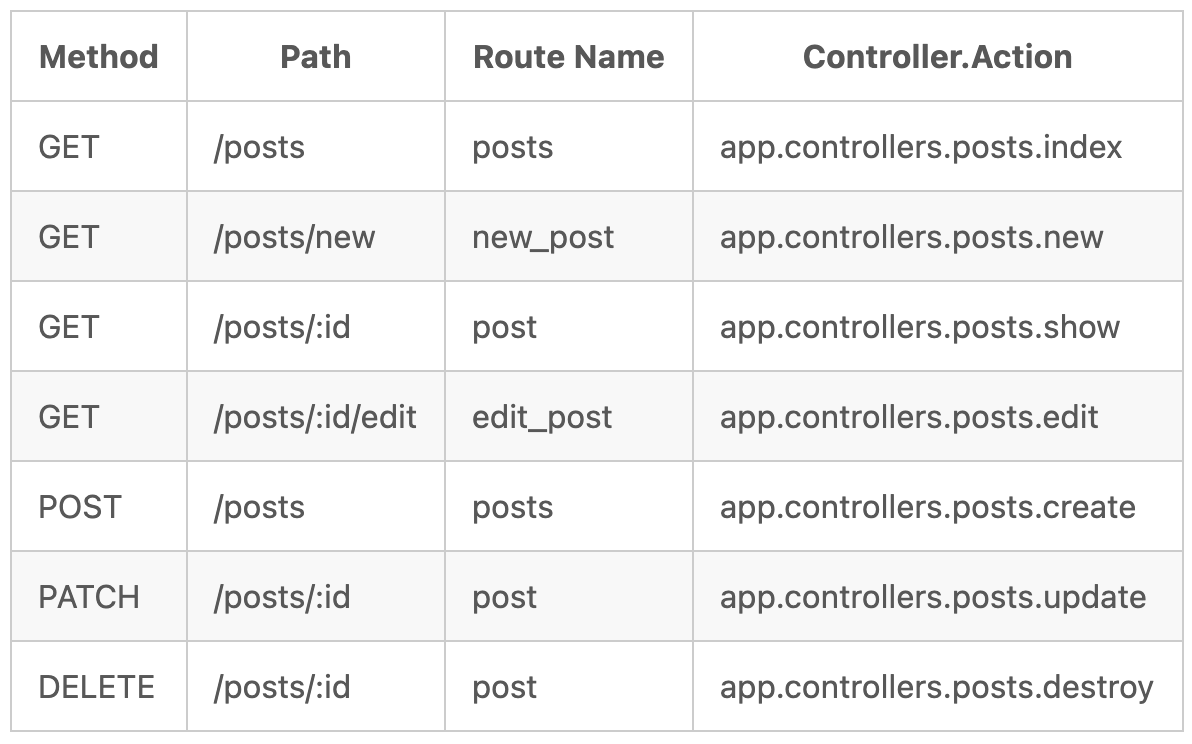
路由修改为
// beforerouter.get('/stu', controller.stu.index);router.get('/stu/new', controller.stu.new);router.get('/stu/:id', controller.stu.show);router.post('/stu', controller.stu.create);// afterrouter.resources('stu', '/stu', controller.stu);
查询(详情)/新增
查询
http://127.0.0.1:7001/stu
http://127.0.0.1:7001/stu/1
新增页
http://127.0.0.1:7001/stu/new
'use strict';const Controller = require('egg').Controller;const students = [{ id: 1, name: 'Jack'},{ id: 2, name: 'Lcuy'},];class StuController extends Controller {async index() {const { ctx } = this;ctx.body = students;}async new() {const { ctx } = this;ctx.body = `<form action="/stu" method="post" class="form-example"><div class="form-example"><label for="name">Enter your name: </label><input type="text" name="name" id="name" required></div><div class="form-example"><input type="submit" value="新增"></div></form>`}async show() {const { ctx } = this;const params = ctx.params;ctx.body = students[params.id];}async create() {const { ctx } = this;const { body } = ctx.request;// console.log(body);students.push({id: students.length,...body})ctx.body = '创建成功!'ctx.redirect('/stu');}}module.exports = StuController;
插件
允许跨域 egg-cors
- 安装 yarn add egg-cors
- 配置 ``` // config/plugin.js cors: { enable: true, package: ‘egg-cors’, },
// config/config.default.js config.cors = { origin: ‘*’, allowMethods: ‘GET,HEAD,PUT,POST,DELETE,PATCH’, };
<a name="bPi8m"></a>#### nunjucks模版插件 egg-view-nunjucks1. 安装2. 配置插件3. 创建模版文件, 控制器中使用render方法配置插件
// egg-demo/config/plugin.js nunjucks: { enable: true, package: ‘egg-view-nunjucks’, // 注意 },
// egg-demo/config/config.default.js config.view = { defaultViewEngine: ‘nunjucks’, };
创建模版文件app/view/home.html, 控制器中使用render方法
async index() { const { ctx } = this; // ctx.body = ‘
hello, Lucy
‘; await ctx.render(‘home.html’); }
模版注入数据
// controller.home.index
await ctx.render(‘home.html’, {names: [‘Jack’, ‘Lucy’]});
// view/home.html
学生列表
-
{% for item in names %}
- {{ item }} {% endfor %}
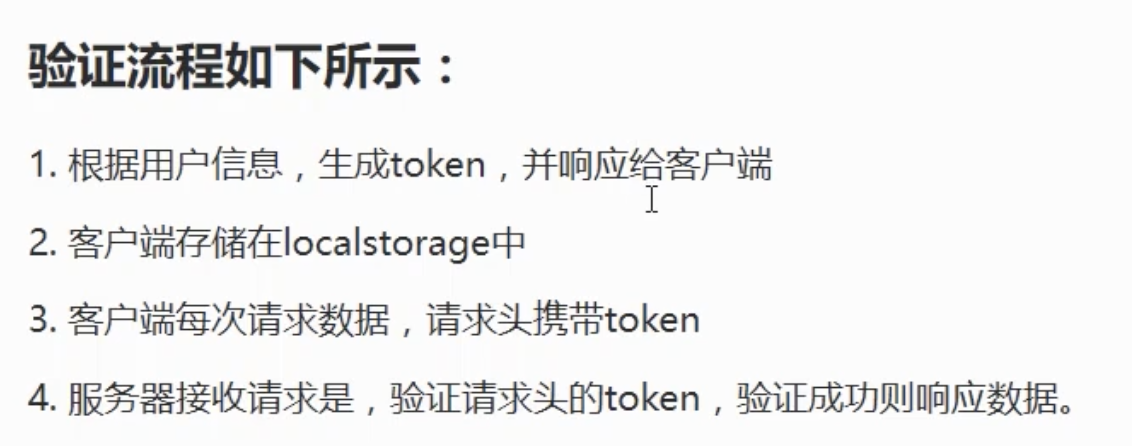
<a name="MMOMT"></a>### 用户登录(插件: egg-jwt)- cookie 与 session- JWT (Json Web Token)session保持用户登陆状态,- 未登陆/注销 ,跳转至登陆页- 登陆, 跳至首页token; 加密的标识, 客户端带token向服务器发送请求, 以证明自己的身份1. 安装egg-jwt yarn add egg-jwt2. 配置插件3. 用法配置插件
// config/plugin.js jwt: { enable: true, package: ‘egg-jwt’, },
// config/config.default.js config.jwt = { secret: ‘123456’, };
<br />获取密钥 this.app.jwt.secret<br />读取头部token this.ctx.request.header.token
// 签名 const token = this.app.jwt.sign(‘admin’, ‘secret’) // eyJhbGciOiJIUzI1NiJ9.YWRtaW4.Hq25ihi_FB2DYnhkH9mO7z7nz67xPsE5IfFsUgDhbrU
// 验证 try { const decode = this.app.jwt.verify(token, ‘secret’) } catch() { this.ctx.body = ‘token未能通过验证!’ } // admin
<br />登陆伪代码
const { username, password } = ctx.request.body; if (username == ‘admin’ && password == ‘123456’) { const token = this.app.jwt.sign(username, this.app.jwt.secret) // response-token } else { // response-error }
<a name="h3vPQ"></a>### 中间件(验证token并拦截)middleware1. 目录中创建js文件2. 使用中间件
// app/middleware/checktoken.js
function checktoken() { return async function(ctx, next) { try { let token = ctx.request.header.token; console.log(‘middleware’, token, ctx.request); let username = ctx.app.jwt.verify(token, ctx.app.config.jwt.secret) if (username) { await next(); } } catch (e) { ctx.body = { code: 400, msg: ‘token无效’ }; } } }
使用中间件, 倒数第二个参数
router.resources(‘stu’, ‘/stu’, app.middleware.checktoken(), controller.stu);
服务端:1. 登陆, 返回token2. 接口(非登陆), 添加中间件验证token, 无效token拦截客户端:1. 登陆后, 本地存放token2. 接口头部添加token3. token拦截, 跳转至登陆页1. 本地识别, 跳转前检查**是否存在token**2. 接口返回拦截, **无效token**<a name="kPiob"></a>#### 辅助工具postman<a name="mMrB2"></a>### 持久化狭义的理解_: “_持久化_”_仅仅指把域对象永久保存到数据库中;广义的理解_,_“持久化”包括和数据库相关的各种操作。<br />意义:- 通过持久化技术可以减少访问数据库数据次数,增加应用程序执行速度;- 代码重用性高,能够完成大部分数据库操作;- 松散耦合,使持久化不依赖于底层数据库和上层业务逻辑实现,更换数据库时只需修改配置文件而不用修改代码需求:<br />使用mysql数据库, sequelize(ORM框架)管理数据层的代码<a name="Wqi7a"></a>#### ORM(对象关系映射, Object Relational Mapping)1. 将数据从对象的形式, 转换成表格的形式2. sequelize是一个基于node的orm框架3. 通过egg-sequelize, 直接使用sequelize提供的方法操作数据库- [ ] 服务<a name="PTvur"></a>### 项目部署前端打包放置到public文件夹下<a name="LYrEo"></a>#### 启动 & 终止
npm run start npm run stop
<a name="gTqDa"></a>### Docker 部署项目<a name="FFLFf"></a>## 一些辅助工作<a name="atHpg"></a>### 创建数据库<a name="XxrEa"></a>### Vue工程<a name="t3k9l"></a>#### 配置代理<a name="MN6Sr"></a>#### 或者配置全局环变量
// .env.development VUE_APP_BASE_API = “http://127.0.0.1:7001“
// 读取 process.env.VUE_APP_BASE_API
<a name="SShUw"></a>#### 封装axios
// stu-vue/src/utils/request.js
// main.ts Vue.prototype.$request = request ```
实践CURD
高级使用
配置RPC

若有收获,就点个赞吧
0 人点赞
