【1】先进行innobackup进行备份
innobackupex —defaults-file=/etc/my.cnf —user=root —password=jXho2xYH2wf9Lyxt —socket=/data/pos/mysql.sock —no-lock —no-timestamp —parallel=8 —compress /data/xtrabackup/$(date +%Y-%m-%d)_full
—-注意改socket
【2】获得备份文件后,进行解压
innobackupex —decompress —parallel=8 /data/xtrabackup
无异常显示:
innobackupex: qpress -do /data/xtrabackup/retail-mysql-pos-slave-13-1_xtr/2017-04-24_full/mysql/slave_master_info.ibd.qp > /data/xtrabackup/retail-mysql-pos- slave-13-1_xtr/2017-04-24_full/mysql/slave_master_info.ibd
innobackupex: qpress -do /data/xtrabackup/retail-mysql-pos-slave-13-1_xtr/2017-04-24_full/mysql/slave_relay_log_info.ibd.qp > /data/xtrabackup/retail-mysql- pos-slave-13-1_xtr/2017-04-24_full/mysql/slave_relay_log_info.ibd
170426 14:25:52 innobackupex: completed OK!
【3】应用日志
(应用前,先修改cnf参数文件)
innobackupex —user=root —password=jXho2xYH2wf9Lyxt —defaults-file=/etc/my.cnf —apply-log —parallel=8 /data/xtrabackup/2017-04-24_full
无异常显示:
[notice (again)]
If you use binary log and don’t use any hack of group commit,
the binary log position seems to be:
InnoDB: Last MySQL binlog file position 0 491008577, file name binlog.000488
xtrabackup: starting shutdown with innodb_fast_shutdown = 1
InnoDB: FTS optimize thread exiting.
InnoDB: Starting shutdown…
InnoDB: Shutdown completed; log sequence number 847050163140
170426 14:37:50 innobackupex: completed OK!
【4】开始恢复数据文件(类似于oracle的restore)
innobackupex --user=root --password=jXho2xYH2wf9Lyxt --defaults-file=/etc/my.cnf --copy-back --parallel=8 /data/xtrabackup/retail-mysql-pos-slave-13-1_xtr<br />无异常显示:<br />innobackupex: Starting to copy InnoDB log files<br />innobackupex: in '/data/xtrabackup/retail-mysql-pos-slave-13-1_xtr'<br />innobackupex: back to original InnoDB log directory '/data/pos3306/db'<br />innobackupex: Copying '/data/xtrabackup/retail-mysql-pos-slave-13-1_xtr/ib_logfile0' to '/data/pos3306/db/ib_logfile0'<br />innobackupex: Copying '/data/xtrabackup/retail-mysql-pos-slave-13-1_xtr/ib_logfile3' to '/data/pos3306/db/ib_logfile3'<br />innobackupex: Copying '/data/xtrabackup/retail-mysql-pos-slave-13-1_xtr/ib_logfile2' to '/data/pos3306/db/ib_logfile2'<br />innobackupex: Copying '/data/xtrabackup/retail-mysql-pos-slave-13-1_xtr/ib_logfile1' to '/data/pos3306/db/ib_logfile1'<br />innobackupex: Finished copying back files.<br />170426 15:13:39 innobackupex: completed OK!
【5】启动服务
/usr/bin/mysqld_safe —defaults-file=/etc/my_3306.cnf &
无异常显示:
[1] 16231
[root@retail-mysql-public-backup-01 db]# 170508 10:39:37 mysqld_safe Logging to ‘/data/pms/err.log’.
170508 10:39:37 mysqld_safe Starting mysqld daemon with databases from /data/pms/db
异常显示:
[root@retail-mysql-public-backup-01 db]# 170508 10:36:31 mysqld_safe Logging to ‘/data/pms/err.log’.
170508 10:36:31 mysqld_safe Starting mysqld daemon with databases from /data/pms/db
170508 10:36:36 mysqld_safe mysqld from pid file /data/pms/mysqld.pid ended
[1]+ Done /usr/bin/mysqld_safe —defaults-file=/etc/my_3306.cnf
【6】授权
GRANT REPLICATION SLAVE, REPLICATION CLIENT ON . TO repl@’10.241.230.50’ IDENTIFIED BY ‘123.com’;
—-主库执行
PS:IP改成backup库所在的服务器
【7】查看binlog_pos点 (在bakcup库上查看并执行,类似于告诉日志从这里开始应用,之前的都不用管)
[root@Backup-Template retail-mysql-pos-slave-13-1_xtr]# cat xtrabackup_info 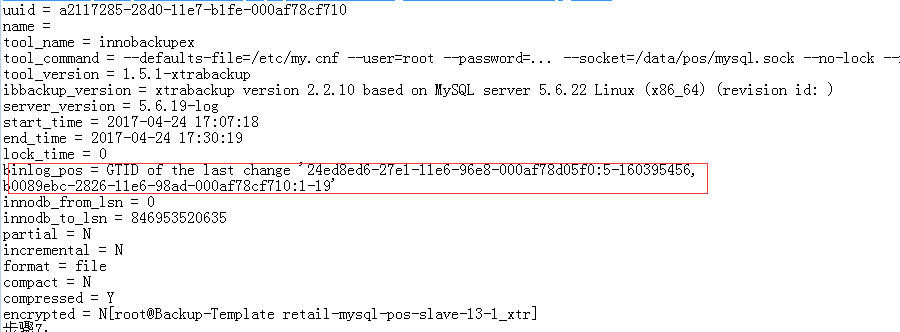
获取这一段
mysql> SET @@GLOBAL.GTID_PURGED=’24ed8ed6-27e1-11e6-96e8-000af78d05f0:5-160395456,
b0089ebc-2826-11e6-98ad-000af78cf710:1-19’;
PS:注意,cnf里的gtid要打开
—-以上均在备库执行
【8】设置追日志的主库ip
change master to master_host=’10.240.11.22’,
master_user=’repl’,
master_password=’123.com’,
master_port=3306,
master_auto_position=1;
PS:ip里写的是主库的ip
—-备库执行
【9】开始追日志,并检查
mysql> start slave;
mysql> show slave status\G;
—检查追日志情况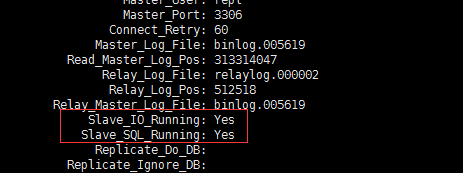
此为yes表示配制没有问题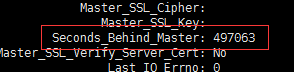
陆续观察此参数,如果变小则表明正在追日志中
—-备库执行

若有收获,就点个赞吧
0 人点赞
