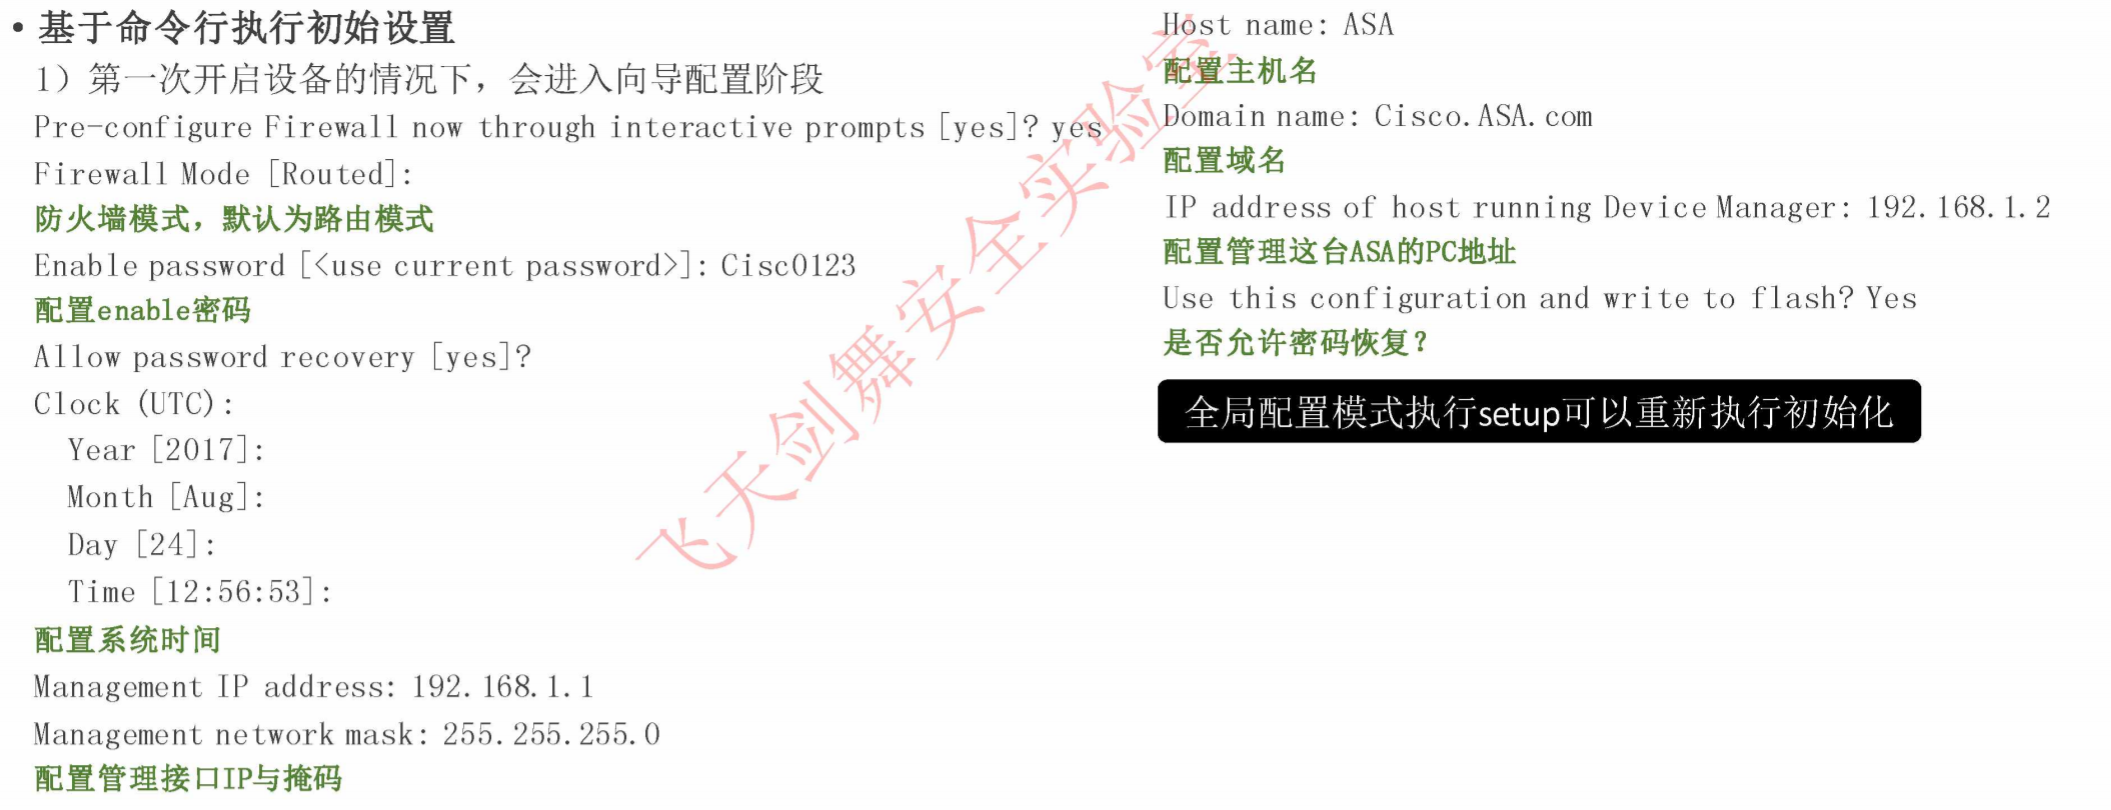
ASA 默认配置
ASA 物理机管理接口会有默认配置
ASA 管理接口还会启用DHCP
ASA 也会默认放行管理口的HTTP管理流量
虚拟化 EVE 环境中可以使用命令来恢复默认配置
configure factory-default
向导模式(Ctrl+Z 强制退出)
ASA 接口配置
接口安全级别
每个接口都有安全级别
默认接口的安全级别是 0,最高是100
高安全级别到低安全级别的流量默认放行(Outbound),低安全级别的流量到高安全级别的流量默认阻断(Inbound)
更改接口安全级别后需要等待现有安全连接失效后,再次建立才会生效,可以手动用命令clear local-host 命令
接口命名
默认安全级别为0.如果将接口命名为“inside”,并且未明确设置安全级别,则ASA会将安全级别设置为100。
接口介质
media-type rj45|
Management-Only
可以将接口配置为只允许管理流量通过
如果禁用该特性,需要使用 no management-only
需要ASA 5510 的 Security Plus许可证才能将management0 / 0端口用作常规接口
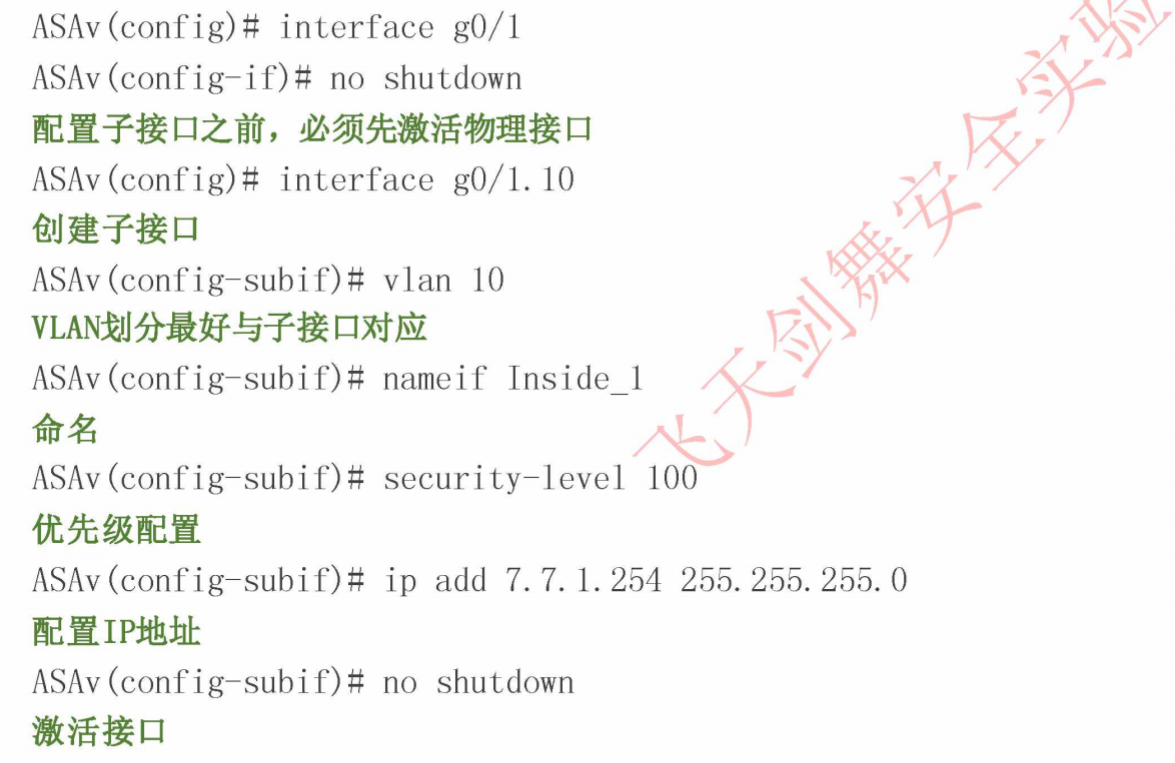
子接口配置
配置管理接口
OOB 接口
用于实现带外网管,在ASA5510上有,从7.2和8.0开始取消OOB端口限制。
光电复用口
交换机中光电复用口是一种端口复用技术!也就是说交换机如果有这种功能的话那么一个光端口会对应一个电口,如果有多个的话是一一对应的,这两个端口在使用的时候只能取其一,也就是说用光口就不能用电口。还有一点就是这个光口肯定是千兆的,那么对应的那个电口也是千兆的这种技术一般是用于接入层交换机或者是汇聚交换机上面 便于同上级互联或者是堆叠! 一般带有这种功能的交换机都是三层交换机 这两个口是可以用作路由接口的。通常可以需要命令更换哪个端口是可用的。
media-type rj45media-type sfp
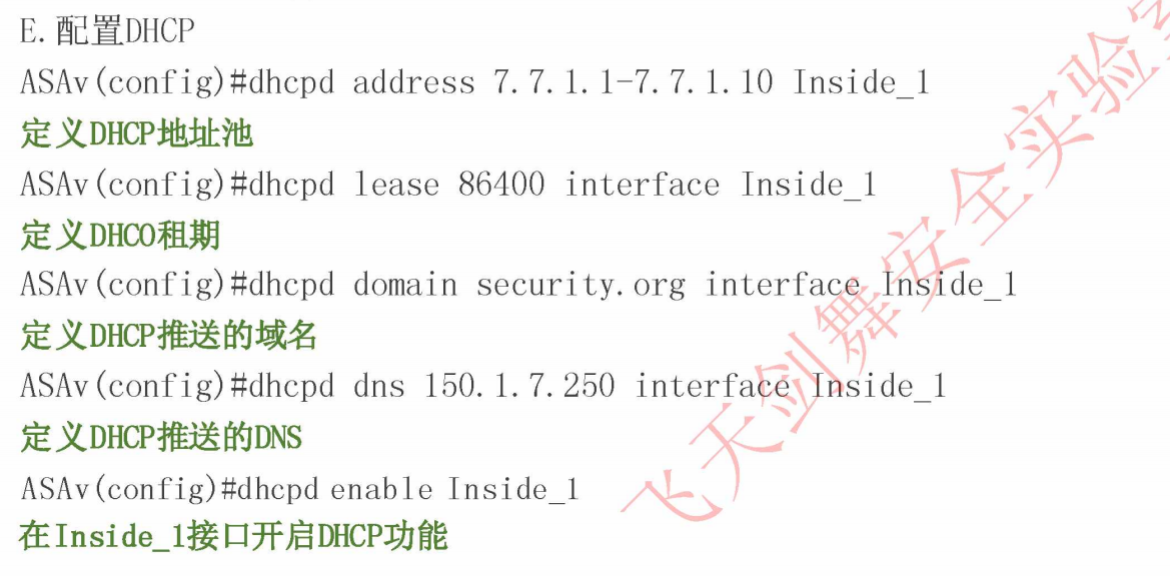
DHCP 配置
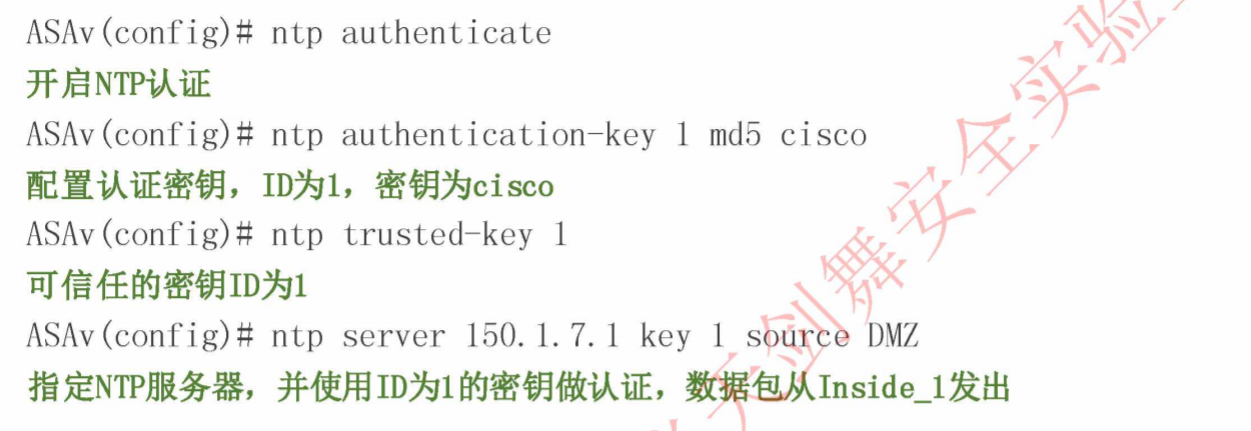
NTP 配置
DNS 配置
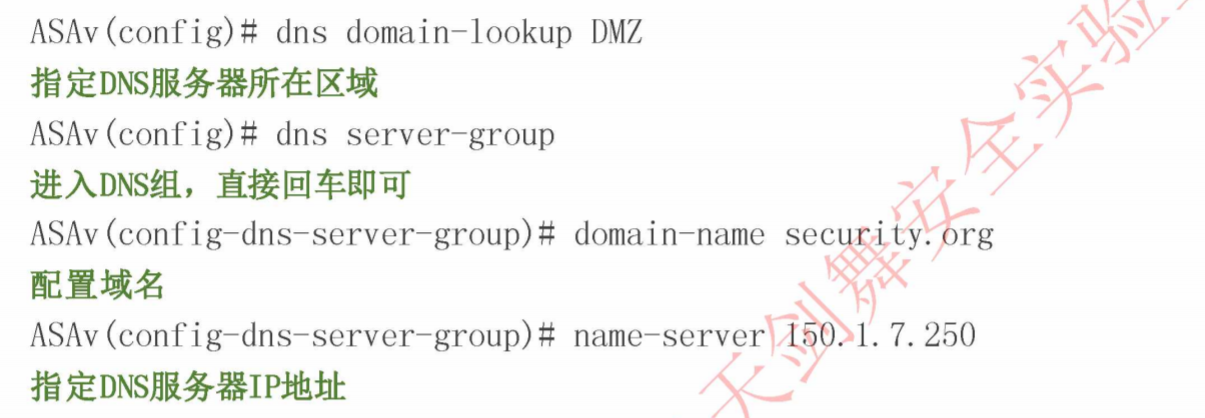
ASA 安全性
ASA状态化表项
ASA首先是一个状态化防火墙,状态化防火墙维护一个关于用户信息的连接表,称为Conn表。
源IP 地址
目的IP地址
IP协议
IP协议信息
ASA 安全策略
访问控制列表:基于特定的网络,主机和服务(TCP/UDP端口号)控制网络访问。
连接表:维护每个连接的状态信息。安全算法使用此信息在已建立的连接中有效转发流量
检测引擎:执行状态检测和应用层检测。检测规则集是预先定义的,来验证应用是否遵从每个RFC和其他标准。
ASA 转发原理
(1)一个新来的TCP SYN报文到达ASA,试图建立一个新的连接。
(2)ASA检查访问列表,确定是否允许连接。
(3)ASA执行路由查询,如果路由正确,ASA使用必要的会话信息在连接表(XLATE和Conn)中创建一个新条目。
(4)ASA在检测引擎中检查预定义的一套规则,如果是已知应用,则进一步执行应用层检测。
(5)ASA根据检测引擎确定是否转发或丢弃报文。如果允许转发,则将报文转发到目的主机。
(6)目的主机响应该报文。
(7)ASA接收返回报文并进行检测,在连接数据库中查询连接,确定会话信息与现有连接是否匹配。
(8)ASA转发属于已建立的现有会话的报文。
ASA的应用层检测是通过检查报文的IP头和有效载荷的内容,对应用层协议流量执行深层检测,检查应用层协议是否遵守RFC标准,从而检测出应用层数据中的恶意行为。
相同安全级别的接口互相访问
same-security-traffic permit inter-interface
同一接口进出流量通信
same-security-traffic permit intra-interface
监控 ASA
ASDM
logging enablelogging debug-tracelogging emblem# 日志格式为.emblemlogging asdm 7logging timestamp
Syslog
logging enablelogging timestamplogging debug-tracelogging trap debugginglogging host mgmt 7.7.3.250logging host inside 1.1.1.1 TCP/1500# 指定Log server TCP和端口logging permit-hostdown# 当使用以TCP为端口的服务器,当服务器不可达时,ASA将断掉所有业务流量。该命令可以允许当服务器不可达时继续转发业务。logging queue size# 相当于log转发buffer。如果log过多,queue被塞满,可能导致log无法发送出去。
Event-list 日志信息过滤列表
Logging enablelogging list Permit_OSPF levle information class ospflogging asdm Permit_OSPF# 只允许 information 级别的OSPF日志
ASA 设备管理
ASA 重置密码
重新插拔电源线,重启ASA
按ESC或Ctrl+Break,进去ROM Monitor 模式
输入命令confreg查看当前寄存器的值
寄存器的初始值为0x00000001,ASA会寻味是否改变寄存器的值
改变寄存器的值为0x41,命令: confreg 0x41
重启设备:boot
此时ASA会跳过startup配置,启动完成后直接进入用户模式
进入特权模式,并保存startup-config到running-config
重置特权模式密码
修改回原寄存器的值,强制ASA从startup读取配置启动
查看当前寄存器的值,保存配置
rommon #0> confregrommon #1> confreg 0x41rommon #2> bootciscoasa> enablepassword:ciscoasa#ciscoasa#copy startup-config running-configDestination filename [running-config]?ciscoasa# conf tciscoasa(config)# enable password 123456ciscoasa(config)# password 123ciscoasa(config)# config-register 0x11ciscoasa(config)# exitciscoasa# show versionciscoasa# copy run startSource filename [running-config]ciscoasa# reload
ASA 恢复出厂设置
ciscoasa(config)# configure factory-default 10.1.1.1 255.255.255.0恢复默认配置,并将管理口配置为上述IP地址
ASA 升级与降级
In privileged EXEC mode, copy the ASA software to flash memory.copy ftp:// [[user[: password]@ ]server[/ path]/ asa_image_name disk n:/ [path/ ]asa_image_nameExample:ciscoasa# copy ftp://jcrichton:aeryn@10.1.1.1/asa991-smp-k8.bin disk0:/asa991-smp-k8.binStep 2Copy the ASDM image to flash memory.copy ftp:// [[user[: password]@ ]server[/ path]/ asdm_image_name disk n:/ [path/ ]asdm_image_nameExample:ciscoasa# copy ftp://jcrichton:aeryn@10.1.1.1/asdm-771791.bin disk0:/asdm-771791.binStep 3Access global configuration mode.configure terminalExample:ciscoasa# configure terminalciscoasa(config)#Step 4Show the current boot images configured (up to 4):show running-config boot systemThe ASA uses the images in the order listed; if the first image is unavailable, the next image is used, and so on. You cannot insert a new image URL at the top of the list; to specify the new image to be first, you must remove any existing entries, and enter the image URLs in the order desired, according to the next steps.Example:ciscoasa(config)# show running-config boot systemboot system disk0:/cdisk.binboot system disk0:/asa931-smp-k8.binStep 5Remove any existing boot image configurations so that you can enter the new boot image as your first choice:no boot system disk n:/ [path/ ]asa_image_nameExample:ciscoasa(config)# no boot system disk0:/cdisk.binciscoasa(config)# no boot system disk0:/asa931-smp-k8.binStep 6Set the ASA image to boot (the one you just uploaded):boot system disk n:/ [path/ ]asa_image_nameRepeat this command for any backup images that you want to use in case this image is unavailable. For example, you can re-enter the images that you previously removed.Example:ciscoasa(config)# boot system disk0:/asa991-smp-k8.binStep 7Set the ASDM image to use (the one you just uploaded):asdm image disk n:/ [path/ ]asdm_image_nameYou can only configure one ASDM image to use, so you do not need to first remove the existing configuration.Example:ciscoasa(config)# asdm image disk0:/asdm-771791.binStep 8Save the new settings to the startup configuration:write memoryStep 9Reload the ASA:reloadStep 10If you are upgrading the ASA FirePOWER module, disable the ASA REST API or else the upgrade will fail.no rest-api agentYou can reenable it after the upgrade:rest-api agentNoteThe ASA 5506-X series does not support the ASA REST API if you are running the FirePOWER module Version 6.0 or later.Step 11Upgrade the ASA FirePOWER module.
downgrade [/noconfirm] old_image_url old_config_url [activation-key old_key]
导入镜像报错
ciscoasa(config)# copy ftp://anonymous@10.140.249.114/asdm-791.bin disk0:Address or name of remote host [10.140.249.114]?Source username [anonymous]?Source filename [asdm-791.bin]?Destination filename [asdm-791.bin]?Accessing ftp://anonymous@10.140.249.114/asdm-791.bin...!%Error copying ftp://anonymous@10.140.249.114/asdm-791.bin (Not enough space on device)ciscoasa(config)#ciscoasa(config)# show disk--#-- --length-- -----date/time------ path11060 108563072 Jun 09 2019 15:38:51 asa982-lfbff-k8.SPA11049 0 Jun 09 2019 15:24:43 coredumpinfo11050 59 Jun 09 2019 15:24:43 coredumpinfo/coredump.cfg8653 0 Jun 09 2019 15:24:41 crypto_archive8528 0 Jun 09 2019 15:23:50 log10974 125 Jun 09 2019 15:23:50 log/asa-appagent.log0 bytes total (0 bytes free)# 看到已经没有存储空间了,但是其实根本没有满。# 解决方案ciscoasa(config)# format flash:Format operation may take a while. Continue? [confirm]Format operation will destroy all data in "flash:". Continue? [confirm]Initializing partition - done!Creating FAT32 filesystemmkdosfs 2.11 (12 Mar 2005)System tables written to diskFormat of disk0 complete# 确保disk0中没有重要内容,格式化disk0.
