refresh方法
org.springframework.context.support.AbstractApplicationContext#refresh
| @Override public void refresh() throws BeansException, IllegalStateException { synchronized (this.startupShutdownMonitor) { // 为了容器初始化做准备,不重要(该方法所做的事情相对比较简单:记录容器启动的时间,并设置容器处于活跃状态。) prepareRefresh(); // 告诉子类刷新内部bean工厂。 / 重要程度:5 1、创建BeanFactory对象 2、xml解析 传统标签解析:bean、import等 自定义标签解析 如: 自定义标签解析流程: a、根据当前解析标签的头信息找到对应的namespaceUri b、加载spring所以jar中的spring.handlers文件。并建立映射关系 c、根据namespaceUri从映射关系中找到对应的实现了NamespaceHandler接口的类 d、调用类的init方法,init方法是注册了各种自定义标签的解析类 e、根据namespaceUri找到对应的解析类,然后调用paser方法完成标签解析 * 3、把解析出来的xml标签封装成BeanDefinition对象/ //告诉子类刷新内部的bean工厂 ConfigurableListableBeanFactory beanFactory = obtainFreshBeanFactory(); //给beanFactory设置一些属性值 prepareBeanFactory(beanFactory); try { // 设置BeanFactory的后置处理器 postProcessBeanFactory(beanFactory); // 调用BeanFactory的后置处理器,这些处理器是在Bean定义中向容器注册的 / BeanDefinitionRegistryPostProcessor BeanFactoryPostProcessor 完成对这两个接口的调用 */ invokeBeanFactoryPostProcessors(beanFactory); // 注册Bean 的后置处理器,在Bean的创建过程中调用. // 把实现了BeanPostProcessor接口的类实例化,并且加入到BeanFactory中 registerBeanPostProcessors(beanFactory); // 对上下文中的消息源进行初始化 initMessageSource(); // 初始化上下文中的事件机制 initApplicationEventMulticaster(); // 初始化其它的特殊的Bean //在springboot中,这个方法是用来做内嵌tomcat启动的 onRefresh(); // 往事件管理类中注册事件类 registerListeners(); /实例化所有的(non-lazy-init) 单件 这个方法是spring中最重要的方法,没有之一 所以这个方法一定要理解要具体看 1、bean实例化过程 2、ioc 3、注解支持 4、BeanPostProcessor的执行 5、Aop的入口 / finishBeanFactoryInitialization(beanFactory); // 发布容器事件,结束Refresh过程 finishRefresh(); } catch (BeansException ex) { if (logger.isWarnEnabled()) { logger.warn(“Exception encountered during context initialization - “ + “cancelling refresh attempt: “ + ex); } // 为了防止Bean资源占用,在异常处理中,销毁已经在前面过程中生成的单件veab destroyBeans(); // 重置’active’ 标志. cancelRefresh(ex); // Propagate exception to caller. throw ex; } *finally { //重置Spring核心中的公共自省缓存,因为我们可能再也不需要单例bean的元数据了…… resetCommonCaches(); } } } |
|---|
(一)obtainFreshBeanFactory
| protected ConfigurableListableBeanFactory obtainFreshBeanFactory() { refreshBeanFactory(); ConfigurableListableBeanFactory beanFactory = getBeanFactory(); if (logger.isInfoEnabled()) { logger.info(“Bean factory for application context [“ + getId() + “]: “ + ObjectUtils.identityToString(beanFactory)); } if (logger.isDebugEnabled()) { logger.debug(beanFactory.getBeanDefinitionCount() + “ beans defined in “ + this); } return beanFactory; } |
|---|
该方法主要通过调用AbstractRefreshableApplicationContext.refreshBeanFactory()方法完成相关功能:
| protected final void refreshBeanFactory() throws BeansException { if (hasBeanFactory()) { destroyBeans(); closeBeanFactory(); } try { DefaultListableBeanFactory beanFactory = createBeanFactory(); //1、创建beanFactory对象 customizeBeanFactory(beanFactory); loadBeanDefinitions(beanFactory);//2、解析spring的xml配置文件,加载bean定义信息 synchronized (this.beanFactoryMonitor) { this.beanFactory = beanFactory; } } catch (IOException ex) { throw new ApplicationContextException( “I/O error parsing XML document for application context [“ + getDisplayName() + “]”, ex); } } |
|---|
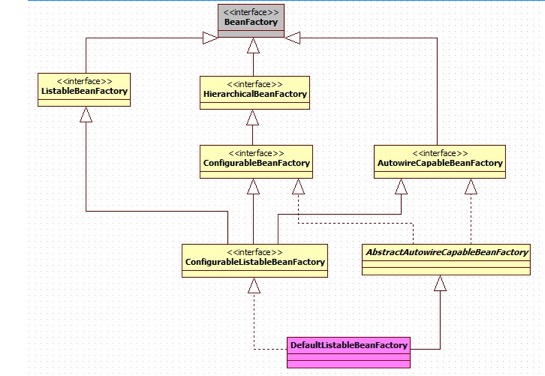
首先,通过createBeanFactory,创建了DefaultListableBeanFactory类型的beanFactory实例。分析一下BeanFactory的类图结构,如下:
创建了beanFactory之后,通过调用AbstractXmlApplicationContext.loadBeanDefinitions方法,加载spring的xml配置文件,把用户通过配置文件定义的bean,解析成容器中以特定的数据结构描述的bean定义。AbstractXmlApplicationContext.loadBeanDefinitions方法的实现如下:
| protected void loadBeanDefinitions(DefaultListableBeanFactory beanFactory) throws IOException { // Create a new XmlBeanDefinitionReader for the given BeanFactory. XmlBeanDefinitionReader beanDefinitionReader = new XmlBeanDefinitionReader(beanFactory); //1、创建BeanDefinitionReader对象 // Configure the bean definition reader with this context’s // resource loading environment. beanDefinitionReader.setResourceLoader(this); beanDefinitionReader.setEntityResolver(new ResourceEntityResolver(this)); // 2、设置xml文件schema的解析器,获取xsd文件。 // Allow a subclass to provide custom initialization of the reader, // then proceed with actually loading the bean definitions. initBeanDefinitionReader(beanDefinitionReader); loadBeanDefinitions(beanDefinitionReader); //3、加载spring的xml配置文件,并解析。 } |
|---|
第一步,创建bean的解析类:XmlBeanDefinitionReader,将bean的解析工作,托管给BeanDefinitionReader处理。BeanDefinitionReader的类结构图如下: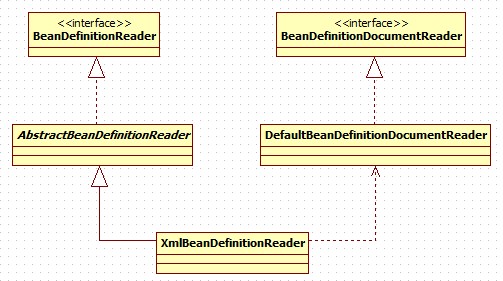
第二步,创建ResourceEntityResolver,设置用于XML配置文件验证的实体分解器。该类的resolveEntity方法,实现对文档验证实体的转换:根据spring定义bean的xml配置文件中的“http://www.springframework.org/schema/beans”形式的url,从spring.jar包中的META-INF\spring.schema文件中,找到对应的DTD或XSD文件在本地的路径。
第三步,调用initBeanDefinitionReader方法,该方法是一个空实现,允许子类去覆盖,可以用来设置自定义的EntityResolver实现类,以及NamespaceHandlerResolver实现类。这也是spring的一个扩展点。
第四步,调用loadBeanDefinitions方法,该方法最终调用XmlBeanDefinitionReader.loadBeanDefinitions(EncodedResource)方法实现xml配置文件的加载及bean的注册,方法的实现如下:
| public int loadBeanDefinitions(EncodedResource encodedResource) throws BeanDefinitionStoreException { Assert.notNull(encodedResource, “EncodedResource must not be null”); if (logger.isInfoEnabled()) { logger.info(“Loading XML bean definitions from “ + encodedResource.getResource()); } Set currentResources = (Set) this.resourcesCurrentlyBeingLoaded.get(); if (currentResources == null) { currentResources = new HashSet(4); this.resourcesCurrentlyBeingLoaded.set(currentResources); } if (!currentResources.add(encodedResource)) { throw new BeanDefinitionStoreException( “Detected recursive loading of “ + encodedResource + “ - check your import definitions!”); } try { InputStream inputStream = encodedResource.getResource().getInputStream(); try { InputSource inputSource = new InputSource(inputStream); if (encodedResource.getEncoding() != null) { inputSource.setEncoding(encodedResource.getEncoding()); } return doLoadBeanDefinitions(inputSource, encodedResource.getResource()); } finally { inputStream.close(); } } catch (IOException ex) { throw new BeanDefinitionStoreException( “IOException parsing XML document from “ + encodedResource.getResource(), ex); } finally { currentResources.remove(encodedResource); if (currentResources.isEmpty()) { this.resourcesCurrentlyBeingLoaded.set(null); } } } protected int doLoadBeanDefinitions(InputSource inputSource, Resource resource) throws BeanDefinitionStoreException { try { int validationMode = getValidationModeForResource(resource); Document doc = this.documentLoader.loadDocument( inputSource, getEntityResolver(), this.errorHandler, validationMode, isNamespaceAware()); return registerBeanDefinitions(doc, resource); } catch (BeanDefinitionStoreException ex) { throw ex; } catch (SAXParseException ex) { throw new XmlBeanDefinitionStoreException(resource.getDescription(), “Line “ + ex.getLineNumber() + “ in XML document from “ + resource + “ is invalid”, ex); } catch (SAXException ex) { throw new XmlBeanDefinitionStoreException(resource.getDescription(), “XML document from “ + resource + “ is invalid”, ex); } catch (ParserConfigurationException ex) { throw new BeanDefinitionStoreException(resource.getDescription(), “Parser configuration exception parsing XML from “ + resource, ex); } catch (IOException ex) { throw new BeanDefinitionStoreException(resource.getDescription(), “IOException parsing XML document from “ + resource, ex); } catch (Throwable ex) { throw new BeanDefinitionStoreException(resource.getDescription(), “Unexpected exception parsing XML document from “ + resource, ex); } } |
|---|
在doLoadBeanDefinitions方法中,调用DefaultDocumentLoader.loadDocument方法,使用JAXP加载xml文档;然后调用registerBeanDefinitions方法,通过DefaultBeanDefinitionDocumentReader.registerBeanDefinitions,注册定义的bean。registerBeanDefinitions方法实现如下:
| public void registerBeanDefinitions(Document doc, XmlReaderContext readerContext) { this.readerContext = readerContext; logger.debug(“Loading bean definitions”); Element root = doc.getDocumentElement(); BeanDefinitionParserDelegate delegate = createHelper(readerContext, root); preProcessXml(root);// 前置处理方法,是一个空实现 parseBeanDefinitions(root, delegate);// 解析整个文档,循环处理各个子节点 postProcessXml(root);// 后置处理方法,也是一个空实现 } protected void parseBeanDefinitions(Element root, BeanDefinitionParserDelegate delegate) { if (delegate.isDefaultNamespace(root.getNamespaceURI())) { NodeList nl = root.getChildNodes(); for (int i = 0; i < nl.getLength(); i++) { Node node = nl.item(i); if (node instanceof Element) { Element ele = (Element) node; String namespaceUri = ele.getNamespaceURI(); if (delegate.isDefaultNamespace(namespaceUri)) {//如果是默认名字空间(beans),则直接使用解析 parseDefaultElement(ele, delegate); } else { delegate.parseCustomElement(ele);//对于非默认名字空间,如util,使用对应的NamespaceHandlerResolver实现类的parse方法进行解析。 } } } } else { delegate.parseCustomElement(root); } } |
|---|
在bean的注册过程中,spring用到了NamespaceHandlerResolver接口,它是XML配置文件中的各种名字空间(如:context)定义的节点(如:context:property-placeholder)对应解析器的分解器。通过Namespace的SystemId(例如:http://www.springframework.org/schema/util),根据spring.jar的META-INF/spring.handlers映射文件,找到对应的解析器的类路径,然后使用该解析类,解析对应的节点。而对于无前缀的beans默认名字空间节点:采用BeanDefinitionParserDelegate完成节点的解析。
至此,完成了BeanFactory实例的创建和Spring的xml配置文件的解析。
(二)prepareBeanFactory
创建好 BeanFactory 后,接着调用prepareBeanFactory方法,添加一些 Spring 本身需要的一些工具类:
| protected void prepareBeanFactory(ConfigurableListableBeanFactory beanFactory) { // Tell the internal bean factory to use the context’s class loader. beanFactory.setBeanClassLoader(getClassLoader()); // Populate the bean factory with context-specific resource editors. beanFactory.addPropertyEditorRegistrar(new ResourceEditorRegistrar(this)); // Configure the bean factory with context callbacks. beanFactory.addBeanPostProcessor(new ApplicationContextAwareProcessor(this)); beanFactory.ignoreDependencyInterface(ResourceLoaderAware.class); beanFactory.ignoreDependencyInterface(ApplicationEventPublisherAware.class); beanFactory.ignoreDependencyInterface(MessageSourceAware.class); beanFactory.ignoreDependencyInterface(ApplicationContextAware.class); // BeanFactory interface not registered as resolvable type in a plain factory. // MessageSource registered (and found for autowiring) as a bean. beanFactory.registerResolvableDependency(BeanFactory.class, beanFactory); beanFactory.registerResolvableDependency(ResourceLoader.class, this); beanFactory.registerResolvableDependency(ApplicationEventPublisher.class, this); beanFactory.registerResolvableDependency(ApplicationContext.class, this); // Detect a LoadTimeWeaver and prepare for weaving, if found. if (beanFactory.containsBean(LOAD_TIME_WEAVER_BEAN_NAME) && JdkVersion.isAtLeastJava15()) { // Register the (JDK 1.5 specific) LoadTimeWeaverAwareProcessor. try { Class ltwapClass = ClassUtils.forName( “org.springframework.context.weaving.LoadTimeWeaverAwareProcessor”, AbstractApplicationContext.class.getClassLoader()); BeanPostProcessor ltwap = (BeanPostProcessor) BeanUtils.instantiateClass(ltwapClass); ((BeanFactoryAware) ltwap).setBeanFactory(beanFactory); beanFactory.addBeanPostProcessor(ltwap); } catch (ClassNotFoundException ex) { throw new IllegalStateException(“Spring’s LoadTimeWeaverAwareProcessor class is not available”); } // Set a temporary ClassLoader for type matching. beanFactory.setTempClassLoader(new ContextTypeMatchClassLoader(beanFactory.getBeanClassLoader())); } } |
|---|
该方法主要分成四步,如下:
第一步,设置类加载器;
第二步,设置属性编辑器注册类,用来注册相关的属性编辑器。ResourceEditorRegistrar类,注册的属性编辑器如下:
| public void registerCustomEditors(PropertyEditorRegistry registry) { ResourceEditor baseEditor = new ResourceEditor(this.resourceLoader); registry.registerCustomEditor(Resource.class, baseEditor); registry.registerCustomEditor(InputStream.class, new InputStreamEditor(baseEditor)); registry.registerCustomEditor(File.class, new FileEditor(baseEditor)); registry.registerCustomEditor(URL.class, new URLEditor(baseEditor)); ClassLoader classLoader = this.resourceLoader.getClassLoader(); registry.registerCustomEditor(Class.class, new ClassEditor(classLoader)); registry.registerCustomEditor(URI.class, new URIEditor(classLoader)); if (this.resourceLoader instanceof ResourcePatternResolver) { registry.registerCustomEditor(Resource[].class, new ResourceArrayPropertyEditor((ResourcePatternResolver) this.resourceLoader)); } } |
|---|
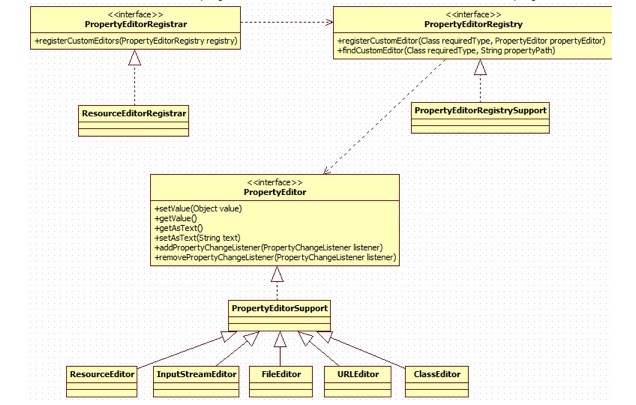
例如InputStreamEditor这个属性编辑器,可以将spring配置文件中,用字符串表示的文件路径,转成Resource资源类,注入到bean的对应属性中。同样,我们可以通过自定义的属性编辑器,将spring配置文件中以某种格式定义的字符串,转成对应的Java对象。spring的属性编辑器类图结构如下:
第三步:设置内置的BeanPostProcessor:ApplicationContextAwareProcessor。该BeanPostProcessor的作用是,为实现特殊接口的bean,注入容器类(例如为实现ApplicationContextAware接口的类,注入ApplicationContext对象实例),如下:
| public Object postProcessBeforeInitialization(Object bean, String beanName) throws BeansException { if (bean instanceof ResourceLoaderAware) { ((ResourceLoaderAware) bean).setResourceLoader(this.applicationContext); } if (bean instanceof ApplicationEventPublisherAware) { ((ApplicationEventPublisherAware) bean).setApplicationEventPublisher(this.applicationContext); } if (bean instanceof MessageSourceAware) { ((MessageSourceAware) bean).setMessageSource(this.applicationContext); } if (bean instanceof ApplicationContextAware) { ((ApplicationContextAware) bean).setApplicationContext(this.applicationContext); } return bean; } |
|---|
第四步:调用ignoreDependencyInterface,设置忽略自动注入的接口(因为这些接口已经通过ApplicationContextAwareProcessor注入了)。
第五步:调用registerResolvableDependency,注入特殊的对象。
(三)invokeBeanFactoryPostProcessors
该方法的主要功能就是从spring配置文件中,获取实现 BeanFactoryPostProcessor 接口的bean,然后按不同的优先级顺序,依次执行BeanFactoryPostProcessor的 postProcessBeanFactory 方法。该方法的具体实现如下:
| / Instantiate and invoke all registered BeanFactoryPostProcessor beans, respecting explicit order if given. Must be called before singleton instantiation. |
|---|
在第二步中,通过beanFactory.getBeanNamesForType(BeanFactoryPostProcessor.class, true, false),获取所有实现BeanFactoryPostProcessor接口的bean。
接下来,根据bean实现的不同排序接口,进行分组、排序。实现PriorityOrdered接口的bean,优先执行postProcessBeanFactory方法;实现Ordered接口的bean,第二优先级执行对应的方法;而对于没有实现排序接口的类,则在最后执行对应的方法。在执行postProcessBeanFactory之前,先通过BeanFactory.getBean获取到对应的bean,然后再执行对应的方法。getBean是spring的核心之一,这里先不深入,后面再分析。
(四) registerBeanPostProcessors
| protected void registerBeanPostProcessors(ConfigurableListableBeanFactory beanFactory) { String[] postProcessorNames = beanFactory.getBeanNamesForType(BeanPostProcessor.class, true, false); // Register BeanPostProcessorChecker that logs an info message when // a bean is created during BeanPostProcessor instantiation, i.e. when // a bean is not eligible for getting processed by all BeanPostProcessors. int beanProcessorTargetCount = beanFactory.getBeanPostProcessorCount() + 1 + postProcessorNames.length; beanFactory.addBeanPostProcessor(new BeanPostProcessorChecker(beanFactory, beanProcessorTargetCount)); // Separate between BeanPostProcessors that implement PriorityOrdered, // Ordered, and the rest. List priorityOrderedPostProcessors = new ArrayList(); List orderedPostProcessorNames = new ArrayList(); List nonOrderedPostProcessorNames = new ArrayList(); for (int i = 0; i < postProcessorNames.length; i++) { if (isTypeMatch(postProcessorNames[i], PriorityOrdered.class)) { priorityOrderedPostProcessors.add(beanFactory.getBean(postProcessorNames[i])); } else if (isTypeMatch(postProcessorNames[i], Ordered.class)) { orderedPostProcessorNames.add(postProcessorNames[i]); } else { nonOrderedPostProcessorNames.add(postProcessorNames[i]); } } // First, register the BeanPostProcessors that implement PriorityOrdered. Collections.sort(priorityOrderedPostProcessors, new OrderComparator()); registerBeanPostProcessors(beanFactory, priorityOrderedPostProcessors); // Next, register the BeanPostProcessors that implement Ordered. List orderedPostProcessors = new ArrayList(); for (Iterator it = orderedPostProcessorNames.iterator(); it.hasNext();) { String postProcessorName = (String) it.next(); orderedPostProcessors.add(getBean(postProcessorName)); } Collections.sort(orderedPostProcessors, new OrderComparator()); registerBeanPostProcessors(beanFactory, orderedPostProcessors); // Finally, register all other BeanPostProcessors. List nonOrderedPostProcessors = new ArrayList(); for (Iterator it = nonOrderedPostProcessorNames.iterator(); it.hasNext();) { String postProcessorName = (String) it.next(); nonOrderedPostProcessors.add(getBean(postProcessorName)); } registerBeanPostProcessors(beanFactory, nonOrderedPostProcessors); } / Register the given BeanPostProcessor beans. / private void registerBeanPostProcessors(ConfigurableListableBeanFactory beanFactory, List postProcessors) { for** (Iterator it = postProcessors.iterator(); it.hasNext();) { BeanPostProcessor postProcessor = (BeanPostProcessor) it.next(); beanFactory.addBeanPostProcessor(postProcessor); } } |
|---|
第一步,通过beanFactory.getBeanNamesForType(BeanPostProcessor.class, true, false),获取spring配置文件中所有实现BeanPostProcessor接口的bean。
第二步,注册内置的BeanPostProcessor:BeanPostProcessorChecker。这里说的注册,其实就是将bean放入AbstractBeanFactory类的beanPostProcessors列表中,为后续的使用做准备。BeanPostProcessorChecker只是打印日志,没有做什么实际性的工作。
第三步,根据bean实现的不同排序接口,进行分组、排序,然后逐一注册。实现PriorityOrdered接口的bean,优先注册;实现Ordered接口的bean,第二优先级注册;而对于没有实现排序接口的类,则在最后注册。同样,在注册之前,先通过BeanFactory.getBean获取到对应的bean。
(五)initMessageSource
这个方法主要功能就是为spring容器初始化MessageSource,功能相对简单,如果spring配置文件没有定义messageSource,则使用默认的。默认的MessageSource实现类为:DelegatingMessageSource。方法的实现如下:
| protected void initMessageSource() { ConfigurableListableBeanFactory beanFactory = getBeanFactory(); if (beanFactory.containsLocalBean(MESSAGE_SOURCE_BEAN_NAME)) { this.messageSource = (MessageSource) beanFactory.getBean(MESSAGE_SOURCE_BEAN_NAME, MessageSource.class); // Make MessageSource aware of parent MessageSource. if (this.parent != null && this.messageSource instanceof HierarchicalMessageSource) { HierarchicalMessageSource hms = (HierarchicalMessageSource) this.messageSource; if (hms.getParentMessageSource() == null) { // Only set parent context as parent MessageSource if no parent MessageSource // registered already. hms.setParentMessageSource(getInternalParentMessageSource()); } } if (logger.isDebugEnabled()) { logger.debug(“Using MessageSource [“ + this.messageSource + “]”); } } else { // Use empty MessageSource to be able to accept getMessage calls. DelegatingMessageSource dms = new DelegatingMessageSource(); dms.setParentMessageSource(getInternalParentMessageSource()); this.messageSource = dms; beanFactory.registerSingleton(MESSAGE_SOURCE_BEAN_NAME, this.messageSource); if (logger.isDebugEnabled()) { logger.debug(“Unable to locate MessageSource with name ‘“ + MESSAGE_SOURCE_BEAN_NAME + “‘: using default [“ + this.messageSource + “]”); } } } |
|---|
在创建MessageSource之后,调用beanFactory.registerSingleton(MESSAGE_SOURCE_BEAN_NAME, this.messageSource)进行注册。该方法对应的实现类是DefaultSingletonBeanRegistry,具体实现如下(只摘录了该类的一部分代码):
| public class DefaultSingletonBeanRegistry extends SimpleAliasRegistry implements SingletonBeanRegistry { / Cache of singleton objects: bean name —> bean instance */ private final Map singletonObjects = CollectionFactory.createConcurrentMapIfPossible(16); / Cache of singleton factories: bean name —> ObjectFactory / private final Map singletonFactories = new HashMap(); /** Cache of early singleton objects: bean name —> bean instance / private final Map earlySingletonObjects = new HashMap(); / Set of registered singletons, containing the bean names in registration order */ private final Set registeredSingletons = new LinkedHashSet(16); public void registerSingleton(String beanName, Object singletonObject) throws IllegalStateException { Assert.notNull(beanName, “‘beanName’ must not be null”); synchronized (this.singletonObjects) { Object oldObject = this.singletonObjects.get(beanName); if (oldObject != null) { throw new IllegalStateException(“Could not register object [“ + singletonObject + “] under bean name ‘“ + beanName + “‘: there is already object [“ + oldObject + “] bound”); } addSingleton(beanName, singletonObject); } } / Add the given singleton object to the singleton cache of this factory. To be called for eager registration of singletons. |
|---|
从上面的代码可以看出,DefaultSingletonBeanRegistry继承了SimpleAliasRegistry并实现SingletonBeanRegistry,使得它既有管理SingletonBean的功能,又提供了别名的功能,它是一个通用的存储共享bean实例的地方。在注册一个SingletonBean的时候,用到了四个存储器:
1. singletonObjects:用来存放注册的SingletonBean,具体的实现类是ConcurrentHashMap。
2. singletonFactories:存储制造 singleton 的工厂。
3. earlySingletonObjects:是singletonFactory 制造出来的 singleton 的缓存。
4. registeredSingletons:按顺序存放已经注册的SingletonBean的名称。
在 getSingleton的时候,spring的默认实现是,先从singletonObjects寻找,如果找不到,再从earlySingletonObjects寻找,仍然找不到,那就从singletonFactories寻找对应的制造singleton的工厂,然后调用工厂的getObject方法,造出对应的SingletonBean,并放入earlySingletonObjects中。具体见DefaultSingletonBeanRegistry.getSingleton,如下:
| public Object getSingleton(String beanName) { return getSingleton(beanName, true); } protected Object getSingleton(String beanName, boolean allowEarlyReference) { Object singletonObject = this.singletonObjects.get(beanName); if (singletonObject == null) { synchronized (this.singletonObjects) { singletonObject = this.earlySingletonObjects.get(beanName); if (singletonObject == null && allowEarlyReference) { ObjectFactory singletonFactory = (ObjectFactory) this.singletonFactories.get(beanName); if (singletonFactory != null) { singletonObject = singletonFactory.getObject(); this.earlySingletonObjects.put(beanName, singletonObject); this.singletonFactories.remove(beanName); } } } } return (singletonObject != NULL_OBJECT ? singletonObject : null); } |
|---|
(六)initApplicationEventMulticaster
这个方法的主要功能是为spring容器初始化ApplicationEventMulticaster,功能也相对简单,如果spring配置文件没有定义applicationEventMulticaster,则使用默认的。默认的ApplicationEventMulticaster实现类是SimpleApplicationEventMulticaster。方法的实现如下:
| protected void initApplicationEventMulticaster() { ConfigurableListableBeanFactory beanFactory = getBeanFactory(); if (beanFactory.containsLocalBean(APPLICATION_EVENT_MULTICASTER_BEAN_NAME)) { this.applicationEventMulticaster = (ApplicationEventMulticaster) beanFactory.getBean(APPLICATION_EVENT_MULTICASTER_BEAN_NAME, ApplicationEventMulticaster.class); if (logger.isDebugEnabled()) { logger.debug(“Using ApplicationEventMulticaster [“ + this.applicationEventMulticaster + “]”); } } else { this.applicationEventMulticaster = new SimpleApplicationEventMulticaster(); beanFactory.registerSingleton(APPLICATION_EVENT_MULTICASTER_BEAN_NAME, this.applicationEventMulticaster); if (logger.isDebugEnabled()) { logger.debug(“Unable to locate ApplicationEventMulticaster with name ‘“ + APPLICATION_EVENT_MULTICASTER_BEAN_NAME + “‘: using default [“ + this.applicationEventMulticaster + “]”); } } } |
|---|
同意,在创建applicationEventMulticaster之后,调用beanFactory.registerSingleton(APPLICATION_EVENT_MULTICASTER_BEAN_NAME, this.applicationEventMulticaster)进行注册。
(七) registerListeners
| protected void registerListeners() { // Register statically specified listeners first. for (Iterator it = getApplicationListeners().iterator(); it.hasNext();) { addListener((ApplicationListener) it.next()); } // Do not initialize FactoryBeans here: We need to leave all regular beans // uninitialized to let post-processors apply to them! Collection listenerBeans = getBeansOfType(ApplicationListener.class, true, false).values(); for (Iterator it = listenerBeans.iterator(); it.hasNext();) { addListener((ApplicationListener) it.next()); } } / Subclasses can invoke this method to register a listener. Any beans in the context that are listeners are automatically added. * @param listener the listener to register */ protected void** addListener(ApplicationListener listener) { getApplicationEventMulticaster().addApplicationListener(listener); } |
|---|
第一步,先注册静态特定的listener,不过默认是空的。
第二步,调用beanFactory.getBeansOfType(ApplicationListener.class, true, false),获取所有实现ApplicationListener接口的bean。该方法底层先调用getBeanNamesForType方法获取所有实现ApplicationListener接口的beanName,然后针对每个beanName,调用getBean方法获取对应的bean实例。
第三步,调用getApplicationEventMulticaster().addApplicationListener(listener),注册每个bean。
spring的ApplicationListener是一个典型的观察者模式,类图结构如下:
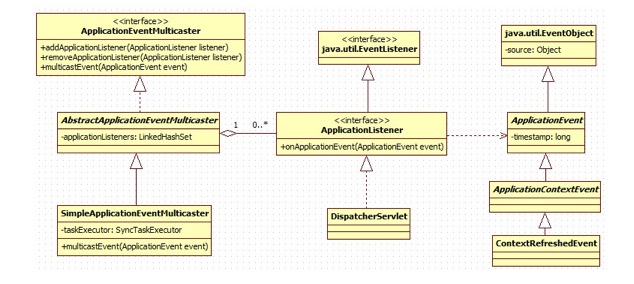
ApplicationEventMulticaster在接收到ApplicationEvent事件之后,通过multicastEvent方法,通知所有的观察者ApplicationListener。SimpleApplicationEventMulticaster类的multicastEvent方法实现如下:
| public void multicastEvent(final ApplicationEvent event) { for (Iterator it = getApplicationListeners().iterator(); it.hasNext();) { final ApplicationListener listener = (ApplicationListener) it.next(); getTaskExecutor().execute(new Runnable() { public void run() { listener.onApplicationEvent(event); } }); } } |
|---|
(八)finishBeanFactoryInitialization
这个方法的主要功能是创建Bean 的实例对象以及构建 Bean 实例对象之间的关联关系,该方法所做的事情,是spring的一个核心关键所在。方法的实现如下:
| protected void finishBeanFactoryInitialization(ConfigurableListableBeanFactory beanFactory) { // Stop using the temporary ClassLoader for type matching. beanFactory.setTempClassLoader(null); // Allow for caching all bean definition metadata, not expecting further changes. beanFactory.freezeConfiguration(); // Instantiate all remaining (non-lazy-init) singletons. beanFactory.preInstantiateSingletons(); } |
|---|
bean的实例化是在beanFactory.preInstantiateSingletons中完成的,该方法的具体实现如下(实现类是:DefaultListableBeanFactory):
| public void preInstantiateSingletons() throws BeansException { if (this.logger.isInfoEnabled()) { this.logger.info(“Pre-instantiating singletons in “ + this); } synchronized (this.beanDefinitionMap) { for (Iterator it = this.beanDefinitionNames.iterator(); it.hasNext();) { String beanName = (String) it.next(); RootBeanDefinition bd = getMergedLocalBeanDefinition(beanName); if (!bd.isAbstract() && bd.isSingleton() && !bd.isLazyInit()) { if (isFactoryBean(beanName)) { FactoryBean factory = (FactoryBean) getBean(FACTORY_BEAN_PREFIX + beanName); if (factory instanceof SmartFactoryBean && ((SmartFactoryBean) factory).isEagerInit()) { getBean(beanName); } } else { getBean(beanName); } } } } } |
|---|
该方法循环处理spring定义的每一个bean:
1)根据beanName,获取bean的定义信息,得到RootBeanDefinition对象实例;
2)对于非抽象的、单例的、非延迟加载的bean,先判断是否为FactoryBean,如果是,则通过在前面加“&”,调用getBean获取对应的FactoryBean。如果是普通的bean,则直接调用getBean方法获取bean。
getBean方法,是spring的核心所在,具体实现如下:
| public Object getBean(String name) throws BeansException { return getBean(name, null, null); } public Object getBean(String name, Class requiredType, Object[] args) throws BeansException { return doGetBean(name, requiredType, args, false); } protected Object doGetBean( final String name, final Class requiredType, final Object[] args, boolean typeCheckOnly) throws BeansException { final String beanName = transformedBeanName(name); Object bean = null; // Eagerly check singleton cache for manually registered singletons. Object sharedInstance = getSingleton(beanName); if (sharedInstance != null && args == null) { if (logger.isDebugEnabled()) { if (isSingletonCurrentlyInCreation(beanName)) { logger.debug(“Returning eagerly cached instance of singleton bean ‘“ + beanName + “‘ that is not fully initialized yet - a consequence of a circular reference”); } else { logger.debug(“Returning cached instance of singleton bean ‘“ + beanName + “‘“); } } bean = getObjectForBeanInstance(sharedInstance, name, beanName, null); } else { // Fail if we’re already creating this bean instance: // We’re assumably within a circular reference. if (isPrototypeCurrentlyInCreation(beanName)) { throw new BeanCurrentlyInCreationException(beanName); } // Check if bean definition exists in this factory. BeanFactory parentBeanFactory = getParentBeanFactory(); if (parentBeanFactory != null && !containsBeanDefinition(beanName)) { // Not found -> check parent. String nameToLookup = originalBeanName(name); if (args != null) { // Delegation to parent with explicit args. return parentBeanFactory.getBean(nameToLookup, args); } else { // No args -> delegate to standard getBean method. return parentBeanFactory.getBean(nameToLookup, requiredType); } } if (!typeCheckOnly) { markBeanAsCreated(beanName); } final RootBeanDefinition mbd = getMergedLocalBeanDefinition(beanName); checkMergedBeanDefinition(mbd, beanName, args); // Guarantee initialization of beans that the current bean depends on. String[] dependsOn = mbd.getDependsOn(); if (dependsOn != null) { for (int i = 0; i < dependsOn.length; i++) { String dependsOnBean = dependsOn[i]; getBean(dependsOnBean); registerDependentBean(dependsOnBean, beanName); } } // Create bean instance. if (mbd.isSingleton()) { sharedInstance = getSingleton(beanName, new ObjectFactory() { public Object getObject() throws BeansException { try { return createBean(beanName, mbd, args); } catch (BeansException ex) { // Explicitly remove instance from singleton cache: It might have been put there // eagerly by the creation process, to allow for circular reference resolution. // Also remove any beans that received a temporary reference to the bean. destroySingleton(beanName); throw ex; } } }); bean = getObjectForBeanInstance(sharedInstance, name, beanName, mbd); } else if (mbd.isPrototype()) { // It’s a prototype -> create a new instance. Object prototypeInstance = null; try { beforePrototypeCreation(beanName); prototypeInstance = createBean(beanName, mbd, args); } finally { afterPrototypeCreation(beanName); } bean = getObjectForBeanInstance(prototypeInstance, name, beanName, mbd); } else { String scopeName = mbd.getScope(); final Scope scope = (Scope) this.scopes.get(scopeName); if (scope == null) { throw new IllegalStateException(“No Scope registered for scope ‘“ + scopeName + “‘“); } try { Object scopedInstance = scope.get(beanName, new ObjectFactory() { public Object getObject() throws BeansException { beforePrototypeCreation(beanName); try { return createBean(beanName, mbd, args); } finally { afterPrototypeCreation(beanName); } } }); bean = getObjectForBeanInstance(scopedInstance, name, beanName, mbd); } catch (IllegalStateException ex) { throw new BeanCreationException(beanName, “Scope ‘“ + scopeName + “‘ is not active for the current thread; “ + “consider defining a scoped proxy for this bean if you intend to refer to it from a singleton”, ex); } } } // Check if required type matches the type of the actual bean instance. if (requiredType != null && bean != null && !requiredType.isAssignableFrom(bean.getClass())) { throw new BeanNotOfRequiredTypeException(name, requiredType, bean.getClass()); } return bean; } |
|---|
(九)finishRefresh
该方法的作用是,发送一个ContextRefreshedEvent事件,通知相关的观察者。方法的实现如下:
| protected void finishRefresh() { publishEvent(new ContextRefreshedEvent(this)); } public void publishEvent(ApplicationEvent event) { Assert.notNull(event, “Event must not be null”); if (logger.isTraceEnabled()) { logger.trace(“Publishing event in context [“ + getId() + “]: “ + event); } getApplicationEventMulticaster().multicastEvent(event); if (this.parent != null) { this.parent.publishEvent(event); } } |
|---|
如果spring配置文件没有定义相关的ApplicationListener,则这个时候还没有相关的观察者。
至此,完成了spring IoC容器的构建过程分析。

若有收获,就点个赞吧
0 人点赞
