(二)使用
1.使用步骤(切入点表达式在里面)
必须导入依赖,否则报错
<dependency>
<groupId>org.aspectj</groupId>
<artifactId>aspectjweaver</artifactId>
<version>1.8.13</version>
</dependency>
spring基于xml的aop配置
第一步:把通知类(一般是程序员编写)也交给spring来管理
第二步:导入aop的约束和名称空间(官网有,或者去别的配置文件复制过来),
并使用aop:config标签开始aop的配置
第三步:在aop:config标签内部使用aop:aspect标签配置切面 id属性:用于给切面提供一个唯一标识。 ref属性:用于引用通知bean的id(一般就是第一步的程序员自己编写的通知类)。
第四步:在aop:aspect标签内部使用对应的标签配置通知的类型
前置通知:
2.切入点表达式
https://docs.qq.com/doc/DQWJQTmRaYmZDT0JK
3.AOP示例
必须导入依赖,否则报错
<bean id=”Logger” class=”com.itheima.utils.Logger”></bean>
<aop:config>
<!—aop:aspect 用于配置通知类型(切面),定义切面的
ref 引入配置好的通知类
--><**aop:aspect id="logAdvice" ref="Logger"**><br /> <!--aop:before 是配置前置通知<br /> method 是方法名 取值来自 ref标签指向的类的方法<br /> pointcut属性:用于指定切入点表达式(写起来有点麻烦了.)execution是切入点表达式关键字--><**aop:before method="printLog" pointcut="execution(* com.itheima.service.*.*(..))"**/><br /> </**aop:aspect**>
4.前置后置异常最终通知(在上面基础上进行修改的)
必须导入依赖,否则报错

<bean id=”Logger” class=”com.itheima.utils.Logger”></bean>
<aop:config>
<!—aop:aspect 用于配置通知类型(切面)
ref 引入配置好的通知类--><**aop:aspect id="logAdvice" ref="Logger"**><br /> <!--aop:before 是配置前置通知<br /> method 是方法名 取值来自 ref标签指向的类的方法<br /> pointcut属性:用于指定切入点表达式(写起来有点麻烦了.)execution是切入点表达式关键字--><!-- 配置前置通知 永远都在切入点方法执行之前执行--><**aop:before method="beforePrintLog" pointcut="execution(* com.itheima.service.*.*(..))"**/><br /> <!-- 配置后置通知 在切入点方法正常执行之后执行,它和异常通知只能执行一个--><**aop:after-returning method="afterReturningPrintLog" pointcut="execution(* com.itheima.service.*.*(..))"**/><br /> <!-- 配置异常通知 在切入点方法执行产生异常之后执行,它和后置通知只能执行一个,<br />--><**aop:after-throwing method="afterThrowingPrintLog" pointcut="execution(* com.itheima.service.*.*(..))"**/><br /> <!-- 配置最终通知 无论切入点方法执行是否产生异常,它都会在其后面执行--><**aop:after method="afterPrintLog" pointcut="execution(* com.itheima.service.*.*(..))"**/></**aop:aspect**>
5.环绕通知介绍使用案例
必须导入依赖,否则报错
什么是环绕通知?是Spring给我提供了一种机制,一种可以在代码中手动控制通知类,通知何时执行的机制,这个环绕通知和前面四个通知有冲突,前面四个是在配置文件里面配置,是Spring确定什么时候来执行,这个环绕通知是我们自己靠代码来指定什么时候执行.
配置环绕通知 注意,**在使用的时候一定要try catch **不要throw*
问题:
当配置了环绕通知之后,执行切入点方法时,出现了环绕通知执行了,但是切入点方法却没有执行。
分析原因:
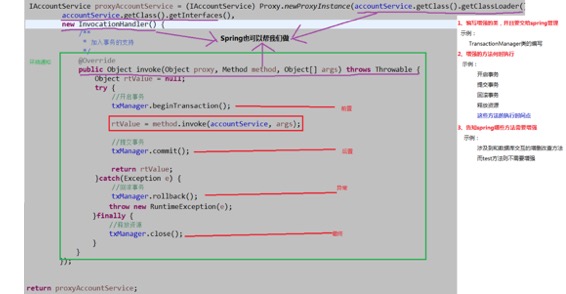
由动态代理的InvocationHandler中的invoke方法得知,环绕通知应该有明确的切入点方法调用。
而我们的环绕通知中没有明确的调用
解决:
spring框架为我们提供了一个接口ProceedingJoinPoint,该接口可以作为环绕通知的方法参数来使用。
当环绕通知执行的时候,spring框架会为我们提供这个参数的具体实现类供我们使用。
该接口中有一个方法:proceed(),此方法就相当于method.invoke明确调用切入点方法
*
环绕通知:
spring框架为我们提供的一种可以在代码中手动控制增强方法何时执行的机制
环绕通知配置
<bean id=”Logger” class=”com.itheima.utils.Logger”></bean>
<aop:config>
<**aop:pointcut expression="execution(* com.itheima.service.*.*(..))" id="pt1"**/><**aop:aspect id="logAdvice" ref="Logger"**><br /> <!--配置环绕通知<br /> **method="aroundPrintLog" **是通知类的方法<br /> **pointcut-ref="pt1"** 指定切入表达式(pt1是上面定义好的表达式id)--><**aop:around method="aroundPrintLog" pointcut-ref="pt1"**></**aop:around**><br /> </**aop:aspect**><br /></**aop:config**><br />配置的方法<br />/**
- 环绕通知
*
@return
@throws Throwable
/
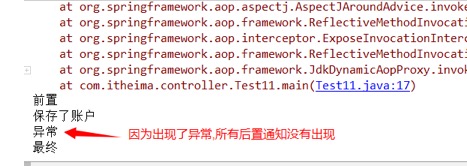
public Object aroundPrintLog(ProceedingJoinPoint pjp) {try {
System.out.println(“前置”);
// proceed(),此方法就相当于method.invoke明确调用切入点方法
pjp.proceed();
System.out.println(“后置”);
} catch (Throwable throwable) {
throwable.printStackTrace();
System.out.println(“异常”);}
System.out.println(“最终”);return null;
环绕通知控制事务(架构Spring Jdbc)
IDEA的案例demo,里面有SQL表和代码

细节代码:
xml配置文件
<!—配置环绕通知 id是唯一标示
class 是自己编写的切面类(事务控制类)
—>
<bean id=”TransactionManager” class=”com.itheima81.utils.TransactionManager”></bean>
<aop:config>
<**aop:pointcut id="pt1" expression="execution(* com.itheima81.service.*.*(..))"**/><br /> <!--< aop:aspect>:定义切面(切面包括通知和切点)<br /> id是唯一标示<br /> ref 是引入自己编写的切面类--><**aop:aspect id="logAdvice" ref="TransactionManager"**><br /> <!--aop:around method="TransactionControl" 是定义切面类的方法<br /> pointcut-ref="pt1 是指定切面类的表达式--><**aop:around method="TransactionControl" pointcut-ref="pt1"**></**aop:around**><br /> </**aop:aspect**><br /></**aop:config**><br />java代码<br />/** 事务管理器
- 环绕通知 */
@Component
public class TransactionManager {
@Autowired private ConnectionUtils connectionUtils;
public Object TransactionControl(ProceedingJoinPoint pjp) throws Throwable {
//proceed 预先声明Object proceed = **null**;**try **{**connectionUtils**.getCurrentConnection().setAutoCommit(**false**);System.out.println(**"已经开启事务(前置AOP)"**); //前置<br />// proceed(),此方法就相当于method.invoke明确调用切入点方法proceed = pjp.proceed();**connectionUtils**.getCurrentConnection().commit();System.out.println(**"已经提交事务(后置AOP)"**); //后置} **catch **(Throwable throwable) {throwable.printStackTrace();<br /> **connectionUtils**.getCurrentConnection().rollback();System.out.println(**"已经回滚事务(异常AOP)"**);//异常}**connectionUtils**.getCurrentConnection().close();// 让连接和当前线程解绑**connectionUtils**.getTl().remove();System.out.println(**"已经释放资源(最终AOP)"**); //最终/*这个返回的是源代码return的值<br /> * 意思就是原来代码return的值如果是1* 这个proceed 就是1* */**return **proceed;
}
}
结果(没有异常)
有异常
…………
自己总结:
说白了就是不改变源代码的情况下给代码进行功能增强(通过配置切面和环绕通知的方式),
其主要的细节应该就是把共用的代码抽取出来. 比如事务,和打印日志.
底层是:
动态代理
使用AOP好处是:
1.减少开发量
2.维护简单
6.完成系统日志管理开发(使用aop技术)
简介
可以通过日志查看系统的情况,完成功能很简单,弄一张表,往里面加入数据就行了,重点是采用什么方法 来进行日志的添加,思考了一下使用AOP技术进行开发比较好.
使用AOP进行日志开发原因是因为AOP作用是可以不改变源代码的情况下对方法进行增强,如果以后不想使用日志记录了,只要修改自己编写的切面类的切入点表达式即可取消日志记录系统,十分的方便.
使用上的小坑,写之前行看这里
1.配置自己编写的切面类必须放入Controller层,因为可以被扫描, 放入SpringMVC容器(牵扯到父子容器问题)
2.注意扫描的时候 一定要指定是Controller结尾的类,目的是增强的时候排除自己编写的切面类, 因为切面类也在Controller层里面,如果不指定是Controller结尾的话,那么切面类也会被增强,然后就进入死循环,
SQL和实体类
具体的需要看业务需求进行SQL的设计
CREATE TABLE sys_log(
id varchar2(32) default SYS_GUID() PRIMARY KEY,
visitTime timestamp,
username VARCHAR2(50),
ip VARCHAR2(30),
method VARCHAR2(200)
)
实体类就根据SQL进行编写
编写切面类代码
在SpringMVC.xml开启AOP注解
<aop:aspectj-autoproxy proxy-target-class=”true”/>
在web.xml配置监听request 对象的监听器
<listener>
<listener-class>org.springframework.web.context.request.RequestContextListener</listener-class>
</listener>
开始编写切面类(注意,一定要在Controller层编写代码)
package cn.itcast.controller;
import cn.itcast.domain.Log;
import cn.itcast.service.LogService;
import org.aspectj.lang.JoinPoint;
import org.aspectj.lang.annotation.After;
import org.aspectj.lang.annotation.Aspect;
import org.aspectj.lang.annotation.Before;
import org.springframework.beans.factory.annotation.Autowired;
import org.springframework.security.core.context.SecurityContextHolder;
import org.springframework.security.core.userdetails.User;
import org.springframework.stereotype.Component;
import javax.servlet.http.HttpServletRequest;
import java.util.Date;
/**
*日志切面类
- 切面类 = 切入点表达式 + 通知类型
*/
@Aspect //当前是切面类
@Component //组件
public class LogAop {
@Autowired**private **LogService **logService**;<br />@Autowired**private **HttpServletRequest **request**;//存储类.方法**private **String **methodName**;<br />/*** 前置通知*/@Before(**"execution(public * cn.itcast.controller.*Controller.*(..))"**)**public void **logBefore(JoinPoint p){//获取执行的方法名**methodName **= p.getSignature().getName();// 获取到目标对象(SysUserController目标对象),获取类的名称String classname = p.getTarget().getClass().getSimpleName();// 拼接**methodName **= classname+**'.'**+**methodName**;}/*** 最终通知*/@After(**"execution(public * cn.itcast.controller.*Controller.*(..))"**)**public void **logAfter() {// 创建日志对象,属性设置进去,保存Log log = **new **Log();// 获取ip地址String ip = **request**.getRemoteAddr();log.setIp(ip);// 操作的类.方法log.setMethod(**methodName**);<br />// 获取到登录的名称User user = (User) SecurityContextHolder.getContext().getAuthentication().getPrincipal();log.setUsername(user.getUsername());<br /> log.setVisitTime(**new **Date());<br />// 存入到数据库中(就是一条保存语句)**logService**.save(log);}<br />}


