需要在服务的生产者那里配置Eureka客户端
现在Eureka虽然有点小瑕疵,但现在已经能正常访问了,那么接下来就需要将用的微服务注册到Eureka服务当中,为后面客户端的使用做铺垫。
【microcloud-provider-product】修改pom文件,增加eureka客户端相关信息。
注意:如果是Edgware或之前的版本,用的是springboot 1.5.或者更低的版本
【microcloud-provider-product】修改application.yml配置文件,在者个文件中定义要注册的eureka服务的地址
eureka:
client: # 客户端进行Eureka注册的配置
service-url:
defaultZone: http://localhost:7001/eureka
【microcloud-provider-product】修改启动类,在这个类上增加eureka客户端的注解信息
package cn.enjoy;
import org.mybatis.spring.annotation.MapperScan;
import org.springframework.boot.SpringApplication;
import org.springframework.boot.autoconfigure.SpringBootApplication;
import org.springframework.cloud.netflix.eureka.EnableEurekaClient;
@SpringBootApplication
@MapperScan(“cn.enjoy.mapper”)
@EnableEurekaClient
public class ProductApp{
public static void main(String[] args) {
SpringApplication.run(ProductApp.class,args);
}
}
加上这注解后,启动
发现Application的名字是UNKNOWN,为此应该为这单独取一个名字
【microcloud-provider-product】修改application.yml配置文件,为这个微服务起一个名字
spring:
application:
name: microcloud-provider-product
重新启动后
现在虽然成功的实现了微服务注册,但是现在看下STATUS,这个时候名称还有点乱,我们现在开源自定义一个路径名称
【microcloud-provider-product】修改application.yml配置文件,追加主机名称的显示:
eureka:
client: # 客户端进行Eureka注册的配置
service-url:
defaultZone: http://localhost:7001/eureka
instance:
instance-id: microcloud-provider-product

另外一般情况下,当鼠标点击查看的时候应该以IP作为链接项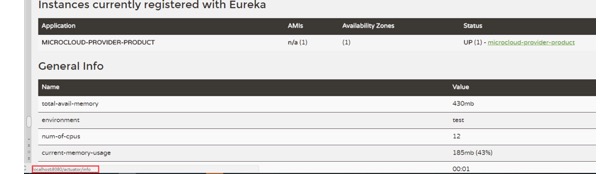
【microcloud-provider-product】修改application.yml配置文件
eureka:
client: # 客户端进行Eureka注册的配置
service-url:
defaultZone: http://localhost:7001/eureka
instance:
instance-id: microcloud-provider-product
prefer-ip-address: true
修改后地址栏变为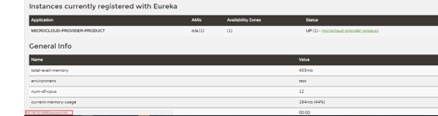
1.配置actuator模块儿
点击状态栏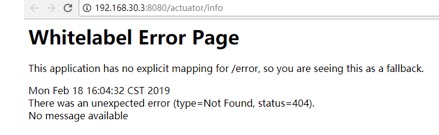
【microcloud-provider-product】如果想看状态信息需要增加actuator模块,这一块的内容已经在讲springboot的时候讲过,修改pom文件,增加
【microcloud-provider-product】修改application.yml文件,追加info相关配置
info:
app.name: microcloud-provider-product
company.name: enjoy
build.artifactId: $project.artifactId$
build.modelVersion: $project.modelVersion$
注意:由于在yml文件中使用了$,这个时候启动是会报错的,因此还需要一个maven-resources-plugin插件的支持
【microcloud】在父工程增加插件,修改pom文件
启动后:
2.清理关闭的生产者服务
在前面启动eureka中,会发现启动会报错,虽然这些错误不影响使用
另外在关闭【microcloud-provider-product】项目后,刷新eureka发现项目还在,隔一段时间后会发现
这其实就是触发了安全模式
【microcloud-eureka】设置服务的清理间隔时间,修改application.yml文件
server:
port: 7001
eureka:
server:
eviction-interval-timer-in-ms: 1000 #设置清理的间隔时间,而后这个时间使用的是毫秒单位(默认是60秒)
enable-self-preservation: false #设置为false表示关闭保护模式
client:
fetch-registry: false
register-with-eureka: false
instance: # eureak实例定义
hostname: localhost # 定义 Eureka 实例所在的主机名称
这个重新测试,服务提供方注册后,关闭服务发现服务实例依然还在。
【microcloud-provider-product】修改application.yml配置
eureka:
client: # 客户端进行Eureka注册的配置
service-url:
defaultZone: http://localhost:7001/eureka
instance:
instance-id: microcloud-provider-product
prefer-ip-address: true
lease-renewal-interval-in-seconds: 2 # 设置心跳的时间间隔(默认是30秒)
lease-expiration-duration-in-seconds: 5 # 如果现在超过了5秒的间隔(默认是90秒)
由于所有的服务都注册到了 Eureka 之中
这样如果配置了“lease-expiration-duration-in-seconds”此选项,
表示距离上一次发送心跳之后等待下一次发送心跳的间隔时间,如果超过了此间隔时间,则认为该微服务已经宕机了。
3.生产者获取服务信息
【microcloud-provider-product】对于注册到 Eureka 上的服务,可以通过发现服务来获取一些服务信息,修改ProductController,增加一个方法
package cn.enjoy.controller;
import cn.enjoy.service.IProductService;
import cn.enjoy.vo.Product;
import org.springframework.cloud.client.discovery.DiscoveryClient;
import org.springframework.web.bind.annotation.*;
import javax.annotation.Resource;
@RestController
@RequestMapping(“/prodcut”)
public class ProductController {
@Resource
private IProductService iProductService;
@Resource
private DiscoveryClient client ; // 进行Eureka的发现服务
@RequestMapping(value=”/get/{id}”)
public Object get(@PathVariable(“id”) long id) {
return this.iProductService.get(id) ;
}
@RequestMapping(value=”/add”)
public Object add(@RequestBody Product product) {
return this.iProductService.add(product) ;
}
@RequestMapping(value=”/list”)
public Object list() {
return this.iProductService.list() ;
}
@RequestMapping(“/discover”)
public Object discover() { // 直接返回发现服务信息
return this.client ;
}
}
【microcloud-provider-product】修改ProductApp, 在主程序中启用发现服务项
package cn.enjoy;
import org.mybatis.spring.annotation.MapperScan;
import org.springframework.boot.SpringApplication;
import org.springframework.boot.autoconfigure.SpringBootApplication;
import org.springframework.cloud.client.discovery.EnableDiscoveryClient;
import org.springframework.cloud.netflix.eureka.EnableEurekaClient;
@SpringBootApplication
@MapperScan(“cn.enjoy.mapper”)
@EnableEurekaClient
@EnableDiscoveryClient
public class ProductApp{
public static void main(String[] args) {
SpringApplication.run(ProductApp.class,args);
}
}
访问:localhost:8080/prodcut/discover
可以发现DiscoveryClient包含的很多信息
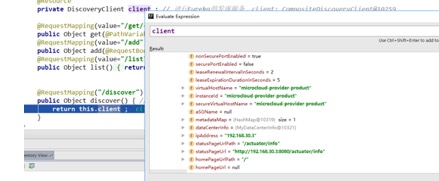
可以看到在eureka里面显示的信息都可以在这里获取得到。
4.Eureka 安全机制SpringSecurity
一般情况下Eureka 和服务的提供注册者都会在一个内网环境中,但免不了在某些项目中需要让其他外网的服务注册到Eureka,这个时候就有必要让Eureka增加一套安全认证机制了,让所有服务提供者通过安全认证后才能注册进来
【microcloud-eureka】修改pom文件,引入SpringSecurity的依赖包 ,需要注意,千万别引自己的Security项目(microcloud-security),不然会报错
| <dependency> <groupId>org.springframework.boot</groupId> <artifactId>spring-boot-starter-security</artifactId> <version>2.1.8.RELEASE</version> </dependency> | | —- |
【microcloud-eureka】 修改application.yml文件,增加用户、密码验证
server:
port: 7001
eureka:
server:
eviction-interval-timer-in-ms: 1000 #设置清理的间隔时间,而后这个时间使用的是毫秒单位(默认是60秒)
enable-self-preservation: false #设置为false表示关闭保护模式
client:
fetch-registry: false
register-with-eureka: false
service-url:
defaultZone: http://admin:enjoy@localhost:7001/eureka
instance: # eureak实例定义
hostname: localhost # 定义 Eureka 实例所在的主机名称
spring:
security:
user:
name: admin
password: enjoy
【microcloud-provider-product】修改application.yml文件,增加验证信息
eureka:
client: # 客户端进行Eureka注册的配置
service-url:
defaultZone: http://admin:enjoy@localhost:7001/eureka
instance:
instance-id: microcloud-provider-product
prefer-ip-address: true
lease-renewal-interval-in-seconds: 2 # 设置心跳的时间间隔(默认是30秒)
lease-expiration-duration-in-seconds: 5 # 如果现在超过了5秒的间隔(默认是90秒)
重新启动
注意:如果是Edgware或之前的版本,做到这一步就行了,但使用现在版本,你会发现启动【microcloud-provider-product】后服务注册不上去

【microcloud-eureka】新增配置类EurekaSecurityConfig,重写configure方法,把csrf劫持关闭
package cn.enjoy;
import org.springframework.context.annotation.Configuration;
import org.springframework.security.config.annotation.web.builders.HttpSecurity;
import org.springframework.security.config.annotation.web.configuration.EnableWebSecurity;
import org.springframework.security.config.annotation.web.configuration.WebSecurityConfigurerAdapter;
@Configuration
@EnableWebSecurity
public class EurekaSecurityConfig extends WebSecurityConfigurerAdapter {
@Override
protected void configure(HttpSecurity http) throws Exception {
http.csrf().disable();
super.configure(http);
}
}
5.HA 高可用集群配置
学习Zookepper服务注册的时候,注册中心是能实现高可用的,但现在的Eureka还是单节点的情况,如果Eureka出现了错误,将会导致整个集群无法继续使用,这个时候就需要考虑Eureka的高可用了。
比如说 干一个活儿 一头牛拉不动,就再找一头牛,两头牛拉
集群: 在不同的服务器上面配置相同的服务对外做一个超大运算的整体
现在所有的东西都去找一个Eureka,现在存在的问题就是如果这个Eurasia挂了的话怎么办.

现在需要3个eureka ,每个eureka都需要配置hostname,所有先修改hosts文件内容如下
127.0.0.1 eureka1
127.0.0.1 eureka2
127.0.0.1 eureka3
【microcloud-eureka】为了方便操作,讲microcloud-eureka项目复制两份,分别复制为【microcloud-eureka2】、 【microcloud-eureka2】
【microcloud-eureka】修改application.yml配置文件,修改端口以及注册位置
server:
port: 7001
eureka:
server:
eviction-interval-timer-in-ms: 1000 #设置清理的间隔时间,而后这个时间使用的是毫秒单位(默认是60秒)
enable-self-preservation: false #设置为false表示关闭保护模式
client:
fetch-registry: false
register-with-eureka: false
service-url:
#defaultZone: http://admin:enjoy@localhost:7001/eureka
defaultZone: http://admin:enjoy@eureka1:7001/eureka,http://admin:enjoy@eureka2:7002/eureka,http://admin:enjoy@eureka3:7003/eureka
instance: # eureak实例定义
hostname: eureka1 # 定义 Eureka 实例所在的主机名称
spring:
security:
user:
name: admin
password: enjoy
【microcloud-eureka2】修改application.yml配置文件
server:
port: 7002
eureka:
server:
eviction-interval-timer-in-ms: 1000 #设置清理的间隔时间,而后这个时间使用的是毫秒单位(默认是60秒)
enable-self-preservation: false #设置为false表示关闭保护模式
client:
fetch-registry: false
register-with-eureka: false
service-url:
#defaultZone: http://admin:enjoy@localhost:7001/eureka
defaultZone: http://admin:enjoy@eureka1:7001/eureka,http://admin:enjoy@eureka2:7002/eureka,http://admin:enjoy@eureka3:7003/eureka
instance: # eureak实例定义
hostname: eureka2 # 定义 Eureka 实例所在的主机名称
spring:
security:
user:
name: admin
password: enjoy
【microcloud-eureka3】修改application.yml配置文件
server:
port: 7003
eureka:
server:
eviction-interval-timer-in-ms: 1000 #设置清理的间隔时间,而后这个时间使用的是毫秒单位(默认是60秒)
enable-self-preservation: false #设置为false表示关闭保护模式
client:
fetch-registry: false
register-with-eureka: false
service-url:
#defaultZone: http://admin:enjoy@localhost:7001/eureka
defaultZone: http://admin:enjoy@eureka1:7001/eureka,http://admin:enjoy@eureka2:7002/eureka,http://admin:enjoy@eureka3:7003/eureka
instance: # eureak实例定义
hostname: eureka3 # 定义 Eureka 实例所在的主机名称
spring:
security:
user:
name: admin
password: enjoy
启动eureka,eureka2,eureka3,进入服务的后台查看副本
登陆http://localhost:7001/
【microcloud-provider-product】修改application.yml配置文件,配置多台enreka的注册
server:
port: 8080
mybatis:
mapper-locations: # 所有的mapper映射文件
- classpath:mapping/*.xml
spring:
datasource:
type: com.alibaba.druid.pool.DruidDataSource # 配置当前要使用的数据源的操作类型
driver-class-name: com.mysql.cj.jdbc.Driver # 配置MySQL的驱动程序类
url: jdbc:mysql://localhost:3306/springcloud?serverTimezone=GMT%2B8 # 数据库连接地址
username: root # 数据库用户名
password: root1234% # 数据库连接密码
application:
name: microcloud-provider-product
# security:
# user:
# roles:
# - USER # 授权角色
# name: root
# password: enjoy
logging:
level:
cn.enjoy.mapper: debug
eureka:
client: # 客户端进行Eureka注册的配置
service-url:
#defaultZone: http://admin:enjoy@localhost:7001/eureka
defaultZone: http://admin:enjoy@eureka1:7001/eureka,http://admin:enjoy@eureka2:7002/eureka,http://admin:enjoy@eureka3:7003/eureka
instance:
instance-id: microcloud-provider-product
prefer-ip-address: true
lease-renewal-interval-in-seconds: 2 # 设置心跳的时间间隔(默认是30秒)
lease-expiration-duration-in-seconds: 5 # 如果现在超过了5秒的间隔(默认是90秒)
info:
app.name: microcloud-provider-product
company.name: enjoy
build.artifactId: $project.artifactId$
build.modelVersion: $project.modelVersion$
6.集群第二种配置方式
开始搭建集群
1.新建Eureka工程 7002 7003
microservicecloud-eureka-7002
microservicecloud-eureka-7003
2.修改host映射问题
域名映射
在host配置文件里面配置完了,可以一个端口有三个域名,三个Eureka服务器如果都是一个localhost就不好使了.
127.0.0.1 eureka7001.com
127.0.0.1 eureka7002.com
127.0.0.1 eureka7003.com
3.配置三个Eureka服务器的yml文件,
第一步修改
eureka:
instance:
hostname: eureka7001.com #eureka服务端的实例名称(host配置了eureka7001.com是localhost)
client:
register-with-eureka: false #false表示不向注册中心注册自己(只有客户端才注册,自己是服务端,不需要注册自己)。
fetch-registry: false #false表示自己端就是注册中心,我的职责就是维护服务实例,并不需要去检索服务
service-url:
#单机 defaultZone: http://${eureka.instance.hostname}:${server.port}/eureka/ #设置与Eureka Server交互的地址查询服务和注册服务都需要依赖这个地址(单机)。
defaultZone: http://eureka7002.com:7002/eureka/,http://eureka7003.com:7003/eureka/
然后第二台Eureka服务器修改yml
server:
port: 7002
eureka:
instance:
hostname: eureka7002.com #eureka服务端的实例名称
client:
register-with-eureka: false #false表示不向注册中心注册自己。
fetch-registry: false #false表示自己端就是注册中心,我的职责就是维护服务实例,并不需要去检索服务
service-url:
#defaultZone: http://${eureka.instance.hostname}:${server.port}/eureka/ #设置与Eureka Server交互的地址查询服务和注册服务都需要依赖这个地址。
defaultZone: http://eureka7001.com:7001/eureka/,http://eureka7003.com:7003/eureka/
然后第三台 Eureka服务器修改yml
server:
port: 7003
eureka:
instance:
hostname: eureka7003.com #eureka服务端的实例名称
client:
register-with-eureka: false #false表示不向注册中心注册自己。
fetch-registry: false #false表示自己端就是注册中心,我的职责就是维护服务实例,并不需要去检索服务
service-url:
#defaultZone: http://${eureka.instance.hostname}:${server.port}/eureka/ #设置与Eureka Server交互的地址查询服务和注册服务都需要依赖这个地址。
defaultZone: http://eureka7001.com:7001/eureka/,http://eureka7002.com:7002/eureka/
4.配置生产者yml配置文件
因为 原来的生产者项目只是注入了一个Eureka项目里面,现在需要同时注册进三个Eureka项目的客户端里面
修改生产者服务器的客户端的yml配置文件
eureka:
client: #客户端注册进eureka服务列表内
service-url:
#defaultZone: http://localhost:7001/eureka #入住到Eureka, 这个是地址
# 配置集群服务器, 给这个项目注册下面三个Eureka服务器里面
defaultZone: http://eureka7001.com:7001/eureka/,http://eureka7002.com:7002/eureka/,http://eureka7003.com:7003/eureka/
instance:
instance-id: microservicecloud-dept8001 #改注册到Eureka的别名
prefer-ip-address: true #访问路径可以显示IP地址
此时访问已经搭建集群的所有Eureka里的控制面板里面,Application列表里面都会有该生产者的服务在里面
5.查看集群环境十分搭建成功
在第一个Eureka里面的控制面板查看
其它的Eureka说明集群环境搭建成功了
7.打包发布
在真实项目中,需要讲Eureka发布到具体服务器上进行执行,打包部署其实和springboot里面讲的大同小异<br /> 和properties文件稍微有点不同,对于properties文件,不同的环境会有不同的配置文件比如application-dev.properties,application-test.properties,application-pro.properties等<br />但如果是yml文件,所有的的配置都再同一个yml文件中<br /> <br />【microcloud-eureka】修改application.yml文件<br />spring:<br /> profiles:<br /> active:<br /> - dev-7001<br /> <br />---<br />server:<br /> port: 7001<br />eureka:<br /> server:<br /> eviction-interval-timer-in-ms: 1000 #设置清理的间隔时间,而后这个时间使用的是毫秒单位(默认是60秒)<br /> enable-self-preservation: false #设置为false表示关闭保护模式<br /> client:<br /> fetch-registry: false<br /> register-with-eureka: false<br /> service-url:<br /> defaultZone: http://admin:enjoy@eureka1:7001/eureka,http://admin:enjoy@eureka2:7002/eureka,http://admin:enjoy@eureka3:7003/eureka<br /> instance: # eureak实例定义<br /> hostname: eureka1 # 定义 Eureka 实例所在的主机名称<br />spring:<br /> profiles: dev-7001<br /> security:<br /> user:<br /> name: admin<br /> password: enjoy<br /> application:<br /> name: microcloud-eureka<br /> <br />---<br />server:<br /> port: 7002<br />eureka:<br /> server:<br /> eviction-interval-timer-in-ms: 1000 #设置清理的间隔时间,而后这个时间使用的是毫秒单位(默认是60秒)<br /> enable-self-preservation: false #设置为false表示关闭保护模式<br /> client:<br /> fetch-registry: false<br /> register-with-eureka: false<br /> service-url:<br /> defaultZone: http://admin:enjoy@eureka1:7001/eureka,http://admin:enjoy@eureka2:7002/eureka,http://admin:enjoy@eureka3:7003/eureka<br /> instance: # eureak实例定义<br /> hostname: eureka2 # 定义 Eureka 实例所在的主机名称<br />spring:<br /> profiles: dev-7002<br /> security:<br /> user:<br /> name: admin<br /> password: enjoy<br /> application:<br /> name: microcloud-eureka2<br /> <br />---<br />server:<br /> port: 7003<br />eureka:<br /> server:<br /> eviction-interval-timer-in-ms: 1000 #设置清理的间隔时间,而后这个时间使用的是毫秒单位(默认是60秒)<br /> enable-self-preservation: false #设置为false表示关闭保护模式<br /> client:<br /> fetch-registry: false<br /> register-with-eureka: false<br /> service-url:<br /> defaultZone: http://admin:enjoy@eureka1:7001/eureka,http://admin:enjoy@eureka2:7002/eureka,http://admin:enjoy@eureka3:7003/eureka<br /> instance: # eureak实例定义<br /> hostname: eureka3 # 定义 Eureka 实例所在的主机名称<br />spring:<br /> profiles: dev-7003<br /> security:<br /> user:<br /> name: admin<br /> password: enjoy<br /> application:<br /> name: microcloud-eureka3<br /> <br /> <br />【microcloud-eureka】添加一个打包插件,修改pom文件<br /><?xml version="1.0" encoding="UTF-8"?><br /><project xmlns="http://maven.apache.org/POM/4.0.0"<br /> xmlns:xsi="http://www.w3.org/2001/XMLSchema-instance"<br /> xsi:schemaLocation="http://maven.apache.org/POM/4.0.0 [http://maven.apache.org/xsd/maven-4.0.0.xsd">](http://maven.apache.org/xsd/maven-4.0.0.xsd%22%3E)<br /> <parent><br /> <artifactId>springcloud</artifactId><br /> <groupId>enjoy</groupId><br /> <version>1.0-SNAPSHOT</version><br /> </parent><br /> <modelVersion>4.0.0</modelVersion><br /> <br /> <artifactId>microcloud-eureka</artifactId><br /> <br /> <properties><br /> <project.build.sourceEncoding>UTF-8</project.build.sourceEncoding><br /> </properties><br /> <dependencies><br /> <dependency><br /> <groupId>org.springframework.boot</groupId><br /> <artifactId>spring-boot-starter-web</artifactId><br /> </dependency><br /> <dependency><br /> <groupId>org.springframework.boot</groupId><br /> <artifactId>spring-boot-starter-test</artifactId><br /> <scope>test</scope><br /> </dependency><br /> <dependency><br /> <groupId>org.springframework.boot</groupId><br /> <artifactId>spring-boot-devtools</artifactId><br /> </dependency><br /> <dependency><br /> <groupId>org.springframework.cloud</groupId><br /> <artifactId>spring-cloud-starter-netflix-eureka-server</artifactId><br /> </dependency><br /> <dependency><br /> <groupId>org.springframework.boot</groupId><br /> <artifactId>spring-boot-starter-security</artifactId><br /> </dependency><br /> </dependencies><br /> <br /> <build><br /> <finalName>eureka-server</finalName><br /> <plugins><br /> <plugin> <!-- 该插件的主要功能是进行项目的打包发布处理 --><br /> <groupId>org.springframework.boot</groupId><br /> <artifactId>spring-boot-maven-plugin</artifactId><br /> <configuration> <!-- 设置程序执行的主类 --><br /> <mainClass>cn.enjoy.EurekaApp</mainClass><br /> </configuration><br /> <executions><br /> <execution><br /> <goals><br /> <goal>repackage</goal><br /> </goals><br /> </execution><br /> </executions><br /> </plugin><br /> </plugins><br /> </build><br /> <br /></project><br /> <br /> <br /> <br />【microcloud-eureka】 在pom文件所在目录<br /> mvn clean install package<br /> <br />接下来就可以在项目的编译目录发现<br />eureka-server.jar 文件<br />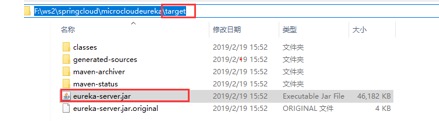<br /> <br />采用默认的方式执行 eureka-server.jar<br />那么此时将运行在 7001 端口上:java -jar eureka-server.jar<br />运行其它的两个 profile 配置:<br />· 运行“dev-7002”profile:java -jar eureka-server.jar --spring.profiles.active=dev-7002;<br />· 运行“dev-7003”profile:java -jar eureka-server.jar --spring.profiles.active=dev-7003<br />

若有收获,就点个赞吧
0 人点赞
