什么是SSO单点登录,就好比你有好几个系统,你只需要在其中一个系统登录过一次之后,再访问别的系统就不需要登录了.这就是单点登录.
代码地址
代码出自图灵学院, 我自己整理了一下,删减了一些无用的代码,整理了整理,
https://gitee.com/zjj19941/ZJJ_Neaten5.10/tree/master/ZJJ_SpringCloud_Oauth2/demo06
代码实现
客户端服务
引入依赖
<dependencies><dependency><groupId>org.springframework.boot</groupId><artifactId>spring-boot-starter-web</artifactId></dependency><dependency><groupId>org.springframework.cloud</groupId><artifactId>spring-cloud-starter-oauth2</artifactId></dependency><!--JWT依赖--><dependency><groupId>io.jsonwebtoken</groupId><artifactId>jjwt</artifactId><version>0.9.1</version></dependency><dependency><groupId>org.springframework.boot</groupId><artifactId>spring-boot-starter-test</artifactId><scope>test</scope></dependency></dependencies>
修改application.properties
server.port=8081
#防止Cookie冲突,冲突会导致登录验证不通过
server.servlet.session.cookie.name=OAUTH2-CLIENT-SESSIONID01
#授权服务器地址
oauth2-server-url: http://localhost:8080
#与授权服务器对应的配置
security.oauth2.client.client-id=client
security.oauth2.client.client-secret=123123
security.oauth2.client.user-authorization-uri=${oauth2-server-url}/oauth/authorize
security.oauth2.client.access-token-uri=${oauth2-server-url}/oauth/token
security.oauth2.resource.jwt.key-uri=${oauth2-server-url}/oauth/token_key
在启动类上添加@EnableOAuth2Sso注解来启用单点登录功能
@EnableOAuth2Sso单点登录的原理简单来说就是:标注有@EnableOAuth2Sso的OAuth2 Client应用在通过某种OAuth2授权流程获取访问令牌后(一般是授权码流程),通过访问令牌访问userDetails用户明细这个受保护资源服务,获取用户信息后,将用户信息转换为Spring Security上下文中的认证后凭证Authentication,从而完成标注有@EnableOAuth2Sso的OAuth2 Client应用自身的登录认证的过程。整个过程是基于OAuth2的SSO单点登录
@SpringBootApplication
@EnableOAuth2Sso
public class Oauth2SsoClientDemoApplication {

    public static void main(String[] args) {
        SpringApplication.run(Oauth2SsoClientDemoApplication.class, args);
    }

}
添加接口用于获取当前登录用户信息
@RestController
@RequestMapping("/user")
public class UserController {

    @RequestMapping("/getCurrentUser")
    public Object getCurrentUser(Authentication authentication) {
        return authentication;
    }
}
授权服务器
修改授权服务器中的AuthorizationServerConfig类,将绑定的跳转路径为http://localhost:8081/login,并添加获取秘钥时的身份认证
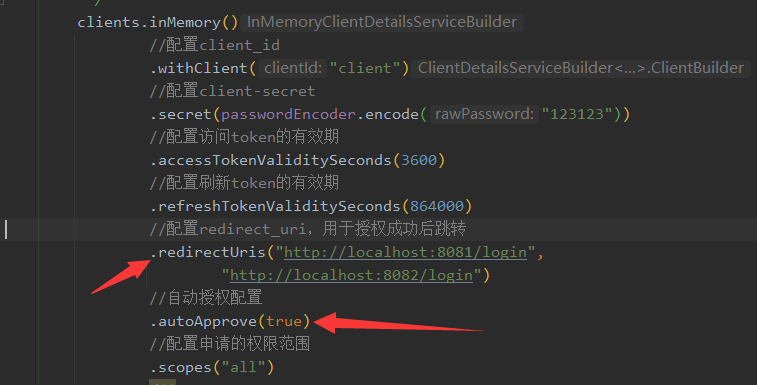
 clients.inMemory()
                //配置client_id
                .withClient("client")
                //配置client-secret
                .secret(passwordEncoder.encode("123123"))
                //配置访问token的有效期
                .accessTokenValiditySeconds(3600)
                //配置刷新token的有效期
                .refreshTokenValiditySeconds(864000)
                //配置redirect_uri,用于授权成功后跳转
                .redirectUris("http://localhost:8081/login",
                        "http://localhost:8082/login")
                //自动授权配置
                .autoApprove(true)
                //配置申请的权限范围
                .scopes("all")
                .authorizedGrantTypes("authorization_code","password","refresh_token");
测试
先启动授权服务器,再启动客户端服务
访问8081服务,因为是第一次访问,需要登录
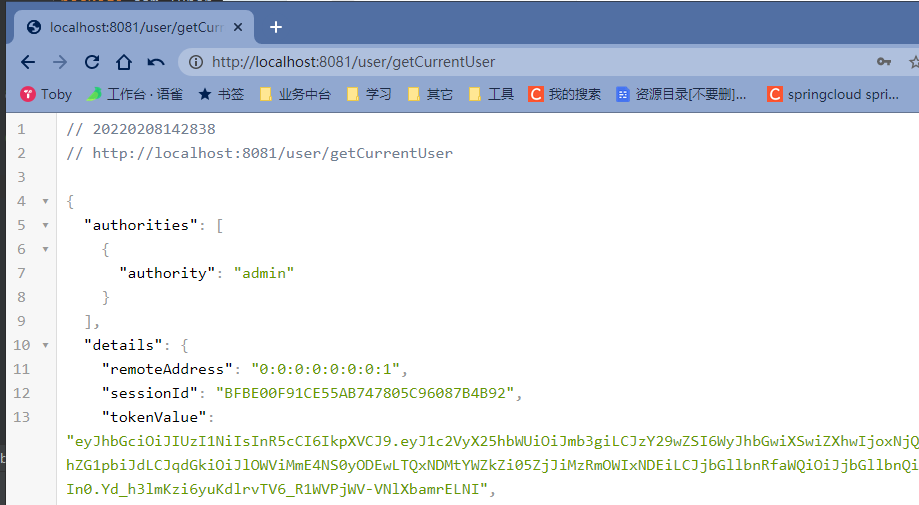
浏览器访问: http://localhost:8081/user/getCurrentUser ,敲完网址直接回车会被重定向到http://localhost:8080/login
登录页面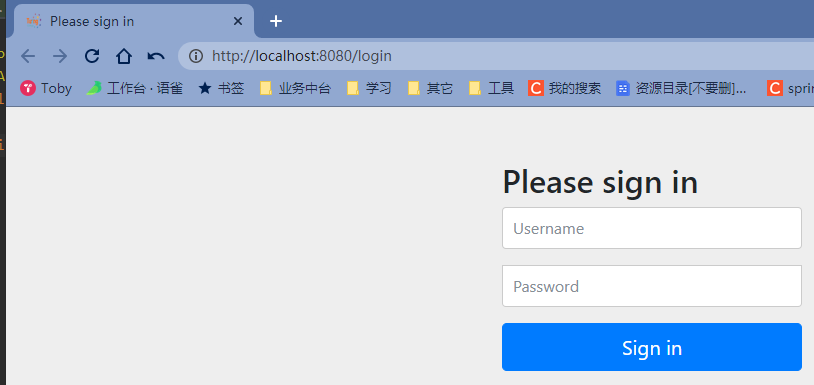
输入完了 账号 fox 密码 123456之后你会发现网址自动跳转到了http://localhost:8081/user/getCurrentUser
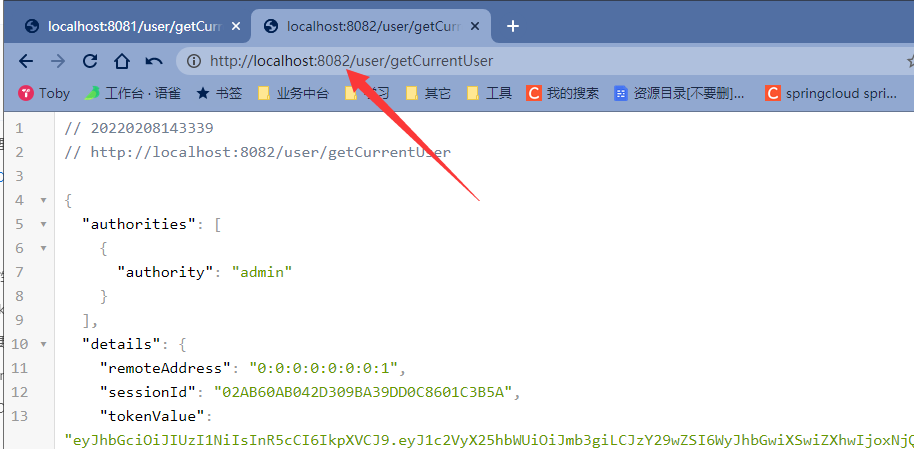
访问8082服务,发现不需要重新登录
你访问 http://localhost:8082/user/getCurrentUser的时候发现也不需要登录了
查看8082服务接口的cookie
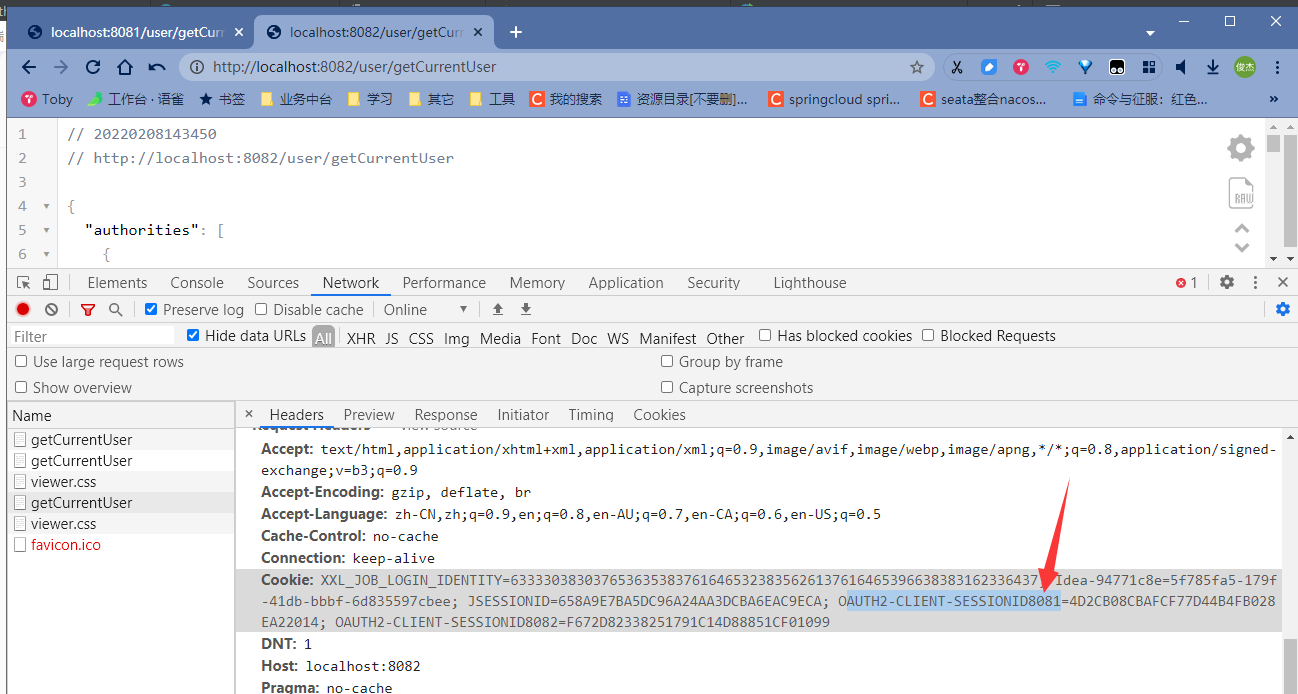
仔细查看发现有 OAUTH2-CLIENT-SESSIONID8081 ,说明这个是8081的认证后的信息
查看 OAUTH2-CLIENT-SESSIONID8082 ,说明这里有8082的认证后的信息
查看8081服务接口的cookie
我们又查看了8081的服务访问接口,发现也有8081 8082的认证后的信息
需要注意事项
配置cookie名字的时候要防止冲突
properties配置
server.port=8081
#防止Cookie冲突,冲突会导致登录验证不通过,这里千万不要重复.可以考虑uuid等等
server.servlet.session.cookie.name=OAUTH2-CLIENT-SESSIONID${server.port}

若有收获,就点个赞吧
0 人点赞
