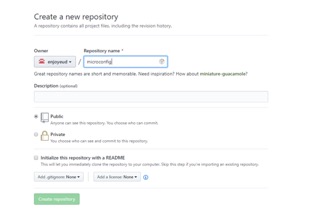
(一)准备github账号
https://github.com/ 注册就不说了
获得git的地址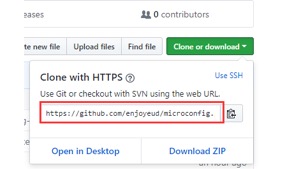
输入用户名密码:把新建的仓库信息下载倒本地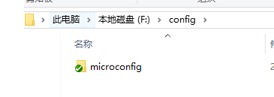
这在里我放倒了f盘的config目录中。
(二)配置中心搭建
有了git服务器之后,接下来就要准备配置中心了
【microcloud-config】 新建一个配置中心的服务提供模块,pom文件如下
<?xml version=”1.0” encoding=”UTF-8”?>
xsi:schemaLocation=”http://maven.apache.org/POM/4.0.0 http://maven.apache.org/xsd/maven-4.0.0.xsd”>
引入springcloudserver的同时,这分布式配置中心也不是谁都能访问的,所以增加了安全验证模块。
应该还记得这时候的用户名密码为:admin/enjoy
【microcloud-config】 新增application.yml配置文件,增加git连接配置信息
server:
port: 7101
spring:
application:
name: microcloud-config
cloud:
config:
server:
git:
uri: https://github.com/enjoyeud/microconfig.git
【microcloud-config】 新增启动类
package cn.enjoy;
import org.springframework.boot.SpringApplication;
import org.springframework.boot.autoconfigure.SpringBootApplication;
import org.springframework.cloud.config.server.EnableConfigServer;
@SpringBootApplication
@EnableConfigServer
public class ConfigApp {
public static void main(String[] args) {
SpringApplication.run(ConfigApp.class,args);
}
}
这些工作准备完成后,为了测试【microcloud-config】是能正确运行的,还需要上传个配置文件到github
【GITHUB】 上传一个application.yml
spring:
profiles:
active:
- dev
—-
spring:
profiles: dev
application:
name: microconfig-test-dev
—-
spring:
profiles: default
application:
name: microconfig-test-default
准备好配置文件后启动【microcloud-config】
| NO | 访问形式 | 访问路径 |
|---|---|---|
| 1 | /{application}-{profile}.yml | http://localhost:7101/application-dev.yml http://localhost:7101/application-default.yml http://localhost:7101/application-beta.yml 不存在 |
| 2 | /{application}/{profile}[/{label}] | http://localhost:7101/application/dev/master http://localhost:7101/application/default/master |
| 3 | /{label}/{application}-{profile}.yml | http://localhost:7101/master/application-default.yml http://localhost:7101/master/application-dev.yml |
(三)简单的客户端
现在已经成功的搭建好了配置中心,但这个时候如果只通过url的访问形式其实没什么太多的意义,最终还是需要把github相关信息加载到客户端上进行访问
新增加一个【microcloud-config-client】模块,这模块讲读取github里面的信息,也不做其他的事情,只是显示一下。
新建【microcloud-config-client】,pom文件如下
<?xml version=”1.0” encoding=”UTF-8”?>
xsi:schemaLocation=”http://maven.apache.org/POM/4.0.0 http://maven.apache.org/xsd/maven-4.0.0.xsd”>
【github】上传一个新的配置文件microcloud-config-client.yml,后面就通过程序来读取这个配置
spring:
profiles:
active:
- dev
—-
server:
port: 8201
spring:
profiles: dev
application:
name: microconfig-test-client
eureka:
client:
service-url:
defaultZone: http://admin:enjoy@localhost:7001/eureka
—-
server:
port: 8102
spring:
profiles: beta
application:
name: microconfig-test-client
eureka:
client:
service-url:
defaultZone: http://admin:enjoy@localhost:7001/eureka
【microcloud-config-client】新建bootstrap.yml文件,这文件读取配置中心的配置
spring:
cloud:
config:
name: microcloud-config-client # 定义要读取的资源文件的名称
profile: dev # 定义profile的 名称
label: master # 定义配置文件所在的分支
uri: http://localhost:7101 # SpringCloudConfig的服务地址
username: admin # 连接的用户名
password: enjoy # 连接的密码
可能有些人奇怪,为什么不直接把相关信息写道application.yml文件之中,其实这是一种规范
l “application.yml”:对应的是用户级的资源配置项;
l “bootstrap.yml”:对应的是系统级的资源配置,其优先级更高
【microcloud-config-client】新建application.yml文件,这文件只是简单的配置一个应用名称
spring:
application:
name: microcloud-config-client # 编写应用的名称
【microcloud-config-client】新建一个controller,这个controller显示从服务器下载到的配置文件
package cn.enjoy.controller;
import org.springframework.beans.factory.annotation.Value;
import org.springframework.web.bind.annotation.RequestMapping;
import org.springframework.web.bind.annotation.RestController;
@RestController
public class ConfigClientController {
@Value(“${spring.application.name}”)
private String applicationName;
@Value(“${eureka.client.serviceUrl.defaultZone}”)
private String eurekaServers;
@RequestMapping(“/config”)
public String getConfig() {
return “ApplicationName = “ + this.applicationName + “、EurekaServers = “
+ this.eurekaServers;
}
}
【microcloud-config-client】 新建一个启动类
package cn.enjoy;
import org.springframework.boot.SpringApplication;
import org.springframework.boot.autoconfigure.SpringBootApplication;
@SpringBootApplication
public class ConfigClientApp {
public static void main(String[] args) {
SpringApplication.run(ConfigClientApp.class,args);
}
}
启动配置中心,访问,确认配置通过url是能正常访问的。
http://localhost:7101/microcloud-config-client-beta.yml
启动【microcloud-config-client】发现tomcat启动了,占用的端口就是dev的8201,访问
http://localhost:8201/config
这个时候简单的客户端已经搭建完成。
(四)Eureka与服务提供商读取配置
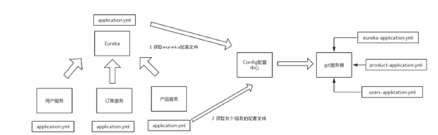
有了上面这些基础,接下来就可以完成这个图的功能了,这里依然简化一下,只考虑product产品服务与eureka
eureka与product服务的配置信息要求去配置中心获取,所以在正式部署项目之前,先准备两个配置,上传到github之中
microcloud-config-eureka-client.yml,这个是eureka的配置文件,这里就没有考虑eureka的高可用了
spring:
profiles:
active:
- dev
—-
server:
port: 7001
eureka:
server:
eviction-interval-timer-in-ms: 1000 #设置清理的间隔时间,而后这个时间使用的是毫秒单位(默认是60秒)
enable-self-preservation: false #设置为false表示关闭保护模式
client:
fetch-registry: false
register-with-eureka: false
service-url:
defaultZone: http://admin:enjoy@localhost:7001/eureka
instance: # eureak实例定义
hostname: localhost # 定义 Eureka 实例所在的主机名称
spring:
profiles: dev
security:
user:
name: admin
password: enjoy
application:
name: microcloud-config-eureka-client
—-
server:
port: 7002
eureka:
server:
eviction-interval-timer-in-ms: 1000 #设置清理的间隔时间,而后这个时间使用的是毫秒单位(默认是60秒)
enable-self-preservation: false #设置为false表示关闭保护模式
client:
fetch-registry: false
register-with-eureka: false
service-url:
defaultZone: http://admin:enjoy@localhost:7002/eureka
instance: # eureak实例定义
hostname: localhost # 定义 Eureka 实例所在的主机名称
spring:
profiles: beta
security:
user:
name: admin
password: enjoy
application:
name: microcloud-config-eureka-client
microcloud-config-product-client.yml,这个事对于产品服务这个服务提供商提供者的配置文件
spring:
profiles:
active:
- dev
—-
server:
port: 8080
mybatis:
mapper-locations: # 所有的mapper映射文件
- classpath:mapping/.xml
spring:
datasource:
type: com.alibaba.druid.pool.DruidDataSource # 配置当前要使用的数据源的操作类型
driver-class-name: com.mysql.jdbc.Driver # 配置MySQL的驱动程序类
url: jdbc:mysql://localhost:3306/springcloud?serverTimezone=GMT%2B8 # 数据库连接地址
username: root # 数据库用户名
password: root1234% # 数据库连接密码
application:
name: microcloud-config-product-client
profiles: dev
logging:
level:
cn.enjoy.mapper: debug
eureka:
client: # 客户端进行Eureka注册的配置
service-url:
defaultZone: http://admin:enjoy@localhost:7001/eureka
instance:
instance-id: microcloud-config-product-client
prefer-ip-address: true
lease-renewal-interval-in-seconds: 2 # 设置心跳的时间间隔(默认是30秒)
lease-expiration-duration-in-seconds: 5 # 如果现在超过了5秒的间隔(默认是90秒)
info:
app.name: microcloud-provider-product
company.name: enjoy
build.artifactId: $project.artifactId$
build.modelVersion: $project.modelVersion$
management:
endpoints:
web:
exposure:
include: ‘‘
—-
server:
port: 8081
mybatis:
mapper-locations: # 所有的mapper映射文件
- classpath:mapping/.xml
spring:
datasource:
type: com.alibaba.druid.pool.DruidDataSource # 配置当前要使用的数据源的操作类型
driver-class-name: com.mysql.jdbc.Driver # 配置MySQL的驱动程序类
url: jdbc:mysql://localhost:3306/springcloud?serverTimezone=GMT%2B8 # 数据库连接地址
username: root # 数据库用户名
password: root1234% # 数据库连接密码
application:
name: microcloud-config-product-client
profiles: beta
logging:
level:
cn.enjoy.mapper: debug
eureka:
client: # 客户端进行Eureka注册的配置
service-url:
defaultZone: http://admin:enjoy@localhost:7002/eureka
instance:
instance-id: microcloud-config-product-client
prefer-ip-address: true
lease-renewal-interval-in-seconds: 2 # 设置心跳的时间间隔(默认是30秒)
lease-expiration-duration-in-seconds: 5 # 如果现在超过了5秒的间隔(默认是90秒)
info:
app.name: microcloud-config-product-client
company.name: enjoy
build.artifactId: $project.artifactId$
build.modelVersion: $project.modelVersion$
management:
endpoints:
web:
exposure:
include: ‘‘
有了这两个配置文件,接下来就可以搭建eureka服务和product服务了
1.eureka配置
复制【microcloud-eureka】一份,修改成为【microcloud-config-eureka-client】,
【microcloud-config-eureka-client】 修改pom文件如下
<?xml version=”1.0” encoding=”UTF-8”?>
xsi:schemaLocation=”http://maven.apache.org/POM/4.0.0 http://maven.apache.org/xsd/maven-4.0.0.xsd”>
【microcloud-config-eureka-client】创建bootstrap.yml文件,读取配置中心eureka的配置
spring:
cloud:
config:
uri: http://localhost:7101
name: microcloud-config-eureka-client
profile: beta
label: master
username: admin
password: enjoy
【microcloud-config-eureka-client】 修改application.yml,删除不需要的配置
spring:
application:
name: microcloud-config-eureka-client
由于使用的是beta,它里面指定的eureka的端口是7002
重启后访问:localhost:7002
2.product服务配置
复制【microcloud-provider-product】项目为【microcloud-config-product-client】
【microcloud-config-product-client】pom文件如下
<?xml version=”1.0” encoding=”UTF-8”?>
xsi:schemaLocation=”http://maven.apache.org/POM/4.0.0 http://maven.apache.org/xsd/maven-4.0.0.xsd”>
【microcloud-config-product-client】新增bootstrap.yml 文件,配置如下
spring:
cloud:
config:
uri: http://localhost:7101
name: microcloud-config-product-client
profile: beta
label: master
username: admin
password: enjoy
【microcloud-config-product-client】 修改application.yml文件
spring:
application:
name: microcloud-config-product-client
启动product服务,访问eureka,现在产品服务已经添加上去了。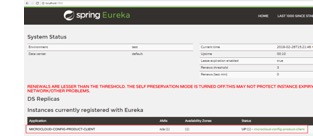
(五)Config配置中心高可用
现在不管是erueka还是服务提供者都是基于SpringCloudConfig获取配置文件的,这个时候配置中心就至关重要了,但在真实的项目环境中,难免SpringCloudConfig会出现各种问题,这个时候就需要考虑config的高可用机制了。
其实解决方式也很简单,把SpringCloudConfig注册到Eureka就搞定了,这个时候用户访问的时候不是直接从配置中心获取配置,而是通过eureka中获取配置中心的地址,再从配置中心获取具体服务的参数就行。
复制【microcloud-eureka】一份,修改成为【microcloud-ha-config-eureka】,这个eureka不注册具体的业务服务,只是负责config配置中心的负载均衡使用
【microcloud-ha-config-eureka】pom文件如下
<?xml version=”1.0” encoding=”UTF-8”?>
xsi:schemaLocation=”http://maven.apache.org/POM/4.0.0 http://maven.apache.org/xsd/maven-4.0.0.xsd”>
【microcloud-ha-config-eureka】 修改application.yml文件
server:
port: 7301
eureka:
server:
eviction-interval-timer-in-ms: 1000 #设置清理的间隔时间,而后这个时间使用的是毫秒单位(默认是60秒)
enable-self-preservation: false #设置为false表示关闭保护模式
client:
fetch-registry: false
register-with-eureka: false
service-url:
defaultZone: http://admin:enjoy@localhost:7301/eureka
instance: # eureak实例定义
hostname: localhost # 定义 Eureka 实例所在的主机名称
spring:
security:
user:
name: admin
password: enjoy
application:
name: microcloud-ha-config-eureka
启动类如下
package cn.enjoy;
import org.springframework.boot.SpringApplication;
import org.springframework.boot.autoconfigure.SpringBootApplication;
import org.springframework.cloud.netflix.eureka.server.EnableEurekaServer;
@SpringBootApplication
@EnableEurekaServer
public class HaConfigEurekaApp {
public static void main(String[] args) {
SpringApplication.run(HaConfigEurekaApp.class,args);
}
}
【microcloud-config】再复制两份,总共3个配置中心,分别为【microcloud-config2】【microcloud-config3】
【microcloud-config】【microcloud-config2】【microcloud-config3】 修改pom文件
增加eureka的支持
【microcloud-config】【microcloud-config2】【microcloud-config3】修改application.yml文件,增加eureka的注册地址
server:
port: 7101
spring:
application:
name: microcloud-config
cloud:
config:
server:
git:
uri: https://github.com/enjoyeud/microconfig.git
eureka:
client:
service-url:
defaultZone: http://admin:enjoy@localhost:7301/eureka
instance:
prefer-ip-address: true # 在地址栏上使用IP地址进行显示
instance-id: microcloud-config1
启动eureka并启动三个配置中心后
【microcloud-config-client】 修改pom文件,增加eureka的支持
<?xml version=”1.0” encoding=”UTF-8”?>
xsi:schemaLocation=”http://maven.apache.org/POM/4.0.0 http://maven.apache.org/xsd/maven-4.0.0.xsd”>
【microcloud-config-client】 修改bootstrap.yml文件,增加eureka相关配置
spring:
cloud:
config:
name: microcloud-config-client # 定义要读取的资源文件的名称
profile: dev # 定义profile的 名称
label: master # 定义配置文件所在的分支
#uri: http://localhost:7101 # SpringCloudConfig的服务地址
username: admin # 连接的用户名
password: enjoy # 连接的密码
discovery:
enabled: true # 通过配置中心加载配置文件
service-id: MICROCLOUD-CONFIG # 在eureka之中注册的服务ID
eureka:
client:
service-url:
defaultZone: http://admin:enjoy@localhost:7301/eureka
访问:http://localhost:8201/config
(六)自动刷新
在整个SpringCloudConfig设计之中,我们已经实现了配置的统一管理,但其实还有一个问题,就是自动刷新。
尝试修改一下【github】 microcloud-config-client.yml文件
spring:
profiles:
active:
- dev
—-
server:
port: 8201
spring:
profiles: dev
application:
name: microconfig-test-client2
eureka:
client:
service-url:
defaultZone: http://admin:enjoy@localhost:7001/eureka
—-
server:
port: 8102
spring:
profiles: beta
application:
name: microconfig-test-client2
eureka:
client:
service-url:
defaultZone: http://admin:enjoy@localhost:7001/eureka
这里的修改非常简单,只是修改了下应用名称,提交后
访问:http://localhost:8201/config
发现配置并没有修改,一直要重启【microcloud-config-client】后才会发现配置已经修改成功,其实这对大多数应用没有什么问题,如果你定时要关注这个小问题也是有办法处理的,在springcloud里面可以借助消息总线SpringCloudBus解决这问题。
ESB(企业服务总线)在一开始讲springcloud的时候就讲过,在springcloud中就是使用springcloudbus解决这问题的
基于总线的设计其实是借鉴了硬件的思想,编写的一个程序都需要用到CPU,内存,硬盘等资源,每一个硬件资源的接口都不同,所以需要借助驱动程序,这个驱动程序就类似于设计模式里面的适配器模式。通过这种设计,举例来说,在程序运行中可能需要用到CPU的资源,但由于不同的CPU通过驱动程序已经对硬件完全兼容了。
虽然这样一来CPU,内存,硬盘对系统是可以识别了,但这些硬件资源一般都不是由程序自己去访问,而是由系统的内核来处理,由操作系统来统一调度各种硬件资源。
这其实就是消息总线的一种体现,操作系统就是这个总线,在架构中,消息中线是一个中枢系统。
springcloudbus是基于SpringCloudStream的,SpringCloudStream的作用其实也是一种适配器模式的体现,消息中间件由很多,比如activemq,rabbitmq ,kafka,不同的消息中间件都会由使用上的差异,而SpringCloudStream就是为了屏蔽各种消息中间件的差异而存在的,具体的SpringCloudStream我们后面会单独拿来说
再来看个图
与之前的架构不一样的地方在于增加了消息总线,消息总线连接了config配置中心和各个配置中心的消费方,当配置提交到github的时候,可以借助/bus/refresh刷新,config配置中心再将变更的消息通知到其他的客户端
【github】 修改配置microcloud-config-client.yml
spring:
profiles:
active:
- dev
—-
server:
port: 8201
spring:
profiles: dev
application:
name: microconfig-test-client2
eureka:
client:
serviceUrl:
defaultZone: http://admin:enjoy@localhost:7301/eureka
register-with-eureka: false
info:
app.name: microcloud-config-client-dev
company.name: enjoy
—-
server:
port: 8102
spring:
profiles: beta
application:
name: microconfig-test-client2
eureka:
client:
serviceUrl:
defaultZone: http://admin:enjoy@localhost:7301/eureka
register-with-eureka: false
info:
app.name: microcloud-config-client-dev
company.name: enjoy
启动rabbitmq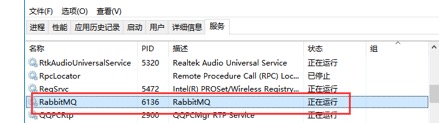
登陆查看 http://localhost:15672
1.准备bus配置中心
新建立一个模块【microcloud-config-bus】,这模块是配置中心的升级版,作用也是配置中心。
【microcloud-config-bus】 修改pom文件
<?xml version=”1.0” encoding=”UTF-8”?>
xsi:schemaLocation=”http://maven.apache.org/POM/4.0.0 http://maven.apache.org/xsd/maven-4.0.0.xsd”>
【microcloud-config-bus】 修改application.yml文件,配置上git目录,一样连接上eureka,要和消息中间件通讯,所以RabbitMQ的连接信息也配置上
server:
port: 7201
spring:
cloud:
config:
server:
git:
uri: https://github.com/enjoyeud/microconfig.git
bus:
trace:
enabled: true
rabbitmq:
host: localhost
port: 5672 # RabbitMQ的监听端口
username: enjoy # 用户名
password: 5428325 # 密码
application:
name: microcloud-config-bus
eureka:
client:
serviceUrl:
defaultZone: http://admin:enjoy@localhost:7301/eureka
instance:
prefer-ip-address: true # 在地址栏上使用IP地址进行显示
instance-id: microcloud-config-bus
management:
endpoints:
web:
exposure:
include: “*”
新增启动类
package cn.enjoy;
import org.springframework.boot.SpringApplication;
import org.springframework.boot.autoconfigure.SpringBootApplication;
import org.springframework.cloud.config.server.EnableConfigServer;
import org.springframework.cloud.netflix.eureka.EnableEurekaClient;
@SpringBootApplication
@EnableConfigServer
@EnableEurekaClient
public class ConfigBusApp {
public static void main(String[] args) {
SpringApplication.run(ConfigBusApp.class,args);
}
}
先启动eureka,再启动ConfigBusApp 之后访问:
http://localhost:7301/
发现新的注册中心已经注册上去了。
2. 准备新的客户端
新建立microcloud-config-bus-client模块,这模块是注册中心的客户端,从注册中心获取数据,职责和【microcloud-config-client】一样,可用基于他拷贝修改,只是增加bus相关的功能。
【microcloud-config-bus-client】 修改pom文件
<?xml version=”1.0” encoding=”UTF-8”?>
xsi:schemaLocation=”http://maven.apache.org/POM/4.0.0 http://maven.apache.org/xsd/maven-4.0.0.xsd”>
【microcloud-config-bus-client】bootstrap.yml 增加rabbitmq相关信息,另外的配置和前面一样,需要从eureka找到注册中心,也需要找具体配置文件信息
spring:
cloud:
config:
name: microcloud-config-client # 定义要读取的资源文件的名称
profile: dev # 定义profile的 名称
label: master # 定义配置文件所在的分支
#uri: http://localhost:7101 # SpringCloudConfig的服务地址
username: admin # 连接的用户名
password: enjoy # 连接的密码
discovery:
enabled: true
service-id: MICROCLOUD-CONFIG-BUS
rabbitmq:
host: localhost
port: 5672 # RabbitMQ的监听端口
username: enjoy # 用户名
password: 5428325 # 密码
eureka:
client:
serviceUrl:
defaultZone: http://admin:enjoy@localhost:7301/eureka
register-with-eureka: false
修改application.yml文件
spring:
application:
name: microcloud-config-client # 编写应用的名称
【microcloud-config-bus-client】 建立一个配置文件的映射类,这类是为了演示使用,里面的属性和github的属性一一对应,同时增加@RefreshScope,代表这个类是可用基于rabbitmq自动刷新的。
package cn.enjoy.config;
import org.springframework.beans.factory.annotation.Value;
import org.springframework.cloud.context.config.annotation.RefreshScope;
import org.springframework.stereotype.Component;
@Component
@RefreshScope
public class InfoConfig {
@Value(“${info.app.name}”)
private String appName ;
@Value(“${info.company.name}”)
private String companyName ;
public String getAppName() {
return appName;
}
public void setAppName(String appName) {
this.appName = appName;
}
public String getCompanyName() {
return companyName;
}
public void setCompanyName(String companyName) {
this.companyName = companyName;
}
@Override
public String toString() {
return “InfoConfig{“ +
“appName=’” + appName + ‘\’’ +
“, companyName=’” + companyName + ‘\’’ +
‘}’;
}
}
【microcloud-config-bus-client】修改ConfigClientController
package cn.enjoy.controller;
import cn.enjoy.config.InfoConfig;
import org.springframework.beans.factory.annotation.Value;
import org.springframework.cloud.context.config.annotation.RefreshScope;
import org.springframework.web.bind.annotation.RequestMapping;
import org.springframework.web.bind.annotation.RestController;
import javax.annotation.Resource;
@RestController
public class ConfigClientController {
@Value(“${spring.application.name}”)
private String applicationName;
@Value(“${eureka.client.serviceUrl.defaultZone}”)
private String eurekaServers;
@Resource
private InfoConfig infoConfig;
@RequestMapping(“/config”)
public String getConfig() {
return “ApplicationName = “ + this.applicationName + “、EurekaServers = “
+ this.eurekaServers+”、infos = “ +infoConfig.toString();
}
}
新增启动类
package cn.enjoy;
import org.springframework.boot.SpringApplication;
import org.springframework.boot.autoconfigure.SpringBootApplication;
import org.springframework.cloud.netflix.eureka.EnableEurekaClient;
@SpringBootApplication
@EnableEurekaClient
public class ConfigClientBusApp {
public static void main(String[] args) {
SpringApplication.run(ConfigClientBusApp.class,args);
}
}
启动后访问
http://localhost:8201/config,这时候已经能获得配置中心的数据
3.测试自动刷新
其实这里的自动刷新只能说是半自动的。
【github】microcloud-config-client.yml,随便修改里面的内容,提交
spring:
profiles:
active:
- dev
—-
server:
port: 8201
spring:
profiles: dev
application:
name: microconfig-test-client2
eureka:
client:
serviceUrl:
defaultZone: http://admin:enjoy@localhost:7301/eureka
register-with-eureka: false
info:
app.name: microcloud-config-client-dev
company.name: enjoy
—-
server:
port: 8102
spring:
profiles: beta
application:
name: microconfig-test-client2
eureka:
client:
serviceUrl:
defaultZone: http://admin:enjoy@localhost:7301/eureka
register-with-eureka: false
info:
app.name: microcloud-config-client-beta
company.name: enjoybeta
【microcloud-config-bus-client】 刷新客户端
http://localhost:8201/config
这个时候信息并没自动刷新,数据还是以前的,这是以为对应消息中间件来说,还需要给他发个消息,代表数据已经更新了。
【microcloud-config-bus】使用postman发生一条post刷新的指令
http://localhost:7201/actuator/bus-refresh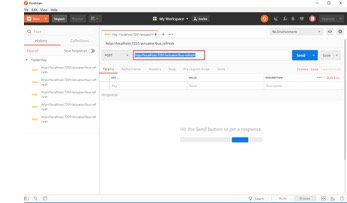
访问http://localhost:15672,发现消息队列里面已经有消息传递了。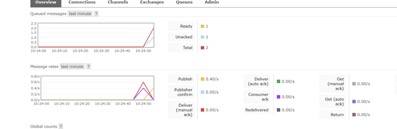
【microcloud-config-bus-client】 刷新客户端
http://localhost:8201/config 发现数据已经跟新

若有收获,就点个赞吧
0 人点赞
