Python 多线程 - Python - 伯乐在线
Tuesday, May 31, 2016
10:38 PM


伯乐在线 > Python - 伯乐在线 > 所有文章 > 基础知识 > Python 多线程
Python 多线程
2016/05/24 · 基础知识 · 多线程, 并行
分享到: 7
本文作者: 伯乐在线 - 人世间 。未经作者许可,禁止转载!
欢迎加入伯乐在线 专栏作者。
线程和进程
计算机,用于计算的机器。计算机的核心是CPU,在现在多核心的电脑很常见了。为了充分利用cpu核心做计算任务,程序实现了多线程模型。通过多线程实现多任务的并行执行。
现在的操作系统多是多任务操作系统。每个应用程序都有一个自己的进程。操作系统会为这些进程分配一些执行资源,例如内存空间等。在进程中,又可以创建一些线程,他们共享这些内存空间,并由操作系统调用,以便并行计算。
线程状态
创建线程之后,线程并不是始终保持一个状态。其状态大概如下:
- New 创建。
- Runnable 就绪。等待调度
- Running 运行。
- Blocked 阻塞。阻塞可能在 Wait Locked Sleeping
- Dead 消亡
这些状态之间是可以相互转换的,一图胜千颜色:
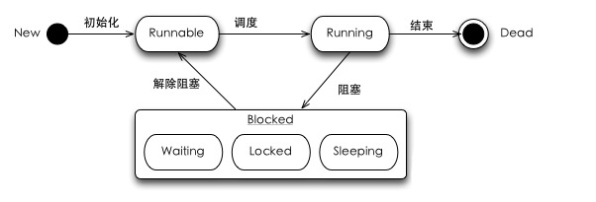
threading_state
(图片引用 内心求法博客)
线程中执行到阻塞,可能有3种情况:
- 同步:线程中获取同步锁,但是资源已经被其他线程锁定时,进入Locked状态,直到该资源可获取(获取的顺序由Lock队列控制)
- 睡眠:线程运行sleep()或join()方法后,线程进入Sleeping状态。区别在于sleep等待固定的时间,而join是等待子线程执行完。当然join也可以指定一个“超时时间”。从语义上来说,如果两个线程a,b, 在a中调用b.join(),相当于合并(join)成一个线程。最常见的情况是在主线程中join所有的子线程。
- 等待:线程中执行wait()方法后,线程进入Waiting状态,等待其他线程的通知(notify)。
线程类型
线程有着不同的状态,也有不同的类型。大致可分为:
- 主线程
- 子线程
- 守护线程(后台线程)
- 前台线程
Python线程与GIL
相比进程,线程更加轻量,可以实现并发。可是在python的世界里,对于线程,就不得不说一句GIL(全局解释器锁)。GIL的存在让python的多线程多少有点鸡肋了。Cpython的线程是操作系统原生的线程在解释器解释执行任何Python代码时,都需要先获得这把锁才行,在遇到 I/O 操作时会释放这把锁。因为python的进程做为一个整体,解释器进程内只有一个线程在执行,其它的线程都处于等待状态等着GIL的释放。
关于GIL可以有更多的趣事,一时半会都说不完。总之python想用多线程并发,效果可能还不如单线程(线程切换耗时间)。想要利用多核,可以考虑使用多进程。
线程的创建
虽然python线程比较鸡肋,可是也并发一无是处。多了解还是有理由对并发模型的理解。
Python提供两个模块进行多线程的操作,分别是thread和threading,前者是比较低级的模块,用于更底层的操作,一般应有级别的开发不常用。后者则封装了更多高级的接口,类似java的多线程风格,提供run方法和start调用。
import time import threading class MyThread(threading.Thread): def run(self): for i in range(5): print ‘thread {}, @number: {}’.format(self.name, i) time.sleep(1) def main(): print “Start main threading” # 创建三个线程 threads = [MyThread() for i in range(3)] # 启动三个线程 for t in threads: t.start() print “End Main threading” if name == ‘main‘: main()
|
| | | —- | —- |
|
1
2
3
4
5
6
7
8
9
10
11
12
13
14
15
16
17
18
19
20
21
22
| import time
import threading
class MyThread(threading.Thread):
def run(self):
for i in range(5):
print ‘thread {}, @number: {}’.format(self.name, i)
time.sleep(1)
def main():
print “Start main threading”
# 创建三个线程
threads = [MyThread() for i in range(3)]
# 启动三个线程
for t in threads:
t.start()
print “End Main threading”
if name == ‘main‘:
main()
|
输入如下:(不同的环境不一样)
Start main threading thread Thread-1, @number: 0 thread Thread-2, @number: 0 thread Thread-3, @number: 0 End Main threading thread Thread-1, @number: 1 thread Thread-3, @number: 1 thread Thread-2, @number: 1 thread Thread-3, @number: 2 thread Thread-1, @number: 2 thread Thread-2, @number: 2 thread Thread-2, @number: 3 thread Thread-1, @number: 3 thread Thread-3, @number: 3
|
| | | —- | —- |
|
1
2
3
4
5
6
7
8
9
10
11
12
13
14
| Start main threading
thread Thread-1, @number: 0
thread Thread-2, @number: 0
thread Thread-3, @number: 0
End Main threading
thread Thread-1, @number: 1
thread Thread-3, @number: 1
thread Thread-2, @number: 1
thread Thread-3, @number: 2
thread Thread-1, @number: 2
thread Thread-2, @number: 2
thread Thread-2, @number: 3
thread Thread-1, @number: 3
thread Thread-3, @number: 3
|
每个线程都依次打印 0 – 3 三个数字,可是从输出的结果观察,线程并不是顺序的执行,而是三个线程之间相互交替执行。此外,我们的主线程执行结束,将会打印 End Main threading。从输出结果可以知道,主线程结束后,新建的线程还在运行。
线程合并(join方法)
上述的例子中,主线程结束了,子线程还在运行。如果需要主线程等待子线程执行完毕再退出,可是使用线程的join方法。join方法官网文档大概是
join(timeout)方法将会等待直到线程结束。这将阻塞正在调用的线程,直到被调用join()方法的线程结束。
主线程或者某个函数如果创建了子线程,只要调用了子线程的join方法,那么主线程就会被子线程所阻塞,直到子线程执行完毕再轮到主线程执行。其结果就是所有子线程执行完毕,才打印 End Main threading。只需要修改上面的main函数
def main(): print “Start main threading” threads = [MyThread() for i in range(3)] for t in threads: t.start() # 一次让新创建的线程执行 join for t in threads: t.join() print “End Main threading”
|
| | | —- | —- |
|
1
2
3
4
5
6
7
8
9
10
11
12
13
| def main():
print “Start main threading”
threads = [MyThread() for i in range(3)]
for t in threads:
t.start()
# 一次让新创建的线程执行 join
for t in threads:
t.join()
print “End Main threading”
|
输入如下:
Start main threading thread Thread-1, @number: 0 thread Thread-2, @number: 0 thread Thread-3, @number: 0 thread Thread-2, @number: 1 …. thread Thread-3, @number: 4 End Main threading Process finished with exit code 0
|
| | | —- | —- |
|
1
2
3
4
5
6
7
8
9
10
| Start main threading
thread Thread-1, @number: 0
thread Thread-2, @number: 0
thread Thread-3, @number: 0
thread Thread-2, @number: 1
….
thread Thread-3, @number: 4
End Main threading
Process finished with exit code 0
|
所有子线程结束了才会执行也行print “End Main threading”。有人会这么想,如果在 t.start()之后join会怎么样?结果也能阻塞主线程,但是每个线程都是依次执行,变得有顺序了。其实join很好理解,就字面上的意思就是子线程 “加入”(join)主线程嘛。在CPU执行时间片段上“等于”主线程的一部分。在start之后join,也就是每个子线程由被后来新建的子线程给阻塞了,因此线程之间变得有顺序了。
借用moxie的总结:
1 join方法的作用是阻塞主进程(挡住,无法执行join以后的语句),专注执行多线程。
2 多线程多join的情况下,依次执行各线程的join方法,前头一个结束了才能执行后面一个。
3 无参数,则等待到该线程结束,才开始执行下一个线程的join。
4 设置参数后,则等待该线程这么长时间就不管它了(而该线程并没有结束)。不管的意思就是可以执行后面的主进程了
线程同步与互斥锁
线程之所以比进程轻量,其中一个原因就是他们共享内存。也就是各个线程可以平等的访问内存的数据,如果在短时间“同时并行”读取修改内存的数据,很可能造成数据不同步。例如下面的例子:
count = 0 class MyThread(threading.Thread): def run(self): global count time.sleep(1) for i in range(100): count += 1 print ‘thread {} add 1, count is {}’.format(self.name, count) def main(): print “Start main threading” for i in range(10): MyThread().start() print “End Main threading”
|
| | | —- | —- |
|
1
2
3
4
5
6
7
8
9
10
11
12
13
14
15
16
| count = 0
class MyThread(threading.Thread):
def run(self):
global count
time.sleep(1)
for i in range(100):
count += 1
print ‘thread {} add 1, count is {}’.format(self.name, count)
def main():
print “Start main threading”
for i in range(10):
MyThread().start()
print “End Main threading”
|
输出结果如下,十个线程,每个线程增加100,运算结果应该是1000:
Start main threading End Main threading thread Thread-6 add 1, count is 161thread Thread-1 add 1, count is 433 thread Thread-7 add 1, count is 482 thread Thread-2 add 1, count is 100 thread Thread-9 add 1, count is 125 thread Thread-8 add 1, count is 335 thread Thread-5 add 1, count is 533thread Thread-3 add 1, count is 533 thread Thread-10 add 1, count is 261 thread Thread-4 add 1, count is 308
|
| | | —- | —- |
|
1
2
3
4
5
6
7
8
9
10
11
12
| Start main threading
End Main threading
thread Thread-6 add 1, count is 161thread Thread-1 add 1, count is 433
thread Thread-7 add 1, count is 482
thread Thread-2 add 1, count is 100
thread Thread-9 add 1, count is 125
thread Thread-8 add 1, count is 335
thread Thread-5 add 1, count is 533thread Thread-3 add 1, count is 533
thread Thread-10 add 1, count is 261
thread Thread-4 add 1, count is 308
|
为了避免线程不同步造成是数据不同步,可以对资源进行加锁。也就是访问资源的线程需要获得锁,才能访问。threading模块正好提供了一个Lock功能,修改代码如下:
创建锁 mutex = threading.Lock() class MyThread(threading.Thread): def run(self): global count time.sleep(1) # 获取锁,修改资源 if mutex.acquire(): for i in range(100): count += 1 print ‘thread {} add 1, count is {}’.format(self.name, count) # 释放锁 mutex.release()
|
| | | —- | —- |
|
1
2
3
4
5
6
7
8
9
10
11
12
13
14
| # 创建锁
mutex = threading.Lock()
class MyThread(threading.Thread):
def run(self):
global count
time.sleep(1)
# 获取锁,修改资源
if mutex.acquire():
for i in range(100):
count += 1
print ‘thread {} add 1, count is {}’.format(self.name, count)
# 释放锁
mutex.release()
|
死锁
有锁就可以方便处理线程同步问题,可是多线程的复杂度和难以调试的根源也来自于线程的锁。利用不当,甚至会带来更多问题。比如死锁就是需要避免的问题。
mutex_a = threading.Lock() mutex_b = threading.Lock() class MyThread(threading.Thread): def task_a(self): if mutex_a.acquire(): print “thread {} get mutex a “.format(self.name) time.sleep(1) if mutex_b.acquire(): print “thread {} get mutex b “.format(self.name) mutex_b.release() mutex_a.release() def task_b(self): if mutex_b.acquire(): print “thread {} get mutex a “.format(self.name) time.sleep(1) if mutex_a.acquire(): print “thread {} get mutex b “.format(self.name) mutex_a.release() mutex_b.release() def run(self): self.task_a() self.task_b() def main(): print “Start main threading” threads = [MyThread() for i in range(2)] for t in threads: t.start() print “End Main threading”
|
| | | —- | —- |
|
1
2
3
4
5
6
7
8
9
10
11
12
13
14
15
16
17
18
19
20
21
22
23
24
25
26
27
28
29
30
31
32
33
34
35
36
37
| mutex_a = threading.Lock()
mutex_b = threading.Lock()
class MyThread(threading.Thread):
def task_a(self):
if mutex_a.acquire():
print “thread {} get mutex a “.format(self.name)
time.sleep(1)
if mutex_b.acquire():
print “thread {} get mutex b “.format(self.name)
mutex_b.release()
mutex_a.release()
def task_b(self):
if mutex_b.acquire():
print “thread {} get mutex a “.format(self.name)
time.sleep(1)
if mutex_a.acquire():
print “thread {} get mutex b “.format(self.name)
mutex_a.release()
mutex_b.release()
def run(self):
self.task_a()
self.task_b()
def main():
print “Start main threading”
threads = [MyThread() for i in range(2)]
for t in threads:
t.start()
print “End Main threading”
|
线程需要执行两个任务,两个任务都需要获取锁,然而两个任务先得到锁后,就需要等另外锁释放。
可重入锁
为了支持在同一线程中多次请求同一资源,python提供了可重入锁(RLock)。RLock内部维护着一个Lock和一个counter变量,counter记录了acquire的次数,从而使得资源可以被多次require。直到一个线程所有的acquire都被release,其他的线程才能获得资源。
mutex = threading.RLock() class MyThread(threading.Thread): def run(self): if mutex.acquire(1): print “thread {} get mutex”.format(self.name) time.sleep(1) mutex.acquire() mutex.release() mutex.release() def main(): print “Start main threading” threads = [MyThread() for i in range(2)] for t in threads: t.start() print “End Main threading”
|
| | | —- | —- |
|
1
2
3
4
5
6
7
8
9
10
11
12
13
14
15
16
17
18
19
20
| mutex = threading.RLock()
class MyThread(threading.Thread):
def run(self):
if mutex.acquire(1):
print “thread {} get mutex”.format(self.name)
time.sleep(1)
mutex.acquire()
mutex.release()
mutex.release()
def main():
print “Start main threading”
threads = [MyThread() for i in range(2)]
for t in threads:
t.start()
print “End Main threading”
|
条件变量
实用锁可以达到线程同步,前面的互斥锁就是这种机制。更复杂的环境,需要针对锁进行一些条件判断。Python提供了Condition对象。它除了具有acquire和release方法之外,还提供了wait和notify方法。线程首先acquire一个条件变量锁。如果条件不足,则该线程wait,如果满足就执行线程,甚至可以notify其他线程。其他处于wait状态的线程接到通知后会重新判断条件。
条件变量可以看成不同的线程先后acquire获得锁,如果不满足条件,可以理解为被扔到一个(Lock或RLock)的waiting池。直达其他线程notify之后再重新判断条件。该模式常用于生成消费者模式:
Python
queue = [] con = threading.Condition() class Producer(threading.Thread): def run(self): while True: if con.acquire(): if len(queue) > 100: con.wait() else: elem = random.randrange(100) queue.append(elem) print “Producer a elem {}, Now size is {}”.format(elem, len(queue)) time.sleep(random.random()) con.notify() con.release() class Consumer(threading.Thread): def run(self): while True: if con.acquire(): if len(queue) < 0: con.wait() else: elem = queue.pop() print “Consumer a elem {}. Now size is {}”.format(elem, len(queue)) time.sleep(random.random()) con.notify() con.release() def main(): for i in range(3): Producer().start() for i in range(2): Consumer().start()
|
| | | —- | —- |
|
1
2
3
4
5
6
7
8
9
10
11
12
13
14
15
16
17
18
19
20
21
22
23
24
25
26
27
28
29
30
31
32
33
34
35
36
37
| queue = []
con = threading.Condition()
class Producer(threading.Thread):
def run(self):
while True:
if con.acquire():
if len(queue) > 100:
con.wait()
else:
elem = random.randrange(100)
queue.append(elem)
print “Producer a elem {}, Now size is {}”.format(elem, len(queue))
time.sleep(random.random())
con.notify()
con.release()
class Consumer(threading.Thread):
def run(self):
while True:
if con.acquire():
if len(queue) < 0:
con.wait()
else:
elem = queue.pop()
print “Consumer a elem {}. Now size is {}”.format(elem, len(queue))
time.sleep(random.random())
con.notify()
con.release()
def main():
for i in range(3):
Producer().start()
for i in range(2):
Consumer().start()
|
上述就是一个简单的生产者消费模型,先看生产者,生产者条件变量锁之后就检查条件,如果不符合条件则wait,wait的时候会释放锁。如果条件符合,则往队列添加元素,然后会notify其他线程。注意生产者调用了condition的notify()方法后,消费者被唤醒,但唤醒不意味着它可以开始运行,notify()并不释放lock,调用notify()后,lock依然被生产者所持有。生产者通过con.release()显式释放lock。消费者再次开始运行,获得条件锁然后判断条件执行。
队列
生产消费者模型主要是对队列进程操作,贴心的Python为我们实现了一个队列结构,队列内部实现了锁的相关设置。可以用队列重写生产消费者模型。
import Queue queue = Queue.Queue(10) class Producer(threading.Thread): def run(self): while True: elem = random.randrange(100) queue.put(elem) print “Producer a elem {}, Now size is {}”.format(elem, queue.qsize()) time.sleep(random.random()) class Consumer(threading.Thread): def run(self): while True: elem = queue.get() queue.task_done() print “Consumer a elem {}. Now size is {}”.format(elem, queue.qsize()) time.sleep(random.random()) def main(): for i in range(3): Producer().start() for i in range(2): Consumer().start()
|
| | | —- | —- |
|
1
2
3
4
5
6
7
8
9
10
11
12
13
14
15
16
17
18
19
20
21
22
23
24
25
26
27
28
29
| import Queue
queue = Queue.Queue(10)
class Producer(threading.Thread):
def run(self):
while True:
elem = random.randrange(100)
queue.put(elem)
print “Producer a elem {}, Now size is {}”.format(elem, queue.qsize())
time.sleep(random.random())
class Consumer(threading.Thread):
def run(self):
while True:
elem = queue.get()
queue.task_done()
print “Consumer a elem {}. Now size is {}”.format(elem, queue.qsize())
time.sleep(random.random())
def main():
for i in range(3):
Producer().start()
for i in range(2):
Consumer().start()
|
queue内部实现了相关的锁,如果queue的为空,则get元素的时候会被阻塞,知道队列里面被其他线程写入数据。同理,当写入数据的时候,如果元素个数大于队列的长度,也会被阻塞。也就是在 put 或 get的时候都会获得Lock。
线程通信
线程可以读取共享的内存,通过内存做一些数据处理。这就是线程通信的一种,python还提供了更加高级的线程通信接口。Event对象可以用来进行线程通信,调用event对象的wait方法,线程则会阻塞等待,直到别的线程set之后,才会被唤醒。
class MyThread(threading.Thread): def init(self, event): super(MyThread, self).init() self.event = event def run(self): print “thread {} is ready “.format(self.name) self.event.wait() print “thread {} run”.format(self.name) signal = threading.Event() def main(): start = time.time() for i in range(3): t = MyThread(signal) t.start() time.sleep(3) print “after {}s”.format(time.time() - start) signal.set()
|
| | | —- | —- |
|
1
2
3
4
5
6
7
8
9
10
11
12
13
14
15
16
17
18
19
20
| class MyThread(threading.Thread):
def init(self, event):
super(MyThread, self).init()
self.event = event
def run(self):
print “thread {} is ready “.format(self.name)
self.event.wait()
print “thread {} run”.format(self.name)
signal = threading.Event()
def main():
start = time.time()
for i in range(3):
t = MyThread(signal)
t.start()
time.sleep(3)
print “after {}s”.format(time.time() - start)
signal.set()
|
上面的例子创建了3个线程,调用线程之后,线程将会被阻塞,sleep 3秒后,才会被唤醒执行,大概输出如下:
thread Thread-1 is ready thread Thread-2 is ready thread Thread-3 is ready after 3.00441598892s thread Thread-2 run thread Thread-3 run thread Thread-1 run
|
| | | —- | —- |
|
1
2
3
4
5
6
7
| thread Thread-1 is ready
thread Thread-2 is ready
thread Thread-3 is ready
after 3.00441598892s
thread Thread-2 run
thread Thread-3 run
thread Thread-1 run
|
后台线程
默认情况下,主线程退出之后,即使子线程没有join。那么主线程结束后,子线程也依然会继续执行。如果希望主线程退出后,其子线程也退出而不再执行,则需要设置子线程为后台线程。python提供了seDeamon方法:
class MyThread(threading.Thread): def run(self): wait_time = random.randrange(1, 10) print “thread {} will wait {}s”.format(self.name, wait_time) time.sleep(wait_time) print “thread {} finished”.format(self.name) def main(): print “Start main threading” for i in range(5): t = MyThread() t.setDaemon(True) t.start() print “End Main threading”
|
| | | —- | —- |
|
1
2
3
4
5
6
7
8
9
10
11
12
13
14
15
16
| class MyThread(threading.Thread):
def run(self):
wait_time = random.randrange(1, 10)
print “thread {} will wait {}s”.format(self.name, wait_time)
time.sleep(wait_time)
print “thread {} finished”.format(self.name)
def main():
print “Start main threading”
for i in range(5):
t = MyThread()
t.setDaemon(True)
t.start()
print “End Main threading”
|
输出结果如下:
Start main threading thread Thread-1 will wait 3s thread Thread-2 will wait 6s thread Thread-3 will wait 4s thread Thread-4 will wait 6s thread Thread-5 will wait 2sEnd Main threading
|
| | | —- | —- |
|
1
2
3
4
5
6
| Start main threading
thread Thread-1 will wait 3s
thread Thread-2 will wait 6s
thread Thread-3 will wait 4s
thread Thread-4 will wait 6s
thread Thread-5 will wait 2sEnd Main threading
|
每个线程都应该等待sleep几秒,可是主线程很快就执行完了,子线程因为设置了后台线程,所以也跟着主线程退出了。
关于Python多线程的介绍暂且就这些,多线程用于并发任务。对于并发模型,Python还有比线程更好的方法。同样设计任务的时候,也需要考虑是计算密集型还是IO密集型。针对不同的场景,设计不同的程式系统。
文中的代码 learn-threading
参考资料:
1 http://www.cnblogs.com/holbrook/tag/多线程/
2 http://zhuoqiang.me/python-thread-gil-and-ctypes.html
加入伯乐在线专栏作者。扩大知名度,还能得赞赏!详见《招募专栏作者》
打赏支持作者写出更多好文章,谢谢!
打赏作者
打赏支持作者写出更多好文章,谢谢!
任选一种支付方式

3
赞 3 收藏 评论
关于作者:人世间
人世间 个人主页 · 我的文章 · 4 ·
相关文章
- Python并发与并行的新手指南
- Python多线程详解
- Python 30 行代码实现小型多线程任务队列
- 用Python爬取图片网站——基于BS4+多线程的处理
- Python “黑魔法” 之 Meta Classes
- Python数据结构——树的基本概念
- Python中的生产者消费者问题
- 零基础学习PDB命令行调试Python代码
- python 线程之 Condition
- 初探 Python 3 的异步 IO 编程
可能感兴趣的话题
- 是时候离开北京了 · 73
- 程序猿加班的好处和坏处? · 18
- 作为程序员,来说说你最舍得花钱买的东西有哪些? · 163
- 你怎么看待买房问题(北上广深) · 156
- 不是说女追男隔层纱吗,最近喜欢上了一个程序猿,可人家拒绝我了… · 145
- 做了好多年开发的女程序员,目前想转个测试,从事测试的朋友给个意见。工资… · 67
- 男生被女生爱,是一种什么感觉? · 34
- 美团2016研发工程师笔试题(球色问题) · 5
- 持续集成(上) · 16
- 大众点评2017校园招聘笔试题(内存地址问题) · 11
« Python 黑魔法 —- 描述器(descriptor)
Python数据结构——栈 »
登录后评论 新用户注册
直接登录


Python
Python小组话题 我有新话题
零基础自学Python感觉很难,不像大…
keepcalm 发起 • 38 回复
Python Data Science Cookboo…
TinaHu 发起 • 3 回复
爬虫
Friday 发起 • 3 回复
轨迹点数据坐标经纬度可视化的时候用…
nature 发起
已经有了python基础,正在学习数据分…
Michael翔 发起
求推荐 Python 爬虫进阶教程
亻可木亘月生 发起 • 3 回复
0 我实现了一个人工机器学习写作器
1 Python 多线程
2 Python-OpenCV 处理图像(一)…
3 python爬虫神器PyQuery的使用方法
4 很全的 Python 面试题
5 Python 黑魔法 —- 描述器(descr…
6 Pyston 0.5 发布
7 Django的一次请求到响应的流程
8 Python数据结构——栈
9 Python-OpenCV 处理图像(二)…
Python工具资源 更多资源 »
SciPy库:Python的科学计算工具集
科学计算和数据分析
NumPy:Python科学计算的基石
Python, 科学计算和数据分析
webssh:基于tornado的web linux终端
Python
Python Prompt Toolkit:构建强大交互式命令行的 Pyt…
Python, 开发库 · 1
Pythonpy:在命令行中直接执行任何Python指令
Python, 命令行工具 · 1
最新评论

author=’ZZB’import urllib2import urllibimport…
Re: Python爬虫实战(2):百度贴吧…
哥们,可否加个qq(991058740),一起学习一下,我在写这段程序的时候遇到点小问题,能问下您吗…

Re: Python数据结构——栈
DFS深度搜索要用到栈
Re: 简单 12 步理解 Python 装…
不错,讲的很通透

Re: Python数据结构——栈
这个数据结构的应用场景是什么?

Re: Scrapy爬虫 - 获取知乎用户…
dont_filter = True,想问一下,这个逻辑有点不清楚,为什么要去掉查重呢

Re: Python 迭代器小结
嗯嗯,如有错误欢迎指正哈。:P
Re: Python 迭代器小结
我看歪了,没错的那里,少看了一句。之前我也发现了,睡着了回复晚了,给您造成困扰,Sorry。

关于 Python 频道
Python频道分享 Python 开发技术、相关的行业动态。
快速链接
问题反馈与求助 »
Python工具资源 »
Python技术话题 »
关注我们
新浪微博:@Python开发者
RSS:订阅地址
推荐微信号


合作联系
Email:bd@Jobbole.com
QQ: 2302462408 (加好友请注明来意)
更多频道
小组 – 好的话题、有启发的回复、值得信赖的圈子
头条 – 分享和发现有价值的内容与观点
相亲 – 为IT单身男女服务的征婚传播平台
资源 – 优秀的工具资源导航
翻译 – 翻译传播优秀的外文文章
文章 – 国内外的精选文章
设计 – UI,网页,交互和用户体验
iOS – 专注iOS技术分享
安卓 – 专注Android技术分享
前端 – JavaScript, HTML5, CSS
Java – 专注Java技术分享
Python – 专注Python技术分享
© 2016 伯乐在线 首页 博客 资源 小组 相亲 反馈

已使用 Microsoft OneNote 2016 创建。

若有收获,就点个赞吧
0 人点赞
