关于springboot整个es有四种方法,分别是TransportClient、RestClient、SpringData-Es、Elasticsearch-SQL,而官方推荐的是RestClient,但是一般工作中常见的是SpringData-ES,好了talk is cheap show code,下面就简单展示下这个四种方案吧
RestClient
官方文档:https://www.elastic.co/guide/en/elasticsearch/client/java-rest/7.x/java-rest-overview.html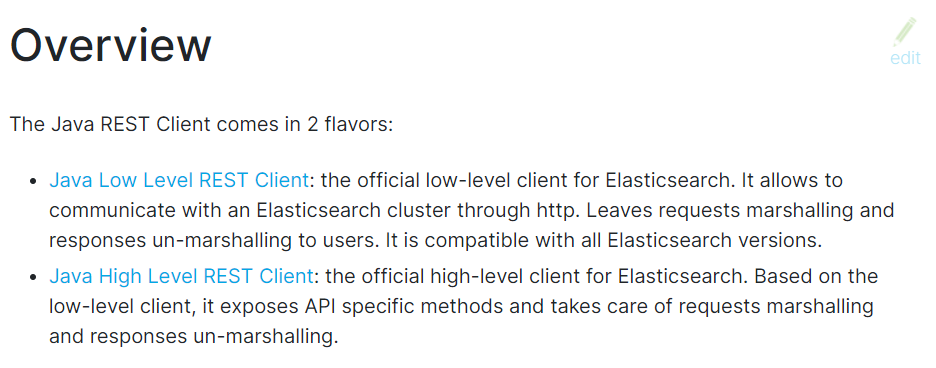
打开网站后他提示我们,es为java提供了两种支持客户端版本,分别时低级的rest客户端和高级的rest客户端,而低版本和高版本客户端的区别是:低版本是需要我们去手动的在代码里面拼接参数,而高版本则无需我们做过多的干预,用户操作透明化
配置
我们统一使用apache的httpclient来进行配置
server:port: 8090spring:thymeleaf:# 开发时关闭缓存不然没法看到实时页面cache: false# 启用不严格检查mode: LEGACYHTML5# Elasticsearch配置elasticsearch:hostname: 8.129.84.57port: 9200
package com.es.demo.config;

import org.apache.http.Header;
import org.apache.http.HttpHost;
import org.apache.http.message.BasicHeader;
import org.elasticsearch.client.RestClient;
import org.elasticsearch.client.RestClientBuilder;
import org.elasticsearch.client.RestHighLevelClient;
import org.springframework.beans.factory.annotation.Value;
import org.springframework.context.annotation.Bean;
import org.springframework.context.annotation.Configuration;

/**
 * ClassName: EsConfig
 * Description:
 * date: 2021/5/2 17:14
 * @author cherry
 */
@Configuration
public class EsConfig {

    @Value("${elasticsearch.hostname}")
    private String hostname;

    @Value("${elasticsearch.port}")
    private int port;

    @Bean
    public RestClient restClient() {
        // 如果是es集群则构建多个HttpHost,其中参数1是IP,参数2是端口,参数3是通信协议
        RestClientBuilder clientBuilder = RestClient.builder(new HttpHost(hostname, port, "http"));
        // 设置默认请求头
        Header[] defaultHeaders = {new BasicHeader("content-type", "application/json")};
        clientBuilder.setDefaultHeaders(defaultHeaders);
        // 添加其他配置,这些配置都是可选的
        return clientBuilder.build();
    }

    @Bean
    public RestHighLevelClient restHighLevelClient() {
        // 如果是es集群则构建多个HttpHost,其中参数1是IP,参数2是端口,参数3是通信协议
        return new RestHighLevelClient(RestClient.builder(new HttpHost(hostname, port, "http")));
    }
}
在连接时是可以设置ssl加密,设置允许修改默认配置,设置节点出现错误提醒,设置默认请求头等,这些都可以在官方文档中看到详细说明
Low Level REST Client
添加依赖
maven
<dependency>
    <groupId>org.elasticsearch.client</groupId>
    <artifactId>elasticsearch-rest-client</artifactId>
    <version>7.14.0</version>
</dependency>
gradle
dependencies {
    compile 'org.elasticsearch.client:elasticsearch-rest-client:7.14.0'
}
创建controller
这里为了方便(没时间画前端)于是都使用了rest风格进行传参(看起来和es原版的rest一样),有时间的可以改成form的形式哦
package com.es.demo.controller;

import com.es.demo.empty.ResponseVo;
import com.fasterxml.jackson.core.JsonProcessingException;
import com.fasterxml.jackson.databind.ObjectMapper;
import org.apache.http.Header;
import org.apache.http.HttpHost;
import org.apache.http.RequestLine;
import org.apache.http.entity.ContentType;
import org.apache.http.nio.entity.NStringEntity;
import org.apache.http.util.EntityUtils;
import org.elasticsearch.action.index.IndexRequest;
import org.elasticsearch.client.Request;
import org.elasticsearch.client.Response;
import org.elasticsearch.client.ResponseListener;
import org.elasticsearch.client.RestClient;
import org.elasticsearch.common.xcontent.XContentBuilder;
import org.elasticsearch.common.xcontent.json.JsonXContent;
import org.springframework.beans.factory.annotation.Autowired;
import org.springframework.http.HttpStatus;
import org.springframework.web.bind.annotation.*;

import java.io.IOException;
import java.util.HashMap;
import java.util.Map;
import java.util.regex.Pattern;

/**
 * ClassName: LowLevelRestController
 * Description:
 * date: 2021/5/2 17:18
 * @author cherry
 */
@RestController
@RequestMapping("/low")
public class LowLevelRestController {

    @Autowired
    private RestClient restClient;

    /**
     * 获取es信息
     * @return
     * @throws IOException
     */
    @GetMapping("/info")
    public ResponseVo getEsInfo() throws IOException {
        Request request = new Request("GET", "/");
        // performRequest是同步的,将阻塞调用线程并在请求成功时返回Response,如果失败则抛出异常
        Response response = restClient.performRequest(request);
        // 获取响应体
        String responseBody = EntityUtils.toString(response.getEntity());
        // 返回结果
        return new ResponseVo(HttpStatus.OK.value(), "查询成功", new ObjectMapper().readValue(responseBody, Map.class));
    }

    /**
     * 根据Id获取文档数据
     * @param id
     * @param indexesName
     * @return
     * @throws JsonProcessingException
     */
    @GetMapping("select/{indexesName}/{id}")
    public ResponseVo getBookById(@PathVariable("id") String id, @PathVariable("indexesName") String indexesName) throws JsonProcessingException {
        Request request = new Request("GET", new StringBuilder("/"+ indexesName +"/"+ indexesName +"/")
                .append(id).toString());
        // 添加Json返回优化
        request.addParameter("pretty", "true");
        Response response = null;
        String responseBody = null;
        try {
            // 执行HTTP请求
            response = restClient.performRequest(request);
            responseBody = EntityUtils.toString(response.getEntity());
        } catch (IOException e) {
            return new ResponseVo(HttpStatus.NOT_FOUND.value(), "can not found the "+ indexesName +" by your id", null);
        }
        return new ResponseVo(HttpStatus.OK.value(), "查询成功", new ObjectMapper().readValue(responseBody, Map.class));
    }

    /**
     * 创建es文档并添加文档数据,这里使用的rest风格,可改为表单传值的方式,设置id可改为雪花算法
     * @param indexesVo
     * @param indexesName
     * @return
     * @throws IOException
     */
    @PostMapping("insert/indexesName}")
    public ResponseVo add(@RequestBody Map<String, Object> indexesVo, @PathVariable("indexesName") String indexesName) throws IOException {
        ObjectMapper objectMapper = new ObjectMapper();
        // 防重复新增数据
        indexesVo.put("id", System.currentTimeMillis());
        Request request = new Request("PUT", new StringBuilder("/"+ indexesName +"/"+ indexesName +"/")
                .append(indexesVo.get("id")).append("/_create").toString());
        // 设置其他一些参数比如美化Json
        request.addParameter("pretty", "true");
        // 设置请求体并指定ContentType,如果不指定会乱码
        request.setEntity(new NStringEntity(objectMapper.writeValueAsString(indexesVo), ContentType.APPLICATION_JSON));
        // 发送HTTP请求
        Response response = restClient.performRequest(request);
        // 获取响应体
        String responseBody = EntityUtils.toString(response.getEntity());
        return new ResponseVo(HttpStatus.OK.value(), "添加成功", objectMapper.readValue(responseBody, Map.class));
    }

    /**
     * 根据id来局部更新文档数据
     * @param indexesVo
     * @param indexesName
     * @return
     * @throws IOException
     */
    @PutMapping("update/{indexesName}")
    public ResponseVo update(@RequestBody Map<String, Object> indexesVo, @PathVariable String indexesName) throws IOException {
        // 构造HTTP请求,不需要局部更新的去掉_update 以及去掉doc
        ObjectMapper objectMapper = new ObjectMapper();
        Request request = new Request("POST", new StringBuilder("/"+ indexesName +"/"+ indexesName +"/")
                .append(indexesVo.get("id")).append("/_update").toString());
        // 设置其他一些参数比如美化Json
        request.addParameter("pretty", "true");
        indexesVo.remove("id");
        Map<String, Object> updateMap = new HashMap<>();
        updateMap.put("doc", indexesVo);
        // 设置请求体并指定ContentType,如果不指定可能产生乱码
        request.setEntity(new NStringEntity(objectMapper.writeValueAsString(updateMap), ContentType.APPLICATION_JSON));
        // 执行HTTP请求
        Response response = restClient.performRequest(request);
        // 获取返回的内容
        String responseBody = EntityUtils.toString(response.getEntity());
        return new ResponseVo(HttpStatus.OK.value(), "更新成功", objectMapper.readValue(responseBody, Map.class));
    }

    /**
     * 根据ID删除
     * @param id
     * @param indexesName
     * @return
     * @throws IOException
     */
    @DeleteMapping("delete/{indexesName}/{id}")
    public ResponseVo deleteById(@PathVariable("id") String id, @PathVariable("indexesName") String indexesName) throws IOException {
        Request request = new Request("DELETE", new StringBuilder("/"+ indexesName +"/"+ indexesName +"/")
                .append(id).toString());
        request.addParameter("pretty", "true");
        // 执行HTTP请求
        Response response = restClient.performRequest(request);
        // 获取结果
        String responseBody = EntityUtils.toString(response.getEntity());
        return new ResponseVo(HttpStatus.OK.value(), "删除成功", new ObjectMapper().readValue(responseBody, Map.class));
    }

}
high Level REST Client
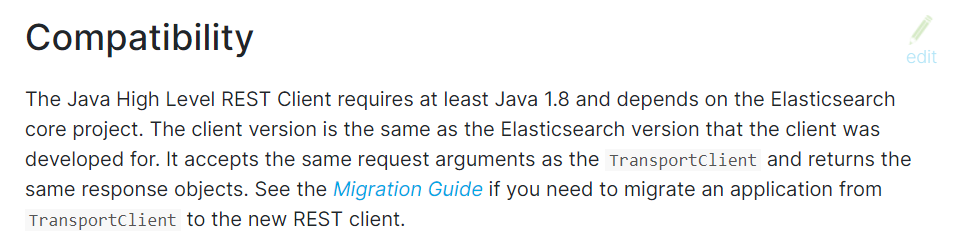
在使用High Level REST Client必须确保java的版本在1.8或之上,并且需要注意的是,es服务端和客户端的版本必须保持一制
添加依赖
maven
<dependency>
    <groupId>org.elasticsearch.client</groupId>
    <artifactId>elasticsearch-rest-high-level-client</artifactId>
    <version>7.14.0</version>
</dependency>
gradle
maven {
        url "https://snapshots.elastic.co/maven/"
}
创建controller
package com.es.demo.controller;

import com.es.demo.empty.ResponseVo;
import com.fasterxml.jackson.databind.ObjectMapper;
import org.elasticsearch.action.delete.DeleteRequest;
import org.elasticsearch.action.delete.DeleteResponse;
import org.elasticsearch.action.get.GetRequest;
import org.elasticsearch.action.get.GetResponse;
import org.elasticsearch.action.index.IndexRequest;
import org.elasticsearch.action.index.IndexResponse;
import org.elasticsearch.action.search.SearchRequest;
import org.elasticsearch.action.search.SearchResponse;
import org.elasticsearch.action.update.UpdateRequest;
import org.elasticsearch.action.update.UpdateResponse;
import org.elasticsearch.client.RequestOptions;
import org.elasticsearch.client.RestHighLevelClient;
import org.elasticsearch.common.xcontent.XContentType;
import org.elasticsearch.search.builder.SearchSourceBuilder;
import org.springframework.beans.factory.annotation.Autowired;
import org.springframework.http.HttpStatus;
import org.springframework.web.bind.annotation.*;

import java.io.IOException;
import java.util.Map;

/**
 * ClassName: HighLevelRestController
 * Description:
 * date: 2021/5/2 20:37
 *
 * @author cherry
 */
@RestController
@RequestMapping("/high")
public class HighLevelRestController {

    @Autowired
    private RestHighLevelClient restHighLevelClient;

    /**
     * 获取ES信息
     *
     * @param
     * @return com.example.common.ResponseVo
     * @throws IOException
     * @author wliduo[i@dolyw.com]
     * @date 2019/8/14 17:11
     */
    @GetMapping("/info")
    public ResponseVo getEsInfo() throws IOException {
        SearchSourceBuilder searchSourceBuilder = new SearchSourceBuilder();
        // SearchRequest
        SearchRequest searchRequest = new SearchRequest();
        searchRequest.source(searchSourceBuilder);
        // 查询ES
        SearchResponse searchResponse = restHighLevelClient.search(searchRequest, RequestOptions.DEFAULT);
        return new ResponseVo(HttpStatus.OK.value(), "查询成功", searchResponse);
    }


    /**
     * 查询文档
     * @param id
     * @param indexesName
     * @param docName
     * @return
     * @throws IOException
     */
    @GetMapping("select/{indexesName}/{docName}/{id}")
    public ResponseVo getById(@PathVariable("id") String id, @PathVariable("indexesName") String indexesName, @PathVariable("docName") String docName) throws IOException {
        // GetRequest
        GetRequest getRequest = new GetRequest(indexesName, docName , id);
        // 查询ES
        GetResponse getResponse = restHighLevelClient.get(getRequest, RequestOptions.DEFAULT);
        Map<String, Object> data = new ObjectMapper().readValue(getResponse.getSourceAsString(), Map.class);
        return new ResponseVo(HttpStatus.OK.value(), "查询成功", data);
    }

    /**
     * 添加文档
     * @param indexesData
     * @param indexesName
     * @param docName
     * @return
     * @throws IOException
     */
    @PostMapping("insert/{docName}/{indexesName}")
    public ResponseVo add(@RequestBody Map<String, Object> indexesData, @PathVariable("indexesName") String indexesName, @PathVariable("docName") String docName) throws IOException {
        Long id = System.currentTimeMillis();
        IndexRequest indexRequest = new IndexRequest(indexesName, docName, id.toString());
        indexesData.put("id", id);
        indexRequest.id(id.toString()).source(new ObjectMapper().writeValueAsString(indexesData), XContentType.JSON);
        // 操作ES
        IndexResponse indexResponse = restHighLevelClient.index(indexRequest, RequestOptions.DEFAULT);
        return new ResponseVo(HttpStatus.OK.value(), "添加成功", indexResponse);
    }

    /**
     * 修改文档
     * @param indexesData
     * @param indexesName
     * @param docName
     * @return
     * @throws IOException
     */
    @PutMapping("update/{docName}/{indexesName}")
    public ResponseVo update(@RequestBody Map<String, Object> indexesData, @PathVariable String indexesName, @PathVariable("docName") String docName) throws IOException {
        // UpdateRequest
        UpdateRequest updateRequest = new UpdateRequest(indexesName, docName, indexesData.get("id").toString());
        updateRequest.doc(new ObjectMapper().writeValueAsString(indexesData), XContentType.JSON);
        // 操作ES
        UpdateResponse updateResponse = restHighLevelClient.update(updateRequest, RequestOptions.DEFAULT);
        return new ResponseVo(HttpStatus.OK.value(), "修改成功", updateResponse);
    }

    /**
     * 删除指定文档
     * @param id
     * @param indexesName
     * @param docName
     * @return
     * @throws IOException
     */
    @DeleteMapping("delete/{docName}/{indexesName}/{id}")
    public ResponseVo deleteById(@PathVariable("id") String id, @PathVariable("indexesName") String indexesName, @PathVariable("docName") String docName) throws IOException {
        // DeleteRequest
        DeleteRequest deleteRequest = new DeleteRequest(indexesName, docName, id);
        // 操作ES
        DeleteResponse deleteResponse = restHighLevelClient.delete(deleteRequest, RequestOptions.DEFAULT);
        return new ResponseVo(HttpStatus.OK.value(), "删除成功", deleteResponse);
    }

}
高级的rest查询比低级的查询要清爽许多,所以官方建议使用高级的rest,这里说明下传入的参数意思吧,indexName为索引名,而docName为文档名,通过索引寻找到对应的文档,然后找到对应id,聪明的小伙伴是不是察觉到了什么呢?哈哈哈,因为id是唯一的,为什么要查询索引再查询文档呢?直接查找索引下的id,减少一次过滤条件,这就是为什么7.0后取消了索引文档类型
这里展示的查询只是皮毛,建议看官方文档,希望大家能有更多收获
https://www.elastic.co/guide/en/elasticsearch/client/java-rest/6.5/java-rest-high-supported-apis.html
TransportClient
官方文档: https://www.elastic.co/guide/en/elasticsearch/client/java-api/7.x/transport-client.html
官方文档中提示在elasticsearch8.0后将开始放弃对TransportClient的支持,注意这里连接集群的客户端必须和服务端的版本一致,不然可能会有莫名的错误
maven
<dependency>
    <groupId>org.elasticsearch.client</groupId>
    <artifactId>transport</artifactId>
    <version>7.14.0</version>
</dependency>

<dependency>
    <groupId>org.apache.logging.log4j</groupId>
    <artifactId>log4j-core</artifactId>
    <version>2.11.1</version>
</dependency>
这里配置了log4j,因为es默认的日志输出使用的是log4j,如果不配置可能会报错,但是不会影响运行效果,接下来我们增加配置类
@Value("${elasticsearch.hostname}")
private String hostname;

@Value("${elasticsearch.port}")
private int port;

@Bean("transportClient")
public TransportClient getTransportClient() {
    //1、创建TransportClient对象
    TransportClient transportClient = null;
    try {
        //2、设置es的集群,节点,连接数信息以及嗅探功能,如果cluster.name为elasticsearch,则可以不填
        Settings settings = Settings.builder().put("cluster.name", "my-application")
            .put("node.name", "node-1")
            .put("client.transport.sniff", true)
            .put("thread_pool.search.size", 10).build();
        //3、初始化TransportClient
        transportClient = new PreBuiltTransportClient(settings);
        //4、配置es的ip和端口
        TransportAddress transportAddress = new TransportAddress(InetAddress.getByName(hostname), port);
        //5、把对ES的连接对象放到transportClient对象中
        transportClient.addTransportAddress(transportAddress);
    } catch (UnknownHostException e) {
        e.printStackTrace();
    }
    return transportClient;
}
这个嗅探功能是什么呢?官网给的解释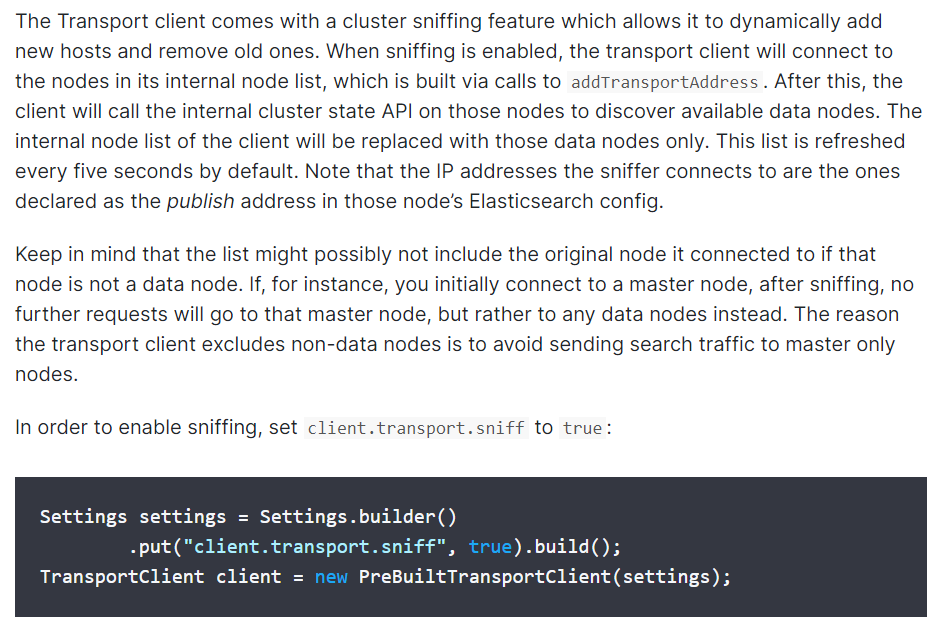
翻译过来:其实就是Transport客户端自带一个集群嗅探特性,当启用嗅测时,传输客户机将连接到其内部节点列表中的节点,该列表是通过调用addTransportAddress构建的。在此之后,客户端将调用这些节点上的内部集群状态API,以发现可用的数据节点。客户端内部节点列表将仅替换为这些数据节点。默认情况下,该列表每5秒刷新一次。注意,嗅探器连接的IP地址是在这些节点的Elasticsearch configKeep中声明为发布地址的IP地址。请记住,如果该节点不是数据节点,列表可能不包括它连接的原始节点。例如,如果您最初连接到一个主节点,在嗅探之后,将不会有进一步的请求发送到该主节点,而是发送到任何数据节点。传输客户端排除非数据节点的原因是为了避免将搜索流量只发送给主节点。
SpringData-es
以idea工具为例,创建一个springdata es项目: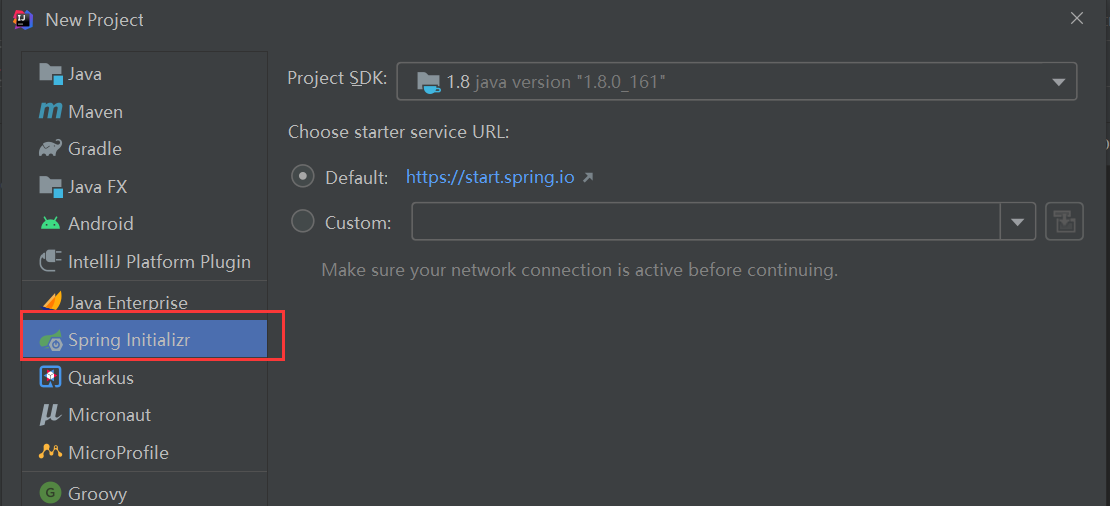
点next,选择好jdk版本后,继续next: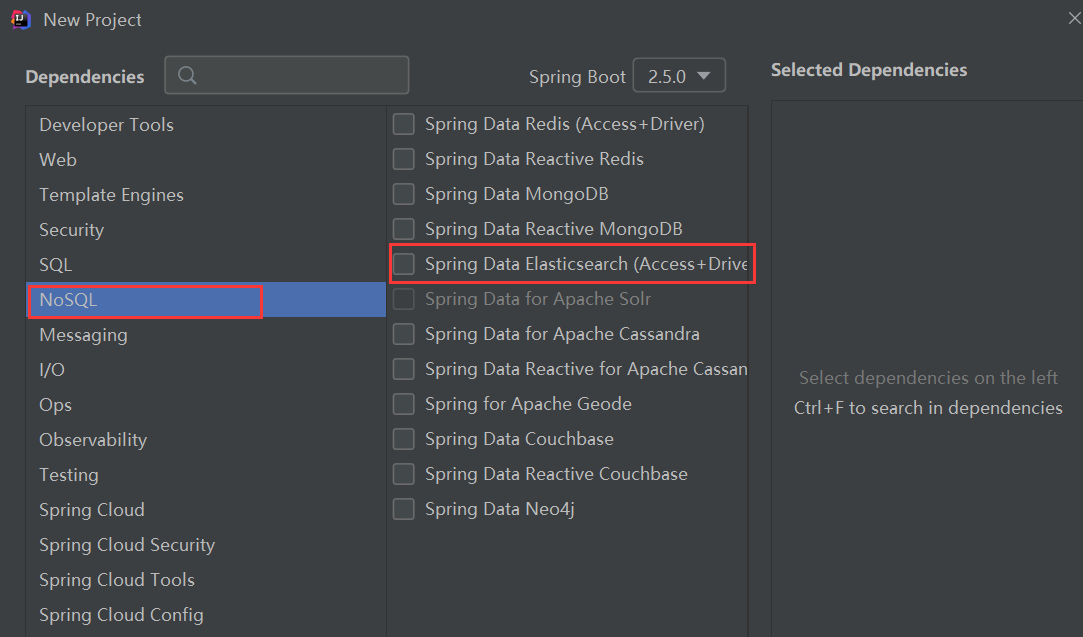
选择完之后,finish。一个springdata es项目就创建好了。
查看pom.xml文件,可以看到es的依赖。这边需要注意一下,springboot的 不同版本使用的默认es客户端版本不一样,需要与自己下载的es server端版本保持一致,不然可能会出现各种依赖报错。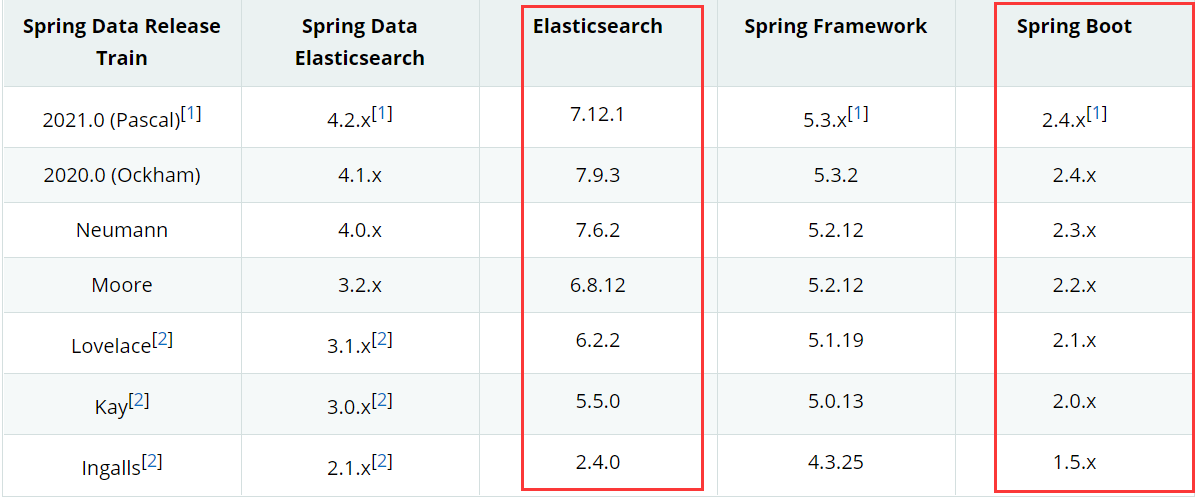
通过spring官网文档中es与springboot的对照,可以发现随着springboot版本的迭代,springdata elasticsearch引用的elasticsearch版本也是在逐渐提高。
笔者目前使用的springboot 2.5.0版本,通过不断的测试发现,es 7.6.2往上版本基本都是支持的。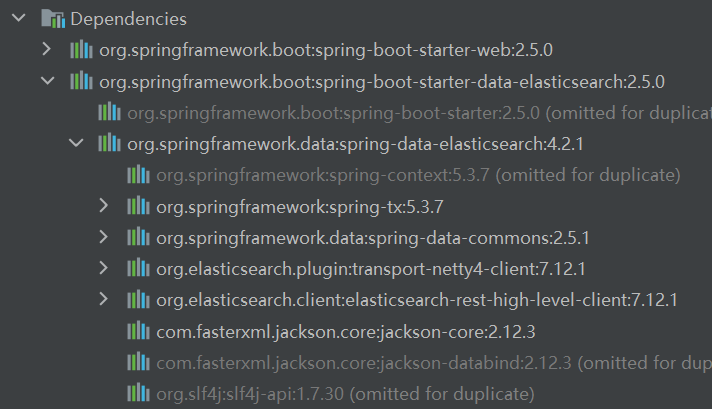
为了避免不必要的麻烦,笔者还是选择了跟依赖版本一致的es 7.12.1的server端。
用springdata es实现一个简单的curd:
controller: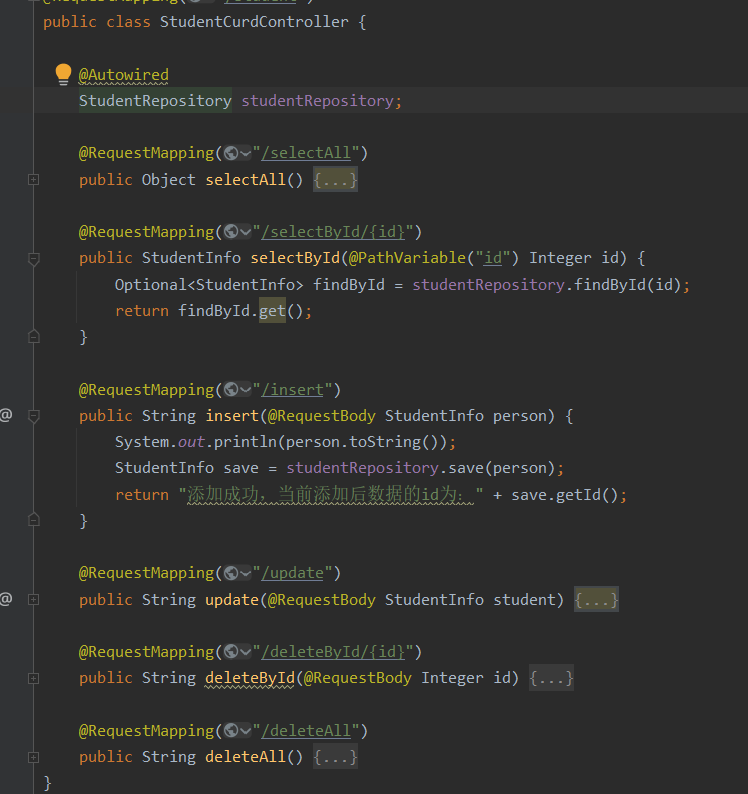
domain: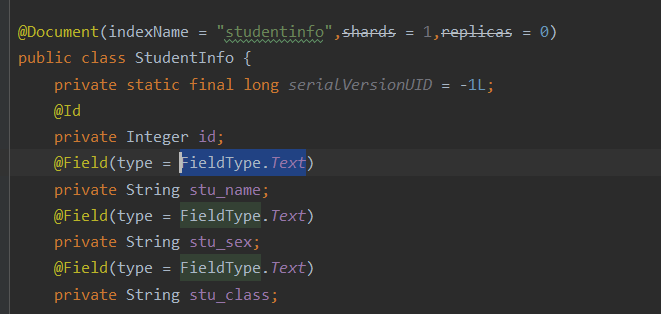
注释:indexName:索引库的名称 type:类型名称(新版本中已经不需要type,不用填) shards:分片数 replicas:副本数目
@Id 主键标识
@Field中的注解
type:字段属性
index:是否索引
store:是否存储
analyzer是否分词
repositroy:
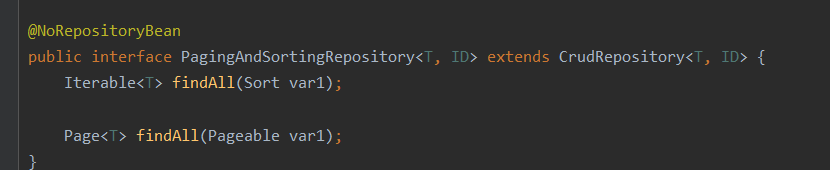
简单的curd通过继承ElasticsearchRepository就可以,无需另外写service层。
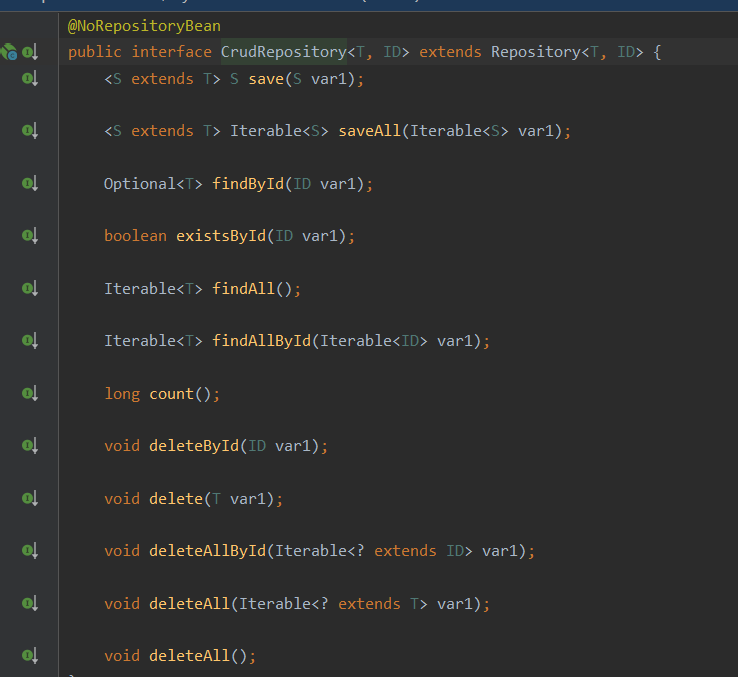
跳入ElasticsearchRepository的源码发现,其实最终继承的还是CrudRepository类,所以要实现简单的curd,我们也可以直接继承CrudRepository类。
再深入研究一下,springdata es到底用的是哪一种模式呢?
通过不断往底层跳代码,一个熟悉的类映入眼帘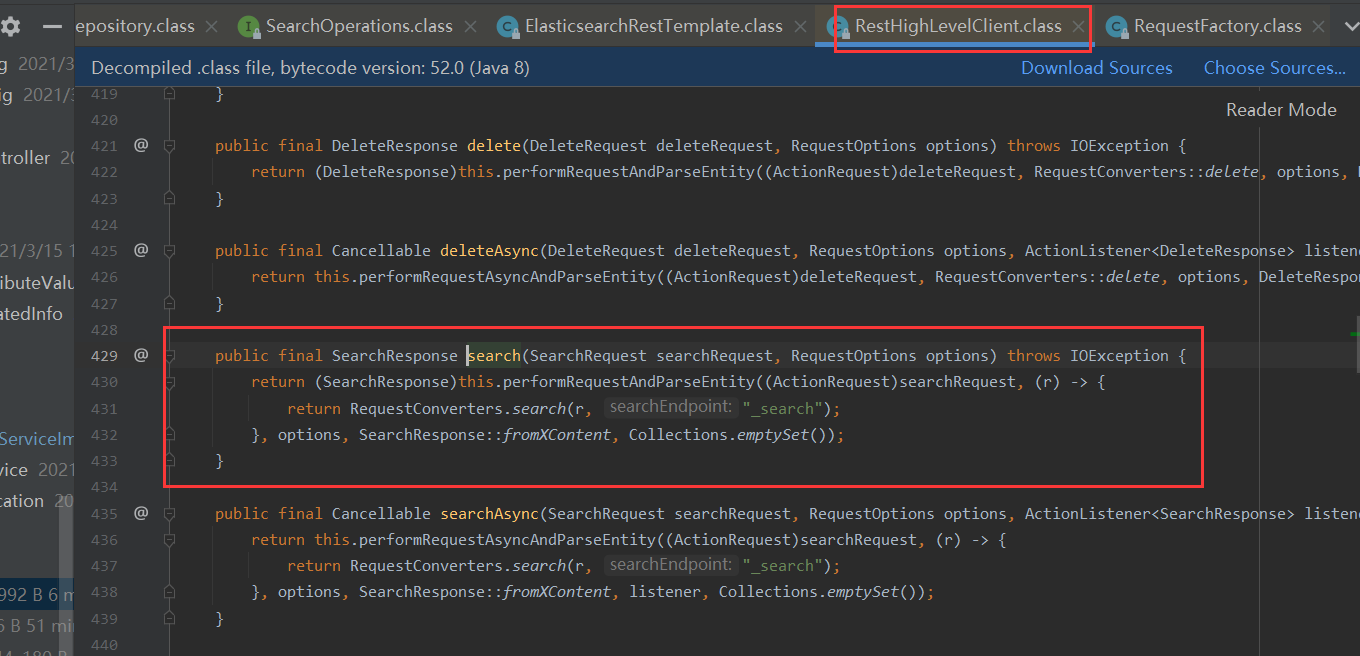
可以说,springdata es底层还是用的封装的es high Level REST Client模式~
下面来试试把数据库表数据导入es吧:
controller:
@Controller
@RequestMapping("/static")
public class DeviceStaticController {

    @Autowired
    private DeviceStaticRepository deviceStaticRepository;

    @Autowired
    private DeviceStaticService deviceStaticService;

    @RequestMapping(value = "/importAll", method = RequestMethod.POST)
    @ResponseBody
    public int importAllList(@RequestBody DeviceStatic deviceStatic) {
        int count = deviceStaticService.importAll();
        System.out.println("成功导入" + count + "条");
        return count;
    }

    @RequestMapping("/listAll")
    public Object selectAll() {
        Iterable<DeviceStatic> findAll = deviceStaticRepository.findAll();
        return findAll;
    }

}
这边先写一个importAll方法,其他的功能待后续补充。
service:
public interface DeviceStaticService {

    /**
     * 从数据库中导入所有设备静态表信息到ES
     */
    int importAll();

}

@Service
public class DeviceStaticServiceImpl implements DeviceStaticService {
    private static final Logger LOGGER = LoggerFactory.getLogger(DeviceStaticServiceImpl.class);

    @Autowired
    private DeviceStaticDao deviceStaticDao;
    @Autowired
    private DeviceStaticRepository deviceStaticRepository;

    @Override
    public int importAll() {
        long begin = System.currentTimeMillis();
        System.out.println("into importAll...");
        List<DeviceStatic> deviceStaticList = deviceStaticDao.getAllDeviceStaticList(null);
        System.out.println("end query,begin save to es....");
        int len = deviceStaticList.size();
        System.out.println("length:" + len);
        int result = 0;
        int size = 10000;
        if (len > size){
            // 计算出要分成几个批次
            int pageCount = (len / size) + (len % size == 0 ? 0 : 1);
            for (int i = 0, from = 0, to = 0; i < pageCount; i++) {
                from = i * size;
                to = from + size;
                // 如果超过总数量,则取到最后一个数的位置
                to = to > len ? len : to;
                // 对list 进行拆分
                List<DeviceStatic> list = deviceStaticList.subList(from, to);
                // 将拆分后的list数据存入es,返回插入条数
                Iterable<DeviceStatic> deviceStaticIterable = deviceStaticRepository.saveAll(list);
                Iterator<DeviceStatic> iterator = deviceStaticIterable.iterator();
                while (iterator.hasNext()) {
                    result++;
                    iterator.next();
                }
            }
        }else{
            Iterable<DeviceStatic> deviceStaticIterable = deviceStaticRepository.saveAll(deviceStaticList);
            Iterator<DeviceStatic> iterator = deviceStaticIterable.iterator();
            while (iterator.hasNext()) {
                result++;
                iterator.next();
            }
        }
        long end = System.currentTimeMillis();
        System.out.println("cost:"+ (end - begin)/1000 + "s");
        return result;
    }

}
dao:
@Repository
@Mapper
public interface DeviceStaticDao {

    /**
     * 获取指定ID的设备信息
     */
    List<DeviceStatic> getAllDeviceStaticList(@Param("id") Long id);
}
domain:
@Document(indexName = "static")
public class DeviceStatic implements Serializable {
    private static final long serialVersionUID = -1L;
    @Id
    private Long dev_id;
    @Field(type = FieldType.Long)
    private Long type_and_ver_id;
    @Field(type = FieldType.Long)
    private Long cust_id;
    @Field(type = FieldType.Long)
    private Long region_area_id;
    @Field(type = FieldType.Long)
    private Long corp_area_id;
    @Field(type = FieldType.Text)
    private String dev_sno;
    @Field(type = FieldType.Text)
    private String dev_mac;
    @Field(type = FieldType.Text)
    private String dev_pppoe;
    @Field(type = FieldType.Text)
    private String dev_ad_no;
    @Field(type = FieldType.Text)
    private String dev_status;
    @Field(type = FieldType.Date)
    private Date dev_create_date;
    @Field(type = FieldType.Date)
    private Date dev_modify_date;
    @Field(type = FieldType.Text)
    private String dev_soap_flag;
    @Field(type = FieldType.Text)
    private String dev_inform_flag;
    @Field(type = FieldType.Text)
    private String dev_remark1;
    @Field(type = FieldType.Text)
    private String dev_remark2;
    @Field(type = FieldType.Text)
    private String dev_remark3;
    @Field(type = FieldType.Text)
    private String dev_remark4;
    @Field(type = FieldType.Text)
    private String dev_remark5;
    @Field(type = FieldType.Text)
    private String dev_type;
    @Field(type = FieldType.Text)
    private String dev_reg_status;

    getter and setter....省略

    toString() ...省略
    }
}
mapper.xml
<?xml version="1.0" encoding="UTF-8"?>
<!DOCTYPE mapper PUBLIC "-//mybatis.org//DTD Mapper 3.0//EN" "http://mybatis.org/dtd/mybatis-3-mapper.dtd">
<mapper namespace="com.example.demo.dao.DeviceStaticDao">
    <select id="getAllDeviceStaticList" resultType="com.example.demo.domain.DeviceStatic">
       select t.* from(
        select rownum rm,
        DEV_ID,
        TYPE_AND_VER_ID,
        CUST_ID,
        REGION_AREA_ID,
        CORP_AREA_ID,
        DEV_SNO,
        DEV_MAC,
        DEV_PPPOE,
        DEV_AD_NO,
        DEV_STATUS,
        DEV_CREATE_TIME,
        DEV_MODIFY_TIME,
        DEV_SOAP_FLAG,
        DEV_INFORM_FLAG,
        DEV_REMARK1,
        DEV_REMARK2,
        DEV_REMARK3,
        DEV_REMARK4,
        DEV_REMARK5,
        DEV_TYPE,
        DEV_REG_STATUS
        from ITMS_DEVICE_STATIC
        <if test="id!=null">
            and id=#{id}
        </if>
        ) t where t.rm <![CDATA[<=]]> 10000000
    </select>
</mapper>
这边加了条数是为了方便测试,10w条,百万条,千万条的切换,观察效率。
配置文件不多赘述,不过为了mybatis读取oracle(mysql)的效率,修改了批量读取条数。不过具体配置就见仁见智了,如何调效率更高,对系统的影响较小,能达到一个平衡即可。
mybatis:
  mapper-locations:
    - classpath:dao/*.xml
    - classpath*:com/**/mapper/*.xml
  configuration:
    default-fetch-size: 2000 #可以根据项目需求加大参数  每次读取2000条 默认 100
    default-statement-timeout: 60
本次使用的oracle表中共240余万数据,从表中读取到分批存入es,总耗时约4分钟。在优化过mybatis读表之后,读表耗时约占1分钟左右,主要瓶颈还在es。我这边设置了1w一批入es,因为消息量过大的话效率会降低,另外也看会超过单次post接口的容量上限。如果各位有更好的方式,也欢迎at我,一起进步~
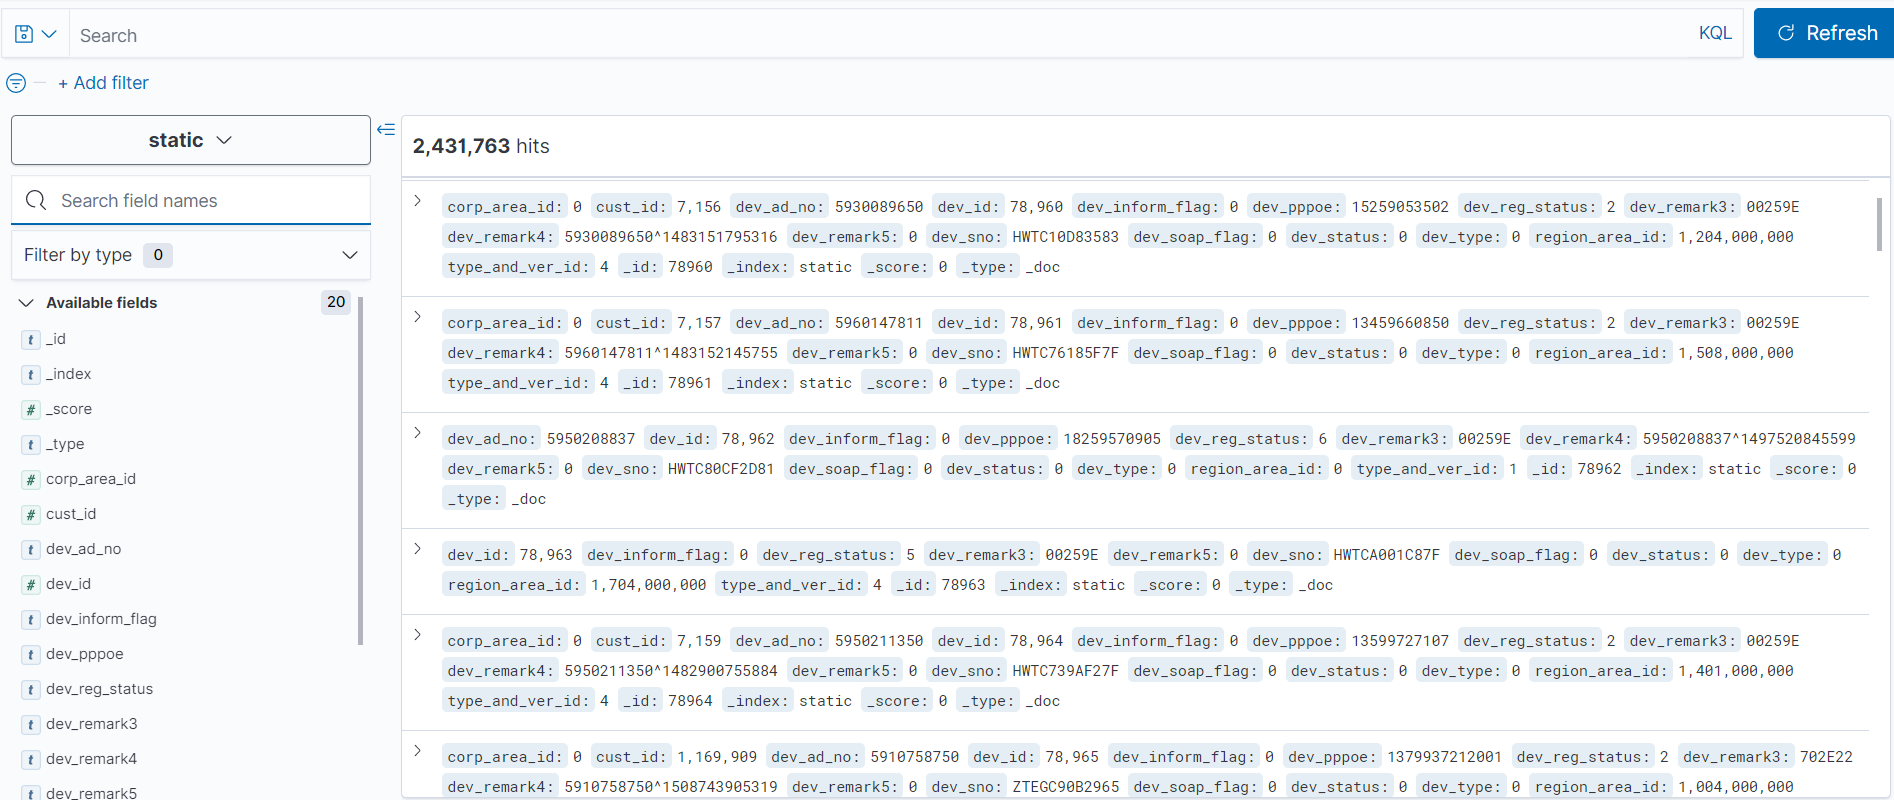
数据库表中数据已完全入es,完美~
Elasticsearch-SQL

若有收获,就点个赞吧
0 人点赞
