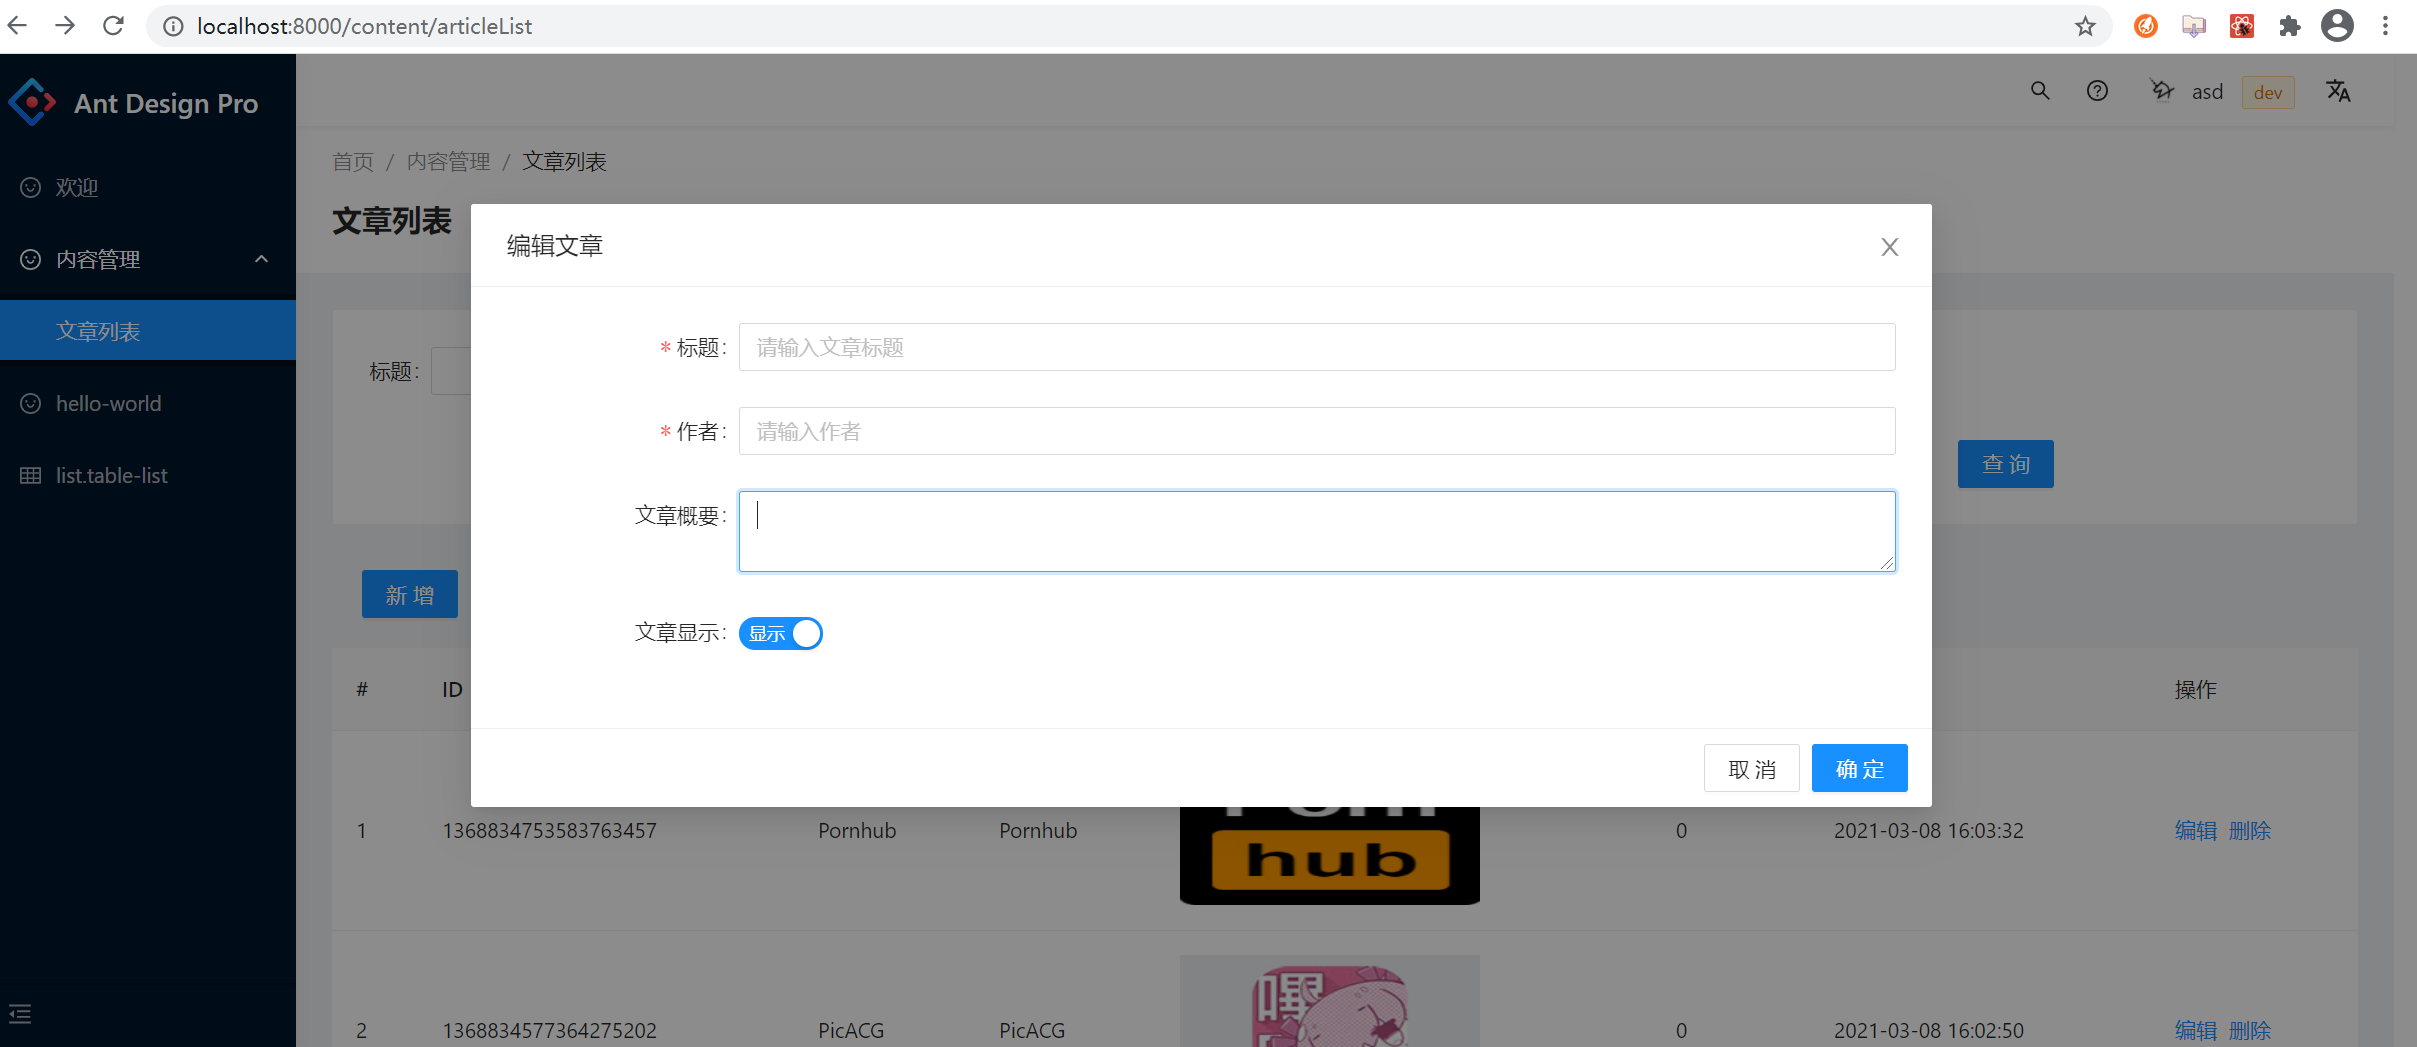
1. 实现布局交互
首先确定新增和编辑的按钮布局, 这里我们采用新增弹窗的交互形式来实现:
创建文件: src\pages\content\Article\components\ArticleEdit.tsx
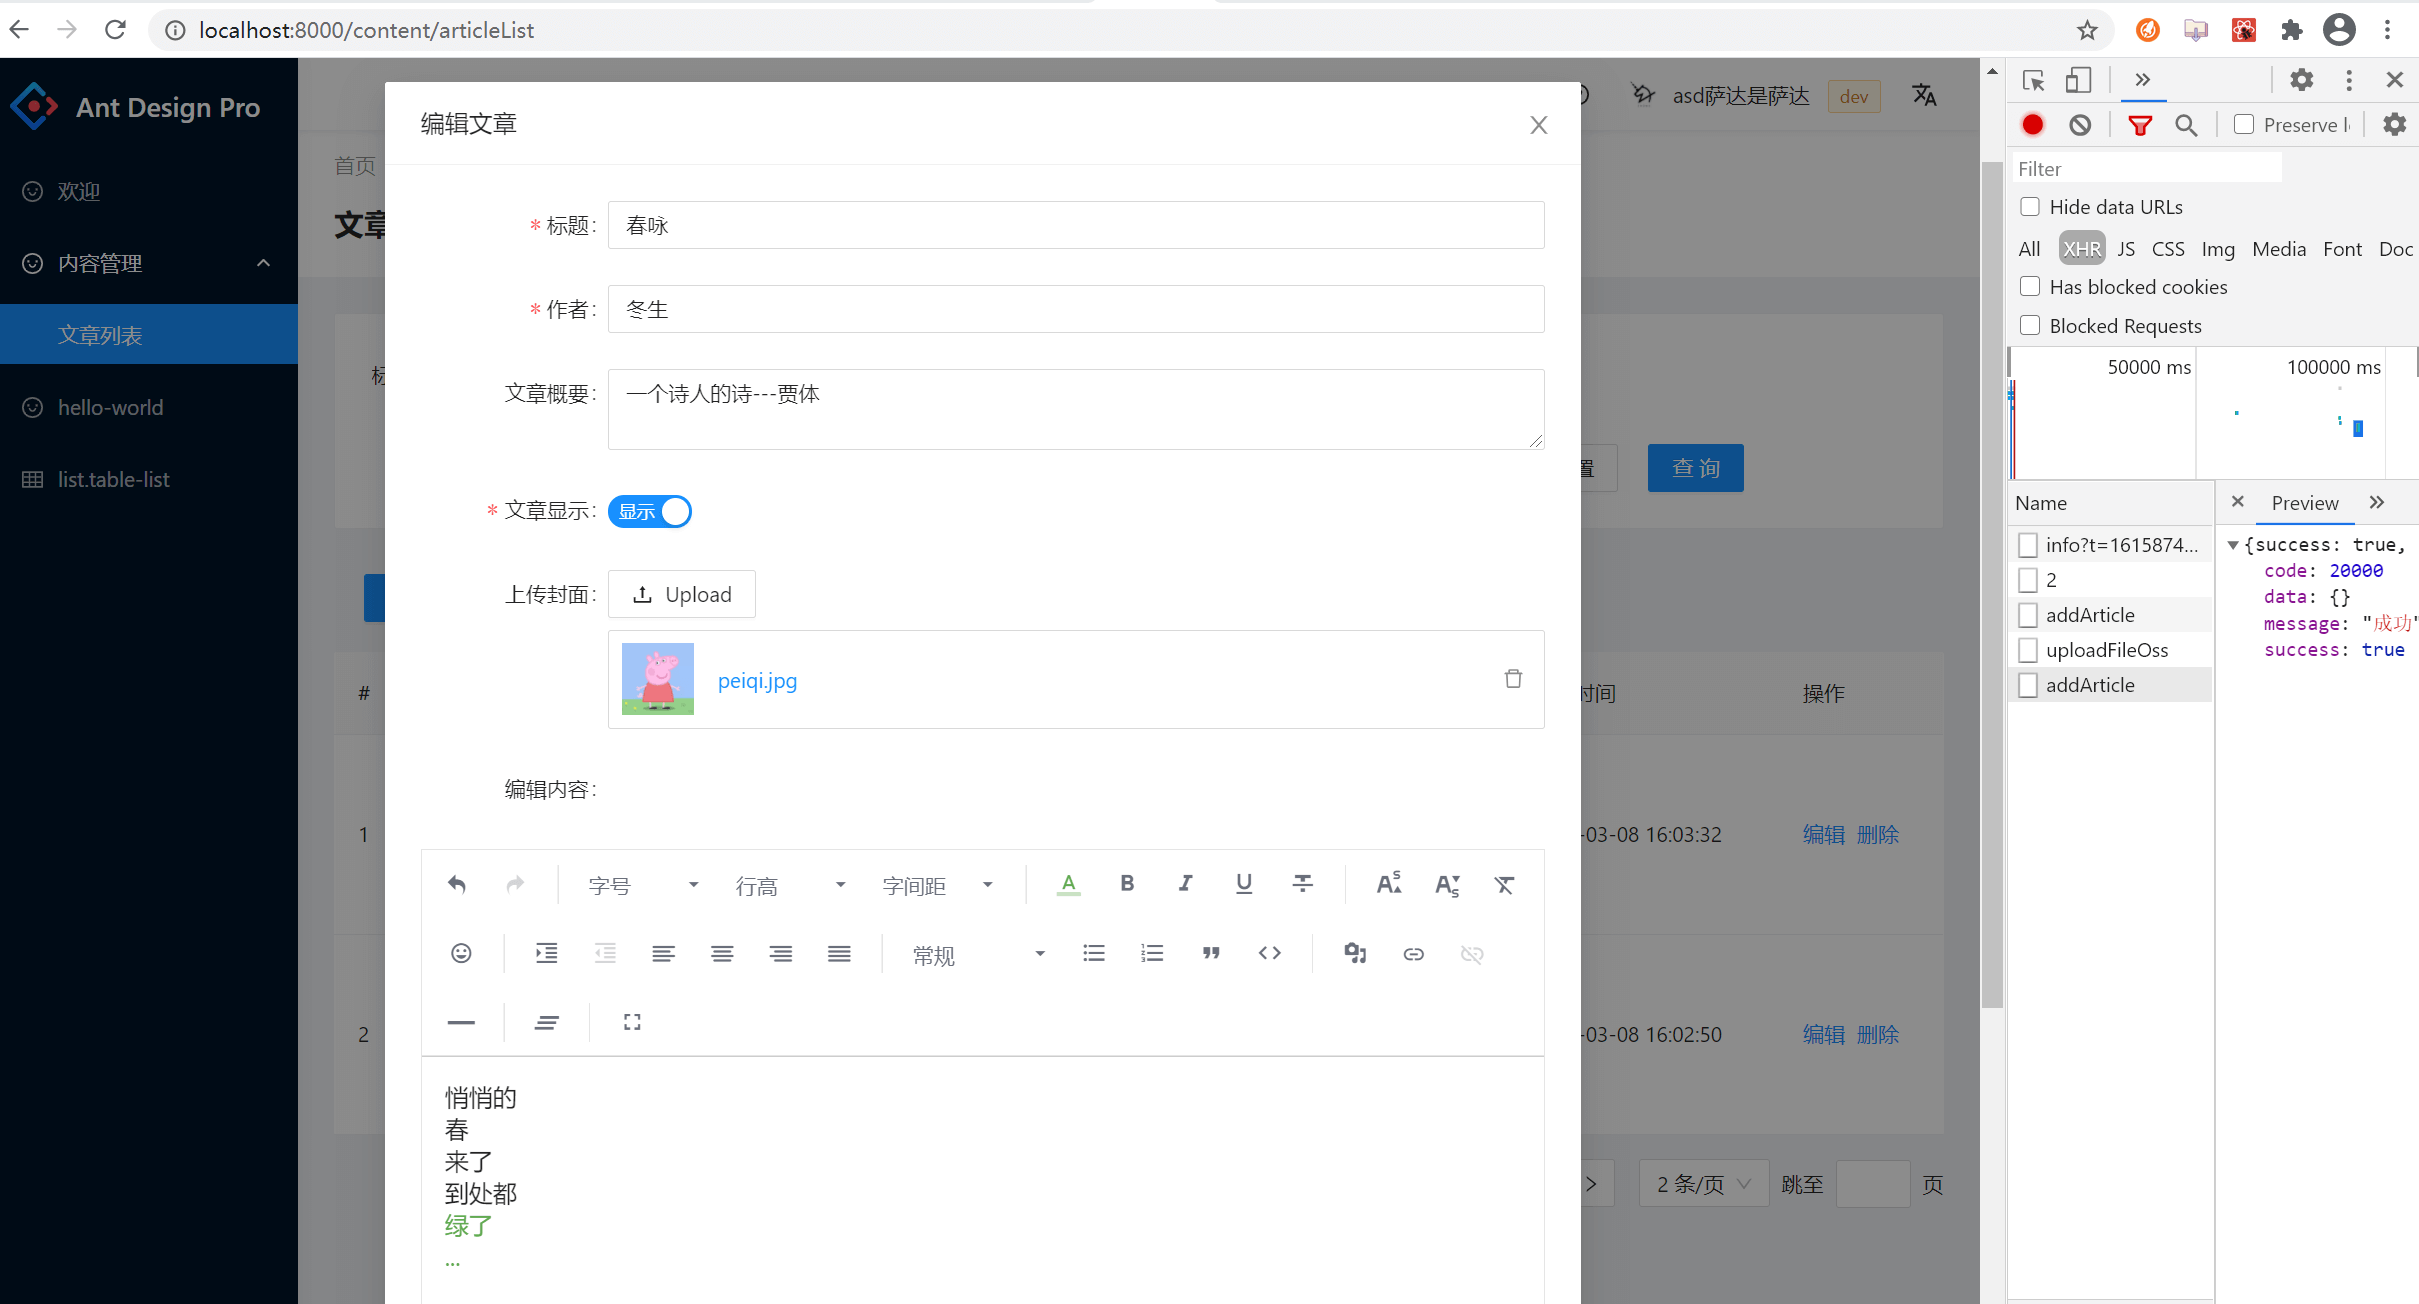
import React, { useEffect,useState } from 'react';import {Modal, Button, Form , Input, Switch} from 'antd';import type {SetStateAction} from 'react';const {TextArea} = Input;type PropsType = {isShow: boolean;setIsShow: any;editId?: string;}const ArticleEdit: React.FC<PropsType> = props=>{const {isShow,setIsShow,editId} = props;const handleOk = ()=>{setIsShow(false);}const handleCancel = ()=>{setIsShow(false);}const [form] = Form.useForm();useEffect(()=>{if(isShow&&editId){alert('编辑请求...')}else if(isShow&&!editId){alert('新增请求...')}},[isShow])/*** 提交保存*/const handleFinish = v=>{console.log(v);}return (<Modal width="60%" title="编辑文章" visible={isShow} onOk={handleOk} onCancel={handleCancel}><Formform={form}onFinish={handleFinish}labelCol={{span: 4}}wrapperCol={{span:20}}><Form.Itemlabel="标题"rules={[{required: true, message: '标题不能为空!'}]}name="title"><Input placeholder="请输入文章标题"></Input></Form.Item><Form.Itemlabel="作者"rules={[{required: true, message: '作者不能为空!'}]}name="author"><Input placeholder="请输入作者"></Input></Form.Item><Form.Itemlabel="文章概要"name="summary"><TextArea></TextArea></Form.Item><Form.Itemlabel="文章显示"name="isShow"><Switch checkedChildren="显示" unCheckedChildren="隐藏" defaultChecked></Switch></Form.Item></Form></Modal>)}export default ArticleEdit;
src\pages\content\Article\index.tsx
import React, { useEffect, useState } from 'react';// # https://procomponents.ant.design/components/page-containerimport { PageContainer } from '@ant-design/pro-layout';import type { ArticleType } from './model';import { Table, Form, Input, Button, Card, Row, Col,Space } from 'antd';import type {TableColumnType} from 'antd';import { connect } from 'umi';import type { Dispatch } from 'umi';import styles from './index.less';import {pickBy} from 'lodash';// 引入明细组件import ArticleEdit from './components/ArticleEdit';// 定义model命名空间const namespace = 'article';type StateType = {articleList: ArticleType[];articleTotalCount: number;dispatch: Dispatch;loading: any;};type PropsType = {articleList: ArticleType[];articleTotalCount: number;dispatch: Dispatch;loading: boolean;};type SearchType = {author?: string;title?: string;}// type ColumnType = {// title: string;// dataIndex?: string;// render: any// }const ArticleList: React.FC<PropsType> = (props) => {const { articleList, articleTotalCount, dispatch, loading } = props;// 条件查询,可以根据title,author查询const [params,setParams] = useState<SearchType>({});// 分页起始页肯定是 1const [current, setCurrent] = useState(1);// 数据量不大 为了体现分页 暂时控制每页2条数据const [pageSize, setPageSize] = useState(2);// 是否打开编辑const [isEdit, setIsEdit] = useState<boolean>(false);// 编辑idconst [editId,setEditId] = useState<string>('');// 获取form组件const [form] = Form.useForm();// 监听current和pageSize的变化重新发送请求useEffect(() => {dispatch({type: `${namespace}/findArticleList`,payload: {start: current,limit: pageSize,params,},});}, [current, pageSize,params]);/*** 去新增页面* @param id*/const goAdd = ()=>{setEditId('');setIsEdit(true);}/*** 去编辑页* @param id*/const goEdit = (id: string)=>{// alert(`id${id}`)setEditId(id);setIsEdit(true);}/*** 删除行数据* @param id*/const goDel = (id: string)=>{alert(`del${id}`)}type ColumnType = {title: string;dataIndex?: string;}// 放到组件外部将无法调用组件内部的 state ; 所以移到组件内部const colums: TableColumnType<ColumnType>[] = [{title: '#',// 如果定义形参未使用 建议添加_render(_text,_record,index){return `${index+1}`;}},{title: 'ID',dataIndex: 'id',},{title: '标题',dataIndex: 'title',},{title: '作者',dataIndex: 'author',},{title: '封面',render: ({coverImg}: ArticleType) => <img className={styles.coverImg} src={coverImg} alt="" />,},{title: '阅读量',dataIndex: 'viewCount',},{title: '创建时间',dataIndex: 'createTime',},{title: '操作',render:({id})=>(<Space><a onClick={()=>goEdit(id)}>编辑</a><a onClick={()=>goDel(id)} className={styles.delBtn}>删除</a></Space>)}];/*** 提交表单触发事件 v为表单name对应的对象* @param v*/const onFinish = (v: SearchType)=>{// console.log(v);// 对于空对象 可能会出现 undefined 的情况,需要去除该属性const useParams = pickBy(v,(item: any)=>item);// 我们只需要改变了 params 就可以触发 useEffectsetParams(useParams);setCurrent(1);}const onReset = ()=>{setParams({});form.resetFields();}return (<PageContainer className={styles.main}><Card className={styles.searchBar}><Formform={form}labelCol={{span: 4,}}wrapperCol={{span: 20,}}layout="inline"onFinish={onFinish}><Row gutter={[20,30]} style={{width:'100%'}}><Col span={6}><Form.Item label="标题" name="title"><Input /></Form.Item></Col><Col span={6}><Form.Item label="作者" name="author"><Input /></Form.Item></Col><Col span={6} offset={18}><Form.Item><Button type="ghost" onClick={onReset}>重置</Button><Button type="primary" htmlType="submit" style={{marginLeft: '20px'}}>查询</Button></Form.Item></Col></Row></Form></Card>{/* rowKey 表格行 key 的取值,可以是字符串或一个函数 标识唯一性,这里我们用每一条数据的id作为key */}<Button onClick={goAdd} type="primary" className={styles.addBtn}>新增</Button><Tableloading={loading}rowKey="id"columns={colums}dataSource={articleList}pagination={{showQuickJumper: true,current,pageSize,total: articleTotalCount,showSizeChanger: true,onShowSizeChange(_curr, size) {// console.log(v)setPageSize(size);},onChange(v) {setCurrent(v);},}}/>{/* 弹窗部分 */}<ArticleEdit editId={editId} isShow={isEdit} setIsShow={setIsEdit} /></PageContainer>);};/*** 提取需要的属性* dva-loading* @param param0*/const mapStateToProps = (state: StateType) => {return {articleList: state[namespace].articleList,articleTotalCount: state[namespace].articleTotalCount,dispatch: state.dispatch,loading: state.loading.effects[`${namespace}/findArticleList`] as boolean,};};export default connect(mapStateToProps)(ArticleList);
2. 接口封装和modal实现
新增和编辑是两个需要大量复用组件的功能,通过在乐居商城的后台实现中总结的经验,完全可以考虑把这两个功能共享同样的组件来实现, 减少代码量,提高复用性. src\services\content\article.ts
import type {ArticleType} from '@/pages/content/Article/model';.../*** 新增文章* @param params*/export async function addArticle(params: ArticleType) {return request(`/lejuAdmin/productArticle/addArticle`, {method: 'POST',data: params,});}/*** 编辑文章* @param params*/export async function updateArticle(params: ArticleType) {return request(`/lejuAdmin/productArticle/updateArticle`, {method: 'POST',data: params,});}/*** 删除文章* @param id*/export async function delArticle({id}: {id: string}) {return request(`/lejuAdmin/productArticle/del/${id}`, {method: 'DELETE'});}
src\pages\content\Article\components\model.ts
这里先添加新增和编辑功能, 同样的,我们根据提交的数据对象是否有 id(id为后台生成) 来判断当前请求是新增还是编辑.
疑问: callback 回调函数的意义?
- 在vuex中的action中,可以通过返回一个promise对象来响应处理, 在dva的effects中,我们可以通过传入回调函数的形式来通知结果. ```typescript import {addArticle as addArticleApi,updateArticle as updateArticleApi} from ‘@/services/content/article’; import {message} from ‘antd’; import type {Effect,Reducer} from ‘umi’;
export type MType = { namespace: string; state: {
}; effects: { saveArticle: Effect; }, reducers: {
}
}
const M: MType = { namespace: ‘articleEdit’, state: {
}, effects: { *saveArticle({payload}, {call,put}){ // 成功后为了通知组件 这里添加了callback的回调函数 const {article,callback} = payload; // 如果有id则为编辑,否则为新增. 这个和vue乐居商城逻辑一样. const saveOrUpdateApi = article.id ? updateArticleApi:addArticleApi; const {success,message:errMsg} = yield call(saveOrUpdateApi,article); if(success){ message.success(‘保存成功!’); if(callback && typeof callback === ‘function’){ callback(); } }else{ message.error(errMsg); } }
}, reducers: {
} }
export default M;
<a name="1l6CX"></a>### 3. 富文本从antd官方推荐的 [社区精选推荐](https://ant.design/docs/react/recommendation-cn) 中找到 [braft-editor](https://github.com/margox/braft-editor) .<br />**注意事项: **- braft富文本的`value `类型为 `EditorState`, 获取html需要调用 `value.toHTML()` 方法- `value` ` onChange` `onSave`- 防抖提高性能```shell# 安装依赖npm install braft-editor --save
// 给富文本添加关联值const [editorState,setEditorState] = useState<EditorState>(null);// 初始化富文本内容setEditorState(BraftEditor.createEditorState(article.content1))// 获取富文本转换的htmlconst htmlStr = editorState.toHTML();// 监听变化const handleEditorChange = (v: EditorState) => {setEditorState(v);};<BraftEditorstyle={{ border: '1px solid #e5e5e5' }}value={editorState}onChange={debounce(handleEditorChange, 500)}onSave={submitContent}/>
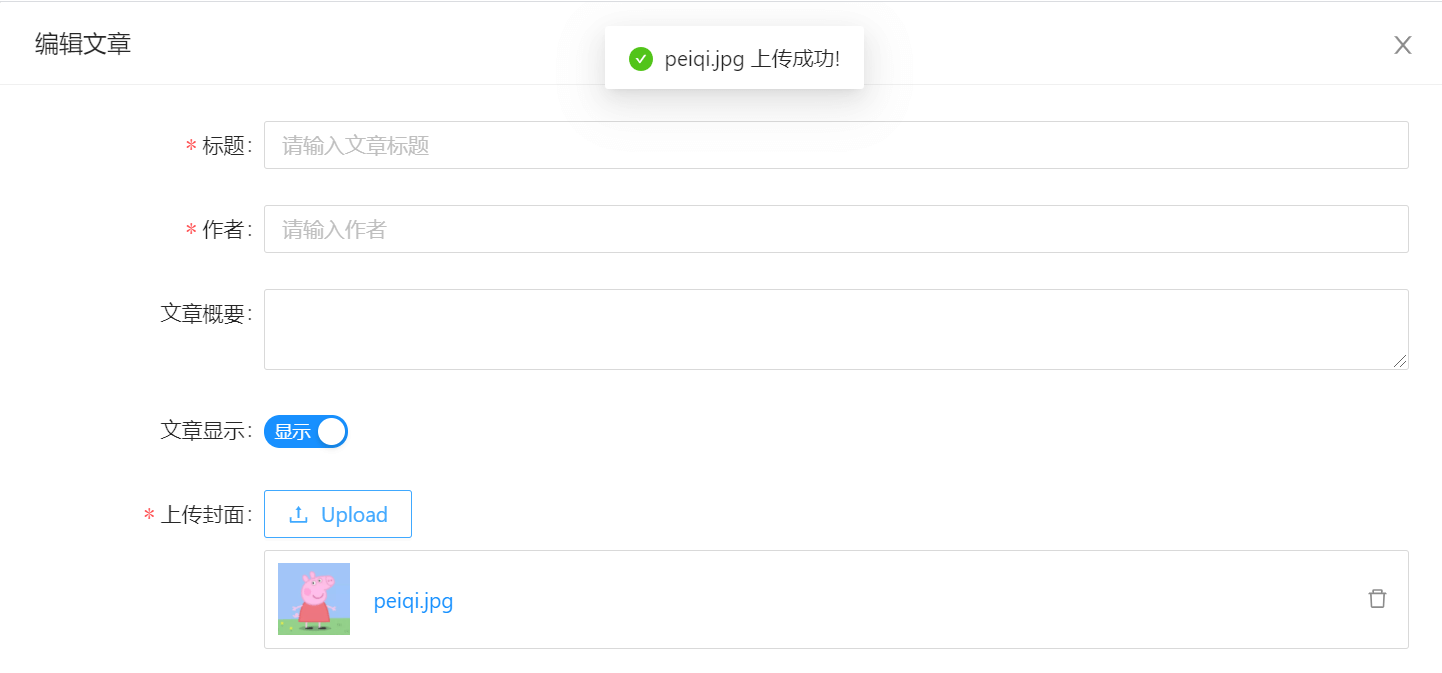
4. 上传图片
接口使用通用上传接口,上传成功之后不会保存数据库, 后台对接阿里云OSS对象存储, 成功后返回阿里云资源地址.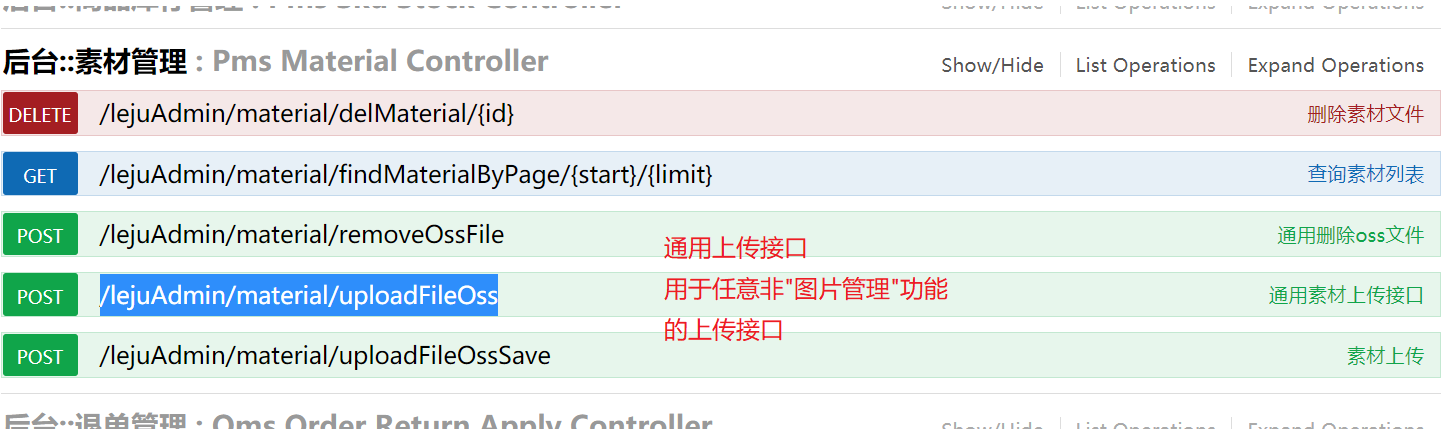
注意事项:
- 上传接口也需要token,通过自定义headers实现
listType="picture"可以使用默认样式fileList属性必须添加,否则会造成 status 无法变成 done的bug, 请参考 #2423- 在
4.13.0版本之前受控状态存在 bug。 Form.Item包含Upload组件, 如何实现校验?
 onChange#
上传中、完成、失败都会调用这个函数。
文件状态改变的回调,返回为:
{file: { /* ... */ },fileList: [ /* ... */ ],event: { /* ... */ },}
file当前操作的文件对象。{uid: 'uid', // 文件唯一标识,建议设置为负数,防止和内部产生的 id 冲突name: 'xx.png' // 文件名status: 'done', // 状态有:uploading done error removed,被 beforeUpload 拦截的文件没有 status 属性response: '{"status": "success"}', // 服务端响应内容linkProps: '{"download": "image"}', // 下载链接额外的 HTML 属性}
fileList当前的文件列表。event上传中的服务端响应内容,包含了上传进度等信息,高级浏览器支持。
5. 表单验证
注意事项:
- 因为不是通过
Form.onFinish触发,需要手动触发表单校验: validateFields Form.Item默认会通过name属性和包含子组件的value属性进行匹配校验,如果子组件没有value属性:
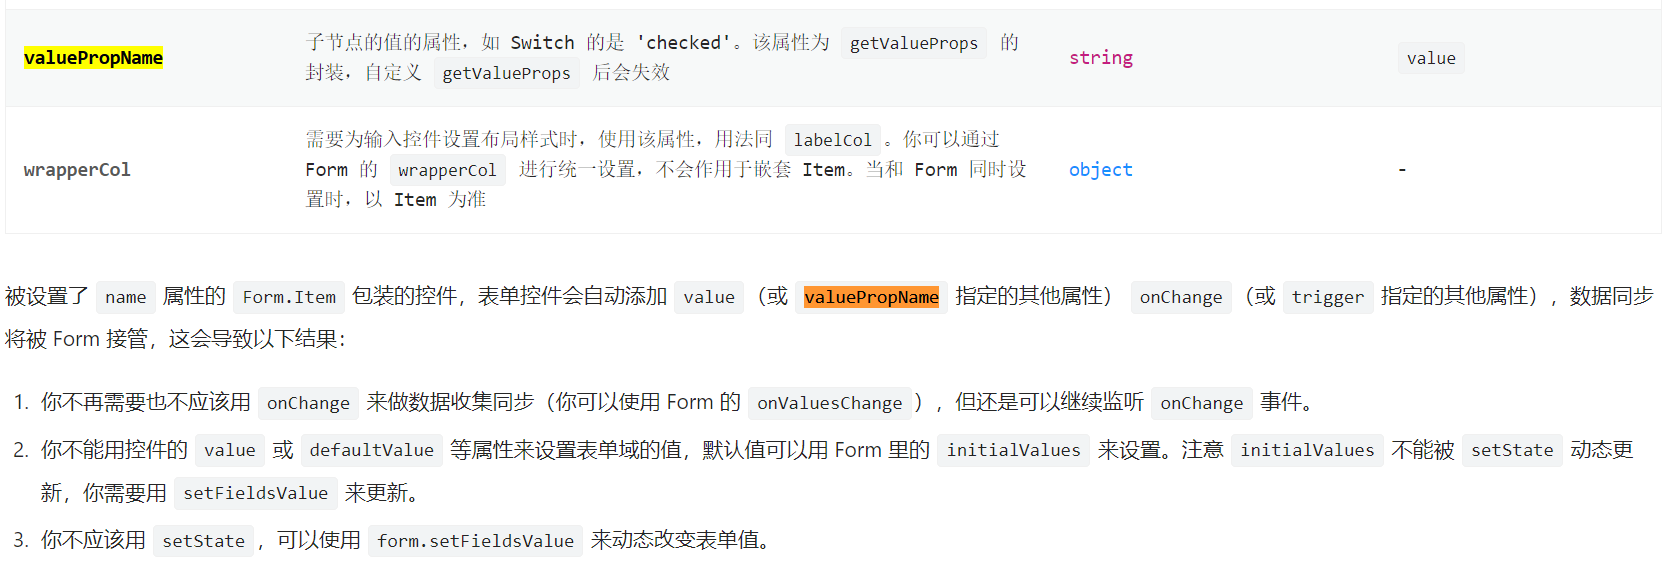
Form.Item 包含多个子元素,会报错. 我们需要对多个子元素 进行封装,变成一个自定义组件, 自定义或第三方的表单控件,也可以与 Form 组件一起使用。只要该组件遵循以下的约定:
- 提供受控属性
value或其它与valuePropName的值同名的属性。 - 提供
onChange事件或trigger的值同名的事件。
- 提供受控属性
对于
Form.Item包含Upload组件, 无法触发表单验证的问题处理, 我们把Upload组件封装为自定义组件, 该组件接收value和onChange,遵循以上约定即可.src\pages\content\Article\components\ArticleEdit.tsx关于
UploadFile的类型推导,通过提示找到源码位置,直接引入// 根据提示找到文件类型的位置 手动引入import type { UploadFile } from 'antd/lib/upload/interface';...// 局部组件 自定义formItem组件// # https://ant.design/components/form-cn/#components-form-demo-customized-form-controlsconst FormUploadFC: React.FC<UploadPropsType> = ({ onChange }) => {const [fileList, setFileList] = useState<UploadFile[]>([]);return (<Uploadaction="/lejuAdmin/material/uploadFileOss"listType="picture"fileList={fileList}headers={{token: getToken() || '',}}// 用于移除文件后 对表单的校验同步onRemove={() => {onChange?.('');return true;}}// # https://ant.design/components/upload-cn/#APIonChange={({ file, fileList: files }: { file: UploadFile; fileList: UploadFile[] }) => {// clone数组,然后只需要一个let nowFiles = [...files];nowFiles = nowFiles.slice(-1);const { status, response } = file;if (status === 'done') {// 获取上传成功的回调结果const { success, data, message: err } = response;if (success) {message.success(`${file.name} 上传成功!`);// 避免因直接修改实参造成的报错if (nowFiles.length > 0) {nowFiles[0].url = data.fileUrl;onChange?.(data.fileUrl);}} else {message.error(err);}} else if (status === 'error') {message.error(`${file.name} file upload failed.`);}// # https://github.com/ant-design/ant-design/issues/2423setFileList(nowFiles);}}><Button icon={<UploadOutlined />}>Upload</Button></Upload>);};// ... 使用<Form.Itemlabel="上传封面"name="coverImg"rules={[{ required: true, message: '上传封面图片' }]}><FormUploadFC /></Form.Item>
6. 提交保存
提交保存,需要对数据进行格式化,使之符合接口数据要求.
注意事项:coverImg字段已经通过自定义表单组件添加到了form
- cb是回调函数,需要关闭窗口,重置表单,刷新父类列表.
src\pages\content\Article\components\ArticleEdit.tsx
// 默认到处组件const ArticleEdit: React.FC<PropsType> = (props) => {// refresh 为通过父级组件传入的参数 为函数类型const { isShow, setIsShow, editId, dispatch, refresh } = props;...const cb = () => {// 1.关闭弹窗 清除校验setIsShow(false);form.resetFields();// 2.刷新父类列表refresh();};const handleOk = () => {form.validateFields().then(() => {// 获取表单数据const v = form.getFieldsValue();// 获取富文本转换的htmlconst htmlStr = editorState.toHTML();// 封装提交数据const articleData = {...v,isShow: v.isShow ? 1 : 0,content1: htmlStr,content2: htmlStr,editorType: 0, // 编辑器类型 默认富文本,写死};if (dispatch) {// // 提交dispatch({type: `${namespace}/saveArticle`,payload: {article: articleData,callback: cb,},});}}).catch(() => {message.error('请注意表单验证!');});};...
src\pages\content\Article\index.tsx
// 新增 refreshList 函数 为了抽离发送请求的dispatch// 另外需要在 子组件 <ArticleEdit> 中调用当前组件,需要传递 refresh 函数进去/*** 刷新数据列表*/const refreshList = ()=>{dispatch({type: `${namespace}/findArticleList`,payload: {start: current,limit: pageSize,params,},});}// 监听current和pageSize的变化重新发送请求useEffect(() => {refreshList();}, [current, pageSize,params]);...{/* 弹窗部分 */}<ArticleEdit editId={editId} isShow={isEdit} setIsShow={setIsEdit} refresh={refreshList}/>

若有收获,就点个赞吧
0 人点赞
