Java并发容器
在java中存在两种容器,一种是普通的集合容器,另一种就是支持线程同步的容器也就是并发容器
并发容器它们存在在JUC(java.util.concurrent)下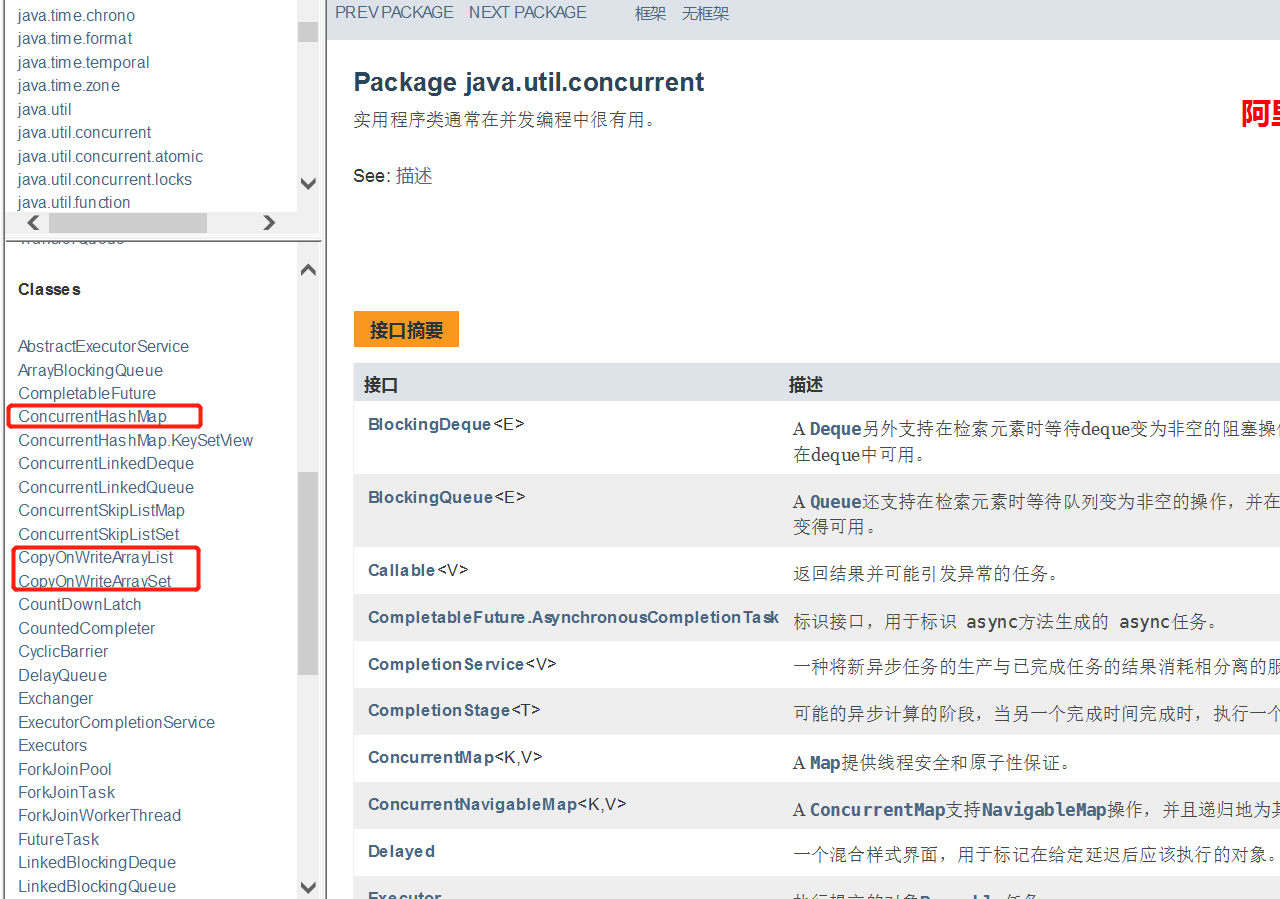
在这个类中都是针对并发操作的相关类,不仅仅是并发容器同时还有与并发相关的阻塞队列、执行器等等
CopyOnWriteArray(List/Set)
List
使用传统的ArrayList去做多线程添加元素的时候会出现并发修改异常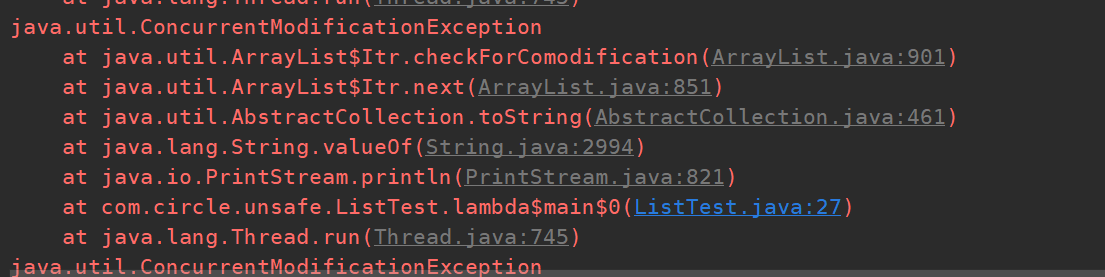
此时有三种解决方案
1.使用vector
List
list = new Vector<>();
查看vector中的add方法,发现该方法是被synchronized修饰的
2.使用Collections的synchronizedList方法对容器进行包装
List
list = Collections.synchronizedList(new ArrayList<>());
3.使用CopyOnWriteArrayList
List
list = new CopyOnWriteArrayList<>();
在该类中的add方法使用的是ReentrantLock进行加锁,该操作相比synchronized要轻许多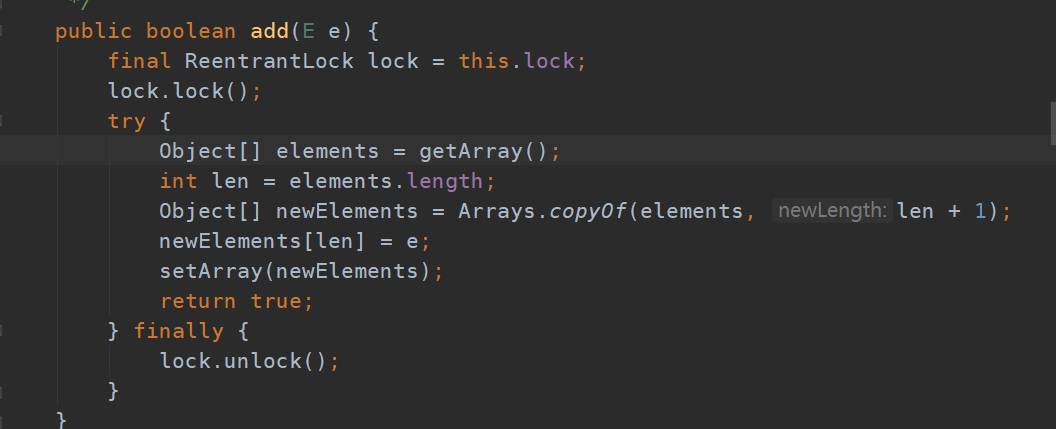
Set
普通hashSet使用的时候依然会出现list的情况。改写也同list一样,不在赘述,直接贴上源码
看出并发set的实现也用lock进行加锁,保证线程安全的同时提高效率。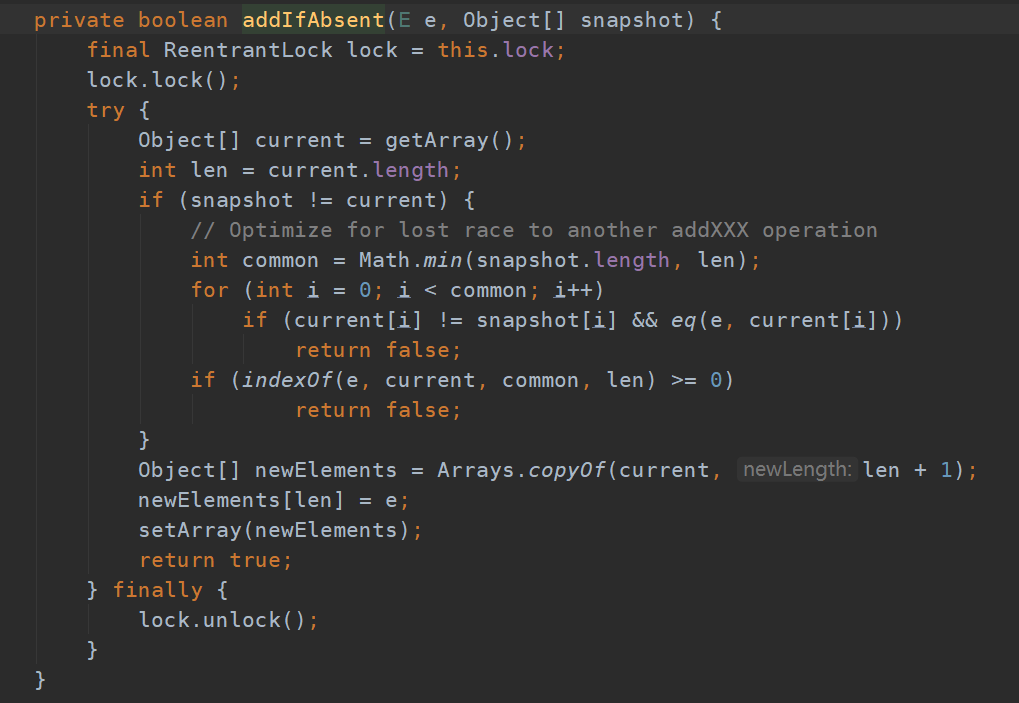
总结
在java并发编程一书写道,如果不希望在迭代期间对容器加锁,那么一种替代方法就是“克隆容器”,并在副本上进行迭代。并发list和set做的就是这么件事情,内部用数组拷贝的方式迭代并且使用lock加锁当前方法,在保证线程安全的情况下又保证了效率。注:长时间的对容器加锁会降低程序的可伸缩性。持有锁的时间越长,竞争就可能越激烈,若多个线程等待锁被释放,将极大的降低吞吐量和CPU的利用率。
HashMap
https://www.cnblogs.com/awkflf11/p/12826164.html
1.8对hash算法和寻址算法的优化(为什么容量是2的幂)
//jdk1.7final int hash(Object k) {int h = hashSeed;//默认为0if (0 != h && k instanceof String) {return sun.misc.Hashing.stringHash32((String) k);}h ^= k.hashCode();// This function ensures that hashCodes that differ only by// constant multiples at each bit position have a bounded// number of collisions (approximately 8 at default load factor).h ^= (h >>> 20) ^ (h >>> 12);return h ^ (h >>> 7) ^ (h >>> 4);}// JDK 1.8以后的HashMap里面的一段源码static final int hash(Object key) {int h;return (key == null) ? 0 : (h = key.hashCode()) ^ (h >>> 16);}final V putVal(int hash, K key, V value, boolean onlyIfAbsent,boolean evict) {Node<K,V>[] tab; Node<K,V> p; int n, i;if ((tab = table) == null || (n = tab.length) == 0)n = (tab = resize()).length;//寻址if ((p = tab[i = (n - 1) & hash]) == null)tab[i] = newNode(hash, key, value, null);。。。}
将hash码与右移16位的hash码异或运算,最后把这个值转化为int。那这样的意义在哪。
首先,右移16位的时候就是把高16的数据移到的低16位上,此时做了异或运算,可以说这个时候就把高16位的数据和低16位的数据进行了一个运算。
比如说:有一个key的hash值 1111 1111 1111 1111 1111 1010 0111 1100 //1.算出来的hash值 0000 0000 0000 0000 1111 1111 1111 1111 //2.右移16位的值,把高16位移到低16位上 1111 1111 1111 1111 0000 0101 1000 0011 //3.异或后的值
现在可以看一下put方法中寻址的操作”tab[i = (n - 1) & hash]”。
首先用数组长度减一的值和hash值进行与运算,为什么不用取模运算?但是与运算的性能要比hash对n取模要高很多,数组的长度会一直是2的n次方,只要他保持数组长度是2的n次方其实与运算和取模运算的效果是一样的,同时与运算的性能更高。
如果用未优化的hash值和数组长度的2进制进行与运算(与运算相同为1 不同为0)。此时会产生一个问题,由于(n-1)肯定是一个比较小的值,转换成2进制的时候,只有低16位的位置有特征,而高16位的位置都是0。而hash值的高16位往往都是1。这种情况下,两个数值的高16位部分去做与运算结果都是0,这样子是没有意义的甚至可以忽略掉的。
如果存在两个hash值,它们2进制的低16位都几乎一样,而高16位各自的特征是微乎其微的。如果直接去运算,有很大的可能造成hash冲突
因此,“位移+异或运算”的意义,首先是将高低16位的特征全部融入到低16位上。其次就是在put时寻址更均匀减少hash碰撞。
1111 1111 1111 1111 1111 1010 0111 1100 //1.算出来的hash值(未优化) 0000 0000 0000 0000 0000 0000 0000 1111 //数组长度的2进制
HashMap是线程不安全的
public V put(K key, V value) {if (key == null)return putForNullKey(value);int hash = hash(key.hashCode());int i = indexFor(hash, table.length);for (Entry<K,V> e = table[i]; e != null; e = e.next) {Object k;if (e.hash == hash && ((k = e.key) == key || key.equals(k))) {V oldValue = e.value;e.value = value;e.recordAccess(this);return oldValue;}}//modCount++ 是一个复合操作modCount++;addEntry(hash, key, value, i);return null;}
从源码中看到put方法中出现了modCount++并没有加锁。可以判断出多线程下一定会出现线程安全问题
扩容期间取值不准确导致线程不安全:
由于hashMap的初始容量很小,当加入数据量很多时就会发生扩容现象,在扩容的过程中会有一个数组复制的过程。如果在复制的这个期间有别的线程来取值的话,很有可能取到一个null值
//示例:public class HashMapNotSafe {public static void main(String[] args) {final Map<Integer, String> map = new HashMap<>();final Integer targetKey = 0b1111_1111_1111_1111; // 65 535final String targetValue = "v";map.put(targetKey, targetValue);new Thread(() -> {IntStream.range(0, targetKey).forEach(key -> map.put(key, "someValue"));}).start();while (true) {if (null == map.get(targetKey)) {throw new RuntimeException("HashMap is not thread safe.");}}}}
同时put碰撞导致线程不安全:
当有多个线程同时put的时候,若同时put的key值是一样的,两个线程判断这个位置的时候又正好是空的,那么它们就会发生碰撞,并且存入到同一个bucket位置。这时就只会存放一个值进去丢失一个数据。
死循环造成CPU100%:
在扩容的时候,扩容的逻辑会反转散列桶的节点顺序。当有多个线程同时进行扩容的时候,也就是两个线程同时反转,可能会形成一个循环。这个循环是链表的循环,也就是A节点指向B,B节点又指向A,在下一次想要获取key的值的时候,就会在遍历链表的时候永远无法遍历结束的情况。
ConcurrentHashMap
1.7&1.8的ConcurrentHashMap
1.7结构示意图
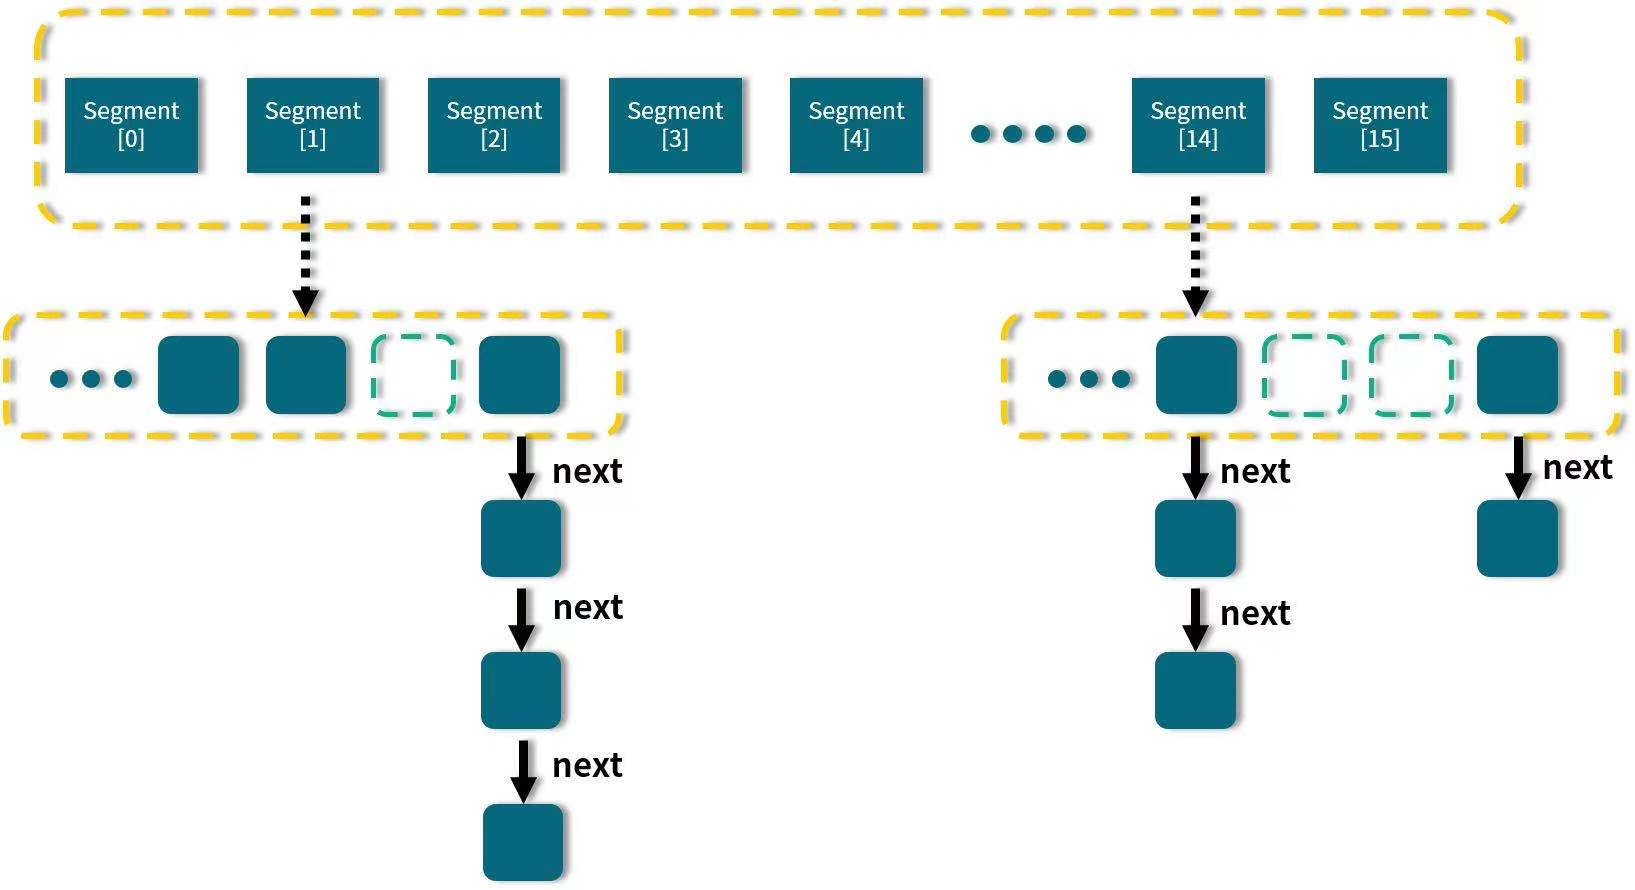
在concurrentHashMap中进行了segment分段,并且每个segment都继承了ReentrantLock,各个segment之间独立上锁互不影响,相比较hashtable每次都要对整个对象上锁concurrentHashMap的并发效率更高。
每个segement的底层采用数组和链表租成的拉链结构。默认0-15一共16个segment,最多可以支持16个线程的并发操作。在初始化给定了默认值之后是不可以扩容的。
1.8结构示意图
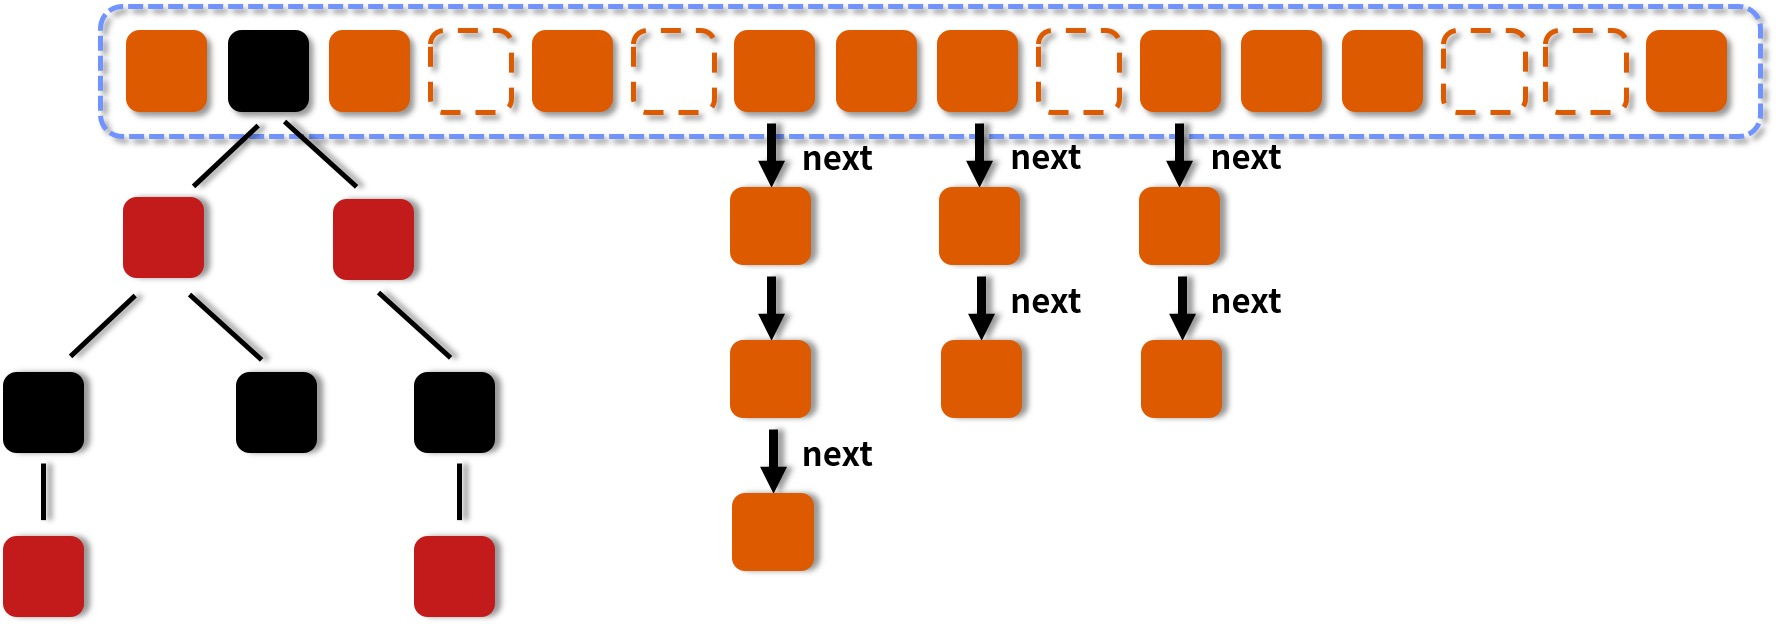
三种填充情况
1.空的,也就是说当前没有数据填充进来
2.和hashMap类似的拉链法形成的一个链表结构
3.红黑树结构,由原本的链表转变而来
重要变化
加入了红黑树这种数据结构。红黑树是每个节点都带有颜色属性的二叉查找树,颜色为红色或黑色,本质上是对二叉查找树BST的一种平衡策略。也就是一种平衡二叉树,查找效率高,会自动升节点和降节点。
红黑树的左右子树的高度几乎一致,查找的性能接近二分查找,时间复杂度为O(log(N))级别。链表最坏的情况为时间复杂度为O(N)级别要比红黑树要差很多。
1.7和1.8ConcurrentHashMap保证并发的原理
1.7使用segment分段锁保证线程安全,而segment继承自ReentrantLock
1.8使用Node+cas+synchronized保证线程安全
ConcurrentHashMap扩容&转换红黑树原理
ConcurrentHashMap的初始容量为16
/** * The default initial table capacity. Must be a power of 2 * (i.e., at least 1) and at most MAXIMUM_CAPACITY. */ private static final int DEFAULT_CAPACITY = 16;
在这个容器中无论是扩容还是自定义大小,最终生成的容器大小都是2的幂次方。方便并发扩容,在ConcurrentHashMap中扩容方法是可以多线程并发操作的。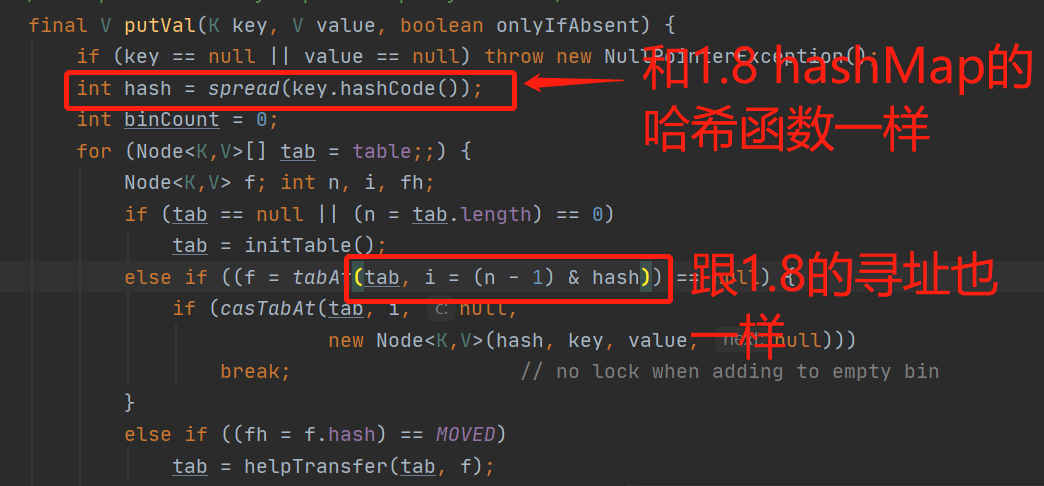
通过这个方法让值变为2的幂次方private static final int tableSizeFor(int c) {int n = c - 1;n |= n >>> 1;n |= n >>> 2;n |= n >>> 4;n |= n >>> 8;n |= n >>> 16;return (n < 0) ? 1 : (n >= MAXIMUM_CAPACITY) ? MAXIMUM_CAPACITY : n + 1;}
扩容负载因子0.75,只影响容量的大小
/** * The load factor for this table. Overrides of this value in * constructors affect only the initial table capacity. The * actual floating point value isn’t normally used — it is * simpler to use expressions such as {@code n - (n >>> 2)} for * the associated resizing threshold. */ private static final float LOAD_FACTOR = 0.75f;
理想情况下,箱子中节点的频率遵循泊松分布(http://en.wikipedia.org/wiki/Poisson_distribution),平均参数约为0.5,给定0.75的调整阈值。扩容使数据分布合理。
但是,仍然会出现单个链表数据过长的情况,图中描述了各个长度会出现的概率。看到当长度为8的时候这种情况的概率是很低的,但仍会发生。遇到这种情况我们就可以拟定当前数据已经出现了比较严重的情况那么这时就会把链表转为红黑树。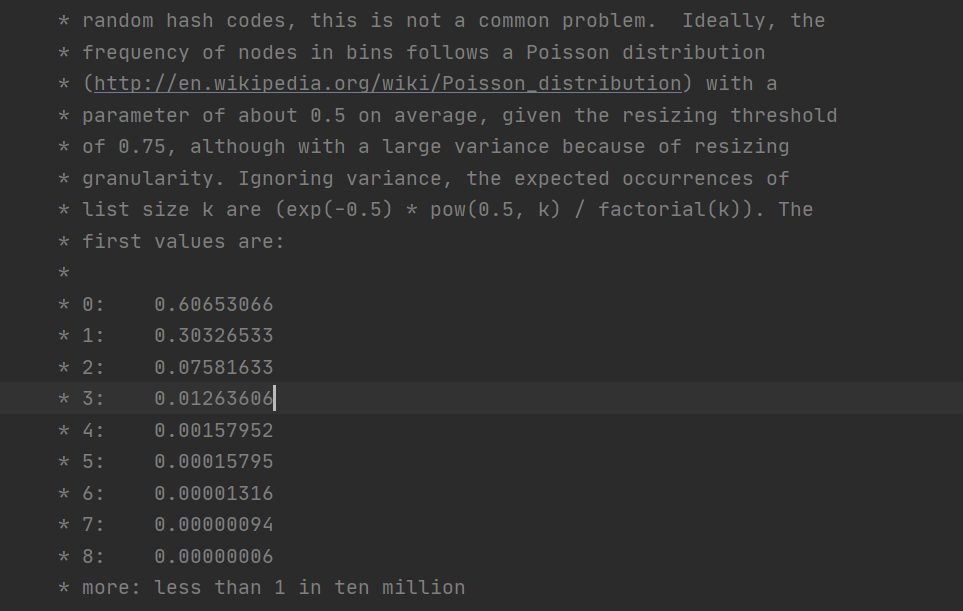
常用辅助类
CountDownLatch

充当一个线程减法计数器,当执行了一定数量的线程之后再去执行其他的操作
public static void main(String[] args) {CountDownLatch countDownLatch = new CountDownLatch(6);for (int i = 0; i < 10; i++) {new Thread(()->{System.out.println(Thread.currentThread().getName()+"Go");countDownLatch.countDown();},String.valueOf(i)).start();}try {countDownLatch.await();} catch (InterruptedException e) {e.printStackTrace();}System.out.println("Close Door");}
CyclicBarrier
执行的线程超过给定的一个阈值(这里是7),才会走下一个线程的操作
public static void main(String[] args) {CyclicBarrier cyclicBarrier = new CyclicBarrier(7, () -> {System.out.println("执行");});for (int i = 0; i < 10; i++) {int finalI = i;new Thread(()->{System.out.println(finalI);try {cyclicBarrier.await();} catch (InterruptedException e) {e.printStackTrace();} catch (BrokenBarrierException e) {e.printStackTrace();}}).start();}}
Semaphore
通过信号量的一个理念做一个限流的操作,当信号量消耗完时只有信号量个数的线程被启动运行,执行完成后返还信号量。
public static void main(String[] args) {Semaphore semaphore = new Semaphore(3);for (int i = 0; i < 10; i++) {new Thread(()->{try {semaphore.acquire();System.out.println(Thread.currentThread().getName()+"得到许可");TimeUnit.SECONDS.sleep(2);System.out.println(Thread.currentThread().getName()+"放弃许可");} catch (InterruptedException e) {e.printStackTrace();} finally {semaphore.release();}},String.valueOf(i)).start();}}
FutureTask之Promise模式
Promise模式
Promise模式是一种异步编程模式 。它使得我们可以先开始一个任务的执行,并得到一个用于获取该任务执行结果的凭据对象,而不必等待该任务执行完毕就可以继续执行其他操作。等到我们需要该任务的执行结果时,再调用凭据对象的相关方法来获取。这样就避免了不必要的等待,增加了系统的并发性。
Promise模式主要由4部分构成: 1:Promisor、 2:Executor、 3:Promise, 4:Result。
Executor: 在Promisor中定义好一个任务, Executor异步执行这个任务。换句话来讲, 就是Promisor决定了,接下来要去异步做一件事情, 然后按下Executor的按钮,就可以执行了。
Promise: 是Promisor的create()方法的返回值,这里是立刻返回的,就像买彩票时候拿到的号码。虽然在买彩票的那一刻,不知道结果, 不过你也不需要在彩票站等待, 直接拿着号码就可以回去了。等开奖时间到了, 就可以用这个号码查询自己有没有中奖。 而Promise就好比这个号码,可以立刻返回得到,不会阻塞程序运行.。
Result:就是通过Promise的方法获得到异步执行的结果,promise这里通过get()获取值的时候是阻塞住的,只有经过了阻塞等待, 才能知道结果。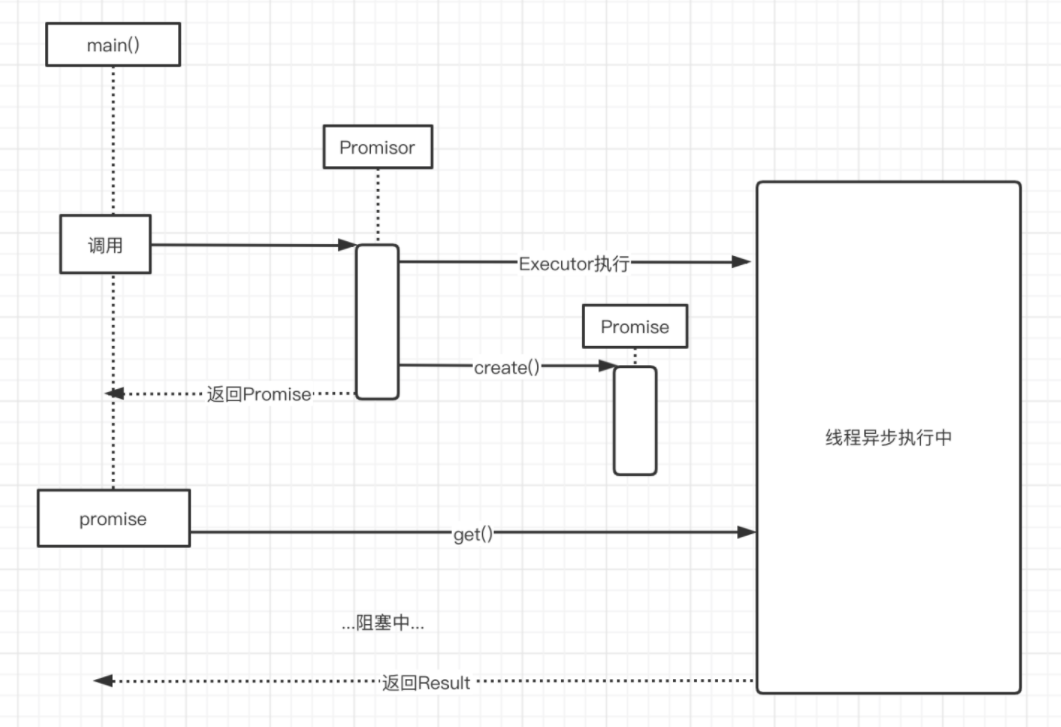
FutureTask源码剖析
构造函数
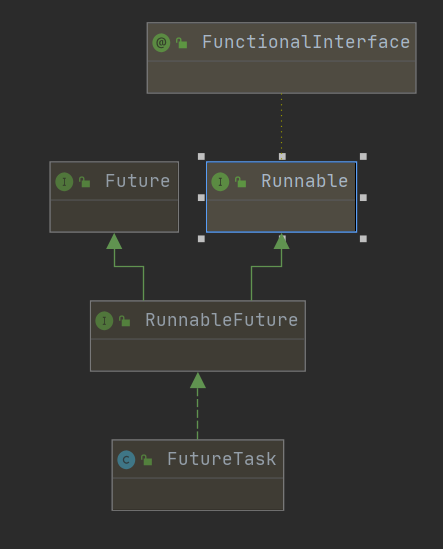
这两个构造函数,一个传Callable接口,一个传Runnable,但是这个Runnable最后也会被转成Callable
public FutureTask(Callable<V> callable) {if (callable == null)throw new NullPointerException();this.callable = callable;this.state = NEW; // ensure visibility of callable}public FutureTask(Runnable runnable, V result) {this.callable = Executors.callable(runnable, result);this.state = NEW; // ensure visibility of callable}
Runnable和Callable的区别:虽然Callable与Runnable很相似,但是Callable可以抛出异常。而更重要的区别是,Callable中的call()方法相比Runnable中的run()方法,前者有返回值,而后者没有。
task执行的结果设置
FutureTask也是实现了Runnable接口,运行方法一定是run方法。
1.将Callable接口对象传入
2.调用call方法,获得结果
3.设置结果,传入的callable的返回值,在线程安全的前提下,赋值给了FutureTask的成员变量outcome。启动Future会通过Callable来获取一个结果,并把这个结果放到成员变量outcome,等待着获取。
public void run() {if (state != NEW ||!UNSAFE.compareAndSwapObject(this, runnerOffset,null, Thread.currentThread()))return;try {1. Callable<V> c = callable;if (c != null && state == NEW) {V result;boolean ran;try {2. result = c.call();ran = true;} catch (Throwable ex) {result = null;ran = false;setException(ex);}if (ran)3. set(result);}} finally {// runner must be non-null until state is settled to// prevent concurrent calls to run()runner = null;// state must be re-read after nulling runner to prevent// leaked interruptsint s = state;if (s >= INTERRUPTING)handlePossibleCancellationInterrupt(s);}}protected void set(V v) {if (UNSAFE.compareAndSwapInt(this, stateOffset, NEW, COMPLETING)) {outcome = v;UNSAFE.putOrderedInt(this, stateOffset, NORMAL); // final statefinishCompletion();}}
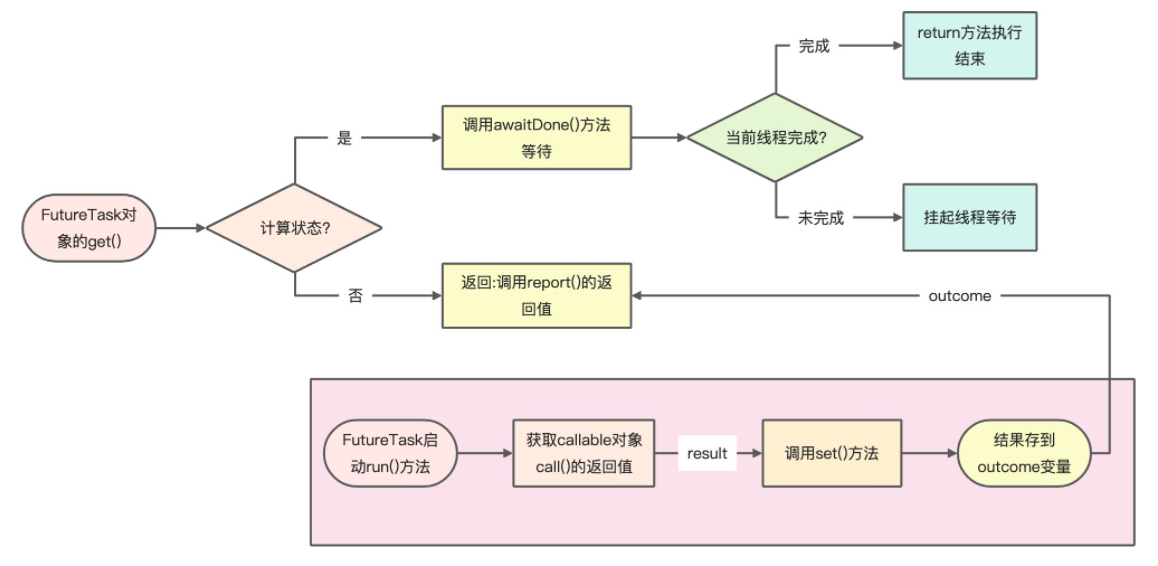
从FutureTask线程获取结果
get方法
如果线程状态不是完成的状态,那么就等待,如果是完成的状态就执行report方法返回结果。
public V get() throws InterruptedException, ExecutionException {
        int s = state;
        if (s <= COMPLETING)
            s = awaitDone(false, 0L);
        return report(s);
    }
返回结果的report方法
1处将outcome赋值给x,2处返回这个x。也就意味着task执行的时候给outcome设置的结果在这里被消费了
private V report(int s) throws ExecutionException {
      1  Object x = outcome;
        if (s == NORMAL)
      2      return (V)x;
        if (s >= CANCELLED)
            throw new CancellationException();
        throw new ExecutionException((Throwable)x);
    }

awaitDone 阻塞方法
1.进入一个循环
2.如果线程状态是完成的状态就返回这个状态值
3.暂停当前线程,在哪个线程中调用就对哪个线程进行操作,此线程进入wait状态(阻塞状态)
private int awaitDone(boolean timed, long nanos)
        throws InterruptedException {
        final long deadline = timed ? System.nanoTime() + nanos : 0L;
        WaitNode q = null;
        boolean queued = false;
    1.  for (;;) {
            if (Thread.interrupted()) {
                removeWaiter(q);
                throw new InterruptedException();
            }

            int s = state;
    2.      if (s > COMPLETING) {
                if (q != null)
                    q.thread = null;
                return s;
            }
            else if (s == COMPLETING) // cannot time out yet
                Thread.yield();
            else if (q == null)
                q = new WaitNode();
            else if (!queued)
                queued = UNSAFE.compareAndSwapObject(this, waitersOffset,
                                                     q.next = waiters, q);
            else if (timed) {
                nanos = deadline - System.nanoTime();
                if (nanos <= 0L) {
                    removeWaiter(q);
                    return state;
                }
                LockSupport.parkNanos(this, nanos);
            }
            else
     3.         LockSupport.park(this);
        }
    }

若有收获,就点个赞吧
0 人点赞
