18.1 国密算法概述
国密即国家密码局认定的国产密码算法。主要有SM1,SM2,SM3,SM4。
18.1.1 SM1算法
SM1 为对称加密。其加密强度与AES相当。该算法不公开,调用该算法时,需要通过加密芯片的接口进行调用。
18.1.2 SM2算法
SM2为非对称加密的公钥密码算法,是我国自主设计的椭圆曲线公钥密码算法,该算法基于256位比特(32字节)ECC,安全强度比RSA 2048位高,签名速度与秘钥生成速度都快于RSA。该算法已公开。
在实际使用非对称加密时,一般是后端生成密钥对,将公钥交给前端,前端用公钥加密数据,后端用私钥对数据解密。在有些项目中,没有使用HTTPS的时候,登录的口令(用户名/密码),需要进行加密传输的需求,这时候我们就需要采用非对称加密来实现。
18.1.3 SM3算法
SM3为消息摘要算法,可用于数字签名、消息认证、验证数据完整性等,可以用MD5 或 SHA-1 算法作为对比理解,但SM3安全度更高,校验结果为256位比特(32字节)。该算法已公开。
18.1.4 SM4算法
SM4是传统的对称加密算法,类似于 DES 或 AES。它的密钥长度和分组长度均为128位,若消息长度过长,需要进行分组,在同一密钥控制下逐组进行加密,若消息长度不足,则要进行填充。
18.2 前端国密算法库
我们在前端选择sm-crypto项目实现国密算法。该项目的地址为https://github.com/JuneAndGreen/sm-crypto。
18.2.1 安装
$ tyarn add sm-crypto或$ cnpm install --save sm-crypto
18.2.2 SM2加密解密
本节是使用sm-crypto算法库实现SM2算法加密解密的示例代码。
- 获取密钥对 ```javascript const sm2 = require(‘sm-crypto’).sm2
let keypair = sm2.generateKeyPairHex()
publicKey = keypair.publicKey // 公钥 privateKey = keypair.privateKey // 私钥
- 加密解密```javascriptconst sm2 = require('sm-crypto').sm2const cipherMode = 1 // 1 - C1C3C2,0 - C1C2C3,默认为1// 加密结果let encryptData = sm2.doEncrypt(msgString, publicKey, cipherMode)// 解密结果let decryptData = sm2.doDecrypt(encryptData, privateKey, cipherMode)
- 签名验签
ps:理论上来说,只做纯签名是最快的。
const sm2 = require('sm-crypto').sm2// 纯签名let sigValueHex = sm2.doSignature(msg, privateKey) // 签名let verifyResult = sm2.doVerifySignature(msg, sigValueHex, publicKey) // 验签结果// 纯签名 + 生成椭圆曲线点let sigValueHex2 = sm2.doSignature(msg, privateKey, {// 传入事先已生成好的椭圆曲线点,可加快签名速度pointPool: [sm2.getPoint(), sm2.getPoint(), sm2.getPoint(), sm2.getPoint()],}) // 签名let verifyResult2 = sm2.doVerifySignature(msg, sigValueHex2, publicKey) // 验签结果// 纯签名 + 生成椭圆曲线点 + der编解码let sigValueHex3 = sm2.doSignature(msg, privateKey, {der: true,}) // 签名let verifyResult3 = sm2.doVerifySignature(msg, sigValueHex3, publicKey, {der: true,}) // 验签结果// 纯签名 + 生成椭圆曲线点 + sm3杂凑let sigValueHex4 = sm2.doSignature(msg, privateKey, {hash: true,}) // 签名let verifyResult4 = sm2.doVerifySignature(msg, sigValueHex4, publicKey, {hash: true,}) // 验签结果// 纯签名 + 生成椭圆曲线点 + sm3杂凑(不做公钥推导)let sigValueHex5 = sm2.doSignature(msg, privateKey, {hash: true,//传入公钥的话,可以去掉sm3杂凑中推导公钥的过程,//速度会比纯签名 + 生成椭圆曲线点 + sm3杂凑快publicKey,})let verifyResult5 = sm2.doVerifySignature(msg, sigValueHex5, publicKey, {hash: true,publicKey,})// 纯签名 + 生成椭圆曲线点 + sm3杂凑 + 不做公钥推 + 添加 userId(长度小于 8192)// 默认 userId 值为 1234567812345678let sigValueHex6 = sm2.doSignature(msgString, privateKey, {hash: true,publicKey,userId: 'testUserId',})let verifyResult6 = sm2.doVerifySignature(msgString, sigValueHex6, publicKey, {hash: true,userId: 'testUserId',})
- 获取椭圆曲线点 ```javascript const sm2 = require(‘sm-crypto’).sm2
let poin = sm2.getPoint() // 获取一个椭圆曲线点,可在sm2签名时传入
<a name="o1ai7"></a>### 18.2.3 SM3加密本节是使用`sm-crypto`算法库实现SM3算法加密的示例代码(摘要算法是单向的)。```javascriptconst sm3 = require('sm-crypto').sm3let hashData = sm3('abc') // 杂凑
18.2.4 SM4加密解密
本节是使用sm-crypto算法库实现SM4算法加密解密的示例代码。
- 加密 ```javascript const sm4 = require(‘sm-crypto’).sm4 // 可以为 utf8 串或字节数组 const msg = ‘hello world! 我是 juneandgreen.’ // 可以为 16 进制串或字节数组,要求为 128 比特 const key = ‘0123456789abcdeffedcba9876543210’
// 加密,默认输出 16 进制字符串,默认使用 pkcs#5 填充 let encryptData = sm4.encrypt(msg, key) // 加密,不使用 padding let encryptData = sm4.encrypt(msg, key, {padding: ‘none’}) // 加密,不使用 padding,输出为字节数组 let encryptData = sm4.encrypt(msg, key, {padding: ‘none’, output: ‘array’})
- 解密```javascriptconst sm4 = require('sm-crypto').sm4// 可以为 16 进制串或字节数组const encryptData = '0e395deb10f6e8a17e17823e1fd9bd98a1bff1df508b5b8a1efb79ec633d1bb129432ac1b74972dbe97bab04f024e89c'// 可以为 16 进制串或字节数组,要求为 128 比特const key = '0123456789abcdeffedcba9876543210'// 解密,默认输出 utf8 字符串,默认使用 pkcs#5 填充let decryptData = sm4.decrypt(encryptData, key)// 解密,不使用 paddinglet decryptData = sm4.decrypt(encryptData, key, {padding: 'none'})// 解密,不使用 padding,输出为字节数组let decryptData = sm4.decrypt(encryptData, key, {padding: 'none', output: 'array'})
18.3 在前端应用国密算法的实例
18.3.1 配置路由
config/routes.ts
{name: '加密解密',icon: 'lock',path: '/crypto',component: './Crypto',},
18.3.2 前端代码
建立新的目录和文件src/pages/Crypto/index.tsx
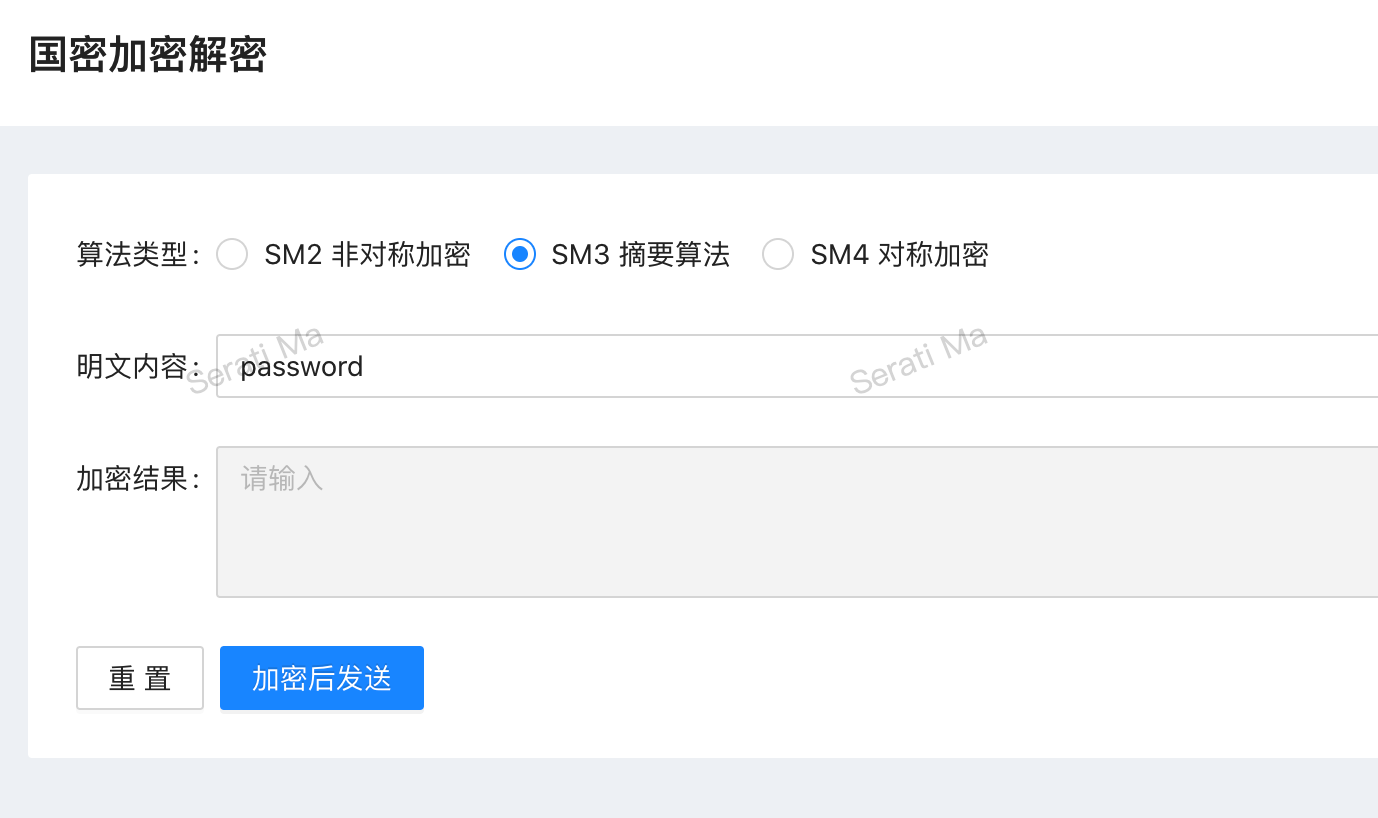
import React from 'react';import { PageContainer } from '@ant-design/pro-layout';import { request } from 'umi';import { Form, notification } from 'antd';import ProCard from '@ant-design/pro-card';import ProForm, {ProFormProps,ProFormText,ProFormRadio,ProFormTextArea,} from '@ant-design/pro-form';//之前用sm2.generateKeyPairHex()计算密钥对后的公钥const publicKey = "04ac0d181497f663c38ecc246183085a272f28c2842aa739fe087cd607d9b32d3dc3f897f45baf4c3196e670437e4af00b935cd263370f028563ff830229007a18"//可以为 16 进制串或字节数组,要求为 128 比特const key = '0123456789abcdeffedcba9876543210'async function sendEncryptData(algorithm:number, encryptData:string) {try {const result = await request('/api/decryptData', {method: 'POST',data: {algorithm,encryptData,}})if(result.success) {const options = {message: '解密结果',description: result.decryptData,}if(result.decryptSuccess)notification.info(options)elsenotification.error(options)}} catch(e) {}}const cryptoPage: React.FC = () => {const [form] = Form.useForm();const FormProps: ProFormProps = {form,layout: "horizontal",initialValues: {algorithm: 3,message: 'password',},submitter: {searchConfig: {submitText: '加密后发送',},},onValuesChange: (changedValus) => {if(changedValus.algorithm === 3)form.setFieldsValue({message: 'password'})else if(changedValus.algorithm != undefined)form.setFieldsValue({message: ''})},onFinish: async (formData: any) => {let encryptData = ''const { algorithm, message } = formDataswitch(algorithm) {case 2://非对称加密const sm2 = require('sm-crypto').sm2const cipherMode = 1 // 1 - C1C3C2,0 - C1C2C3,默认为1encryptData = sm2.doEncrypt(message, publicKey, cipherMode)break;case 4://对称加密const sm4 = require('sm-crypto').sm4//加密,默认输出 16 进制字符串,默认使用 pkcs#5 填充encryptData = sm4.encrypt(message, key)break;default:// 杂凑const sm3 = require('sm-crypto').sm3encryptData = sm3(message)}form.setFieldsValue({encryptResult: encryptData})sendEncryptData(algorithm, encryptData)},}return (<PageContainer header={{breadcrumb: {},}} title="国密加密解密"><ProCard><ProForm {...FormProps}><ProFormRadio.Group name="algorithm"label="算法类型"options={[{ value: 2, label: 'SM2 非对称加密' },{ value: 3, label: 'SM3 摘要算法' },{ value: 4, label: 'SM4 对称加密' },]} /><ProFormText name="message"label="明文内容"fieldProps ={{ autoComplete:"off" }}/><ProFormTextArea name="encryptResult"label="加密结果" disabled={true} /></ProForm></ProCard></PageContainer>)}export default cryptoPage;
18.3.3 配套的Mock代码
mock/crypto.ts
import { Request, Response } from 'express';function decryptData(req: Request, res: Response, u: string) {const key = '0123456789abcdeffedcba9876543210'//const keypair = sm2.generateKeyPairHex()const privateKey = "72b7015c42fc937d6a7197a5595c13ed683e87d32ea6180514740d6263b3c88d"const { algorithm=3, encryptData=''} = {...req.body}const result = {success: true,decryptSuccess: true,decryptData: '',}switch(algorithm) {case 2:const sm2 = require('sm-crypto').sm2const cipherMode = 1 // 1 - C1C3C2,0 - C1C2C3,默认为1result.decryptData = sm2.doDecrypt(encryptData, privateKey, cipherMode)break;case 4:const sm4 = require('sm-crypto').sm4result.decryptData = sm4.decrypt(encryptData, key)break;default:const sm3 = require('sm-crypto').sm3if(encryptData == sm3('password'))result.decryptData = '哈希计算结果一致'else {result.decryptSuccess = falseresult.decryptData = '哈希计算结果不一致'}}return res.json(result);}export default {'POST /api/decryptData': decryptData,};
18.4 使用SM2和SM3保护用户密码
18.4.1 处理逻辑
我们可以组合使用SM2和SM3保护用户密码,以实现不在后端保存明文密码和不通过网络传递明文密码的两个目标:
- 后端保存用户密码经SM3算法计算后的哈希值
- 前端使用SM2算法的公钥加密用户密码后传输
- 后端使用SM2算法的私钥解密收到的用户密码
- 后端使用SM3算法计算用户密码的哈希值
- 后端判断新计算的哈希值与之前保存的结果是否一致
18.4.2 在前端加密用户密码
在pages/user/Login/index.tsx中修改登录部分的代码 ```diff
- const loginResult = await login({ …values, type: loginType });
- const publicKey = “04ac0d181497f663c38ecc246183085a272f28c2842aa739fe087cd607d9b32d3dc3f897f45baf4c3196e670437e4af00b935cd263370f028563ff830229007a18”
- let { password, …rest } = values +
- if(password != undefined) {
- const sm2 = require(‘sm-crypto’).sm2
- const cipherMode = 1 // 1 - C1C3C2,0 - C1C2C3,默认为1
- password = sm2.doEncrypt(password, publicKey, cipherMode)
- }
- const loginResult = await login({ …rest, password, type: loginType });
```
18.4.3 Mock中解密和计算哈希
在mock/user.ts中修改登录响应函数(请自行仔细比较代码的变化)
const privateKey = "72b7015c42fc937d6a7197a5595c13ed683e87d32ea6180514740d6263b3c88d"//字符串admin经过SM3进行哈希计算后的结果const adminHash = "dc1fd00e3eeeb940ff46f457bf97d66ba7fcc36e0b20802383de142860e76ae6"//字符串user经过SM3进行哈希计算后的结果const userHash = "92e7fbdcca8b9f36be0638e48e77cbeeb49ef15886b6cd12d46e09d74a232a81"async function login(req: Request, res: Response) {let { password, username, captcha, type } = req.body;const result:TYPE.QueryResult & {type:string} = {success: true,type,data: {}}console.log("body = ", req.body)await waitTime(2000);if(type === 'account') {if(password != undefined ) {//解密获得加密前的明文密码const sm2 = require('sm-crypto').sm2const cipherMode = 1 // 1 - C1C3C2,0 - C1C2C3,默认为1password = sm2.doDecrypt(password, privateKey, cipherMode) // 解密结果//计算前端密码的哈希值const sm3 = require('sm-crypto').sm3password = sm3(password)}//将前端密码的哈希值与后端保存的对比if (username === 'admin' && password === adminHash ) {result.data['token'] = makeToken(username)}if (username === 'user' && password === userHash ) {result.data['token'] = makeToken(username)}} else {if(currentCaptcha != captcha) {result.success = false;result.errorMessage = '验证码错误'} elseresult.data['token'] = makeToken()}return res.json(result);}
18.5 参考信息
- 国密算法标准文档 https://github.com/guanzhi/GM-Standards
- 北大的国密算法工具箱 https://github.com/guanzhi/GmSSL,http://gmssl.org
- 独立的前端SM2项目 https://github.com/Saberization/SM2
- 独立的前端SM4项目 https://github.com/windard/sm4
版权说明:本文由北京朗思云网科技股份有限公司原创,向互联网开放全部内容但保留所有权力。

若有收获,就点个赞吧
0 人点赞
