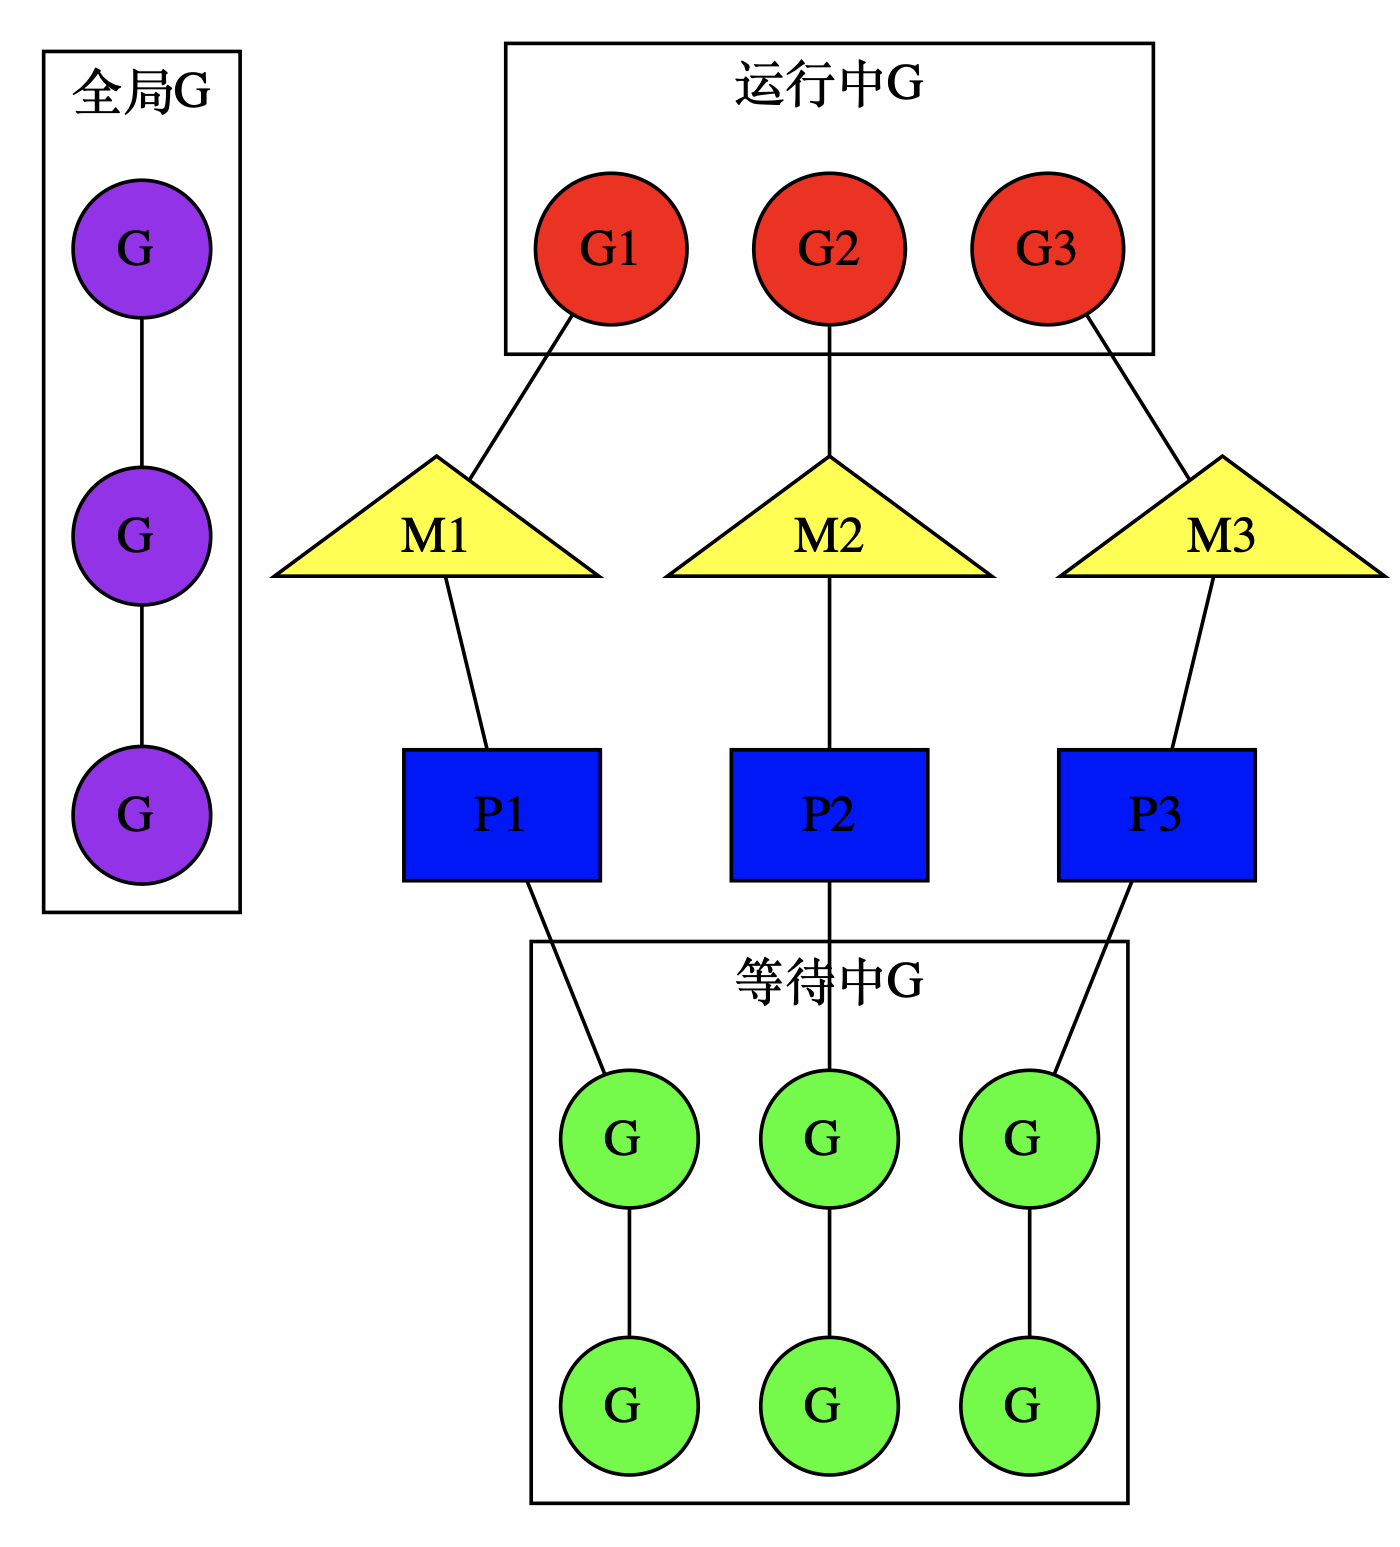
调度相关的数据结构有三个,M(线程),P(调度器),G(goroutine)
M 表示线程,P 作为调度器用来帮助每个线程管理自己的 goroutine,G 就是 golang 的协程。我们可以通过 runtime.GOMAXPROCS(n int) 函数设置 P 的个数,注意P 的个数并不代表 M 的个数,例如程序启动时 runtime 代码会出实话 procs 个 P,但开始的时候只会启动一个 M,就是 M0 和一个栈为 64K(其他 goroutine 默认初始栈大小 2K) 来执行 runtime 代码。
那其他线程是什么时候创建的呐?
当 goroutine 被唤醒时,要在 M 上运行 (恢复 goroutine 的上下文),P 是帮助 M 管理 goroutine 的,恢复上下文的操作也由 P 来完成。如果被唤醒时发现还有空闲的 P,并且没有其他 M 在窃取 goroutine(M 发现本地 goroutine 队列和全局 goroutine 队列都没有 goroutine 的时候,会去其他线程窃取 goroutine),说明其他 M 都在忙,就会创建一个 M 让这个空闲的 P 帮他来管理 goroutine。
总之一句话,开始的时候创建一个 M,当发现调度不过来且还有空闲 P 没有工作就在创建新的,直到创建 procs 个 M(procs 通过 runtime.GOMAXPROCS 设置)
G
golang 用结构体 g 表示 goroutine
g
type g struct {stack stackstackguard0 uintptrstackguard1 uintptr_panic *_panic_defer *_deferm *msched gobuf...schedlink guintptr...preempt bool...}
gobuf
gobuf 保存 goroutine 的调度信息,当一个 goroutine 被调度的时,本质上就是把这个 goroutine 放到 cpu,恢复各个寄存器的值,然后运行
type gobuf struct {sp uintptrpc uintptrg guintptrctxt unsafe.Pointerret sys.Uintreglr uintptrbp uintptr}
M
golang 中 M 表示实际操作系统的线程
m
type m struct {g0 *g...gsignal *gtls [6]uintptrmstartfn func()curg *g...p puintptrnextp puintptroldp puintptr...spinning boolblocked bool...park notealllink *m...thread uintptr...}
P
golang 中 P 表示一个调度器,为 M 提供上下文环境,使得 M 可以执行多个 goroutine
p
type p struct {m muintptr...runqhead uint32runqtail uint32runq [256]guintptr...sudogcache []*sudogsudogbuf [128]*sudog...pad cpu.CacheLinePad}
schedt
schedt 结构体用来保存 P 的状态信息和 goroutine 的全局运行队列
type schedt struct {...lock mutexmidle muintptrnmidle int32nmidlelocked int32mnext int64maxmcount int32nmsys int32nmfreed int64ngsys uint32pidle puintptrnpidle uint32nmspinning uint32runq gQueuerunqsize int32...gFree struct {lock mutexstack gListnoStack gListn int32}...}
重要的全局变量
allgs []*gallm *mallp []*pncpu int32gomaxprocs int32sched schedtm0 mg0 g
下面是用 go 实现的 hello world,代码里并没有关于调度的初始化,所以程序的入口并非是 main.main,下面通过 gdb 一步步找到 go 是如何初始化调度的。
package mainfunc main() {println("hello, world!")}
编译
go build -gcflags "-N -l" test.go
使用 OS X 的同学注意,go1.11 之后压缩的 debug 信息,OS X 的同学需要同时做以下设置参考Debug Go Program With Gdb On Macos
export GOFLAGS="-ldflags=-compressdwarf=false"
调试
- 利用断点可以找出目标文件的信息,在入口处打一个断点,找到程序入口在 rt0_darwin_amd64.s 的第 8 行
➜ sudo gdb test(gdb) info filesSymbols from "/Users/journey/workspace/src/tool/gdb/test".Local exec file:`/Users/journey/workspace/src/tool/gdb/test', file type mach-o-x86-64.Entry point: 0x104cd000x0000000001001000 - 0x00000000010515b1 is .text0x00000000010515c0 - 0x000000000108162a is __TEXT.__rodata0x0000000001081640 - 0x0000000001081706 is __TEXT.__symbol_stub10x0000000001081720 - 0x0000000001081e80 is __TEXT.__typelink0x0000000001081e80 - 0x0000000001081e88 is __TEXT.__itablink0x0000000001081e88 - 0x0000000001081e88 is __TEXT.__gosymtab0x0000000001081ea0 - 0x00000000010bfacd is __TEXT.__gopclntab0x00000000010c0000 - 0x00000000010c0020 is __DATA.__go_buildinfo0x00000000010c0020 - 0x00000000010c0128 is __DATA.__nl_symbol_ptr0x00000000010c0140 - 0x00000000010c0d08 is __DATA.__noptrdata0x00000000010c0d20 - 0x00000000010c27f0 is .data0x00000000010c2800 - 0x00000000010ddc90 is .bss0x00000000010ddca0 - 0x00000000010e01e8 is __DATA.__noptrbss(gdb) b *0x104cd00Breakpoint 1 at 0x104cd00: file /usr/local/go/src/runtime/rt0_darwin_amd64.s, line 8.
- 进入上面找到的文件 rt0_darwin_amd64.s(不同的架构文件是不同的)
➜ runtime ls rt0_*rt0_aix_ppc64.s rt0_darwin_amd64.s rt0_freebsd_arm.s rt0_linux_arm64.s rt0_nacl_386.s rt0_netbsd_arm64.s rt0_plan9_amd64.srt0_android_386.s rt0_darwin_arm.s rt0_illumos_amd64.s rt0_linux_mips64x.s rt0_nacl_amd64p32.s rt0_openbsd_386.s rt0_plan9_arm.srt0_android_amd64.s rt0_darwin_arm64.s rt0_js_wasm.s rt0_linux_mipsx.s rt0_nacl_arm.s rt0_openbsd_amd64.s rt0_solaris_amd64.srt0_android_arm.s rt0_dragonfly_amd64.s rt0_linux_386.s rt0_linux_ppc64.s rt0_netbsd_386.s rt0_openbsd_arm.s rt0_windows_386.srt0_android_arm64.s rt0_freebsd_386.s rt0_linux_amd64.s rt0_linux_ppc64le.s rt0_netbsd_amd64.s rt0_openbsd_arm64.s rt0_windows_amd64.srt0_darwin_386.s rt0_freebsd_amd64.s rt0_linux_arm.s rt0_linux_s390x.s rt0_netbsd_arm.s rt0_plan9_386.s rt0_windows_arm.s
- 打开文件 go/src/runtime/rt0_darwin_amd64.s:8
这里没有做什么就调了函数_rt0_amd64
TEXT _rt0_amd64_darwin(SB),NOSPLIT,$-8JMP _rt0_amd64(SB)
- 然后在打断点看看_rt0_amd64 在哪
在 ams_amd64.s 第 15 行
(gdb) b _rt0_amd64Breakpoint 2 at 0x1049350: file /usr/local/go/src/runtime/asm_amd64.s, line 15.
这里首先把参数放到 DI,SI 寄存器中,然后调用 runtime.rt0_go,这就是进程初始化主要函数了
参数 0 放在 DI 通用寄存器
参数 1 放在 SI 通用寄存器
参数 2 放在 DX 通用寄存器
参数 3 放在 CX 通用寄存器
TEXT _rt0_amd64(SB),NOSPLIT,$-8MOVQ 0(SP), DILEAQ 8(SP), SIJMP runtime·rt0_go(SB)
- 然后跳转到 runtime.rt0_go
(gdb) b runtime.rt0_goBreakpoint 3 at 0x1049360: file /usr/local/go/src/runtime/asm_amd64.s, line 89.
初始化
这个函数有点长,下面我们分段来看 rt0_go 这个函数
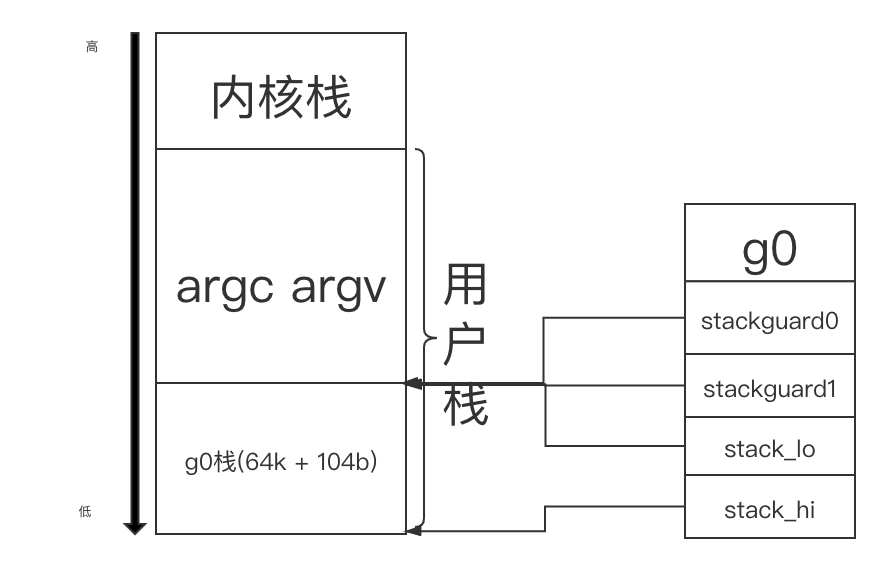
初始化参数以及创建 g0
- 首先将之前放入通用寄存器的参数放入 AX,BX 寄存器,然后调整栈顶指针 (真 SP 寄存器) 的位置,SP 指针先减 39,关于 16 字节向下对齐(因为 CPU 有一组 SSE 指令,这些指令中出现的内存地址必须是 16 的倍数),然后把参数放到 SP+16 字节和 SP+24 字节处
golang 的汇编有抽象出来的寄存器,通过是否有前缀变量区分真假寄存器,例如 a+8(SP) 就是 golang 的寄存器,8(SP) 就是真的寄存器 - 创建 g0,并初始化 g.stackgruard0,g.stackguard1 以及 g.stack.lo,g.stack.hi 的值 (实际上是分配一段内存,然后分割成小段,约定哪小段表示哪个变量)
TEXT runtime·rt0_go(SB),NOSPLIT,$0MOVQ DI, AXMOVQ SI, BXSUBQ $(4*8+7), SPANDQ $~15, SPMOVQ AX, 16(SP)MOVQ BX, 24(SP)MOVQ $runtime·g0(SB), DILEAQ (-64*1024+104)(SP), BXMOVQ BX, g_stackguard0(DI)MOVQ BX, g_stackguard1(DI)MOVQ BX, (g_stack+stack_lo)(DI)MOVQ SP, (g_stack+stack_hi)(DI)
创建完 g0 的内存分布
然后略过一段 CPU 型号检测和 CGO 初始化的代码
...
创建 m0
- 创建将 m0.tls 放入 DI 寄存器,然后调用 runtime.settls 将 m0 设置为线程私有变量 (mac 下什么也没干),将 m0 与主线程绑定,然后对 m0.tls 进行存取操作验证是否能用,不能用就直接退出
- 绑定 m0 和 g0 的关系,m0.g0 = g0,g0.m = m0
LEAQ runtime·m0+m_tls(SB), DICALL runtime·settls(SB)get_tls(BX)MOVQ $0x123, g(BX)MOVQ runtime·m0+m_tls(SB), AXCMPQ AX, $0x123JEQ 2(PC)CALL runtime·abort(SB)ok:get_tls(BX)LEAQ runtime·g0(SB), CXMOVQ CX, g(BX)LEAQ runtime·m0(SB), AXMOVQ CX, m_g0(AX)MOVQ AX, g_m(CX)CLDCALL runtime·check(SB)
创建完 m0 之后的内存分布
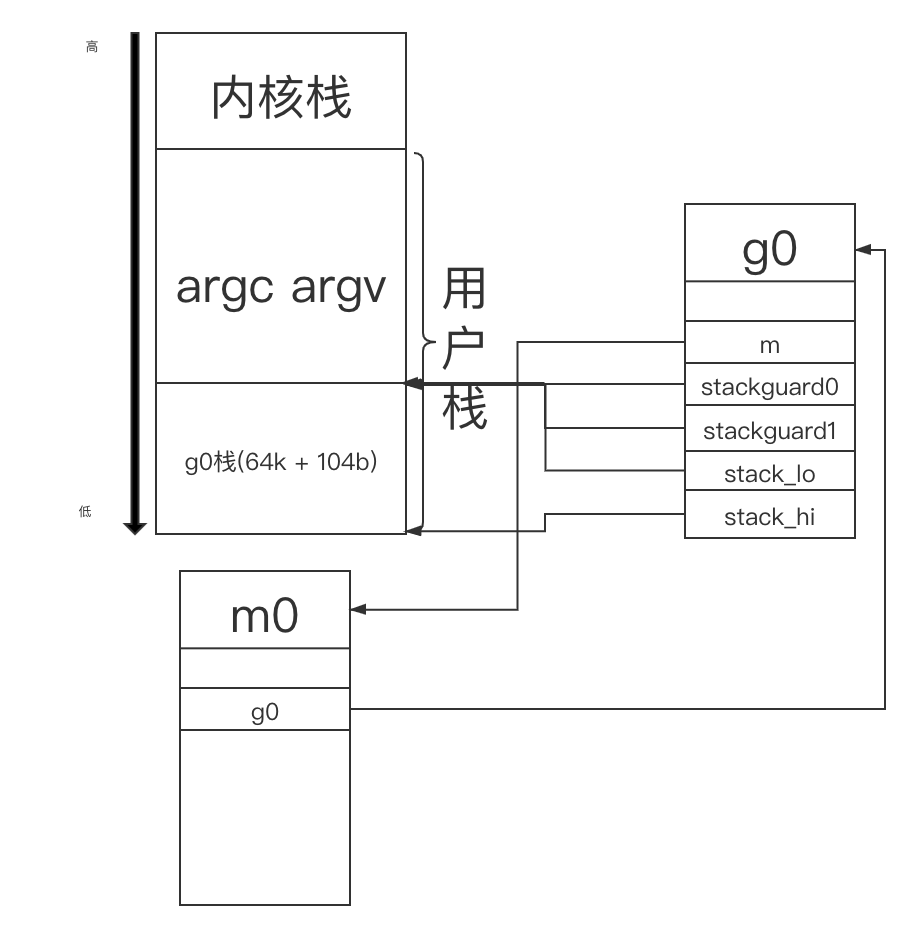
m0 和 g0 的关系
- m0 表示主线程,g0 表示主线程的第一个 goroutine
- g0 主要是记录主线程的栈信息,执行调度函数 (schedule 后边会讲) 时会用,而用户 goroutine 有自己的栈,执行的时候会从 g0 栈切换到用户 goroutine 栈
初始化调度
g0 和 m0 都创建并初始化好了,下面就该进行调度初始化了
- 将参数放入 AX(初始化 g0 时将参数放入 SP+16 和 SP+24 的位置
- runtime.args 初始化参数的
- runtime.osinit 是初始化 CPU 核数的
- 重点看 runtime.schedinit
MOVL 16(SP), AXMOVL AX, 0(SP)MOVQ 24(SP), AXMOVQ AX, 8(SP)CALL runtime·args(SB)CALL runtime·osinit(SB)CALL runtime·schedinit(SB)
runtime.schedinit
下面函数省略了调度无关的代码,大概流程:
- 设置最大线程数
- 根据 GOMAXPROCS 设置 procs(P 的数量)
- 调用 procresizeprocs 调整 P 的数量
func schedinit() {_g_ := getg()if raceenabled {_g_.racectx, raceprocctx0 = raceinit()}sched.maxmcount = 10000...mcommoninit(_g_.m)...sched.lastpoll = uint64(nanotime())procs := ncpuif n, ok := atoi32(gogetenv("GOMAXPROCS")); ok && n > 0 {procs = n}if procresize(procs) != nil {throw("unknown runnable goroutine during bootstrap")}...}
runtime.procresize
- 调度初始化最后一步
- 更新最后一次修改 P 数量动作的时间戳并累加花费时间
根据 nprocs 调整 P 的数量 (加锁)
- nprocs > 现有 P 数量,就扩展 allp(p 的全局数组) 的长度为 nprocs
- nprocs < 现有 P 数量,就缩容 allp 的长度为 nprocs
- 如果上一步是扩容了,就从堆中创建新 P,并把 P 放入扩容出来的位置
- 通过 g0 找到 m0,然后将 allp[0]和 m0 绑定
- 如果 allp 缩容了,就将多余的 p 销毁
- 将空闲的 p 加入空闲链表
到目前为止,创建了 m0,g0,和 nprocs 个 P,但是还是没有让调度真正的跑起来
func procresize(nprocs int32) *p {old := gomaxprocsif old < 0 || nprocs <= 0 {throw("procresize: invalid arg")}if trace.enabled {traceGomaxprocs(nprocs)}now := nanotime()if sched.procresizetime != 0 {sched.totaltime += int64(old) * (now - sched.procresizetime)}sched.procresizetime = nowif nprocs > int32(len(allp)) {lock(&allpLock)if nprocs <= int32(cap(allp)) {allp = allp[:nprocs]} else {nallp := make([]*p, nprocs)copy(nallp, allp[:cap(allp)])allp = nallp}unlock(&allpLock)}for i := old; i < nprocs; i++ {pp := allp[i]if pp == nil {pp = new(p)}pp.init(i)atomicstorep(unsafe.Pointer(&allp[i]), unsafe.Pointer(pp))}_g_ := getg()if _g_.m.p != 0 && _g_.m.p.ptr().id < nprocs {_g_.m.p.ptr().status = _Prunning_g_.m.p.ptr().mcache.prepareForSweep()} else {if _g_.m.p != 0 {if trace.enabled {traceGoSched()traceProcStop(_g_.m.p.ptr())}_g_.m.p.ptr().m = 0}_g_.m.p = 0_g_.m.mcache = nilp := allp[0]p.m = 0p.status = _Pidleacquirep(p)if trace.enabled {traceGoStart()}}for i := nprocs; i < old; i++ {p := allp[i]p.destroy()}if int32(len(allp)) != nprocs {lock(&allpLock)allp = allp[:nprocs]unlock(&allpLock)}var runnablePs *pfor i := nprocs - 1; i >= 0; i-- {p := allp[i]if _g_.m.p.ptr() == p {continue}p.status = _Pidleif runqempty(p) {pidleput(p)} else {p.m.set(mget())p.link.set(runnablePs)runnablePs = p}}stealOrder.reset(uint32(nprocs))var int32p *int32 = &gomaxprocsatomic.Store((*uint32)(unsafe.Pointer(int32p)), uint32(nprocs))return runnablePs}
创建 “第一个”goroutine
我们返回 runtime·rt0_go 接着看
- 将 runtime.main 地址放入 AX
- 参数 AX, 0 入栈 (函数参数入栈由右向左)
- 然后调用 runtime.newproc 创建 goroutine
MOVQ $runtime·mainPC(SB), AXPUSHQ AXPUSHQ $0CALL runtime·newproc(SB)POPQ AXPOPQ AX
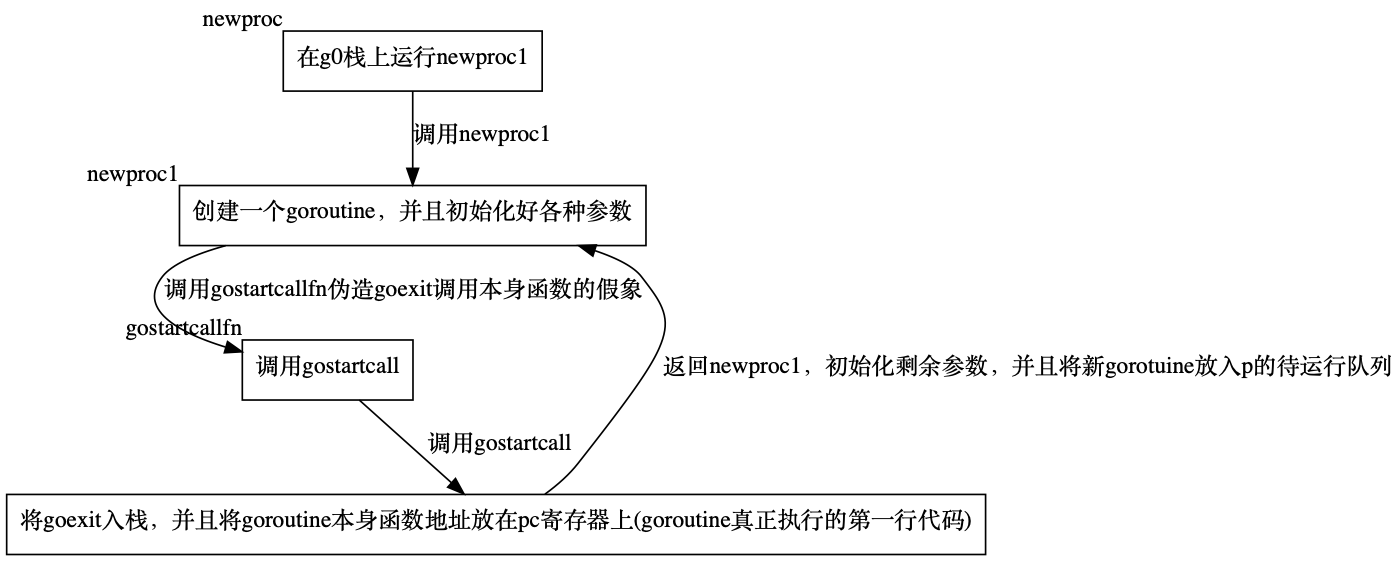
newproc
- 首先获取参数地址
- 获取当前所在 goroutine(初始化时 runtime 代码都在 g0 执行)
- 获取要执行指令地址
- 在 gp 的栈上执行 runtime.newproc1(在 g0 栈上执行)
func newproc(siz int32, fn *funcval) {argp := add(unsafe.Pointer(&fn), sys.PtrSize)gp := getg()pc := getcallerpc()systemstack(func() {newproc1(fn, (*uint8)(argp), siz, gp, pc)})}
newproc1 函数主要的工作
这个函数有点长分段来看
- 首先获得当前所在 goroutine(g0)
- 禁止抢占
- 计算参数位置
- 计算下参数是否过大
- 获取当前 goroutine 所在 m 的 p,前边讲过 g0 对应的 m 是 m0,m0 对应的 p 是 allp[0]
- 创建一个 goroutine(先从 p 的缓存里找,找不到就 new 一个),并且确认 goroutine 栈边界是初始化好的 (方式 p 缓存里的 goroutine 参数没初始化)
- 计算栈顶的地址,如果有参数就将参数放到新创建的这个 goroutine 上
func newproc1(fn *funcval, argp *uint8, narg int32, callergp *g, callerpc uintptr) {_g_ := getg()if fn == nil {_g_.m.throwing = -1throw("go of nil func value")}acquirem()siz := nargsiz = (siz + 7) &^ 7if siz >= _StackMin-4*sys.RegSize-sys.RegSize {throw("newproc: function arguments too large for new goroutine")}_p_ := _g_.m.p.ptr()newg := gfget(_p_)if newg == nil {newg = malg(_StackMin)casgstatus(newg, _Gidle, _Gdead)allgadd(newg)}if newg.stack.hi == 0 {throw("newproc1: newg missing stack")}if readgstatus(newg) != _Gdead {throw("newproc1: new g is not Gdead")}...
设置各个寄存器的值 (在 cpu 上恢复上下文时使用)
- 清理 sched
- 设置栈顶置针位置
- 设置 pc 寄存器值 (goexit 函数第二条指令,常理应该是 goroutine 本身函数的第一条指令,这个妙用后边说)
- 设置 goroutine 地址
- 调用 gostartcallfn,参数是 sched 和 goroutine 的参数
memclrNoHeapPointers(unsafe.Pointer(&newg.sched), unsafe.Sizeof(newg.sched))newg.sched.sp = spnewg.stktopsp = spnewg.sched.pc = funcPC(goexit) + sys.PCQuantumnewg.sched.g = guintptr(unsafe.Pointer(newg))gostartcallfn(&newg.sched, fn)
判断一下 goroutine 的函数是否为空,然后调用 gostartcall
func gostartcallfn(gobuf *gobuf, fv *funcval) {var fn unsafe.Pointerif fv != nil {fn = unsafe.Pointer(fv.fn)} else {fn = unsafe.Pointer(funcPC(nilfunc))}gostartcall(gobuf, fn, unsafe.Pointer(fv))}
- 获取 sp,现在新 goroutine 的栈上之后本身的函数,sp 指向函数的第一个参数
- 将 sp 指向 pc 里面的指令地址,也就是 goexit 的第二条指令,然后重新设置新 goroutinesp 地址
- 这时候 pc 才指向 goroutine 自己的函数
gostartcall 的主要作用就是将 goexit 入栈,然后设置 goroutine 的 pc 指向自身函数,伪装成是 goexit 调用的自身函数,当自身函数执行完时返回 goexit 清理线程,大概就是下面这样
func goexit() {goroutine自身函数()清理现场()}
func gostartcall(buf *gobuf, fn, ctxt unsafe.Pointer) {sp := buf.spif sys.RegSize > sys.PtrSize {sp -= sys.PtrSize*(*uintptr)(unsafe.Pointer(sp)) = 0}sp -= sys.PtrSize*(*uintptr)(unsafe.Pointer(sp)) = buf.pcbuf.sp = spbuf.pc = uintptr(fn)buf.ctxt = ctxt}
然后再回到 newproc 函数,剩下的就是设置 goroutine 的状态,然后把 goroutine 放入 p 的待执行队列中
newg.gopc = callerpcnewg.ancestors = saveAncestors(callergp)newg.startpc = fn.fnif _g_.m.curg != nil {newg.labels = _g_.m.curg.labels}if isSystemGoroutine(newg, false) {atomic.Xadd(&sched.ngsys, +1)}newg.gcscanvalid = falsecasgstatus(newg, _Gdead, _Grunnable)if _p_.goidcache == _p_.goidcacheend {_p_.goidcache = atomic.Xadd64(&sched.goidgen, _GoidCacheBatch)_p_.goidcache -= _GoidCacheBatch - 1_p_.goidcacheend = _p_.goidcache + _GoidCacheBatch}newg.goid = int64(_p_.goidcache)_p_.goidcache++if raceenabled {newg.racectx = racegostart(callerpc)}if trace.enabled {traceGoCreate(newg, newg.startpc)}runqput(_p_, newg, true)if atomic.Load(&sched.npidle) != 0 && atomic.Load(&sched.nmspinning) == 0 && mainStarted {wakep()}releasem(_g_.m)}
总结一下创建第一个 goroutine 执行 runtime.main 的过程 (只是创建啊,整个调度这时候还是没有跑起来)
调度循环
我们再返回 runtime·rt0_go 继续看,总结一下到目前为止已经准备好的事情
- 将 m0 与主线程绑定了 (将 m0 结构体设为主线程的私有变量)
- 创建了 g0,并且与 m0 绑定
- 创建了 procs 个 p 并且初始化,将 allp[0]与 m0 绑定,形成初步的 GMP 模型 (g0,m0,p0)
- 创建了一个执行 runtime.main(不是代码里的 main.main,runtime.main 会做加载 init 函数等操作然后调用 main.main) 的 goroutine 并且放入了 p0 的待运行队列
接下来就是调度循环了,调用 runtime.mstart,这个函数就是调度循环,除非程序退出否则永远阻塞住
CALL runtime·mstart(SB)CALL runtime·abort(SB)RETMOVQ $runtime·debugCallV1(SB), AXRET
runtime.mstart
- 获取了当前所在 goroutine(初始化时代码都是在 g0 上执行的)
- 初始化栈保护
- 调用 mstart1
go/src/runtime/proc.go, line 1146
func mstart() {_g_ := getg()osStack := _g_.stack.lo == 0if osStack {size := _g_.stack.hiif size == 0 {size = 8192 * sys.StackGuardMultiplier}_g_.stack.hi = uintptr(noescape(unsafe.Pointer(&size)))_g_.stack.lo = _g_.stack.hi - size + 1024}_g_.stackguard0 = _g_.stack.lo + _StackGuard_g_.stackguard1 = _g_.stackguard0mstart1()if GOOS == "windows" || GOOS == "solaris" || GOOS == "illumos" || GOOS == "plan9" || GOOS == "darwin" || GOOS == "aix" {osStack = true}mexit(osStack)}
runtime.mstart1
- 保存 g0 的指令指针和栈指针,保存这两个值是理解调度循环的关键,mstart1 执行完之后,g0 继续执行指令,不会再返回来了,保存了指令和栈指针之后,g0 要继续执行指令的时候,就会又从上面开始执行
- 做一些初始化工作
- 调用 schedule 开始调度
func mstart1() {_g_ := getg()if _g_ != _g_.m.g0 {throw("bad runtime·mstart")}save(getcallerpc(), getcallersp())asminit()minit()if _g_.m == &m0 {mstartm0()}if fn := _g_.m.mstartfn; fn != nil {fn()}if _g_.m != &m0 {acquirep(_g_.m.nextp.ptr())_g_.m.nextp = 0}schedule()}
runtime.schedule
调度开始了,m 要找 gorutine 放到 cpu 上执行了
- 每调度 61 次 (具体为啥是 61 有待思考),就从全局的 goroutine 列表中选 goroutine
- 如果上一步没找到,就从 m 对应的 p 的缓存里找
- 如果上一步还没有找到,就调 findrunnable 从其他线程窃取 goroutine,如果发现有就窃取一半放到自己的 p 缓存中,如果都没有就说明真的没有待运行的 goroutine 了,就陷入睡眠一直阻塞在 findrunnable 函数,等待被唤醒
- 直到有 goroutine 需要执行了,就调用 execute 执行 goroutine
func schedule() {_g_ := getg()if _g_.m.locks != 0 {throw("schedule: holding locks")}if _g_.m.lockedg != 0 {stoplockedm()execute(_g_.m.lockedg.ptr(), false)}if _g_.m.incgo {throw("schedule: in cgo")}top:if sched.gcwaiting != 0 {gcstopm()goto top}if _g_.m.p.ptr().runSafePointFn != 0 {runSafePointFn()}var gp *gvar inheritTime booltryWakeP := falseif trace.enabled || trace.shutdown {gp = traceReader()if gp != nil {casgstatus(gp, _Gwaiting, _Grunnable)traceGoUnpark(gp, 0)tryWakeP = true}}if gp == nil && gcBlackenEnabled != 0 {gp = gcController.findRunnableGCWorker(_g_.m.p.ptr())tryWakeP = tryWakeP || gp != nil}if gp == nil {if _g_.m.p.ptr().schedtick%61 == 0 && sched.runqsize > 0 {lock(&sched.lock)gp = globrunqget(_g_.m.p.ptr(), 1)unlock(&sched.lock)}}if gp == nil {gp, inheritTime = runqget(_g_.m.p.ptr())if gp != nil && _g_.m.spinning {throw("schedule: spinning with local work")}}if gp == nil {gp, inheritTime = findrunnable()}if _g_.m.spinning {resetspinning()}if sched.disable.user && !schedEnabled(gp) {lock(&sched.lock)if schedEnabled(gp) {unlock(&sched.lock)} else {sched.disable.runnable.pushBack(gp)sched.disable.n++unlock(&sched.lock)goto top}}if tryWakeP {if atomic.Load(&sched.npidle) != 0 && atomic.Load(&sched.nmspinning) == 0 {wakep()}}if gp.lockedm != 0 {startlockedm(gp)goto top}execute(gp, inheritTime)}
触发调度
触发调度地方大致有:
- 主动挂起
- 系统调用
- 协作式调度
- 正常退出
- proc.go:1208 runtime.mstart1(调度开始)
主动挂起
- proc.go:2610 runtime.park_m
在上一章内容里讲过golang channel 源码阅读,当 goroutine 接收一个 channel 为空且为阻塞的时候,goroutine 会调用 goparkunlock 使 goroutine 陷入睡眠,等待 send 端调用 goready 函数唤醒函数,主动挂起就是这种情况,当 goroutine 由于某些条件在等待时,就会主动挂起,不放回待运行队列,等待被唤醒
各种阻塞条件 -> runtime.gopark() -> runtime.park_m() -> runtime.schedule
- 获取当前所在 m,并且固定 m
- 获取当前程序所在 goroutine
- 设置锁状态以及阻塞原因
- 调用 runtime.park_m 挂起 goroutine
func gopark(unlockf func(*g, unsafe.Pointer) bool, lock unsafe.Pointer, reason waitReason, traceEv byte, traceskip int) {if reason != waitReasonSleep {checkTimeouts()}mp := acquirem()gp := mp.curgstatus := readgstatus(gp)if status != _Grunning && status != _Gscanrunning {throw("gopark: bad g status")}mp.waitlock = lockmp.waitunlockf = unlockfgp.waitreason = reasonmp.waittraceev = traceEvmp.waittraceskip = traceskipreleasem(mp)mcall(park_m)}
- 获取当前 goroutine
- 将 goroutine 状态设置为 Gwaiting
- 重新调度
func park_m(gp *g) {_g_ := getg()if trace.enabled {traceGoPark(_g_.m.waittraceev, _g_.m.waittraceskip)}casgstatus(gp, _Grunning, _Gwaiting)dropg()if fn := _g_.m.waitunlockf; fn != nil {ok := fn(gp, _g_.m.waitlock)_g_.m.waitunlockf = nil_g_.m.waitlock = nilif !ok {if trace.enabled {traceGoUnpark(gp, 2)}casgstatus(gp, _Gwaiting, _Grunnable)execute(gp, true)}}schedule()}
协作式调度
- proc.go:2625 runtime.goschedImpl(协作式调度)
- 主动让出 cpu,这个情况不会挂起 goroutine,而是放回队列,等待下次调度,这个函数 (GoSched) 被暴露出去,可以调用,例如,线上有这种情况,写 log 是异步的,但由于机器磁盘老旧性能不佳,所以当 log goroutine 运行时还是会过多的占用 cpu,这时候可以调用 GoSched 适当降低当前 goroutine 优先级
runtime.Gosched -> runtime.gosched_m -> runtime.goschedImpl runtime.schedule
func gosched_m(gp *g) {if trace.enabled {traceGoSched()}goschedImpl(gp)}
- 调度保护,当调度器发现 goroutine 处于禁止的状态时就会主动调度让出 cpu
func goschedguarded_m(gp *g) {if gp.m.locks != 0 || gp.m.mallocing != 0 || gp.m.preemptoff != "" || gp.m.p.ptr().status != _Prunning {gogo(&gp.sched)}if trace.enabled {traceGoSched()}goschedImpl(gp)}
- 发生抢占,例如当一个 goroutine 运行时间过长但不像等待 channel 那样阻塞,一直有事情做时,其他 goroutine 可能会抢占 cpu
func gopreempt_m(gp *g) {if trace.enabled {traceGoPreempt()}goschedImpl(gp)}
func goschedImpl(gp *g) {status := readgstatus(gp)if status&^_Gscan != _Grunning {dumpgstatus(gp)throw("bad g status")}casgstatus(gp, _Grunning, _Grunnable)dropg()lock(&sched.lock)globrunqput(gp)unlock(&sched.lock)schedule()}
非 main goroutine 结束
- proc.go:2704,2727 runtime.goexit0(goroutine 正常执行完)
非 main goroutine 结束后会继续调度,这个是正常继续下一次调度不做过多介绍
系统调用
- proc.go:3141 runtime.exitsyscall0(系统调用)
runtime·exitsyscall -> runtime·exitsyscall0 -> runtime.schedule
我们来看下系统调用的过程
func syscall_syscall(fn, a1, a2, a3 uintptr) (r1, r2, err uintptr) {entersyscall()libcCall(unsafe.Pointer(funcPC(syscall)), unsafe.Pointer(&fn))exitsyscall()return}func syscall()
首先会调用 runtime.entersyscall 获取当前的指令位置和栈指针,然后调用 reentersyscall 做 goroutine 进入系统调用之前的准备
func entersyscall() {reentersyscall(getcallerpc(), getcallersp())}
- 禁止线程抢占防止出现栈不一致的情况
- 保证当前函数不会触发栈调整 (golang 进程的栈初始 2k,然后动态调整)
- 设置 goroutine 状态为 Gsyscall
- 将 goroutine 的 P 暂时和 M 分离,并且设置 P 状态为 Psyscall
- 释放锁
func reentersyscall(pc, sp uintptr) {_g_ := getg()_g_.m.locks++_g_.stackguard0 = stackPreempt_g_.throwsplit = truesave(pc, sp)_g_.syscallsp = sp_g_.syscallpc = pccasgstatus(_g_, _Grunning, _Gsyscall)if _g_.syscallsp < _g_.stack.lo || _g_.stack.hi < _g_.syscallsp {systemstack(func() {print("entersyscall inconsistent ", hex(_g_.syscallsp), " [", hex(_g_.stack.lo), ",", hex(_g_.stack.hi), "]\n")throw("entersyscall")})}if trace.enabled {systemstack(traceGoSysCall)save(pc, sp)}if atomic.Load(&sched.sysmonwait) != 0 {systemstack(entersyscall_sysmon)save(pc, sp)}if _g_.m.p.ptr().runSafePointFn != 0 {systemstack(runSafePointFn)save(pc, sp)}_g_.m.syscalltick = _g_.m.p.ptr().syscalltick_g_.sysblocktraced = true_g_.m.mcache = nilpp := _g_.m.p.ptr()pp.m = 0_g_.m.oldp.set(pp)_g_.m.p = 0atomic.Store(&pp.status, _Psyscall)if sched.gcwaiting != 0 {systemstack(entersyscall_gcwait)save(pc, sp)}_g_.m.locks--}
然后就进入系统调用
...
- 获得 goroutine
- 线程加锁
调 exitsyscallfast 替当前 goroutine 找一个 P
- 如果原 P 处于 Psyscall 就让这个 P 接管,否则的话进行 2)
- 否则的话就找空闲的 P,有的话就调用 exitsyscall0 继续调度,否则的话进行 3)
- 将 goroutine 设置为 Grunning,加入全局队列,调用 Gosched() 继续调度
func exitsyscall() {_g_ := getg()_g_.m.locks++if getcallersp() > _g_.syscallsp {throw("exitsyscall: syscall frame is no longer valid")}_g_.waitsince = 0oldp := _g_.m.oldp.ptr()_g_.m.oldp = 0if exitsyscallfast(oldp) {if _g_.m.mcache == nil {throw("lost mcache")}if trace.enabled {if oldp != _g_.m.p.ptr() || _g_.m.syscalltick != _g_.m.p.ptr().syscalltick {systemstack(traceGoStart)}}_g_.m.p.ptr().syscalltick++casgstatus(_g_, _Gsyscall, _Grunning)_g_.syscallsp = 0_g_.m.locks--if _g_.preempt {_g_.stackguard0 = stackPreempt} else {_g_.stackguard0 = _g_.stack.lo + _StackGuard}_g_.throwsplit = falseif sched.disable.user && !schedEnabled(_g_) {Gosched()}return}_g_.sysexitticks = 0if trace.enabled {for oldp != nil && oldp.syscalltick == _g_.m.syscalltick {osyield()}_g_.sysexitticks = cputicks()}_g_.m.locks--mcall(exitsyscall0)if _g_.m.mcache == nil {throw("lost mcache")}_g_.syscallsp = 0_g_.m.p.ptr().syscalltick++_g_.throwsplit = false}
我每天都在努力, 只是想证明我是认真的活着.
https://www.cnblogs.com/wuwangchuxin0924/p/13264054.html

若有收获,就点个赞吧
0 人点赞
