引子
我们有一个转账需求
下面是示例代码
public class Account {private Integer id;private String name;private Double money;// setter getter....}public interface AccountDao {// 转出操作public void out(String outUser, Double money);// 转入操作public void in(String inUser, Double money);}@Repositorypublic class AccountDaoImpl implements AccountDao {@Autowiredprivate QueryRunner queryRunner;@Overridepublic void out(String outUser, Double money) {try {queryRunner.update("update account set money=money-? where name=?",money, outUser);} catch (SQLException e) {e.printStackTrace();}}@Overridepublic void in(String inUser, Double money) {try {queryRunner.update("update account set money=money+? where name=?",money, inUser);} catch (SQLException e) {e.printStackTrace();}}}public interface AccountService {public void transfer(String outUser, String inUser, Double money);}@Servicepublic class AccountServiceImpl implements AccountService {@Autowiredprivate AccountDao accountDao;@Overridepublic void transfer(String outUser, String inUser, Double money) {accountDao.out(outUser, money);accountDao.in(inUser, money);}}
核心配置文件如下
<?xml version="1.0" encoding="UTF-8"?><beans xmlns="http://www.springframework.org/schema/beans"xmlns:xsi="http://www.w3.org/2001/XMLSchema-instance"xmlns:context="http://www.springframework.org/schema/context"xsi:schemaLocation="http://www.springframework.org/schema/beanshttp://www.springframework.org/schema/beans/spring-beans.xsdhttp://www.springframework.org/schema/contexthttp://www.springframework.org/schema/context/spring-context.xsd"><!--开启组件扫描--><context:component-scan base-package="com.lagou"/><!--加载jdbc配置文件--><context:property-placeholder location="classpath:jdbc.properties"/><!--把数据库连接池交给IOC容器--><bean id="dataSource" class="com.alibaba.druid.pool.DruidDataSource"><property name="driverClassName" value="${jdbc.driver}"></property><property name="url" value="${jdbc.url}"></property><property name="username" value="${jdbc.username}"></property><property name="password" value="${jdbc.password}"></property></bean><!--把QueryRunner交给IOC容器--><bean id="queryRunner" class="org.apache.commons.dbutils.QueryRunner"><constructor-arg name="ds" ref="dataSource"></constructor-arg></bean></beans>
测试代码如下
@RunWith(SpringJUnit4ClassRunner.class)@ContextConfiguration("classpath:applicationContext.xml")public class AccountServiceTest {@Autowiredprivate AccountService accountService;@Testpublic void testTransfer() throws Exception {accountService.transfer("tom", "jerry", 100d);}}
问题
上面的代码事务在dao层,转出转入操作都是一个独立的事务,但实际开发,应该把业务逻辑控制在 一个事务中,所以应该将事务挪到service层。
传统事务解决方法
- 编写线程绑定工具类
- 编写事务管理器
- 修改service层代码
- 修改dao层代码
@Componentpublic class ConnectionUtils {private ThreadLocal<Connection> threadLocal = new ThreadLocal<>();@Autowiredprivate DataSource dataSource;/*** 获取当前线程上的连接** @return Connection*/public Connection getThreadConnection() {// 1.先从ThreadLocal上获取Connection connection = threadLocal.get();// 2.判断当前线程是否有连接if (connection == null) {try {// 3.从数据源中获取一个连接,并存入到ThreadLocal中connection = dataSource.getConnection();threadLocal.set(connection);} catch (SQLException e) {e.printStackTrace();}}return connection;}/*** 解除当前线程的连接绑定*/public void removeThreadConnection() {threadLocal.remove();}}
/*** 事务管理器工具类,包含:开启事务、提交事务、回滚事务、释放资源*/@Componentpublic class TransactionManager {@Autowiredprivate ConnectionUtils connectionUtils;public void beginTransaction() {try {connectionUtils.getThreadConnection().setAutoCommit(false);} catch (SQLException e) {e.printStackTrace();}}public void commit() {try {connectionUtils.getThreadConnection().commit();} catch (SQLException e) {e.printStackTrace();}}public void rollback() {try {connectionUtils.getThreadConnection().rollback();} catch (SQLException e) {e.printStackTrace();}}public void release() {try {connectionUtils.getThreadConnection().setAutoCommit(true); // 改回自动提交事务connectionUtils.getThreadConnection().close();// 归还到连接池connectionUtils.removeThreadConnection();// 解除线程绑定} catch (SQLException e) {e.printStackTrace();}}}
在service层里调用
@Servicepublic class AccountServiceImpl implements AccountService {@Autowiredprivate AccountDao accountDao;@Autowiredprivate TransactionManager transactionManager;@Overridepublic void transfer(String outUser, String inUser, Double money) {try {// 1.开启事务transactionManager.beginTransaction();// 2.业务操作accountDao.out(outUser, money);int i = 1 / 0;accountDao.in(inUser, money);// 3.提交事务transactionManager.commit();} catch (Exception e) {e.printStackTrace();// 4.回滚事务transactionManager.rollback();} finally {// 5.释放资源transactionManager.release();}}}
最后再回头修改一下Dao
@Repositorypublic class AccountDaoImpl implements AccountDao {@Autowiredprivate QueryRunner queryRunner;@Autowiredprivate ConnectionUtils connectionUtils;@Overridepublic void out(String outUser, Double money) {try {queryRunner.update(connectionUtils.getThreadConnection(), "updateaccount set money=money-? where name=?", money, outUser);} catch (SQLException e) {e.printStackTrace();}}@Overridepublic void in(String inUser, Double money) {try {queryRunner.update(connectionUtils.getThreadConnection(), "updateaccount set money=money+? where name=?", money, inUser);} catch (SQLException e) {e.printStackTrace();}}}
上面代码,通过对业务层改造,已经可以实现事务控制了,但是由于我们添加了事务控制,也产生了 一个新的问题: 业务层方法变得臃肿了,里面充斥着很多重复代码。并且业务层方法和事务控制方法耦 合了,违背了面向对象的开发思想。
使用动态代理优化
我们可以将业务代码和事务代码进行拆分,通过动态代理的方式,对业务方法进行事务的增强。这样 就不会对业务层产生影响,解决了耦合性的问题啦!
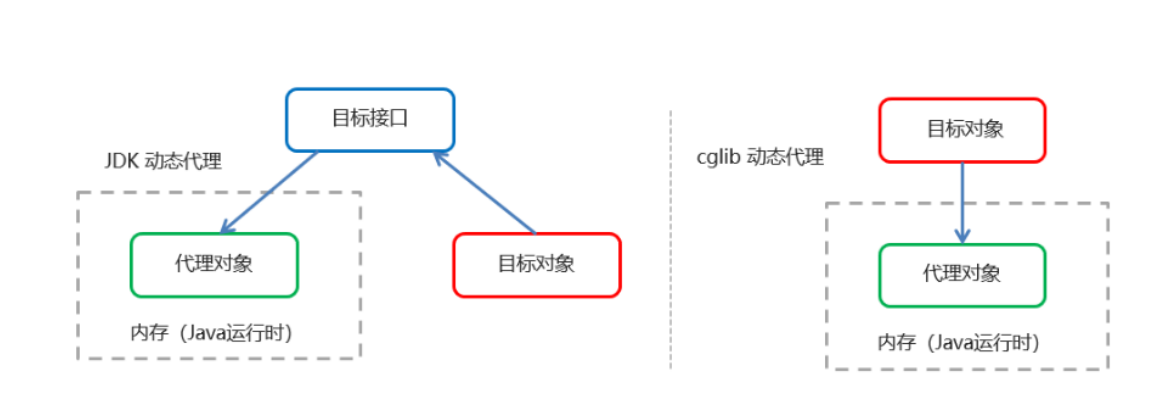
常用的动态代理技术
JDK 代理 :基于接口的动态代理技术,利用拦截器(必须实现invocationHandler)加上反射机制生成 一个代理接口的匿名类,在调用具体方法前调用InvokeHandler来处理,从而实现方法增强
CGLIB代理:基于父类的动态代理技术:动态生成一个要代理的子类,子类重写要代理的类的所有不是 final的方法。在子类中采用方法拦截技术拦截所有的父类方法的调用,顺势织入横切逻辑,对方法进行增强 
JDK动态代理
@Componentpublic class JDKProxyFactory {@Autowiredprivate AccountService accountService;@Autowiredprivate TransactionManager transactionManager;public AccountService createAccountServiceJDKProxy() {AccountService accountServiceProxy = (AccountService) Proxy.newProxyInstance(accountService.getClass().getClassLoader(),accountService.getClass().getInterfaces(), new InvocationHandler() {@Overridepublic Object invoke(Object proxy, Method method, Object[] args) throws Throwable {try {transactionManager.beginTransaction();method.invoke(accountService, args);transactionManager.commit();} catch (Exception e) {e.printStackTrace();transactionManager.rollBack();} finally {transactionManager.release();}return null;}});return accountServiceProxy;}}@Service(value = "accountService")public class AccountServiceImpl implements AccountService {@Autowiredprivate AccountDao accountDao;@Overridepublic void transfer(String outUser, String inUser, double money) {accountDao.out(outUser, money);accountDao.in(inUser, money);}}
Cglib动态代理
@Componentpublic class CglibProxyFactory {@Autowiredprivate AccountService accountService;@Autowiredprivate TransactionManager transactionManager;public AccountService createAccountServiceCglibProxy() {AccountService accountServiceProxy = null;/** 参数一:目标对象的字节码对象* 参数二:动作类,实现增强功能* */accountServiceProxy = (AccountService)Enhancer.create(accountService.getClass(), new MethodInterceptor() {@Overridepublic Object intercept(Object o, Method method, Object[] objects,MethodProxy methodProxy) throws Throwable {Object result = null;try {// 1.开启事务transactionManager.beginTransaction();// 2.业务操作result = method.invoke(accountService, objects);// 3.提交事务transactionManager.commit();} catch (Exception e) {e.printStackTrace();// 4.回滚事务transactionManager.rollback();} finally {// 5.释放资源transactionManager.release();}return result;}});return accountServiceProxy;}}
AOP
AOP 为 Aspect Oriented Programming 的缩写,意思为面向切面编程
AOP 是 OOP(面向对象编程) 的延续,是软件开发中的一个热点,也是Spring框架中的一个重要内容,利用AOP可以对业务逻辑的各个部分进行隔离,从而使得业务逻辑各部分之间的耦合度降低,提高程序的可重用性,同时提高了开发的效率。
这样做的好处是:
- 在程序运行期间,在不修改源码的情况下对方法进行功能增强
- 逻辑清晰,开发核心业务的时候,不必关注增强业务的代码
- 减少重复代码,提高开发效率,便于后期维护
实际上,AOP 的底层是通过 Spring 提供的的动态代理技术实现的。在运行期间,Spring通过动态代理技术动态的生成代理对象,代理对象方法执行时进行增强功能的介入,在去调用目标对象的方法,从而完成功能的增强。
相关术语
- Target(目标对象):代理的目标对象
- Proxy (代理):一个类被 AOP 织入增强后,就产生一个结果代理类
- Joinpoint(连接点):所谓连接点是指那些可以被拦截到的点。在spring中指的是方法,因为
spring只支持方法类型的连接点 - Pointcut(切入点):所谓切入点是指我们要对哪些 Joinpoint 进行拦截的定义
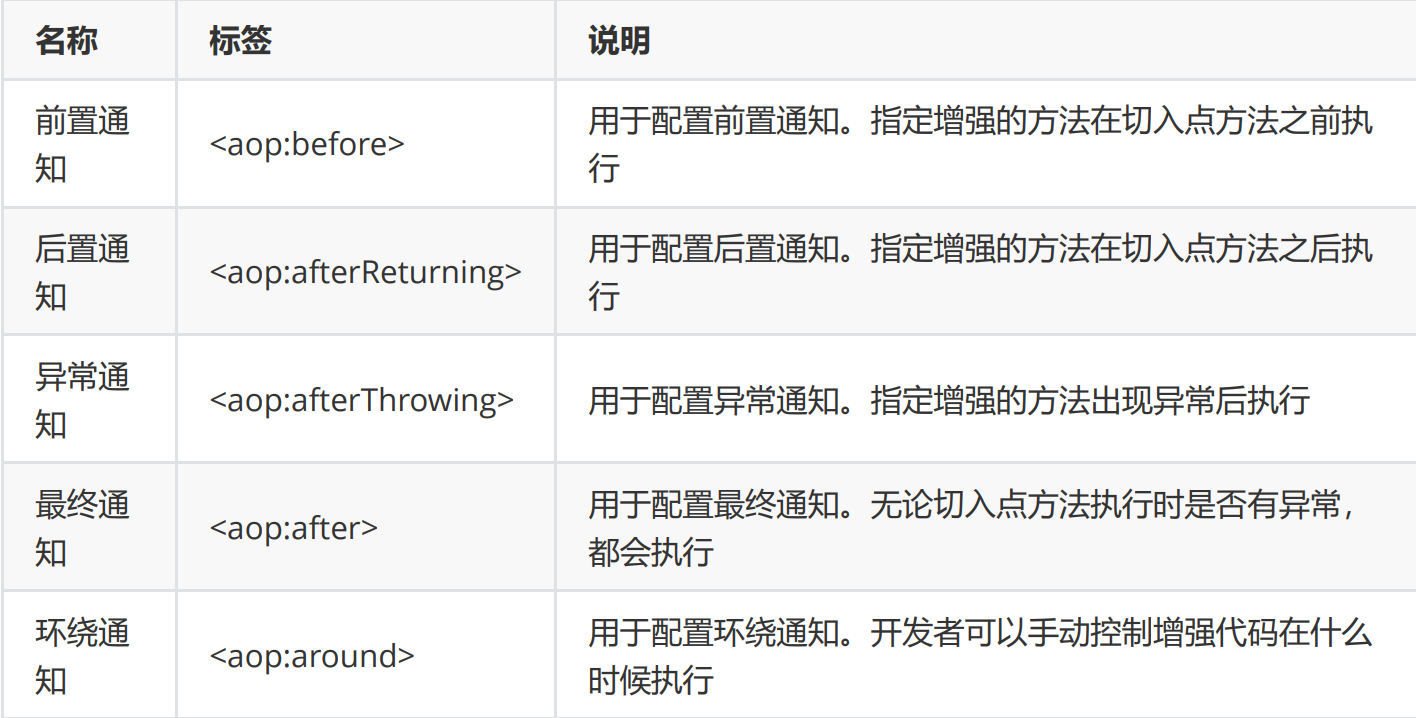
- Advice(通知/ 增强):所谓通知是指拦截到 Joinpoint 之后所要做的事情就是通知
分类:前置通知、后置通知、异常通知、最终通知、环绕通知 - Aspect(切面):是切入点和通知(引介)的结合
- Weaving(织入):是指把增强应用到目标对象来创建新的代理对象的过程。spring采用动态代理织
入,而AspectJ采用编译期织入和类装载期织入
注意事项
在 Spring 中,框架会根据目标类是否实现了接口来决定采用哪种动态代理的方式。 当bean实现接口时,会用JDK代理模式 当bean没有实现接口,用cglib实现( 可以强制使用cglib(在spring配置中加入
<aop:aspectj-autoproxy proxyt-target-class="true"/>)
))
基于XML的AOP开发
- 创建java项目,导入AOP相关坐标
- 创建目标接口和目标实现类(定义切入点)
- 创建通知类及方法(定义通知)
- 将目标类和通知类对象创建权交给spring
- 在核心配置文件中配置织入关系,及切面
- 编写测试代码
<dependencies><!--导入spring的context坐标,context依赖aop--><dependency><groupId>org.springframework</groupId><artifactId>spring-context</artifactId><version>5.1.5.RELEASE</version></dependency><!-- aspectj的织入(切点表达式需要用到该jar包) --><dependency><groupId>org.aspectj</groupId><artifactId>aspectjweaver</artifactId><version>1.8.13</version></dependency><!--spring整合junit--><dependency><groupId>org.springframework</groupId><artifactId>spring-test</artifactId><version>5.1.5.RELEASE</version></dependency><dependency><groupId>junit</groupId><artifactId>junit</artifactId><version>4.12</version></dependency></dependencies>
public interface AccountService {public void transfer();}public class AccountServiceImpl implements AccountService {@Overridepublic void transfer() {System.out.println("转账业务...");}}public class MyAdvice {public void before() {System.out.println("前置通知...");}}
<?xml version="1.0" encoding="UTF-8"?><beans xmlns="http://www.springframework.org/schema/beans"xmlns:xsi="http://www.w3.org/2001/XMLSchema-instance"xmlns:aop="http://www.springframework.org/schema/aop"xsi:schemaLocation="http://www.springframework.org/schema/beanshttp://www.springframework.org/schema/beans/spring-beans.xsdhttp://www.springframework.org/schema/aophttp://www.springframework.org/schema/aop/spring-aop.xsd"><bean id="accountService" class="com.ning.service.impl.AccountServiceImpl"/><bean id="myAdvice" class="com.ning.advice.MyAdvice"/><aop:config><aop:aspect ref="myAdvice"><aop:before method="before" pointcut="execution(public void com.ning.service.impl.AccountServiceImpl.transfer())"/></aop:aspect></aop:config></beans>
@RunWith(SpringJUnit4ClassRunner.class)@ContextConfiguration("classpath:applicationContext.xml")class AccountServiceTest {@Autowiredprivate AccountService accountService;@Testpublic void testTransfer() throws Exception {accountService.transfer();}}
XML Execution表达式语法
execution([修饰符] 返回值类型 包名.类名.方法名(参数))访问修饰符可以省略返回值类型、包名、类名、方法名可以使用星号 * 代替,代表任意包名与类名之间一个点 . 代表当前包下的类,两个点 .. 表示当前包及其子包下的类参数列表可以使用两个点 .. 表示任意个数,任意类型的参数列表execution(public void com.lagou.service.impl.AccountServiceImpl.transfer())execution(void com.lagou.service.impl.AccountServiceImpl.*(..))execution(* com.lagou.service.impl.*.*(..))execution(* com.lagou.service..*.*(..))
当多个增强的切点表达式相同时,可以将切点表达式进行抽取,在增强中使用 pointcut-ref 属性代替 pointcut 属性来引用抽取后的切点表达式。
<aop:config><!--抽取的切点表达式--><aop:pointcut id="myPointcut" expression="execution(* com.lagou.service..*.*(..))"> </aop:pointcut><aop:aspect ref="myAdvice"><aop:before method="before" pointcut-ref="myPointcut"></aop:before></aop:aspect></aop:config>
通知语法
<aop:通知类型 method=“通知类中方法名” pointcut=“切点表达式"></aop:通知类型>

注意:通常情况下,环绕通知都是独立使用的
环绕通知的使用方法
public Object around(ProceedingJoinPoint joinPoint) {try {System.out.println("前置通知执行了");final Object o = joinPoint.proceed();System.out.println("后置通知执行了");return o;} catch (Throwable throwable) {throwable.printStackTrace();System.out.println("异常通知执行了");} finally {System.out.println("最终通知执行了");}return null;}
基于注解的AOP开发
依赖
<dependencies><!--导入spring的context坐标,context依赖aop--><dependency><groupId>org.springframework</groupId><artifactId>spring-context</artifactId><version>5.1.5.RELEASE</version></dependency><!-- aspectj的织入 --><dependency><groupId>org.aspectj</groupId><artifactId>aspectjweaver</artifactId><version>1.8.13</version></dependency><!--spring整合junit--><dependency><groupId>org.springframework</groupId><artifactId>spring-test</artifactId><version>5.1.5.RELEASE</version></dependency><dependency><groupId>junit</groupId><artifactId>junit</artifactId><version>4.12</version></dependency></dependencies>
接口与实现类等
public interface AccountService {public void transfer();}@Servicepublic class AccountServiceImpl implements AccountService {@Overridepublic void transfer() {System.out.println("转账业务...");}}@Component@Aspectpublic class MyAdvice {@Before("execution(* com.lagou..*.*(..))")public void before() {System.out.println("前置通知...");}}
核心配置文件
<?xml version="1.0" encoding="UTF-8"?><beans xmlns="http://www.springframework.org/schema/beans"xmlns:xsi="http://www.w3.org/2001/XMLSchema-instance"xmlns:aop="http://www.springframework.org/schema/aop"xmlns:context="http://www.springframework.org/schema/context"xsi:schemaLocation="http://www.springframework.org/schema/beanshttp://www.springframework.org/schema/beans/spring-beans.xsdhttp://www.springframework.org/schema/aophttp://www.springframework.org/schema/aop/spring-aop.xsdhttp://www.springframework.org/schema/contexthttp://www.springframework.org/schema/context/spring-context.xsd"><context:component-scan base-package="com.ning"/><!-- 强制使用动态代理 proxy-target-class="true"--><aop:aspectj-autoproxy proxy-target-class="true"/></beans>
测试代码
@RunWith(SpringJUnit4ClassRunner.class)@ContextConfiguration("classpath:applicationContext.xml")class AccountServiceTest {@Autowiredprivate AccountService accountService;@Testpublic void testTransfer() throws Exception {accountService.transfer();}}
切点表达式
@Component@Aspectpublic class MyAdvice {@Pointcut("execution(* com.ning.service.impl.AccountServiceImpl.*(..))")public void myPoint() {}@Before("MyAdvice.myPoint()")public void before() {System.out.println("前置通知执行了");}@AfterReturning("MyAdvice.myPoint()")public void afterReturning() {System.out.println("后置通知执行了");}}
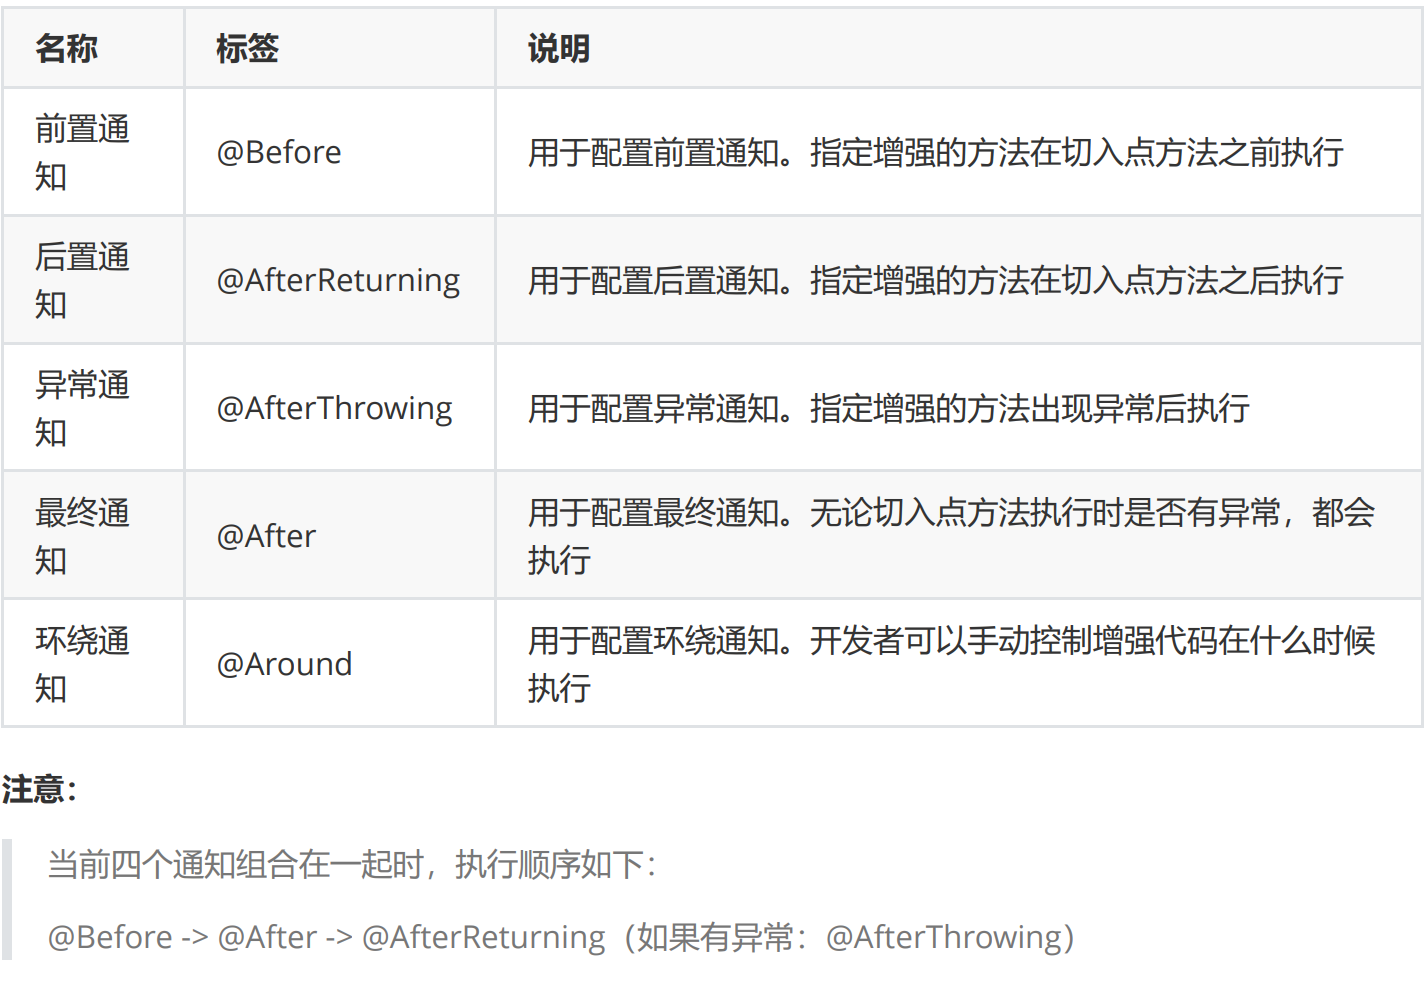
通知类型

纯注解配置
@Configuration@ComponentScan("com.lagou")@EnableAspectJAutoProxy //替代 <aop:aspectj-autoproxy />public class SpringConfig {}

