简介
Spring Security是一个功能强大且高度可定制的身份验证和访问控制框架。它是用于保护基于 Spring的应用程序的实际标准。Spring Security是一个框架,致力于为Java应用程序提供身份验证和授权。与所有Spring项目一样,Spring Security的真正强大之处在于可以轻松扩展以满足自定义要求. 
简洁版
不能脱离spring,但是用起来比shiro方便。
功能
登录、授权、单一登录、集成cas做单点登录(多个系统只需要登录一次)、继承Oauth做登录授权。
依赖
<!--添加Spring Security 依赖 --><dependency><groupId>org.springframework.boot</groupId><artifactId>spring-boot-starter-security</artifactId></dependency>
过滤器链
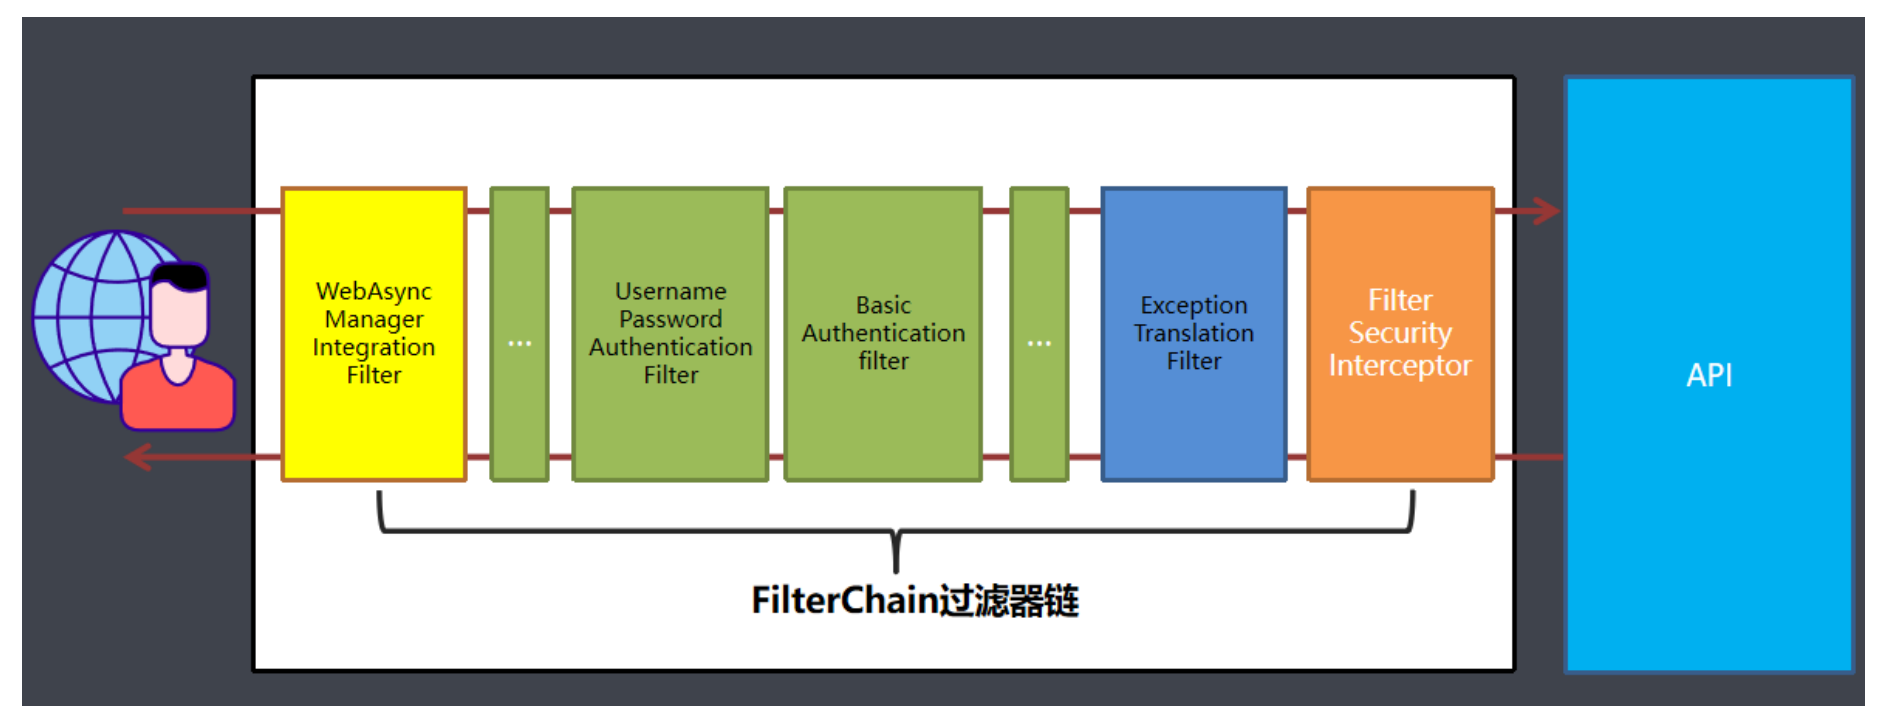
- org.springframework.security.web.context.request.async.WebAsyncManagerIntegrationFilter 根据请求封装获取WebAsyncManager,从WebAsyncManager获取/注册的安全上下文可调 用处理拦截器
2. org.springframework.security.web.context.SecurityContextPersistenceFilter SecurityContextPersistenceFilter主要是使用SecurityContextRepository在session中保存 或更新一个SecurityContext,并将SecurityContext给以后的过滤器使用,来为后续fifilter 建立所需的上下文。SecurityContext中存储了当前用户的认证以及权限信息。
3. org.springframework.security.web.header.HeaderWriterFilter 向请求的Header中添加相应的信息,可在http标签内部使用security:headers来控制
4. org.springframework.security.web.csrf.CsrfFilter csrf又称跨域请求伪造,SpringSecurity会对所有post请求验证是否包含系统生成的csrf的 token信息,如果不包含,则报错。起到防止csrf攻击的效果。
5. org.springframework.security.web.authentication.logout.LogoutFilter org.springframework.bootspring-boot-starter-security 匹配URL为/logout的请求,实现用户退出,清除认证信息。
6. org.springframework.security.web.authentication.UsernamePasswordAuthenticationFilter 表单认证操作全靠这个过滤器,默认匹配URL为/login且必须为POST请求。
7. org.springframework.security.web.authentication.ui.DefaultLoginPageGeneratingFilter 如果没有在配置文件中指定认证页面,则由该过滤器生成一个默认认证页面。
8. org.springframework.security.web.authentication.ui.DefaultLogoutPageGeneratingFilter 由此过滤器可以生产一个默认的退出登录页面
9. org.springframework.security.web.authentication.www.BasicAuthenticationFilter 此过滤器会自动解析HTTP请求中头部名字为Authentication,且以Basic开头的头信息。
10. org.springframework.security.web.savedrequest.RequestCacheAwareFilter 通过HttpSessionRequestCache内部维护了一个RequestCache,用于缓存 HttpServletRequest
11. org.springframework.security.web.servletapi.SecurityContextHolderAwareRequestFilter 针对ServletRequest进行了一次包装,使得request具有更加丰富的API
12. org.springframework.security.web.authentication.AnonymousAuthenticationFilter 当SecurityContextHolder中认证信息为空,则会创建一个匿名用户存入到 SecurityContextHolder中。spring security为了兼容未登录的访问,也走了一套认证流程, 只不过是一个匿名的身份。
13. org.springframework.security.web.session.SessionManagementFilter securityContextRepository限制同一用户开启多个会话的数量
14. org.springframework.security.web.access.ExceptionTranslationFilter 异常转换过滤器位于整个springSecurityFilterChain的后方,用来转换整个链路中出现的异常
15. org.springframework.security.web.access.intercept.FilterSecurityInterceptor 获取所配置资源访问的授权信息,根据SecurityContextHolder中存储的用户信息来决定其是否有权限。 SpringSecurity默认加载15个过滤器, 但是随着配置可以增加或者删除一些过滤器
自定义登录页面
这是http basic认证送的界面的样子。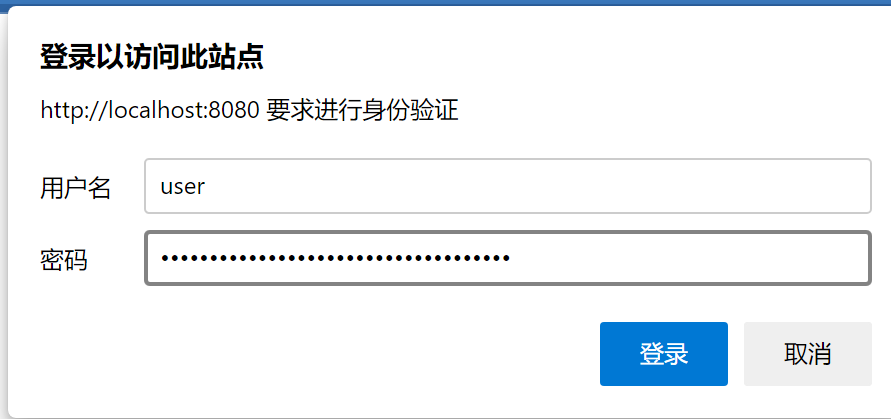
当然实际上我们都会自己定制的。
@Configurationpublic class SecurityConfig extends WebSecurityConfigurerAdapter {@Overrideprotected void configure(AuthenticationManagerBuilder auth) throws Exception {super.configure(auth);}//放行静态资源@Overridepublic void configure(WebSecurity web) throws Exception {web.ignoring().antMatchers("/css/**", "/images/**", "/js/**");}//修改这个方法可以自定义登录界面@Overrideprotected void configure(HttpSecurity http) throws Exception {// http.httpBasic() //开启http basic认证// .and()// .authorizeRequests()// .anyRequest()// .authenticated();// http.formLogin().and().authorizeRequests().anyRequest().authenticated(); //表单认证,更安全,默认方式http.formLogin().loginPage("/toLoginPage").and().authorizeRequests().antMatchers("/toLoginPage")//放行login页面.permitAll()//允许放行.anyRequest().authenticated();}}
Spring Security 中,安全构建器 HttpSecurity 和 WebSecurity 的区别是 :
- WebSecurity 不仅通过 HttpSecurity 定义某些请求的安全控制,也通过其他方式定义其他某些
请求可以忽略安全控制; - HttpSecurity 仅用于定义需要安全控制的请求(当然 HttpSecurity 也可以指定某些请求不需要
安全控制); - 可以认为 HttpSecurity 是 WebSecurity 的一部分, WebSecurity 是包含 HttpSecurity 的更大
的一个概念; - 构建目标不同
WebSecurity 构建目标是整个 Spring Security 安全过滤器 FilterChainProxy,
HttpSecurity 的构建目标仅仅是 FilterChainProxy 中的一个 SecurityFilterChain 。
表单登录
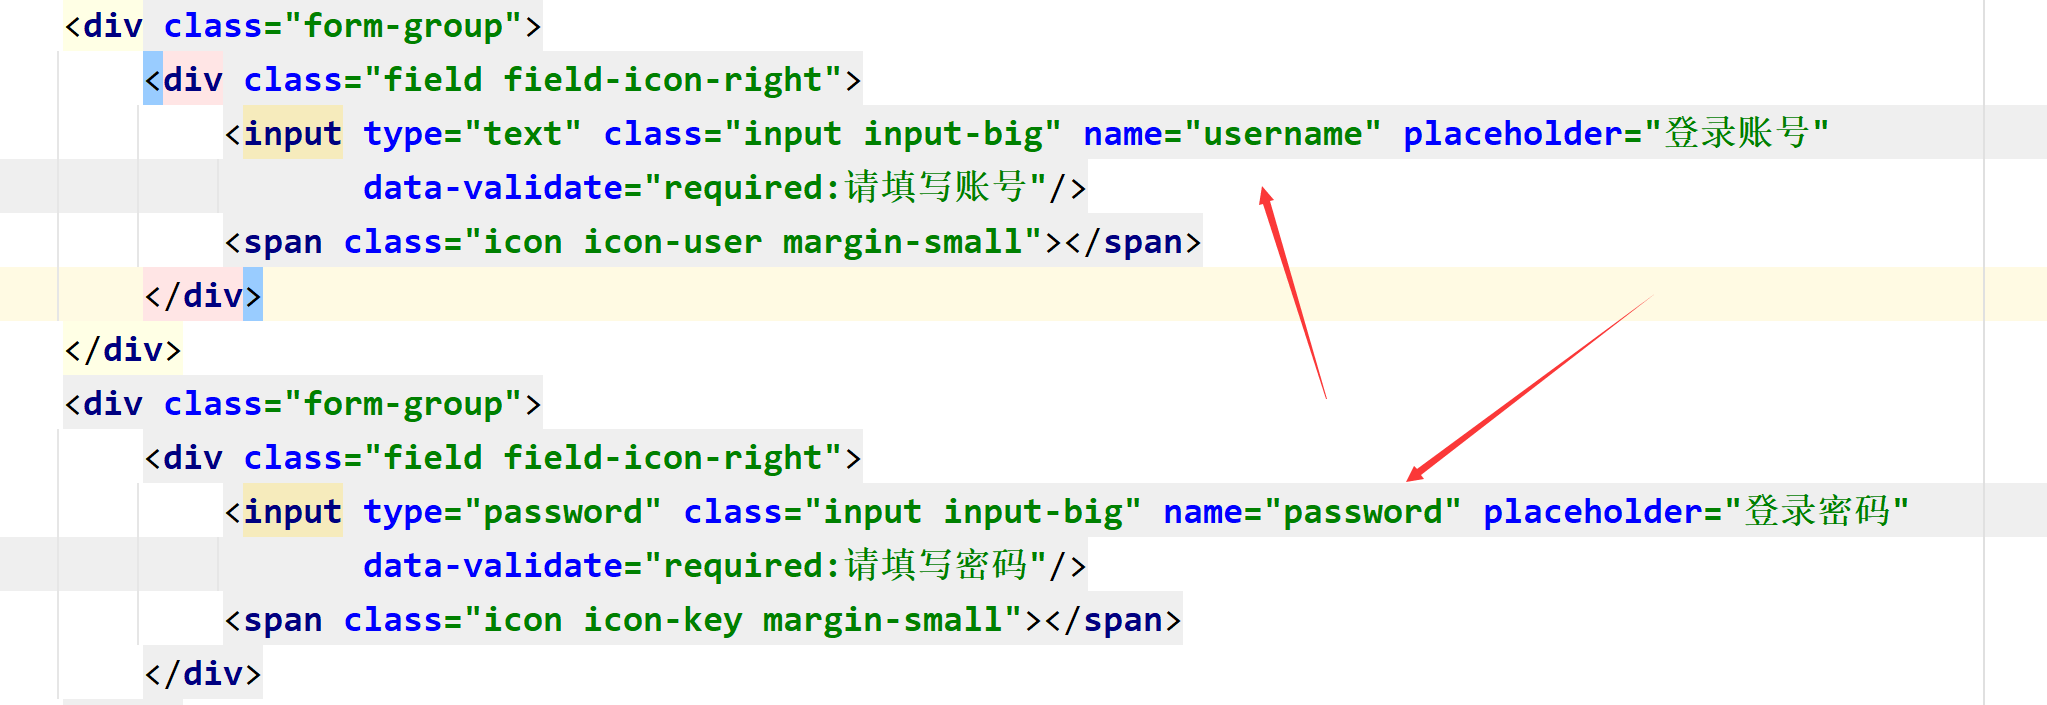
@Overrideprotected void configure(HttpSecurity http) throws Exception {/*http.httpBasic()//开启httpbasic认证.and().authorizeRequests().anyRequest().authenticated();//所有请求都需要登录认证才能访问*/http.formLogin()//开启表单认证.loginPage("/toLoginPage")//自定义登录页面.loginProcessingUrl("/login")// 登录处理Url.usernameParameter("username").passwordParameter("password"). //修改自定义表单name值..successForwardUrl("/")// 登录成功后跳转路径.and().authorizeRequests().antMatchers("/toLoginPage").permitAll()//放行登录页面.anyRequest().authenticated();//所有请求都需要登录认证才能访问;// 关闭csrf防护http..csrf().disable();http.headers().frameOptions().sameOrigin();//同源域名下的iframe}
基于数据库实现认证
首先要自己实现个service类,完成对用户名和密码的校验设置。
@Servicepublic class MyUserDetailsService implements UserDetailsService {@Autowiredprivate UserService userService;@Overridepublic UserDetails loadUserByUsername(String s) throws UsernameNotFoundException {final User user = userService.findByUsername(s);if (user == null) {throw new UsernameNotFoundException("没有找到该用户: " + s);}UserDetails userDetails = new org.springframework.security.core.userdetails.User(s,"{noop}"+user.getPassword(),true, //用户是否启用true, //用户是否过期true, //用户凭证是否过期true, //用户是否锁定new ArrayList<>());return userDetails;}}
之后要在配置类里把这个service注入。
@Configurationpublic class SecurityConfig extends WebSecurityConfigurerAdapter {@Autowiredprivate MyUserDetailsService myUserDetailsService;@Overrideprotected void configure(AuthenticationManagerBuilder auth) throws Exception {auth.userDetailsService(myUserDetailsService);}//放行静态资源@Overridepublic void configure(WebSecurity web) throws Exception {web.ignoring().antMatchers("/css/**", "/images/**", "/js/**");}//修改这个方法可以自定义登录界面@Overrideprotected void configure(HttpSecurity http) throws Exception {http.formLogin().loginPage("/toLoginPage").loginProcessingUrl("/login").usernameParameter("username").passwordParameter("password")//自定义用户名密码.successForwardUrl("/").and().authorizeRequests().antMatchers("/toLoginPage").permitAll().anyRequest().authenticated();http.csrf().disable();//禁用http.headers().frameOptions().sameOrigin();//同源域名下的iframe}}
密码加密
之前的例子里数据库是明文密码,不安全。
在spring security里,应该用BCrypt算法相关的实现去加密密码。
bcrypt算法相对来说是运算比较慢的算法,在密码学界有句常话:越慢的算法越安全。黑客破解成本越高。通过salt和const这两个值来减缓加密过程,它的加密时间(百ms级)远远超过 md5(大概1ms左右)。对于计算机来说,Bcrypt 的计算速度很慢,但是对于用户来说,这个过程不算慢。bcrypt是单向的,而且经过salt和cost的处理,使其受攻击破解的概率大大降低,同时 破解的难度也提升不少,相对于MD5等加密方式更加安全,而且使用也比较简单
bcrypt加密后的字符串形如:$2a$10$wouq9P/HNgvYj2jKtUN8rOJJNRVCWvn1XoWy55N3sCkEHZPo3lyWq
其中$是分割符,无意义;2a是bcrypt加密版本号;10是const的值;而后的前22位是salt值;再然后的字符串就是密码的密文了;这里的const值即生成salt的迭代次数,默认值是10,推荐值12。
 实际用起来也超级方便…
获取当前用户
写法
@GetMapping("/loginUser")@ResponseBodypublic UserDetails getCurrentUser1() {return (UserDetails) SecurityContextHolder.getContext().getAuthentication().getPrincipal();}@GetMapping("/loginUser2")@ResponseBodypublic UserDetails getCurrentUser2(Authentication authentication) {return (UserDetails) authentication.getPrincipal();}@GetMapping("/loginUser3")@ResponseBodypublic UserDetails getCurrentUser2(@AuthenticationPrincipal UserDetails userDetails) {return userDetails;}
返回结果大概这样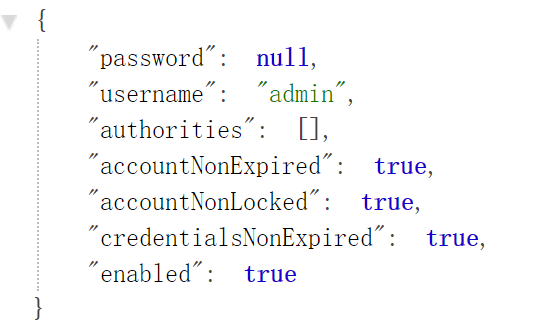
记住我功能如何实现
简单的token生成法
Token=MD5(username+分隔符+expiryTime+分隔符+password)
注意: 这种方式不推荐使用, 有严重的安全问题. 整体就是密码信息在前端浏览器cookie中存放. 如果cookie 被盗取很容易破解. 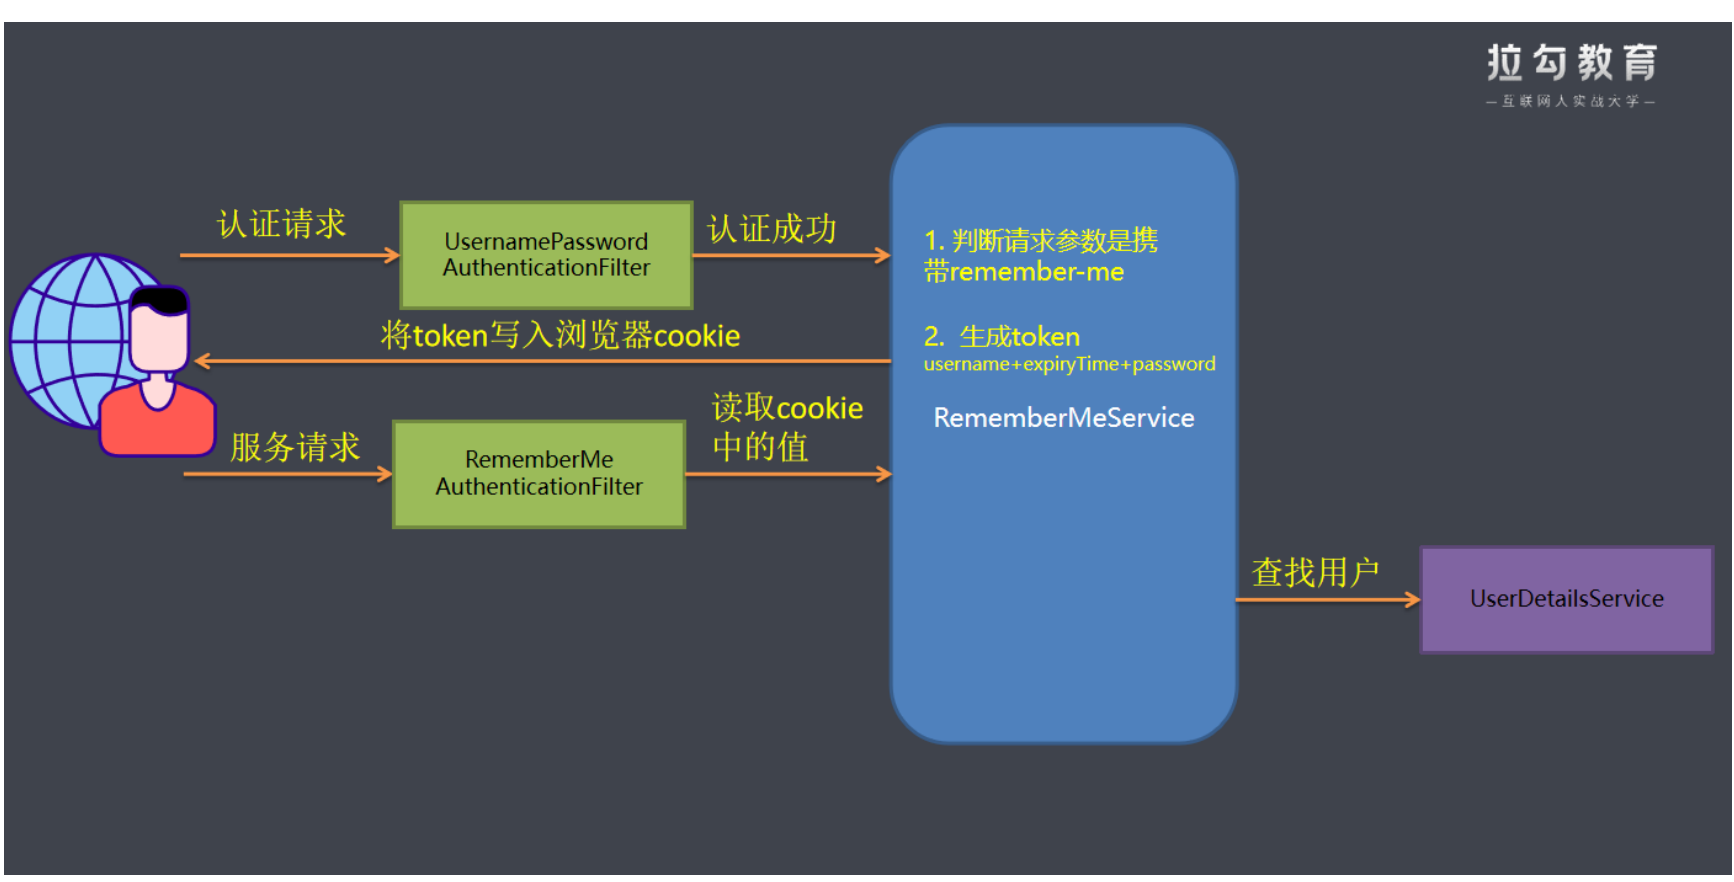
当然实现起来很简单,只需要修改下SecurityConfig配置类中带有HttpSecurity的方法即可。

持久化的token生成法
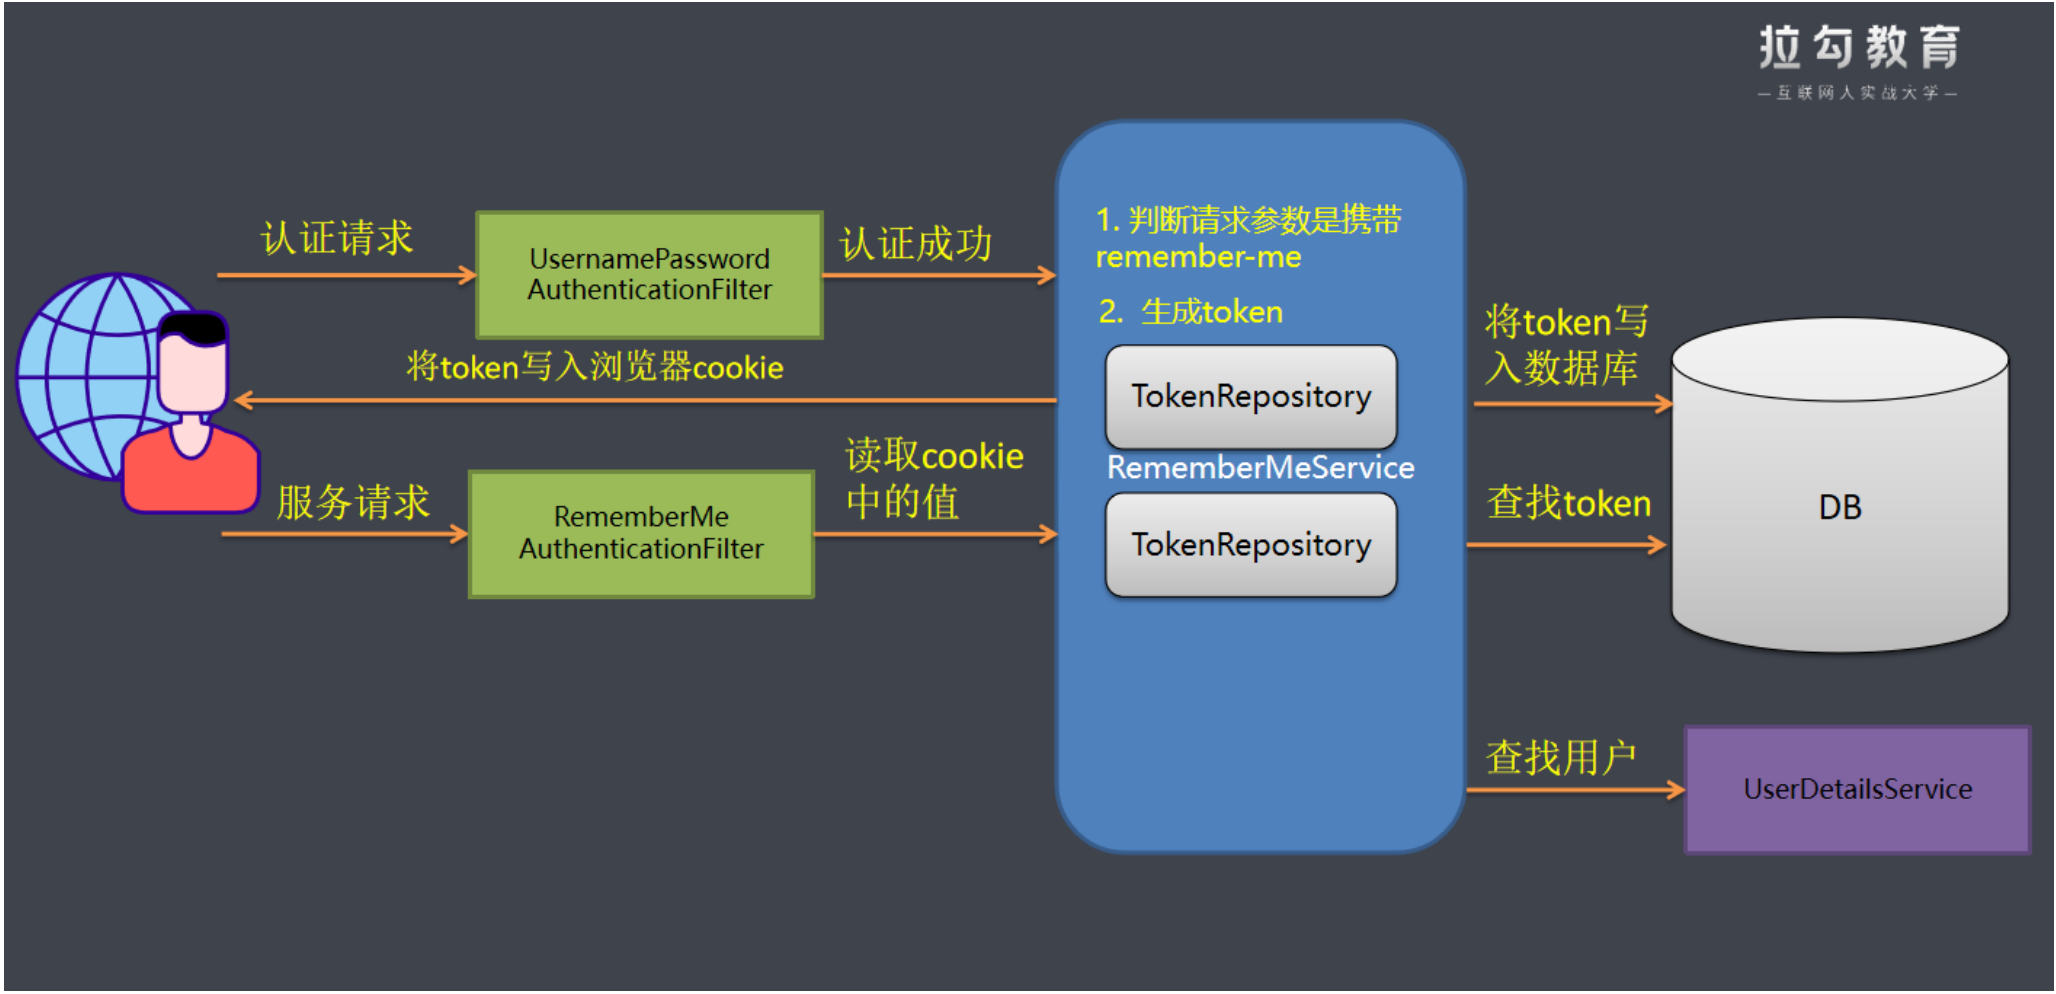
存入数据库Token包含:
token: 随机生成策略,每次访问都会重新生成
series: 登录序列号,随机生成策略。用户输入用户名和密码登录时,该值重新生成。使用 remember-me功能,该值保持不变
expiryTime: token过期时间。
CookieValue=encode(series+token)
实现
在SecurityConfig类里添加如下代码
@Autowiredprivate DataSource dataSource;@Beanpublic PersistentTokenRepository getPersistentTokenRepository() {final JdbcTokenRepositoryImpl jdbcTokenRepository = new JdbcTokenRepositoryImpl();jdbcTokenRepository.setDataSource(dataSource);jdbcTokenRepository.setCreateTableOnStartup(true);//第一次启动设置为true,第二次启动项目去掉return jdbcTokenRepository;}
然后在之前的configure方法里多加一行<br />
防止漏洞
在重要的方法里修修改改。可以在代码里加入:
Authentication authentication =SecurityContextHolder.getContext().getAuthentication();// 判断认证信息是否来源于RememberMeif (RememberMeAuthenticationToken.class.isAssignableFrom(authentication.getClass())) {throw new RememberMeAuthenticationException("认证信息来源于RememberMe,请重新登录");}
这样重要的方法就返回异常了。
自定义登录成功/失败
自定义成功处理:实现AuthenticationSuccessHandler接口,并重写onAnthenticationSuccesss()方法
自定义失败处理:实现AuthenticationFailureHandler接口,并重写onAuthenticationFailure()方法
核心就是实现接口
@Servicepublic class MyAuthenticationService implements AuthenticationSuccessHandler, AuthenticationFailureHandler {private RedirectStrategy redirectStrategy = new DefaultRedirectStrategy();@Overridepublic void onAuthenticationSuccess(HttpServletRequest httpServletRequest, HttpServletResponse httpServletResponse, Authentication authentication) throws IOException, ServletException {System.out.println("成功了");redirectStrategy.sendRedirect(httpServletRequest, httpServletResponse, "/");}@Overridepublic void onAuthenticationFailure(HttpServletRequest httpServletRequest, HttpServletResponse httpServletResponse, AuthenticationException e) throws IOException, ServletException {System.out.println("失败了");redirectStrategy.sendRedirect(httpServletRequest, httpServletResponse, "/toLoginPage");}}
接着再在config类里修改下配置<br />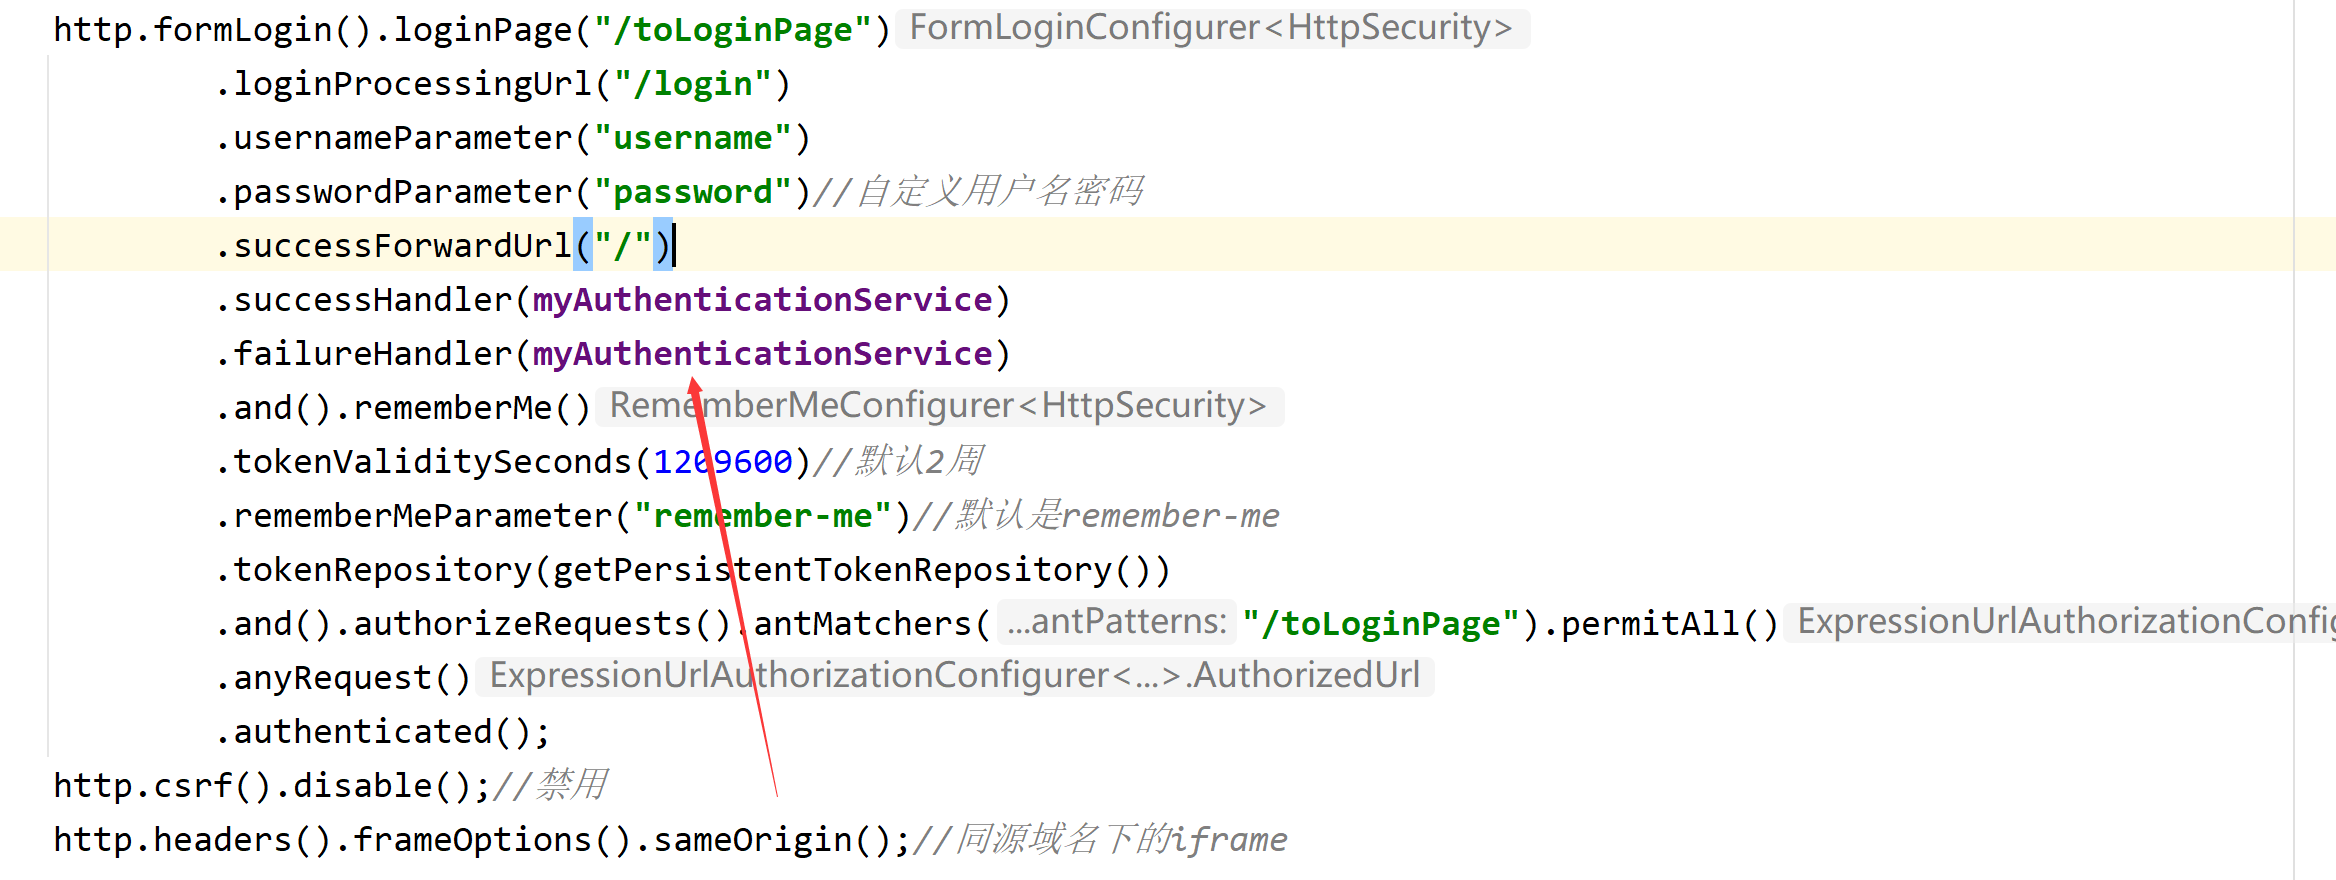<br />记得先注入这个service,我不贴了。
异步登录
其实就是返回响应让前端去做处理。
主要实现方法就是修改一下之前的service
@Servicepublic class MyAuthenticationService implements AuthenticationSuccessHandler, AuthenticationFailureHandler {private RedirectStrategy redirectStrategy = new DefaultRedirectStrategy();@Autowiredprivate ObjectMapper objectMapper;@Overridepublic void onAuthenticationSuccess(HttpServletRequest httpServletRequest, HttpServletResponse httpServletResponse, Authentication authentication) throws IOException, ServletException {System.out.println("成功了");// redirectStrategy.sendRedirect(httpServletRequest, httpServletResponse, "/");HashMap<String, Object> map = new HashMap<>();map.put("code", HttpStatus.OK.value());map.put("message", "登录成功");httpServletResponse.setContentType("application/json;charset=UTF-8");httpServletResponse.getWriter().write(objectMapper.writeValueAsString(map));}@Overridepublic void onAuthenticationFailure(HttpServletRequest httpServletRequest, HttpServletResponse httpServletResponse, AuthenticationException e) throws IOException, ServletException {System.out.println("失败了");// redirectStrategy.sendRedirect(httpServletRequest, httpServletResponse, "/toLoginPage");HashMap<String, Object> map = new HashMap<>();map.put("code", HttpStatus.UNAUTHORIZED.value());map.put("message", "登录失败");httpServletResponse.setContentType("application/json;charset=UTF-8");httpServletResponse.getWriter().write(objectMapper.writeValueAsString(map));}}
退出登录
首先可以让之前的MyAuthenticationService继续实现一个LogoutSuccessHandler接口
之后只需要
@Overridepublic void onLogoutSuccess(HttpServletRequest httpServletRequest, HttpServletResponse httpServletResponse, Authentication authentication) throws IOException, ServletException {System.out.println("退出成功");redirectStrategy.sendRedirect(httpServletRequest, httpServletResponse, "/toLoginPage");}
这样实现一个方法就可以跳转了。
然后还要修改配置类,注册一下服务。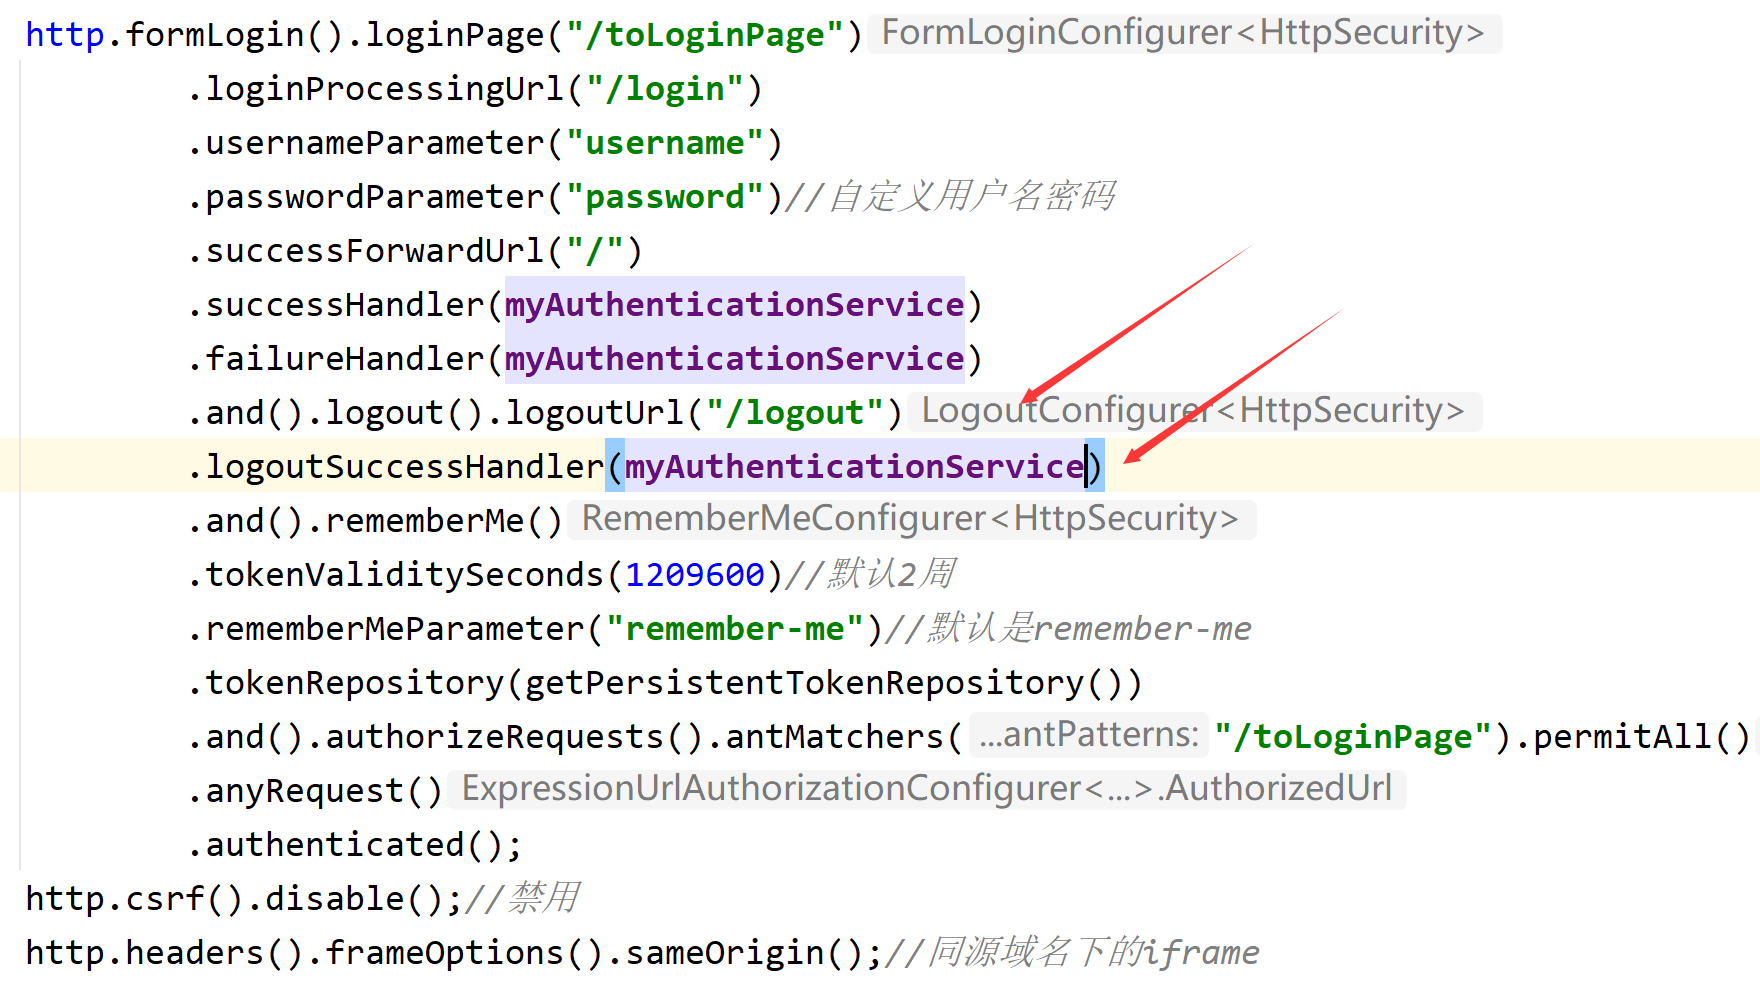
图形验证码
spring security添加验证码大致可以分为三个步骤:
- 根据随机数生成验证码图片;
- 将验证码图片显示到登录页面;
- 认证流程中加入验证码校验。
Spring Security的认证校验是由UsernamePasswordAuthenticationFilter过滤器完成的,所以我们的验证码校验逻辑应该在这个过滤器之前。验证码通过后才能到后续的操作. 流程如下: 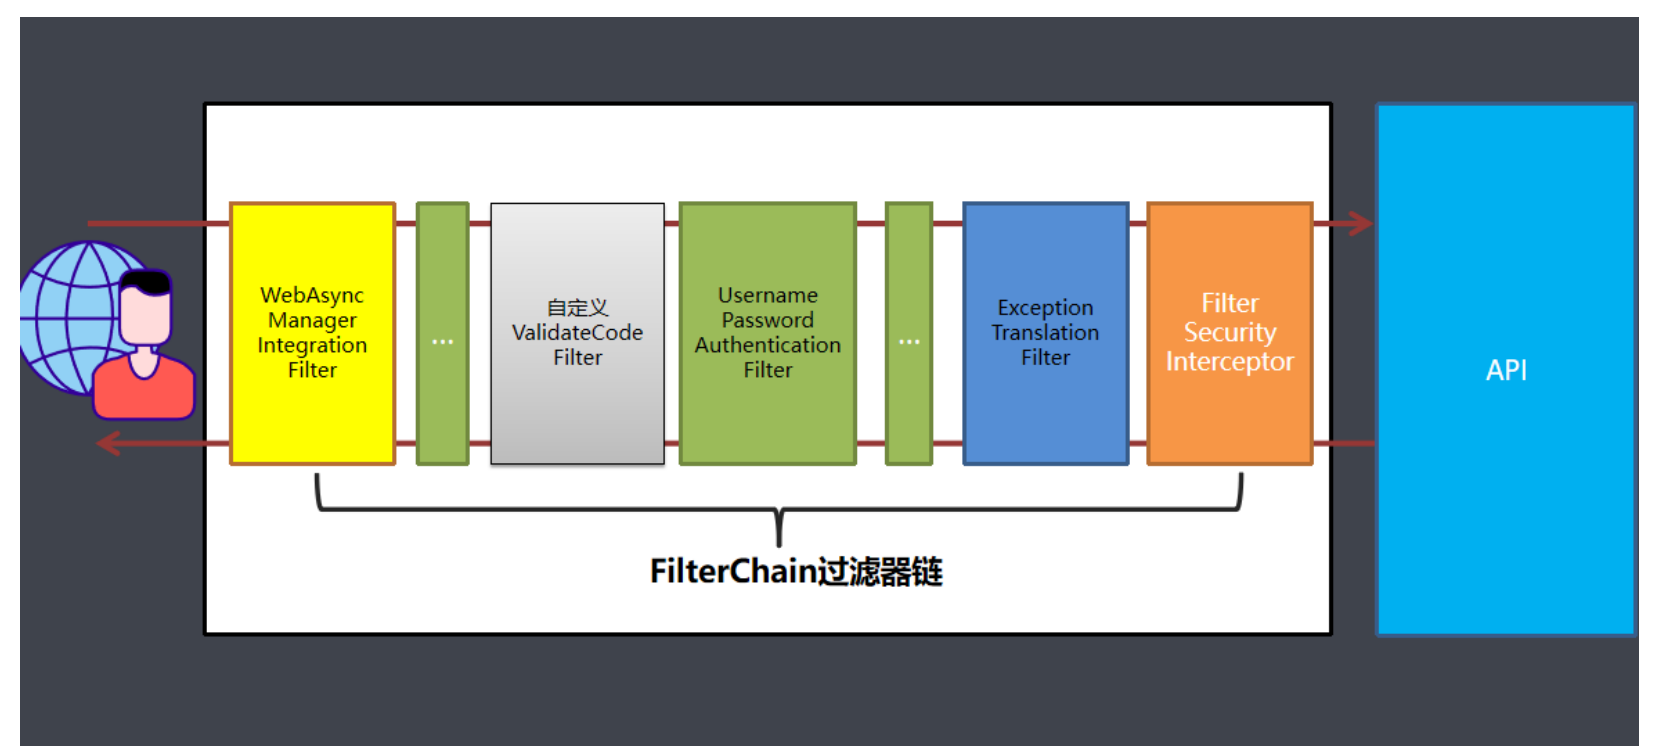
在实现方面,首先要自己写个filter,之后要注册
@Componentpublic class ValidateCodeFilter extends OncePerRequestFilter {@Overrideprotected void doFilterInternal(HttpServletRequest httpServletRequest, HttpServletResponse httpServletResponse, FilterChain filterChain) throws ServletException, IOException {if (httpServletRequest.getRequestURI().equals("/login") && httpServletRequest.getMethod().equalsIgnoreCase("post")) {httpServletRequest.getParameter("imageCode");//验证流程省略}filterChain.doFilter(httpServletRequest, httpServletResponse);}}
然后把这行加入到formLogin相关的配置前面。
Session管理
设置session时间,只需要修改application.properties文件即可。
其他常用的配置如下(写在config类的configure方法里)
http.sessionManagement().invalidSessionUrl("/toLoginPage") //失效跳到哪里.maximumSessions(1) //同一时间只能有一个用户可以登录(互踢).maxSessionsPreventsLogin(true) //session到上限就不允许登录了,和到期后重定向互斥。.expiredUrl("/toLoginPage");
集群Session同步
实际场景中一个服务会至少有两台服务器在提供服务,在服务器前面会有一个nginx做负载均衡, 用户访问nginx,nginx再决定去访问哪一台服务器。当一台服务宕机了之后,另一台服务器也可以继续提供服务,保证服务不中断。如果我们将session保存在Web容器(比如tomcat)中,如果一个用户第一次访问被分配到服务器一上面需要登录,当某些访问突然被分配到服务器二上,因为服务器二上没有用户在服务器一上登录的会话session信息,服务器二还会再次让用户登录,用户已经登录了还让登录就感觉不正常了。
解决这个问题的思路是用户登录的会话信息不能再保存到Web服务器中,而是保存到一个单独的库 (redis、mongodb、jdbc等)中,所有服务器都访问同一个库,都从同一个库来获取用户的session信息,如用户在服务器一上登录,将会话信息保存到库中,用户的下次请求被分配到服务器二,服务器二从库中检查session是否已经存在,如果存在就不用再登录了,可以直接访问服务了。
基于redis实现
引入依赖
<dependency><groupId>org.springframework.session</groupId><artifactId>spring-session-data-redis</artifactId></dependency>
#使用redis共享sessionspring.session.store-type=redis
CSRF
CSRF(Cross-site request forgery),中文名称:跨站请求伪造
你这可以这么理解CSRF攻击:攻击者盗用了你的身份,以你的名义发送恶意请求。CSRF能够做的事情包括:以你名义发送邮件,发消息,盗取你的账号,甚至于购买商品,虚拟货币转账……造成的问题包括:个人隐私泄露以及财产安全。
CSRF这种攻击方式在2000年已经被国外的安全人员提出,但在国内,直到06年才开始被关注,08 年,国内外的多个大型社区和交互网站分别爆出CSRF漏洞,如:NYTimes.com(纽约时报)、 Metafilter(一个大型的BLOG网站),YouTube和百度HI……而现在,互联网上的许多站点仍对此毫无 防备,以至于安全业界称CSRF为“沉睡的巨人”。 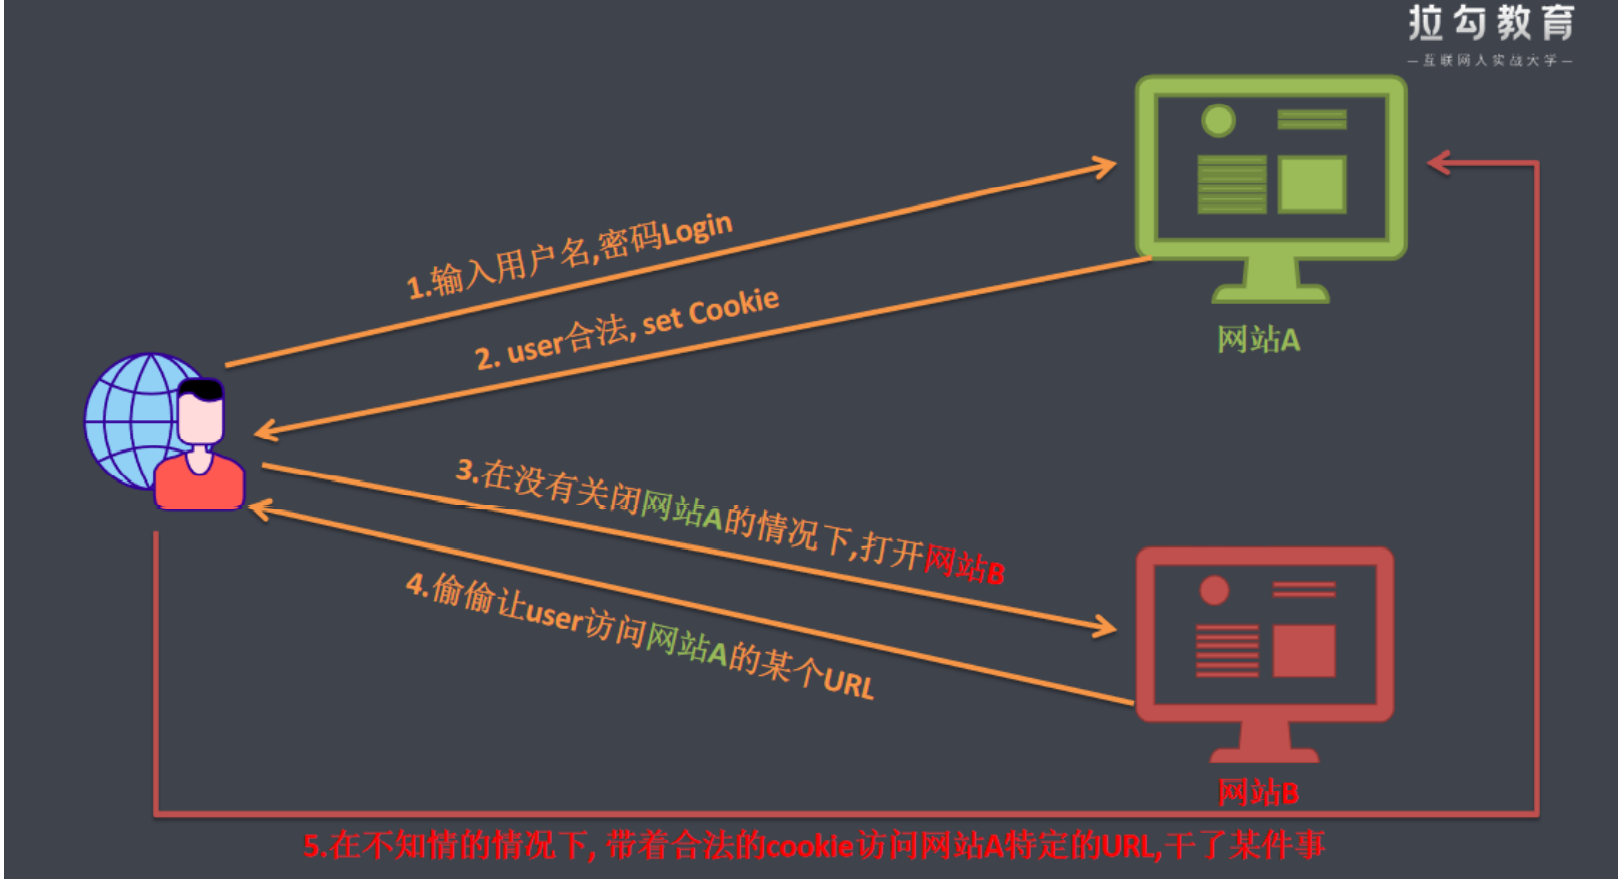
从上图可以看出,要完成一次CSRF攻击,受害者必须依次完成三个步骤:
1.登录受信任网站A,并在本地生成Cookie。
2.在不登出A的情况下,访问危险网站B。
3. 触发网站B中的一些元素
防御策略
在业界目前防御 CSRF 攻击主要有三种策略:验证 HTTP Referer 字段;在请求地址中添加 token 并验证;在 HTTP 头中自定义属性并验证。
- 验证 HTTP Referer 字段
根据 HTTP 协议,在 HTTP 头中有一个字段叫 Referer,它记录了该 HTTP 请求的来源地址。
在通常情况下,访问一个安全受限页面的请求来自于同一个网站,在后台请求验证其 Referer 值,
如果是以自身安全网站开头的域名,则说明该请求是是合法的。如果 Referer 是其他网站的话,则
有可能是黑客的 CSRF 攻击,拒绝该请求。
2. 在请求地址中添加 token 并验证
CSRF 攻击之所以能够成功,是因为黑客可以完全伪造用户的请求,该请求中所有的用户验证
信息都是存在于 cookie 中,因此黑客可以在不知道这些验证信息的情况下直接利用用户自己的
cookie 来通过安全验证。要抵御 CSRF,关键在于在请求中放入黑客所不能伪造的信息,并且该
信息不存在于 cookie 之中。可以在 HTTP 请求中以参数的形式加入一个随机产生的 token,并在
服务器端建立一个拦截器来验证这个 token,如果请求中没有 token 或者 token 内容不正确,则
认为可能是 CSRF 攻击而拒绝该请求。
3. 在 HTTP 头中自定义属性并验证
这种方法也是使用 token 并进行验证,和上一种方法不同的是,这里并不是把 token 以参数
的形式置于 HTTP 请求之中,而是把它放到 HTTP 头中自定义的属性里。
SpringSecurity的防护机制
org.springframework.security.web.csrf.CsrfFilter
开启csrf防护
//开启csrf防护, 可以设置哪些不需要防护http.csrf().ignoringAntMatchers("/user/save");
页面需要添加token值
<input type="hidden" th:name="${_csrf.parameterName}" th:value="${_csrf.token}"/>
跨域
跨域,实质上是浏览器的一种保护处理。如果产生了跨域,服务器在返回结果时就会被浏览器拦截 (注意:此时请求是可以正常发起的,只是浏览器对其进行了拦截),导致响应的内容不可用。
解决方案:
- JSONP
浏览器允许一些带src属性的标签跨域,也就是在某些标签的src属性上写url地址是不会产生跨
域问题 - CORS解决跨域
CORS是一个W3C标准,全称是”跨域资源共享”(Cross-origin resource sharing)。CORS需要
浏览器和服务器同时支持。目前,所有浏览器都支持该功能,IE浏览器不能低于IE10。浏览器在发
起真正的请求之前,会发起一个OPTIONS类型的预检请求,用于请求服务器是否允许跨域,在得
到许可的情况下才会发起请求
在security中,可以通过增加配置的方式支持跨域。
具体地,在配置类里加如下代码
public CorsConfigurationSource corsConfigurationSource() {CorsConfiguration corsConfiguration = new CorsConfiguration();// 设置允许跨域的站点corsConfiguration.addAllowedOrigin("*");// 设置允许跨域的http方法corsConfiguration.addAllowedMethod("*");// 设置允许跨域的请求头corsConfiguration.addAllowedHeader("*");// 允许带凭证corsConfiguration.setAllowCredentials(true);// 对所有的url生效UrlBasedCorsConfigurationSource source = newUrlBasedCorsConfigurationSource();source.registerCorsConfiguration("/**", corsConfiguration);return source;}
然后在configure方法里加这行
http.cors().configurationSource(corsConfigurationSource());
注册一下相关的方法
这样基本就可以了

