写于:2019-06-04 08:52:37 参考资料: Hystrix GitHub 官方文档 Hystrix Wiki 文档
一、Hystrix 工作流程概述
下图是一张 Hystrix 官方放出来的 Hystrix 工作流程图。
该流程图阐述了官方对Hystrix 提出的5个功能点。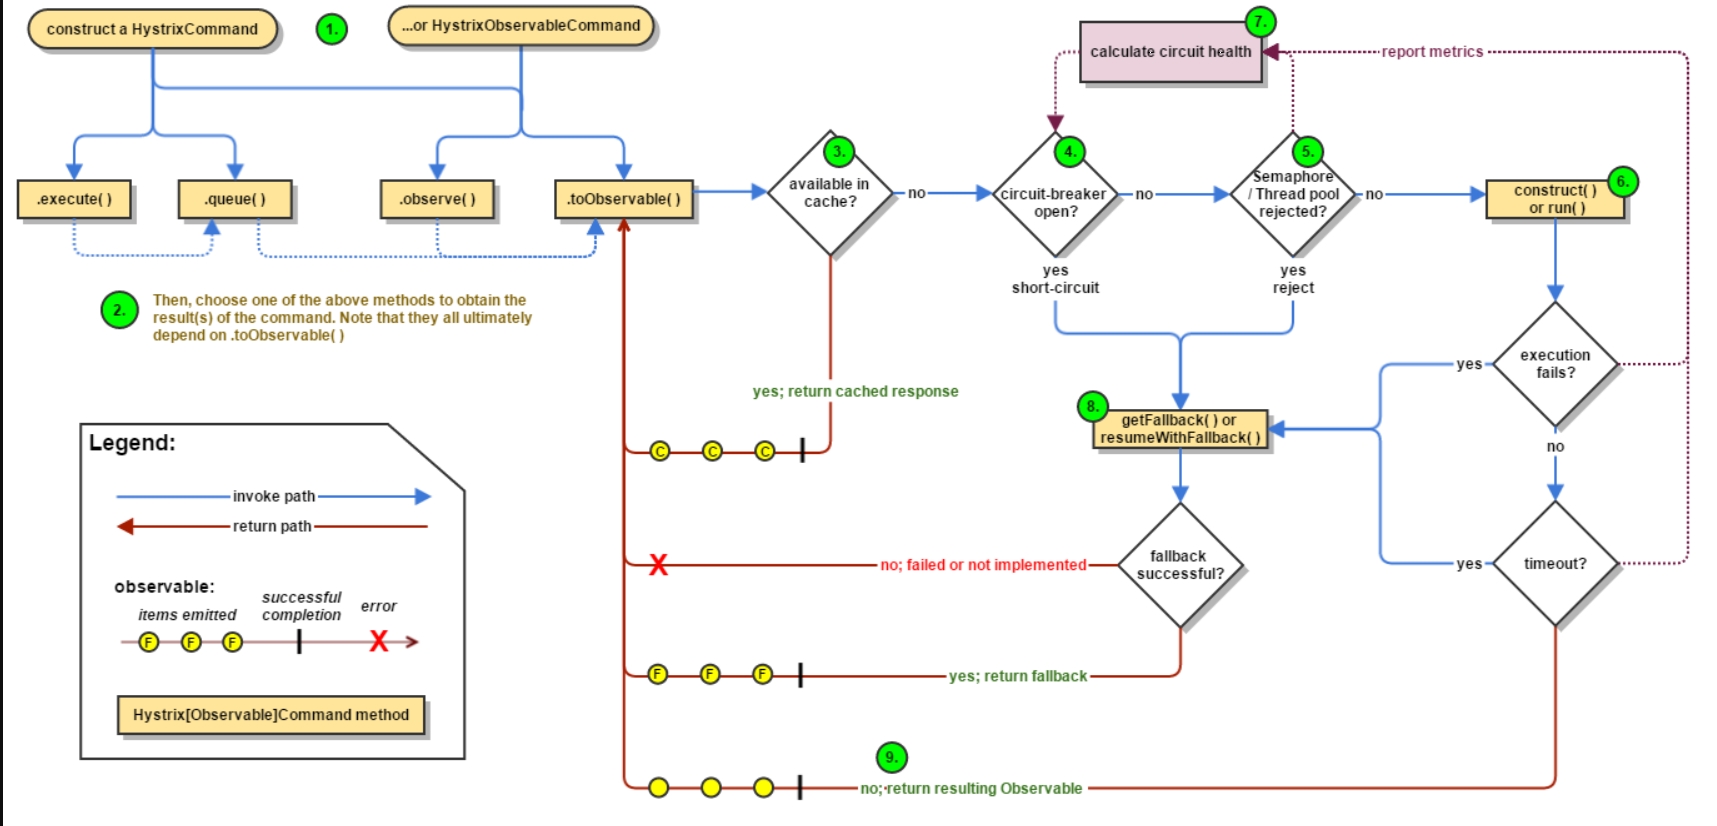
根据上图针对 Hystrix 工作流程进行简单解析。
步骤1、构造 Hystrix 专属对象HystrixCommand或HystrixObservableCommand,用来封装请求,并发出处理命令。
步骤2、开始执行处理命令
步骤3、本次请求是否有缓存的响应数据,如果存在进入到步骤9。如果缓存中没有缓存响应内容,进入步骤4
步骤4、判定本次请求对应的服务是否被熔断(本次请求被判定为不可用)。如果该请求对应服务被熔断了,到步骤8。否则进入步骤5。
步骤5、Hystrix 用来处理执行请求调用的队列/线程池/信号量 是否已经填满了。如果满了,进入步骤8,否则进入步骤6 。
步骤6、Hystrix 开始执行请求调用。如果请求失败了,或者请求超时。Hystrix 会同时执行 步骤 7 和步骤8的操作。否则表示请求成功进入到步骤9.
步骤7、收集步骤6执报告指标。
步骤8、接收 步骤 4 、步骤 5 、步骤 6的失败信息,查询是否存在对应的自定义返回信息。进入步骤9
步骤9、该步骤用来返回数据。步骤3进入的,返回对应的response 缓存数据。步骤 8 进入的,根据是否存在自定义信息返回,如果存在返回自定信息,如果不存在返回相对应的错误信息。
步骤6进入的,返回请求返回的结果。
二、Hystrix 起始:请求封装对象
Hystrix 提供了2 种请求封装的对象:HystrixCommand 和 HystrixObservableCommand
这两种对象分别对应到4种 请求控制操作:
- execute()
- queue()
- observe()
- toObservable()
通过官方文档,或者查看 Hystrix 源码,能够得知这2种请求封装对象,4中请求控制操作最终对应的同一个实现:Observable
The synchronous call execute() invokes queue().get(). queue() in turn invokes toObservable().toBlocking().toFuture(). Which is to say that ultimately every HystrixCommand is backed by an Observable implementation, even those commands that are intended to return single, simple values.
三、Hystrix 工作流程详细分析-熔断
官方给定的熔断的工作原理图: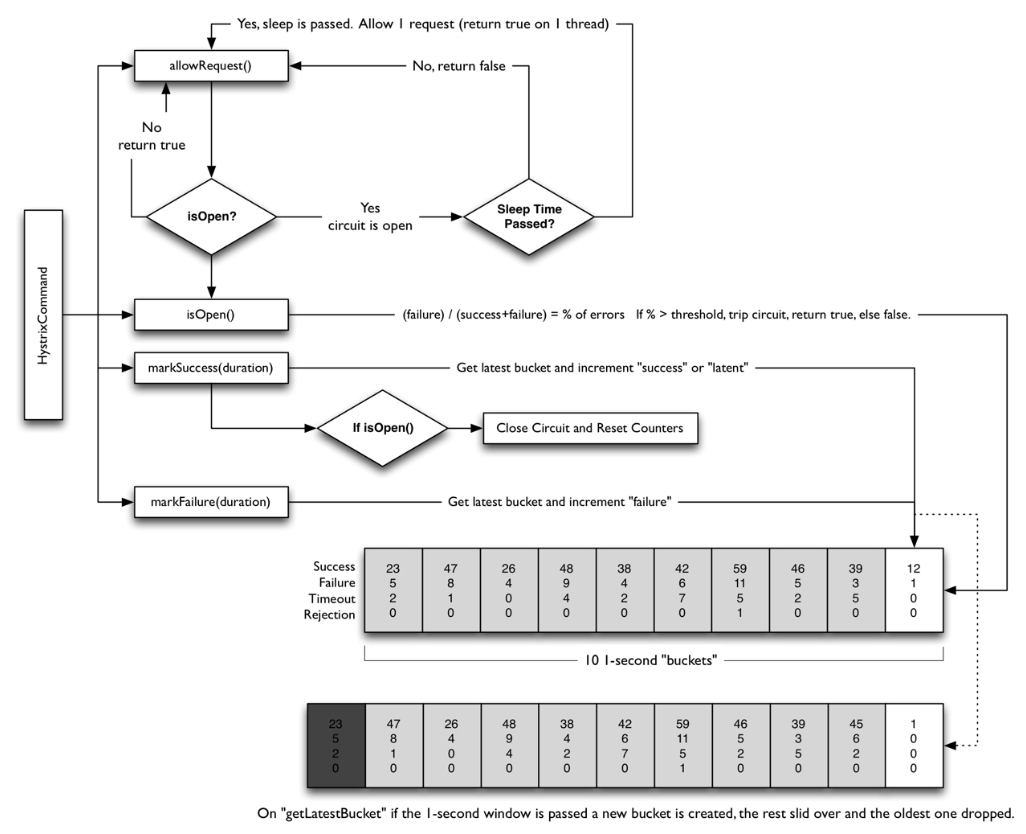
结合 Hystrix 熔断实现代码 HystrixCircuitBreaker 进行分析。
3.1、HystrixCircuitBreaker 类结构
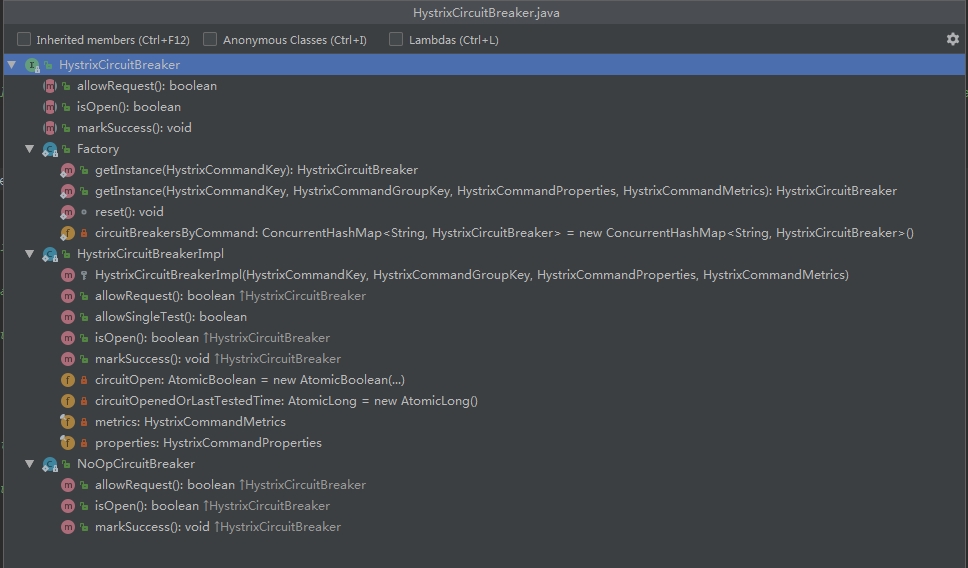
根据上图,结合 HystrixCircuitBreaker 源码得到如下结论:
3.2、HystrixCircuitBreaker 是一个接口
public interface HystrixCircuitBreaker {public boolean allowRequest();public boolean isOpen();void markSuccess();}
该接口定义了 熔断操作的3个基础方法:
- allowRequest()
- isOpen()
- markSuccess()
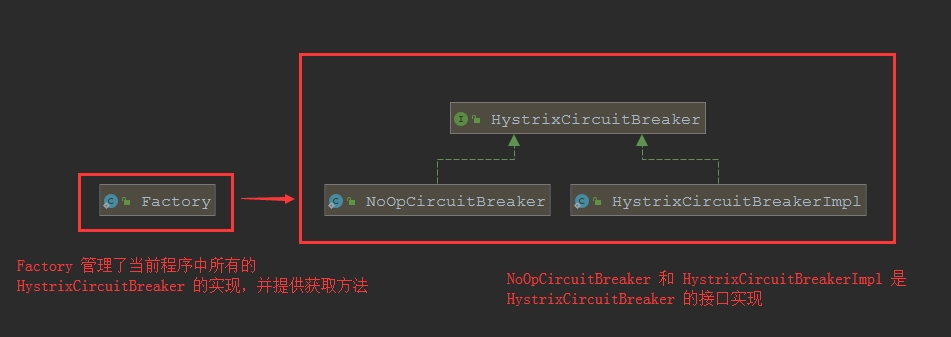
3.3、HystrixCircuitBreaker中定义了3个静态内部类
- Factory
- NoOpCircuitBreaker
- HystrixCircuitBreakerImpl
3.4、静态内部类 Factory
代码实现如下:
public interface HystrixCircuitBreaker {public static class Factory {// String is HystrixCommandKey.name() (we can't use HystrixCommandKey directly as we can't guarantee it implements hashcode/equals correctly)private static ConcurrentHashMap<String, HystrixCircuitBreaker> circuitBreakersByCommand = new ConcurrentHashMap<String, HystrixCircuitBreaker>();......// 从 容器中获取相关的 HystrixCircuitBreaker 实现public static HystrixCircuitBreaker getInstance(HystrixCommandKey key) { return circuitBreakersByCommand.get(key.name()); }// 清空所有的 HystrixCircuitBreaker 实现static void reset() { circuitBreakersByCommand.clear();}}}
Factory 维护了一个 HystrixCommandKey.name() 和 HystrixCircuitBreaker 的集合关系,并提供方法通过 HystrixCommandKey.name() 获取相应的 HystrixCircuitBreaker。
3.5、静态内部类 NoOpCircuitBreaker
public interface HystrixCircuitBreaker {// An implementation of the circuit breaker that does nothing.static class NoOpCircuitBreaker implements HystrixCircuitBreaker {@Overridepublic boolean allowRequest() { return true; }@Overridepublic boolean isOpen() { return false; }@Overridepublic void markSuccess() { }}}
NoOpCircuitBreaker 是一个空实现,什么也没做,或者说这个断路器就是一直处于放行状态。
3.6、静态内部类 HystrixCircuitBreakerImpl 代码实现
public interface HystrixCircuitBreaker {static class HystrixCircuitBreakerImpl implements HystrixCircuitBreaker {private final HystrixCommandProperties properties;private final HystrixCommandMetrics metrics;/* track whether this circuit is open/closed at any given point in time (default to false==closed) */private AtomicBoolean circuitOpen = new AtomicBoolean(false);/* when the circuit was marked open or was last allowed to try a 'singleTest' */private AtomicLong circuitOpenedOrLastTestedTime = new AtomicLong();......}}
在 HystrixCircuitBreakerImpl 中有两个需要关注的初始值:
private AtomicBoolean circuitOpen = new AtomicBoolean(false);
circuitOpen 用来判定熔断器开启或者关闭(默认为关闭状态)
private AtomicLong circuitOpenedOrLastTestedTime = new AtomicLong();
circuitOpenedOrLastTestedTime 记录熔断器开启的时间,或者最近一次允许放行一个请求进行测试的时间。
根据 HystrixCircuitBreaker 定义的三个方法进行分析
3.6.1、 HystrixCircuitBreakerImpl#allowRequest() 方法
执行逻辑图如下: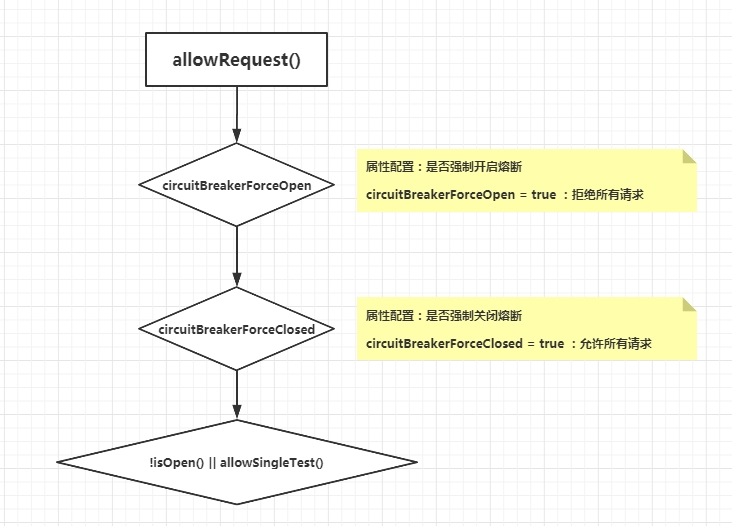
在 alloRequest() 方法中,存在2个关键的配置 circuitBreakerForceOpen 和 circuitBreakerForceClosed 。
circuitBreakerForceOpen = true 时会拒绝所有的请求
circuitBreakerForceClosed = true 时,会调用 isOpen() 但是仍然会放行所有的请求。
通常情况下,这两个值 都是 flase。所以正常情况下 会执行 !isOpen() || allowSingleTest()
来看看 isOpen()。
static class HystrixCircuitBreakerImpl implements HystrixCircuitBreaker {@Overridepublic boolean isOpen() {// ①if (circuitOpen.get()) {// if we're open we immediately return true and don't bother attempting to 'close' ourself as that is left to allowSingleTest and a subsequent successful test to closereturn true;}// ②// we're closed, so let's see if errors have made us so we should trip the circuit openHealthCounts health = metrics.getHealthCounts();// check if we are past the statisticalWindowVolumeThresholdif (health.getTotalRequests() < properties.circuitBreakerRequestVolumeThreshold().get()) {// we are not past the minimum volume threshold for the statisticalWindow so we'll return false immediately and not calculate anythingreturn false;}// ③if (health.getErrorPercentage() < properties.circuitBreakerErrorThresholdPercentage().get()) {return false;} else {// our failure rate is too high, trip the circuitif (circuitOpen.compareAndSet(false, true)) {// if the previousValue was false then we want to set the currentTimecircuitOpenedOrLastTestedTime.set(System.currentTimeMillis());return true;} else {// How could previousValue be true? If another thread was going through this code at the same time a race-condition could have// caused another thread to set it to true already even though we were in the process of doing the same// In this case, we know the circuit is open, so let the other thread set the currentTime and report back that the circuit is openreturn true;}}}
执行逻辑如下:
①、先判断此时熔断器是否打开,如果熔断器打开了直接返回true,否则代表熔断器是关闭的状态,进入下一个判断。
②、获取 Hystrix 的请求统计信息,从请求信息中判定此时 请求总数 小于 circuitBreakerRequestVolumeThreshold 直接返回熔断器关闭,反之进入下一个判断。
HealthCounts 统计信息在上面的Hystrix工作原理的步骤7种收集而来,其中记录内容就是上面熔断器工作原理图片中的 “bucket” ,一个 bucket 是1s,一共10个,也就是 HealthCounts 记录了10s内的请求快照信息。 当请求总数达到 circuitBreakerRequestVolumeThreshold 设置定的阈值时,才会进行是否熔断的判断。
③、请求错误比例小于 circuitBreakerErrorThresholdPercentage 设定的阈值,直接返回熔断关闭。否则进行熔断器开启,并设置熔断的时间戳。
通过 allowRequest() 和 isOpen() 方法,我们能够知道,当请求在正常阈值内的时候, isOpen() 返回 false , allowRequest() 返回 true。请求能够直接通行而不会被熔断。 在请求出现失败对比总请求达到 circuitBreakerErrorThresholdPercentage 比例阈值时,开启熔断,isOpen() 返回 true。而此时 allowRequest() 执行 allowSingleTest()。
下面来看看 allowSingleTest()
static class HystrixCircuitBreakerImpl implements HystrixCircuitBreaker {public boolean allowSingleTest() {long timeCircuitOpenedOrWasLastTested = circuitOpenedOrLastTestedTime.get();// 1) if the circuit is open// 2) and it's been longer than 'sleepWindow' since we opened the circuitif (circuitOpen.get() && System.currentTimeMillis() > timeCircuitOpenedOrWasLastTested + properties.circuitBreakerSleepWindowInMilliseconds().get()) {// We push the 'circuitOpenedTime' ahead by 'sleepWindow' since we have allowed one request to try.// If it succeeds the circuit will be closed, otherwise another singleTest will be allowed at the end of the 'sleepWindow'.if (circuitOpenedOrLastTestedTime.compareAndSet(timeCircuitOpenedOrWasLastTested, System.currentTimeMillis())) {// if this returns true that means we set the time so we'll return true to allow the singleTest// if it returned false it means another thread raced us and allowed the singleTest before we didreturn true;}}return false;}}
执行逻辑如下:
1、获取熔断时间
2、如果此时熔断开启,并且当前时间 > 熔断时间 + circuitBreakerSleepWindowInMilliseconds 。更新最近一下熔断时间(最近一次尝试恢复时间),并返回允许请求通过。
circuitBreakerSleepWindowInMilliseconds 为熔断之后,熔断尝试关闭需要的时间间隔
3.6.2、 HystrixCircuitBreakerImplmarkSuccess() 方法
static class HystrixCircuitBreakerImpl implements HystrixCircuitBreaker {public void markSuccess() {if (circuitOpen.get()) {if (circuitOpen.compareAndSet(true, false)) {//win the thread race to reset metrics//Unsubscribe from the current stream to reset the health counts stream. This only affects the health counts view,//and all other metric consumers are unaffected by the resetmetrics.resetStream();}}}}
首先,该方法会在 AbstractCommand#toObservable 调用AbstractCommand#executeCommandAndObserve时调用。
而 AbstractCommand#toObservable 是所有包裹了 Hystrix 请求都会调用到的方法。换句话说,就是通过 Hystrix 发起每一次请求都会进入到该方法,如果此次请求被判定为请求成功会调用 markSuccess() 。
在 markSuccess() 方法中,逻辑很清晰,就是如果熔断器是开启的,直接关闭熔断器,并将本次请求统计到汇总 metrics 中。
3.7、Hystrix 熔断器总结
1、Hystrix 熔断默认关闭
2、可以通过配置属性 circuitBreakerForceClosed 和 circuitBreakerForceOpen 来强制熔断器的关闭或者开启
3、熔断的判定标准:请求失败次数比例 > circuitBreakerErrorThresholdPercentage 参数(失败请求的统计汇总在调用AbstractCommand#toObservable中会调用applyHystrixSemantics进行请求统计汇总)
4、熔断开启之后,在一定周期内(该周期 circuitBreakerSleepWindowInMilliseconds进行配置),会尝试放行一个请求进行尝试操作,如果请求成功会调用 markSuccess() 关闭熔断。
总的来说 熔断实现了Hystrix 官方提到的两个功能点:
- 1、尽可能优雅的进行服务降级
当请求失败数达到一定数量时,判定服务不可用进行服务降级 - 2、快速的进行故障恢复
在固定周期内放行请求,尝试进行恢复,一旦请求成功,马上关闭熔断,恢复服务。
四、Hystrix 工作流程详细分析 - 资源隔离(线程隔离)
4.1、线程隔离 - 线程池
在官方给定图中,可以比较直观的看到,每一个被 HystrixCommand 包裹的请求接口都有自己的请求线程池。在上面的谈论到的 Hystrix 的工作流程图也能够得知。HystrixCommand 包裹的接口除了接受熔断的控制,还受到自身线程池数量的控制,每个请求都需要从对应的线程池中拿到线程才有资格进行请求访问。
一、每个请求接口都拥有自己的线程池进行处理,在发送某个接口突然您访问量激增的情况,该接口中无法拿到线程的请求会被拒绝掉,而不会影响到整个服务应用中的其他接口。
二、每个请求接口都拥有自己的线程池进行处理,方便我们进行接口级别的容错,降级,熔断控制。
官方中提到了使用线程的诸多好处,这里说两个进行说明,其他的不进行一一例举,有兴趣的可以通过文章开头的连接点击查看。
下面我们来简单的看看源码。
首先 Hystrix 中提供了 HystrixCommand 和 HystrixObservableCommand 两种对象对请求接口进行封装。这两种对象的构造方法调用的都是父类 AbstractCommand 中的构造方法。
下面我们来看看 AbstractCommand 中的构造方法。
abstract class AbstractCommand<R> implements HystrixInvokableInfo<R>, HystrixObservable<R> {protected AbstractCommand(......HystrixThreadPoolKey threadPoolKey, HystrixThreadPool threadPool) {......this.threadPoolKey = initThreadPoolKey(threadPoolKey, this.commandGroup, this.properties.executionIsolationThreadPoolKeyOverride().get());// 调用初始化线程池的方法this.threadPool = initThreadPool(threadPool, this.threadPoolKey, threadPoolPropertiesDefaults);......}// 初始化线程池private static HystrixThreadPool initThreadPool(HystrixThreadPool fromConstructor, HystrixThreadPoolKey threadPoolKey, HystrixThreadPoolProperties.Setter threadPoolPropertiesDefaults) {// 如果指定,初始化默认的线程池if (fromConstructor == null) {// get the default implementation of HystrixThreadPoolreturn HystrixThreadPool.Factory.getInstance(threadPoolKey, threadPoolPropertiesDefaults);} else {return fromConstructor;}}}
Hystrix 默认针对每一个HystrixCommand 对象都生成一个线程池(如果你指定了,就用你指定的)。并且通过 维护了 ConcurrentHashMap ,存放了 threadPoolKey 和 threadPool 的对应关系
扩展:可以通过构造方法中的 initThreadPool() 最终进入到 HystrixThreadPool 的静态内部类 Factory 查看到代码
4.2、线程隔离 - 信号量
线程池隔离使用线程池数量进行限流,当线程池中的线程都被使用中,则拒绝新来的请求,而信号量通过信号的数量进行控制,每一个请求进来都需要尝试获取信号量,只有获取到信号量的请求线程才会执行操作,拿不到信号量的请求直接被拒绝。
在Hystrix 中 HystrixCommand 和 HystrixObservableCommand 都提供了对信号量的设置,同样是在 他们父类 AbstractCommand 构造方法中
abstract class AbstractCommand<R> implements HystrixInvokableInfo<R>, HystrixObservable<R> {protected AbstractCommand(......TryableSemaphore fallbackSemaphore, TryableSemaphore executionSemaphore) {......// 属性配置this.properties = initCommandProperties(this.commandKey, propertiesStrategy, commandPropertiesDefaults);/* fallback semaphore override if applicable */this.fallbackSemaphoreOverride = fallbackSemaphore;/* execution semaphore override if applicable */this.executionSemaphoreOverride = executionSemaphore;......}}
针对信号量其他相关的配置属性通过 : HystrixCommandProperties 进行设置,并传入构造方法中。
4.3、对比线程池隔离和信号量隔离
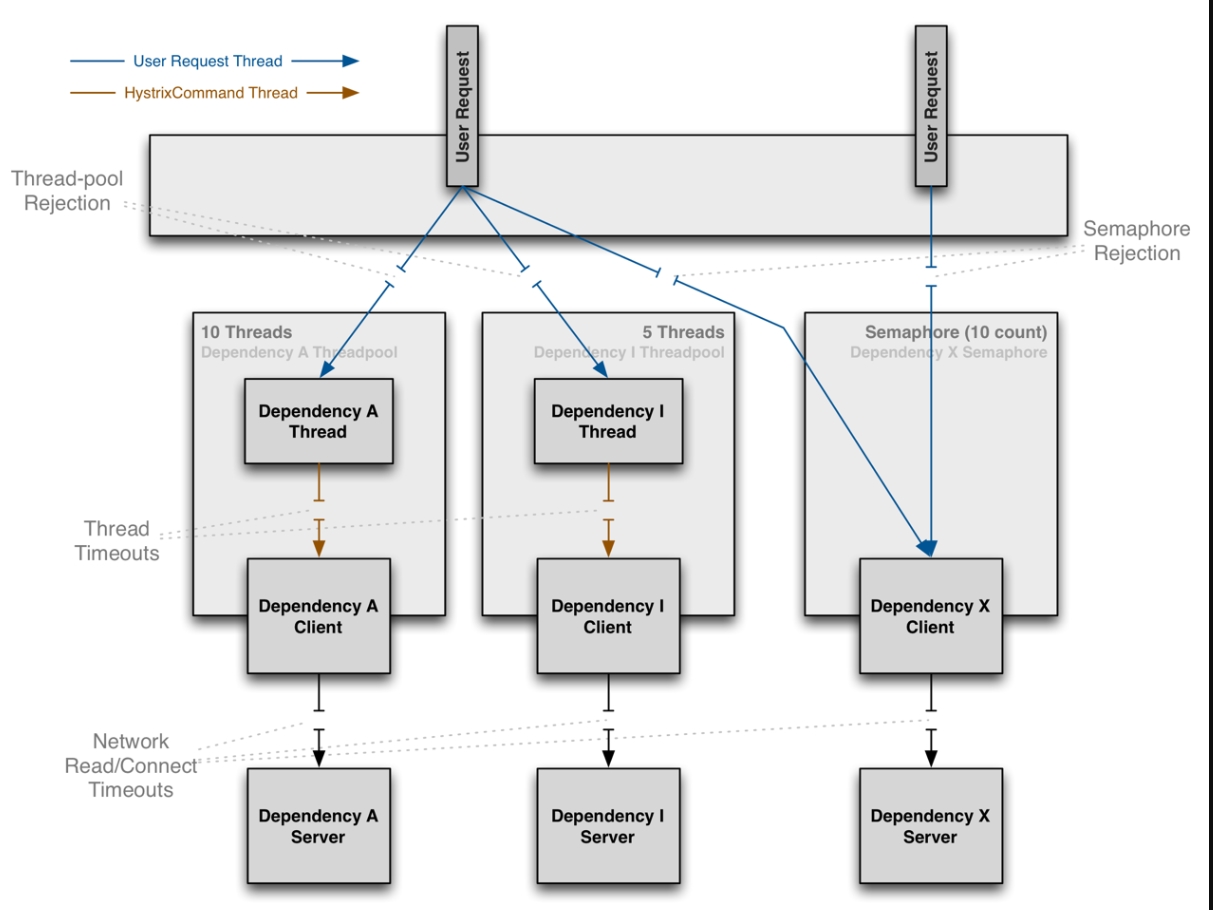
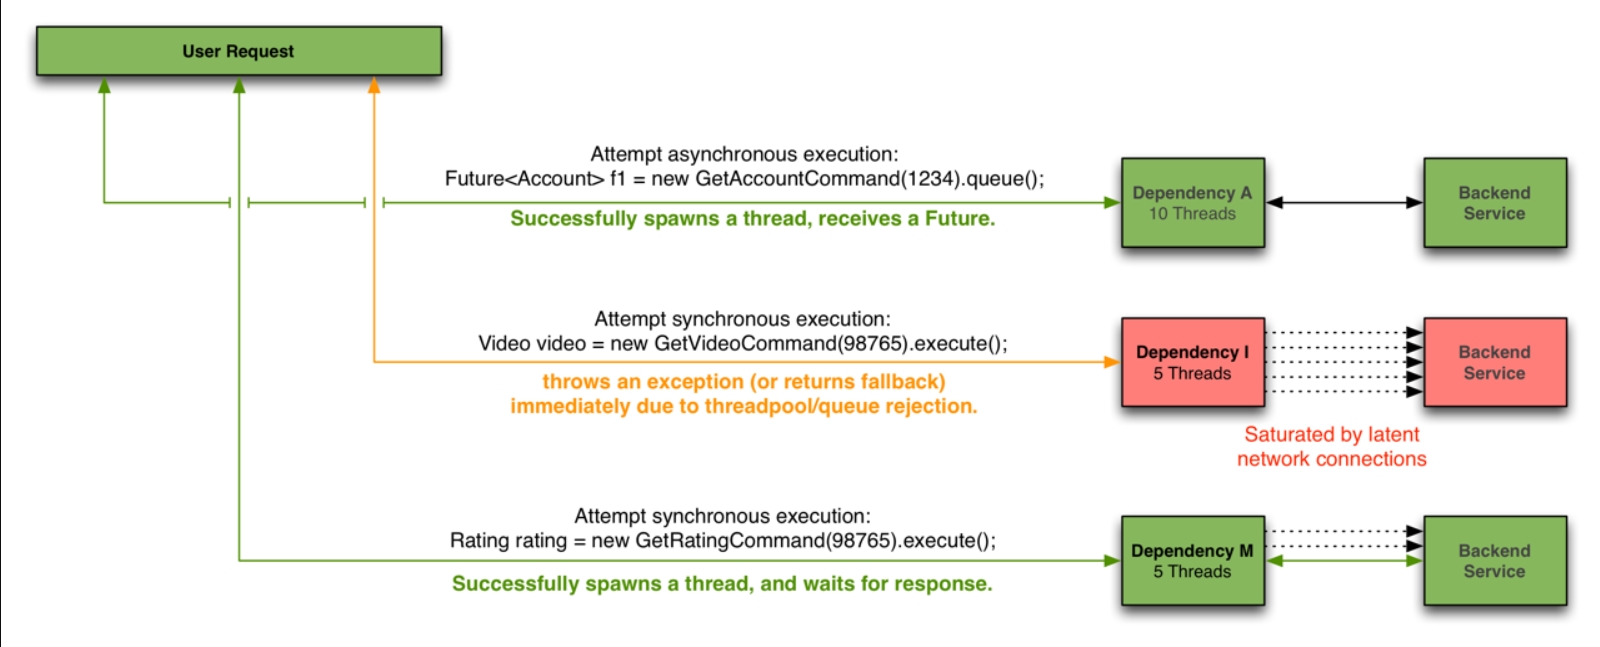
从图中能够直观的看到,线程池隔离中,发送请求的线程和执行依赖请求的线程不是同一个线程。而信号量隔离中,发送请求和执行请求的线程是同一个线程。以此来进行区分:
- 线程池隔离支持异步,信号量隔离不支持
- 线程池隔离需要进行线程切换会造成多余的开销,信号量隔离不用进行线程切换不会造成多余的开销
- 线程池隔离通过线程大小进行限流和熔断控制,信号量通过信号数量进行限流和熔断控制。

若有收获,就点个赞吧
0 人点赞
