一、AOP 概述
正式一点的描述:AOP (Aspect Oriented Programming ) 面向切面编程。
非官方描述:AOP 是通过预编译方式和运行期动态代理在不修改源代码的情况下给程序动态统一添加功能的一种技术。
AOP 的设计贯彻 spring 简化开发理念,能够实现业务需求与系统需求的解耦,比如日志、事务等操作。
AOP 原理就是代理机制,通过 JDKProxy 和 Cglib 的代理机制实现代理,通过代理机制能够有效的将功能型代码从业务中剥离,同时能够减少重复性代码操作,比如说重复性的访问日志输出等。
二、AOP 简单案例
以下案例使用 spring boot 2.0.4 进行测试
( 引入 aop ,需要手动开启,可以在 application.properties 中配置 spring.aop.auto=true,可以在 xml 中配置
代码下载地址 (切换 springframework分支)
2.1、XML 格式
步骤一:定义切面方法类
public class XmlAopMethod {/*** <p> 前置通知 </p>* @param joinPoint*/public void before(JoinPoint joinPoint){......}/*** <p> 后置通知 </p>* @param joinPoint*/public void after(JoinPoint joinPoint){......}/*** <p> 环绕通知 </p>* @param thisJoinPoint* @throws Throwable*/public void around(ProceedingJoinPoint thisJoinPoint) throws Throwable {......}/*** <p> 异常通知 </p>* @param joinPoint* @param ex*/public void afterThrow(JoinPoint joinPoint,Exception ex){......}}
步骤二:xml配置
<beans xmlns="http://www.springframework.org/schema/beans"xmlns:aop="http://www.springframework.org/schema/aop"xmlns:xsi="http://www.w3.org/2001/XMLSchema-instance"xsi:schemaLocation="http://www.springframework.org/schema/beanshttp://www.springframework.org/schema/beans/spring-beans-3.0.xsdhttp://www.springframework.org/schema/aophttp://www.springframework.org/schema/aop/spring-aop-3.0.xsd"><!-- 开启 aop 功能 --><aop:aspectj-autoproxy proxy-target-class="true"/><!-- 注入操控方法类 --><bean id="xmlAopMethod" class="com.qguofeng.config.aop.xml.XmlAopMethod"></bean><!-- AOP 配置 --><aop:config><!-- 声明切面,并注入切面 Bean,等价于@Aspect --><aop:aspect ref="xmlAopMethod"><!-- 配置一个切入点,等价于@Pointcut --><aop:pointcut expression="execution(* com.qguofeng.web.controller..*(..))" id="xmlPointcut"/><!-- 配置通知,等价于@Before、@After、@AfterReturn、@Around、@AfterThrowing --><aop:before method="before" pointcut-ref="xmlPointcut"/><aop:after method="after" pointcut-ref="xmlPointcut"/><aop:around method="around" pointcut-ref="xmlPointcut"/><aop:after-throwing method="afterThrow" pointcut-ref="xmlPointcut" throwing="ex"/></aop:aspect></aop:config></beans>
步骤三:加载 xml 配置
@Configuration@ImportResource(locations={"classpath:application-aop.xml"})public class XmlAopConfig {}
2.2、Annotation 格式
直接定义切面方法类
@Component@Aspectpublic class AnnotationMethod {@Pointcut("execution(* com.qguofeng.web.controller..*(..))")public void pointcut(){}/*** <p> 前置通知 </p>* @param joinPoint*/@Before("pointcut()")public void before(JoinPoint joinPoint){ ...... }/*** <p> 后置通知 </p>* @param joinPoint*/@After("pointcut()")public void after(JoinPoint joinPoint){ ...... }/*** <p> 环绕通知 </p>* @param thisJoinPoint* @throws Throwable*/@Around("pointcut()")public void around(ProceedingJoinPoint thisJoinPoint) throws Throwable { ...... }/*** <p> 异常通知 </p>* @param joinPoint* @param ex*/@AfterThrowing(pointcut = "pointcut()" ,throwing = "ex")public void afterThrow(JoinPoint joinPoint,Exception ex){ ...... }}
看了上面的例子之后,再来看看 AOP 相关定义,我们就能够更直观的理解这些概念
Joinpoint(连接点)
程序执行过程中的某一行为都可以是一个连接点,只要是类中和方法有关的都能够成为连接点,如方法执行前,方法执行后,方法抛出异常后,方法执行成功返回值后都能够成为一个连接点。
Pointcut(切入点)
类中的方法,且方法执行前,方法执行后等都可以成为一个连接点。但是我们在使用过程中并不需要针对所有连接点进行通知,而切入点就是指定只针对哪一些连接点进行通知操作,圈定的范围叫切入点。 在指定切点时有对应的表达式:下面是表达式格式: execution(<修饰符> ? <返回类型> <包> <方法名>(<参数>)<异常>?) 其中除了 返回类型、方法名、参数外其他都是可选的。 为了更直观的了解切入点表达式,我们进行一些简单的讲解, 在上面的例子中我们定义了切入点:execution( com.qguofeng.web.controller..(..)) 其对应格式为 execution( <返回值> <包> <方法名>(<参数>) ) 意思如下:返回值为任意值,com.qguofeng.web.controller包以及子包下的任意方法名,参数不做限制的所有方法。 在表达式中,我们使用了正则表达式,在不同的修饰中,正则表达的也不一样,下面我面列举一些常用的 <修饰符>: 表示任意返回值,一般忽略不选 <返回类型>: 表示任意返回值 <包>:1、com. 表示 com包下的所有类 2、com.. 表示 com 包以及子包下的所有类 <参数>:.. 表示 参数不限制
Advice(通知)
通知就是在指定某一连接点(如方法执行前或者方法执行后等)触发执行特定的代码块。
Aspect(切面)
由切入点和通知组成的操作流程,被定义成切面。由切入点指定在那些地方进行代码操作(指定包、类甚至方法),然后由通知执行在指定的地方如何执行操作,执行哪些操作。如:在切入点指定的包路径com.qguofeng.* 下的所有类中给的所有方法作为切入点,由通知指定在所有切入点方法的特定区域(如:方法执行前,方法执行后等)执行代码块。
Target Object(目标对象)
被我们织入切面的对象,就是目标对象。
三、Spring AOP 源码解析
看源码前,首先我们知道了 Spring Aop 原理是 JDK proxy 和 cglib 。
通过源码我们需要知道就是如下两点:
1、哪里触发代理
2、选择哪种方式实现类的代理。
上面的例子中我们知道两种 aop 的使用方式:xml 和 注解。
对于早期的 Xml 方式,我们需要一般关注的是 aop 相关的标签解析类,对于 aop 来说,其标签解析器是 AopNamespaceHandler ,以此为入口进行源码跟踪就能够知道其相关工作原理。
不过在如今 注解大行其道的时代,我们还是以注解为主,对于 xml 有兴趣的朋友可以以 AopNamespaceHandler 为人口进行源码跟踪。
在注解中,我们开启 AOP 使用的注解是 @EnableAspectJAutoProxy。
【题外话】在 spring boot 中该注解被自动化配置,所以使用者无需关注,只需要引入相关依赖,其自动配置类为 AopAutoConfiguration 。 《springboot-自动化配置》
查看 @EnableAspectJAutoProxy 代码
@Target(ElementType.TYPE)@Retention(RetentionPolicy.RUNTIME)@Documented@Import(AspectJAutoProxyRegistrar.class)public @interface EnableAspectJAutoProxy {..........}
从代码中,我们看到我们接下去 需要进入的入口 AspectJAutoProxyRegistrar。
class AspectJAutoProxyRegistrar implements ImportBeanDefinitionRegistrar {@Overridepublic void registerBeanDefinitions(AnnotationMetadata importingClassMetadata, BeanDefinitionRegistry registry) {AopConfigUtils.registerAspectJAnnotationAutoProxyCreatorIfNecessary(registry);..........}
进入 AopConfigUtils 中的 registerAspectJAnnotationAutoProxyCreatorIfNecessary 方法查看
public abstract class AopConfigUtils {..........@Nullablepublic static BeanDefinition registerAspectJAnnotationAutoProxyCreatorIfNecessary(BeanDefinitionRegistry registry,@Nullable Object source) {return registerOrEscalateApcAsRequired(AnnotationAwareAspectJAutoProxyCreator.class,registry, source);}@Nullableprivate static BeanDefinition registerOrEscalateApcAsRequired(Class<?> cls,BeanDefinitionRegistry registry, @Nullable Object source) {..........}..........}
从以上的代码追踪中,我们可以知道,@EnableAspectJAutoProxy 最终完成的任务,是将 AnnotationAwareAspectJAutoProxyCreator 注册到 Spring 容器中。
接下来我们以 AnnotationAwareAspectJAutoProxyCreator 为入口进行代码追踪。
首先我们先来看看 AnnotationAwareAspectJAutoProxyCreator 类继承结构。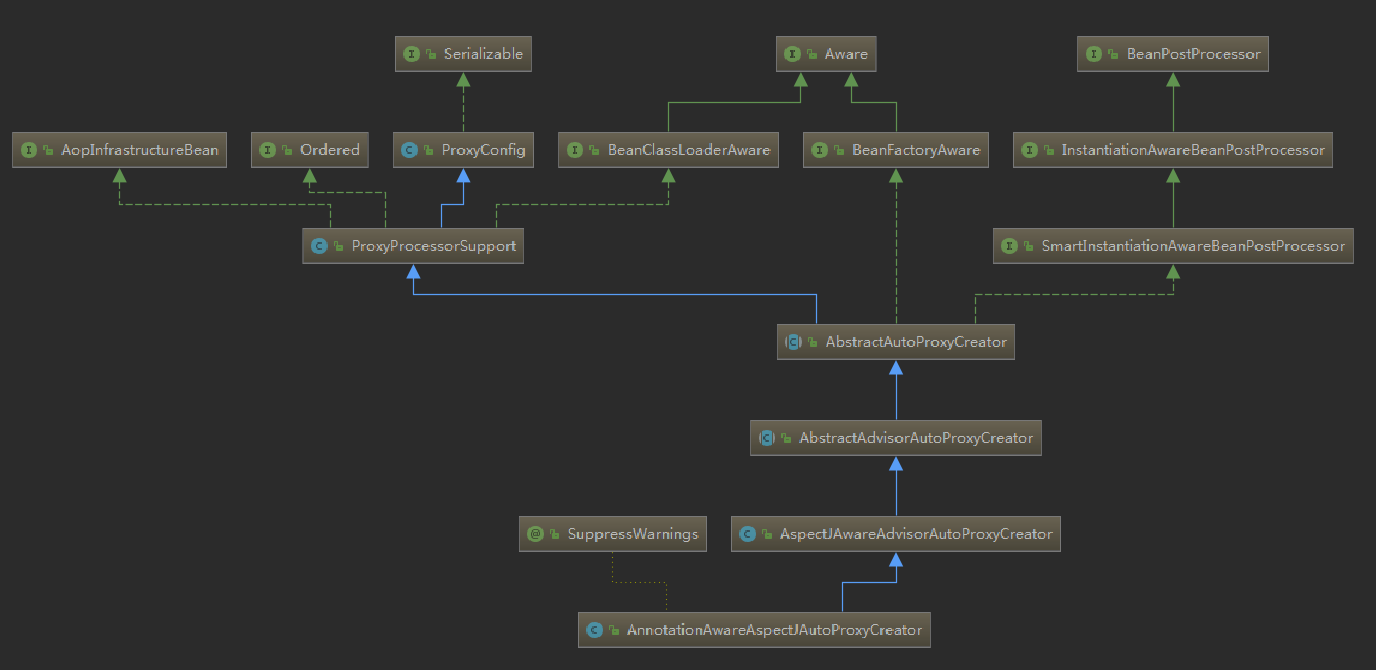
从图中我们可以得到如下信息:
AnnotationAwareAspectJAutoProxyCreator 可以直接访问 spring 容器
实现 BeanFactoηAware 接口的 bean 可以直接访问 Spring 容器,被容器创建以后,它会拥有一个指向 Spring 容器的引用,可以利用该bean根据传入参数动态获取被spring工厂加载的bean。
AnnotationAwareAspectJAutoProxyCreator 在类初始化前后以及实例化前后都能够进行相关的操作
实现了 BeanPostProcessor 接口的 bean 在 spring 容器初始化前以及初始化后能够进行的处理。 实现了 InstantiationAwareBeanPostProcessor 接口的 Bean 在 spring 容器实例化前后进行 bean 的处理。 其中: 实例化的过程是一个创建Bean的过程,即调用Bean的构造函数,单例的Bean放入单例池中 初始化的过程是一个赋值的过程,即调用Bean的setter,设置Bean的属性
也就是说开启了 aop ,在每个 bean 实例化前都会调用 postProcessBeforeInstantiation() 方法,通过追踪我们可以知道 AnnotationAwareAspectJAutoProxyCreator 调用的是其父类 AbstractAutoProxyCreator 实现的 postProcessBeforeInstantiation() 方法,代码如下:
public abstract class AbstractAutoProxyCreator extends ProxyProcessorSupportimplements SmartInstantiationAwareBeanPostProcessor, BeanFactoryAware {..........private final Map<Object, Class<?>> proxyTypes = new ConcurrentHashMap<>(16);..........@Overridepublic Object postProcessBeforeInstantiation(Class<?> beanClass, String beanName)throws BeansException {..........Object proxy = createProxy(beanClass, beanName, specificInterceptors, targetSource);..........}protected Object createProxy(Class<?> beanClass, @Nullable String beanName,@Nullable Object[] specificInterceptors, TargetSource targetSource) {..........return proxyFactory.getProxy(getProxyClassLoader());}..........}
经过一系列的判断,我们需要关注的是 createProxy(……) 方法 中的 getProxy() 方法。
通过查看 getProxy() 之后我们可以发现,getProxy() 该方法由最后调用的是 AopProxy 中 getProxy() 方法。
对于 AopProxy 有两个子类:JdkDynamicAopProxy 和 CglibAopProxy 。
AopProxy 接口代码如下:
/*** Delegate interface for a configured AOP proxy, allowing for the creation* of actual proxy objects.** <p>Out-of-the-box implementations are available for JDK dynamic proxies* and for CGLIB proxies, as applied by {@link DefaultAopProxyFactory}.** @author Rod Johnson* @author Juergen Hoeller* @see DefaultAopProxyFactory*/public interface AopProxy {..........}
根据 AopProxy 头部的注释我们可以知道,spring 调用 AopProxy 开箱即用的实现类为 DefaultAopProxyFactory 。
接下来我们来看看 DefaultAopProxyFactory ,代码如下:
public class DefaultAopProxyFactory implements AopProxyFactory, Serializable {@Overridepublic AopProxy createAopProxy(AdvisedSupport config) throws AopConfigException {// 判定是使用 jdk 代理还是 cglib 代理if (config.isOptimize() || config.isProxyTargetClass() ||hasNoUserSuppliedProxyInterfaces(config)) {Class<?> targetClass = config.getTargetClass();if (targetClass == null) {throw new AopConfigException("TargetSource cannot determine target class: " +"Either an interface or a target is required for proxy creation.");}// 如何被代理类有接口 ,使用 jdk proxyif (targetClass.isInterface() || Proxy.isProxyClass(targetClass)) {return new JdkDynamicAopProxy(config);}// 否则使用 cglibreturn new ObjenesisCglibAopProxy(config);}else {return new JdkDynamicAopProxy(config);}}..........}
DefaultAopProxyFactory 决定了是选择 jdk 代理还是 cglib 代理,而 spring 默认,如果被代理类有对应的接口,则默认使用 jdk proxy ,否则默认使用 cglib。
四、总结
1、在哪里触发的代理
通过 AbstractAutoProxyCreator 中 postProcessBeforeInstantiation() 方法反向追踪,我们发现代理的操作是在 调用 createBean() 的使用进行触发。
2、选择哪种方式实现类的代理
由 Spring 默认实现的 DefaultAopProxyFactory 类,在调用 createAopProxy() 的时候进行默认规则的判定。

若有收获,就点个赞吧
0 人点赞
