At its simplest, the X-Particles particle emitter can be used instead of the standard Cinema 4D emitter, giving you more options and control over particles than you would otherwise have. If you just want to generate some particles, the emitter is all you need and will work perfectly well on its own without the addition of the control system.
简单的说,XP粒子发射器可以代替标准的C4D发射器,给你更多的选择和控制粒子。如果你只是想生成一些粒子,发射器就是那个你需要的,并且不用添加控制系统就可以完美地工作。
You can also add tags to the emitter and a variety of particle modifiers (including all the standard Cinema 4D modifiers) and again these will work without the control system.
还可以给发射器添加标签和各种粒子修改器(包括所有的标准C4D修改器) ,并且同样不需要控制系统就能运行。
For the ultimate control over your particles, however, you will need to become familiar with the X-Particles control system.
为了终极掌控粒子,不管怎样,你需要先熟悉xp粒子控制系统。
For more information, you can:
更多信息,你可以:
- refer to this documentation (see the table of contents in the sidebar)
参阅这个文档(请参阅侧栏中的目录) - refer to the online video manual
参考在线视频手册 - watch the videos available on the X-Particles web site and on our YouTube site
观看Xp官方网站和YouTube网站 - try the sample files provided on our site and dissect them to see how they work
尝试我们网站提供的样本文件,解析并了解它们是如何工作的 - ask on the INSYDIUM Online forum or Discord channel
可以在insydium在线论坛和讨论频道提问
In this section, we will take a brief overview of the X-Particles particle emitter and how to set up a basic control system.
在这一章节,我们将简要概述XP粒子发射器和如何建立一个基本的控制系统。
Adding an emitter | 添加发射器
To do most things with X-Particles you need an emitter. So, to add an X-Particles emitter to the scene, go to the Cinema 4D menu bar and find the ‘X-Particles’ entry. Click this entry to display the X-Particles menu, then click the entry ‘xpEmitter’ to add an emitter to your scene.
用Xp粒子做大多数东西,你都需要一个发射器。因此,添加一个Xp粒子发射器到场景。到C4D菜单栏中找到“Xp粒子”选项。单击此选项显示Xp粒子菜单,然后单击“xp发射器”将发射器添加到场景中。
At this point, clicking the Play button on the timeline (or hitting the F8 key) will play the animation and start to generate particles.
此时,点击时间轴上的播放按钮(或按F8键),将播放动画并开始生成粒子。
Note: the animation only plays forward; you cannot scrub the timeline backwards and forwards unless you cache the system first. For more information on caching, please see the Cache object.
注意: 动画只能向前播放; 除非先缓存系统,否则不能前后拖拽时间轴。有关缓存的更多信息,请参见缓存对象。
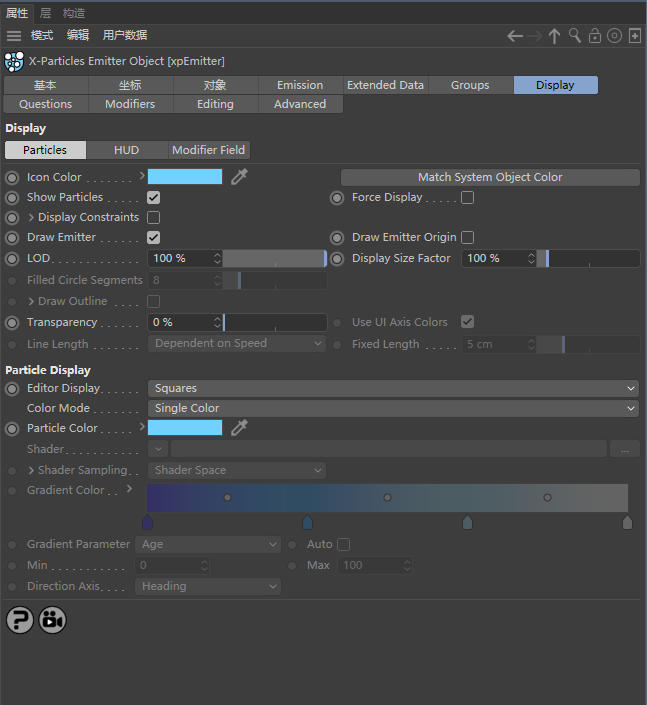
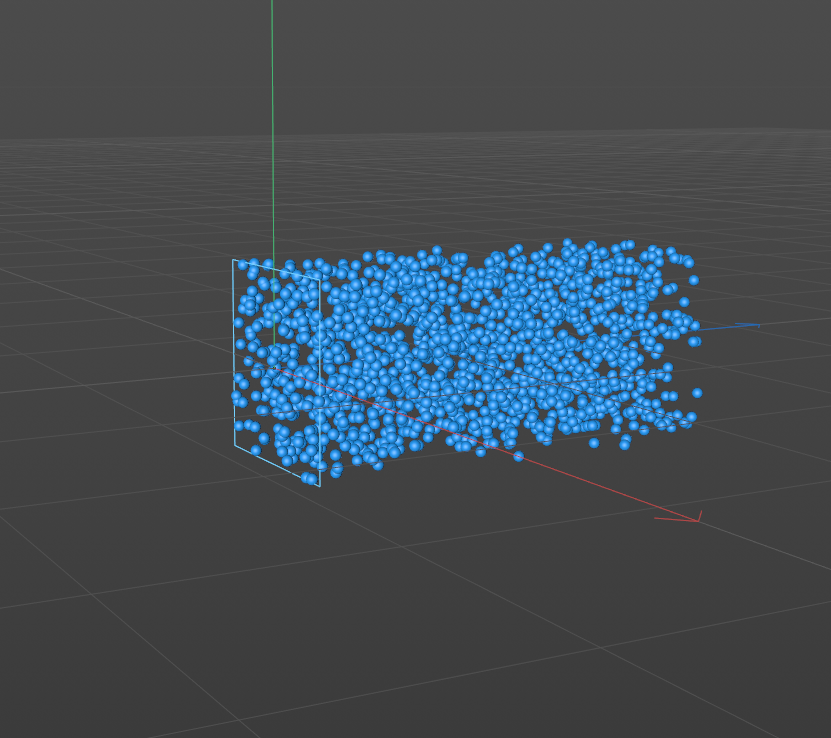
By default the on-screen representation of the particles is the simplest possible one, to place least overhead on the computer. This will show the particles as small blue dots. If you find these difficult to see, simply change the representation in the ‘Display’ tab; you can select a variety of different shapes and change the particle colour. These parameters can be keyframed if you wish, or if you are using the X-Particles control system, you can change them with an Action. This can help to make it easier to understand what the particles are doing when setting up a complex system.
默认情况下,粒子是以最简单的小蓝点的粒子形式在屏幕上显示,把电脑功耗降到最小。如果您觉得这些难以看到,只需改变’显示’标签的形式; 您可以选择各种不同的形状和改变粒子颜色。甚至这些参数也可以记录关键帧,或者如果你正在使用Xp粒子控制系统,你可以用动作改变它们。这可以帮助我们更容易的理解粒子在建立一个复杂系统时所做的事情。
You can turn off the editor display if you want to: in the ‘Display’ tab just uncheck the ‘Show Particles’ switch or set the ‘Editor Display’ to ‘None’. Note that this does not affect sprites or generated objects, just the editor display of particles. If you don’t want to see the default emitter shape, uncheck ‘Draw Emitter’ in the ‘Display’ tab.
如果需要,你也可以关闭编辑视窗显示,: 在’显示’选项中取消勾选’显示粒子’的开关或设置’编辑视窗显示’为’无’。请注意,这不会影响精灵或生成的对象,只是粒子的编辑视窗显示。如果你不想看到默认的发射器形状,取消勾选“显示”选项中的“绘制发射器”。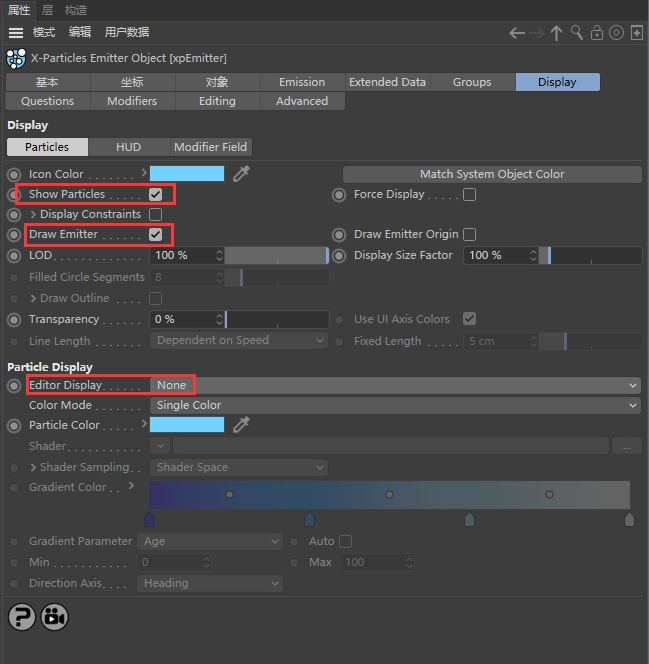
If you find that you always want your particles to appear as cyan spheres (for example) you can set these defaults in the X-Particles Preferences. The settings there will then be used as the default options for all future emitters and scenes.
如果你希望你的粒子总是显示为青色的球体(例如) ,你可以在XP粒子的参数设置中设置这些默认值。那里的设置将被用作所有未来的发射器和场景的默认选项。
Generating objects | 生成器对象
Up until now your particles cannot be rendered – it’s just an editor display. To get something to render, you can do several things:
到目前为止,你的粒子还不能渲染-它只是一个显示效果。要得到要渲染的东西,你需要如下操作:
- create an object to be generated (e.g. a sphere): add a Generator object to the scene and make the sphere a child of the generator object. In the Generator, drag the emitter into the Emitter field; that’s all that is needed
创建一个要生成的对象(例如一个球体) : 添加一个生成器对象到场景中,并使该球体成为生成器对象的子对象。在生成器下面,拖动发射器到发射器链接选区,这样就可以了。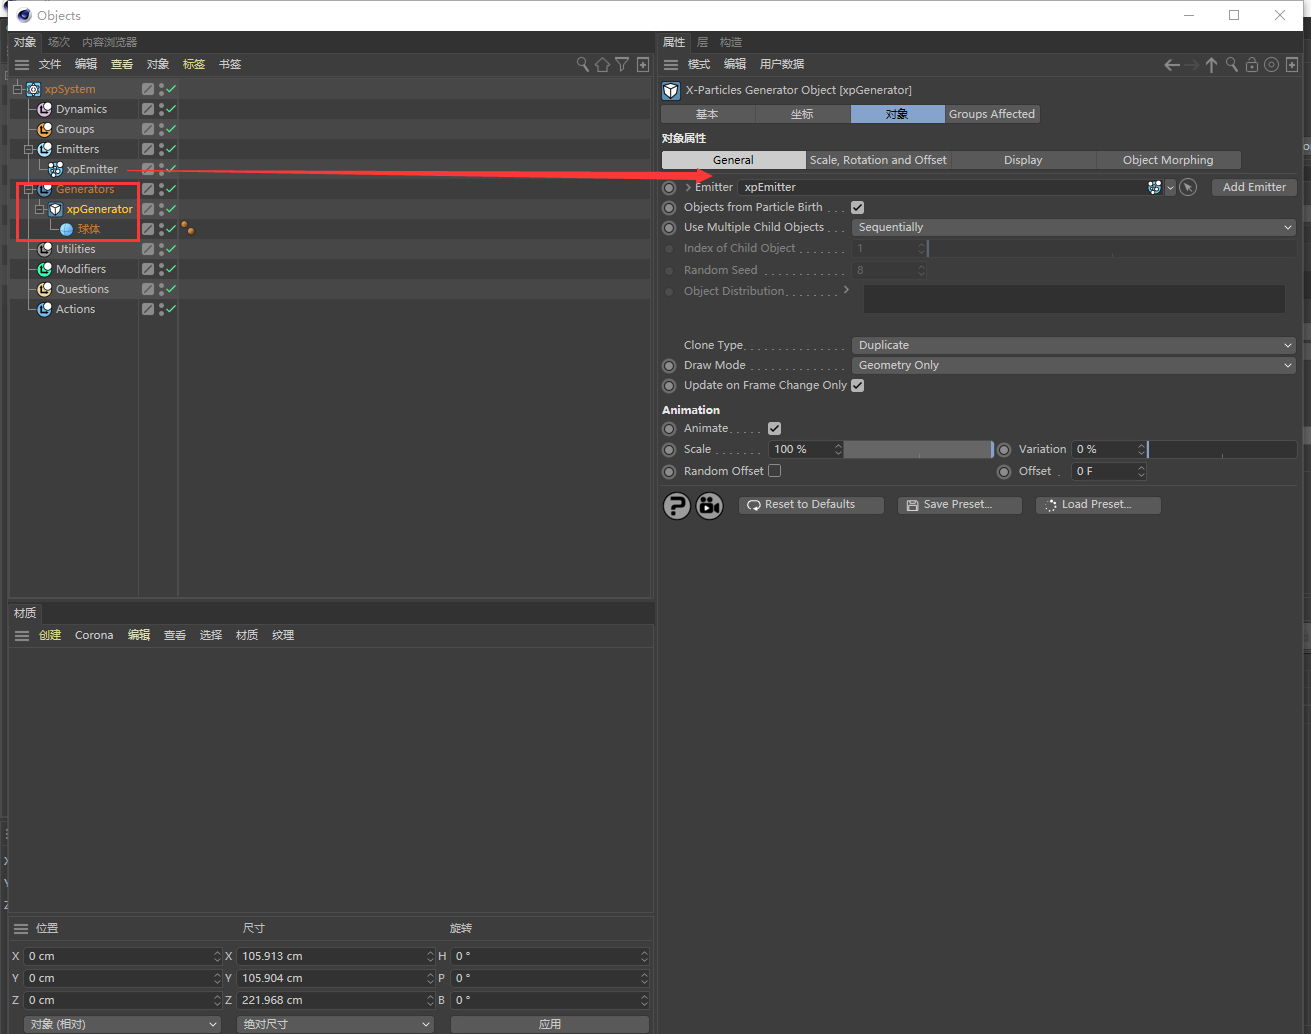
- or add a Sprite object to the scene, drag the emitter into the Emitter field, and select the desired options in the Sprite object
或者在场景中添加一个精灵对象,将发射器拖到发射器链接选区中,并在精灵对象中选择所需的选项

- or use a OpenVDB or Skinner objects to generate a mesh
或者使用 OpenVDB 或 蒙皮对象 来生成网格 - or use the X-Particles material to render the particles without generating geometry
或使用xp粒子材质在不产生几何形状的情况下渲染粒子 - or use the Hair renderer to render the particles without generating geometry (see the Hints and Tips page for an explanation of how to do this)
或者使用毛发渲染器渲染粒子而不产生几何体(参见网页提示与技巧,解释如何做到这一点)
For details on using the Generator object, please see the Generator Object page. Details of the Sprite object can be found on the Sprite Object page.
有关使用生成器对象的详细信息,请参阅生成器页面。精灵对象的详细信息可以在精灵对象页面上找到。
Sprites | 精灵
In X-Particles, sprites are small objects (actually Cinema 4D primitives) or lights, which are a convenient way to generate simple geometric objects. They have the advantages that they are small, lightweight objects which can be readily controlled via the X-Particles control system, including changing the type of generated sprite and their attached materials. They can also be used with the sprite shader, which enables age-dependent texture effects.
在XP粒子中,精灵是一种便于生成简单几何体的小物体(实际上是C4D基本形态)或者光。他们的好处是,他们是小和轻量级的对象,可以很容易地通过XP粒子控制系统控制,包括改变生成的精灵和他们的附加材质的类型。它们也可以和精灵着色器一起使用,使纹理效果与年龄有关。
For details on using the Sprite object, please see the Sprite Object page.
有关使用精灵对象的详细信息,请参阅精灵对象页面。
The control system | 控制系统
Now that you have got the basics, you might want to go to the page ‘The X-Particles control system‘ as this will give you vital information on using the particle controls in this plugin.
现在你已经掌握了基本知识,接下来你需要进入“XP粒子控制系统”页面学习了,因为这将给你关于在这个插件中使用粒子操控的重要信息。

若有收获,就点个赞吧
0 人点赞
