- Introduction | 引言
- Verifying the Installation | 验证安装
- Verifying System GPUs | 验证系统Gpu
- Creating a simple scene | 创建一个简单的场景
- Selecting Redshift as the renderer | 选择Rs作为渲染器
- Our first render | 第一次渲染
- Creating a Redshift Material | 创建Rs材质
- Adjusting the material settings | 调整材质设置
- Editing Materials | 编辑材质
- Editing the Material Shader Graph | 编辑材质球
- Interactive Preview Rendering - IPR | 交互式预览渲染-IPR
- Creating a Redshift Light | 创建Rs灯光
- Creating a Physical Sky and Sun | 创造一个物质的天空和太阳
- Creating a Redshift Camera | 创建Rs相机
- Adding Lens Effects to a Camera | 为相机添加些镜头效果
Introduction | 引言
In this section we are going to walk through the basics of the plugin by making a simple scene and rendering it with Redshift. This guide assumes that the Redshift Cinema 4D plugin has been installed already.
在这一部分中,我们将通过创建一个简单的场景并使用Rs渲染来逐步了解这个插件的基础知识。我猜你已经安装好Redshift了。
Ok,let’s fire up Cinema 4D and get started.
好的,让我们启动C4D,开始吧。
Verifying the Installation | 验证安装
First of all let’s make sure that the plugin has installed correctly by looking at the Redshift Preferences which are available in the Cinema 4D Preferences window. Select the Redshift menu from the Cinema 4D’s menu bar and then choose the Preferences option.
首先,让我们确保插件安装正确,查看Rs偏好设置就好了。从C4D的菜单栏中选择Rs,然后选择 Preferences 选项。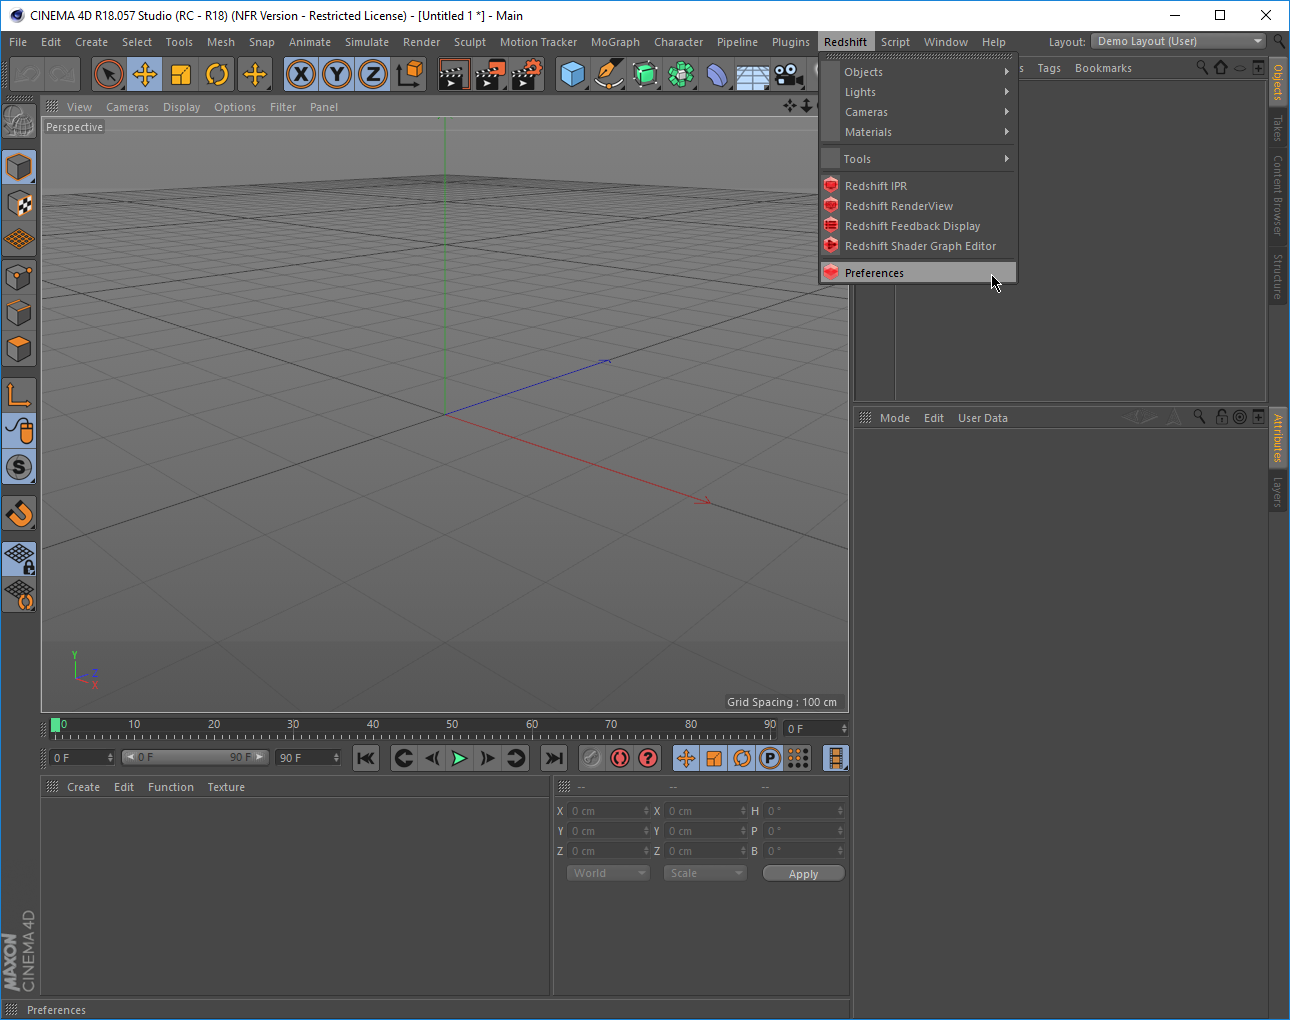
Note | 注意了
If the Redshift main menu is missing,then the plugin installation has not been successful
如果界面没有看到Rs主菜单,那么就说明插件没安装成功
When selected,the Redshift Preferences are displayed
选中此选项后,将显示Rs首选项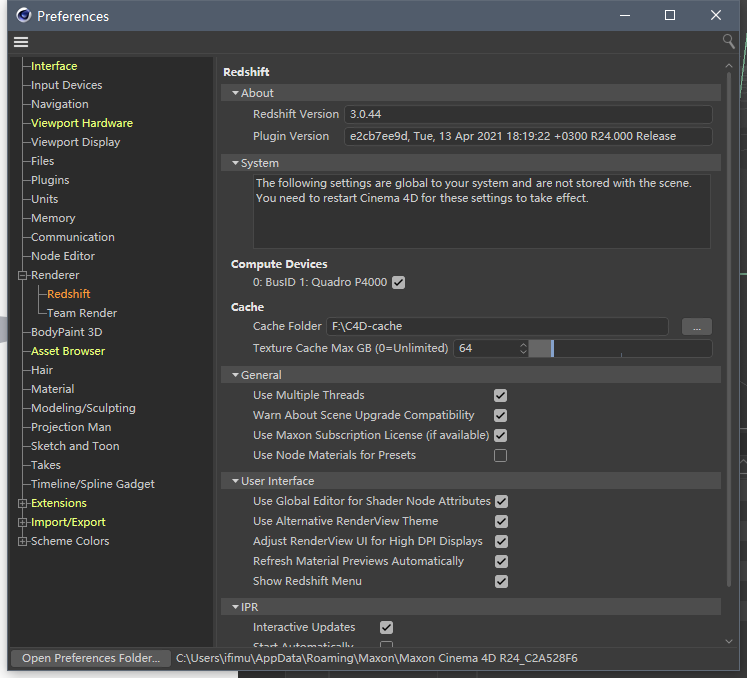
Verifying System GPUs | 验证系统Gpu
Let’s also make sure that Redshift has detected our system’s GPUs. In the previous image we can see that Redshift has detected two GPUs,and both have been activated. So,everything is working correctly and we can start Rendering!
让我们也确保Rs已经检测到我们的系统的gpu。在前面的图像中,我们可以看到Rs检测到了gpu,并且都已经被激活。所以,一切正常工作,我们可以开始渲染了!
Creating a simple scene | 创建一个简单的场景
From the Create menu select Object and then Sphere to add a sphere to our blank scene
从菜单栏的创建里选择对象,然后选择球体添加到我们的空白场景中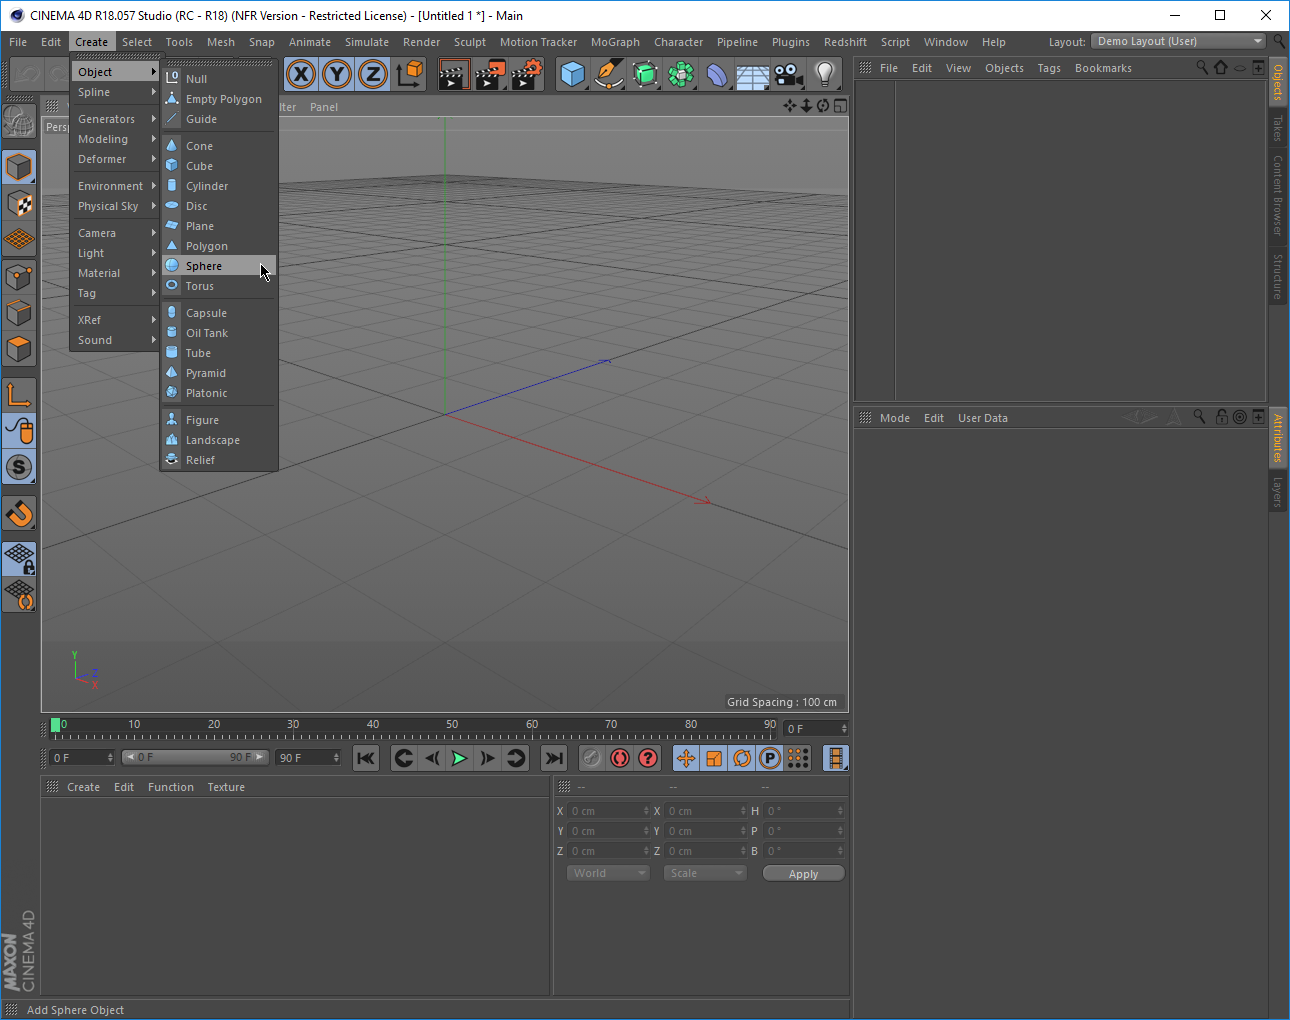
Selecting Redshift as the renderer | 选择Rs作为渲染器
Next we need to tell Cinema 4D to use Redshift as the current renderer. To do that,we open the Render Settings window by selecting Render from the Cinema 4D’s menu bar and then Edit Render Settings.
接下来我们需要告诉C4D使用Rs作为当前的渲染器。跟着操作,我们找到视图窗口上面的这个图标——渲染设置,然后点开。
Then in the Render Settings window we select Redshift from the renderer selection drop-down box.
然后在“渲染设置”窗口中,从渲染器选择下拉框中选择“Rs”。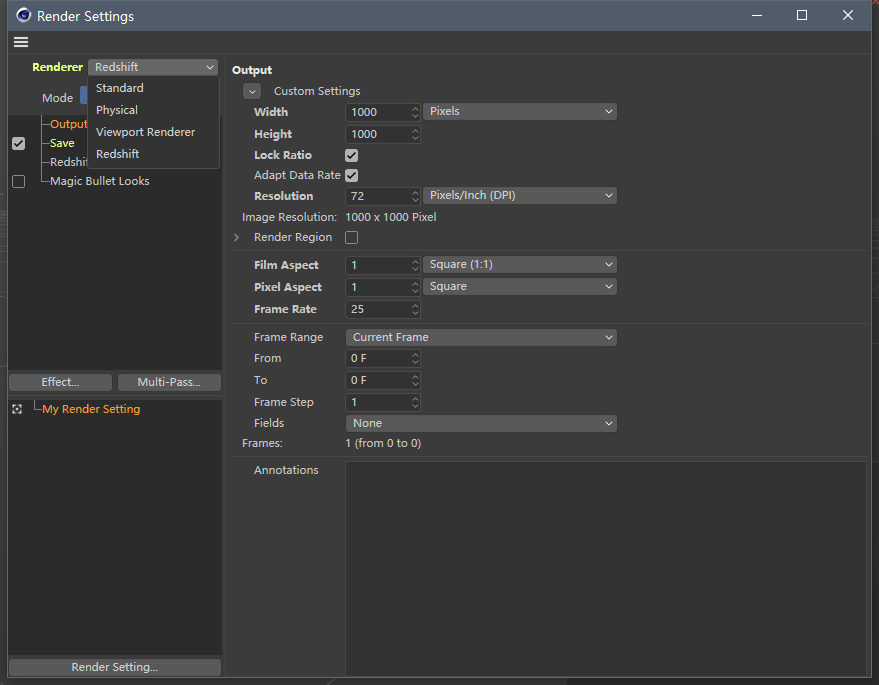
After that,we select the new Redshift entry from the tree on the left side of the Renderer Settings Window. This will reveal the Redshift Render settings for our scene.
然后,我们从渲染设置窗口的左侧栏中选中Rs,然后就会显示我们的场景的Rs渲染设置。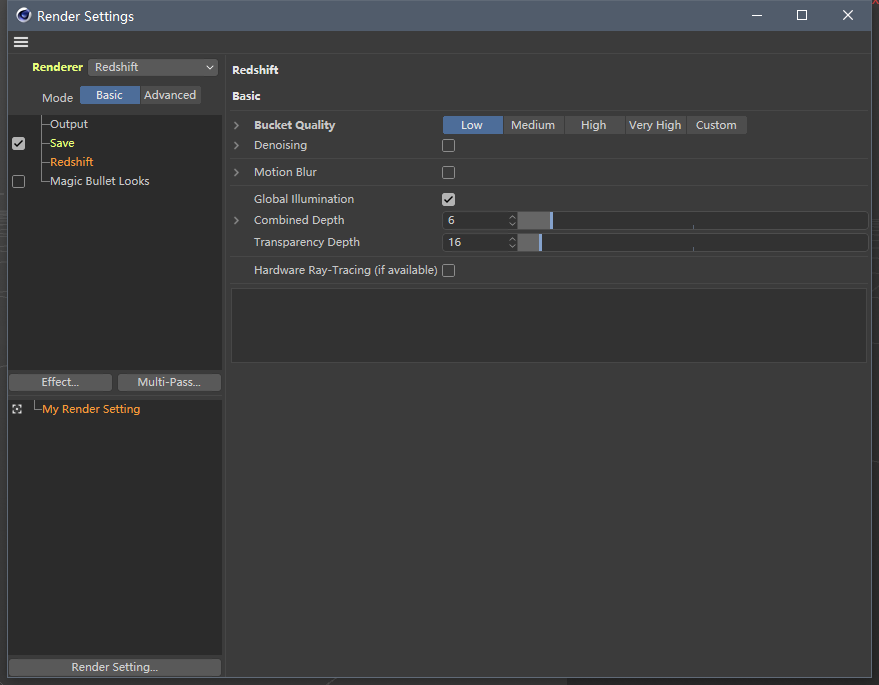
Our first render | 第一次渲染
Now,we are all set,to render our simple scene. From the Render menu in the main menu select Render View to render our object in the viewport.
现在,我们都准备好了,来渲染个简单的场景吧。在主菜单下面找到这个图标——渲染活动视图,点击后可以在视图窗口中显示我们的物体对象。
You should see something like this:
你应该会看到这样的场景: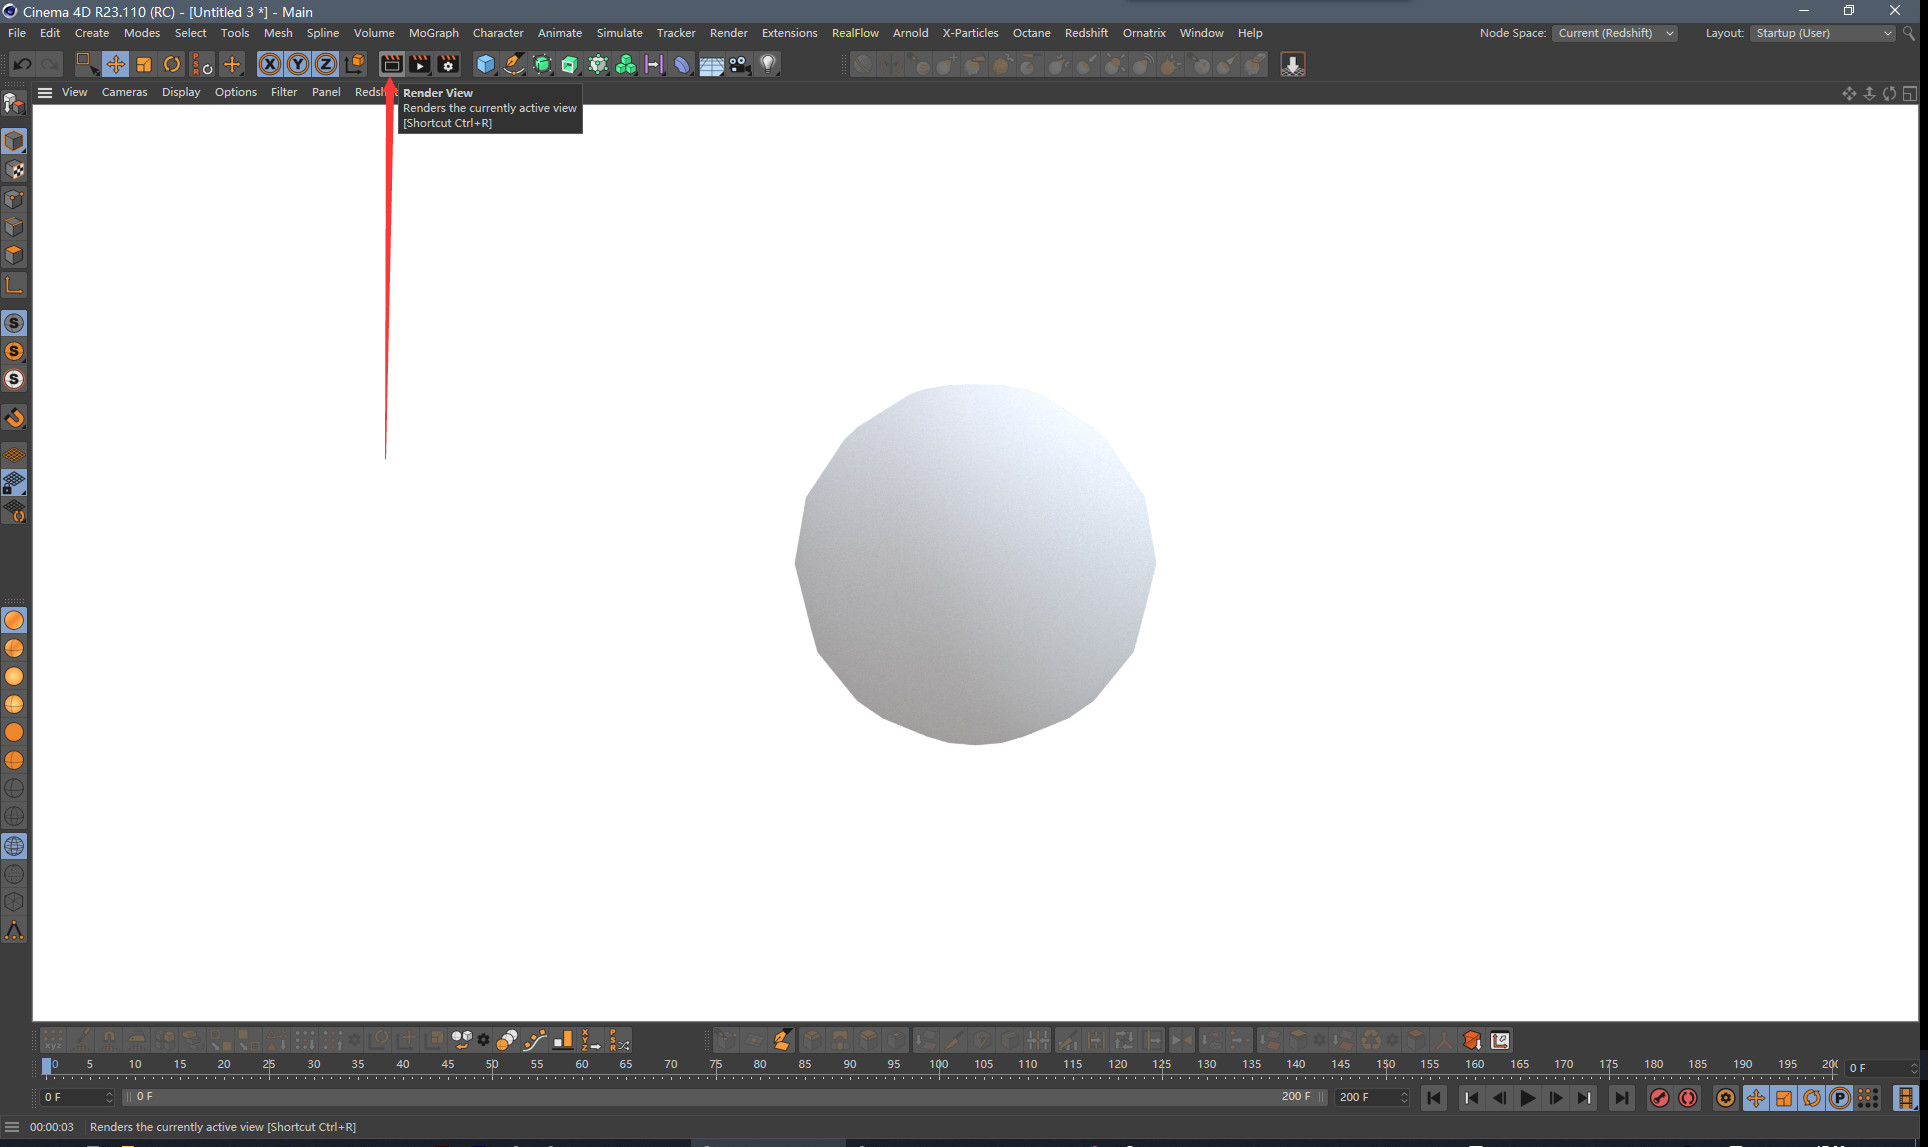
Not very exciting.
没啥好兴奋的。
Let’s see if we can make things more interesting by adding materials.
让我们看看是否可以通过添加材质让球球变得更有趣。
Creating a Redshift Material | 创建Rs材质
From the Redshift menu,select the Materials group,and within it select the Material option.
从“Rs”菜单中,选择“材质”组,并在其中选择“材质”选项。
This will create a material based on Redshift’s Rs Material physically correct shader.
然后就会创建一个基于Rs物理上正确的着色Rs材质。(简单来说,就是建了个Rs材质球)
Assigning a material | 上材质!
Drag and drop the new material onto the sphere in the scene or alternatively on the object in the scene tree on the top-left part of the Cinema 4D UI.
拖拽新材质到场景中的球体上,或者在右边对象栏中C4D对应的对象UI上。
Adjusting the material settings | 调整材质设置
Select the Redshift material from the material editor. When the material is selected,the parameters of each material component (the shader nodes) can be edited directly within the Cinema 4D Attribute Editor.
从材质编辑器中选择Rs材质。当材质被选中时,每个材质构成(着色器节点)的参数可以在C4D属性编辑器中直接编辑。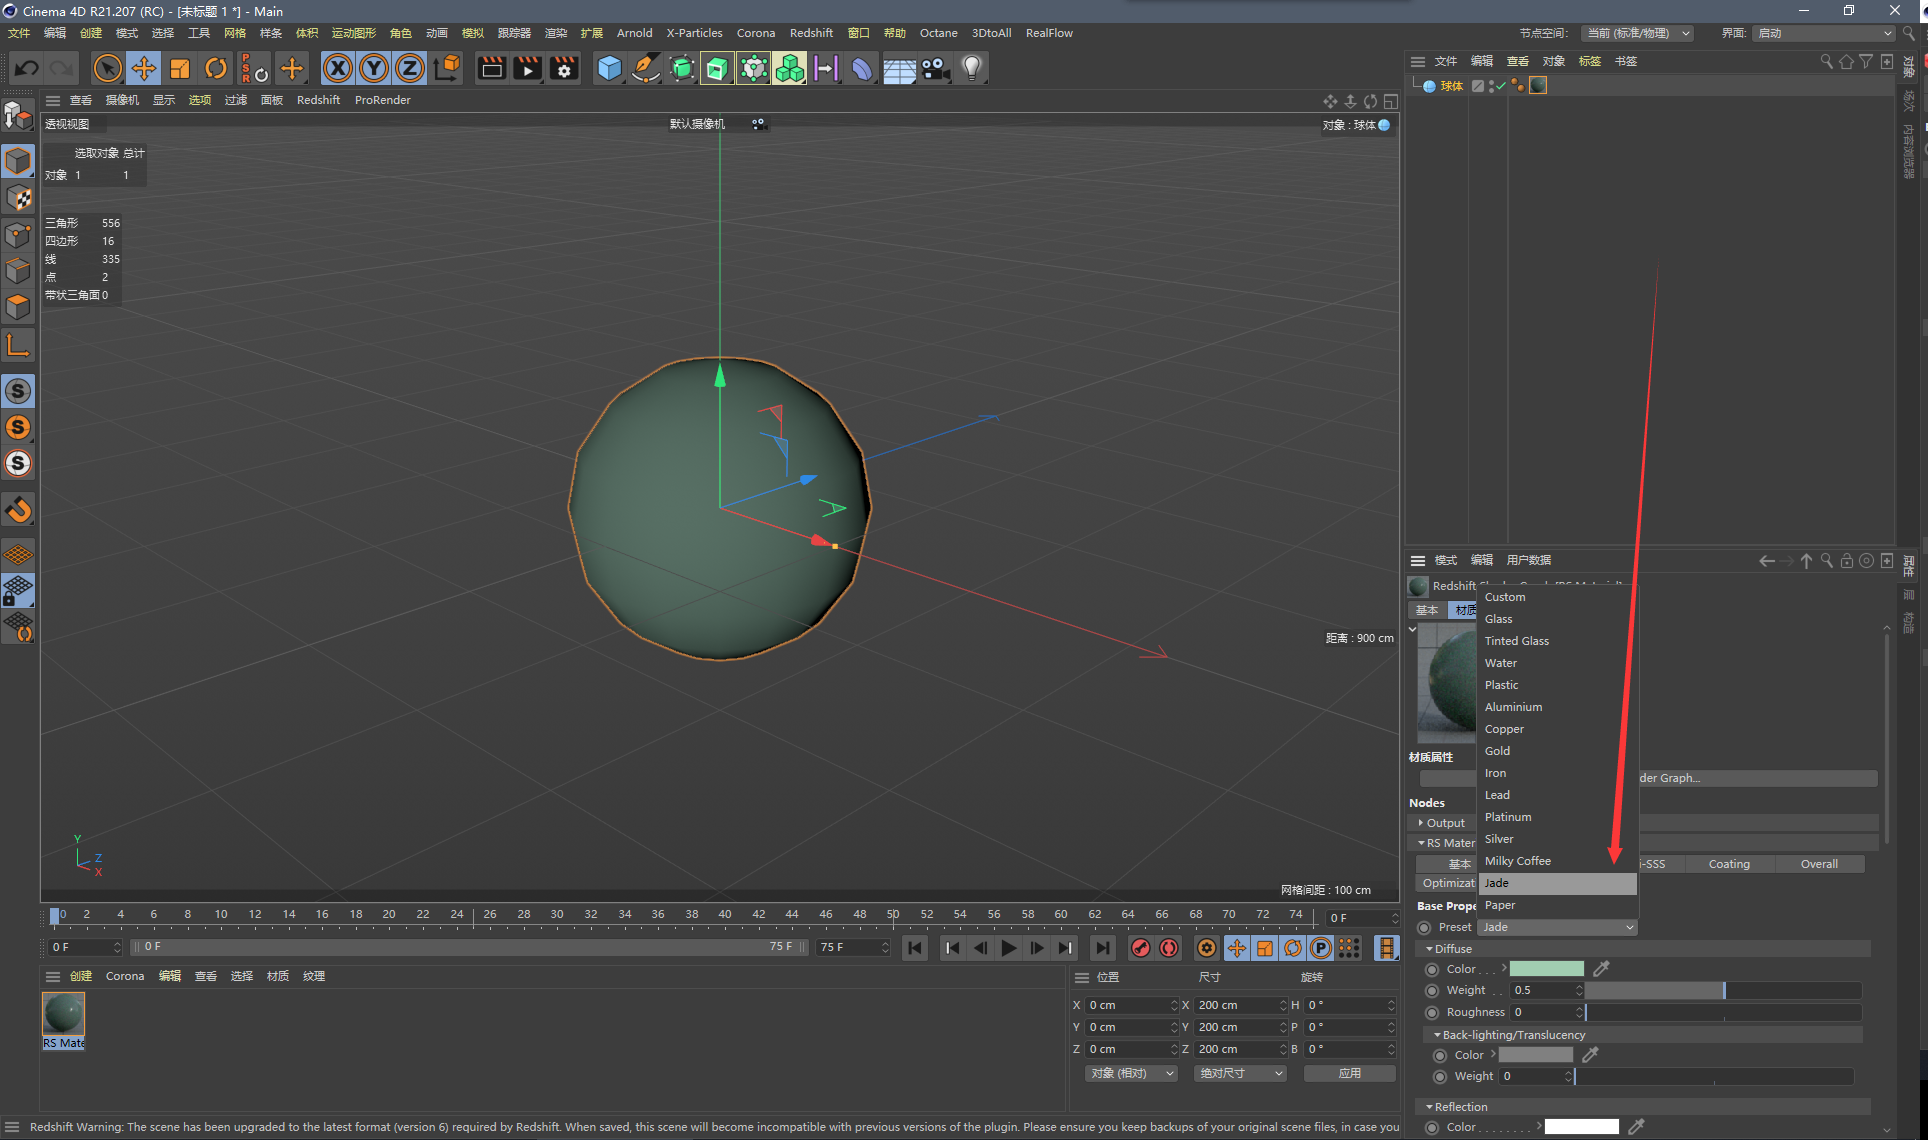
Select the Jade preset from the Base Properties tab. Note that the material preview updates to reflect the changes.
从基本属性选项卡中选择 Jade 预置。注意材质预览更新所显示的变化。
Now,render the scene again,to see our new material.
现在,再次渲染场景,看看我们的新材质。
Editing Materials | 编辑材质
First lets add a couple more objects to the scene to make it slightly more interesting. Add a Capsule object and a sufficiently large plane object to act as a floor for our other objects. Create another Redshift material,leaving all the settings in their default state,and assign it to the capsule object.
首先,让我们在场景中添加一些对象,使其稍微有趣一些。添加一个胶囊对象和一个足够大平面对象作为我们其他对象的地板。创建另一个Rs材质,将所有设置保持在默认状态,并将其分配给胶囊对象。
Now our scene would look something like this
现在我们的场景应该是这样的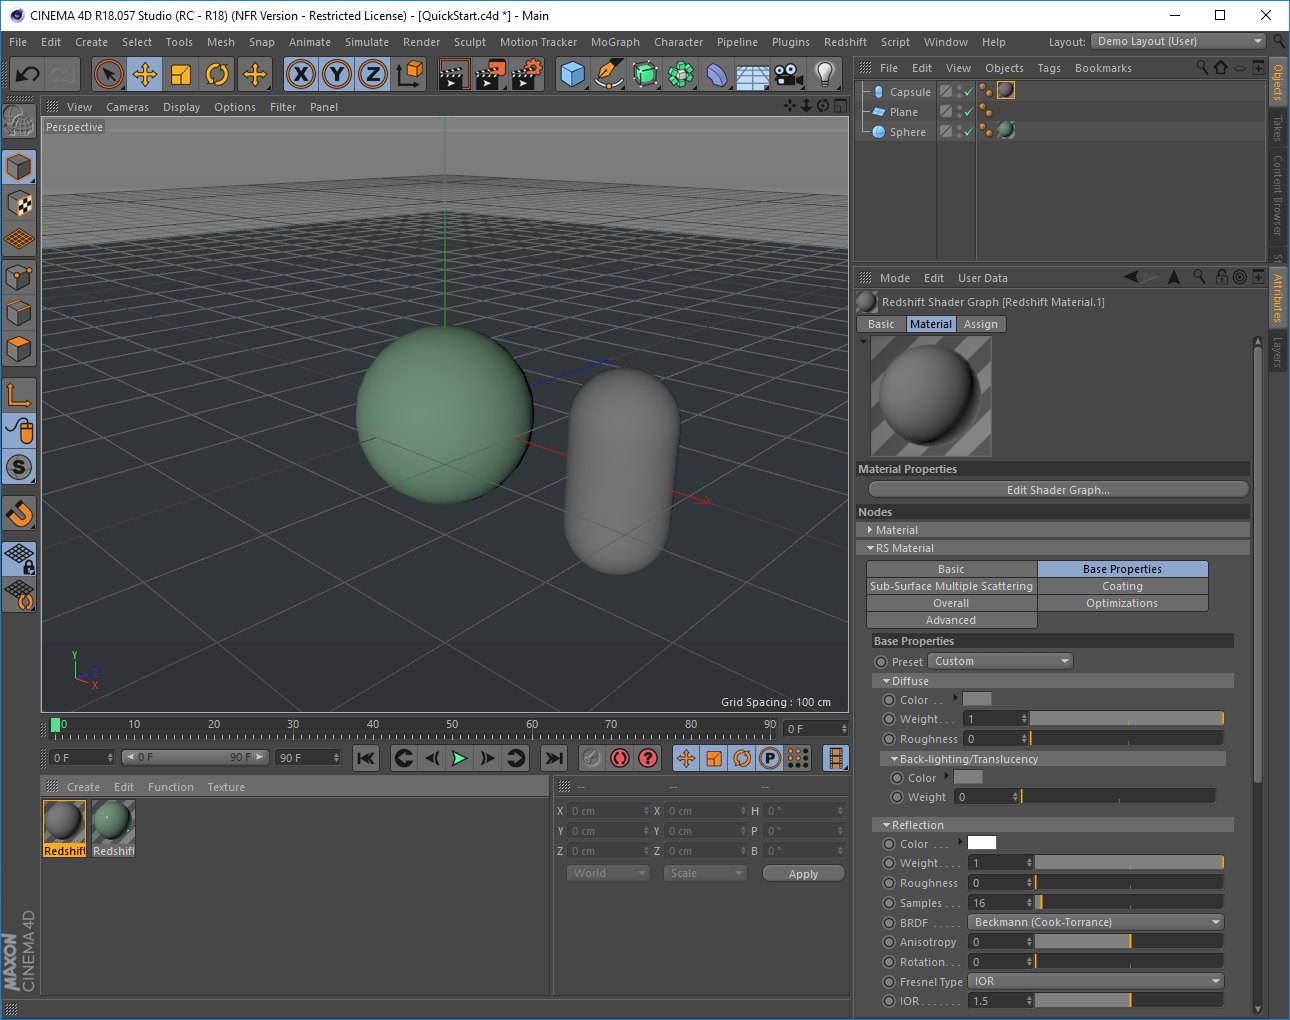
Select the capsule material and click the Edit Shader Graph Button within the Attribute Editor
选择胶囊材质并点击属性编辑器中的编辑着色器图形按钮
This is the Redshift Shader Graph Editor,which you can use to create and customize your materials. In Redshift materials are constructed by connecting Shader Nodes together. The Redshift Shader Graph Editor is divided into three main areas.
这是Rs着色图形编辑器,你可以用它来创建和自定义材质。在Rs中,材质是通过连接着色节点来构建的。Rs着色器图形编辑器分为三个主要领域。
Node Tree | 节点树
The left area contains a tree of all the Shader Nodes that can be added to a Graph. They are organized into groups depending on the node type or usage.
左边区域包含可以添加到图中的所有着色节点的树。它们根据节点类型或使用情况被组织成组。
Graph Area | 图形区域
The center area contains the Shader Graph,which is based on Cinema 4D’s Xpresso system. Nodes be added by dragging one from Node Tree and dropping it into this area. Connections can be formed by clicking on the Output Port area (red square) of a source node to select the desired output and the clicking on the Input Port area (blue square) of the target node,and selecting the input port that will be connected.
中心区域包含着色器图形,它是基于 Cinema 4D 的 Xpresso 系统。通过从 Node Tree 拖动一个节点并将其拖放到这个区域,可以添加节点。可以通过单击源节点的输出端口区域(红色方块)来选择所需的输出,然后单击目标节点的输入端口区域(蓝色方块) ,并选择要连接的输入端口来形成连接。
Node Attribute Editor | 节点属性编辑器
The right area holds an attribute editor for editing the parameters of the currently selected node from the center area. The editor supports all the functions of the built-in attribute editor of Cinema 4D including setting key-frames.
右侧区域保存了一个属性编辑器,用于编辑来自中心区域的当前选定节点的参数。该编辑器支持C4D内置属性编辑器的所有功能,包括设置关键帧。
Our material has two Shader Nodes. The first is Material which represents the material’s final outputs to the renderer. The second node is Rs Material which is Redshift’s physically accurate Material Shader. There are multiple material shaders in Redshift,all of which are located under the Materials category in the node tree. In the graph you also see that the shader’s Out Color output is connected to the final Surface output of the material.
我们的材质有两个着色节点。第一个是材质,它代表材质的最终输出到渲染器。第二个节点是 Rs 材质,这是Rs的物理精确材质着色器。在 Redshift 有多个材质着色器,所有这些都位于节点树中的材质类别下。在图中,你还可以看到着色器的输出是与材质的最终 Surface 输出相连的。
Editing the Material Shader Graph | 编辑材质球
Let’s try changing the color of the shader. Select the Rs Material node,and then,in the Basic Properties tab of the node’s attributes change the Color parameters of the Diffuse section. Render the scene to see your changes.
让我们尝试改变着色器的颜色。选择 Rs Material 节点,然后在节点属性的 Basic Properties 选项卡中更改漫反射部分的 Color 参数。渲染场景以查看您的变化。
Now let’s make our boring gray material into something more interesting by adding a Texture!
现在让我们添加一个纹理,使我们无聊的灰色材质变得更加有趣!
Adding a Texture | 添加纹理
Open the Textures category in the Node Tree and drag a Texture node into the graph. This will create a texture sampling node. Now let’s connect its Out Color port to the Diffuse Color port of the Rs Material shader.
打开节点树中的纹理类别,并将纹理节点拖动到图中。这将创建一个纹理采样节点。现在让我们连接其出色端口的漫反射颜色港口的 Rs 材质着色器。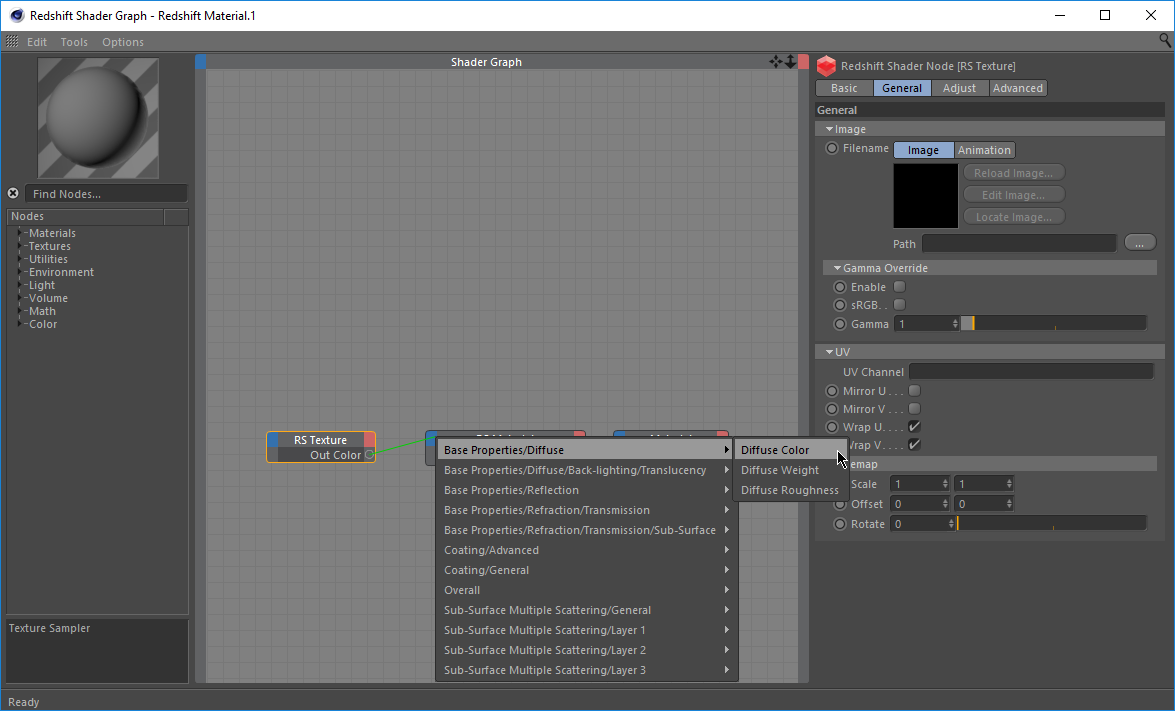
Let’s tell the Texture shader node,the file we want to use. Select the Texture node and in the General settings tab,set the texture’s Filename parameter by clicking the three dots button and picking a texture file from your system:
让我们告诉纹理着色器节点,我们要使用的文件。选择纹理节点,在常规设置选项卡中,通过单击三点按钮并从系统中选择一个纹理文件来设置纹理的文件名参数: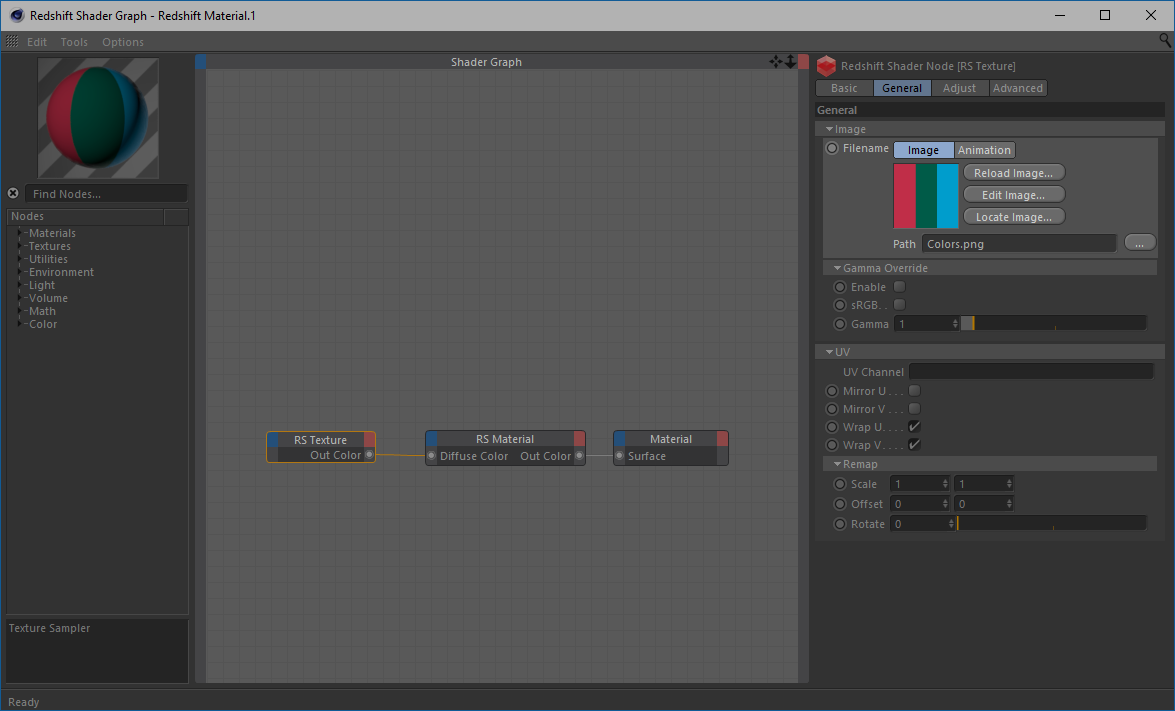
Tip | 小知识
You can also set the texture by dragging and dropping files onto the preview area textures from the File Explorer / Finder or from other parts of the Cinema 4D UI (for example Bitmap Shaders)
您还可以通过从文件资源管理器 / 查找或者C4D界面的其他部分(比如位图渲染器)中拖放文件到预览区的纹理
Now let’s render again to see the results
现在让我们再次渲染来看看结果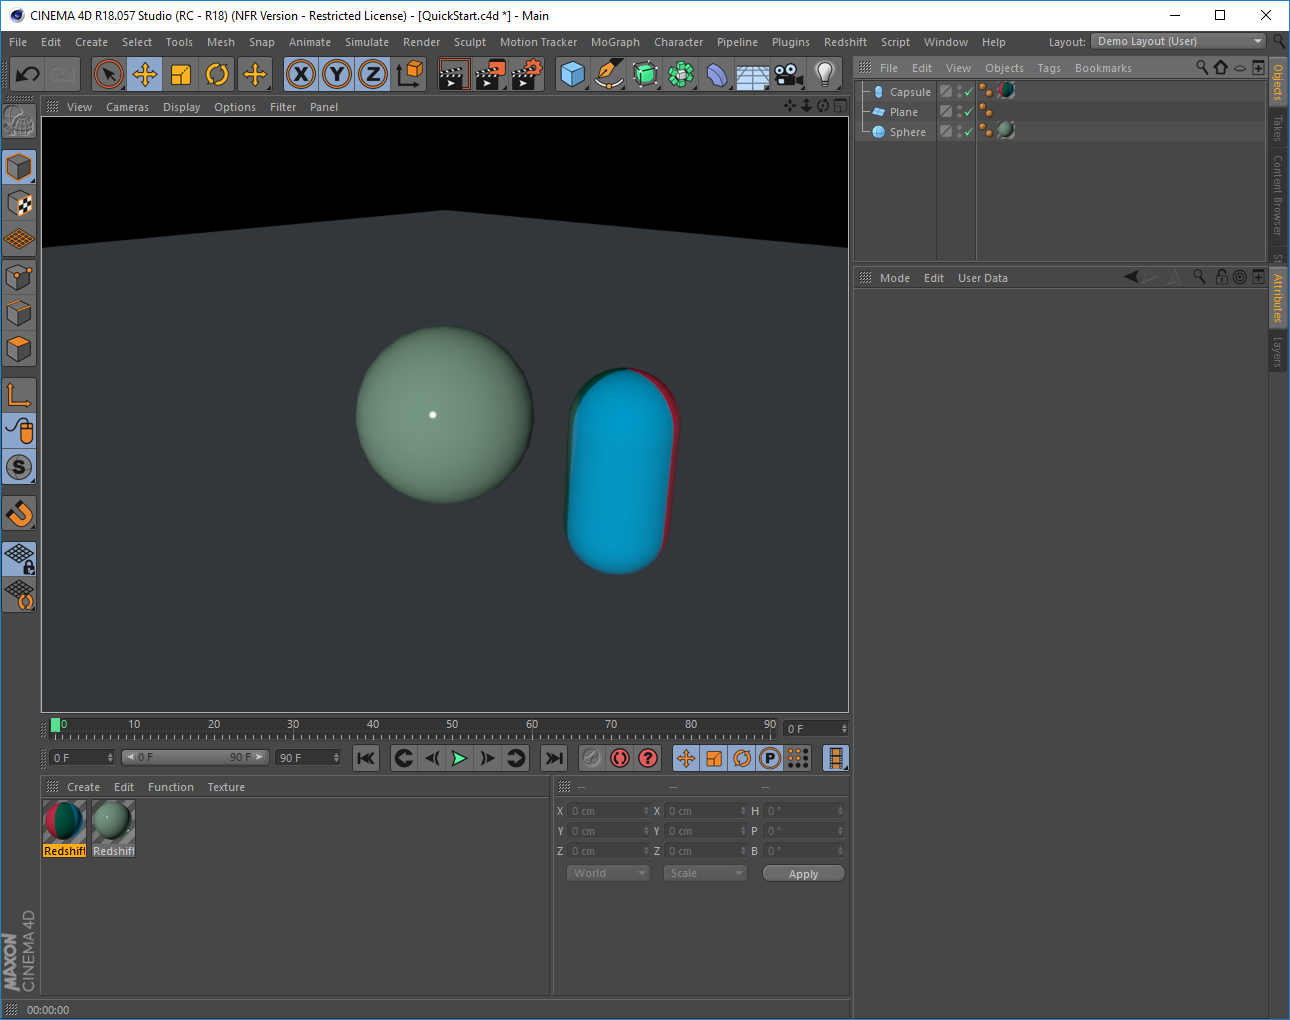
Interactive Preview Rendering - IPR | 交互式预览渲染-IPR
Editing the scene and clicking Render every time is not only counter-productive,but also slow for complex scenes. Wouldn’t it be nice if we could get some quick feedback on our scene,without having to stop our flow? Actually this is one of the many features inside the Redshift Render View (RV). Check the RenderView page,for more info.
编辑场景并且每次都点击渲染不仅会适得其反,而且对于复杂的场景来说速度也很慢。如果我们能够在我们的场景中得到一些快速的反馈,而不必停止我们的流动,这不是很好吗?实际上,这是Rs渲染视图(RV)中的许多特性之一。查看渲染视图页面,了解更多信息。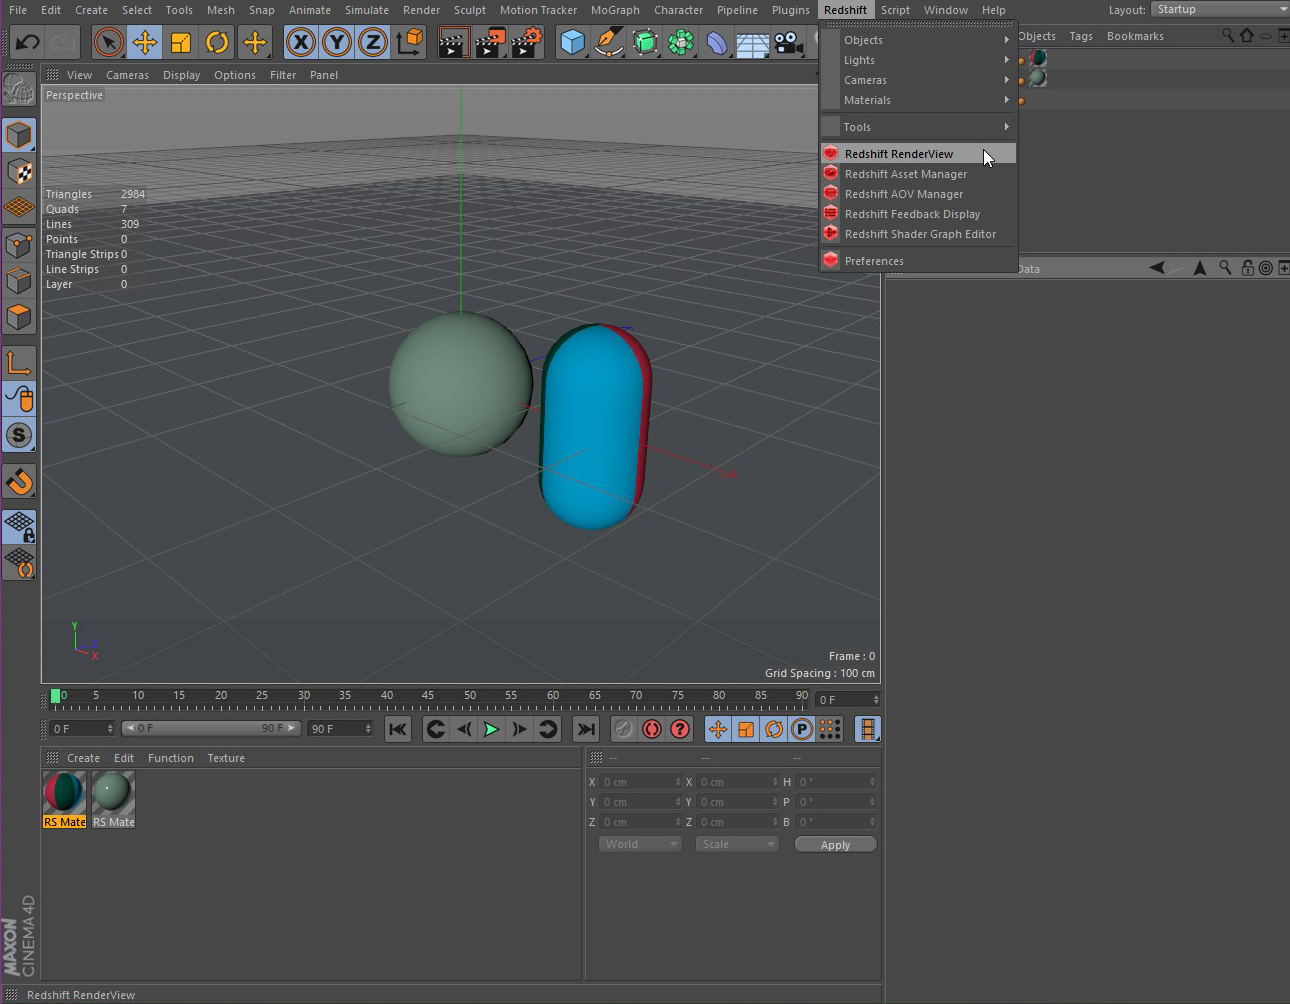
Let’s open the render view window,by navigating the application main menu to the Redshift plugin menu,and selecting Redshift RenderView
让我们打开渲染视图窗口,通过导航应用程序主菜单到Rs插件菜单,并选择Rs渲染视图
This is the RenderView window,to activate the IPR,press the Play button on the RV window tool-bar. When the IPR is activated any changes detected in the scene are automatically reflected in the RenderView. That includes Camera and Object movements,Material assignments,Material and Object parameter changes,as well Object geometry edits.
这是渲染视图窗口,要激活 IPR,按 RV 窗口工具栏上的播放按钮。当 IPR 被激活时,在场景中检测到的任何变化都会自动反映在渲染视图中。这包括相机和对象的运动,材质分配,材质和对象参数的变化,以及对象的几何编辑。
Now with the IPR active,move the viewport camera around,move an object,or try changing some material parameter. All changes will be reflected in the RV.
现在,随着 IPR 的激活,移动视窗摄像头,移动一个物体,或者尝试改变一些材质参数。所有的变化都会反映在 RV 中。
Creating a Redshift Light | 创建Rs灯光
Our scene so far has only very simple lighting. Let’s make it more dramatic by adding a Redshift Light.
我们的场景到目前为止只有非常简单的灯光。让我们通过添加Rs光使它更加戏剧化。
From the Redshift menu,select Infinite Light from the Lights sub-menu.
在“Rs”菜单中,从“光”子菜单中选择“无限光”。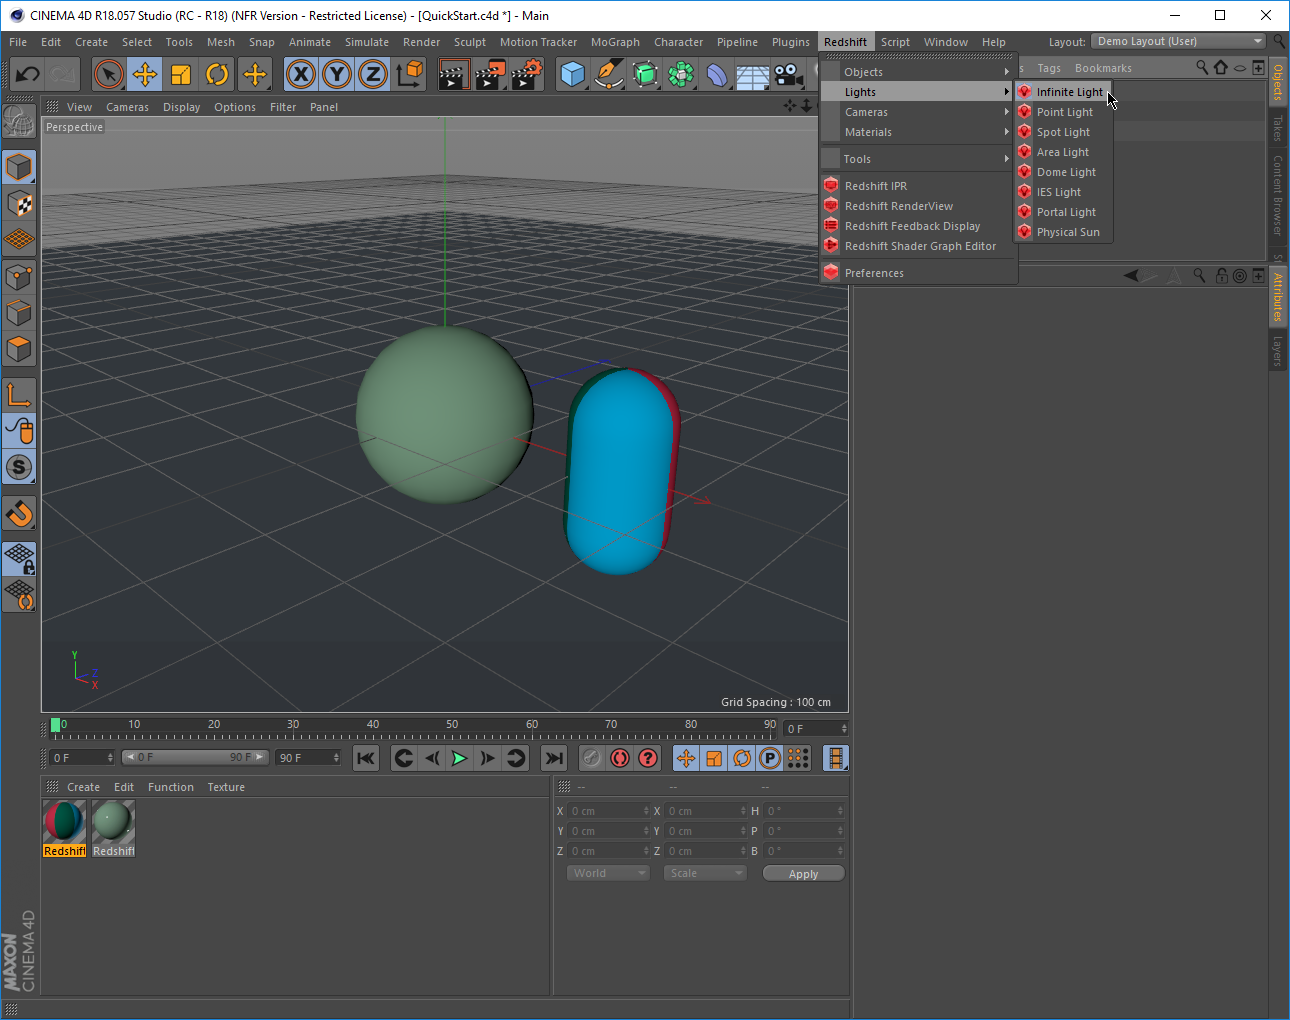
Select and move the light to a good spot,and rotate it towards our objects. Let’s take a quick look at the basic parameters of this object.
选择并移动光线到一个好的位置,然后将其旋转到我们的物体上。让我们快速看一下这个对象的基本参数。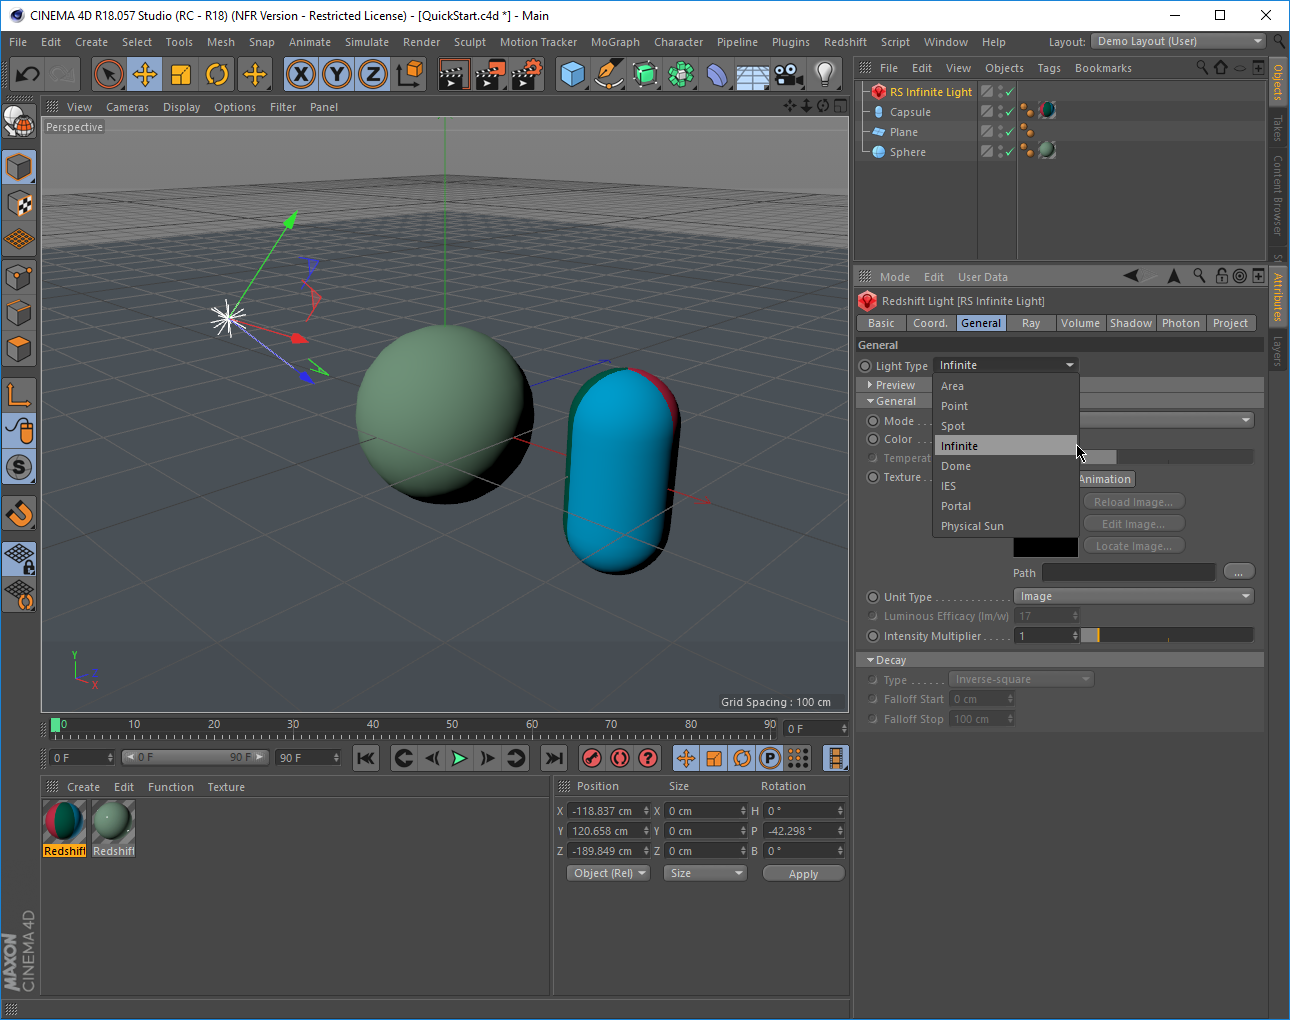
Looking in the General tab of this object,we see that this light is actually an Redshift Light where its type has been set as Infinite. You can easily switch between different light types by changing the Light Type parameter.
查看这个物体的一般标签,我们看到这个光实际上是一个Rs光,其类型被设置为无限。通过更改 Light Type 参数,您可以轻松地在不同的灯光类型之间进行切换。
Next tweak our light a bit by clicking on the Shadow tab.
下一步通过点击阴影标签来调整我们的灯光。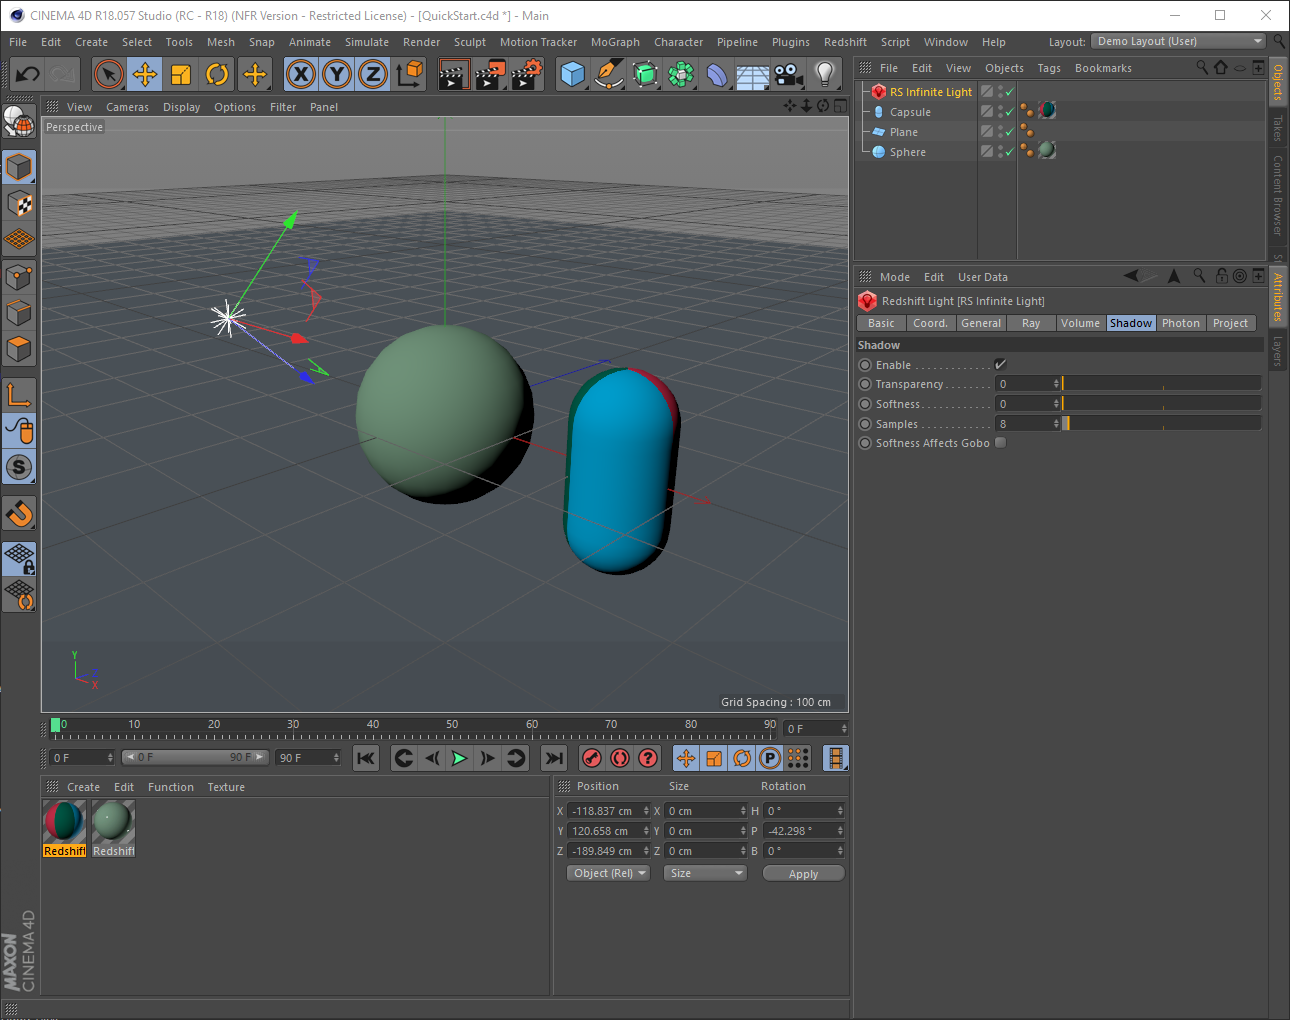
Here you can find the shadowing settings. Let’s change the intensity of the shadows by adjusting the Transparency setting.
在这里你可以找到阴影设置。让我们通过调整透明度设置来改变阴影的强度。
Now our scene will look this in the RV
现在我们的场景将在 RV 中看到这个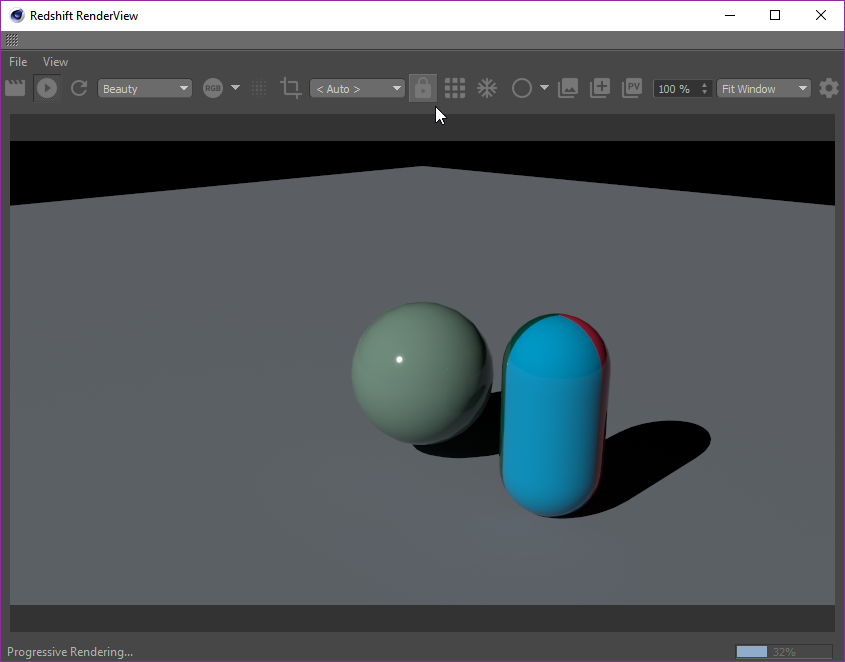
Creating a Physical Sky and Sun | 创造一个物质的天空和太阳
How about we go one step further with the lighting? Let’s add a Physical Sun and Sky to give our scene a more realistic look.
我们在灯光方面再进一步怎么样?让我们添加一个物理的太阳和天空给我们的场景一个更加现实的外观。
First let’s delete the Redshift Light,because it will not be necessary once we have a Sun object.
首先让我们删除Rs光,因为它将不是必要的,一旦我们有一个太阳对象。
Then in the Redshift menu select the Redshift Sun & Sky Rig option from the Object sub-menu like so:
然后在“Rs”菜单中,从“对象”子菜单中选择“Rs太阳和天空钻机”选项,如下所示: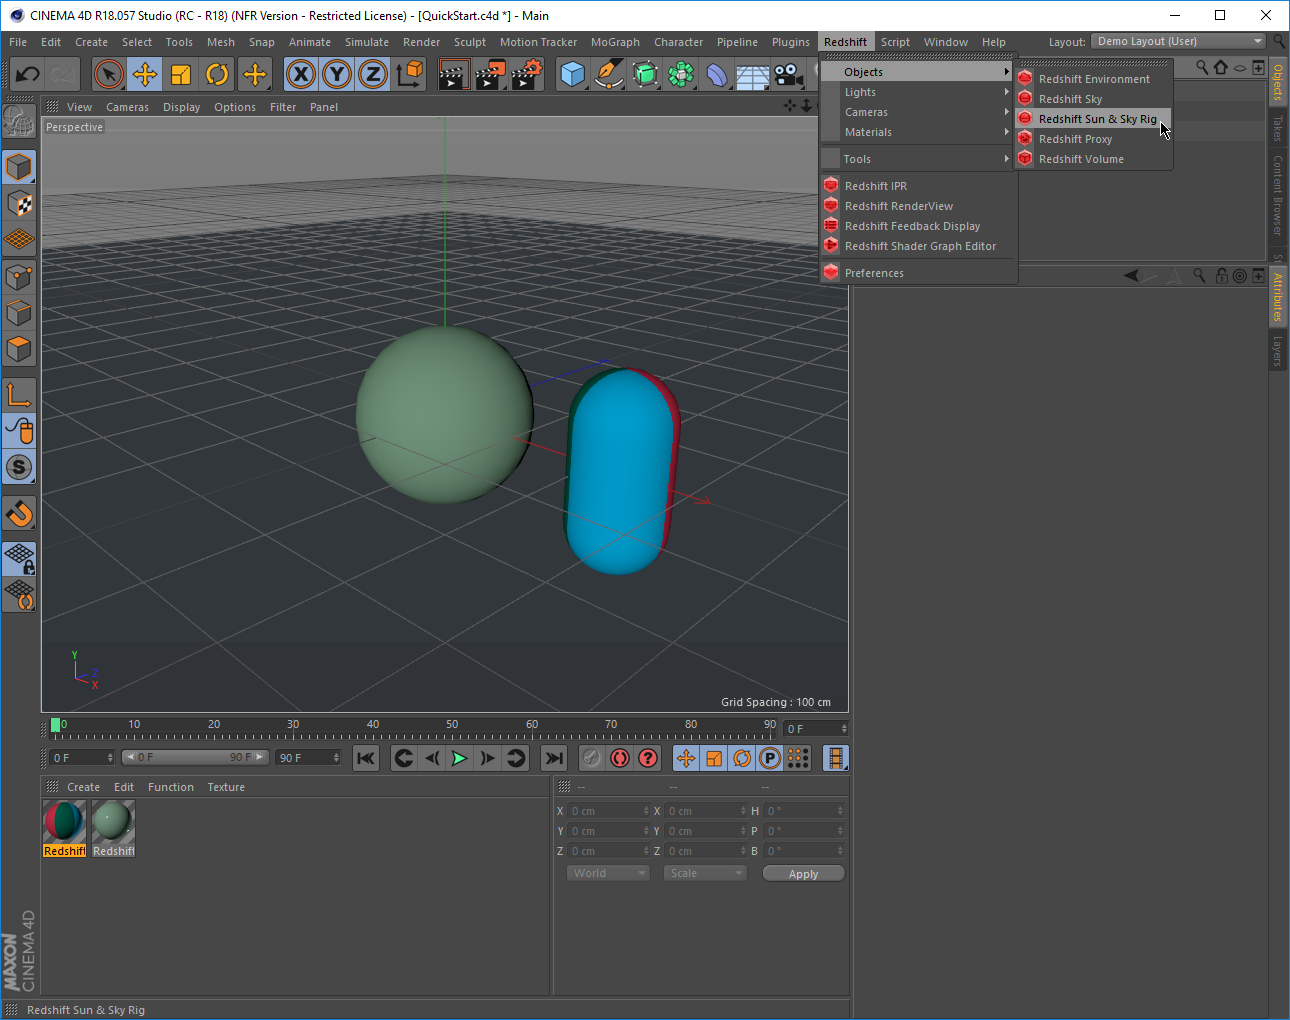
Now our scene tree will look something like this:
现在我们的场景树看起来像这样: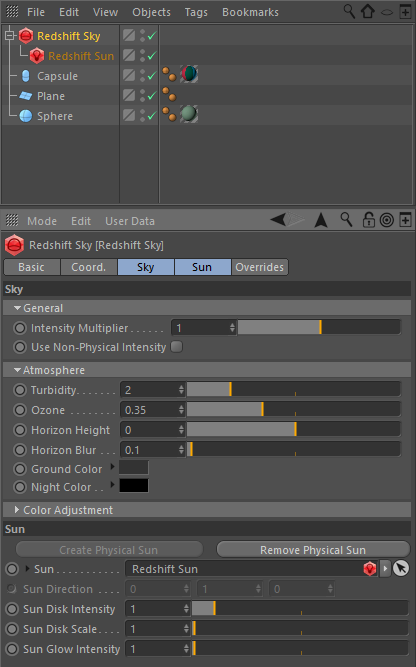
Let’s rotate our viewport camera towards the horizon and check our RV window to see how it looks
让我们把视区摄像头转向地平线,检查渲染窗口,看看效果如何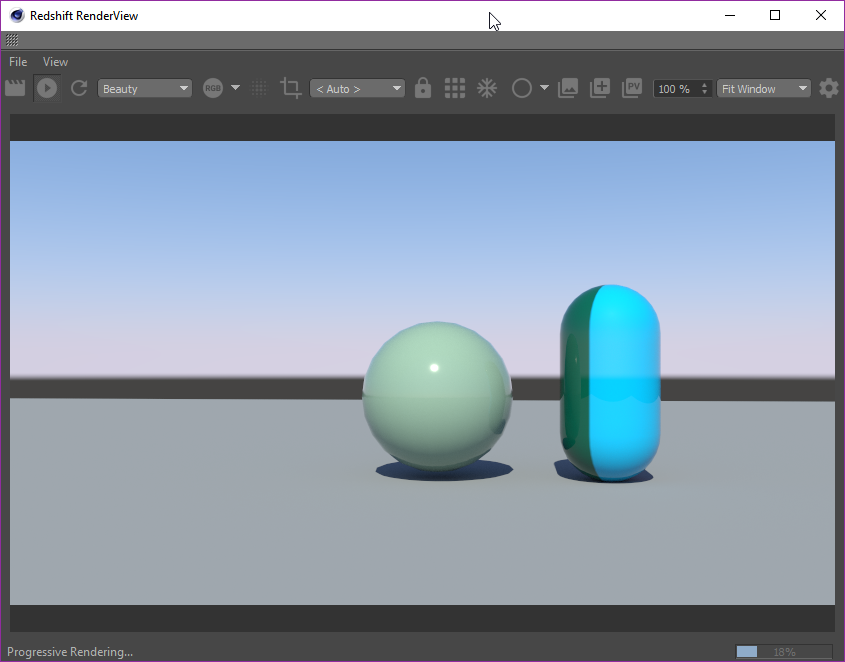
Tip | 又一个小知识
A Redshift Sun object can be rotated and animated just like an Infinite light. Changes to the Sun’s direction will also affect the behavior of the Physical Sky.
一个Rs太阳物体可以旋转和动画就像一个无限的光。太阳方向的改变也会影响物理天空的行为。
So,let’s bring the sun into view by selecting the Redshift Sun object by rotating it until it faces our viewport.
所以,让我们通过选择Rs太阳物体,旋转它直到它面对我们的视区,把太阳带入视野。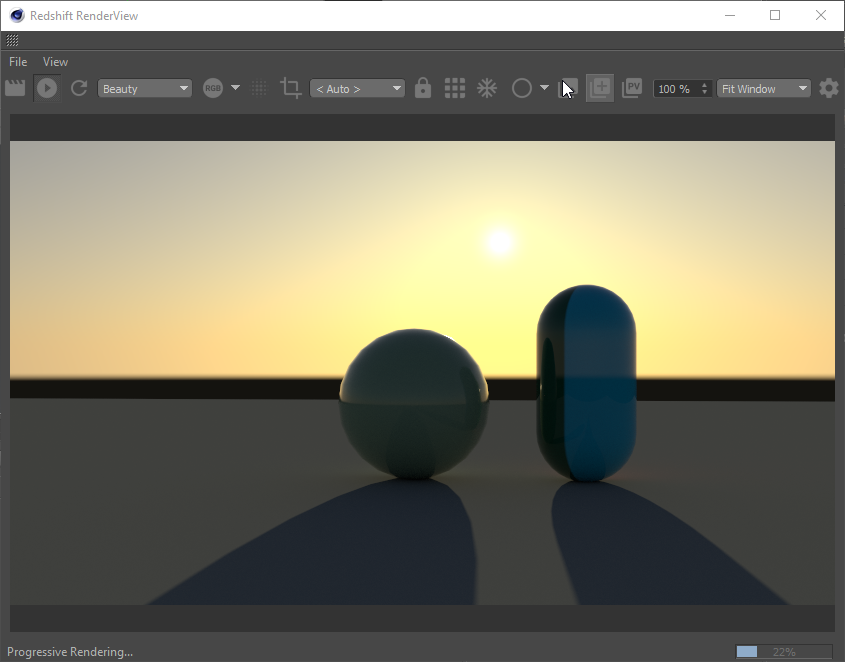
You can try changing the parameters of the Redshift Sun and Redshift Sky objects,and see what other results you can get.
您可以尝试更改Rs太阳和Rs天空对象的参数,看看还能得到什么其他结果。
Creating a Redshift Camera | 创建Rs相机
Let’s experiment a little with this render,by changing the camera type to one of the Redshift cameras.
让我们尝试一下这个渲染,把相机类型改为Rs相机之一。
First let’s create a Redshift camera object. In the Redshift menu select the Standard Camera from the Cameras sub-menu. The camera should match our current viewport.
首先让我们创建一个Rs相机对象。在“Rs”菜单中,从“相机”子菜单中选择“标准相机”。相机应该与我们当前的视区相匹配。
Then activate the camera in the viewport by selecting from the viewport’s Cameras menu the Use Camera sub-menu and then selecting our new camera. Now our viewport is looking through our new camera.
然后从视窗的相机菜单中选择“使用相机”子菜单激活相机,然后选择我们的新相机。现在我们的视口正在通过我们的新相机观察。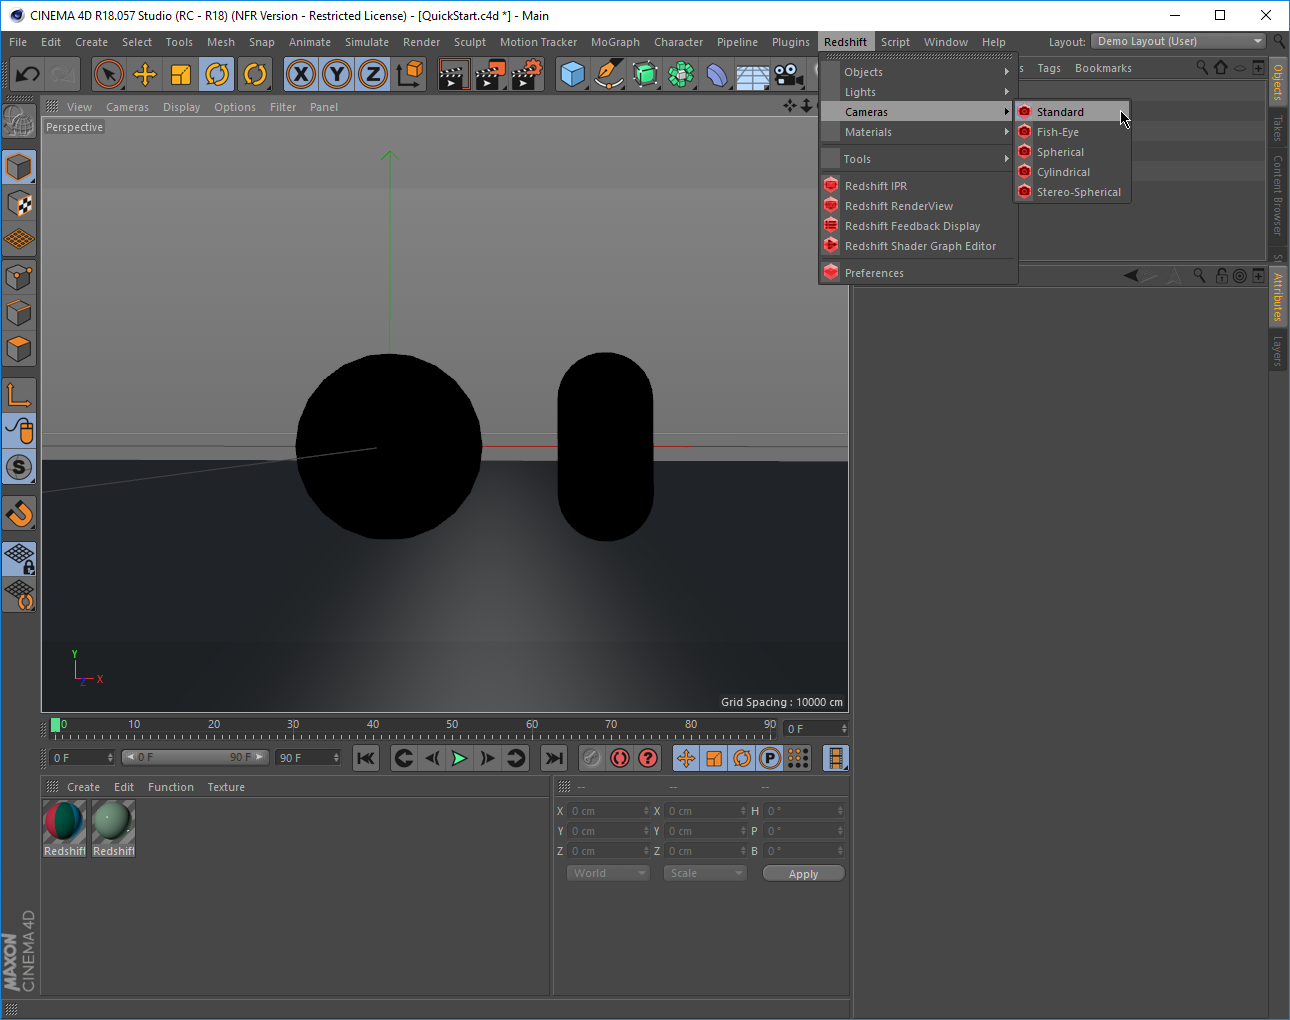
The object holds a Redshift Camera Tag,which contains the Redshift-specific attributes of our camera.
该对象拥有一个Rs相机标记,其中包含Rs特定的属性我们的相机。
Let’s check out some of the parameters.
我们来看看其中的一些参数。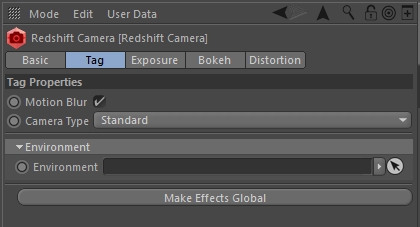
With Camera Type you can override the camera type from the standard Cinema 4D one to one of the Redshift ones.
使用 Camera Type,你可以从标准的 Cinema 4 d 转换到Rs相机。
Let’s change it to Fisheye.
我们改成鱼眼吧。
Now our render camera uses a Fisheye-type lens,and looks like this.
现在我们的渲染相机使用了鱼眼镜头,看起来像这样。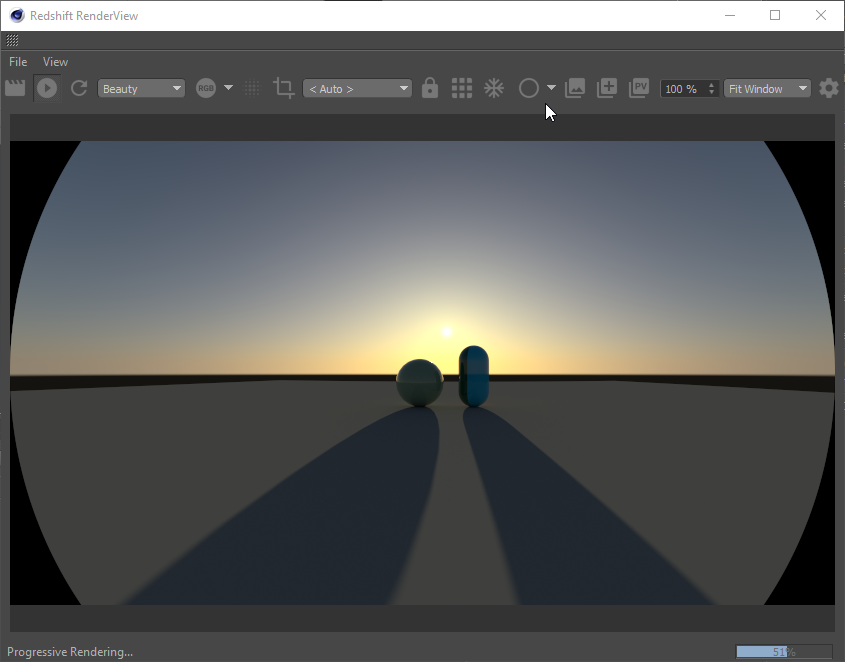
Try the different camera types and experiment with their parameters.
尝试不同的摄像机类型,并试验它们的参数。
Adding Lens Effects to a Camera | 为相机添加些镜头效果
We can also add lens effects to our Redshift camera,via the Exposure Bokeh and Distortion tabs.
我们也可以通过曝光倒影和扭曲标签为Rs相机添加镜头效果。
Let’s adjust some of the parameters
让我们调整一下一些参数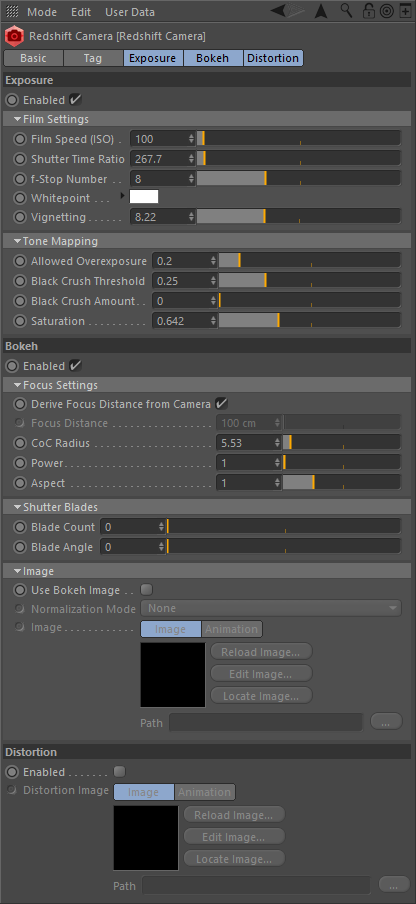
Here we adjusted the Shutter Time Ratio,added Vignetting and dropped a little bit the saturation amount.
在这里我们调整了快门时间比率,增加了虚光晕,减少了一点饱和度。
Finally we added a touch of Depth-Of-Field/Bokeh by slightly increasing the CoC Radius.
最后我们通过稍微增加 CoC 半径来增加一点 Depth-Of-Field/Bokeh 的感觉。
And here is the final image from our RV.
这是我们从渲染窗口看到的最终渲染结果。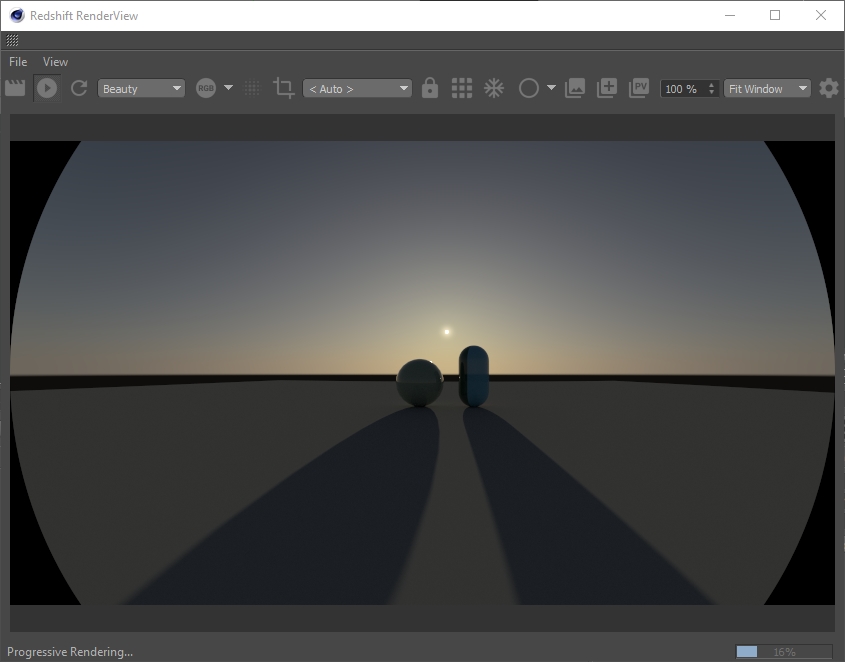

若有收获,就点个赞吧
0 人点赞
