- What is Custom Data? | 什么是定制数据?
- Examples | 例子
What is Custom Data? | 什么是定制数据?
Each X-Particles particle carries with it quite a large amount of data specific to itself (colour, speed, age, etc.) and more is added by some modifiers or if you add it by turning on features such as particle rotations in the emitter.
每个 x 粒子带有相当大的数据量特定于它自己(颜色,速度,年龄等)和更多的是由一些修饰符添加,或者如果你添加它通过打开特征,如粒子旋转发射器。
However, there may be times when you want to add some specific data to each particle which is not already available. You can do that by adding Custom Data in the emitter.
但是,有时候您可能需要向每个粒子添加一些特定的数据,而这些数据目前还不可用。您可以通过在发射器中添加自定义数据来做到这一点。
Once added, you can test this data with a specific Custom Data question, or change it with the Custom Data Modifier or the Custom Data Action. You can also carry out data mapping using custom data items you have added to the particles.
添加后,可以使用特定的自定义数据问题测试该数据,或者使用自定义数据修饰符或自定义数据操作更改该数据。您还可以使用添加到粒子中的自定义数据项执行数据映射。
Adding new Custom Data | 添加新的自定义数据
This is done in the emitter’s ‘Extended Data’ tab, ‘Custom Data’ quicktab. In this quicktab you will initially see this:
这是通过发射器的扩展数据选项卡,自定义数据选项卡来完成的:
To add an item of custom data, click the ‘Add’ button. You can remove data items individually once they have been added using the ‘Remove Custom Data’ button in each custom data section, or remove all custom data by clicking the ‘Reset’ button.
要添加自定义数据项,请单击“添加”按钮。您可以在每个自定义数据部分中使用“删除自定义数据”按钮单独删除添加的数据项,或者通过单击“重置”按钮删除所有自定义数据。
If you click ‘Add’ you will see this interface:
如果你点击添加,你会看到这个界面: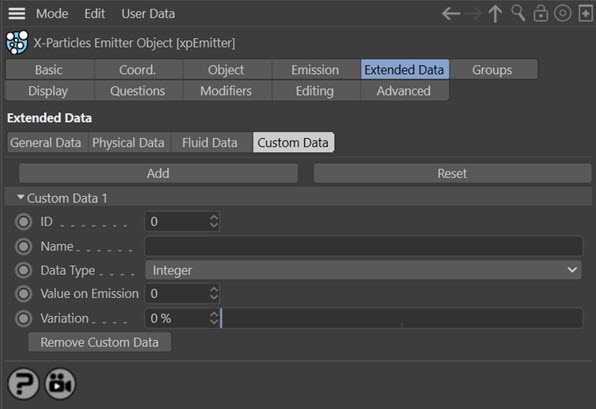
The various parameters are as follows.
各种参数如下。
ID, Name, Data Type, Value on Emission | 发射的 ID,名称,数据类型,值
The various parameters shown for each item of custom data are explained in the emitter custom data quicktab page.
在发射器自定义数据 quicktab 页面中解释了为每个自定义数据项显示的各种参数。
Querying Custom Data items | 查询自定义数据项
A special question has been added to the Question object to let you test the value of your custom data. Please refer to the Question Object for details.
在 Question 对象中添加了一个特殊的问题,用于测试自定义数据的值。详情请参阅问题对象。
Changing Custom Data items | 更改自定义数据项
You cannot change the data type of a custom data item once it has been created (e.g. you cannot convert a Matrix to an integer). But you can change the value of the item.
自定义数据项创建后,不能更改其数据类型(例如,不能将矩阵转换为整数)。但是您可以更改项目的值。
The Custom Data Modifier | 自定义数据修饰符
This is a modifier which specifically changes the value of custom data. It works in exactly the same way as other modifiers which alter particle data, such as the speed modifier or direction modifier. For more details, please see the Custom Data Modifier page.
这是一个专门更改自定义数据值的修饰符。它的工作方式与其他改变粒子数据的修饰符完全相同,比如速度修饰符或方向修饰符。有关详细信息,请参阅自定义数据修改器页面。
The Change Custom Data Action | 更改自定义数据操作
As with all modifiers in X-Particles, there is an action which can turn the Custom Data modifier on or off for a specific particle. As with actions such as the Change Speed action, this action can also change custom data items directly, without needing a modifier. Please see the Custom Data Action page for more information.
和 x 粒子中的所有修饰符一样,有一个操作可以打开或关闭特定粒子的自定义数据修饰符。与诸如“更改速度”操作一样,此操作也可以直接更改自定义数据项,而不需要修饰符。有关更多信息,请参见自定义数据操作页面。
Using the Get/Set Custom Data Xpresso nodes | 使用 Get/Set 自定义数据 Xpresso 节点
There are two new Xpresso nodes to let you get or set custom data values.
有两个新的 Xpresso 节点可以让您获取或设置自定义数据值。
The Get Custom Data node | 获取自定义数据节点
The incoming ports in this node work in the same way as the Get Particle Data node. It is explained fully in the Xpresso nodes page.
此节点中的传入端口与 Get Particle Data 节点的工作方式相同。在 Xpresso 节点页面中对此进行了充分的解释。
The Set Custom Data node | 设置自定义数据节点
This node works in the same way as the other ‘Set Data’ nodes. It is explained fully in the Xpresso nodes page.
该节点的工作方式与其他“ Set Data”节点相同。在 Xpresso 节点页面中对此进行了充分的解释。
Examples | 例子
1. Frame Counter | 帧计数器
This example demonstrates how to use custom data to implement a frame counter to use as a timer.
此示例演示如何使用自定义数据实现用作计时器的帧计数器。
Let us suppose we want to increase the speed of a particle by 50 scene units every 15 frames. The speed modifier can increase speed each frame but we want a single increase every 15 frames. The only way to do this in earlier versions was to set up a series of questions testing the particle age for 15-frame increments and triggering a Change Speed action each time the question passed. To do this for just 300 frames would have required 19 questions! You could also have done this with Xpresso but not everyone likes Xpresso so we want to avoid that.
假设我们想要每15帧增加一个粒子的速度50个场景单位。速度调节器可以提高每帧的速度,但我们希望每15帧增加一次。在早期版本中做到这一点的唯一方法是设置一系列问题,测试粒子的年龄为15帧增量,并在每次问题通过时触发变更速度动作。要做到这一点,只需要300帧将需要19个问题!你也可以用 Xpresso 做这个,但不是每个人都喜欢 Xpresso,所以我们想避免这种情况。
Adding Custom Data | 添加自定义数据
The first thing to do is add an item of custom data to the emitter. We’ll call it ‘counter’ and leave it as an integer. The value on emission should be 15, as we are going to reduce the value of this integer by 1, each frame, until it reaches zero.
首先要做的是向发射器添加一个自定义数据项。我们称它为‘ counter’,并将其作为整数保留。发射的值应该是15,因为我们要减少这个整数的值,每帧,直到它达到零。
Changing the value | 更改值
To change the value of the custom data we add a Custom Data modifier. In the modifier all we need to do is specify the name of the data (‘counter’), set ‘Operation’ to ‘Increment/Decrement’ and set ‘Value’ to -1; this will add -1 to the data value each frame, that is, it will reduce it by 1 each frame.
若要更改自定义数据的值,请添加“自定义数据”修饰符。在修改器中,我们所需要做的就是指定数据的名称(‘ counter’) ,将‘ Operation’设置为‘ Increment/Decrement’,并将‘ Value’设置为-1; 这将使每帧数据值增加-1,也就是说,每帧数据值减少1。
Testing the value | 测试价值
Next, we add a Question to the emitter. The question type should be ‘Custom Data’ and again we enter the name. All the other parameters can be left at the defaults, because we want to test for the data item equalling zero, which thanks to the custom data modifier, it will be after 15 frames.
接下来,我们向发射器添加一个 Question。问题类型应该是“自定义数据”,我们再次输入名称。所有其他参数都可以保留默认值,因为我们想测试数据项是否等于零,这要感谢自定义数据修饰符,它将在15帧之后。
Taking some action when the question passes | 当问题过去时,采取一些行动
All we need to do then is add the Action to the question; this should be a Change Speed action in direct change mode. Leave the change as ‘Relative’ and set the value to 50. Now the action will add 50 to the particle speed each time it is triggered.
然后我们需要做的就是将 Action 添加到问题中; 这应该是一个直接更改模式下的 Change Speed 操作。将更改保留为“相对”,并将值设置为50。现在,每次触发这个动作,粒子的速度就会增加50。
Play this and it will increase the speed - just once, after 15 frames. To make it happen every 15 frames, we need to do two things. First, in the emitter’s Question tab, change the icon of the question from the default yellow tick to a blue clock. This will ensure that the question is checked every frame, regardless of whether the question passes or fails. If you don’t do that, the question will only ever be tested once, which is not what we want.
播放这个,它将增加速度-只有一次,15帧后。为了让它每15帧发生一次,我们需要做两件事。首先,在发射器的“问题”选项卡中,将问题的图标从默认的黄色刻度改为蓝色时钟。这将确保问题在每一帧都被检查,而不管问题是通过还是失败。如果你不这样做,这个问题只会被测试一次,而这并不是我们想要的。
Finally, add another action to the question and be sure it comes after the change speed action. This new action should be a Change Custom Data action; again, enter the data name ‘counter’ and set the value to 15. If this isn’t done, the custom data modifier will continue to decrement the data, making it less than zero, so the question will never pass again.
最后,对问题添加另一个操作,并确保它在更改速度操作之后出现。这个新的操作应该是 Change Custom Data 操作; 同样,输入数据名称‘ counter’并将值设置为15。如果不这样做,自定义数据修饰符将继续递减数据,使其小于零,因此这个问题将永远不会再次传递。
Play the animation now and the particle speed will increase by 50 units every 15 frames.
现在播放动画,粒子速度将每15帧增加50个单位。
How it works | 它是如何工作的
The data item is initially set to 15. Each frame the custom data modifier decrements it by 1 and the value is tested by the question. When it reaches zero, the change speed action is triggered and the custom data item is reset to 15. The modifier will continue to decrement it each frame until the value reaches zero again and the cycle is repeated.
数据项最初设置为15。每帧自定义数据修饰符将其递减1,并通过问题测试该值。当它达到零时,更改速度动作被触发,自定义数据项被重置为15。修改器将继续递减每一帧,直到该值再次达到零,并重复周期。
This is a very simple example of using custom data to set up a frame counter in X-Particles.
这是一个使用自定义数据在 X-Particles 中设置帧计数器的非常简单的示例。
2. Collision testing with Xpresso | 与 Xpresso 的碰撞测试
The Question node in X-Particles cannot test for the recent collision of a particle with an object because the internal flag that is set in the emitter is cleared after the emitter has carried any required processing. We can still do this though, using custom data.
X 粒子中的问题节点无法测试粒子与物体最近的碰撞,因为在发射器中设置的内部标志在发射器进行任何必要的处理之后被清除。我们仍然可以使用自定义数据来做到这一点。
The custom data | 自定义数据
Add a new custom data item to the emitter. Set its name to ‘collided’ and the type to integer, with a value of zero.
向发射器添加一个新的自定义数据项。将它的名称设置为“碰撞”,类型设置为整数,值为零。
Add a collider object | 添加碰撞器对象
Add an object to the scene that the particles will collide with, and add an X-Particles collider tag to that.
添加一个物体到场景中的粒子将碰撞,并添加一个 x 粒子碰撞器标签。
Add a Question object to the emitter | 向发射器添加一个 Question 对象
Add a Question object and be sure to change its icon in the emitter to a blue clock icon, or it will only be tested once for each particle.
添加一个问题对象,并确保改变其图标在发射器的蓝色时钟图标,否则它将只为每个粒子测试一次。
In the Question object, set the type to ‘Particle Flags’ and the question itself to ‘Particle Collided (Object)’. Add an action to the question and choose a ‘Change Custom Data’ action from the ‘Direct Actions’ group.
在“问题”对象中,将类型设置为“粒子旗”,并将问题本身设置为“粒子碰撞(对象)”。向问题添加一个操作,并从“直接操作”组中选择“更改自定义数据”操作。
In the action, change the data item name to ‘collided’, the operation to ‘Set Value’ and the ‘Value’ to 1.
在这个操作中,将数据项名称更改为“碰撞”,操作更改为“设置值”,并将“值”更改为1。
Add an Xpresso tag to the emitter | 向发射器添加 Xpresso 标记
In the Xpresso window, set up a node tree to look like this:
在 Xpresso 窗口中,设置一个节点树,如下所示: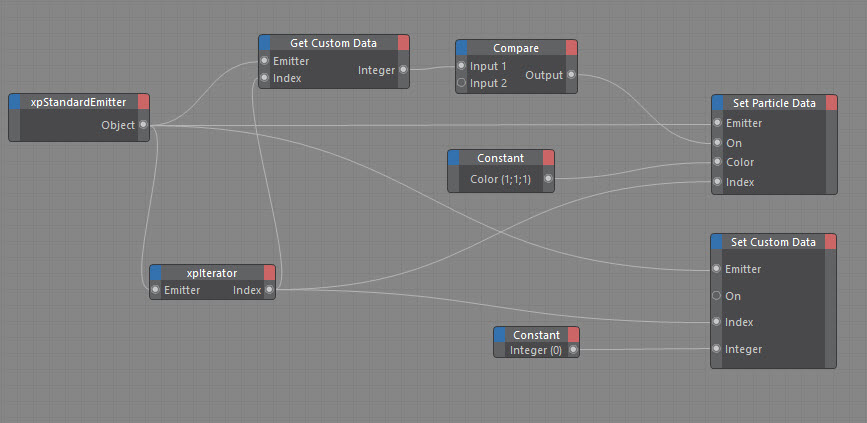
How it works | 它是如何工作的
For each particle, the Question object tests if a collision has occurred. If it has, the custom data item named ‘collided’ is set to 1 using the Action. In the Xpresso nodes, the same custom data item is retrieved and its value tested in the Compare node to see if it equals 1. If it does, the Set Particle Data node is used to change the colour (to white, in this case).
对于每个粒子,Question 对象测试是否发生了碰撞。如果有,则使用 Action 将自定义数据项“冲突”设置为1。在 Xpresso 节点中,检索相同的自定义数据项,并在 Compare 节点中测试其值,以查看它是否等于1。如果是,则使用 Set Particle Data 节点更改颜色(在本例中为白色)。
The only other thing to do is to reset the custom data item to zero so whatever process is carried out on the particle does not repeat each frame. The constant node does this, as it doesn’t matter whether the value was 0 or 1 - it just has to be zero at the end of the Xpresso tree.
唯一要做的另一件事就是将自定义数据项重置为零,这样无论在粒子上执行什么过程都不会重复每一帧。常量节点可以做到这一点,因为值是0还是1并不重要——它只需要在 Xpresso 树的末尾处为零即可。
3. Adding a boolean test question | 添加一个布尔测试问题
One of the standard questions in the Question object is a Boolean Input question. However, this is limited in that it is not intended as a particle-specific question but one which tests some other parameter in Cinema 4D. The problem is that if you test a particle variable, such as speed, and the last particle tested passes that test, the question’s action(s) will be applied to all particles, not just the one which passed the question.
Question 对象中的标准问题之一是布尔输入问题。然而,这是有限的,因为它不是作为一个粒子特定的问题,而是一个测试电影4D 的其他一些参数。问题是,如果你测试一个粒子变量,比如速度,而最后一个被测试的粒子通过了测试,那么问题的行动将适用于所有的粒子,而不仅仅是通过问题的粒子。
Using custom data you can easily add a particles-specific boolean test. To do this:
使用自定义数据,你可以轻松地添加粒子特定的布尔测试:
- Add a custom data item and give it a name such as ‘bool’. 添加一个自定义数据项,并为其命名为“ bool”
- Make it an integer type and set its initial value to zero. 将其设置为整数类型并将其初始值设置为零
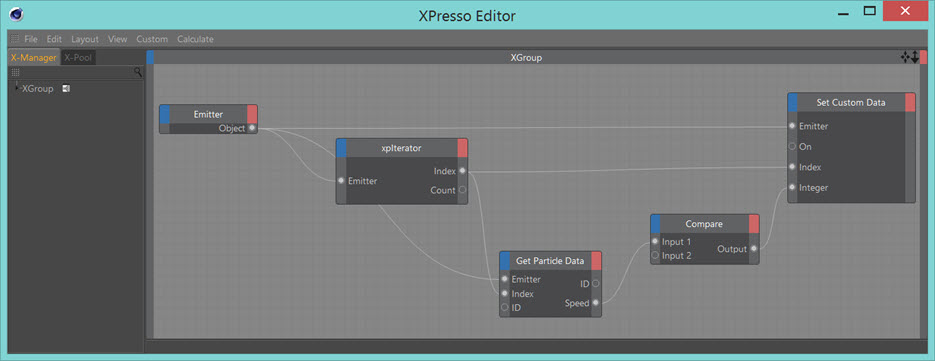
- In an Xpresso node, set up a node tree like this: 在 Xpresso 节点中,像这样建立一个节点树:
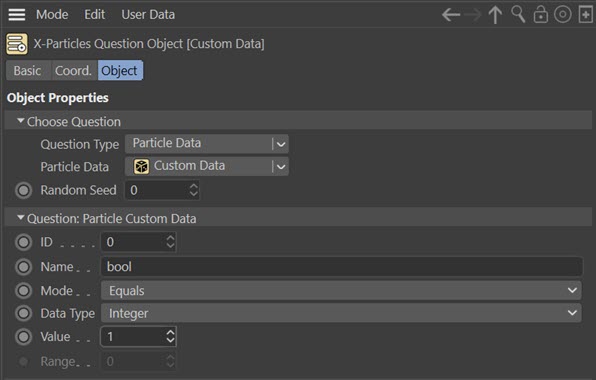
- Add a 加一个Custom Data question 自定义数据问题 and set it like this: 然后设置成这样:
How it works | 它是如何工作的
For each particle, the speed is obtained by the Get Particle Data node, and compared to whatever value is set in the Compare node. The output, either 1 (true) or 0 (false) is piped into the Set Custom Data node, which then sets that value into the particle.
对于每个粒子,由 Get Particle Data 节点获得速度,并与比较节点中设置的任何值进行比较。输出(1(true)或0(false)通过管道输出到 Set Custom Data 节点,然后该节点将该值设置为粒子。
In the Custom Data question, the value of the custom data item in the particle is tested and compared to the ‘Value’ parameter (which is set to 1), and if that question passes, any actions are executed - but only for that particle.
在自定义数据问题中,测试粒子中自定义数据项的值,并将其与“ Value”参数(设置为1)进行比较,如果该问题通过,则执行任何操作——但仅针对该粒子。
Clearly there are simpler ways to test particle speed, but you can use custom data to set up any kind of particle-specific boolean value.
显然有更简单的方法来测试粒子速度,但是您可以使用自定义数据来设置任何种类的粒子特定的布尔值。

若有收获,就点个赞吧
0 人点赞
