中间件
1. 前言
这节我们一起来学习 Koa 的中间件使用方式,实现原理,中间件使用是 Koa 在工作中最常使用的场景,能把我们很多重复的工作抽象出来,减少工作量,同时让整体代码健壮性大大提高,在工作中我们经常会遇到对所有的请求 Request,Response 进行拦截处理,比如统计接口耗时,每个接口调用次数,Resonse Gzip 压缩等,这类全局的拦截处理,都能很好的用中间件解决,本章需要掌握的重点有:
- 理解洋葱模型
- 掌握中间件的基本使用
- 了解中间件实现原理
平时使用中间件最容易出错的地方是异步中间件使用是 next 方法 忘记 await 了,这个点需要注意。
本章中难点是中间件的原理理解,理解起来有困难的话,大家可以本地跑下代码,Debug 下代码运行逻辑,如果刚开始学习。 Koa,也可以不用深究这块知识,先在脑子有个印象,日后再学习。
2. 洋葱模型
讲中间件前必须得讲「洋葱模型」,Koa 的中间件的设计是基于「洋葱模型」。
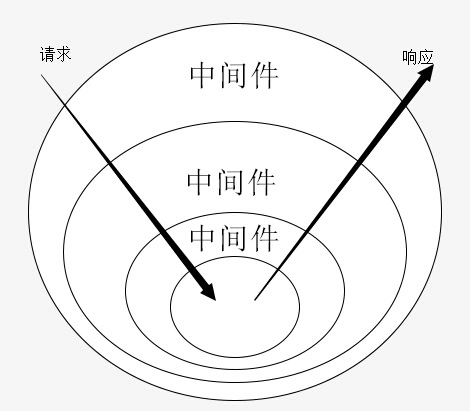
他和 Express 和其他常用的框架相比,最大的区别是一个中间件可以执行两次,不再是常规的自上而下去执行,我们看段Demo。
const Koa = require('koa');const app = new Koa();const PORT = 3000;app.use(async (ctx, next)=>{console.log(1)await next();console.log(1)});app.use(async (ctx, next) => {console.log(2)await next();console.log(2)})app.use(async (ctx, next) => {console.log(3)})app.listen(PORT);console.log(`http://localhost:3000`);
打印结果如下:
12321
从打印就过来看,每个函数先执行 next 前面的代码,再执行其他函数代码,其他执行完成后,再回来执行 next 后面的代码,这就是我们讲的洋葱模型。
3. 中间件概念
理解了中间件的概念后,我们来理解下中间件,中间件这个词,听起来很高大上,是一个通用的概念,并不是 Koa 独有,网上经常听见 中间件团队,感性的理解就是链接上游下游,经常我们会把很多通用的逻辑用中间件来封装,的举几个例子,大家来理解下(其实大家用 Redux这类库也是有中间件的概念,思路是一样的)。
比如我们有很多接口用用户权限校验,写些伪代码如下:
// 用户权限校验,假设返回 false 表示没有权限,true 为有权限,都是些伪代码function auth() {}app.get("/api/getOrderList",(request,res) => {const result = auth()if(!result){throw new Error("用户没有权限")}})app.get("/api/orderDetail/:id",(request,res) => {const result = auth()if(!result){throw new Error("用户没有权限")}})
大家可以看到,这样写起来,每个 api 对应的接口都要来写一遍,会疯掉,而且代码也不好看,那我们希望,进入接口前,先去执行认证这个模块。

这样我们在 auth 这个方法里把认证相关逻辑处理下,是不是整个代码健壮行就提升不少,耦合性也大大降低,以后要改认证的逻辑就只需要在 auth 方法里处理就好。
const auth = (ctx, next) => {const user = ctx.getCurrentUser() // 假设有这么个方法if(!user.login){throw new Error(" need login")}next();}
4. 中间件使用
4.1 基本语法
先来个最简单的 demo。
const Koa = require('koa');const app = new Koa();app.use( (ctx, next) => {console.log('the first middleware')next()});app.listen(3000);
可以看到中间件创建起来还是非常简洁的,首先 通过 app.use(ctx, next) 方法创建,有 2 个参数,一个是上下文 ctx,一个是 next 函数,next 函数的作用是串联起所有的中间件,初学的时候可以不用深究,知道这样用就行,随着对 Koa 越来越熟悉,可以再翻回来看,那还有异步的中间件,异步中间件声明如下:
app.use( async (ctx, next) => {console.log('the first middleware')await next()});
通过 async 和 await 就组成了异步中间件,这样在中间件里就可以做异步处理了, async 和 await 用起来非常方便,Node.js 也支持的非常好,同步功能也能实现,所以我们工作中更多的使用异步中间件。
异步中间件大家需要注意的是,next 返回的是个 Promsie 对象,所以一定要在 用 await next() 才行,不然 不执行。
那我们前面介绍了 Koa 的中间件是基于「洋葱模型」,所以在使用的时候,一般有下面 4 种方式。
4.2 next 前面执行逻辑
比如我们需要个中间件是打印每个请求进来的 Url,Http Method,来分析日志。
const logger = (ctx, next) => {console.log(`${Date.now()} ${ctx.request.method} ${ctx.request.url}`)next()}app.use(logger)
对于类似这种我们只需要在请求进来的时候做处理,就把逻辑写到 next 的前面就好。
4.3 next 后面执行逻辑
比如我们在开发中经常会遇到一个问题是,对 Http 请求做 Gzip 压缩,这样浏览器请求很更快,我们想象下,这个中间件,只需要在 Response 这个层面做处理就好,代码如下:
const gzip = async (ctx, next) => {await next() // 在 next 后面执行// 后续中间件执行完成后将响应体转换成 gziplet body = ctx.bodyif (!body) return// 支持 options.thresholdif (options.threshold && ctx.length < options.threshold) returnif (isJSON(body)) body = JSON.stringify(body)// 设置 gzip body,修正响应头const stream = zlib.createGzip() // zlib 第三方压缩库,这里我就不引用了stream.end(body)ctx.body = streamctx.set('Content-Encoding', 'gzip')}app.use(gzip)
类似上面这样的只需要处理 Response 的中间件,就写在 next 后面。
4.4 next 前后都用执行逻辑
假设我们有这样的需求,需要统计每个请求消耗的时间(对比在页面里,我们看某个方法执行来多长时间),那我们需要在 请求进来打印一个时间,请求出去打印一个时间,2个之差就是我们需要的了,代码如下:
const logger = async (ctx, next) => {const startTime = Date.now();console.log(`${startTime} ${ctx.request.method} ${ctx.request.url}`)await next()console.log(`use time: ${Date.now() - startTime} `)}app.use(logger)
4.5 不执行后面逻辑
大家想一下,我最开始举的权限的例子,假设某个请求进来,在权限这个中间件里判断当前这个用户就是没有权限,那我们应该结束这个请求,直接返回错误信息给用户。
app.use(async (ctx, next) => {if (await checkUser(ctx)) {await next();} else {ctx.response.body = 'no permission';ctx.response.status = 403;}});
在 else 这个地方,我们没有调用 await next() 这个时候后续的都不会执行,直接返回,这种场景也是挺场景的。
上面我们总结了中间件 4 种常用的方法,基本覆盖了平常使用的场景,大家可以好好看看。
5. 多个中间件(洋葱模型)
很多时候,我们的的项目会有很多个中间件,这里就会出现执行顺序的问题,那中间件的设计原则是,谁在前面先执行谁,举个例子(记得翻看之前的洋葱模型)。
const one = (ctx, next) => {console.log('>> one')next()console.log('<< one')}const two = (ctx, next) => {console.log('>> two')next()console.log('<< two')}const three = (ctx, next) => {console.log('>> three')next();console.log('<< three')}app.use(one)app.use(two)app.use(three)结果如下>> one>> two>> three<< three<< two<< one
上面的代码的执行步骤是 :
- 最外层的中间件首先执行。
- 调用next函数,把执行权交给下一个中间件。
… - 最内层的中间件最后执行。
- 执行结束后,把执行权交回上一层的中间件。
… - 最外层的中间件收回执行权之后,执行 next 函数后面的代码。
注释中的执行过程移出来了,这样更加直观。
6. 实现原理
在讲实现原理之前,我们可以思考下,假设是你,你会怎么去设计一个中间件系统,最简单的就是每个请求过来之前先执行中间件代码,类似下面这样:
function compose(middlewareArray){return function (context, next){middlewareArray.map(fn => fn(context))next()}}const middleware1 = () => {console.log(1)}const middleware2 = () => {console.log(2)}compose([middleware1, middleware2],function(context){console.log('next')})
这是个最简单的 Request 中间件,还不支持异步,本质就是 callback 回调。
那我们看看Koa是怎么实现的,学习下它的思想。
// middleware 是一个函数的集合,函数也就是我们的各种中间件.function compose (middleware) {// 判断中间件数组是否符合要求if (!Array.isArray(middleware)) throw new TypeError('Middleware stack must be an array!')for (const fn of middleware) {if (typeof fn !== 'function') throw new TypeError('Middleware must be composed of functions!')}/*** @param {Object} context* @return {Promise}* @api public*/return function (context, next) {// last called middleware #let index = -1return dispatch(0)function dispatch (i) {if (i <= index) return Promise.reject(new Error('next() called multiple times'))index = ilet fn = middleware[i] // 查找当前的中间件// 如果当前中间件是最后一个 那么设定next为当前中间件if (i === middleware.length) fn = nextif (!fn) return Promise.resolve()try {// 执行当前中间件,并且设定next为下一个中间件.return Promise.resolve(fn(context, function next () {return dispatch(i + 1)}))} catch (err) {return Promise.reject(err)}}}}const one = (ctx, next) => {console.log('>> one')next()console.log('<< one')}const two = (ctx, next) => {console.log('>> two')next()console.log('<< two')}const three = (ctx, next) => {console.log('>> three')next()console.log('<< three')}const middleware = [one, two, three]compose(middleware)().then()
代码执行结果要不要贴一下,有助于学生更容易理解。
上面这段代码,就是 Koa 中间件的核心逻辑了,第一次进入的时候,执行第一个中间件,然后设定第二个中间件为,传入第一个中间件的 next 函数,然后递归下去,直到最后一个中间件执行结束后,在逐个释放中间件函数,直到最后一个中间件的时候,next 为空,下一轮会直接返回 Promise.resolve,可能初学者第一次看有些懵,再拆分下:
function midware() {const three = (ctx, next) => {console.log('>> three')next()console.log('<< three')}const two = (ctx, three) => {console.log('>> two')three()console.log('<< two')}return Promise.resolve((ctx,two ) => {console.log('>> one')two()console.log('<< one')})}
这样看起来就好理解了,建议初学者把这 2 段代码 copy 到控制台执行一遍,理解下逻辑,理解这段代码就理解 类似这种中间件的设计技巧,假设你一次看不太明白,不用死磕,不影响你是用 Koa ,先头脑里有个概念,先看其他,后面再看。
再抛个问题出来,上面的举例的中间件都是作用在所有请求上面,那要是我只想在某一个请求上用某个中间件应该怎么处理。
比如有个请求是上传文件的,需要一个中间件处理这个一个请求,应该怎么办,这里卖个关子,大家可以去看 Koa 的路由章节。
7. 小结
这节把 「洋葱模型」,中间件使用,设计做了梳理。

若有收获,就点个赞吧
0 人点赞
