从pull镜像到启动容器
完成测试环境初始化后,重新查看/var/lib/containerd目录:
tree /var/lib/containerd/ -L 2/var/lib/containerd/├── io.containerd.content.v1.content│ └── ingest├── io.containerd.metadata.v1.bolt│ └── meta.db├── io.containerd.runtime.v1.linux├── io.containerd.runtime.v2.task├── io.containerd.snapshotter.v1.btrfs├── io.containerd.snapshotter.v1.native│ └── snapshots├── io.containerd.snapshotter.v1.overlayfs│ └── snapshots└── tmpmounts
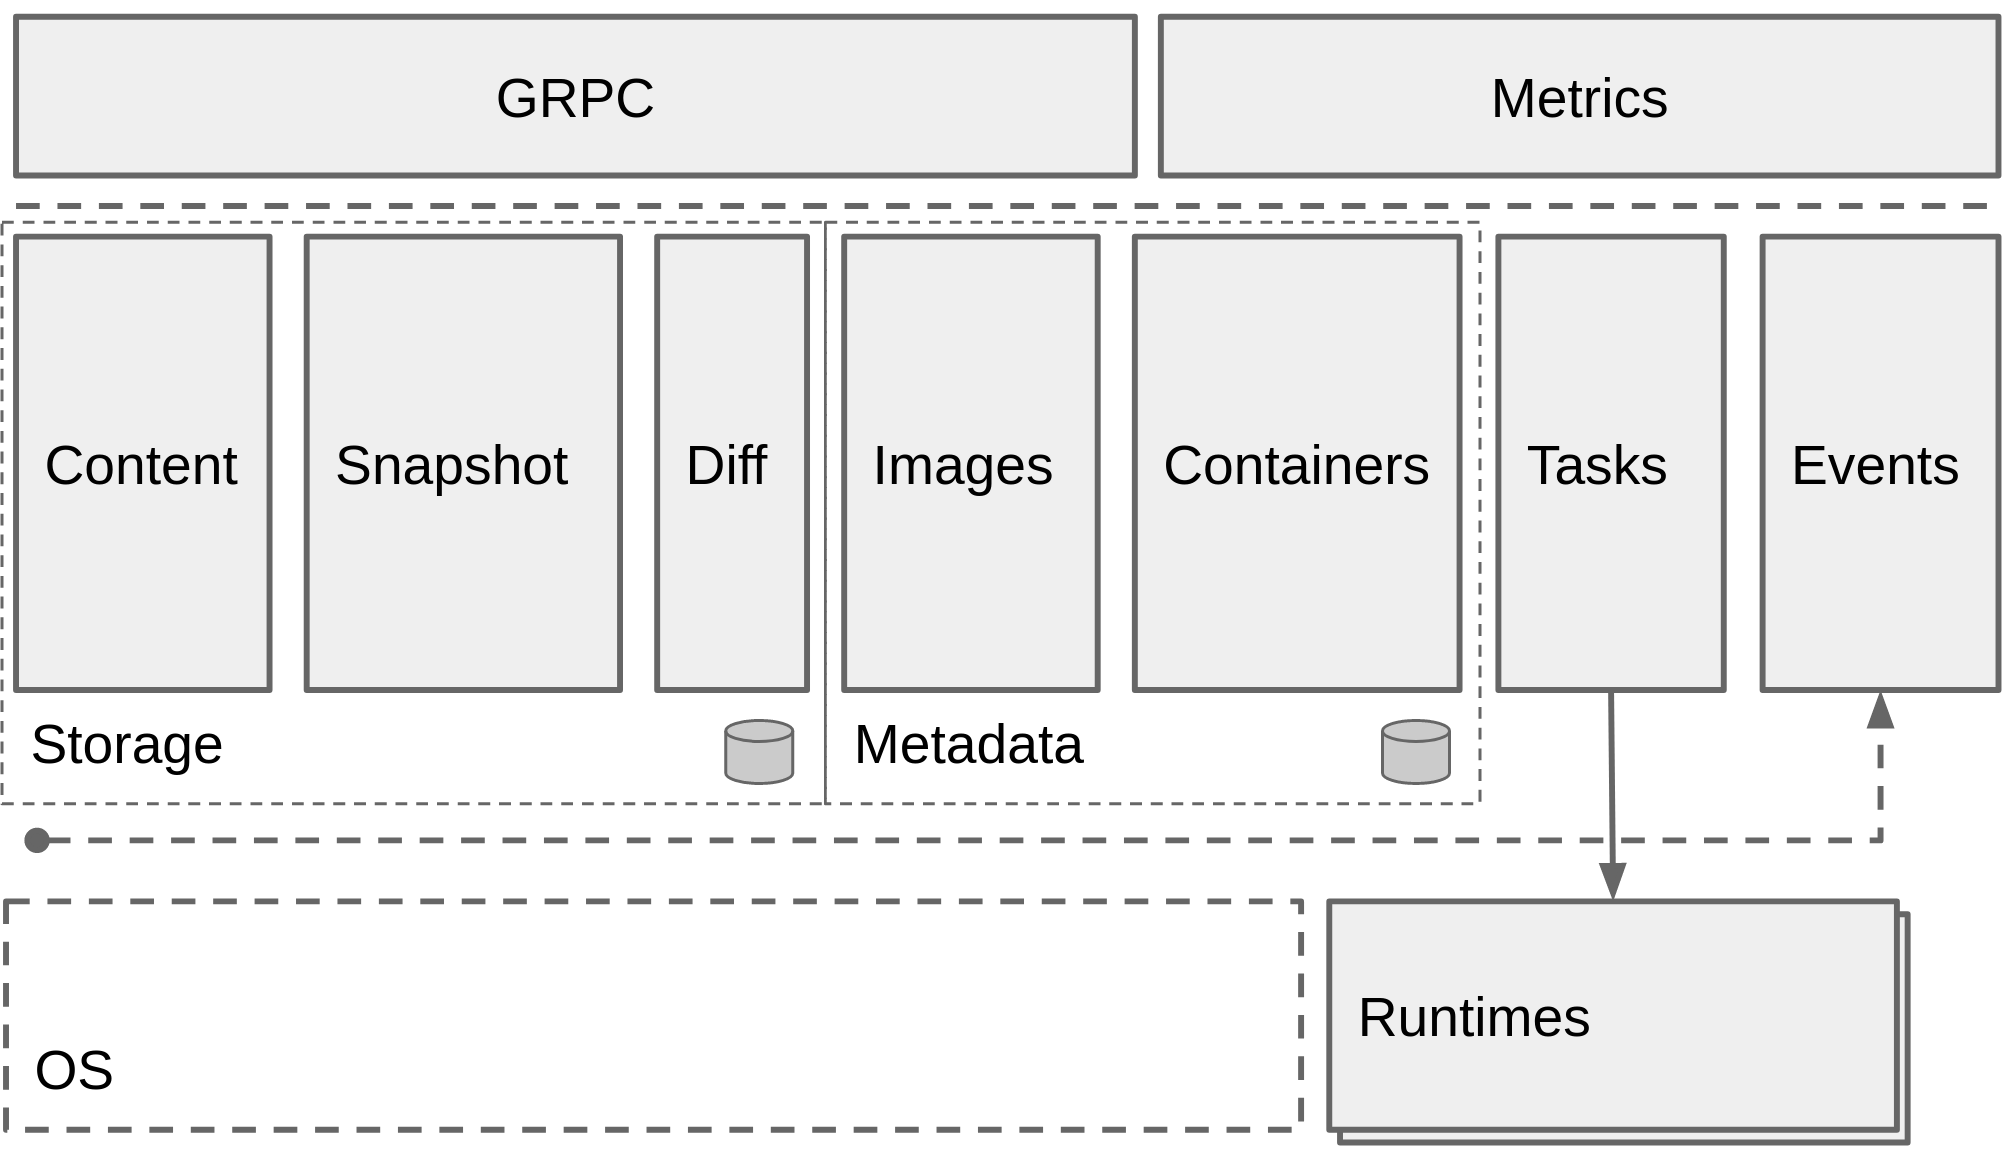
/var/lib/containerd的各个子目录很清晰的对应到了content, snapshot, metadata和runtime,和containerd的架构示意图中的子系统和组件上:
/var/lib/containerd下各个子目录的名称也可以对应到使用ctr plugin ls查看打印的部分插件名称,实际上这些目录是Containerd的插件用于保存数据的目录,每个插件都可以有自己单独的数据目录,Containerd本身不存储数据,它的所有功能都是通过插件实现的。
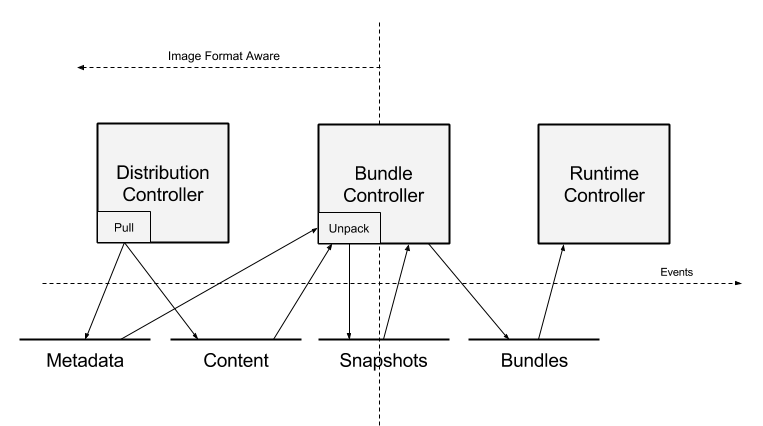
下面按照下面containerd的数据流图,依次执行从pull镜像、启动容器、在容器中创建一个文件步骤,并观察containerd的数据目录的变化。
先pull一个镜像:
nerdctl pull redis:alpine3.13docker.io/library/redis:alpine3.13: resolved |++++++++++++++++++++++++++++++++++++++|index-sha256:eaaa58f8757d6f04b2e34ace57a71d79f8468053c198f5758fd2068ac235f303: done |++++++++++++++++++++++++++++++++++++++|manifest-sha256:b7cb70118c9729f8dc019187a4411980418a87e6a837f4846e87130df379e2c8: done |++++++++++++++++++++++++++++++++++++++|config-sha256:1690b63e207f6651429bebd716ace700be29d0110a0cfefff5038bb2a7fb6fc7: done |++++++++++++++++++++++++++++++++++++++|layer-sha256:6ab1d05b49730290d3c287ccd34640610423d198e84552a4c2a4e98a46680cfd: done |++++++++++++++++++++++++++++++++++++++|layer-sha256:8cc52074f78e0a2fd174bdd470029cf287b7366bf1b8d3c1f92e2aa8789b92ae: done |++++++++++++++++++++++++++++++++++++++|layer-sha256:aa7854465cce07929842cb49fc92f659de8a559cf521fc7ea8e1b781606b85cd: done |++++++++++++++++++++++++++++++++++++++|layer-sha256:8173c12df40f1578a7b2dfbbc0034a4fbc8ec7c870fd32b9236c2e5e1936616a: done |++++++++++++++++++++++++++++++++++++++|layer-sha256:540db60ca9383eac9e418f78490994d0af424aab7bf6d0e47ac8ed4e2e9bcbba: done |++++++++++++++++++++++++++++++++++++++|layer-sha256:29712d301e8c43bcd4a36da8a8297d5ff7f68c3d4c3f7113244ff03675fa5e9c: done |++++++++++++++++++++++++++++++++++++++|elapsed: 16.4s total: 7.7 Mi (481.5 KiB/s)
从上面命令的执行过程来看总共pull了1个index, 1个config, 1个manifest和6个layer。
io.containerd.metadata.v1.bolt/meta.db是boltdb文件,存储了对images和bundles的持久化引用。 boltdb是一个嵌入式的key/value数据库,containerd的源码文件https://github.com/containerd/containerd/blob/master/metadata/buckets.go头部的注释描述了db schema数据结构。
// keys.// ├──version : <varint> - Latest version, see migrations// └──v1 - Schema version bucket// ╘══*namespace*// ├──labels// │ ╘══*key* : <string> - Label value// ├──image// │ ╘══*image name*// │ ├──createdat : <binary time> - Created at// │ ├──updatedat : <binary time> - Updated at// │ ├──target// │ │ ├──digest : <digest> - Descriptor digest// │ │ ├──mediatype : <string> - Descriptor media type// │ │ └──size : <varint> - Descriptor size// │ └──labels// │ ╘══*key* : <string> - Label value// ├──containers// │ ╘══*container id*// │ ├──createdat : <binary time> - Created at// │ ├──updatedat : <binary time> - Updated at// │ ├──spec : <binary> - Proto marshaled spec// │ ├──image : <string> - Image name// │ ├──snapshotter : <string> - Snapshotter name// │ ├──snapshotKey : <string> - Snapshot key// │ ├──runtime// │ │ ├──name : <string> - Runtime name// │ │ ├──extensions// │ │ │ ╘══*name* : <binary> - Proto marshaled extension// │ │ └──options : <binary> - Proto marshaled options// │ └──labels// │ ╘══*key* : <string> - Label value// ├──snapshots// │ ╘══*snapshotter*// │ ╘══*snapshot key*// │ ├──name : <string> - Snapshot name in backend// │ ├──createdat : <binary time> - Created at// │ ├──updatedat : <binary time> - Updated at// │ ├──parent : <string> - Parent snapshot name// │ ├──children// │ │ ╘══*snapshot key* : <nil> - Child snapshot reference// │ └──labels// │ ╘══*key* : <string> - Label value// ├──content// │ ├──blob// │ │ ╘══*blob digest*// │ │ ├──createdat : <binary time> - Created at// │ │ ├──updatedat : <binary time> - Updated at// │ │ ├──size : <varint> - Blob size// │ │ └──labels// │ │ ╘══*key* : <string> - Label value// │ └──ingests// │ ╘══*ingest reference*// │ ├──ref : <string> - Ingest reference in backend// │ ├──expireat : <binary time> - Time to expire ingest// │ └──expected : <digest> - Expected commit digest// └──leases// ╘══*lease id*// ├──createdat : <binary time> - Created at// ├──labels// │ ╘══*key* : <string> - Label value// ├──snapshots// │ ╘══*snapshotter*// │ ╘══*snapshot key* : <nil> - Snapshot reference// ├──content// │ ╘══*blob digest* : <nil> - Content blob reference// └──ingests// ╘══*ingest reference* : <nil> - Content ingest reference
可以看出主要记录了关于image, content, snapshots, containers的元数据。这里编写了一个简单的go程序读取打印一下当前boltdb中的内容,注意上面结构描述中的一些binary类型会打印成乱码。
package mainimport ("fmt""log"bolt "go.etcd.io/bbolt")func main() {{db, err := bolt.Open("/var/lib/continaerd/io.containerd.metadata.v1.bolt/meta.db", 0666, nil)if err != nil {log.Fatal(err)}defer db.Close()db.View(func(tx *bolt.Tx) error {b := tx.Bucket([]byte("v1")).Bucket([]byte("default"))space := ""travelBucket(b, space)return nil})}}func travelBucket(b *bolt.Bucket, space string) {space = space + "\t"b.ForEach(func(k, v []byte) error {if v == nil {fmt.Printf("%sbucket=%s: \n", space, k)travelBucket(b.Bucket([]byte(k)), space)} else {fmt.Printf("%skey=%s, value=%s\n", space, k, v)}return nil})}
到这里只需明白一点,meta.db中存储的是各个存储的元数据。那么实际pull的镜像被存储到哪了呢? 镜像内容被存储到了io.containerd.content.v1.content/blobs/sha256中:
ll io.containerd.content.v1.content/blobs/sha256total 106681690b63e207f6651429bebd716ace700be29d0110a0cfefff5038bb2a7fb6fc729712d301e8c43bcd4a36da8a8297d5ff7f68c3d4c3f7113244ff03675fa5e9c540db60ca9383eac9e418f78490994d0af424aab7bf6d0e47ac8ed4e2e9bcbba6ab1d05b49730290d3c287ccd34640610423d198e84552a4c2a4e98a46680cfd8173c12df40f1578a7b2dfbbc0034a4fbc8ec7c870fd32b9236c2e5e1936616a8cc52074f78e0a2fd174bdd470029cf287b7366bf1b8d3c1f92e2aa8789b92aeaa7854465cce07929842cb49fc92f659de8a559cf521fc7ea8e1b781606b85cdb7cb70118c9729f8dc019187a4411980418a87e6a837f4846e87130df379e2c8eaaa58f8757d6f04b2e34ace57a71d79f8468053c198f5758fd2068ac235f303
上面的9个文件,正好对应1个index文件, 1个config, 1个manifest文件和6个layer文件。index和manifest可以直接用cat命令查看,layer文件可以用tar解压缩。因此content中保存的是config, manifest, tar文件是OCI镜像标准的那套东西。
而实际上containerd也确实是将这些content中的tar解压缩到snapshot中。
查看/var/lib/containerd目录:
tree /var/lib/containerd/ -L 3/var/lib/containerd/├── io.containerd.content.v1.content│ ├── blobs│ │ └── sha256│ └── ingest├── io.containerd.metadata.v1.bolt│ └── meta.db├── io.containerd.runtime.v1.linux├── io.containerd.runtime.v2.task├── io.containerd.snapshotter.v1.btrfs├── io.containerd.snapshotter.v1.native│ └── snapshots├── io.containerd.snapshotter.v1.overlayfs│ ├── metadata.db│ └── snapshots│ ├── 1│ ├── 2│ ├── 3│ ├── 4│ ├── 5│ └── 6└── tmpmounts
可以看到io.containerd.snapshotter.v1.overlayfs/snapshots中多了名称为1~6的6个子目录,查看这6个目录:
tree /var/lib/containerd/io.containerd.snapshotter.v1.overlayfs/snapshots/ -L 3/var/lib/containerd/io.containerd.snapshotter.v1.overlayfs/snapshots/├── 1│ ├── fs│ │ ├── bin│ │ ├── dev│ │ ├── etc│ │ ├── home│ │ ├── lib│ │ ├── media│ │ ├── mnt│ │ ├── opt│ │ ├── proc│ │ ├── root│ │ ├── run│ │ ├── sbin│ │ ├── srv│ │ ├── sys│ │ ├── tmp│ │ ├── usr│ │ └── var│ └── work├── 2│ ├── fs│ │ ├── etc│ │ └── home│ └── work├── 3│ ├── fs│ │ ├── etc│ │ ├── lib│ │ ├── sbin│ │ ├── usr│ │ └── var│ └── work├── 4│ ├── fs│ │ ├── bin│ │ ├── etc│ │ ├── lib│ │ ├── tmp│ │ ├── usr│ │ └── var│ └── work├── 5│ ├── fs│ │ └── data│ └── work└── 6├── fs│ └── usr└── work
containerd的snapshotter的主要作用就是通过mount各个层为容器准备rootfs。containerd默认配置的snapshotter是overlayfs,overlayfs是联合文件系统的一种实现。 overlayfs将只读的镜像层成为lowerdir,将读写的容器层成为upperdir,最后联合挂载呈现出mergedir。
下面启动一个redis容器:
| nerdctl run -d —name redis redis:alpine3.13 |
|---|
可以看到io.containerd.snapshotter.v1.overlayfs/snapshots中多了名称为7的目录:
tree /var/lib/containerd/io.containerd.snapshotter.v1.overlayfs/snapshots/ -L 2/var/lib/containerd/io.containerd.snapshotter.v1.overlayfs/snapshots/├── 1│ ├── fs│ └── work├── 2│ ├── fs│ └── work├── 3│ ├── fs│ └── work├── 4│ ├── fs│ └── work├── 5│ ├── fs│ └── work├── 6│ ├── fs│ └── work└── 7├── fs└── work
可以使用mount命令查看容器挂载的overlayfs的RootFS:
mount | grep /var/lib/containerdoverlay on /run/containerd/io.containerd.runtime.v2.task/default/8102f7fbee26792830e54e80b3488714ac559e092c59beb2e311cf8e88f475d6/rootfs type overlay (rw,relatime,lowerdir=/var/lib/containerd/io.containerd.snapshotter.v1.overlayfs/snapshots/6/fs:/var/lib/containerd/io.containerd.snapshotter.v1.overlayfs/snapshots/5/fs:/var/lib/containerd/io.containerd.snapshotter.v1.overlayfs/snapshots/4/fs:/var/lib/containerd/io.containerd.snapshotter.v1.overlayfs/snapshots/3/fs:/var/lib/containerd/io.containerd.snapshotter.v1.overlayfs/snapshots/2/fs:/var/lib/containerd/io.containerd.snapshotter.v1.overlayfs/snapshots/1/fs,upperdir=/var/lib/containerd/io.containerd.snapshotter.v1.overlayfs/snapshots/7/fs,workdir=/var/lib/containerd/io.containerd.snapshotter.v1.overlayfs/snapshots/7/work)
可以看出: snapshots/6/fs, snapshots/5/fs…snapshots/1/fs为lowerdir,snapshots/7/fs为upperdir。 最终联合挂载合并呈现的目录为/run/containerd/io.containerd.runtime.v2.task/default/8102f7fbee26792830e54e80b3488714ac559e092c59beb2e311cf8e88f475d6/rootfs即为容器的rootfs,ls查看这个目录可以看到一个典型的linux系统目录结构:
ls /run/containerd/io.containerd.runtime.v2.task/default/8102f7fbee26792830e54e80b3488714ac559e092c59beb2e311cf8e88f475d6/rootfsbin data dev etc home lib media mnt opt proc root run sbin srv sys tmp usr var
我们exec到容器中去,并在/root目录中创建一个hello文件:
| nerdctl exec -it redis sh echo hello > /root/hello |
|---|
在宿主机上的upperdir中可以找到这个文件。在容器中对文件系统做的改动都会体现在upperdir中:
| ls /var/lib/containerd/io.containerd.snapshotter.v1.overlayfs/snapshots/7/fs/root/ hello |
|---|
containerd的Snapshotter
最后来看一下containerd的Snapshot组件。Snapshot为containerd实现了Snapshotter用于管理文件系统上容器镜像的快照和容器的rootfs挂载和卸载等操作功能。 snapshotter对标Docker中的graphdriver存储驱动的设计。contaienrd在设计上使用snapshotter新模式取代了docker中的graphdriver,其核心开发人员也在其博客中 Where are containerd’s graph drivers?中介绍了为什么要这么做。

