怎么安装查百度。
可视化神经网络图
第一步
代码部分:
import torchimport torch.nn as nnimport torch.nn.functional as Fimport torchvisionfrom tensorboardX import SummaryWriterclass Net(nn.Module):def __init__(self):super(Net, self).__init__()self.conv1 = nn.Conv2d(1, 10, kernel_size=5)self.conv2 = nn.Conv2d(10, 20, kernel_size=5)self.conv2_drop = nn.Dropout2d()self.fc1 = nn.Linear(320, 50)self.fc2 = nn.Linear(50, 10)self.bn = nn.BatchNorm2d(20)def forward(self, x):x = F.max_pool2d(self.conv1(x), 2)x = F.relu(x) + F.relu(-x)x = F.relu(F.max_pool2d(self.conv2_drop(self.conv2(x)), 2))x = self.bn(x)x = x.view(-1, 320)x = F.relu(self.fc1(x))x = F.dropout(x, training=self.training)x = self.fc2(x)x = F.softmax(x, dim=1)return x#定义输入input = torch.rand(32, 1, 28, 28)#实例化神经网络model = Net()#将model保存为graphwith SummaryWriter(log_dir='logs',comment='Net') as w:w.add_graph(model, (input, ))
第二步
终端cd到该目录下(pycharm直接Terminal即可),输入下图中命令
第三步
在Edge浏览器输入http://localhost:6006即可
若出现”TensorFlow installation not found - running with reduced feature set“的报错,查看下面博客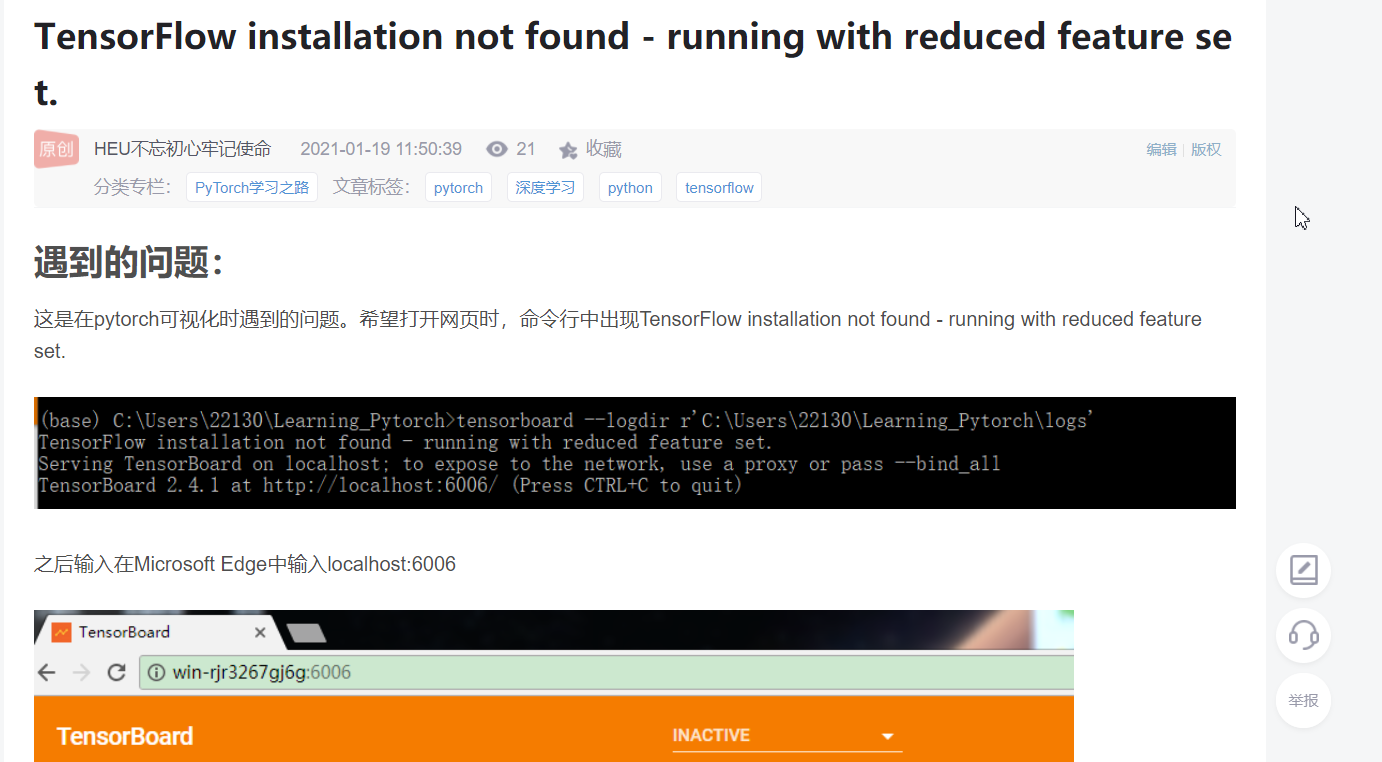
详细参考文章
如何抹除旧的calar
到日志文件夹里面删除对应的日志文件即可。

若有收获,就点个赞吧
0 人点赞
