一、Mybatis介绍

MyBatis 本是apache的一个开源项目iBatis, 2010年这个项目由apache software foundation 迁移到了google
code,并且改名为MyBatis 。2013年11月迁移到Github。
iBATIS一词来源于”internet”和”abatis”的组合,是一个基于Java的持久层框架。iBATIS提供的持久层框架包括SQL
Maps和Data Access Objects(DAOs)
MyBatis 是一款优秀的持久层框架,它支持定制化 SQL、存储过程以及高级映射。MyBatis 避免了几乎所有的
JDBC 代码和手动设置参数以及获取结果集。MyBatis 可以使用简单的 XML 或注解来配置和映射原生信息,将接口
和 Java 的 POJOs(Plain Ordinary Java Object,普通的 Java对象)映射成数据库中的记录。
二、搭建Mybatis
2.1.添加驱动包(mysql.jar和mybatis的jar包)
<dependency><groupId>org.mybatis</groupId><artifactId>mybatis</artifactId><version>3.4.6</version></dependency><dependency><groupId>mysql</groupId><artifactId>mysql-connector-java</artifactId><version>5.1.40</version></dependency>
2.2.添加配置文件:src/mybatis-confifig.xml
连接数据库的配置文件的作用:
(1).指定连接数据库的url,username,password,driver
(2).由框架自动获取连接
(3).指定了事务的管理对象
配置文件中default要和id值相同,default表示默认访问环境,
但是也可以自己指定使用哪个id数据源,代码如下:
SqlSession session= new SqlSessionFactoryBuilder().build(r,"a2").openSession();
<?xml version="1.0" encoding="UTF-8"?><!DOCTYPE configuration PUBLIC "-//mybatis.org//DTD Config 3.0//EN""http://mybatis.org/dtd/mybatis-3-config.dtd"><configuration><environments default="development"><environment id="development"><transactionManager type="JDBC"/><dataSource type="POOLED"><property name="driver" value="com.mysql.jdbc.Driver"/><property name="url" value="jdbc:mysql://localhost:3306/dbName"/><property name="username" value="root"/><property name="password" value="123456"/></dataSource></environment></environments><!-- 指定maper文件的路径(maven项目从resources源文件夹下找资源)--><mappers><mapper resource="包名/mapper文件名"/></mappers></configuration>
2.3.创建实体类和接口类
2.4.添加mapper文件
注:在mapper文件中保存sql语句
<mapper namespace="接口的完整路径">
<insert id="方法名" parameterType="参数类型">
//sql
</insert>
<select id="方法名" resultType="查询后的返回值类型">
//sql语句---注:sql语句没有分号
</select>
</mapper>
2.5.修改mybatis的配置文件,让该配置文件知道mapper文件的存在
2.6.获得SqlSession,通过该对象进行数据的操作
//1.加载配置文件
Reader r=Resources.getResourceAsReader("mybatis-config.xml");
//2.创建SqlSessionFactoryBuilder对象
SqlSessionFactoryBuilder builder= new SqlSessionFactoryBuilder();
//3.得到session工厂
SqlSessionFactory factory=builder.build(r);
//4.得到session
SqlSession session= factory.openSession();
//5.调取sql语句,insert("方法的完整路径"),路径=namespace+id
int rs=session.insert("dao.EmpDao.insertEmp",e);
session.commit();
2.7配置数据源
SqlSessionFactory build = builder.build(reader,"a2");//a2数据源名
三、Mybatis实现CRUD
mapper文件中参数的读取:
单个基本类型参数或 String 类型:
mapper读取参数:#{参数名(也可以是自定义名称)}
参数类型为对象类型时,读取参数的语法: #{对象中的属性名}
insert,delete,update,select中的parameterType参数可以省略
多个参数值的情况?
将参数封装到map集合中,再将map集合传递给mapper文件
取值的时候,#{map的key值}
处理结果没有和实体类做对应的时候,可以返回map类型
<select id="jisuan" resultType="map">
在做查询时,如果需要将查询的结果和实体类属性自动对应的话,要求:属性名=列名
添加:session.insert(“namespace+id”[,传递给sql的参数值]);
修改:session.update(“namespace+id”[,传递给sql的参数值]);
删除:session.delete(“namespace+id”[,传递给sql的参数值]);
单行:session.selectOne(“namespace+id”[,传递给sql的参数值]);
多行:session.selectList(“namespace+id”[,传递给sql的参数值]);
处理多个聚合函数:使用map作为方法的返回值,默认key是列名
注意:增删改的时候需要提交事务
session.commit();
session.rollback();
查询的时候要添加resultType属性
调试接口和mapper.xml文件的插件:
Free Mybatis plugin 插件
四、省略实现类
Reader r=Resources.getResourceAsReader("mybatis.xml");
SqlSession session=
new SqlSessionFactoryBuilder().build(r).openSession();
//参数是接口的class类
StudentDao dao=session.getMapper(StudentDao.class);
五、ThreadLocal处理sqlSession
介绍:ThreadLocal是什么呢?其实ThreadLocal并非是一个线程的本地实现版本,它并不是一个Thread,而是
threadlocalvariable(线程局部变量)。也许把它命名为ThreadLocalVar更加合适。线程局部变量(ThreadLocal)其实
的功用非常简单,就是为每一个使用该变量的线程都提供一个变量值的副本,是Java中一种较为特殊的线程绑定机
制,是每一个线程都可以独立地改变自己的副本,而不会和其它线程的副本冲突。
示例:
class Test{
private ThreadLocal<String> str = new ThreadLocal<String>();
private List<String> list = new ArrayList<String>();
class A extends Thread {
public void run() {
str.set("zhangsan");
System.out.println("A...." + str.get());
list.add("xxx");
System.out.println("A<<<"+list.get(0));
}}
class B extends Thread {
public void run() {
System.out.println("B...." + str.get());
list.add("xxx");
System.out.println("B<<<"+list.get(0));
}}}
测试代码:
Test2 t=new Test2();
Test2.A a=t.new A();
Test2.B b=t.new B();
a.start();
b.start();
SessionUtil类:
public class mybatisUtil {
private static ThreadLocal<SqlSession> threadLcoal = new ThreadLocal<SqlSession>();
private static SqlSessionFactory SqlSessionFactory;
/**
*
* 加载配置文件
*/
static{
try{
Reader reader = Resources.getResourceAsReader("mybatis.cfg.xml");
SqlSessionFactory = new SqlSessionFactoryBuilder().build(reader);
}catch(IOException e){
e.printStackTrace();
throw new RuntimeException(e);
}
}
/**
*
* 获取SqlSession
*
* @return
*/
public static SqlSession getSqlSession(){
//从当前线程获取
SqlSession sqlSession = threadLcoal.get();
if(sqlSession == null){
sqlSession = SqlSessionFactory.openSession();
//将sqlSession与当前线程绑定
threadLcoal.set(sqlSession);
}
return sqlSession;
}
/**
* 关闭Session
*/
public static void closeSqlSession(){
//从当前线程获取
SqlSession sqlSession = threadLcoal.get();
if(sqlSession != null){
sqlSession.close();
threadLcoal.remove();
}
}
}
六、给类起别名
<!—给实体类起别名 -->
<typeAliases>
<!--
<typeAlias alias="u" type="com.yhp.bean.Users">
</typeAlias>-->
<!--指定哪些包的类可以使用别名,默认别名:类名首字母小写(实际使用的时候,全部小写也可以做结果映射) -->
<package name="bean"></package>
</typeAliases>
七、获得新增数据的id
适用于可以自增的主键列上
<insert useGeneratedKeys="true" keyProperty="userid">
八、log4j显示sql语句
log4j 日志记录
步骤:添加jar包和log4j.properties文件
<dependency>
<groupId>org.slf4j</groupId>
<artifactId>slf4j-api</artifactId>
<version>1.7.5</version>
</dependency>
<dependency>
<groupId>org.slf4j</groupId>
<artifactId>slf4j-log4j12</artifactId>
<version>1.7.12</version>
</dependency>
<dependency>
<groupId>log4j</groupId>
<artifactId>log4j</artifactId>
<version>1.2.17</version>
</dependency>
log4j.properties
log4j.rootLogger=DEBUG, Console
log4j.appender.Console=org.apache.log4j.ConsoleAppender
log4j.appender.Console.layout=org.apache.log4j.PatternLayout
log4j.appender.Console.layout.ConversionPattern=%d [%t] %-5p [%c] - %m%n
log4j.logger.java.sql.ResultSet=INFO
log4j.logger.org.apache=INFO
log4j.logger.java.sql.Connection=DEBUG
log4j.logger.java.sql.Statement=DEBUG
log4j.logger.java.sql.PreparedStatement=DEBUG
九、Mybatis复杂查询
9.1 in 查询
foreach标签中属性说明:
item 表示集合中每一个元素进行迭代时的别名,等同于c 标签中的var
index 指定一个名字,用于表示在迭代过程中,每次迭代到的位置,可以不写
open 表示该语句以什么开始,
separator 表示在每次进行迭代之间以什么符号作为分隔符,
close 表示以什么结束,
注意:在使用foreach 的时候最关键的也是最容易出错的就是collection 属性,
collection该属性是必须指定的
list 时取值list,数组时取值array,map 时取值map 的key 值
(1)参数是list
<select id="findall" resultType="bean.Emp">
select * from emp where empno in
<foreach collection="list" index="b" item="a" open="("
separator="," close=")" >
#{a}
</foreach>
</select>
(2)参数是数组
<select id="findall" resultType="bean.Emp">
select * from emp where empno in
<foreach collection="array" index="b" item="a" open="("
separator="," close=")" >
#{a}
</foreach>
</select>
(3)参数Map
<select id="findall" resultType="bean.Emp">
select * from emp where empno in
<foreach collection="keya" index="b" item="a" open="(" separator="," close=")" >
#{a}
</foreach>
</select>
注意:parameterType 的值可以省略
传的值:
Map map=new HashMap();
map.put(“keya”, list1);
9.2 模糊查询
(1)模糊查+分页
如果传递的参数是多个时?———使用Map 集合
String sql;
StringBuffffer sql;//动态sql的保存
(2)动态sql
模糊查询:
<if test="属性名!=属性值">
and ename like '${属性名}'
</if>
注意:test属性中读取属性值时直接写属性名
模糊查询读取属性时使el 表达式,${属性名}
除以上位置外,都使用#{属性名}
多个条件时使用and,or 拼接
如果传递过来的是map类型,则test属性中写的是key
#{}:相当于占位符
#{id}:其中的id可以表示输入参数的名称,如果是简单类型名称可以任意
${}:表示拼接sql语句
value: 表 示 获 取 输 入 的 参 数 值 {}会引起SQL注入,一般情况下不推荐使用。
示例:
<if test="ename!=null and ename!=''">
and ename like '%${属性名}%'
</if>
或者:
and sname like "%"#{username}"%"
或者:
sname like concat(concat('%',#{username}),'%')


实例:
<select id="finde" resultType="student">
        select * from student where 1=1
        <if test="stuName!=null and stuName !=''">
            and  stuname like "%"#{stuName}"%"
        </if>
        <if test="studentNo!=null and studentNo!=''">
            and studentno=#{studentNo}
        </if>
    </select>
9.3 区间查询
between 开始值 and 结束值
列名 >=开始时间 and 列名<=结束时间
<if test="stu.endTime!=null and stu.endTime!=''">
and regdate <![CDATA[ <= ]]> #{stu.endTime}
</if>
9.4 resultMap
(1)处理单表关系
通过给列起别名,让别名=属性名,也可以实现数据对应
resultType=”指定返回值的类型”//当列名和属性名一致时使用
resultMap=”key 值” //1.当列名和属性名不一致 2.做多表查询时
mybatis 能实现的是单标的自动操作
<resultMap id="aaa" type="bean.Dept">
<!-- 可以手动指定列名和属性名的关系 ,非主键列使用result 标签,主键
列使用id 标签-->
<id property="dept_no" column="deptno"></id>
<result property="d_name" column="dname"/>
<result property="d_loc" column="loc"/>
</resultMap>
(2)处理多表关系
两表联查:一对多和多对一
注:如果是单表查询,select 中使用resultType 设置返回的类型即可
但是如果是多表联查,那么select 查询的结果需要单独使用resultMap 标签来
进行结果的映射
存的是集合的话使用Collection 子标签
存的是一方的话使用association 子标签
resultType 和resultMap 属性只能出现一个
格式:
一对多:
<resultMap type="" id="自定义名称">
<id property="id" column="dept_id" /><!--主键列-->
<result property="java 属性名" column="列名" />
<collection property="属性名" ofType="java 类型">
<id property="属性名" column="列名" />
<result property="属性名" column="列名" />
</collection>
</resultMap>
多对一:
<resultMap type="" id="">
<id property="" column="" />
<result property="" column="" />
<association property="" javaType="">
<id property="" column="" />
<result property="" column="" />
</association>
</resultMap>
JavaType和ofType都是用来指定对象类型的,但是JavaType是用来指定pojo中属性的类型,而ofType指定的是映
射到list集合属性中pojo的类型。
十、pageHelper分页
10.1方式1:
Mybatis使用RowBounds对象进行分页,它是针对ResultSet结果集执行的内存分页,而非物理分页。可以在sql内
直接书写带有物理分页的参数来完成物理分页功能,也可以使用分页插件来完成物理分页。
优缺点
物理分页每次都要访问数据库,逻辑分页只访问一次
物理分页占用内存少,逻辑分页相对较多
物理分页数据每次都是最新的,逻辑分页有可能滞后
rowBounds实现分页:
SqlSession sqlSession = new SqlSessionFactoryBuilder()
.build(Resources.getResourceAsReader("mybatis-config.xml"))
.openSession();
List<Users> usersList =
sqlSession.selectList("com.yhp.dao.UsersDao.findall",
null, new RowBounds(0, 3));//rowBounds(开始位置,显示条数)
for (Users users : usersList) {
System.out.println(users.getUsername());
}
sql语句:
<select id="findall" resultType="com.yhp.bean.Users">
select * from users
</select>
10.2方式2:使用分页插件
分页插件的基本原理是使用Mybatis提供的插件接口,实现自定义插件,在插件的拦截方法内拦截待执行的sql,然
后重写sql,根据dialect方言,添加对应的物理分页语句和物理分页参数。
示例:
<select id="findall" resultType="bean.Emp">
select * from emp
</select>
(1)导入jar 包
分页插件:pagehelper.jar
sql 解析工具:jsqlparser.jar
<dependency>
<groupId>com.github.pagehelper</groupId>
<artifactId>pagehelper</artifactId>
<version>5.1.6</version>
</dependency>
(2) 在MyBatis 的总体文件中配置插件
放到之前
<plugins>
<!-- PageHelper4.1.6 -->
<plugin interceptor="com.github.pagehelper.PageHelper">
<property name="dialect" value="mysql"/>
</plugin>
</plugins>
注意:插件5.1以后interceptor不同,并且不需要指定数据库名字
<plugins>
<plugin interceptor="com.github.pagehelper.PageInterceptor">
</plugin>
</plugins>
(3) 在执行查询之前设置
PageHelper.startPage(当前页,每页条数)
示例:
//分页查询(注意事项:设置分页的值一定要在查询之前)
//1.在工具类中指定页码值和显示条数
PageHelper.startPage(2,5);
//2.调取查询的方法,得到结果集
Student student1=new Student();
//student1.setStuname("aa");
// student1.setAddress1("昌平");
List<Student> list=dao.findall(student1);
//3.将list集合封装到PageInfo对象中
PageInfo pageInfo=new PageInfo(list);
List<Student> list2= pageInfo.getList();
//4.得到结果
for (Student student :list2) {
System.out.println(student.getStuname());
}
System.out.println("每页显示条数:"+pageInfo.getPageSize());
System.out.println("当前页的条数:"+pageInfo.getSize());
System.out.println("总条数:"+pageInfo.getTotal());
System.out.println("总页数:"+pageInfo.getPages());
System.out.println("上一页:"+pageInfo.getPrePage());
System.out.println("下一页:"+pageInfo.getNextPage());
System.out.println("当前页:"+pageInfo.getPageNum());
十一、缓存
缓存:
一级缓存
SqlSession 的缓存 ———>自动开启
二级缓存:
做到从不同的缓存中共享数据
SqlSessionFactory 的缓存 —->需要手动开启
映射配置文件中配置
<mapper namespace="接口路径">
<cache eviction="FIFO"
flushInterval="60000"
size="512"
readOnly="true"/>
</mapper>

<!--    说明:-->
<!--    eviction: 二级缓存中,缓存的对象从缓存中移除的策略,回收策略为先进先出-->
<!--    flflushInterval: 刷新缓存的事件间隔,单位:毫秒-->
<!--    size: 缓存对象的个数-->
<!--    readOnly: 是否是只读的-->
测试代码:
//不同qlSession,要同一个sqlSessionFactory
SqlSessionFactory factory= new SqlSessionFactoryBuilder()
.build(Resources.getResourceAsReader("mybatis-config.xml"));
SqlSession sqlSession1=factory.openSession();
Student student = sqlSession1.selectOne("com.yhp.dao.StudentDao.findbystuid", 1);
System.out.println(student.getSname());
sqlSession1.close();
System.out.println("===================================");
SqlSession sqlSession2= factory.openSession();
student = sqlSession2.selectOne("com.yhp.dao.StudentDao.findbystuid", 1);
System.out.println(student.getSname());
sqlSession2.close();
cache元素用来开启当前mapper的namespace下的二级缓存,该元素的属性设置如下:
flflushInterval:刷新间隔,可以被设置为任意的正整数,而且它们代表一个合理的毫秒形式的时间段,默认情况下
是不设置的,也就是没有刷新间隔,缓存仅仅调用语句时刷新。
size:缓存数目,可以被设置为任意正整数,要记住你的缓存对象数目和你运行环境可用内存资源数目,默认值是 1024.
readOnly:只读,属性可以被设置为true或false,只读的缓存会给所有调用者返回缓存对象的相同实例,因此这
些对象不能被修改。这提供了很重要的性能优势,可读写的缓存会返回缓存对象的拷贝(通过序列化),这会慢一
些,但是安全,因此默认是false。
eviction:收回策略,默认为LRU,有如下几种:
LRU:最近最少使用的策略,移除最长时间不被使用的对象。
FIFO:先进先出策略,按对象进入缓存的顺序来移除它们。
SOFT:软引用策略,移除基于垃圾回收器状态和软引用规则的对象。
WEAK:弱引用策略,更积极地移除基于垃圾收集器状态和弱引用规则的对象。
注意:使用二级缓存时,与查询结果映射的java对象必须实现java.io.Serializable接口的序列化和反序列化操作,
如果存在父类,其成员都需要实现序列化接口,实现序列化接口是为了对缓存数据进行序列化和反序列化操作,因
为二级缓存数据存储介质多种多样,不一定在内存,有可能是硬盘或者远程服务器。
十二、Mybatis注解
在mybatis中可以将sql语句通过注解的方式定义在java中,此时配置文件扫描该注解的位置即可,代码如下:
<mapper class="com.dao.StudentDao"></mapper>
12.1@Insert插入
@Insert("insert into student(username,password,birthday) values(#{user_name},#{password},#
{birthday})")
@Options(useGeneratedKeys = true,keyProperty = "userid")
public int insertstu(Student student);

示例:
 @Insert("insert into student(studentno,stuname,stuage) values(#{studentNo},#{stuName},#{age})")
    @Options(useGeneratedKeys = true,keyProperty = "studentId")//获得新增数据的id
    public int insertStu(Student student);
12.2@Delete删除
@Delete("delete from student where userid=#{userid}")
public int deleteuser(int userid);

示例:
@Delete("delete from student where studentid=#{sid}")
    public int deleteStu(int sid);
12.3@Update修改
@Update("update student set username=#{user_name},sex=#{sex} where userid=#{userid}")
public int updateuser(Student stu);

示例:
 @Update("update student set studentno=#{studentNo},stuname=#{stuName} where studentid=#{studentId}")
    public int updateStu(Student student);
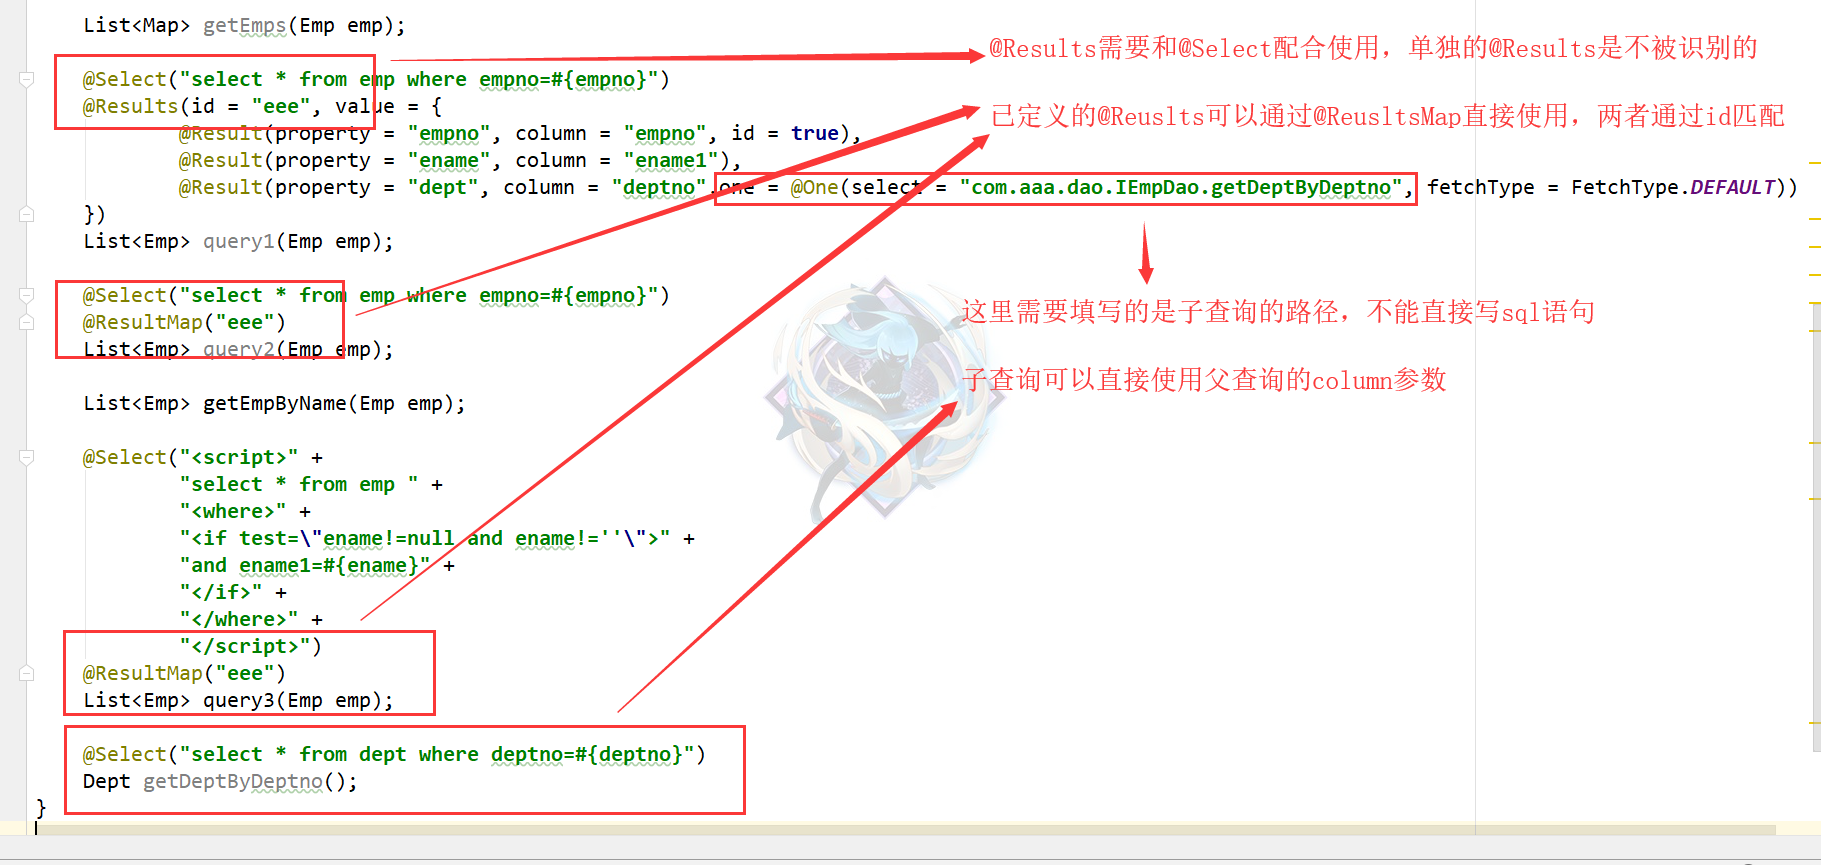
12.4@Select查询
@Select("select * from student")
/* @Results({
@Result(id = true, property = "id", column = "test_id") //主键列
@Result(column = "username",property = "user_name") //普通列
})*/

示例:
 @Select("select * from student")
    @Results({
            @Result(column = "stuage",property = "age")
    })
    public List<Student> findall();

 @Select("select count(*) from student")
    public int totalCount();
12.5 @SelectProvider将sql语句集中化管理
@SelectProvider(type = 自定义sql所在的类.class, method = “sql定义的方法”)
实例:@SelectProvider(type = SqlTemp.class,method =”getall44”)
补充:
@InsertProvider(type = SqlTemp.class,method = “insert”)
@DeleteProvider(type = SqlTemp.class,method = “delete”)
@UpdateProvider(type = SqlTemp.class,method = “update”)
public String insertstu(){
return "insert into student(username,password,sex,birthday) values(#{username},#
{password},#{sex},#{birthday})";
}
public String gradestudent(Map map){
StringBuffer sql=new StringBuffer("select * from student s,grade g where
s.gid=g.gradeid");
if (map.get("uname")!=null){
sql.append(" and username like '%"+map.get("uname")+"%'");
}
if(map.get("gname")!=null){
sql.append(" and gradename like '%"+map.get("gname")+"%'");
}
return sql.toString();
}
12.6@ResultType返回值类型
@ResultType(Student.class)
public List<Student> findall44();
12.7@ResultMap
@ResultMap("mapper文件中的id名即可")
public List<Student> findall33();
注意:(1)mapper文件中namespace的值要写当前接口的全路径
(2)配置文件中加载接口和mapper.xml二选一
实例代码:
接口:
@Select("select * from student s ,grade g where s.gid=g.cid")
@ResultMap("com.yhp.dao.StudentDao2.a1")
public List<Student> findstu_grade();
mapper文件: 这里namespace一定是接口的完整路径
<mapper namespace="com.yhp.dao.StudentDao2">
<resultMap id="a1" type="student">
<id property="sid" column="sid"></id>
<result property="sname" column="sname"></result>
<association property="grade" javaType="grade">
<id property="cid" column="cid"></id>
<result property="cname" column="cname"></result>
</association>
</resultMap>
</mapper>
配置文件:只需要扫描mapper文件,不需要扫描接口
<mappers>
<mapper resource="resultMapper.xml"></mapper>
</mappers>
12.8绑定参数:
@Insert("insert into student(sname1,sex) values(#{sname},#{sex})")
@Options(useGeneratedKeys = true,keyProperty = "sid")
public int insertStu(@Param("sname") String name, @Param("sex")String usersex);
12.9@Options
@Options(useCache = true,
flushCache = Options.FlushCachePolicy.FALSE, //表示查询时不刷新缓
timeout = 10000) //表示查询结果缓存10000秒
注意:需要和@CacheNamespace一起使用,并且对象需要实现序列化接口
12.10 @CacheNamespace
@CacheNamespace(size = 512) : 定义在该命名空间内允许使用内置缓存,最大值为512个对象引用,读写默认
是开启的,
缓存内省刷新时间为默认3600000毫秒,用来修饰接口
12.11 动态sql:
@Select(" <script>select * from student where 1=1 " +
" <if test=\"name!=null and name!=''\">" +
" and username like '%${name}%'" +
" </if>" +
" <if test=\"'pass!=null'\">" +
" and password like '%${pass}%'"+
" </if></script>")
十三、lombok插件
在idea工具中添加lombok插件:
安装:
<dependency>
<groupId>org.projectlombok</groupId>
<artifactId>lombok</artifactId>
<version>1.18.2</version>
<scope>provided</scope>
</dependency>
lombok的使用
@Data 注解在类上;提供类所有属性的 getting 和 setting 方法,此外还提供了equals、canEqual、hashCode、
toString 方法
@Setter :注解在属性上;为属性提供 setting 方法
@Getter :注解在属性上;为属性提供 getting 方法
@Log4j :注解在类上;为类提供一个 属性名为log 的 log4j 日志对象
@NoArgsConstructor :注解在类上;为类提供一个无参的构造方法
@AllArgsConstructor :注解在类上;为类提供一个全参的构造方法
@Cleanup : 可以关闭流
@Builder : 被注解的类加个构造者模式
@Synchronized : 加个同步锁
@SneakyThrows : 等同于try/catch 捕获异常
@NonNull : 如果给参数加个这个注解 参数为null会抛出空指针异常
@Value : 注解和@Data类似,区别在于它会把所有成员变量默认定义为private fifinal修饰,并且不会生成set方法。
@ToString 重写toString()方法
十四、Mybatis自动化
14.1添加依赖包:
<dependency>
<groupId>org.mybatis.generator</groupId>
<artifactId>mybatis-generator-core</artifactId>
<version>1.3.5</version>
</dependency>
14.2加载插件:
<build>
<plugins>
<plugin>
<groupId>org.mybatis.generator</groupId>
<artifactId>mybatis-generator-maven-plugin</artifactId>
<version>1.3.5</version>
<configuration>
<!--配置文件的路径-->
<configurationFile>src/main/resources/generatorConfig.xml</configurationFile>
<overwrite>true</overwrite>
</configuration>
<dependencies>
<dependency>
<groupId>org.mybatis.generator</groupId>
<artifactId>mybatis-generator-core</artifactId>
<version>1.3.5</version>
</dependency>
</dependencies>
</plugin>
</plugins>
</build>
14.3修改配置文件:
<?xml version="1.0" encoding="UTF-8"?>
<!DOCTYPE generatorConfiguration
PUBLIC "-//mybatis.org//DTD MyBatis Generator Configuration 1.0//EN"
"http://mybatis.org/dtd/mybatis-generator-config_1_0.dtd">
<!-- 配置生成器 -->
<generatorConfiguration>
<!--数据库驱动jar -->
<classPathEntry
location="F:\yhp\jar\mysql驱动\mysql-connector-java-5.0.8-bin.jar" />
<context id="MyBatis" targetRuntime="MyBatis3">
<!--去除注释 -->
<commentGenerator>
<property name="suppressAllComments" value="true" />
</commentGenerator>
<!--数据库连接 -->
<jdbcConnection driverClass="com.mysql.jdbc.Driver"
connectionURL="jdbc:mysql://localhost:3306/chaoshi"
userId="root"
password="123456">
</jdbcConnection>
<!--生成实体类 指定包名 以及生成的地址 (可以自定义地址,但是路径不存在不会自动创建
使用Maven生成在target目录下,会自动创建) -->
<javaModelGenerator targetPackage="com.yhp.bean"
targetProject="F:\yhp\three\workspace\mybatis_001\src\main\java">
<property name="trimStrings" value="true" />
</javaModelGenerator>
<!--生成SQLmapper文件 -->
<sqlMapGenerator targetPackage="mapper"
targetProject="F:\yhp\three\workspace\mybatis_001\src\main\resources">
</sqlMapGenerator>
<!--生成Dao文件,生成接口 -->
<javaClientGenerator type="XMLMAPPER"
targetPackage="com.yhp.dao"
targetProject="F:\yhp\three\workspace\mybatis_001\src\main\java">
</javaClientGenerator>
<table tableName="student" enableCountByExample="false"
enableUpdateByExample="false" enableDeleteByExample="false"
enableSelectByExample="false" selectByExampleQueryId="false">
</table>
<table tableName="grade" enableCountByExample="false"
enableUpdateByExample="false" enableDeleteByExample="false"
enableSelectByExample="false" selectByExampleQueryId="false">
</table>
<table tableName="subject" enableCountByExample="false"
enableUpdateByExample="false" enableDeleteByExample="false"
enableSelectByExample="false" selectByExampleQueryId="false">
</table>
</context>
</generatorConfiguration>
运行:maven Project选项卡->plugins->找到mybatis-generator-core,双击运行就会自动生成
注意:运行一次即可,如果运行过程中,未完全成功。则将原来生成的代码删除后,再次运行。
切记!切记!切记!

若有收获,就点个赞吧
0 人点赞
