前言
Redis是一个开源的面向键值对Key-Value类型数据的分布式NoSQL数据库系统,它的特点是高性能,适用于高并发的应用场景。可以说Redis纯粹是为应用而产生的。
Redis是一个高性能的KV数据库,并提供多种语言的API。Redis的缺点也很明显,对事务的处理很弱,也无法做太复杂的关系型数据库中的模型。
Redis支持存储的Value类型相对更多,典型的如字符串String、链表List、集合Set、有序集合Zset(sorted set)、哈希类型Hash,这些数据类型都支持push和pop、add和remove,以及取交集、并集、差集等更为复杂的操作。由于这些操作都是原子性的,在此基础上,Redis支持各种不同方式的排序。
点击查看【processon】
一、Redis介绍
1. 什么是Redis
Redis是用C语言开发的一个开源的高性能键值对(key-value)数据库。建议在linux上运行,它通过提供多种键值数据类型来适应不同场景下的存储需求,数据存储在内存中,也可持久化到磁盘中,目前为止Redis支持的键值数据类型如下:
- 速度快
- 持久化
- 多种数据结构
- 支持多种编程语言
- 功能丰富
- 简单
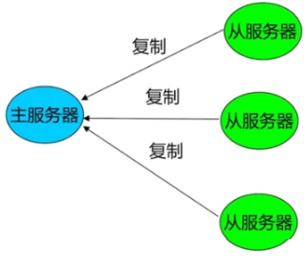
- 主从复制
- 高可用、分布式
- Redis是把数据存在内存中,所以速度才会快。Redis是用C语言写的开源项目。
- Redis所有数据保存在内存中,对数据的更新将异步地保存到磁盘上,这样可以做到断电不丢失数据。
- Redis主从复制可以实现高可用和分布式
3. Redis数据结构
3.1. 字符串
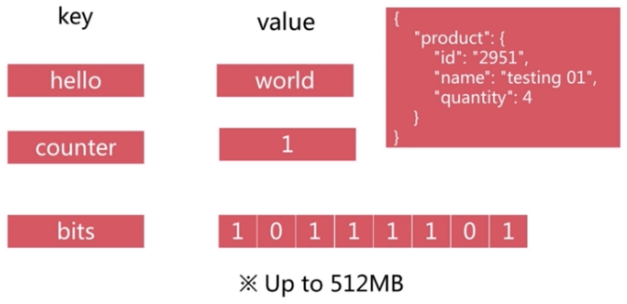
注意:values的值可以是字符串也可以是别的,但是values的大小最好不要超过100k。
3.2. Hash
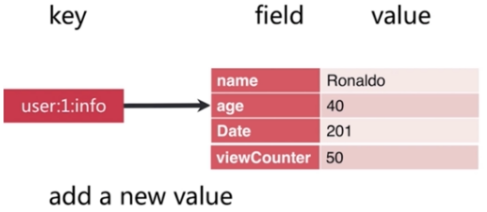
可以看出Hash的数据结构是一个map中包含一个map,一个key的value是一个对象,里面还有key和value。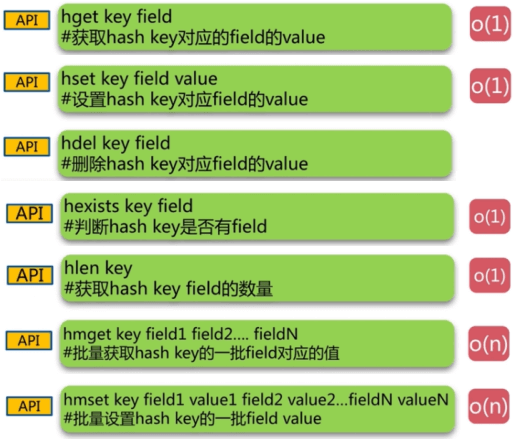
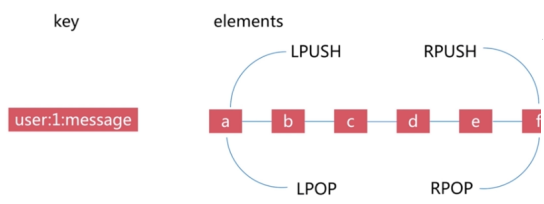
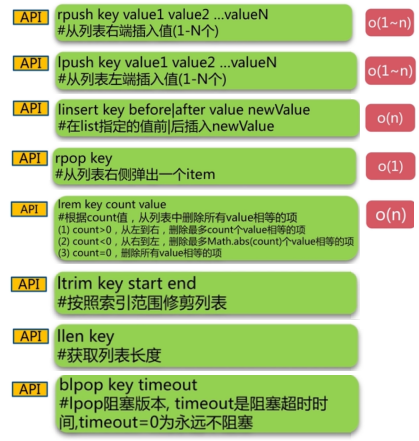
3.3. list
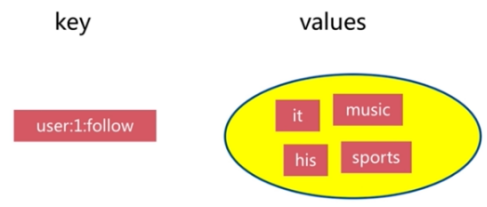
3.4. set
3.5. zset
set集合是一个有序集合,但是zset是一个key、value是无序的,但是value中的key、value是有序的。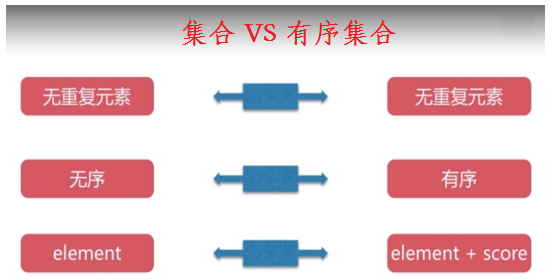
zset使用的比较少,包括其他数据结构的api,都可以查看api文档。
4. Redis的应用场景
- 缓存(数据查询、短连接、新闻内容、商品内容等等)(最多使用)

- 分布式集群架构中的session分离
- 聊天室的在线好友列表
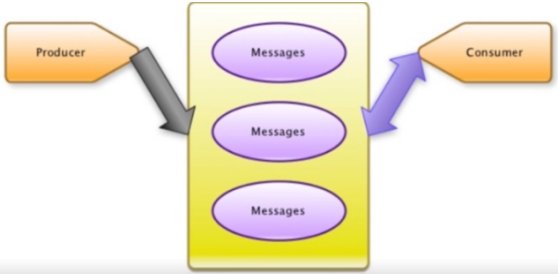
- 任务队列(秒杀、抢购、12306等等)
- 应用排行榜

- 网站访问统计

- 数据过期处理(可以精确到毫秒)
注意:在使用场景中,不用考虑数据混乱因素,因为Redis的增删查改是单线程执行的。
二、Redis安装并设置开机自动启动
Redis的使用在Linux中效果会更佳,该文章主要体现教程,因此我以Windows作为例子进行安装。
1. 安装
- 要安装Redis,首先要获取安装包。Windows的Redis安装包需要到以下GitHub链接找到。链接:https://github.com/MSOpenTech/redis。打开网站后,找到Release,点击前往下载页面。
- 在下载网页中,找到最后发行的版本(此处是3.2.100)。找到Redis-x64-3.2.100.msi和Redis-x64-3.2.100.zip,点击下载。这里说明一下,第一个是msi微软格式的安装包,第二个是压缩包。
- 双击刚下载好的msi格式的安装包(Redis-x64-3.2.100.msi)开始安装。
- 选择“同意协议”,点击下一步继续。
- 选择“添加Redis目录到环境变量PATH中”,这样方便系统自动识别Redis执行文件在哪里。
- 端口号可保持默认的6379,并选择防火墙例外,从而保证外部可以正常访问Redis服务。
- 设定最大值为100M。作为实验和学习,100M足够了。
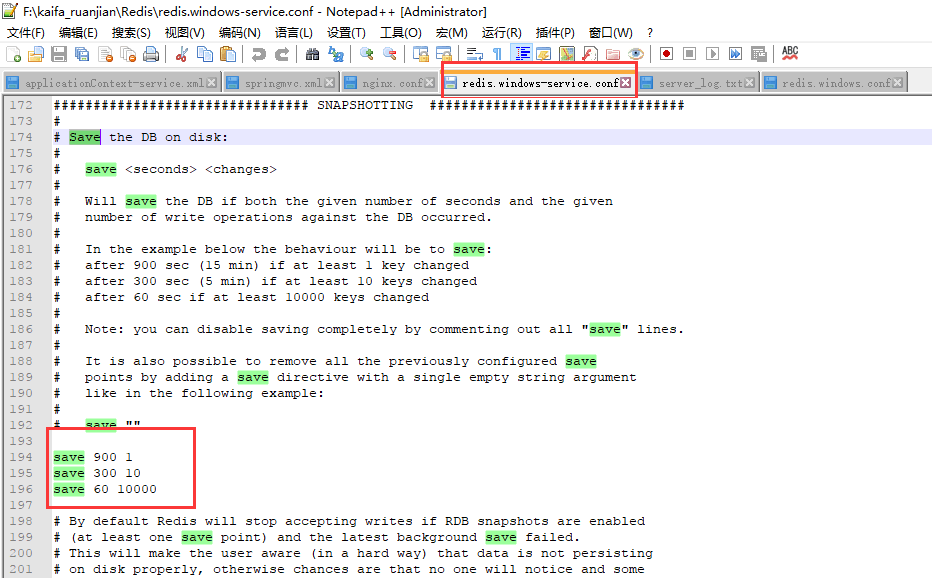
安装完毕后,需要先做一些设定工作,以便服务启动后能正常运行。使用文本编辑器,这里使用Notepad++,打开Redis服务配置文件。注意:不要找错了,通常为redis.windows-service.conf,而不是redis.windows.conf。后者是以非系统服务方式启动程序使用的配置文件。
找到含有requirepass字样的地方,追加一行,输入:“requirepass 147258qq”。这是访问Redis时所需的密码,一般测试情况下可以不用设定密码。不过,即使是作为本地访问,也建议设定一个密码。此处以简单的147258qq来演示。
点击“开始”>右击“计算机”>选择“管理”。在左侧栏中依次找到并点击“计算机管理(本地)”>服务和应用程序>服务。再在右侧找到Redis名称的服务,查看启动情况。如未启动,则手动启动之。正常情况下,服务应该正常启动并运行了。
最后来测试一下Redis是否正常提供服务。进入Redis的目录,cd C:\Program Files\Redis。输入redis-cli并回车。(redis-cli是客户端程序)如图正常提示进入,并显示正确端口号,则表示服务已经启动。
使用服务前需要先通过密码验证。输入“auth 147258qq”并回车(12345是之前设定的密码)。返回提示OK表示验证通过。
实际测试一下读写。输入set mykey1 “I love you all!”并回车,用来保存一个键值。再输入get mykey1,获取刚才保存的键值。
2. 设置开机自动启动
- 设置服务命令:“redis-server —service-install redis.windows-service.conf —loglevel verbose”
- 输入命令之后没有报错,表示成功了,刷新服务,会看到多了一个redis服务。
- 右键Redis并选择属性,设置启动类型为自动。
3. 常用的redis服务命令
- 卸载服务:redis-server —service-uninstall
- 开启服务:redis-server —service-start
- 停止服务:redis-server —service-stop
注意
- Windows使用的这个Redis是64位版本的,32位操作系统的同学就不要折腾了。
作为服务运行的Redis配置文件,通常为redis.windows-service.conf,而不是redis.windows.conf。小心不要选错了。如果修改了redis.windows.conf(非redis.windows-service.conf)文件上的配置,从服务自启动,配置的信息是不生效的,如密码配置和ip绑定。
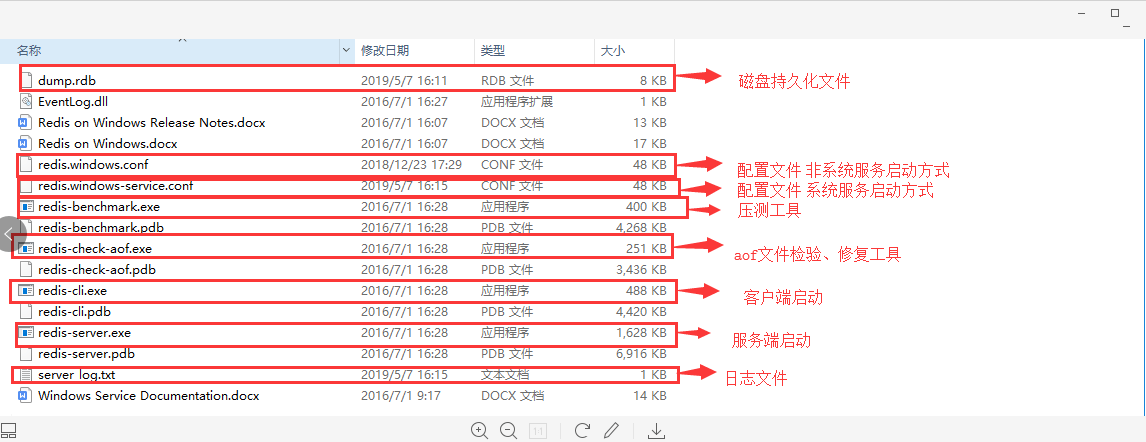
三、Redis文件结构
四、Redis启动方式
Redis有三种启动方式,具体如下:
(1)使用redis-server命令,会以默认的redis配置进行启动
(2)使用redis-server –port6379就可以使用动态参数配置进行启动
(3)使用redis-server configPath就可以使用配置文件方式进行启动
当直接运行redis-service.exe时候,是没有使用配置文件的,而且会提示以下内容:
三种启动方式比较生成环境选择配置启动;
- 单机多实例配置文件可以用端口区分开;
- 一般我们比较少使用默认配置和动态参数配置方式进行启动,因为我们参数需要设置非常多,所以使用配置文件启动方式;
五、Redis持久化
1. 持久化作用

2. 持久化方式
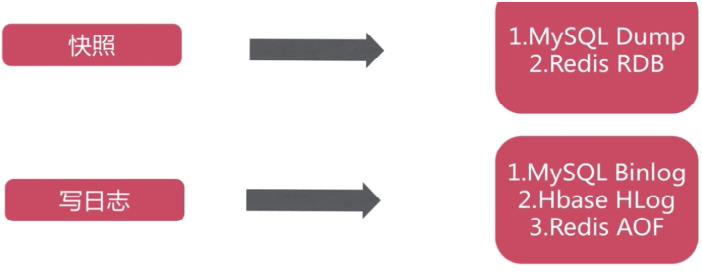
3. RDB
3.1. 什么是RDB
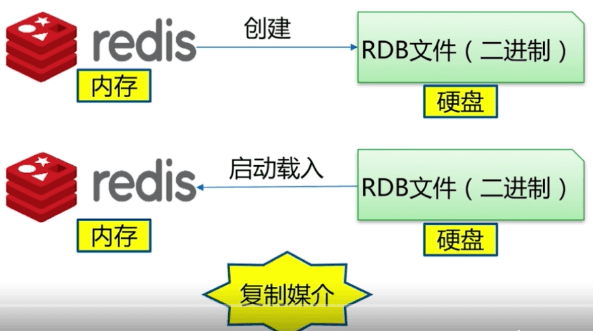
Redis存的东西是以二进制文件的,这个文件就是RDB,使用的是快照方式,RDB也是复制媒介。3.2. RDB文件生成方式
- save方式
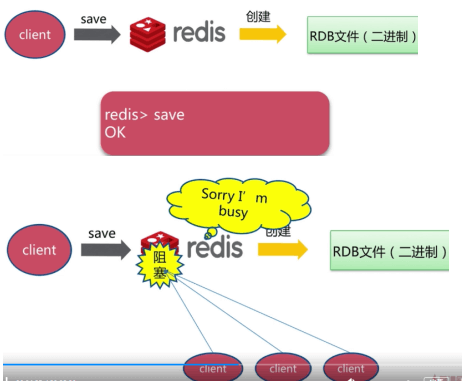
当save太多数据时候,可能会导致阻塞,因为使用的是单线程。
这个N主要要数据量的多少。
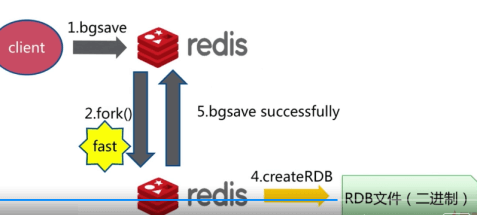
- bgsave方式
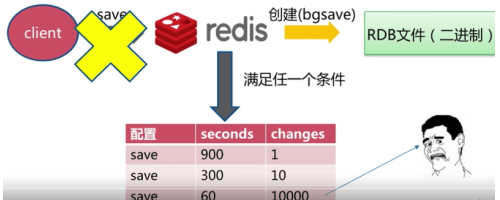
- 自动生成RDB
配置文件内容如下:如果在900S内改变一条数据,就生成RDB文件,如果在300s内改变10条数据,就生成RDB文件。
最佳配置:
Save与bgsave比较:
3.3. 不容忽视的生成RDB文件方式
- 全量复制;
- debug reload;
-
3.4. RDB总结
RDB是Redis内存到硬盘的快照,用于持久化。
- save通常会阻塞Redis。
- bgsave不会阻塞Redis,但是会fork新进程。
- save自动配置满足任一条件就会被执行。
- 有些触发机制不容忽视(详见上一章节)。
4. AOF
4.1.RDB问题
- 耗时、耗性能。
- 不可控、丢失数据。
因为RDB需要将全部数据生成RDB文件,所以这个过程比较耗时,如果用fork(bgsave)过程,则太消耗内容。如果RDB文件非常大,还会影响IO性能。在T3-T4之间就会出现数据丢失。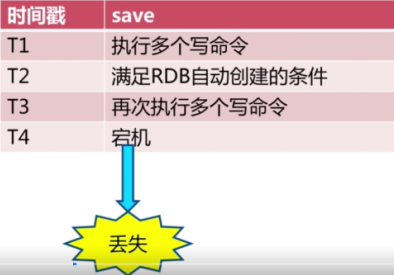
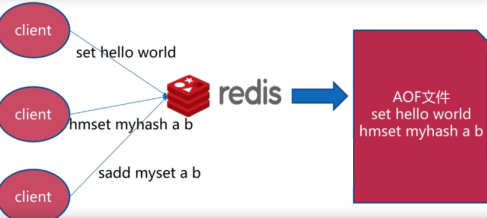
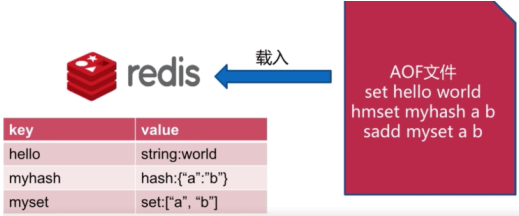
4.2. AOF文件创建和恢复
4.3. AOF三种策略
- Always策略

- Everysec策略
每秒写入一次数据,如果机器突然有问题,可能丢失一秒数据。
- No策略


4.4. AOF重写
把过期的,重复的,可优化命令进行化解。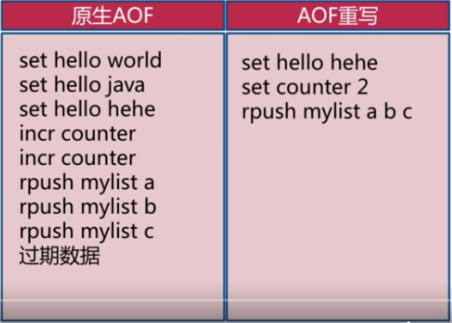
重写作用:
- 减少磁盘占用量
- 加速恢复速度
重写方式:
- bgrewriteaof
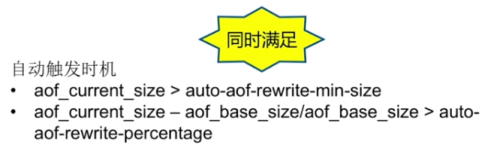
- AOF重写配置
Bgrewriteaof命令: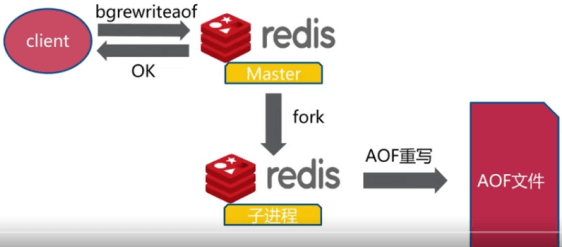
AOF重写配置: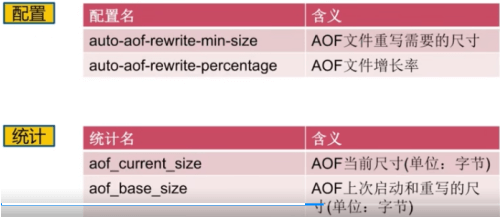
AOF重写流程: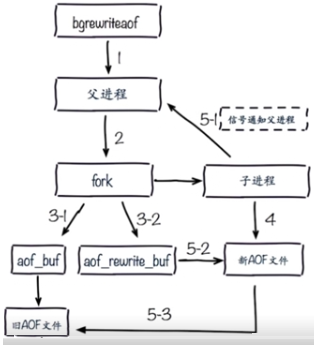
5. RDB与AOF选择

6. Redis默认的持久化
六、Redis配置文件详解
Redis常用的配置文件在redis.windows-service.conf,具体配置包括设置登录密码、设置持久化方式、持久化路径、最大的内存空间、数据库数量、日志的等级、日志的路径、设置允许客户端连接的IP等,主从复制、高可用、集群、缓存等相关的功能将在下一篇进行讲解。
# redis 配置文件示例# 当你需要为某个配置项指定内存大小的时候,必须要带上单位,# 通常的格式就是 1k 5gb 4m 等酱紫:## 1k => 1000 bytes# 1kb => 1024 bytes# 1m => 1000000 bytes# 1mb => 1024*1024 bytes# 1g => 1000000000 bytes# 1gb => 1024*1024*1024 bytes## 单位是不区分大小写的,你写 1K 5GB 4M 也行################################## INCLUDES #################################### 假如说你有一个可用于所有的 redis server 的标准配置模板,# 但针对某些 server 又需要一些个性化的设置,# 你可以使用 include 来包含一些其他的配置文件,这对你来说是非常有用的。## 但是要注意哦,include 是不能被 config rewrite 命令改写的# 由于 redis 总是以最后的加工线作为一个配置指令值,所以你最好是把 include 放在这个文件的最前面,# 以避免在运行时覆盖配置的改变,相反,你就把它放在后面(外国人真啰嗦)。## include /path/to/local.conf# include /path/to/other.conf################################ 常用 ###################################### 默认情况下 redis 不是作为守护进程运行的,如果你想让它在后台运行,你就把它改成 yes。# 当redis作为守护进程运行的时候,它会写一个 pid 到 /var/run/redis.pid 文件里面。daemonize no# 当redis作为守护进程运行的时候,它会把 pid 默认写到 /var/run/redis.pid 文件里面,# 但是你可以在这里自己制定它的文件位置。pidfile /var/run/redis.pid# 监听端口号,默认为 6379,如果你设为 0 ,redis 将不在 socket 上监听任何客户端连接。port 6379# TCP 监听的最大容纳数量## 在高并发的环境下,你需要把这个值调高以避免客户端连接缓慢的问题。# Linux 内核会一声不响的把这个值缩小成 /proc/sys/net/core/somaxconn 对应的值,# 所以你要修改这两个值才能达到你的预期。tcp-backlog 511# 默认情况下,redis 在 server 上所有有效的网络接口上监听客户端连接。# 你如果只想让它在一个网络接口上监听,那你就绑定一个IP或者多个IP。## 示例,多个IP用空格隔开:## bind 192.168.1.100 10.0.0.1# bind 127.0.0.1# 指定 unix socket 的路径。## unixsocket /tmp/redis.sock# unixsocketperm 755# 指定在一个 client 空闲多少秒之后关闭连接(0 就是不管它)timeout 0# tcp 心跳包。## 如果设置为非零,则在与客户端缺乏通讯的时候使用 SO_KEEPALIVE 发送 tcp acks 给客户端。# 这个之所有有用,主要由两个原因:## 1) 防止死的 peers# 2) Take the connection alive from the point of view of network# equipment in the middle.## On Linux, the specified value (in seconds) is the period used to send ACKs.# Note that to close the connection the double of the time is needed.# On other kernels the period depends on the kernel configuration.## A reasonable value for this option is 60 seconds.# 推荐一个合理的值就是60秒tcp-keepalive 0# 定义日志级别。# 可以是下面的这些值:# debug (适用于开发或测试阶段)# verbose (many rarely useful info, but not a mess like the debug level)# notice (适用于生产环境)# warning (仅仅一些重要的消息被记录)loglevel notice# 指定日志文件的位置logfile ""# 要想把日志记录到系统日志,就把它改成 yes,# 也可以可选择性的更新其他的syslog 参数以达到你的要求# syslog-enabled no# 设置 syslog 的 identity。# syslog-ident redis# 设置 syslog 的 facility,必须是 USER 或者是 LOCAL0-LOCAL7 之间的值。# syslog-facility local0# 设置数据库的数目。# 默认数据库是 DB 0,你可以在每个连接上使用 select <dbid> 命令选择一个不同的数据库,# 但是 dbid 必须是一个介于 0 到 databasees - 1 之间的值databases 16################################ 快照 ################################## 存 DB 到磁盘:## 格式:save <间隔时间(秒)> <写入次数>## 根据给定的时间间隔和写入次数将数据保存到磁盘## 下面的例子的意思是:# 900 秒内如果至少有 1 个 key 的值变化,则保存# 300 秒内如果至少有 10 个 key 的值变化,则保存# 60 秒内如果至少有 10000 个 key 的值变化,则保存## 注意:你可以注释掉所有的 save 行来停用保存功能。# 也可以直接一个空字符串来实现停用:# save ""save 900 1save 300 10save 60 10000# 默认情况下,如果 redis 最后一次的后台保存失败,redis 将停止接受写操作,# 这样以一种强硬的方式让用户知道数据不能正确的持久化到磁盘,# 否则就会没人注意到灾难的发生。## 如果后台保存进程重新启动工作了,redis 也将自动的允许写操作。## 然而你要是安装了靠谱的监控,你可能不希望 redis 这样做,那你就改成 no 好了。stop-writes-on-bgsave-error yes# 是否在 dump .rdb 数据库的时候使用 LZF 压缩字符串# 默认都设为 yes# 如果你希望保存子进程节省点 cpu ,你就设置它为 no ,# 不过这个数据集可能就会比较大rdbcompression yes# 是否校验rdb文件rdbchecksum yes# 设置 dump 的文件位置dbfilename dump.rdb# 工作目录# 例如上面的 dbfilename 只指定了文件名,# 但是它会写入到这个目录下。这个配置项一定是个目录,而不能是文件名。dir ./################################# 主从复制 ################################## 主从复制。使用 slaveof 来让一个 redis 实例成为另一个reids 实例的副本。# 注意这个只需要在 slave 上配置。## slaveof <masterip> <masterport># 如果 master 需要密码认证,就在这里设置# masterauth <master-password># 当一个 slave 与 master 失去联系,或者复制正在进行的时候,# slave 可能会有两种表现:## 1) 如果为 yes ,slave 仍然会应答客户端请求,但返回的数据可能是过时,# 或者数据可能是空的在第一次同步的时候## 2) 如果为 no ,在你执行除了 info he salveof 之外的其他命令时,# slave 都将返回一个 "SYNC with master in progress" 的错误,#slave-serve-stale-data yes# 你可以配置一个 slave 实体是否接受写入操作。# 通过写入操作来存储一些短暂的数据对于一个 slave 实例来说可能是有用的,# 因为相对从 master 重新同步数而言,据数据写入到 slave 会更容易被删除。# 但是如果客户端因为一个错误的配置写入,也可能会导致一些问题。## 从 redis 2.6 版起,默认 slaves 都是只读的。## Note: read only slaves are not designed to be exposed to untrusted clients# on the internet. It's just a protection layer against misuse of the instance.# Still a read only slave exports by default all the administrative commands# such as CONFIG, DEBUG, and so forth. To a limited extent you can improve# security of read only slaves using 'rename-command' to shadow all the# administrative / dangerous commands.# 注意:只读的 slaves 没有被设计成在 internet 上暴露给不受信任的客户端。# 它仅仅是一个针对误用实例的一个保护层。slave-read-only yes# Slaves 在一个预定义的时间间隔内发送 ping 命令到 server 。# 你可以改变这个时间间隔。默认为 10 秒。## repl-ping-slave-period 10# The following option sets the replication timeout for:# 设置主从复制过期时间## 1) Bulk transfer I/O during SYNC, from the point of view of slave.# 2) Master timeout from the point of view of slaves (data, pings).# 3) Slave timeout from the point of view of masters (REPLCONF ACK pings).## It is important to make sure that this value is greater than the value# specified for repl-ping-slave-period otherwise a timeout will be detected# every time there is low traffic between the master and the slave.# 这个值一定要比 repl-ping-slave-period 大## repl-timeout 60# Disable TCP_NODELAY on the slave socket after SYNC?## If you select "yes" Redis will use a smaller number of TCP packets and# less bandwidth to send data to slaves. But this can add a delay for# the data to appear on the slave side, up to 40 milliseconds with# Linux kernels using a default configuration.## If you select "no" the delay for data to appear on the slave side will# be reduced but more bandwidth will be used for replication.## By default we optimize for low latency, but in very high traffic conditions# or when the master and slaves are many hops away, turning this to "yes" may# be a good idea.repl-disable-tcp-nodelay no# 设置主从复制容量大小。这个 backlog 是一个用来在 slaves 被断开连接时# 存放 slave 数据的 buffer,所以当一个 slave 想要重新连接,通常不希望全部重新同步,# 只是部分同步就够了,仅仅传递 slave 在断开连接时丢失的这部分数据。## The biggest the replication backlog, the longer the time the slave can be# disconnected and later be able to perform a partial resynchronization.# 这个值越大,salve 可以断开连接的时间就越长。## The backlog is only allocated once there is at least a slave connected.## repl-backlog-size 1mb# After a master has no longer connected slaves for some time, the backlog# will be freed. The following option configures the amount of seconds that# need to elapse, starting from the time the last slave disconnected, for# the backlog buffer to be freed.# 在某些时候,master 不再连接 slaves,backlog 将被释放。## A value of 0 means to never release the backlog.# 如果设置为 0 ,意味着绝不释放 backlog 。## repl-backlog-ttl 3600# 当 master 不能正常工作的时候,Redis Sentinel 会从 slaves 中选出一个新的 master,# 这个值越小,就越会被优先选中,但是如果是 0 , 那是意味着这个 slave 不可能被选中。## 默认优先级为 100。slave-priority 100# It is possible for a master to stop accepting writes if there are less than# N slaves connected, having a lag less or equal than M seconds.## The N slaves need to be in "online" state.## The lag in seconds, that must be <= the specified value, is calculated from# the last ping received from the slave, that is usually sent every second.## This option does not GUARANTEES that N replicas will accept the write, but# will limit the window of exposure for lost writes in case not enough slaves# are available, to the specified number of seconds.## For example to require at least 3 slaves with a lag <= 10 seconds use:## min-slaves-to-write 3# min-slaves-max-lag 10## Setting one or the other to 0 disables the feature.## By default min-slaves-to-write is set to 0 (feature disabled) and# min-slaves-max-lag is set to 10.################################## 安全 #################################### Require clients to issue AUTH <PASSWORD> before processing any other# commands. This might be useful in environments in which you do not trust# others with access to the host running redis-server.## This should stay commented out for backward compatibility and because most# people do not need auth (e.g. they run their own servers).## Warning: since Redis is pretty fast an outside user can try up to# 150k passwords per second against a good box. This means that you should# use a very strong password otherwise it will be very easy to break.## 设置认证密码# requirepass foobared# Command renaming.## It is possible to change the name of dangerous commands in a shared# environment. For instance the CONFIG command may be renamed into something# hard to guess so that it will still be available for internal-use tools# but not available for general clients.## Example:## rename-command CONFIG b840fc02d524045429941cc15f59e41cb7be6c52## It is also possible to completely kill a command by renaming it into# an empty string:## rename-command CONFIG ""## Please note that changing the name of commands that are logged into the# AOF file or transmitted to slaves may cause problems.################################### 限制 ##################################### Set the max number of connected clients at the same time. By default# this limit is set to 10000 clients, however if the Redis server is not# able to configure the process file limit to allow for the specified limit# the max number of allowed clients is set to the current file limit# minus 32 (as Redis reserves a few file descriptors for internal uses).## 一旦达到最大限制,redis 将关闭所有的新连接# 并发送一个‘max number of clients reached’的错误。## maxclients 10000# 如果你设置了这个值,当缓存的数据容量达到这个值, redis 将根据你选择的# eviction 策略来移除一些 keys。## 如果 redis 不能根据策略移除 keys ,或者是策略被设置为 ‘noeviction’,# redis 将开始响应错误给命令,如 set,lpush 等等,# 并继续响应只读的命令,如 get## This option is usually useful when using Redis as an LRU cache, or to set# a hard memory limit for an instance (using the 'noeviction' policy).## WARNING: If you have slaves attached to an instance with maxmemory on,# the size of the output buffers needed to feed the slaves are subtracted# from the used memory count, so that network problems / resyncs will# not trigger a loop where keys are evicted, and in turn the output# buffer of slaves is full with DELs of keys evicted triggering the deletion# of more keys, and so forth until the database is completely emptied.## In short... if you have slaves attached it is suggested that you set a lower# limit for maxmemory so that there is some free RAM on the system for slave# output buffers (but this is not needed if the policy is 'noeviction').## 最大使用内存# maxmemory <bytes># 最大内存策略,你有 5 个选择。## volatile-lru -> remove the key with an expire set using an LRU algorithm# volatile-lru -> 使用 LRU 算法移除包含过期设置的 key 。# allkeys-lru -> remove any key accordingly to the LRU algorithm# allkeys-lru -> 根据 LRU 算法移除所有的 key 。# volatile-random -> remove a random key with an expire set# allkeys-random -> remove a random key, any key# volatile-ttl -> remove the key with the nearest expire time (minor TTL)# noeviction -> don't expire at all, just return an error on write operations# noeviction -> 不让任何 key 过期,只是给写入操作返回一个错误## Note: with any of the above policies, Redis will return an error on write# operations, when there are not suitable keys for eviction.## At the date of writing this commands are: set setnx setex append# incr decr rpush lpush rpushx lpushx linsert lset rpoplpush sadd# sinter sinterstore sunion sunionstore sdiff sdiffstore zadd zincrby# zunionstore zinterstore hset hsetnx hmset hincrby incrby decrby# getset mset msetnx exec sort## The default is:## maxmemory-policy noeviction# LRU and minimal TTL algorithms are not precise algorithms but approximated# algorithms (in order to save memory), so you can tune it for speed or# accuracy. For default Redis will check five keys and pick the one that was# used less recently, you can change the sample size using the following# configuration directive.## The default of 5 produces good enough results. 10 Approximates very closely# true LRU but costs a bit more CPU. 3 is very fast but not very accurate.## maxmemory-samples 5############################## APPEND ONLY MODE ################################ By default Redis asynchronously dumps the dataset on disk. This mode is# good enough in many applications, but an issue with the Redis process or# a power outage may result into a few minutes of writes lost (depending on# the configured save points).## The Append Only File is an alternative persistence mode that provides# much better durability. For instance using the default data fsync policy# (see later in the config file) Redis can lose just one second of writes in a# dramatic event like a server power outage, or a single write if something# wrong with the Redis process itself happens, but the operating system is# still running correctly.## AOF and RDB persistence can be enabled at the same time without problems.# If the AOF is enabled on startup Redis will load the AOF, that is the file# with the better durability guarantees.## Please check http://redis.io/topics/persistence for more information.appendonly no# The name of the append only file (default: "appendonly.aof")appendfilename "appendonly.aof"# The fsync() call tells the Operating System to actually write data on disk# instead to wait for more data in the output buffer. Some OS will really flush# data on disk, some other OS will just try to do it ASAP.## Redis supports three different modes:## no: don't fsync, just let the OS flush the data when it wants. Faster.# always: fsync after every write to the append only log . Slow, Safest.# everysec: fsync only one time every second. Compromise.## The default is "everysec", as that's usually the right compromise between# speed and data safety. It's up to you to understand if you can relax this to# "no" that will let the operating system flush the output buffer when# it wants, for better performances (but if you can live with the idea of# some data loss consider the default persistence mode that's snapshotting),# or on the contrary, use "always" that's very slow but a bit safer than# everysec.## More details please check the following article:# http://antirez.com/post/redis-persistence-demystified.html## If unsure, use "everysec".# appendfsync alwaysappendfsync everysec# appendfsync no# When the AOF fsync policy is set to always or everysec, and a background# saving process (a background save or AOF log background rewriting) is# performing a lot of I/O against the disk, in some Linux configurations# Redis may block too long on the fsync() call. Note that there is no fix for# this currently, as even performing fsync in a different thread will block# our synchronous write(2) call.## In order to mitigate this problem it's possible to use the following option# that will prevent fsync() from being called in the main process while a# BGSAVE or BGREWRITEAOF is in progress.## This means that while another child is saving, the durability of Redis is# the same as "appendfsync none". In practical terms, this means that it is# possible to lose up to 30 seconds of log in the worst scenario (with the# default Linux settings).## If you have latency problems turn this to "yes". Otherwise leave it as# "no" that is the safest pick from the point of view of durability.no-appendfsync-on-rewrite no
七、Redis图形化工具
1. Redis Desktop Manager
一款基于Qt5的跨平台Redis桌面管理软件。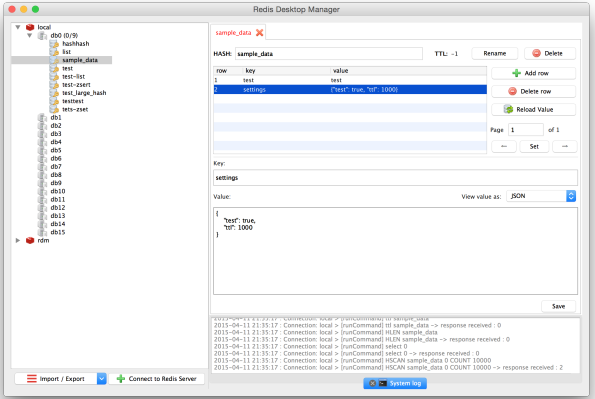
- 支持:Windows 7+,Mac OS X 10.10+,Ubuntu 14+
- 特点:C++ 编写,响应迅速,性能好。但不支持数据库备份与恢复。
项目地址: https://github.com/uglide/RedisDesktopManager
2. Redis Client
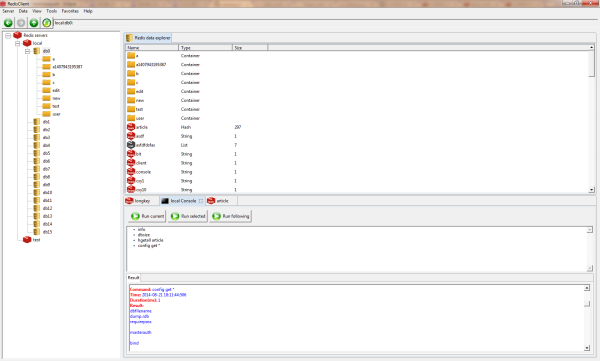
项目简介:使用Java编写,功能丰富,缺点是性能稍差,网络不好时,会不时断线。
项目地址:https://github.com/caoxinyu/RedisClient
3. Redis Studio
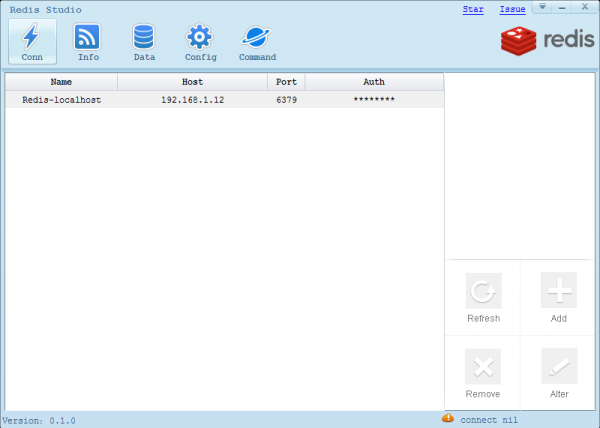
项目简介:一个C++编写的redis管理工具,仅支持windows平台,支持xp操作系统。
项目地址:https://github.com/cinience/RedisStudio
八、Java之Jedis连接Redis单机
连接Redis的Java客户端可以使用Jedis,Jedis 是 Redis 官方首选的 Java 客户端开发包。在这里我们是进行Redis基础讲解,所以先测试Redis单机,在下一篇文章中,我们将进行集群搭建与连接测试。
1. 连接前准备
[ ] 确保Redis的服务已经开启。
[ ] 确保在Reids的配置文件中添加访问客户端的IP(如:bind 127.0.0.1 192.168.101.6)。
2. IDEA创建Maven工程
3. 添加依赖
```xml <?xml version=”1.0” encoding=”UTF-8”?> <project xmlns=”http://maven.apache.org/POM/4.0.0“
xmlns:xsi="http://www.w3.org/2001/XMLSchema-instance"xsi:schemaLocation="http://maven.apache.org/POM/4.0.0 http://maven.apache.org/xsd/maven-4.0.0.xsd">
4.0.0 com.wxc com-redis 1.0-SNAPSHOT junit junit 4.12 redis.clients jedis 2.1.0 org.apache.commons commons-lang3 3.3.2 org.apache.maven.plugins maven-compiler-plugin 2.0.2 1.8 1.8
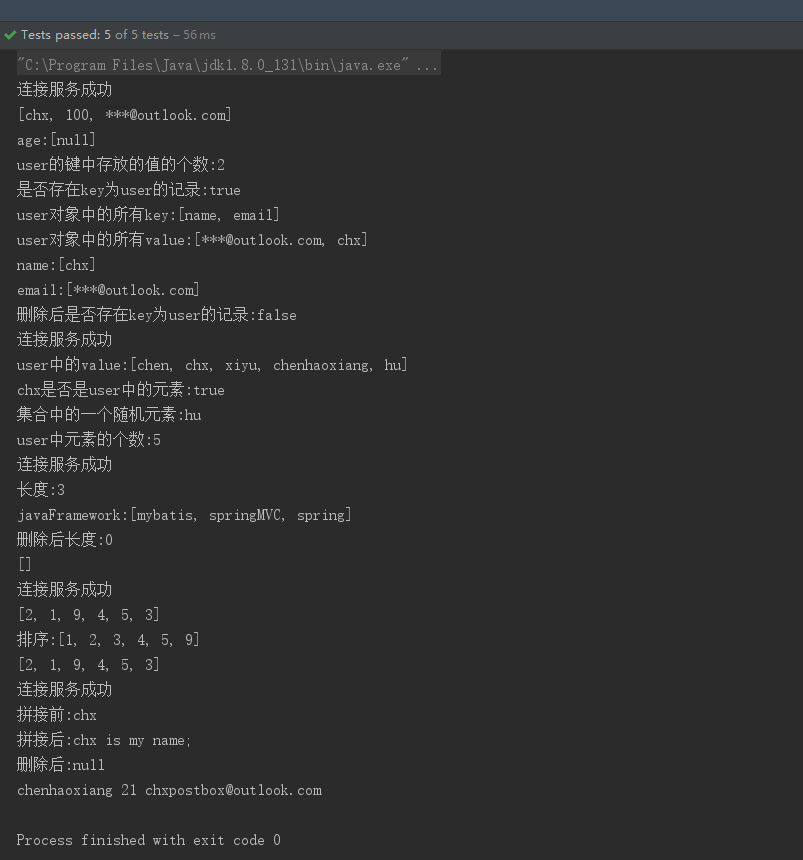
<a name="a283c160"></a>### 4. 增删改查- **TestRedis.java**```javaimport org.junit.Before;import org.junit.Test;import redis.clients.jedis.Jedis;import java.util.HashMap;import java.util.Iterator;import java.util.List;import java.util.Map;public class TestRedis {private Jedis jedis;@Beforepublic void setJedis() {// 连接redis服务器(在这里是连接本地的)jedis = new Jedis("192.168.101.6", 6379);// 权限认证,当开启密码了就需要jedis.auth("147258qq");System.out.println("连接服务成功");}/*** Redis操作字符串*/@Testpublic void testString() {// 添加数据jedis.set("name", "chx"); // key为name放入value值为chxSystem.out.println("拼接前:" + jedis.get("name")); // 读取key为name的值// 向key为name的值后面加上数据 ---拼接jedis.append("name", " is my name;");System.out.println("拼接后:" + jedis.get("name"));// 删除某个键值对jedis.del("name");System.out.println("删除后:" + jedis.get("name"));// 设置多个键值对jedis.mset("name", "chenhaoxiang", "age", "20", "email", "chxpostbox@outlook.com");jedis.incr("age"); // 用于将键的整数值递增1。如果键不存在,则在执行操作之前将其设置为0。 如果键包含错误类型的值或包含无法表示为整数的字符串,则会返回错误。此操作限于64位有符号整数。System.out.println(jedis.get("name") + " " + jedis.get("age") + " " + jedis.get("email"));}@Testpublic void testMap() {// 添加数据Map<String, String> map = new HashMap<String, String>();map.put("name", "chx");map.put("age", "100");map.put("email", "***@outlook.com");jedis.hmset("user", map);// 取出user中的name,结果是一个泛型的List// 第一个参数是存入redis中map对象的key,后面跟的是放入map中的对象的key,后面的key是可变参数List<String> list = jedis.hmget("user", "name", "age", "email");System.out.println(list);// 删除map中的某个键值jedis.hdel("user", "age");System.out.println("age:" + jedis.hmget("user", "age")); // 因为删除了,所以返回的是nullSystem.out.println("user的键中存放的值的个数:" + jedis.hlen("user")); // 返回key为user的键中存放的值的个数2System.out.println("是否存在key为user的记录:" + jedis.exists("user")); // 是否存在key为user的记录 返回trueSystem.out.println("user对象中的所有key:" + jedis.hkeys("user")); // 返回user对象中的所有keySystem.out.println("user对象中的所有value:" + jedis.hvals("user")); // 返回map对象中的所有value// 拿到key,再通过迭代器得到值Iterator<String> iterator = jedis.hkeys("user").iterator();while (iterator.hasNext()) {String key = iterator.next();System.out.println(key + ":" + jedis.hmget("user", key));}jedis.del("user");System.out.println("删除后是否存在key为user的记录:" + jedis.exists("user")); // 是否存在key为user的记录}/*** jedis操作List*/@Testpublic void testList(){// 移除javaFramwork所所有内容jedis.del("javaFramwork");// 存放数据jedis.lpush("javaFramework","spring");jedis.lpush("javaFramework","springMVC");jedis.lpush("javaFramework","mybatis");// 取出所有数据,jedis.lrange是按范围取出// 第一个是key,第二个是起始位置,第三个是结束位置System.out.println("长度:"+jedis.llen("javaFramework"));// jedis.llen获取长度,-1表示取得所有System.out.println("javaFramework:"+jedis.lrange("javaFramework",0,-1));jedis.del("javaFramework");System.out.println("删除后长度:"+jedis.llen("javaFramework"));System.out.println(jedis.lrange("javaFramework",0,-1));}/*** jedis操作Set*/@Testpublic void testSet(){// 添加jedis.sadd("user","chenhaoxiang");jedis.sadd("user","hu");jedis.sadd("user","chen");jedis.sadd("user","xiyu");jedis.sadd("user","chx");jedis.sadd("user","are");// 移除user集合中的元素arejedis.srem("user","are");System.out.println("user中的value:"+jedis.smembers("user")); // 获取所有加入user的valueSystem.out.println("chx是否是user中的元素:"+jedis.sismember("user","chx")); // 判断chx是否是user集合中的元素System.out.println("集合中的一个随机元素:"+jedis.srandmember("user")); // 返回集合中的一个随机元素System.out.println("user中元素的个数:"+jedis.scard("user"));}/*** 排序*/@Testpublic void test(){jedis.del("number"); // 先删除数据,再进行测试jedis.rpush("number","4"); // 将一个或多个值插入到列表的尾部(最右边)jedis.rpush("number","5");jedis.rpush("number","3");jedis.lpush("number","9"); // 将一个或多个值插入到列表头部jedis.lpush("number","1");jedis.lpush("number","2");System.out.println(jedis.lrange("number",0,jedis.llen("number")));System.out.println("排序:"+jedis.sort("number"));System.out.println(jedis.lrange("number",0,-1)); // 不改变原来的排序jedis.del("number"); // 测试完删除数据}}
5. 运行结果
九、项目源码与资料下载
链接:https://pan.baidu.com/s/1ckd7J1JamotpQAxUQ05Ueg 提取码:lpa3
参考
博客园:Redis-RDB与AOF
https://www.cnblogs.com/wangfajun/p/5787077.html
博客园:redis.conf配置详细解析
https://www.cnblogs.com/kreo/p/4423362.html
博客园:几款开源的图形化Redis客户端管理软件推荐
https://www.cnblogs.com/zxtceq/p/7676862.html
博客园:Windows下安装Redis服务
https://www.cnblogs.com/jaign/articles/7920588.html
CSDN:Windows下Redis配置
https://blog.csdn.net/wdeng2011/article/details/78149719
CSDN:Windows下Redis服务开机自动启动教程(亲测可用)
https://blog.csdn.net/mhshencaobo/article/details/86136910
红黑联盟:Windows系统下设置Redis开机自启动的方法教程
https://www.2cto.com/database/201807/762681.html

若有收获,就点个赞吧
0 人点赞
