资源规划
| 组件 | bigdata-node1 | bigdata-node2 | bigdata-node3 |
|---|---|---|---|
| OS | centos7.6 | centos7.6 | centos7.6 |
| JDK | jvm | jvm | jvm |
| Presto | N.A | N.A | PrestoServer/presto-cli/YanagishimaServer |
安装介质
官网:https://prestodb.github.io
版本:presto-server-0.219.tar.gz、presto-cli-0.219-executable.jar、yanagishima-18.0.zip
下载:https://repo1.maven.org/maven2/com/facebook/presto/presto-server/0.219/presto-server-0.219.tar.gz、https://repo1.maven.org/maven2/com/facebook/presto/presto-cli/0.219/presto-cli-0.219-executable.jar、https://github.com/yanagishima/yanagishima/archive/18.0.zip
环境准备
安装JDK
参考:《 CentOS7.6-安装JDK-1.8.221 》
安装Python
安装Presto服务端
单机部署
解压
cd /sharewget https://repo1.maven.org/maven2/com/facebook/presto/presto-server/0.219/presto-server-0.219.tar.gztar -zxvf presto-server-0.219.tar.gz -C ~/modules/
配置
在安装目录中创建一个目录etc , 加入以下配置:
cd ~/modules/presto-server-0.219# 数据目录:用于存储日志、本地元数据等的数据目录mkdir data# 配置目录mkdir etc && cd ./etc
- 配置etc/node.properties。
节点属性:特定于每个节点的环境配置。
touch node.propertiesvi node.properties
内容如下:
# 环境名称(类似于集群名称),群集中的所有Presto节点必须具有相同的环境名称node.environment=production# Presto安装的唯一标识符,对于每个节点,这必须是唯一的node.id=presto1# 数据目录的位置(文件系统路径)。Presto将在此处存储日志和其他数据node.data-dir=/home/vagrant/modules/presto-server-0.219/data
- 配置etc/jvm.config。
JVM Config:Java虚拟机的命令行选项,包含用于启动Java虚拟机的命令行选项列表。该文件的格式是一个选项列表,每行一个。
touch jvm.configvi jvm.config
内容如下:
-server-Xmx16G-XX:+UseG1GC-XX:G1HeapRegionSize=32M-XX:+UseGCOverheadLimit-XX:+ExplicitGCInvokesConcurrent-XX:+HeapDumpOnOutOfMemoryError-XX:+ExitOnOutOfMemoryError
- 配置etc/config.properties。
配置属性:Presto服务器的配置,包含Presto服务器的配置。每个Presto服务器都可以充当协调器和工作器,但是专用一台机器来执行协调工作可以在更大的集群上提供最佳性能。
touch config.propertiesvi config.properties
内容如下:
coordinator=truenode-scheduler.include-coordinator=truehttp-server.http.port=8081query.max-memory=3GBquery.max-memory-per-node=1GBquery.max-total-memory-per-node=2GBdiscovery-server.enabled=truediscovery.uri=http://192.168.0.103:8081
配置解释:
- coordinator
允许此Presto实例充当协调器(接受来自客户端的查询并管理查询执行)。
- node-scheduler.include-coordinator
允许在协调器上安排工作。对于较大的集群,协调器上的处理工作可能会影响查询性能,因为计算机的资源不可用于调度,管理和监视查询执行的关键任务。
- http-server.http.port
指定HTTP服务器的端口。Presto使用HTTP进行内部和外部的所有通信。
- query.max-memory
查询可能使用的最大分布式内存量。
- query.max-memory-per-node
查询可在任何一台计算机上使用的最大用户内存量。
- query.max-total-memory-per-node
查询可在任何一台计算机上使用的最大用户和系统内存量,其中系统内存是读取器,写入程序和网络缓冲区等执行期间使用的内存。
- discovery-server.enabled
Presto使用Discovery服务查找群集中的所有节点。每个Presto实例都会在启动时使用Discovery服务注册自己。为了简化部署并避免运行其他服务,Presto协调器可以运行Discovery服务的嵌入式版本。它与Presto共享HTTP服务器,因此使用相同的端口。
- discovery.uri
Discovery服务器的URI。因为我们在Presto协调器中启用了Discovery的嵌入式版本,所以它应该是Presto协调器的URI。替换example.net:8080以匹配Presto协调器的主机和端口。此URI不得以斜杠结尾。
说明:此处为了方便**测试,不考虑性能,只用单节点,即是coordinator也充当worker。同时,**8080端口容易起冲突,将修改为8081。
分布式搭建,请参考官网,并修改相关配置:
https://prestodb.github.io/docs/current/installation/deployment.html
- 配置etc/log.properties。
日志级别配置文件,允许为命名的记录器层次结构设置最小日志级别。每个记录器都有一个名称,通常是使用记录器的类的完全限定名称。记录器具有基于名称中的点的层次结构(如Java包)。
touch log.propertiesvi log.properties
内容如下:
com.facebook.presto = INFO
连接器
配置多数据源:
mkdir -p ~/modules/presto-server-0.219/etc/catalog
Hive Connector
vi ~/modules/presto-server-0.219/etc/catalog/hive.properties
内容如下:
connector.name=hive-hadoop2hive.metastore.uri=thrift://192.168.0.101:9083hive.config.resources=/home/vagrant/modules/hadoop-2.7.2/etc/hadoop/core-site.xml,/home/vagrant/modules/hadoop-2.7.2/etc/hadoop/hdfs-site.xml
MySQL Connector
vi ~/modules/presto-server-0.219/etc/catalog/mysql.properties
内容如下:
connector.name=mysqlconnection-url=jdbc:mysql://192.168.0.103:3306?useUnicode=true&characterEncoding=UTF-8&useSSL=false&autoReconnect=true&failOverReadOnly=falseconnection-user=rootconnection-password=123456
更多关于连接器的配置信息,请参考官网:
https://prestodb.github.io/docs/current/connector.html
启动服务
cd ~/modules/presto-server-0.219# 前台方式启动./bin/launcher run# 守护进程方式启停./bin/launcher start./bin/launcher stop./bin/launcher kill./bin/launcher restart./bin/launcher status
验证
# 进程查看jpsps -ef | grep presto# 日志查看tail -f -n 100 /home/vagrant/modules/presto-server-0.219/data/var/log/http-request.log
集群部署
安装Presto CLI
Presto CLI提供了一个基于终端的交互式shell,用于运行查询。CLI是一个自动执行的JAR文件,这意味着它的行为类似于普通的UNIX可执行文件。
cd ~/modules/presto-server-0.219# 下载介质wget https://repo1.maven.org/maven2/com/facebook/presto/presto-cli/0.219/presto-cli-0.219-executable.jar# cp /share/presto-cli-0.219-executable.jar ~/modules/presto-server-0.219/mv presto-cli-0.219-executable.jar presto-cli# 设置执行权限chmod +x presto-cli
- Hive Connector
若连接器使用Hive Connector,则启动Presto CLI之前需要先启动Hive服务。
cd ~/modules/apache-hive-2.3.4-binnohup bin/hive --service metastore >/dev/null 2>&1 &
启动Presto CLI:
cd ~/modules/presto-server-0.219./presto-cli --server 192.168.0.103:8081 --catalog hive --schema defalutjava -jar presto-cli --server 192.168.0.103:8081 --catalog hive --schema defalut
命令行终端中输入:
show schemas;
如果显示的信息与Hive中的信息一致就可以了,有一点点不同,hivesql中的database,在这里叫schema。所以查看数据库时,就得用show schemas,且查询时每个表必须要加上schema;
- MySQL Connector
启动Presto CLI:
cd ~/modules/presto-server-0.219./presto-cli --server 192.168.0.103:8081 --catalog mysql --schema eaglejava -jar presto-cli --server 192.168.0.103:8081 --catalog mysql --schema eagle
命令行终端中输入:
show tables;
Web UI:http://bigdata-node3:8081
安装Presto可视化客户端
■ yanagishima
解压
cd /sharewget https://github.com/yanagishima/yanagishima/archive/18.0.zipcp yanagishima-18.0.zip ~/modules/cd ~/modulesunzip yanagishima-18.0.zip
配置
vi ~/modules/yanagishima-18.0/conf/yanagishima.properties
Hive Connector
presto.datasources=root-presto presto.coordinator.server.root-presto=http://192.168.0.103:8081 catalog.root-presto=hive schema.root-presto=default sql.query.engines=presto auth.mysql-presto=false
默认配置
presto.query.max-run-time-seconds=1800 presto.max-result-file-byte-size=1073741824 select.limit=500 audit.http.header.name=some.auth.header use.audit.http.header.name=false to.values.query.limit=500 check.datasource=false cors.enabled=false
- **MySQL Connector**```shell# web portjetty.port=7080# MySQL Connectorpresto.datasources=mysql-prestopresto.coordinator.server.mysql-presto=http://192.168.0.103:8081catalog.mysql-presto=mysqlschema.mysql-presto=eaglesql.query.engines=prestoauth.mysql-presto=false# 默认配置presto.query.max-run-time-seconds=1800presto.max-result-file-byte-size=1073741824select.limit=500audit.http.header.name=some.auth.headeruse.audit.http.header.name=falseto.values.query.limit=500check.datasource=falsecors.enabled=false
启动
cd ~/modules/yanagishima-18.0nohup bin/yanagishima-start.sh >y.log 2>&1 &
验证
Web UI:http://bigdata-node3:7080
-- 注意:SQL结束不要使用分号(“;”)show tablesSELECT * FROM mysql.eagle."ke_users" LIMIT 100SELECT * FROM ke_users
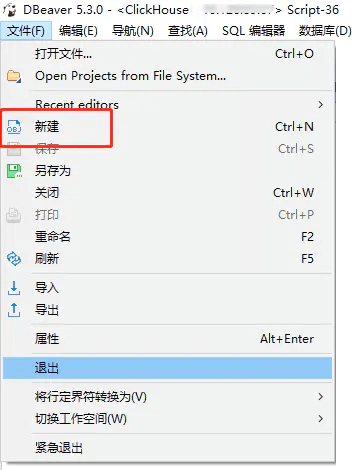
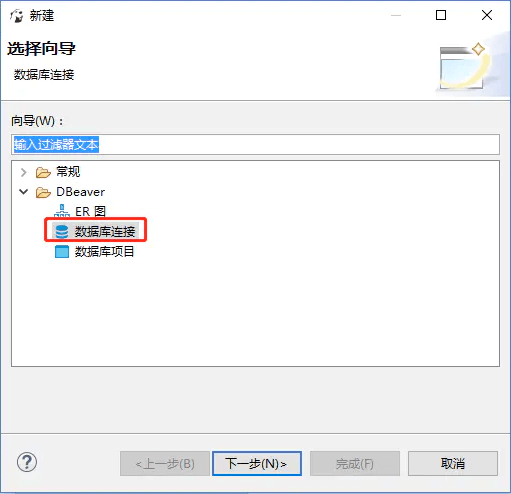
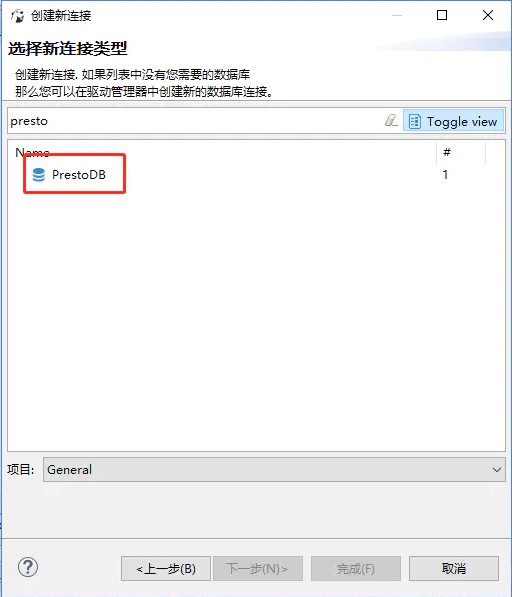
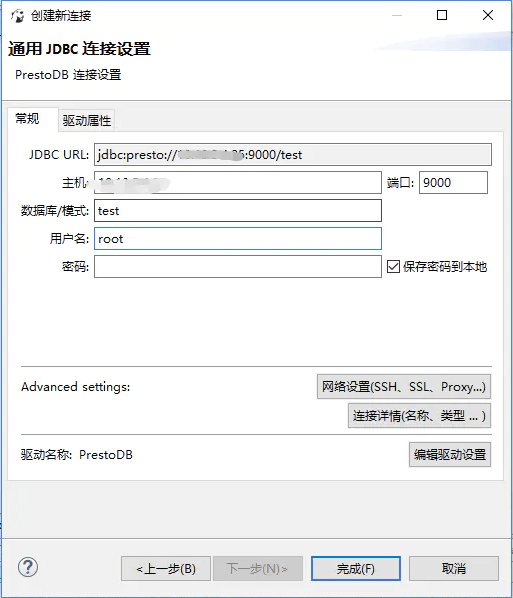
■ DBeaver
1. 新建数据源
2. 选择向导
3. 选择连接类型
4. 连接设置
5. 验证
进行如上操作直接点击完成即可自动下载jdbc驱动,下载过程可能会失败,多试几次即可,驱动下载完毕即可连接Presto,然后就可以执行查询了。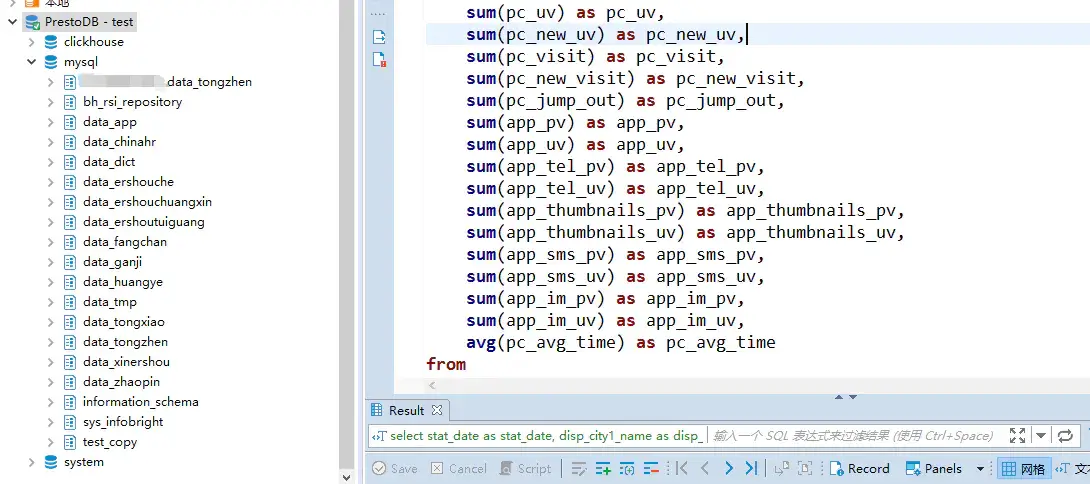
参考
CSDN:Presto部署安装
https://blog.csdn.net/onionm/article/details/99011996
简书:Presto安装及连接MySQL
https://www.jianshu.com/p/1936d345abac?from=singlemessage

若有收获,就点个赞吧
0 人点赞
