- Foreword
- Version description —— compared with version 006
- New features
- Wi-Fi-based field control
- CyberOS UIs
- New block and MicroPython API
- Official release of the Bluetooth Controller extension for CyberPi
- Chassis calibration
- Showing expression with the 8×16 LED matrix
- Official release of the Network extension
- Providing the user cloud message function in Python 3 programming [coming soon]
- BUG fixes and user experience improvement
- Added Python 3 Programming for mBot2 [coming soon]
- Modified the Wi-Fi function
- Modified the fast charging function for mBot2
- Optimized CyberOS
- Updated the start UI
- Modified the menu hierarchy and items
- Revised texts
- Increased the function of the HOME button
- Added the function for displaying the battery level of an external battery
- Block and MicroPython APIs
- Added the function for displaying the firmware version of an extension board
- Added the function for resetting CyberPi
- Added the items Preset and My programs
- Improved the motion performance of mBot2
- Improved the Quad RGB Sensor extension
- Blocks and micro-python API
Foreword
This page provides details about iteration 007 of CyberPi.
Most iterations upgrade the product incrementally while being compatible with earlier versions, so the programs you compile for earlier versions can be used in the latest version.
Understanding the information on this page may require some background knowledge. If you have already purchased the latest version of CyberPi, or are using an earlier version and have no questions about feature updates, you don’t have to read this page.
Version description —— compared with version 006
- Added the underlying feature of Wi-Fi-based field control for subsequent official release of functions
- Optimzied the start and menu UIs of CyberOS, facilitating the use of preset programs
- Fixed the found bugs and supported the enhanced version of mBot2 Shield, in which an external battery port was provided
- Fixed some bugs of the Network APIs to faciliate the further development of courses using CyberPi in fields such as communication engineering
- Added APIs for mBot2 in the Python 3 library developed for CyberPi
- Added blocks and functions to the 8×16 LED matrix and quad RGB sensor
| Release date | September 30 |
| —- | —- |
| Hardware version | CyberPi PCB V1.1
Pocket Shield PCB V1.1
mBot2 Shield PCB V1.1 (PCBA V1.0)
mBot2 Shield PCB V1.2
*An external battery port is added to mBot2 Shield V1.2, so that mBot2 can be used in competitions with higher performance requirements. | | Firmware version | CyberPi 007 firmware (NEW)
Pocket Shield 006 firmware
mBot2 Shield 004 firmware (NEW) | | mBlock extension | Cyberpi 1.1.20(NEW)
pocket_shield 0.03
mbot2 0.02
mbuild_quad_color_sensor 0.02
cyberpi_mbuild_ultrasonic2 0.01
cyberpi_mbuild_science 0.01
halocode_network 0.0.2(NEW) | | mBlock IDE | Web version 1.0.4
PC version 5.3.1
Mobile version 2.1.3 |
New features
Wi-Fi-based field control
In 433 band-based field control mode, MakeboX communicates with the power management module on the robot through the 433 band and thus controls the robot and obtains its status information.
In the Wi-Fi-based field control mode, MakeboX interacts with the robot based on the Wi-Fi ESP32_NOW protocol. In all the coming competition events where CyberPi is used, MakeboX will control robots and obtain their status information in the Wi-Fi-based field control mode.
CyberOS UIs
The following UI is added on CyberOS. Choose Settings > About CyberPi to find it. After you scan the QR code with your smart phone where the MakeX officiating app is installed, your smart phone, MakeboX, and CyberPi can communicate with each other wirelessly.
With the Wi-Fi-based field control technology and MakeboX, the MakeX officiating app can pause, restart, and monitor the status of robots in competitions, which can be expected in the some of 2022 competitions.
New block and MicroPython API
| Block (available only in Upload mode) | API |
|---|---|
 You can find this block in the Sensing category after adding CyberPi from the device library. |
cyberpi.is_makex_mode(name) Determines what stage CyberPi is in. Parameters: - name str, indicating the possible state of a competition. Value range:- auto:automatic mode- manual:manual mode |
Returns a boolean value.
Note: A competition can be in another state instead of these two states, subject to the default states you have defined on CyberPi before connecting it to MakeboX. |
Official release of the Bluetooth Controller extension for CyberPi
The 007 firmware officially supports the Bluetooth Controller extension, and you can use the following blocks to write your programs.
Chassis calibration
The chassis calibration function is added. With this function, after you change the wheelbase and wheel diameter of mBot2, it still can execute commands, such as turning 90 degrees, accurately through calibration and intelligent turning coefficient setting. In addition, this function, to some extent, resolves the problem of inaccurate turning caused due to improper building of mBot2.
| Block (available only in Upload mode) | APIs |
|---|---|
 |
mbot2.set_auto() mbot2.reset() |
Showing expression with the 8×16 LED matrix
An expression block is added in the 8×16 LED Maxtrix extension for CyberPi. You can use this block to write programs for mBot2, making it a robot with emotions.
| Block (available only in Upload mode) | APIs |
|---|---|
 |
cyberpi.emotion.look_up() cyberpi.emotion.look_down() cyberpi.emotion.look_left() cyberpi.emotion.look_right() cyberpi.emotion.look_around() cyberpi.emotion.blink() cyberpi.emotion.smile() cyberpi.emotion.yeah() cyberpi.emotion.naughty() cyberpi.emotion.proud() cyberpi.emotion.yummy() cyberpi.emotion.uh_oh() cyberpi.emotion.wow() cyberpi.emotion.hurt() cyberpi.emotion.sad() cyberpi.emotion.angry() cyberpi.emotion.hello() cyberpi.emotion.sprint() cyberpi.emotion.startle() cyberpi.emotion.shiver() cyberpi.emotion.dizzy() cyberpi.emotion.sleepy() cyberpi.emotion.zzz() cyberpi.emotion.wake_up() cyberpi.emotion.yes() cyberpi.emotion.no() |
Official release of the Network extension
In version 007, bugs reported by users are fixed and the Network extension is officially released. You can use it to teach network communications.
Your feedback and suggestions are welcome, and we will improve the extension accordingly to give full play to the value of CyberPi in education.
| Blocks (available in both Upload and Live modes) | Function | API(s) |
|---|---|---|
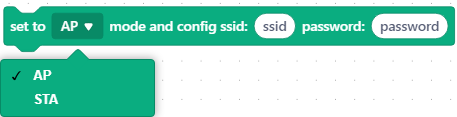 |
cyberpi.network.config_ap(ssid, password) cyberpi.network.config_sta(ssid, password) |
|
 |
Determines whether CyberPi connects to the network | cyberpi.network.is_connect() |
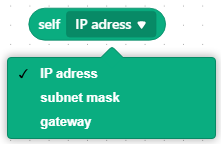 |
cyberpi.network.get_ip() cyberpi.network.get_subnet_mark() cyberpi.network.get_gateway() |
|
 |
str Example: ‘192.168.4.1’ |
cyberpi.network.set_ip(ip) |
 |
cyberpi.network.create_client() | |
 |
ip : ‘192.168.4.1’ port: 5050 |
cyberpi.network.client_connect_to(ip, port) |
 |
cyberpi.network.create_server(port) | |
 |
cyberpi.network.server_wait_connection(port) | |
 |
cyberpi.network.server_get_latest_connection(port) | |
 |
cyberpi.network.server_get_connections(port) | |
 |
cyberpi.network.server_get_connections(port)[index] | |
 |
Messages sent using this API will end with a line break. data:str ip_to:str port:int |
cyberpi.network.write_line(data, ip_to, port) |
 |
When this API is run, CyberPi listens for messages from 192.168.4.1 at the port it specifies. When a line break is received, CyberPi determines that a full line of data is received and returns the received message. ip_from: str port: int |
cyberpi.network.read_line(ip_from, port) |
 |
data: str ip_to: str port: int |
cyberpi.network.write(data, ip_to, port) |
 |
When this API is run, CyberPi listens for messages from 192.168.4.1 at the port it specifies until the data received reaches the specified length, and CyberPi will return a message at the specified length. ip_from: str data_size: int port: int |
cyberpi.network.read(ip_from, data_size, port) |
In Simple Network mode, CyberPi works as a client (STA) by default and connects to other non-CyberPi devices (e.g. a phone, a server on a LAN). By default, port 5050 is used to implement data communication.
| Blocks (available in both Upload and Live modes) | Function | API(s) |
|---|---|---|
 |
Establish a connection between CyberPi and the AP with the corresponding ssid, password, and ip address. Set CyberPi as a client. | cyberpi.network.config_sta(ssid, password) cyberpi.network.create_client() cyberpi.network.client_connect_to(ip, port=5050) |
 |
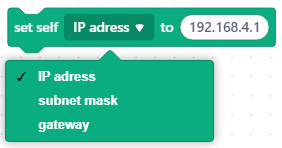
Change your IP address | cyberpi.network.set_ip(ip) |
 |
Connect to a “server” at a specific address and send a message | cyberpi.network.client_connect_to(ip, port=5050) cyberpi.network.write_line(data, ip_to, port) |
 |
Read data from a specific server | cyberpi.network.read_line(ip_from, port=5050) |
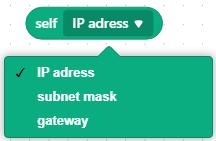 |
cyberpi.network.get_ip() cyberpi.network.get_subnet_mark() cyberpi.network.get_gateway() |
|
 |
cyberpi.network.is_connect() |
Providing the user cloud message function in Python 3 programming [coming soon]
We will soon update the Python 3 library for Cyberpi to support the user cloud message function. Stay tuned to the updates in the Python API Documentation for CyberPi.
BUG fixes and user experience improvement
Added Python 3 Programming for mBot2 [coming soon]
Most of the features supported by MicroPython will be supported by Python 3. For example, mBot2 will support Python 3 programming.
Stay tuned to the updates in the Python API Documentation for CyberPi.
Modified the Wi-Fi function
In versions earlier than 007, CyberPi automatically connects to the Wi-Fi network it has connected to last time, which affects the ESP32-NOW communication. Therefore, this function is deleted, and you need to connect CyberPi to the Wi-Fi network through the block or API.
| Blocks (available in both Upload and Live modes) | Function | API |
|---|---|---|
 |
CyberPi stores the name and password of the last Wi-Fi network it has connected to and connects to that network when this block is used. | cyberpi.Wi-Fi.reconnect() |
 |
Disconnects CyberPi from the Wi-Fi network. CyberPi is restored to the default communication channel to ensure the LAN broadcast quality of the CyberPi. |
cyberpi.Wi-Fi.disconnect() |
Modified the fast charging function for mBot2
To improve the fast charging experience on mBot2, the fast charging activation function is deleted. You don’t need to activate fast charging any more. In version 007, by default, fast charging is enabled when the power switch of mBot2 is turned off.
Optimized CyberOS
Updated the start UI
The start UI is updated due to the new VI of Makeblock.
Modified the menu hierarchy and items
- Programs are categorized into Preset and My programs after you choose Switch Program.
- The items About CyberPi and Reset CyberPi are added after you choose Settings.
- The option Activate fast charging is deleted.
Revised texts
Known text mistakes are corrected.Increased the function of the HOME button
After pressing HOME to enter CyberOS, you can press HOME again to quickly return to the homepage.Added the function for displaying the battery level of an external battery
After connecting the enhanced mBot2 Shield to CyberPi, the external battery level is also displayed. You can clearly see the status of both the internal and external batteries.
(The battery icon on the right indicates the power level of the internal battery, and that on the left indicates the power level of the external battery.)Block and MicroPython APIs
| Block (supports both the upload and live modes) | API | | —- | —- | | | cyberpi.get_extra_battery()
Returns the power level of the external battery, 0–100
This function is available only for mBot2 Shield V1.2. |
Added the function for displaying the firmware version of an extension board
Choose Settings > Update. The firmware version of the extension board is shown, so that you can understand the firmware versions of your devices. 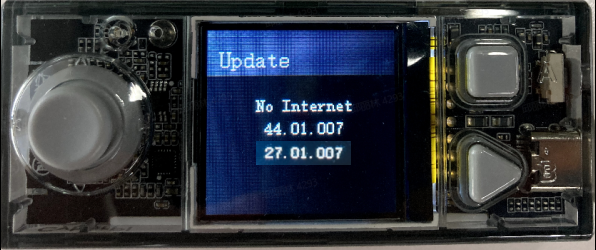
Added the function for resetting CyberPi
Choose Settings > Reset. When the reset starts, the following UI is displayed: 
When the reset is complete, the homepage is displayed.
Resetting CyberPi deletes all the data you’ve uploaded to CyberPi, all the Wi-Fi settings, and the name you set for CyberPi.
Added the items Preset and My programs
After you choose Switch program, you can choose between Preset and My programs.
Program SNs are deleted to give space for program names.
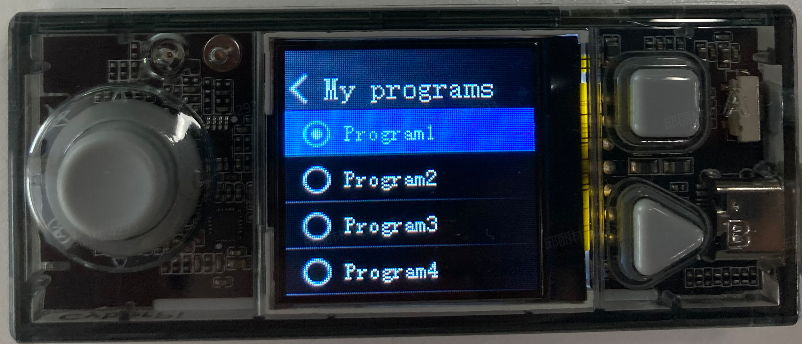
(You can pull the joystick to left or right to switch between preset programs and user-defined programs.)
Preset programs
The Preset programs include several default programs. Names are given to help users understand the functions of the programs.
My programs
My programs are programs uploaded by users. Names you set for the programs on mBlock 5 are displayed.
Logic of overriding in program uploading
When a preset program is being executed, a program you upload replaces Program1 in My programs.
Improved the motion performance of mBot2
- Used the chassis calibration function to reduce errors that may occur when mBot2 moves forward or makes turnings.
- Updated the CyberPi firmware to control the accumulative errors of the encoder motors rotating in angles within ±3° in a single thread.
- Deleted the default self-locking setting for the encoder motors in the CyberPi firmware, so that no unexpected sounds are made by the encoder motors when they are not moving (when their speed are set to 0).
Improved the Quad RGB Sensor extension
The user-defined color option is added.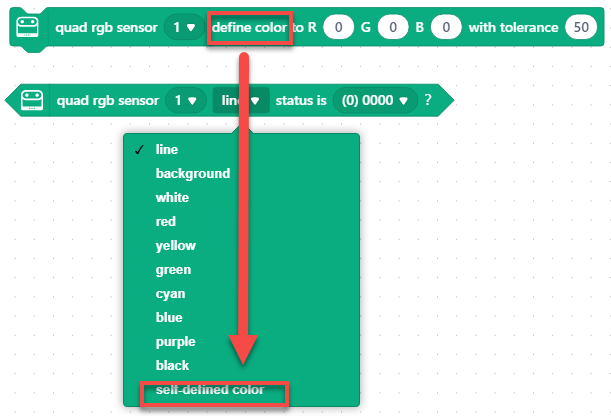
Blocks and micro-python API
| Blocks (available in both Upload and Live modes) | APIs | Function | | —- | —- | —- | |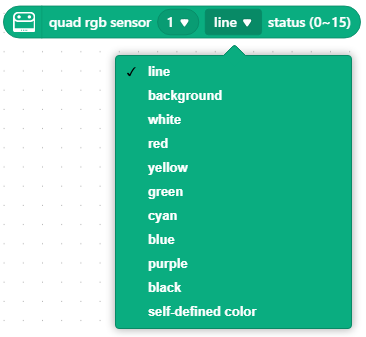 | mbuild.quad_rgb_sensor.get_line_sta(position, index)
mbuild.quad_rgb_sensor.get_ground_sta(position, index)
mbuild.quad_rgb_sensor.get_white_sta(position, index)
mbuild.quad_rgb_sensor.get_red_sta(position, index)
mbuild.quad_rgb_sensor.get_yellow_sta(position, index)
mbuild.quad_rgb_sensor.get_green_sta(position, index)
mbuild.quad_rgb_sensor.get_cyan_sta(position, index)
mbuild.quad_rgb_sensor.get_blue_sta(position, index)
mbuild.quad_rgb_sensor.get_purple_sta(position, index)
mbuild.quad_rgb_sensor.get_black_sta(position, index)
mbuild.quad_rgb_sensor.get_custom_sta(position, index)
Position: “middle” or “all”
middle:L1, R1
all: L2, L1, R1,R2 | The quad RGB sensor identifies the status of the color, line, and background.
Returning 1 means the identification result of the corresponding probe is true.
0 means the probe does not identify the corresponding color, line or background.
The final return value is the decimal value corresponding to the binary value of 0000~1111, and the type is int. | |
 | You can get the transcode of these blocks based on the preceding APIs. | |
|
| You can get the transcode of these blocks based on the preceding APIs. | |
|  | mbuild.quad_rgb_sensor.set_led_color() | Set the color of the fill light in line following. Using this function will overwrite the fill light color setting selected for line-following learning. |
|
| mbuild.quad_rgb_sensor.set_led_color() | Set the color of the fill light in line following. Using this function will overwrite the fill light color setting selected for line-following learning. |
|  | mbuild.quad_rgb_sensor.close_led() | Temporarily turn off the fill light. When any sensing function of the line-following sensor is used, the line-following fill light is lit up. |

若有收获,就点个赞吧
0 人点赞
