 |
简体中文 |
|---|---|
| English | |
| 日本語 |
Thank you for choosing CyberPi!
If you use CyberPi for the first time, read this guide carefully and follow the instructions so that you won’t miss its functions.
1. Before you use CyberPi
1.1 Power on CyberPi
Use a Micro USB cable (Type-C) to connect CyberPi to your PC.
The PC can supply power for CyberPi.
:::info Note:
- The Micro USB cable is not included in the package. You need to purchase one separately.
- You can also use a power bank to supply power for CyberPi.
:::
:::info
 When charging CyberPi, ensure that the voltage is lower than 6 V. The hardware of CyberPi may be damaged if the voltage is equal to or higher than 6 V.
:::
When charging CyberPi, ensure that the voltage is lower than 6 V. The hardware of CyberPi may be damaged if the voltage is equal to or higher than 6 V.
:::

Alternatively, you can purchase Pocket Shield.
Pocket Shield is equipped with a built-in rechargeable battery that can supply power for CyberPi and provides 2-pin and 3-pin interfaces that can be used to connect servos, LED strips, and motors, which significantly improves the extensibility of CyberPi.1.2 Know about your CyberPi
1.2.1 Hardware functions

1.2.2 Default functions of the joystick and buttons
CyberPi is equipped with one joystick and two buttons.
On system UIs, the default functions of the joystick and buttons are described as follows.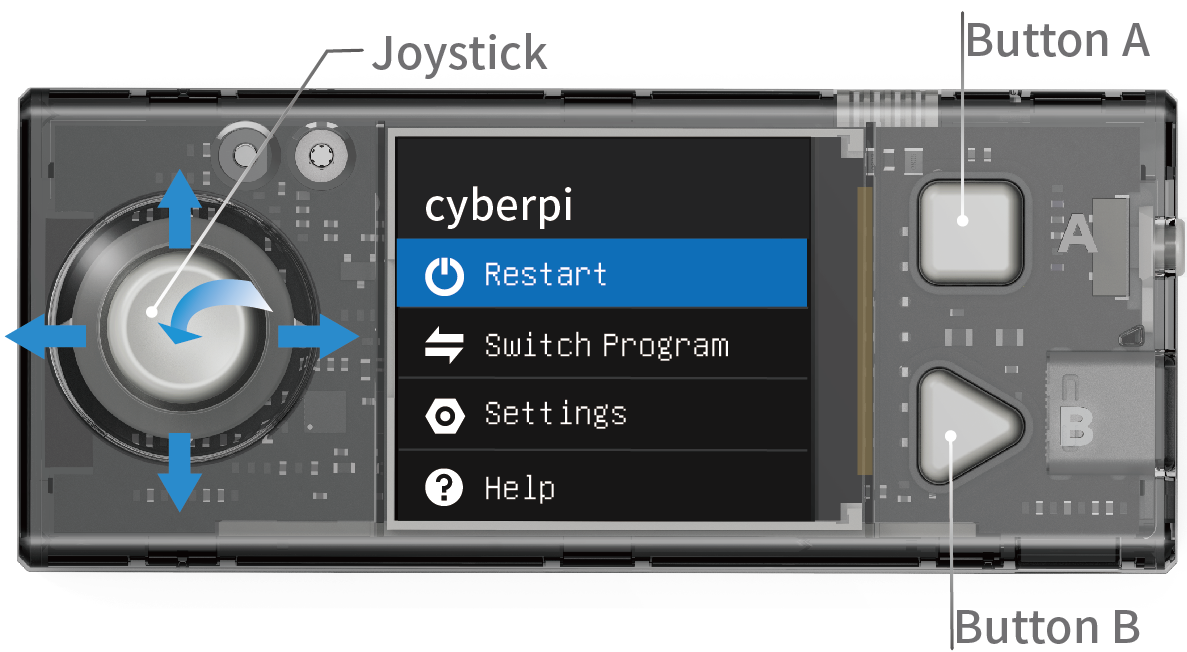
- Move the joystick up: to select the previous item
- Move the joystick down: to select the next item
- Move the joystick to the left: to select the left item
- Move the joystick to the right: to select the right item
- Press the joystick in the middle: to confirm the selection and enter the lower-level menu, if any
- Button A: to return to the upper-level menu
- Button B: to confirm the selection and enter the lower-level menu, if any
2. Enter the CyberOS homepage
CyberPi runs CyberOS.
After being powered on, CyberPi displays the system homepage.
If it doesn’t display the homepage, you can press the Home button on the right side of CyberPi to enter the homepage.
After starting CyberOS, you can use the preset programs, set the system language, and update the system through the Internet.
You can exit from the homepage by choosing “Restart Program”, and the system automatically executes the last program you’ve executed.
:::info Note: When CyberPi is connected to mBlock 5 and being programmed in Live mode, the HOME button doesn’t take effect and you can’t enter the homepage by pressing it. :::
2.2 Set the system language
If the default system language is not your native language, you can change it.
The following takes the steps for changing the language from English to Chinese as an example:
(1) Enter the homepage, select Settings by moving the joystick up or down, and press B to enter the Settings page.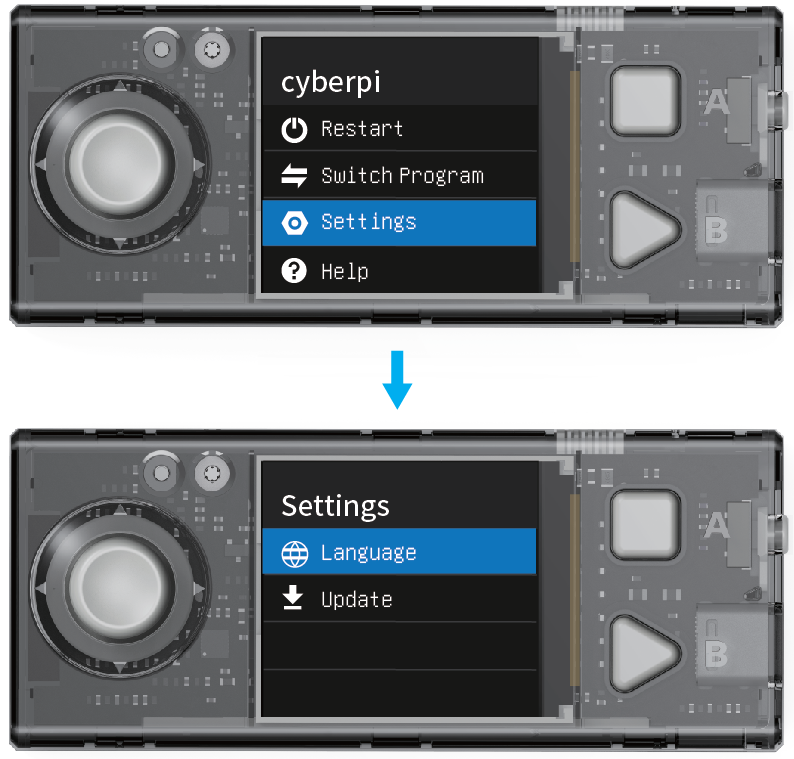
(2) On the Settings page, select Language by moving the joystick up or down and press button B to enter the Language page.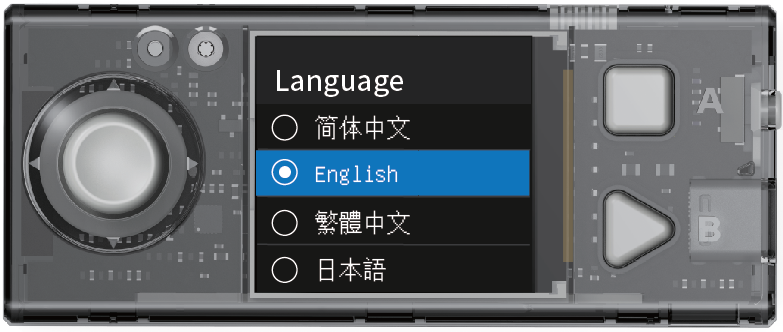
(3) On the Language page, select 简体中文 by moving the joystick up or down and press button B to complete the setting.
After you set a language, the system switches to the language and returns to the homepage.
2.3 Switch programs
CyberPi can store multiple programs and you can switch them. In addition, CyberPi is delivered with several default example programs on it to help you understand its main functions.
:::info Note:
- Internet access is required for AI and IoT programs, and therefore they are not included in the default example programs and are provided in the example programs on mBlock 5. Find them by choosing Tutorials > Example Programs on mBlock 5.
- The program you upload to CyberPi on mBlock 5 replaces the one you have used last time. The default example programs are provided, and you can restore them by uploading them to your CyberPi. :::
(1) Enter the homepage, select Switch Program by moving the joystick up or down, and press B to enter the Switch Program page.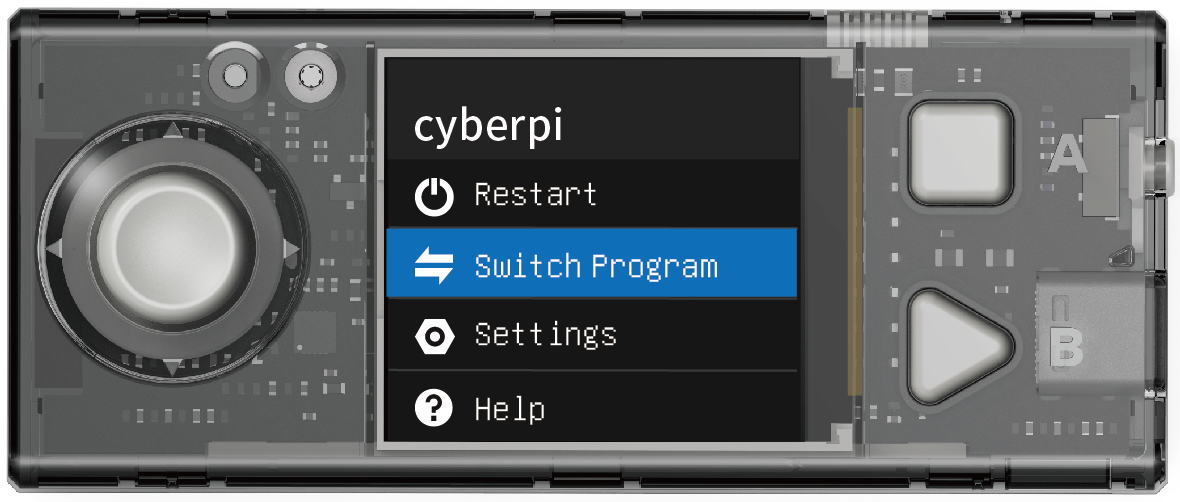
(2) On the Switch Program page, select a program, for example, Program1, by moving the joystick up or down, and then press button B.
CyberPi restarts and executes Program 1.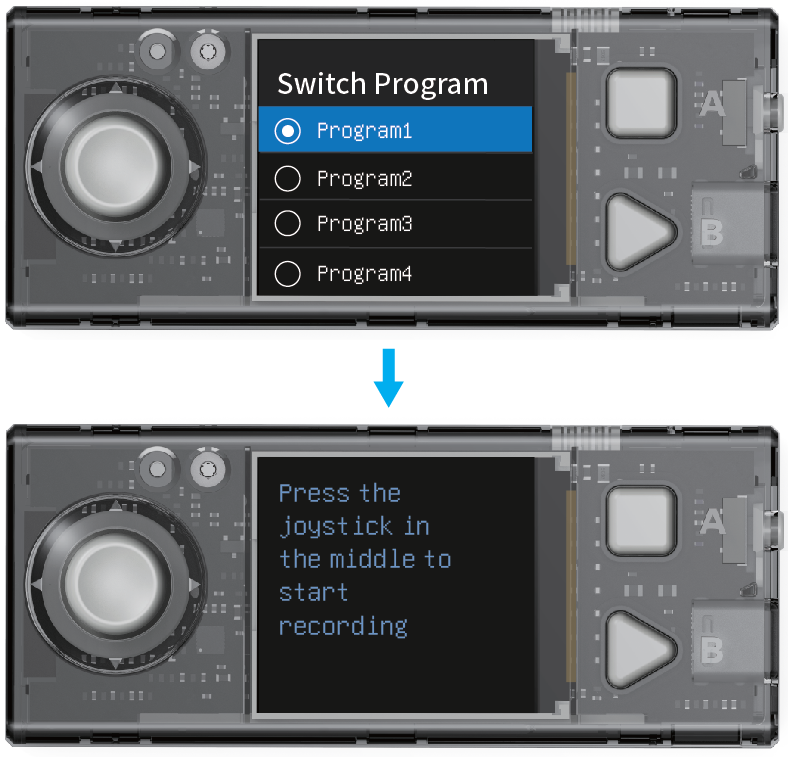
CyberPi displays the name of the program first and then prompts you to perform the steps required for executing the program.
3. Start programming
This section describes how to program CyberPi on mBlock 5. You can use the powerful functions of CyberPi through programming.
3.1 Download and install the required software
Currently, CyberPi supports the block-based graphical programming and Python programming. Make sure that you have downloaded and installed the required software.
| Language | Editor | mBlock 5 version | Required software | URL address |
|---|---|---|---|---|
Scratch, MicroPython |
mBlock Block-based Editor |
PC client on Windows/Mac |
mBlock 5 for Windows mBlock 5 for Mac |
N/A |
Web version on Windows/Mac |
Google Chrome mLink2 for Windows mLink2 for Mac |
https://ide.mblock.cc | ||
Web version on Chromebook |
mLink for Chromebook For details about how to use mBlock 5 to program CyberPi on Chromebook, see “Programming CyberPi on Chromebook.” |
https://ide.mblock.cc | ||
| Scratch | mBlock Block-based Editor | Mobile app |
mBlock 5 app | Use your phone or tablet to scan the QR code: Alternatively, search for “Makeblock” in app stores. |
| Python, MicroPython | mBlock-Python Editor | Web version on Windows/Mac |
Google Chrome mLink2 for Windows mLink2 for Mac |
https://python.makeblock.com/ |
3.2 Block-based programming
3.2.1 Add and connect CyberPi
(1) Open mBlock 5.
Open mLink2 if you are to use mBlock 5 on the web. :::info
Note: To use some cloud service functions, you need to sign in to your mBlock 5 account. Sign up an account if you haven’t got one.
:::
:::info
Note: To use some cloud service functions, you need to sign in to your mBlock 5 account. Sign up an account if you haven’t got one.
:::
(2) Use a Micro USB cable (Type-C) to connect CyberPi to your PC. 
(3) Click + add on the Devices tab, select CyberPi in the device library, and click OK.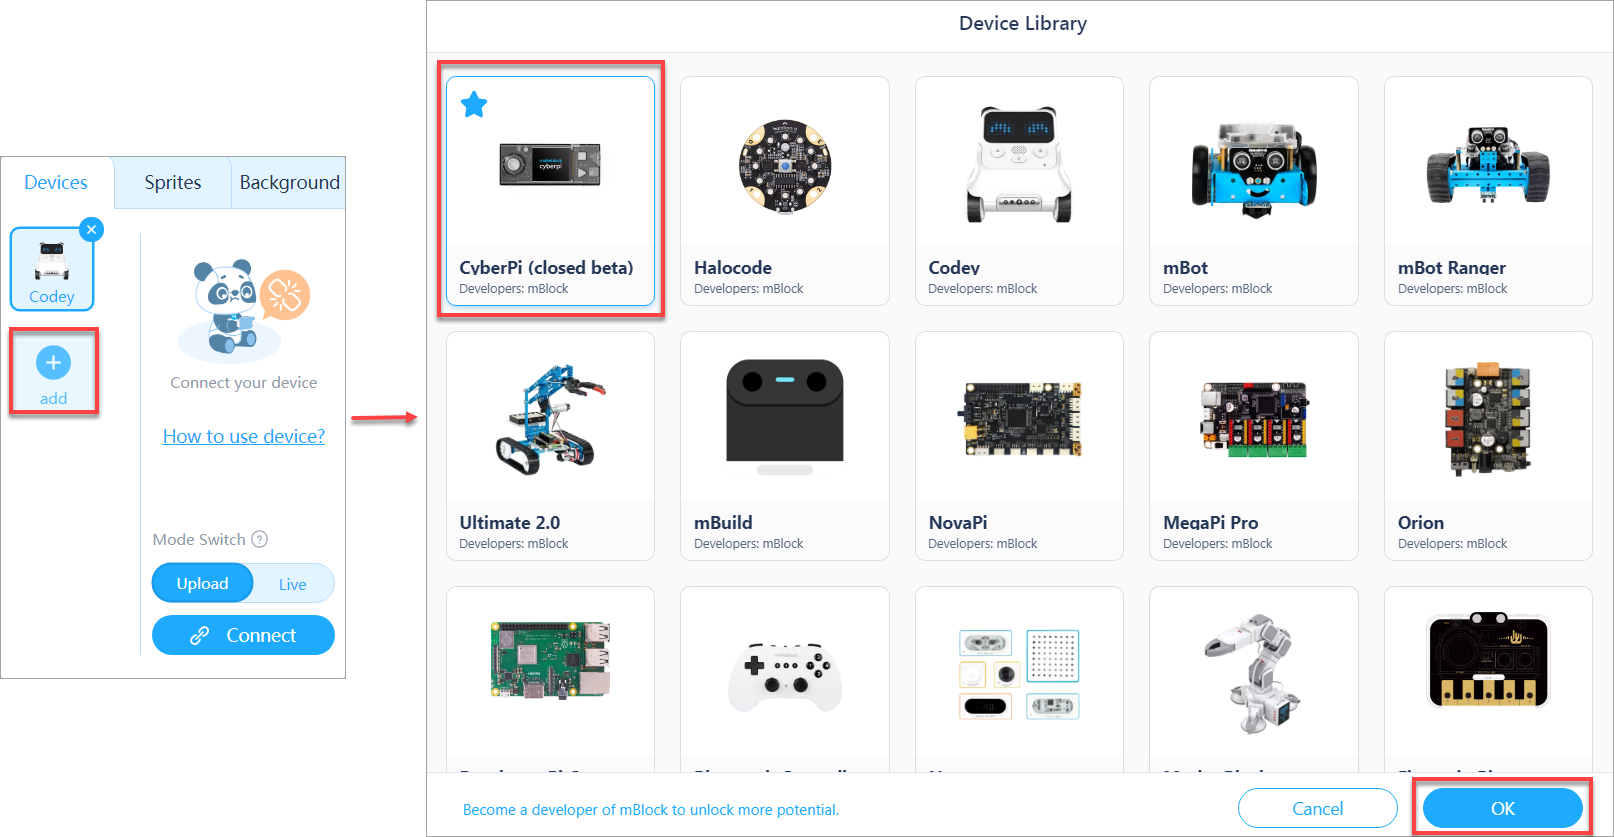
(4) Click Connect to connect CyberPi to mBlock 5.
A message is displayed after CyberPi is connected, indicating that the connection is successful.
(5) Set the programming mode.
mBlock 5 provides two programming modes, namely Live and Upload. You can click to switch the modes.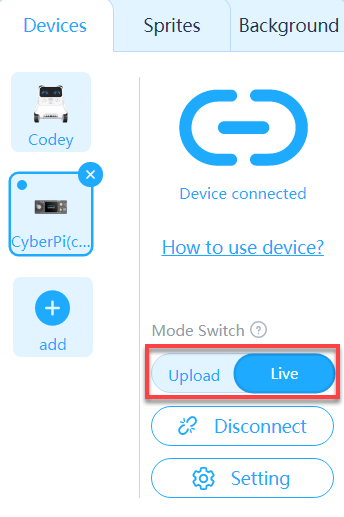
Live: In this mode, you can view the program execution effect in real time, which facilitates the debugging of the program. In this mode, you must keep CyberPi connected to mBlock 5. If they are disconnected, the program cannot be executed.
Upload: In this mode, you need to upload the compiled program to CyberPi. After being successfully uploaded, the program can still run properly on CyberPi when it is disconnected from mBlock 5.
3.2.2 Example programs
mBlock 5 provides a large number of example programs.
Choose Tutorials > Example Programs and click CyberPi to view example programs provided for CyberPi.
You can select and load a program to view, execute, or upload it to CyberPi.
3.2.3 Block help
mBlock 5 provides multiple types of blocks for CyberPi. If you don’t understand a block when using it, you can right-click it and click Help that appears.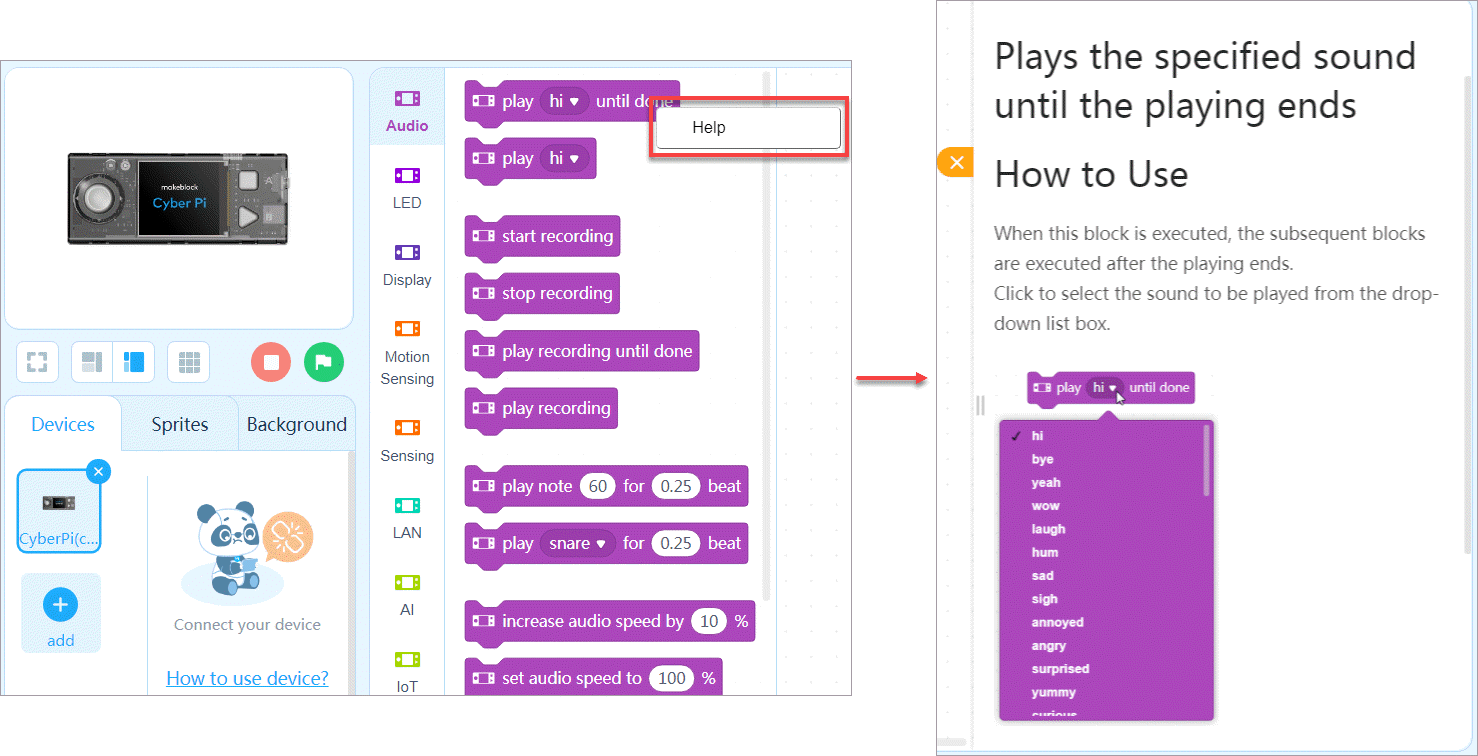
3.2.4 Programming languages
mBlock 5 provides two programming languages for CyberPi, namely block-based programming and Python. In Upload mode, you can click the buttons on the right to switch the programming languages.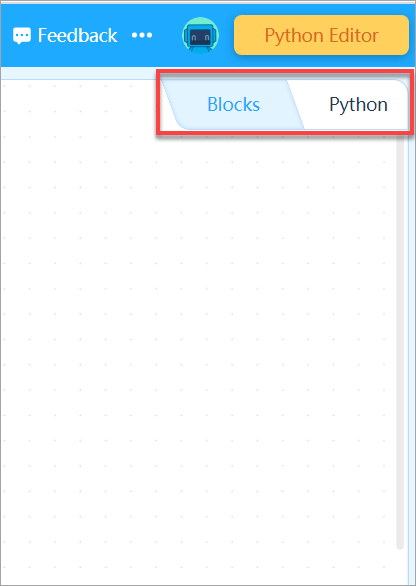
In addition, when programming CyberPi in the block-based language, you can click the switching button on the right to view the corresponding Python statements (obtained by converting the blocks).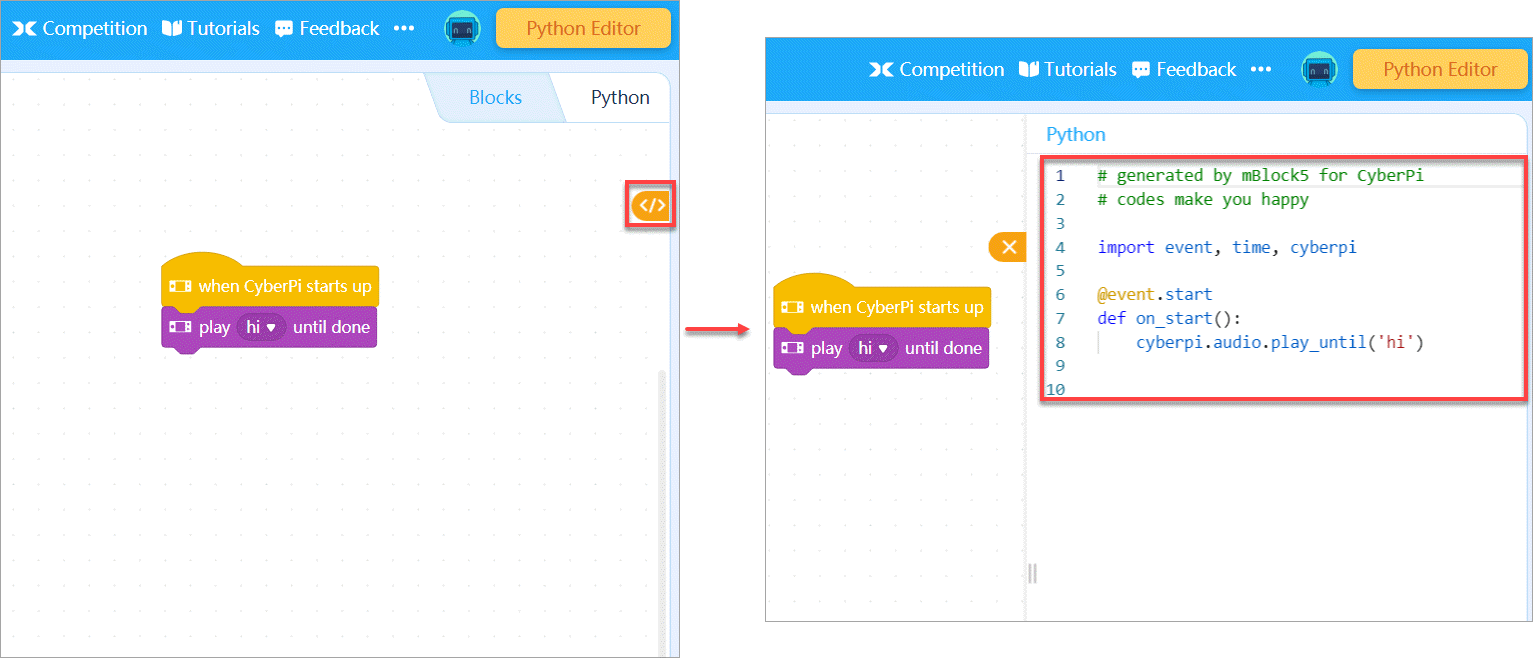 :::tips
Note: You can see Python API Documentation for CyberPi to know about more functions of CyberPi.
:::
:::tips
Note: You can see Python API Documentation for CyberPi to know about more functions of CyberPi.
:::
3.2.5 Example: Compile the “Marquee” program
Perform the following steps to compile a program using blocks in Live mode to implement the marquee effect of the LEDs on CyberPi.
(1) Set the programming mode to Live.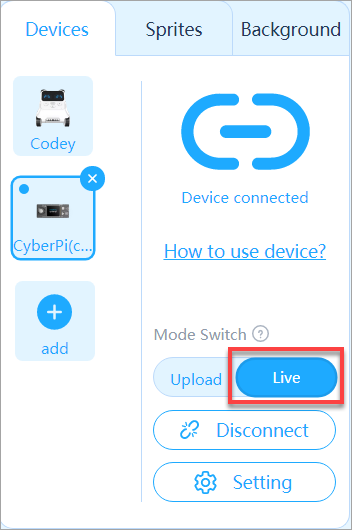
(2) Set the initial color(s) of the LEDs.
Set the initial colors to red, orange, yellow, green, and cyan.
(3) Set a condition for rolling the colors. 
Each time button A on CyberPi is pressed, the colors roll from left to right by one position.
(4) Add an event that triggers the program.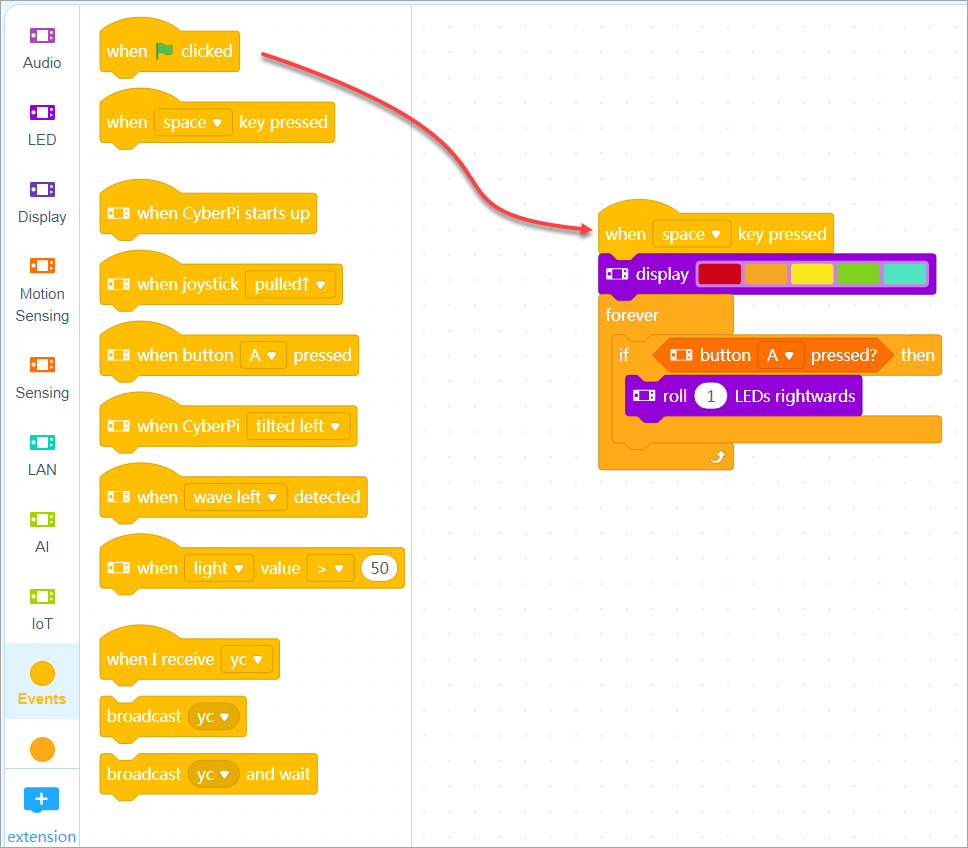
The program is to be executed when you press the space key.
The Marquee program is complete.
Press the space key, and then keep pressing button A to see the execution result of the program.
(5) Name the project and save it.
After saving a project, you can click your user image and choose My Projects to view it.
:::info Note: To save projects, you need to sign in to mBlock 5 first. :::
You can also save your project to the local disk.
3.3 Python programming
Open mBlock-Python Editor on Google Chrome.
For details about how to program CyberPi on mBlock-Python Editor, see mBlock-Python Editor Online Help.
4. Online help
After-sales services and technical support
If you encounter any product quality problems or find any parts missing or damaged when you open the package, or if you need any technical support, contact us for after-sales services through:
support@makeblock.com
(Service hours: 9:00–12:00 & 14:00–18:30 from Monday to Friday)
Feedback and suggestions
Should you have any feedback or suggestions on CyberPi, contact our R&D team through:
cyber.list@makeblock.com
5. FAQs
How can I design a game with CyberPi?
To ensure user experience, only limited control permission on CyberPi’s screen is provided for users currently. More functions are on the way.
Currently, you can use mBlock-Python Editor in combination with some Python libraries such as pygame to implement control over a Python game, using CyberPi as a remote control.
You can find examples in the mBlock-Python Editor Online Help.
Alternatively, you can use the CyberPi Lab extensions to use the latest functions of CyberPi, for which you may need to update the firmware of CyberPi.
6. More information
CyberPi Operation Guide
Pocket Shield Operation Guide
CyberPi Series User Manual
Python API Documentation for CyberPi
mBlock 5 Online Help
mBlock-Python Editor Online Help

若有收获,就点个赞吧
0 人点赞
