一、早期文本渲染——位图
早期文本渲染采用位图字体(Bitmap Font),字体就是一张大纹理,这张纹理是由相同大小的小纹理格子拼成,一个小个子就是一个字符纹理,通过索引我们可以获取指定字符的纹理格子位置。如下图: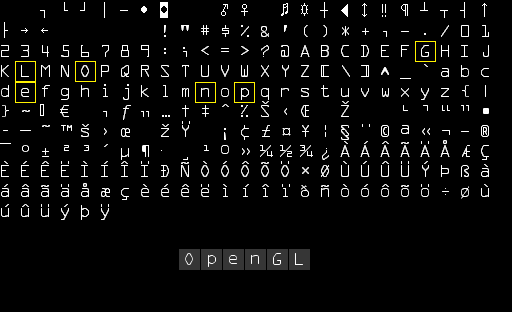
绘制OpenGL文字的伪代码如下:
// ************************************************// ******** C + + 代 码// ************************************************while(......){ //渲染循环......for(int i = 0; i < 6; i++){setVAO_VBO_data(); // 设置VAO、VBObindTexture(); // 绑定当前字符纹理setShaderData(); // 设置着色器参数glDrawArrays(GL_TRIANGLES, 0, 6); // 绘制矩形}......}// ************************************************// ******** 顶 点 着 色 器 代 码// ************************************************layout(location = 0) in vec2 aPos; // 顶点坐标layout(location = 0) in vec2 aTexCoords; // 纹理坐标out vec2 fTexCoords;void main(){gl_Position = vec4(aPos.xy, 0.0, 0.0);fTexCoords = aTexCoords;}// ************************************************// ******** 片 段 着 色 器 代 码// ************************************************in vec2 fTexCoords;uniform sampler2D charTexture; // 字符纹理,很有可能就是一个灰度图uniform vec3 textColor; // 字符颜色out vec4 FragColor;void main(){float alpha = texture(charTexture, fTexCoords).r; // GL_RED// 矩形区域,字符所占的像素,alpha=1,其他地方alpha=0// 开启混合,且混合公式设置为glBlendFunc( GL_SRC_ALPHA, GL_ONE_MINUS_SRC_ALPHA );// alpha=0的地方会显示为背景颜色(透明的)FragColor = vec4(textColor, alpha);}
这种文本渲染方式非常简单且高效,但是由于字符纹理是预生成的(固定的),能满足的需求非常简单(字符集确定,字体大小固定不变)。显然这不能满足大部分的现代需求。现代我们采样更灵活的方式渲染,我们会动态生成字符纹理,其中很常见的就是FreeType库加载TrueType字体。
二、现代文本渲染——FreeType
FreeType是一个用于加载字体并支持渲染到位图以及提供多种字体相关的操作的跨平台库(所有常见主流平台)。FreeType最大的优势是能够加载TrueType字体。
TrueType是通过数学曲线(贝赛尔曲线)来定义字符的字形(Glyph,长啥样),然后通过给定的字体大小来动态生成字符的纹理。这样就能渲染不同大小的文字又不会有质量损失问题。
我们简单学习一下OpenGL借助FreeType库绘制TrueType字符的方法。实践项目里面有非常详尽的注释。
1、初始化库
bool initFreeType( FT_Library &freeType ){if( FT_Init_FreeType( &freeType ) ){cout << "ERROR::FREETYPE::failed to init FreeType Library." << endl;return false;}return true;}
2、加载字体
一个Face对应一个字体,通过Face我们可以获得字符的度量信息等。通过这些信息,我们才可以创建字符的纹理。
bool createFace( const FT_Library &freeType, FT_Face &face, const std::string &ttfPath ){if( FT_New_Face( freeType, ttfPath.c_str(), 0, &face ) ){cout << "ERROR::FREETYPE::failed to load font(" << ttfPath.c_str() << ")" << endl;return false;}return true;}
3、生成字符纹理
struct CharRenderInfo // 绘制一个字符需要的数据:纹理、度量信息(指定绘制的矩形区域:大小、位置),// 度量相关知识:https://www.processon.com/view/link/5f75475207912906db11dd4c{GLuint TextureID; // 字形纹理IDglm::ivec2 Size; // 字形大小glm::ivec2 Bearing; // 从基准线到字形左部/顶部的偏移值GLuint Advance; // 原点距下一个字形原点的距离};// 生成charSet中所有字符(指定大小)的纹理,并将信息保存到charDataMap中void loadGlyphTexture(map<GLchar, CharRenderInfo> &charDataMap, // 存储字符纹理信息FT_Face face, // 字体const std::vector<GLubyte> &charSet, // 字符集:生成这些字符的纹理const GLuint nominalFontWidth, // 字体大小const GLuint nominalFontHeight ){// 生成纹理之前,我们需要设置好字体大小,所以“为什么不要乱用字体大小?”// 注意这只是名义大小(nominal),别指望它是最终实际大小。// 一般我们可以设置width=0,字体的宽度会根据高度自动生成。FT_Set_Pixel_Sizes( face, nominalFontWidth, nominalFontHeight );// 字符的纹理我们是用的8 bit灰度图,因此一个像素就是1个byte,要取消内存对齐限制glPixelStorei( GL_UNPACK_ALIGNMENT, 1 );for( const auto &_char : charSet ){if( FT_Load_Char( face, _char, FT_LOAD_RENDER ) ) // 激活_char字符的字形,这样可以获得该字符的度量信息{cout << "ERROR::FREETYPE::failed to load glyph(" << _char << ")" << endl;continue;}// *********************** 生成纹理GLuint texture;glGenTextures( 1, &texture );glBindTexture( GL_TEXTURE_2D, texture );glTexImage2D( GL_TEXTURE_2D,0,GL_RED, // 8bit灰度图,在着色器中指定颜色face->glyph->bitmap.width, // 度量信息获取宽高face->glyph->bitmap.rows,0,GL_RED,GL_UNSIGNED_BYTE,face->glyph->bitmap.buffer );glTexParameteri( GL_TEXTURE_2D, GL_TEXTURE_WRAP_S, GL_CLAMP_TO_EDGE ); // 环绕方式glTexParameteri( GL_TEXTURE_2D, GL_TEXTURE_WRAP_T, GL_CLAMP_TO_EDGE );glTexParameteri( GL_TEXTURE_2D, GL_TEXTURE_MIN_FILTER, GL_NEAREST ); // 纹理缩小采样glTexParameteri( GL_TEXTURE_2D, GL_TEXTURE_MAG_FILTER, GL_NEAREST ); // 纹理放大采样glBindTexture( GL_TEXTURE_2D, 0 );charDataMap.emplace( _char, CharRenderInfo{texture,glm::ivec2( face->glyph->bitmap.width,face->glyph->bitmap.rows ),glm::ivec2( face->glyph->bitmap_left,face->glyph->bitmap_top ),static_cast<GLuint>( face->glyph->advance.x )} );}}
4、创建VAO、VBO
文字有不同大小,也有不同位置,但本质上都是绘制矩形区域(6个顶点),区别在于顶点数据不同,因此我们可以提前创建好一个“缓冲区”用于存放当前要渲染的字符的顶点坐标和颜色等顶点数据:
void createVAO_VBO( GLuint &VAO_quad, GLuint &VBO_quad ){//顶点数据格式// {// 0.0f, 0.0f, // 顶点坐标(坐标系由投影矩阵决定)// 0.0f, 1.0f // 纹理坐标// },const GLsizei vertex_Size = sizeof( GLfloat )*(2 + 2); // 单个顶点数据大小glGenVertexArrays( 1, &VAO_quad );glBindVertexArray( VAO_quad );glGenBuffers( 1, &VBO_quad );glBindBuffer( GL_ARRAY_BUFFER, VBO_quad );glBufferData( GL_ARRAY_BUFFER,vertex_Size * 6, // 一个矩形2个三角形,6个顶点NULL, // 开辟空的VBOGL_DYNAMIC_DRAW ); // VBO的数据会频繁更新glEnableVertexAttribArray( 0 );glVertexAttribPointer( 0, 4, GL_FLOAT, GL_FALSE, 4 * sizeof( GLfloat ), ( GLvoid * )( 0 * sizeof( GLfloat ) ) );glBindBuffer( GL_ARRAY_BUFFER, 0 );glBindVertexArray( 0 );}
5、着色器
其实就是绘制矩形图像的逻辑。
// ************************************************// ******** 顶 点 着 色 器 代 码// ************************************************#version 330 corelayout (location = 0) in vec4 vertex; // <vec2 pos, vec2 tex>uniform mat4 projectionMatrix; // 投影矩阵:文字一般都是2D显示,也就是采用正交投影out vec2 TexCoords; // 纹理坐标void main(){// vertex.xy 顶点坐标// vertex.zw 纹理坐标gl_Position = projectionMatrix * vec4(vertex.xy, 0.0, 1.0);TexCoords = vertex.zw;}
// ************************************************// ******** 片 段 着 色 器 代 码// ************************************************#version 330 corein vec2 TexCoords; // 纹理坐标uniform sampler2D textTexture; // 纹理采样器uniform vec3 textColor; // 字体颜色out vec4 FragColor;void main(){// 8bit灰度图,只为了分辨矩形区域内,alpha=1的是字符所占的像素,alpha=0则是空的,我们要开启混合来显示背景颜色(透明)FragColor = vec4(textColor, texture(textTexture, TexCoords).r);// 矩形区域内,字符所占的像素,alpha=1,其他地方alpha=0。// 开启混合,且混合公式设置为glBlendFunc( GL_SRC_ALPHA, GL_ONE_MINUS_SRC_ALPHA );// alpha=0的地方会显示为背景颜色(透明的)。}
6、开启混合
混合的知识点参考:https://www.yuque.com/tvvhealth/cs/kahsp8#8s08l
glEnable( GL_BLEND );glBlendFunc( GL_SRC_ALPHA, GL_ONE_MINUS_SRC_ALPHA );
7、定义坐标系
文本一般都是2D显示,可以采用正交投影:
// Shader类参考:https://github.com/JackieLong/OpenGL/tree/main/project_lib/srcconst GLint ScreenWidth = 800;const GLint ScreenHeight = 600;shaderText.use();shaderText.setMat4( "projectionMatrix",// 正交投影矩阵,变换后的坐标系原点在屏幕左下角,左上角(ScreenWidth, ScreenHeight)glm::ortho( 0.0f, // 屏幕的左边static_cast< GLfloat >( ScreenWidth ), // 屏幕的右边0.0f, // 屏幕的底边static_cast< GLfloat >( ScreenHeight ) ) ); // 屏幕的顶部shaderText.setInt( "textTexture", GL_TEXTURE0 ); // 使用的默认纹理单元
8、渲染文本
简单说就是挨个绘制字符矩形区域。
void renderText( const Shader &shader, // 文本渲染着色器const string &text, // 文本内容const glm::vec2 &pos, // 位置const GLfloat &scale, // 缩放const glm::vec3 &color ) // 文本颜色{GLfloat tmp_x = pos.x;shader.use();shader.setVec3( "textColor", color );glActiveTexture( TEXTURE_CELL_TEXT );glBindVertexArray( VAO_quad );for( const auto &_char : text ){// 获取渲染_char字符所需要的信息CharRenderInfo character = charDataMap[_char];// 字符纹理glBindTexture( GL_TEXTURE_2D, character.TextureID );// 纹理矩形区域左下角的位置GLfloat xpos = tmp_x + character.Bearing.x * scale;GLfloat ypos = pos.y - ( character.Size.y - character.Bearing.y ) * scale;// 矩形区域的宽高GLfloat width = character.Size.x * scale;GLfloat height = character.Size.y * scale;GLfloat tmpvertices[ 6 * 4] ={// 三角形1xpos, ypos + height, 0.0f, 0.0f, // 左上角xpos, ypos, 0.0f, 1.0f, // 左下角xpos + width, ypos, 1.0f, 1.0f, // 右下角// 三角形2xpos, ypos + height, 0.0f, 0.0f, // 左上角xpos + width, ypos, 1.0f, 1.0f, // 右下角xpos + width, ypos + height, 1.0f, 0.0f // 右上角};glBindBuffer( GL_ARRAY_BUFFER, VBO_quad );glBufferSubData( GL_ARRAY_BUFFER, 0, sizeof( tmpvertices ), tmpvertices ); // 更新VBO数据glBindBuffer( GL_ARRAY_BUFFER, 0 );glDrawArrays( GL_TRIANGLES, 0, 6 );tmp_x += ( character.Advance >> 6 ) * scale; // 位偏移6个单位来获取单位为像素的值 (2^6 = 64)}glBindVertexArray( 0 );glBindTexture( GL_TEXTURE_2D, 0 );}
renderText调用示例如下:
while(......){ // 渲染循环......renderText( shaderText,"This is sample text.",glm::vec2( 25.0f, 25.0f ), // 文本位置1.0f, // 缩放glm::vec3( 0.5f, 0.8f, 0.2f ) ); // 文本颜色......}

若有收获,就点个赞吧
0 人点赞
