根据我们之前的学习, OAuth是一个开放的授权标准,而Spring Security Oauth2是对OAuth2协议的一种实现框架。下面我们来搭建自己的Spring Security OAuth2的服务框架。<br /> OAuth2的服务提供方包含两个服务,即授权服务(Authorization Server,也叫做认证服务)和资源服务(Resource Server),使用Spring Security OAuth2的时候,可以选择在同一个应用中来实现这两个服务,也可以拆分成多个应用来实现同一组授权服务。<br /> **授权服务(Authorization Server)**应包含对接入端以及登入用户的合法性进行验证并颁发token等功能,对令牌的请求断点由Spring MVC控制器进行实现,下面是配置一个认证服务必须的endpoints:
- AuthorizationEndpoint服务于认证请求。默认URL:/oauth/authorize
- TokenEndpoint服务于访问令牌的请求。默认URL:/oauth/token
- OAuth2AuthenticationProcessingFilter用来对请求给出的身份令牌进行解析健全。
我们搭建的示例项目大致如下
其中,distributed-security-uaa模块将用来实现认证授权服务,而distributed-security-salary模块用来实现资源服务。认证的大致流程如下:
1、客户请求distributed-security-uaa授权服务申请access_token
2、客户携带申请到的access_token访问distributed-security-salary中的服务。
3、distributed-security-salary将检验access_token的合法性,验证合法后才返回资源信息。
7.2 基础环境搭建
7.2.1 父工程搭建
父工程主要管理子模块及各个依赖的版本。pom.xml文件如下:
<?xml version="1.0" encoding="UTF-8"?><project xmlns="http://maven.apache.org/POM/4.0.0"xmlns:xsi="http://www.w3.org/2001/XMLSchema-instance"xsi:schemaLocation="http://maven.apache.org/POM/4.0.0 http://maven.apache.org/xsd/maven-4.0.0.xsd"><modelVersion>4.0.0</modelVersion><groupId>com.tuling</groupId><artifactId>AuthDemo</artifactId><packaging>pom</packaging><version>1.0-SNAPSHOT</version><properties><maven.compiler.source>1.8</maven.compiler.source><maven.compiler.target>1.8</maven.compiler.target><java.version>1.8</java.version><spring-boot-version>2.3.3.RELEASE</spring-boot-version><spring-cloud-version>Greenwich.RELEASE</spring-cloud-version></properties><modules><module>spring-boot-security</module><module>basicAuth</module><module>distributed-security-uaa</module><module>distributed-security-salary</module></modules><dependencyManagement><dependencies><dependency><groupId>org.springframework.boot</groupId><artifactId>spring-boot-dependencies</artifactId><version>${spring-boot-version}</version><type>pom</type><scope>import</scope></dependency><dependency><groupId>org.springframework.cloud</groupId><artifactId>spring-cloud-dependencies</artifactId><version>${spring-cloud-version}</version><type>pom</type><scope>import</scope></dependency><dependency><groupId>javax.servlet</groupId><artifactId>javax.servlet-api</artifactId><version>3.1.0</version></dependency><dependency><groupId>javax.interceptor</groupId><artifactId>javax.interceptor-api</artifactId><version>1.2</version></dependency><dependency><groupId>com.alibaba</groupId><artifactId>fastjson</artifactId><version>1.2.47</version></dependency><dependency><groupId>mysql</groupId><artifactId>mysql-connector-java</artifactId><version>5.1.47</version></dependency><dependency><groupId>org.springframework.security</groupId><artifactId>spring-security-jwt</artifactId><version>1.1.1.RELEASE</version></dependency><dependency><groupId>org.springframework.security.oauth.boot</groupId><artifactId>spring-security-oauth2-autoconfigure</artifactId><version>2.1.2.RELEASE</version></dependency></dependencies></dependencyManagement><build><plugins><plugin><groupId>org.springframework.boot</groupId><artifactId>spring-boot-maven-plugin</artifactId><version>${spring-boot-version}</version><configuration><mainClass>com.tuling.springbootsecurity.SpringBootSecurityApplication</mainClass></configuration><executions><execution><goals><goal>repackage</goal></goals></execution></executions></plugin><plugin><artifactId>maven-compiler-plugin</artifactId><configuration><source>1.8</source><target>1.8</target></configuration></plugin></plugins></build></project>
7.2.2 UAA授权服务模块
1、创建distributed-security-uaa模块,作为授权服务工程,pom.xml依赖如下:
<?xml version="1.0" encoding="UTF-8"?><project xmlns="http://maven.apache.org/POM/4.0.0"xmlns:xsi="http://www.w3.org/2001/XMLSchema-instance"xsi:schemaLocation="http://maven.apache.org/POM/4.0.0 http://maven.apache.org/xsd/maven-4.0.0.xsd"><parent><artifactId>AuthDemo</artifactId><groupId>com.tuling</groupId><version>1.0-SNAPSHOT</version></parent><modelVersion>4.0.0</modelVersion><artifactId>distributed-security-uaa</artifactId><dependencies><dependency><groupId>org.springframework.boot</groupId><artifactId>spring-boot-starter-web</artifactId></dependency><dependency><groupId>org.springframework.cloud</groupId><artifactId>spring-cloud-starter-security</artifactId></dependency><dependency><groupId>org.springframework.cloud</groupId><artifactId>spring-cloud-starter-oauth2</artifactId></dependency><dependency><groupId>org.springframework.security</groupId><artifactId>spring-security-jwt</artifactId></dependency><dependency><groupId>javax.interceptor</groupId><artifactId>javax.interceptor-api</artifactId><version>1.2</version></dependency><dependency><groupId>com.alibaba</groupId><artifactId>fastjson</artifactId></dependency></dependencies><build><plugins><plugin><groupId>org.springframework.boot</groupId><artifactId>spring-boot-maven-plugin</artifactId><version>${spring-boot-version}</version><configuration><mainClass>com.tuling.security.distributed.uaa.UaaServerApplication</mainClass></configuration><executions><execution><goals><goal>repackage</goal></goals></execution></executions></plugin><plugin><artifactId>maven-compiler-plugin</artifactId><configuration><source>1.8</source><target>1.8</target></configuration></plugin></plugins></build></project>
2、创建启动类
package com.tuling.security.distributed.uaa;import org.springframework.boot.SpringApplication;import org.springframework.boot.autoconfigure.SpringBootApplication;import org.springframework.cloud.client.discovery.EnableDiscoveryClient;import org.springframework.security.oauth2.config.annotation.web.configuration.EnableAuthorizationServer;@SpringBootApplication//@EnableDiscoveryClient@EnableAuthorizationServerpublic class UaaServerApplication {public static void main(String[] args) {SpringApplication.run(UaaServerApplication.class,args);}}
3、配置文件 application.properties
spring.application.name=uaa‐serviceserver.port=53020spring.main.allow‐bean‐definition‐overriding=trueserver.servlet.context‐path=/uaaspring.mvc.throw‐exception‐if‐no‐handler‐found=truespring.resources.add‐mappings=falsemanagement.endpoints.web.exposure.include=refresh,health,info,env
7.2.3 Salary资源服务模块
这个工程主要是测试认证授权功能,并不涉及薪水管理的相关业务。访问本工程的资源将需要进行OAuth认证。
1、创建distributed-security-salary模块,pom.xml依赖如下:
<?xml version="1.0" encoding="UTF-8"?><project xmlns="http://maven.apache.org/POM/4.0.0"xmlns:xsi="http://www.w3.org/2001/XMLSchema-instance"xsi:schemaLocation="http://maven.apache.org/POM/4.0.0 http://maven.apache.org/xsd/maven-4.0.0.xsd"><parent><artifactId>AuthDemo</artifactId><groupId>com.tuling</groupId><version>1.0-SNAPSHOT</version></parent><modelVersion>4.0.0</modelVersion><artifactId>distributed-security-salary</artifactId><version>0.0.1</version><dependencies><dependency><groupId>org.springframework.boot</groupId><artifactId>spring-boot-starter-actuator</artifactId></dependency><dependency><groupId>org.springframework.boot</groupId><artifactId>spring-boot-starter-web</artifactId></dependency><dependency><groupId>org.springframework.cloud</groupId><artifactId>spring-cloud-starter-security</artifactId></dependency><dependency><groupId>org.springframework.cloud</groupId><artifactId>spring-cloud-starter-oauth2</artifactId></dependency><dependency><groupId>javax.interceptor</groupId><artifactId>javax.interceptor-api</artifactId></dependency><dependency><groupId>com.alibaba</groupId><artifactId>fastjson</artifactId></dependency></dependencies><build><plugins><plugin><groupId>org.springframework.boot</groupId><artifactId>spring-boot-maven-plugin</artifactId><version>${spring-boot-version}</version><configuration><mainClass>com.tuling.security.distributed.salary.SalaryResourceApplication</mainClass></configuration><executions><execution><goals><goal>repackage</goal></goals></execution></executions></plugin><plugin><artifactId>maven-compiler-plugin</artifactId><configuration><source>1.8</source><target>1.8</target></configuration></plugin></plugins></build></project>
2、创建启动类
package com.tuling.security.distributed.salary;import org.springframework.boot.SpringApplication;import org.springframework.boot.autoconfigure.SpringBootApplication;import org.springframework.security.oauth2.config.annotation.web.configuration.EnableResourceServer;@SpringBootApplication@EnableResourceServerpublic class SalaryResourceApplication {public static void main(String[] args) {SpringApplication.run(SalaryResourceApplication.class,args);}}
3、配置文件 application.properties
spring.application.name=salary‐serviceserver.port=53021spring.main.allow‐bean‐definition‐overriding=truelogging.level.root=debuglogging.level.org.springframework.web=infoserver.servlet.context‐path=/resourcespring.mvc.throw‐exception‐if‐no‐handler‐found=truespring.resources.add‐mappings=falsemanagement.endpoints.web.exposure.include=refresh,health,info,env
这样,我们的基础开发框架就搭建起来了。然后我们开始进行配置。
7.3 授权服务配置
这一阶段的目的是配置出给客户颁发access_token的服务。这一步主要在授权服务模快中完成
7.3.1 打开@EnableAuthorizationServer 注解
这个注解是Spring Security打开OAuth认证服务的基础注解,可以在启动类或者任意一个@Configuration声明的启动类中打开这个注释。
之前我们配置Spring Security时,利用了WebSecurityConfigurerAdapter注入一个配置对象来完成对基础认证授权功能的配置。 在使用OAuth2时,Spring Security也提供了一个类似的适配器来帮助我们完成配置
package com.tuling.security.distributed.uaa.config;import org.springframework.context.annotation.Configuration;import org.springframework.security.oauth2.config.annotation.web.configuration.AuthorizationServerConfigurerAdapter;@Configurationpublic class MyAuthorizationConfig extends AuthorizationServerConfigurerAdapter {}
AuthorizationServerConfigurerAdapter要求配置以下几个类,这几个类是由Spring创建的独立的配置对象,它们会被Spring传入AuthorizationServerConfigurer中进行配置。
public class AuthorizationServerConfigurerAdapter implements AuthorizationServerConfigurer {public void configure(AuthorizationServerSecurityConfigurer security) throws Exception {}public void configure(ClientDetailsServiceConfigurer clients) throws Exception {}public void configure(AuthorizationServerEndpointsConfigurer endpoints) throws Exception {}}
这三个配置也是整个授权认证服务中最核心的配置。
ClientDetailsServiceConfigurer:用来配置客户端详情服务(ClientDetailsService),客户端详情信息在这里进行初始化,你能够把客户端详情信息写死在这里或者是通过数据库来存储调取详情信息。
AuthorizationServerEndpointsConfifigurer:用来配置令牌(token)的访问端点和令牌服务(tokenservices)。
AuthorizationServerSecurityConfifigurer:用来配置令牌端点的安全约束.
7.3.2 配置客户端详细信息
ClientDetailsServiceConfigurer能够使用内存或者JDBC来实现客户端详情服务(ClientDetailsService),ClientDetailsService负责查找ClientDetails,一个ClientDetails代表一个需要接入的第三方应用,例如我们上面提到的OAuth流程中的百度。ClientDetails中有几个重要的属性如下:
- clientId: 用来标识客户的ID。必须。
- secret: 客户端安全码,如果有的话。在微信登录中就是必须的。
- scope: 用来限制客户端的访问范围,如果是空(默认)的话,那么客户端拥有全部的访问范围。
- authrizedGrantTypes:此客户端可以使用的授权类型,默认为空。在微信登录中,只支持authorization_code这一种。
- authorities:此客户端可以使用的权限(基于Spring Security authorities)
- redirectUris:回调地址。授权服务会往该回调地址推送此客户端相关的信息。
Client Details客户端详情,能够在应用程序运行的时候进行更新,可以通过访问底层的存储服务(例如访问mysql,就提供了JdbcClientDetailsService)或者通过自己实现ClientRegisterationService接口(同时也可以实现ClientDetailsService接口)来进行定制。
示例中我们暂时使用内存方式存储客户端详情信息,配置如下
@Overridepublic void configure(ClientDetailsServiceConfigurer clients) throws Exception {//内存配置的方式配置用户信息clients.inMemory()//内存方式.withClient("c1") //client_id.secret(new BCryptPasswordEncoder().encode("secret"))//客户端秘钥.resourceIds("order")//客户端拥有的资源列表.authorizedGrantTypes("authorization_code","password", "client_credentials", "implicit", "refresh_token")//该client允许的授权类型.scopes("all")//允许的授权范围.autoApprove(false)//跳转到授权页面.redirectUris("http://www.baidu.com");//回调地址// .and() //继续注册其他客户端// .withClient()// ...// 加载自定义的客户端管理服务 // clients.withClientDetails(clientDetailsService);}
管理令牌
AuthorizationServerTokenService接口定义了一些对令牌进行管理的必要操作,令牌可以被用来加载身份信息,里面包含了这个令牌的相关权限。
实现一个AuthorizationServerTokenServices这个接口,需要继承DefaultTokenServices这个类。 该类中包含了一些有用的实现。你可以使用它来修改令牌的格式和令牌的存储。默认情况下,他在创建一个令牌时,是使用随机值来进行填充的。这个类中完成了令牌管理的几乎所有的事情,唯一需要依赖的是spring容器中的一个TokenStore接口实现类来定制令牌持久化。而这个TokenStore,有一个默认的实现,就是ImMemoryTokenStore,这个类会将令牌保存到内存中。除此之外,还有几个默认的TokenStore实现类可以使用。
- InMemoryTokenStore:这个是默认采用的方式。他可以在单服务器上完美运行(即并发访问压力不大的情况下,并且他在失败时不会进行备份)。大多数的项目都可以使用这个实现类来进行尝试。也可以在并发的时候来进行管理,因为不会被保存到磁盘中,所以更易于调试。
- JdbcTokenStore:这是一个基于JDBC的实现类,令牌会被保存到关系型数据库中。使用这个实现类,可以在不同的服务器之间共享令牌信息。当然,这个是需要使用spring boot jdbc相关的依赖的。类似的,还有RedisTokenStore基于Redis存储令牌信息。
- JwtTokenStore:全程是JSON Web Token。他可以把令牌信息全部编码整合进令牌本身,这样后端服务可以不用存储令牌相关信息,这是他最大的优势。但是他也有缺点, 那就是撤销一个已经授权的令牌会非常困难。所以他通常用来处理一个生命周期较短的令牌以及撤销刷新令牌(refresh_token)。而另一个缺点就是这个令牌会比较大,因为他要包含较多的用户凭证信息。JwtTokenStore不会保存任何数据,但是他在转换令牌值以及授权信息方面和DefaultTokenServices所扮演的角色是一样的。
所以我们下面的步骤首先是要定义一个TokenStore
1、注入TokenConfig
我们先定义一个TokenConfig,往Spring容器中注入一个InMemoryTokenStore,生成一个普通令牌
@Configurationpublic class TokenConfig {@Beanpublic TokenStore tokenStore(){//使用基于内存的普通令牌return new InMemoryTokenStore();}
2、注入AuthorizationServerTokenService
在AuthorizationServer中定义AuthorizationServerTokenServices
@Autowiredprivate TokenStore tokenStore;//会通过之前的ClientDetailsServiceConfigurer注入到Spring容器中@Autowiredprivate ClientDetailsService clientDetailsService;public AuthorizationServerTokenServices tokenService() {DefaultTokenServices service = new DefaultTokenServices();service.setClientDetailsService(clientDetailsService); //客户端详情服务service.setSupportRefreshToken(true); //允许令牌自动刷新service.setTokenStore(tokenStore); //令牌存储策略-内存service.setAccessTokenValiditySeconds(7200); // 令牌默认有效期2小时service.setRefreshTokenValiditySeconds(259200); // 刷新令牌默认有效期3天return service;}
7.3.3 令牌访问端点配置
AuthorizationServerEndpointsConfigurer这个对象的实例可以完成令牌服务以及令牌服务各个endpoint配置。
配置授权类型(Grant Types)
AuthorizationServerEndpointsConfigurer对于不同类型的授权类型,也需要配置不同的属性。
- authenticationManager:认证管理器。当你选择了password(资源所有者密码)这个授权类型时,就需要指定authenticationManager对象来进行鉴权。
- userDetailsService:用户主体管理服务。如果设置了这个属性,那说明有一个自己的UserDetailsService接口的实现,或者你可以把这个东东设置到全局域(例如GlobalAuthenticationManagerConfigurer)上去,当你设置了这个之后,那么refresh_token刷新令牌方式的授权类型流程中就会多包含一个检查步骤,来确保这个账号是否仍然有效。
- authorizationCodeServices:这个属性是用来设置授权服务器的,主要用于 authorization_code 授权码类型模式。
- implicitGrantService:这个属性用于设置隐式授权模式的状态。
- tokenGranter:如果设置了这个东东(即TokenGranter接口的实现类),那么授权将会全部交由你来自己掌控,并且会忽略掉以上几个属性。这个属性一般是用作深度拓展用途的,即标准的四种授权模式已经满足不了你的需求时,才会考虑使用这个。
配置授权断点的URL(Endpoint URLS):
AuthorizationServerEndpointsConfifigurer这个配置对象首先可以通过pathMapping()方法来配置断点URL的链接地址。即将oauth默认的连接地址替代成其他的URL链接地址。例如spring security默认的授权同意页面/auth/confirm_access非常简陋,就可以通过passMapping()方法映射成自己定义的授权同意页面。
框架默认的URL链接有如下几个:
/oauth/authorize : 授权端点
/auth/token : 令牌端点
/oauth/confirm_access : 用户确认授权提交的端点
/oauth/error : 授权服务错误信息端点。
/oauth/check_token : 用于资源服务访问的令牌进行解析的端点
/oauth/token_key : 使用Jwt令牌需要用到的提供公有密钥的端点。
需要注意的是,这几个授权端点应该被Spring Security保护起来只供授权用户访问。
在AuthorizationServer配置令牌访问端点
@Autowiredprivate AuthorizationCodeServices authorizationCodeServices;@Autowiredprivate AuthenticationManager authenticationManager;@Overridepublic void configure(AuthorizationServerEndpointsConfigurer endpoints) throws Exception {endpoints// .pathMapping("/oauth/confirm_access","/customer/confirm_access")//定制授权同意页面.authenticationManager(authenticationManager)//认证管理器.userDetailsService(userDetailsService)//密码模式的用户信息管理.authorizationCodeServices(authorizationCodeServices)//授权码服务.tokenServices(tokenService())//令牌管理服务.allowedTokenEndpointRequestMethods(HttpMethod.POST);}//设置授权码模式的授权码如何存取,暂时用内存方式。@Beanpublic AuthorizationCodeServices authorizationCodeServices(){return new InMemoryAuthorizationCodeServices();//JdbcAuthorizationCodeServices}
7.3.4 令牌端点的安全约束
AuthorizationServerSecurityConfifigurer , 用来配置令牌端点(Token Endpoint)的安全约束,在AuthorizationServer中配置如下:
@Overridepublic void configure(AuthorizationServerSecurityConfigurer security) throws Exception {security.tokenKeyAccess("permitAll()") // oauth/token_key公开.checkTokenAccess("permitAll()") // oauth/check_token公开.allowFormAuthenticationForClients(); // 表单认证,申请令牌}
7.3.5 授权服务配置总结:
OAuth2的授权服务配置是大家使用Spring Security OAuth最头疼的地方。其实具体的配置方式可以不用着重记忆,翻翻API基本能看懂大概。但是这三块核心的配置对象一定要理解记忆。
1、ClientDetailsServiceConfigurer 配置客户端信息。
2、AuthorizationServerEndpointsConfigurer 配置令牌服务。首选需要配置token如何存取,以及客户端支持哪些类型的token。然后不同的令牌服务需要不同的其他服务。authorization_code类型需要配置authorizationCodeServices来管理授权码,password类型需要UserDetailsService来验证用户身份。
3、AuthorizationServerSecurityConfigurer 对相关endpoint定义一些安全约束。
7.3.6 web安全配置
完成上面的OAuth配置后,还要注意添加之前Spring Security相关的安全配置。这也是跟之前的Sprnig Security整合的关键。
package com.tuling.security.distributed.uaa.config;import org.springframework.beans.factory.annotation.Autowired;import org.springframework.context.annotation.Bean;import org.springframework.security.authentication.AuthenticationManager;import org.springframework.security.config.annotation.method.configuration.EnableGlobalMethodSecurity;import org.springframework.security.config.annotation.web.builders.HttpSecurity;import org.springframework.security.config.annotation.web.configuration.EnableWebSecurity;import org.springframework.security.config.annotation.web.configuration.WebSecurityConfigurerAdapter;import org.springframework.security.core.userdetails.User;import org.springframework.security.core.userdetails.UserDetailsService;import org.springframework.security.crypto.bcrypt.BCryptPasswordEncoder;import org.springframework.security.crypto.password.PasswordEncoder;import org.springframework.security.oauth2.provider.ClientDetailsService;import org.springframework.security.oauth2.provider.token.TokenStore;import org.springframework.security.provisioning.InMemoryUserDetailsManager;/*** 注入一个自定义的配置*/@EnableWebSecurity@EnableGlobalMethodSecurity(prePostEnabled = true,securedEnabled = true)public class MyWebSecurityConfig extends WebSecurityConfigurerAdapter {@Autowiredprivate ClientDetailsService clientDetailsService;@Autowiredprivate TokenStore tokenStore;@Beanpublic PasswordEncoder passwordEncoder() {// return NoOpPasswordEncoder.getInstance();return new BCryptPasswordEncoder();}//从父类加载认证管理器@Beanpublic AuthenticationManager authenticationManagerBean() throws Exception {return super.authenticationManagerBean();}@Beanpublic UserDetailsService userDetailsService(){InMemoryUserDetailsManager userDetailsManager = new InMemoryUserDetailsManager(User.withUsername("admin").password(passwordEncoder().encode("admin")).authorities("mobile","salary").build(),User.withUsername("manager").password(passwordEncoder().encode("manager")).authorities("salary").build(),User.withUsername("worker").password(passwordEncoder().encode("worker")).authorities("worker").build());return userDetailsManager;}//配置用户的安全拦截策略@Overrideprotected void configure(HttpSecurity http) throws Exception {//链式配置拦截策略http.csrf().disable()//关闭csrf跨域检查.authorizeRequests().anyRequest().authenticated() //其他请求需要登录.and() //并行条件.formLogin(); //可从默认的login页面登录,并且登录后跳转到main.html}}
7.4 授权服务流程测试:
在之前配置客户端详细信息时,我们配置了客户端可以支持的授权类型
client.authorizedGrantTypes("authorization_code","password", "client_credentials", "implicit", "refresh_token")//该client允许的授权类型
这里就列出了OAuth2支持的四种授权类型。其实是代表了OAuth授权三方的不同互信程度。
1、客户端模式 client_credentials:
这种模式是最简单的模式,流程如下: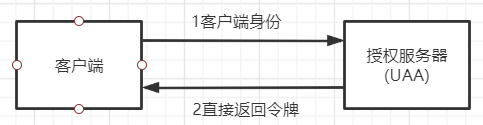
(1) 客户端向授权服务器发送自己的身份信息,请求令牌access_token。请求地址:
/uaa/oauth/token?client_id=c1&client_secret=secret&grant_type=client_credentials
参数列表:
- grant_type :授权类型,需要填写client_credentials,客户端模式
- client_id :客户端标识
- client_secret :客户端密钥
(2)授权服务器确认客户端身份后,直接将令牌access_token返回给客户端。
用POSTMAN进行测试的截图如下: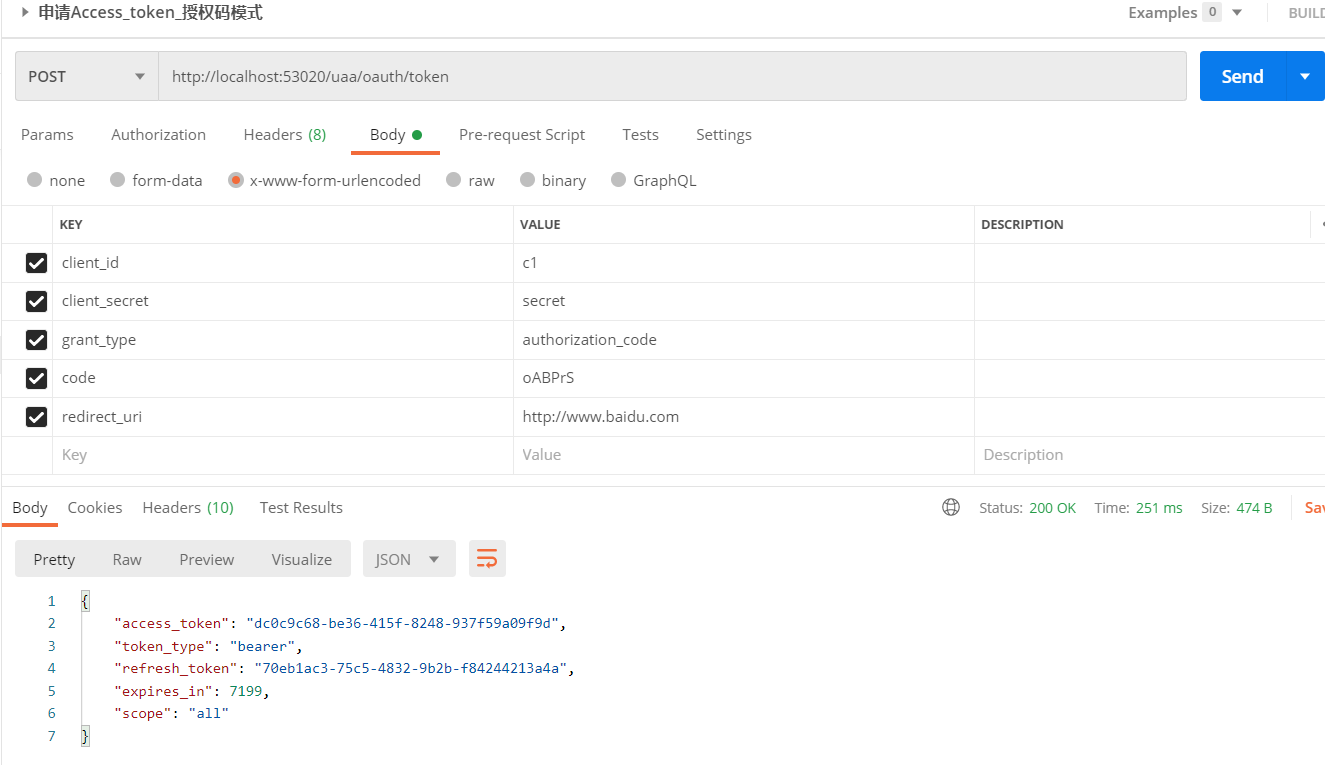
这种模式是最方便但是也最不安全的模式,代表了授权服务器对客户端的完全互信。因此,这种模式一般可以用在授权服务器对客户端完全信任的场景,例如内部系统或者协议合作方系统对接。
2、密码模式 password:
该模式的流程如下: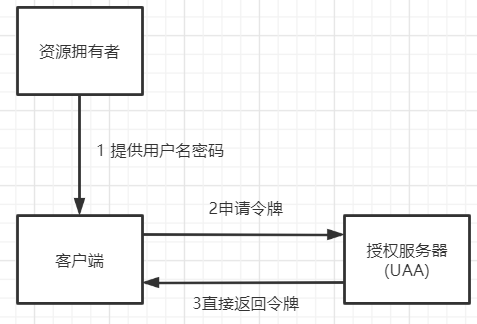
(1) 资源拥有者将用户名、密码发送给客户端
(2)客户端拿着资源拥有者的用户名、密码向授权服务器请求令牌access_token,请求如下:
/uaa/oauth/token?client_id=c1&client_secret=secret&grant_type=password&username=admin&password=admin
参数列表:
- grant_type :授权类型,需要填写password,密码模式
- client_id : 客户端标识
- client_secret :客户端密钥
- username : 资源拥有者用户名
- password :资源拥有者密码(3) 授权服务器将令牌access_token发送给客户端用POSTMAN测试的示例如下:

这种模式用户会把用户名和密码直接泄漏给客户端,代表了资源拥有者和授权服务器对客户端的绝对互信,相信客户端不会做坏事。一般适用于内部开发的客户端的场景。
3、简化模式 implicit:
这种模式的流程如下:
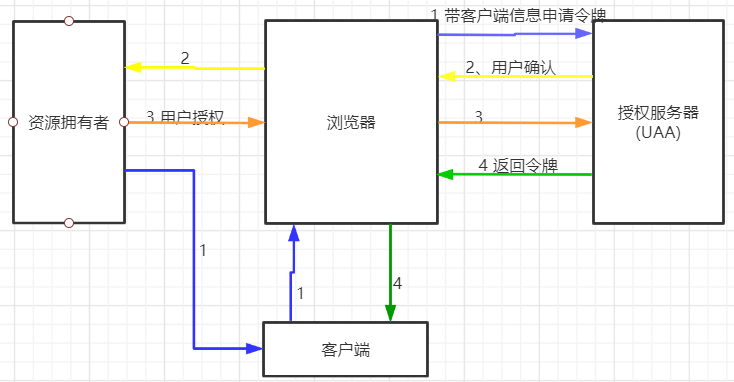
(1)用户访问客户端,客户端将向授权服务器申请授权。
(2)授权服务器将引导用户进入授权验证页面,等待用户同意授权。
(3)用户在授权验证页面同意进行授权。
(4)用户同意授权后,授权服务器向客户端返回令牌access_token
测试流程如下:
(1)客户端引导用户,直接访问授权服务器的授权申请地址: http://localhost:53020/uaa/oauth/authorize?client_id=c1&response_type=token&scope=all&redirect_uri=http://www.baidu.com。此时,会跳转到授权服务器的登录页面,需要用户自己输入用户名密码,进行登录。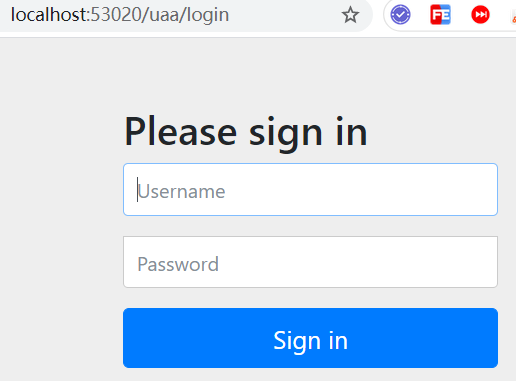
(2)用户使用admin/admin登录后,进入授权确认页面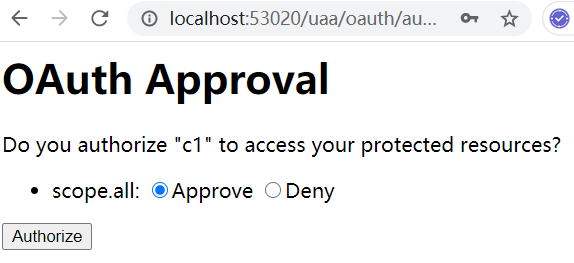
(3)用户在页面选择同意,并提交。
(4)此时页面就会跳转到指定的redirect uri(我们配置的www.baidu.com。此地址需要授权服务器预先配置,同时客户端需要提交参数)。在跳转地址上,直接带上了access_token,这个就是访问令牌。
这种方案下,一般redirect uri会配置成客户端自己的一个相应地址。这个相应地址接收到授权服务器推送过来的访问令牌后,就可以将访问令牌在本地进行保存,然后在需要调用资源服务时,再拿出来通过资源服务的认证。
注意下,这种模式下,access_token并不是以Get请求参数的形式推送的,而是以#fragmenet的方式返回的。
这种模式下,oauth三方的数据已经进行了隔离。这种模式一般用于没有服务端的第三方单页面应用,这样可以在JS里直接相应access_token。4、授权码模式 authorization_code :
微信登录就是采用的这种模式。这种模式的流程如下
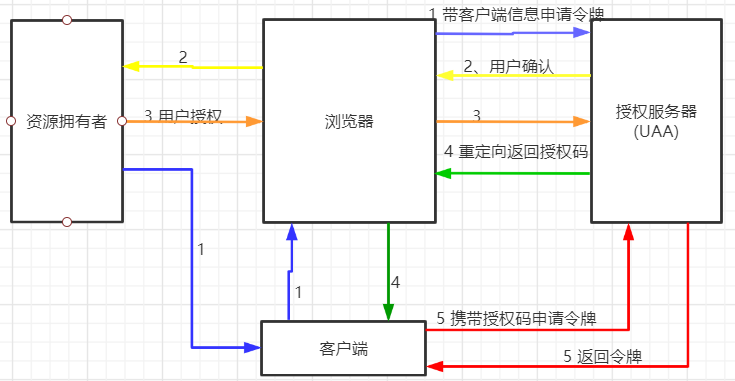
相比上面的简化模式,就是在后面第4步,授权服务器先返回给客户端一个授权码,也就是authorization_code。客户端拿到授权码后,再向授权服务器申请令牌。
测试流程如下:
(1)用户申请access_token时(访问地址http://localhost:53020/uaa/oauth/authorize?client_id=c1&response_type=code&scope=all&redirect_uri=http://www.baidu.com),会首先跳转登录页面,需要用户进行登录。—微信中,将这个登录页面定制成了扫二维码登录的页面。
(2)使用admin用户登录完成后,会弹出默认的授权页面。—微信将授权页面进行了定制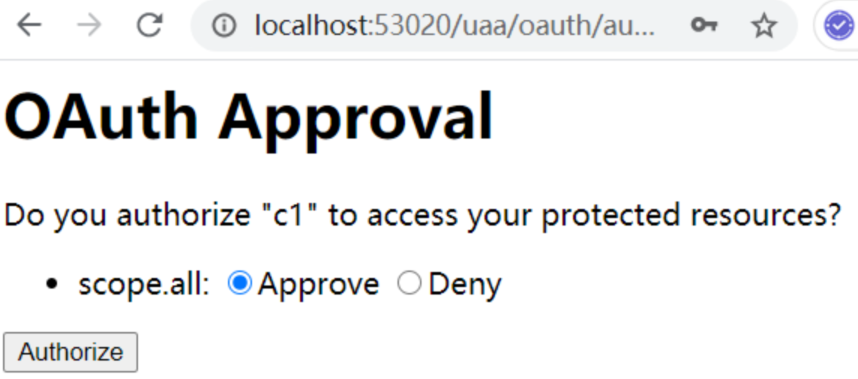
(3)选择同意后,会跳转到我们指定的百度网页,并带上了授权码code。—实际项目中应该是指向自己客户端工程的一个路径,后台获取code后保存起来。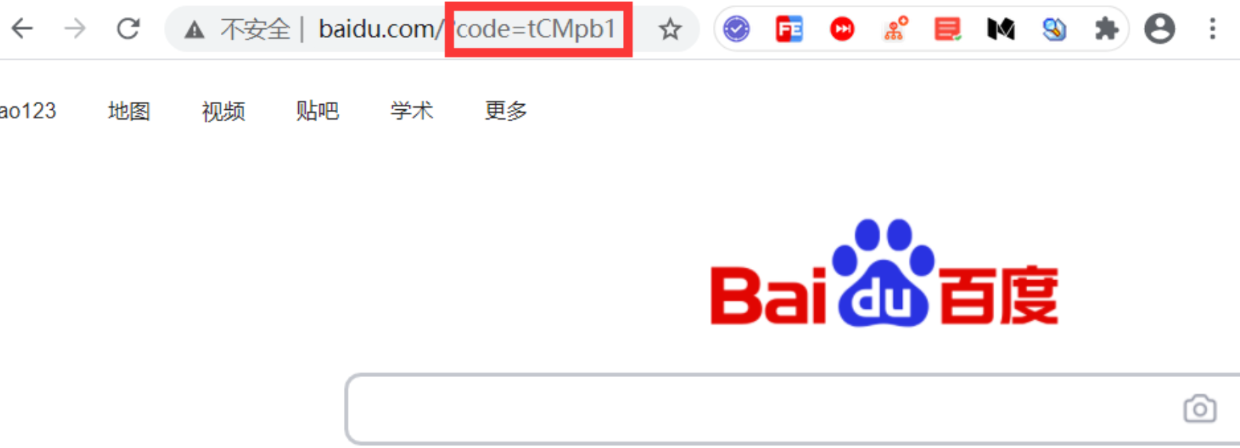
拿到code后,就可以向UAA工程申请access_token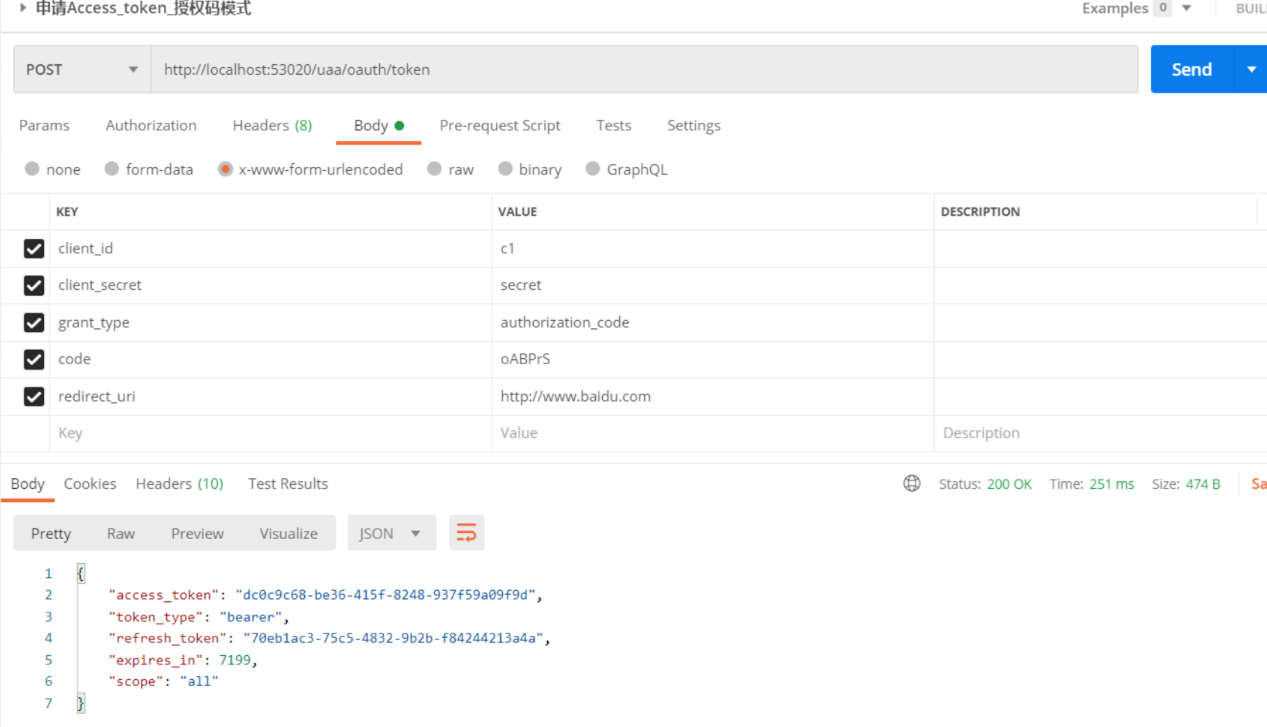
以这种方式就能获得access_token。这里注意,redirect_uri需要与上一步一致。
这种模式是四种模式中最安全的一种。这种模式下,oauth2认证的三方可以在互不信任的情况下完成担保认证过程。而且,这种模式下,access_token是直接在后台服务端之间进行交互,这样也较小了令牌泄漏的风险。5、刷新令牌 refresh_token
最后还一个授权类型refresh_token,这个其实严格来说不算是一种授权类型,只是代表一个刷新令牌的端口。当令牌access_token超时后,可以申请这个端口获取更新的令牌。
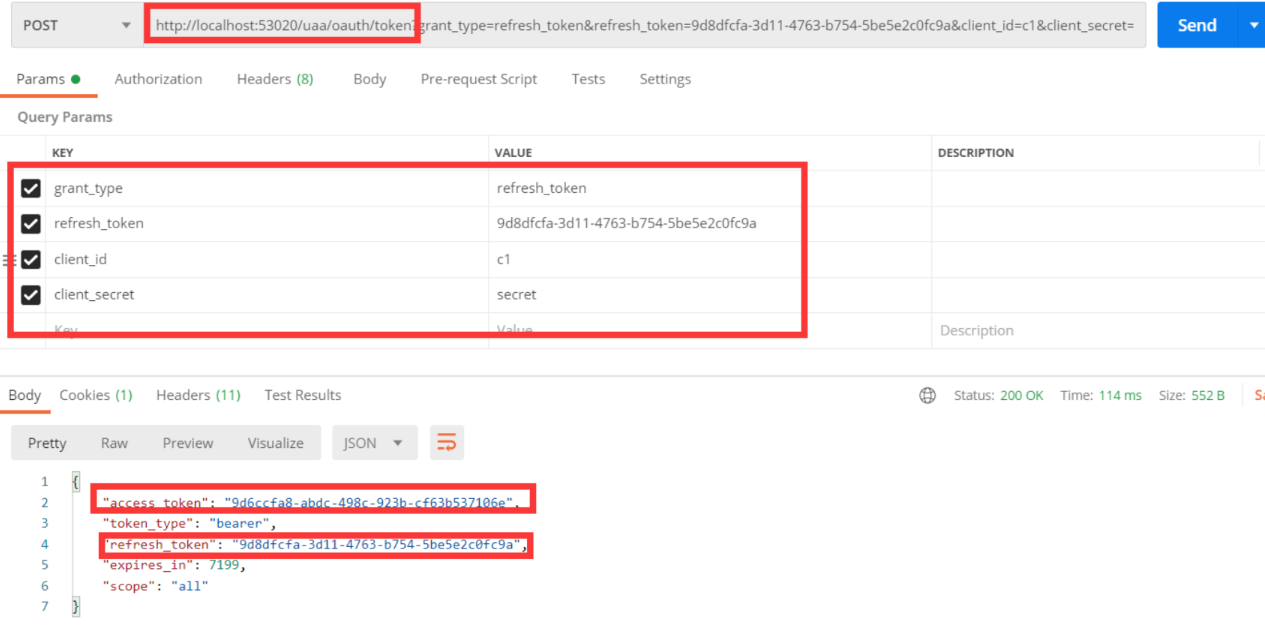
这里用到的refresh_token是随access_token一起申请到的。6、验证令牌接口
这个接口也是oauth的统一定义端口,他的权限不在客户端配置中配置,而是在AuthorizationServerSecurityConfigurer对象中配置。这里只是一并进行测试

7.5 资源服务配置
前面完成的授权服务实际上是OAuth协议中最复杂的部分,他规定了三方在互不信任的假设下如何进行担保认证。而到了资源服务这一步,其实就比较简单了。资源服务只要在访问资源之前,进行令牌验证即可。
7.5.1 打开@EnableResourceServer注解
这个注解是Spring Security打开OAuth资源服务的基础注解,可以在启动类或者任意一个@Configuration声明的启动类中打开这个注释。
7.5.2 资源服务器核心配置
然后,与之前的配置方式类似,Spring Security也提供了ResourceServerConfigurerAdapter适配器来协助完成资源服务器的配置。这个适配器提供了多个configure方法,对以下两个核心对象进行配置。
ResourceServerSecurityConfigurer中主要包含:tokenServices : ResourceServerTokenServices类的实例,用来实现令牌服务,即如何验证令牌。
- tokenStore : TokenStore类的实例,指定令牌如何访问,与tokenServices配置可选
- resourceId : 这个资源服务的ID,是可选的。但是推荐设置并在授权服务中进行验证。
- 其他的扩展属性例如tokenExtractor令牌提取器用来提取请求中的令牌。
HttpSecurity,这个配置与Spring Security类似:
- authorizeRequests()方法验证请求。antMatchers方法匹配访问路径。access()方法配置需要的权限。
- .sessionManagement()方法配置session管理策略。
- 其他自定义权限保护规则也通过HttpSecurity来配置。
@EnableResourceServer注解会自动增加一个类型为OAuth2AuthenticationProcessingFilter的过滤器链。
ResourceServerConfig示例内容如下
package com.tuling.security.distributed.salary.config;import org.springframework.context.annotation.Configuration;import org.springframework.security.config.annotation.web.builders.HttpSecurity;import org.springframework.security.config.http.SessionCreationPolicy;import org.springframework.security.oauth2.config.annotation.web.configuration.ResourceServerConfigurerAdapter;import org.springframework.security.oauth2.config.annotation.web.configurers.ResourceServerSecurityConfigurer;import org.springframework.security.oauth2.provider.token.RemoteTokenServices;import org.springframework.security.oauth2.provider.token.ResourceServerTokenServices;@Configurationpublic class MyResourceServerConfig extends ResourceServerConfigurerAdapter {public static final String RESOURCE_SALARY = "salary";@Overridepublic void configure(ResourceServerSecurityConfigurer resources) throws Exception {resources.resourceId(RESOURCE_SALARY) //资源ID.tokenServices(tokenServices()) //使用远程服务验证令牌的服务.stateless(true); //无状态模式}//配置安全策略@Overridepublic void configure(HttpSecurity http) throws Exception {http.authorizeRequests() //校验请求.antMatchers("/order/**") // 路径匹配规则。.access("#oauth2.hasScope('all')") // 需要匹配scope.and().csrf().disable().sessionManagement().sessionCreationPolicy(SessionCreationPolicy.STATELESS);}//配置access_token远程验证策略。public ResourceServerTokenServices tokenServices(){// DefaultTokenServices services = new DefaultTokenServices();RemoteTokenServices services = new RemoteTokenServices();services.setCheckTokenEndpointUrl("http://localhost:53020/uaa/oauth/check_token");services.setClientId("c1");services.setClientSecret("secret");return services;}}
这里需要注意的是ResourceServerSecurityConfigurer的tokenServices()方法,设定了一个token的管理服务。其中,如果资源服务和授权服务是在同一个应用程序上,那可以使用DefaultTokenServices,这样的话,就不用考虑关于实现所有必要的接口一致性的问题。而如果资源服务器是分离的,那就必须要保证能够有匹配授权服务提供的ResourceServerTokenServices,他知道如何对令牌进行解码。
令牌解析方法:使用DefaultTokenServices在资源服务器本地配置令牌存储、解码、解析方式。使用RemoteTokenServices资源服务器通过HTTP请求来解码令牌,每次都请求授权服务器端点/oauth/check_token。这时需要授权服务将这个端点暴露出来,以便资源服务进行访问。所以这里要注意下授权服务的下面这个配置
@Overridepublic void configure(AuthorizationServerSecurityConfigurer security) throws Exception {security.tokenKeyAccess("permitAll()")// /oauth/token_key 允许访问.checkTokenAccess("permitAll()") // /oauth/check_token 允许访问}
而这个/oauth/check_token端点可以获取到access_token对应到的客户信息
7.5.3 编写资源
然后我们编写一个简单的薪水查询接口
package com.tuling.security.distributed.salary.controller;import org.springframework.security.access.prepost.PreAuthorize;import org.springframework.web.bind.annotation.GetMapping;import org.springframework.web.bind.annotation.RequestMapping;import org.springframework.web.bind.annotation.RestController;@RestController@RequestMapping("salary")public class SalaryController {@GetMapping("query")@PreAuthorize("hasAuthority('salary')")//需要授权客户端拥有order资源才可以访问。public String query(){return "salary info";}}
7.5.4 添加安全访问控制
以Spring Security的方式添加安全访问控制策略
package com.tuling.security.distributed.salary.config;import org.springframework.context.annotation.Configuration;import org.springframework.security.config.annotation.method.configuration.EnableGlobalMethodSecurity;import org.springframework.security.config.annotation.web.builders.HttpSecurity;import org.springframework.security.config.annotation.web.configuration.WebSecurityConfigurerAdapter;@Configuration@EnableGlobalMethodSecurity(securedEnabled = true,prePostEnabled = true)public class MyWebSecurityConfig extends WebSecurityConfigurerAdapter {@Overrideprotected void configure(HttpSecurity http) throws Exception {http.csrf().disable().authorizeRequests().antMatchers("/salary/**")// .hasAuthority("salary") //这里采用了注解的方法级权限配置。.authenticated().anyRequest().permitAll();}}
这里使用了@EnableGlobalMethodSecurity方法打开了基于注解的方法级别的权限验证。
7.5.5 资源访问测试
到这里,我们的资源服务器就算配置完成了。 下面我们来访问资源服务器的salary接口进行测试。测试时要注意,在向资源服务器提交access_token时,需要在请求的headers上添加一个Authorization参数来提交令牌,而令牌的内容需要先加上token的类型Bearer,然后空格,再加上access_token。
首先,直接访问资源路径不带任何参数。http://localhost:53021/resource/salary/query 会返回一个错误内容:
{"error": "unauthorized","error_description": "Full authentication is required to access this resource"}
然后,我们随意提交一个错误的访问令牌。这里要注意的是,在向资源服务器提交accesstoken时,需要在请求的headers上添加一个Authorization参数来提交令牌,而令牌的内容需要先加上token的类型,是Bearer。然后空格,再加上access_token。
然后,我们重新申请一个正确的access_token,重新访问资源
测试到这里要注意的有两点
一是,要总结下在我们示例代码中验证的资源的要素包含了哪些,这些都是OAuth认证流程中需要注意的概念。包括 clientDetails, resourceId,scope,authorities(其实还可以有roles,只是roles是相当于ROLE{rolename}格式的资源)。
另一点是关于TokenStore对象。到目前为止,我们在资源服务器中并没有配置TokenStore对象,也就是说,资源服务器并不知道access_token有什么意义。他需要使用RemoteTokenServices将令牌拿到授权服务器上去进行验证才会知道access_token代表的客户信息。这一点在请求量加大后,显然会加重系统的网络负担以及运行效率。而这一点,也是后面的JWT令牌需要解决的问题。
7.6 JWT令牌
7.6.1 JWT令牌介绍
7.6.1.1、什么是JWT
JWT令牌全称JSON WebToken,是一个开放的行业标准(RFC 7519),它定义了一种简单的、自包含的协议格式,用于在通信双方传递json对象,传递的信息经过数字签名,可以被验证和信任。JWT可以使用HMAC算法或使用RSA算法的公私钥来签名,方式被篡改。
在OAuth中使用JWT,那令牌本身就包含了客户的详细信息,这样资源服务不用依赖授权服务就可以完成令牌解析。
JWT官网:https://jwt.io/
RFC 7519标准:https://tools.ietf.org/html/rfc7519
JWT令牌的优点
- 基于json,非常方便解析
- 可以在令牌中自定义丰富的内容,易扩展。
- 通过非对称加密算法及数字签名技术,JWT防止篡改,安全性高。
- 资源服务使用JWT可以不依赖于认证服务,自己完成解析。
但是也有一个很大的缺点,就是JWT令牌较长,占据的存储空间比较大。
7.6.1.2、JWT令牌结构
JWT令牌由三个部分组成,每部分中间使用点 (.) 分隔,例如 Header.Payload.Signature
- Header
头部包括令牌的类型(JWT)以及使用的哈希算法(如HMAC SHA256 RSA)。例如
{"alg": "HS256","typ": "JWT"}
将上面的内容使用Base64URL编码,就得到了JWT令牌的第一个部分。
- Payload
第二部分是负载,内容也是一个对象,他是存放有效信息的地方,他可以存放JWT提供的现有字段,例如 iss(签发者),exp(过期时间戳),sub(面向的用户)等,也可以自定义字段。此部分不建议存放敏感信息,因为此部分可以解码还原出原始内容。
最后将这部分JSON内容使用Base64URL编码,就得到了JWT令牌的第二个部分。
- Signature
第三部分是签名,此部分用于防止JWT内容被篡改。
这个部分使用Base64url将前两部分进行编码,编码后使用点(.)连接组成字符串,最后使用header中声明的签名算法进行签名。
我们了解下JWT的基础知识,有利于使用自定义的JWT令牌。
7.6.2 配置JWT令牌服务
首先我们要在授权服务UAA中配置JWT令牌。在UAA中,只需要配置JWT令牌服务即可生成JWT格式的令牌。
1、注入JwtTokenStore
package com.tuling.security.distributed.uaa.config;import org.springframework.context.annotation.Bean;import org.springframework.context.annotation.Configuration;import org.springframework.security.oauth2.provider.token.TokenStore;import org.springframework.security.oauth2.provider.token.store.JwtAccessTokenConverter;import org.springframework.security.oauth2.provider.token.store.JwtTokenStore;@Configurationpublic class TokenConfig {private static final String SIGN_KEY="uaa";// 使用JWT令牌。@Beanpublic TokenStore tokenStore(){return new JwtTokenStore(accessTokenConvert());}@Beanpublic JwtAccessTokenConverter accessTokenConvert(){JwtAccessTokenConverter converter = new JwtAccessTokenConverter();converter.setSigningKey(SIGN_KEY);return converter;}}
2、在MyAuthorizationConfig中使用注入的accessTokenConvert声明tokenService
//使用JWT令牌@Autowiredprivate JwtAccessTokenConverter accessTokenConverter;...public AuthorizationServerTokenServices tokenService() {DefaultTokenServices service = new DefaultTokenServices();service.setClientDetailsService(clientDetailsService); //客户端详情服务service.setSupportRefreshToken(true); //允许令牌自动刷新service.setTokenStore(tokenStore); //令牌存储策略-内存//使用JWT令牌service.setTokenEnhancer(accessTokenConverter);service.setAccessTokenValiditySeconds(7200); // 令牌默认有效期2小时service.setRefreshTokenValiditySeconds(259200); // 刷新令牌默认有效期3天return service;}
3、然后就可以测试生成的JWT令牌
可以看到,申请到的令牌已经变成了JWT格式,比之前长了很多。
7.6.3 JWT令牌验证
然后我们到资源服务器中配置使用JWT令牌
1、将授权服务中的TokenConfig类全部拷贝到资源服务中。这也是因为资源服务需要与授权服务保持相同的Token。
2、在MyResourceServerConfig中屏蔽ResourceServerTokenServices
//使用JWT令牌,需要引入与uaa一致的tokenStore,存储策略。@Autowiredprivate TokenStore tokenStore;...// 使用JWT令牌就不再需要远程解析服务了,资源服务可以在本地进行解析。// public ResourceServerTokenServices tokenServices(){//// DefaultTokenServices services = new DefaultTokenServices();// RemoteTokenServices services = new RemoteTokenServices();// services.setCheckTokenEndpointUrl("http://localhost:53020/uaa/oauth/check_token");// services.setClientId("c1");// services.setClientSecret("secret");// return services;// }@Overridepublic void configure(ResourceServerSecurityConfigurer resources) throws Exception {resources.resourceId(RESOURCE_SALARY) //资源ID// .tokenServices(tokenServices()) //使用远程服务验证令牌的服务//使用JWT令牌验证,就不需要调用远程服务了,用本地验证方式就可以了。.tokenStore(tokenStore).stateless(true);}

八、主线问题总结
这样,我们就完成了Spring Security OAuth2的体验之旅,现在我们回头来体验一下整个过程。有一些问题需要总结下。
1、什么是认证、授权、会话、RBAC?基于Session的方式和基于Token的方式有什么区别?
2、Spring Security的工作原理,认证流程、授权流程。中间有哪些关键组件?主体服务、密码解析器、访问安全规则、登录登出页面逻辑… 这些关键组件如何进行扩展?
3、OAuth2.0认证的四种模式,他们的大体流程。
4、Spring Security OAuth2.0如何实现OAuth2.0协议? 有哪些关键组件?
九、附录,HttpSecurity配置项
| 方法 | 说明 |
|---|---|
| openidLogin() | 用于基于 OpenId 的验证 |
| headers() | 将安全标头添加到响应 |
| cors() | 配置跨域资源共享( CORS ) |
| sessionManagement() | 允许配置会话管理 |
| portMapper() | 向到 HTTPS 或者从 HTTPS 重定向到 HTTP。默认情况下,Spring Security使用一个PortMapperImpl映射 HTTP 端口8080到 HTTPS 端口8443,HTTP 端口80到 HTTPS 端口443 |
| jee() | 配置基于容器的预认证。 在这种情况下,认证由Servlet容器管理 |
| x509() | 配置基于x509的认证 |
| rememberMe | 允许配置“记住我”的验证 |
| authorizeRequests() | 允许基于使用HttpServletRequest限制访问 |
| requestCache() | 允许配置请求缓存 |
| exceptionHandling() | 允许配置错误处理 |
| securityContext() | 在HttpServletRequests之间的SecurityContextHolder上设置SecurityContext的管理。 当使用WebSecurityConfifigurerAdapter时,这将 |
| servletApi() | 将HttpServletRequest方法与在其上找到的值集成到SecurityContext中。 当使用WebSecurityConfifigurerAdapter时,这将自动应用 |
| csrf() | 添加 CSRF 支持,使用WebSecurityConfifigurerAdapter时,默认启用 |
| logout() | 添加退出登录支持。当使用WebSecurityConfifigurerAdapter时,这将自动应用。默认情况是,访问URL”/ logout”,使HTTP Session无效来 |
| anonymous() | 允许配置匿名用户的表示方法。 当与WebSecurityConfifigurerAdapter结合使用时,这将自动应用。 默认情况下,匿名用户将使用 |
| formLogin() | 指定支持基于表单的身份验证。如果未指定FormLoginConfifigurer#loginPage(String),则将生成默认登录页面 |
| oauth2Login() | 根据外部OAuth 2.0或OpenID Connect 1.0提供程序配置身份验证 |
| requiresChannel() | 配置通道安全。为了使该配置有用,必须提供至少一个到所需信道的映射 |
| httpBasic() | 配置 Http Basic 验证 |
| addFilterAt() | 允许配置错误处理 |
| exceptionHandling() | 在指定的Filter类的位置添加过滤器 |

若有收获,就点个赞吧
0 人点赞
