一、IOC的加载流程如下:
1、生活中的例子
如我们要购买一个衣柜(Bean),我们会先想好颜色款式(@Lazy@Scope)等,并找到衣柜店(ApplicationContext)进行购买,衣柜店可以自己生产(继承了BeanFactory),也可以请设计师(BeanDefinitionRegistry)根据我们的要求设计好图纸(BeanDefinition)给厂家(BeanFactory)进行生产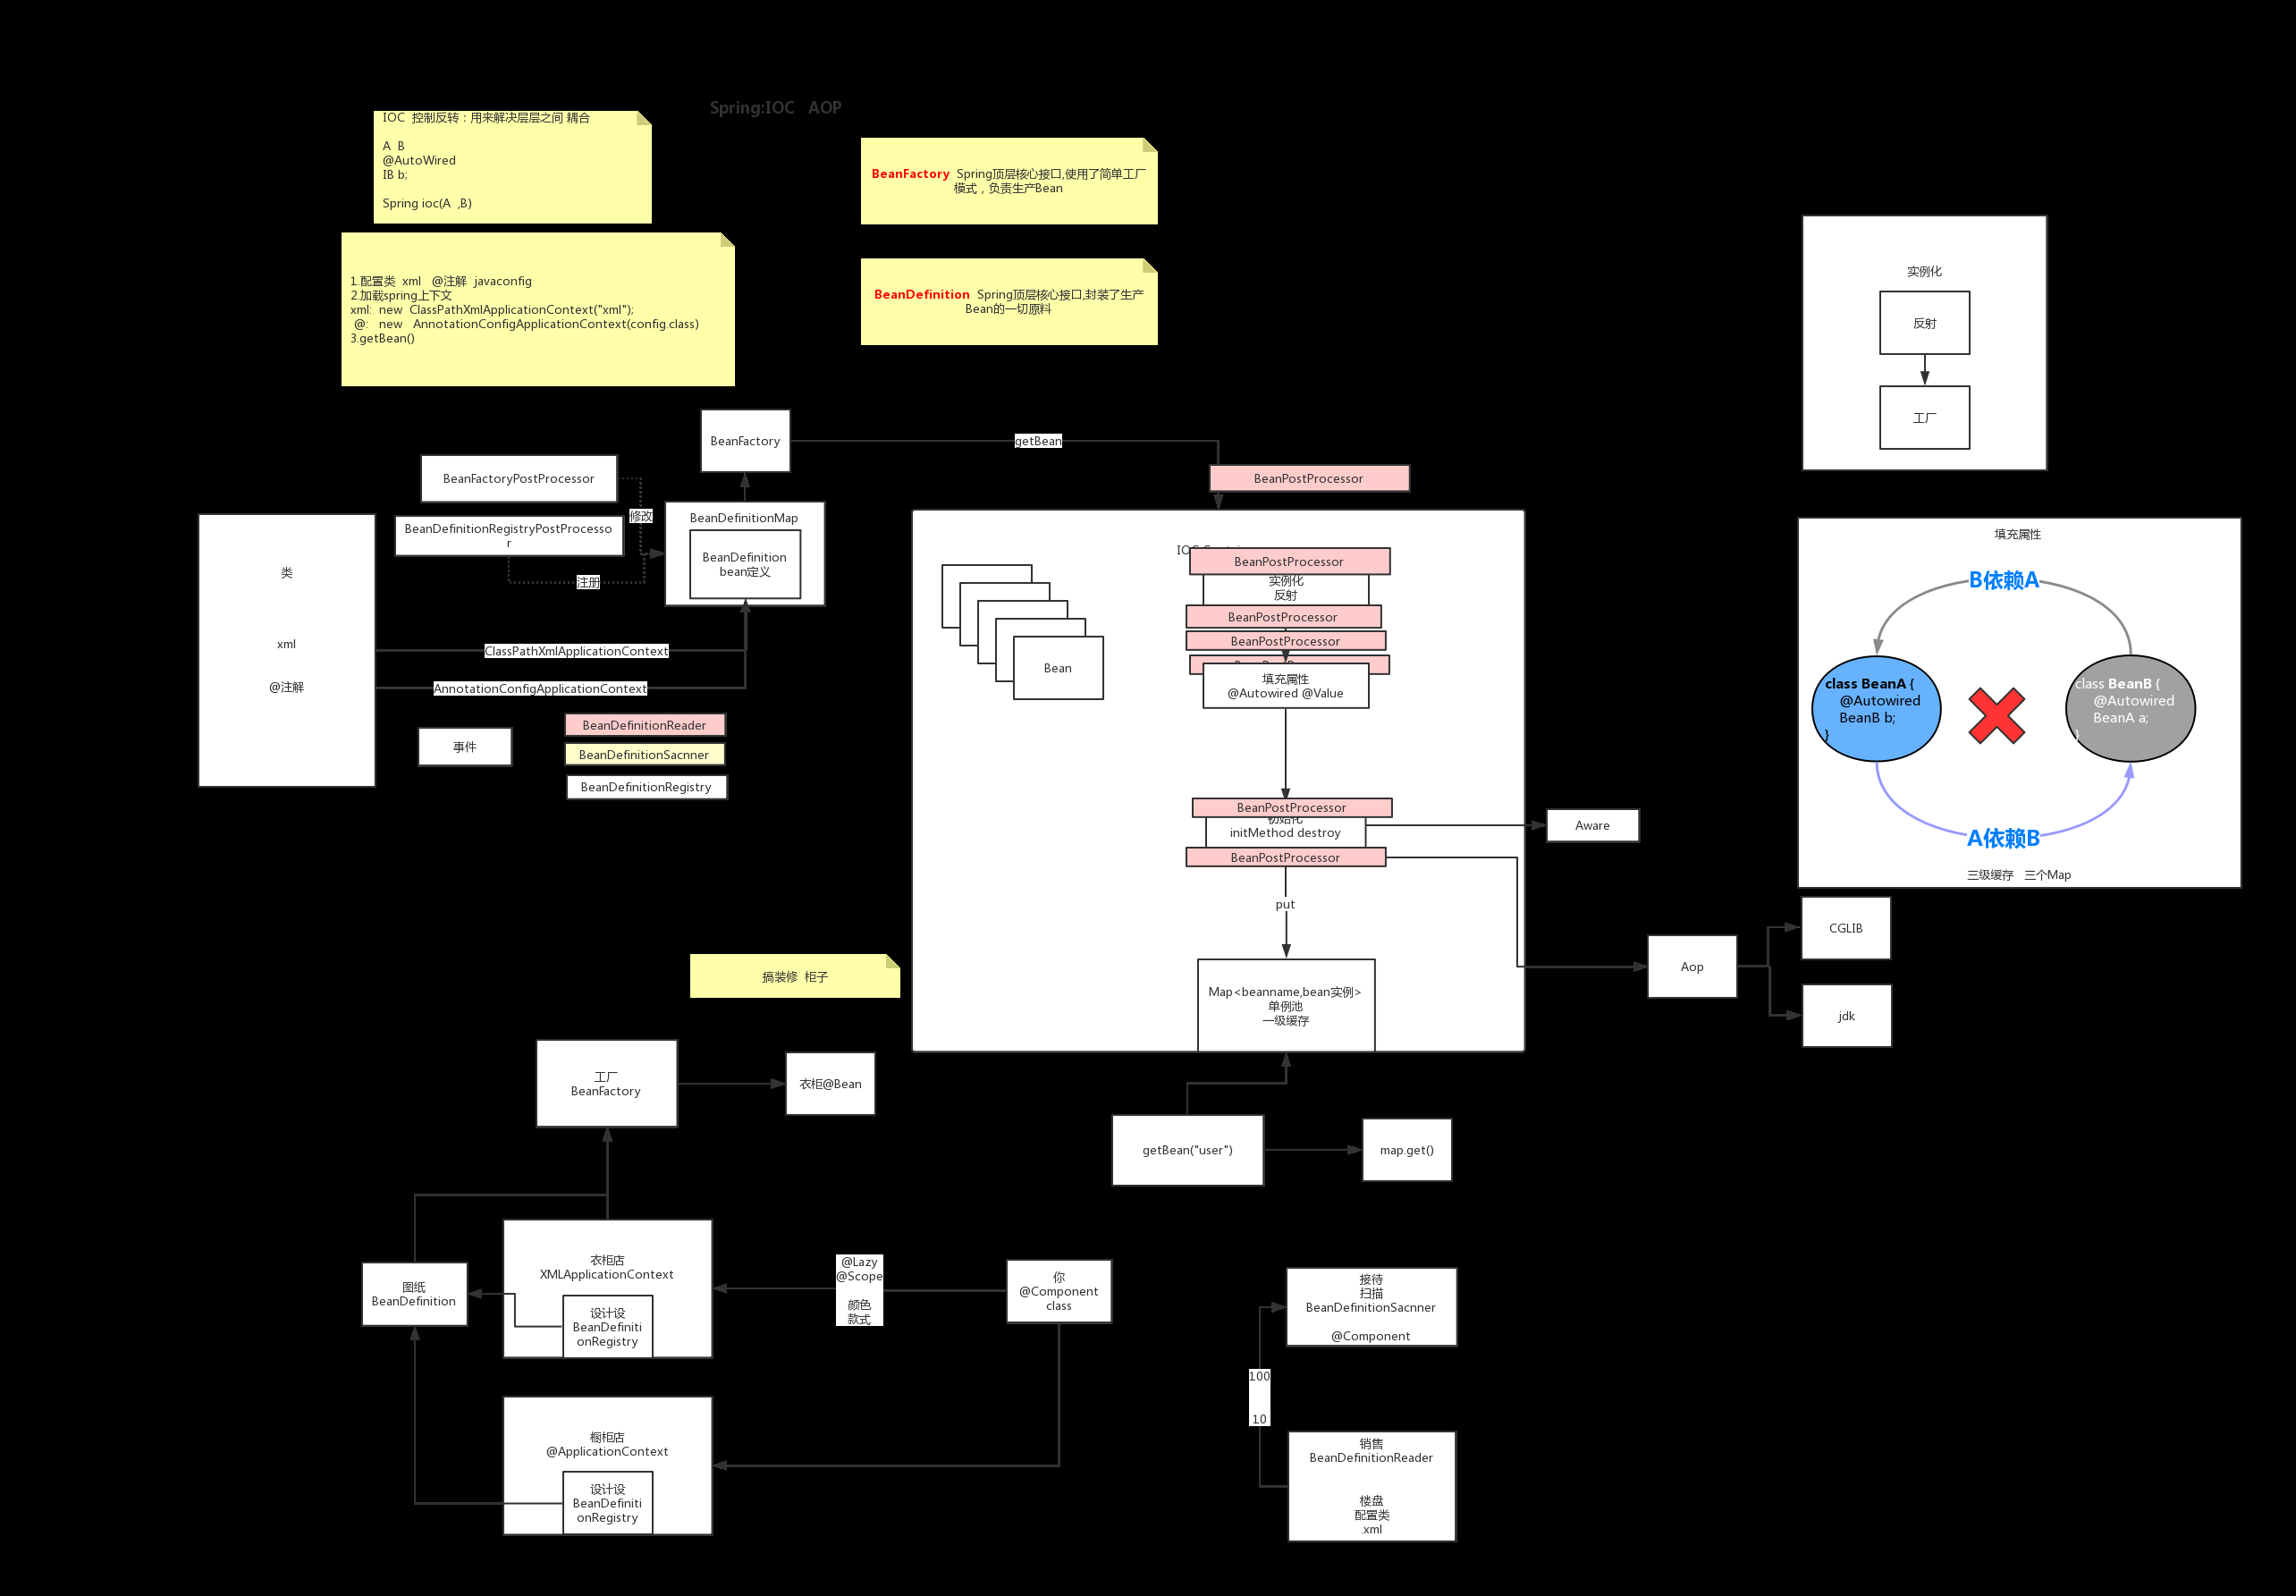
2、下面我们创建一个简单的工程,然后从源码去验证我们上面这个图所分析的加载过程是否正确
2.1加载Bean一般常用的有两种方法
a.xml(读取Bean定义是直接耦合的方式读取)
b.配置类(利用BeatFactoryPostProcessor进行解耦了,设计理念更先进)
所以我们下面就通过配置类加注解的方式来实验一下IOC的加载过程
@ComponentScan("com.bean.test.bean")public class BeanConfig {}
@Servicepublic class User {public void sayHi(){System.out.println("hi");}}
import com.bean.test.bean.User;import org.springframework.context.ApplicationContext;import org.springframework.context.annotation.AnnotationConfigApplicationContext;import org.springframework.context.annotation.ComponentScan;public class BeanApplication {public static void main(String[] args) {ApplicationContext context = new AnnotationConfigApplicationContext(BeanConfig.class);User user = context.getBean(User.class);user.sayHi();}}
2.2工程运行正常打印hi的话说明工程就正常了
2.2.1 查看AnnotationConfigApplicationContext的构造类

上图,我们在调用new AnnotationConfigApplicationContext(BeanConfig.class)的时候,
构造函数会调用this()的无参构造函数,无参构造函数如下:
2.2.2 查看AnnotationConfigApplicationContext的父类GenericApplicationContext的无参构造函数

可以看到,在创建AnnotationConfigApplicationContext对象的时候是会先new一个beanFactory出来,
DefaultListableBeanFactory继承自各种BeanFactory,拥有最全的功能,还实现了BeanDefinitionRegistry(Bean定义注册)功能
2.2.3 在无参构造函数中实现了配置读取类、配置扫描类

2.2.4 在new AnnotatedBeanDefinitionReader的时候还注册了一此处理器用以支撑ApplicationContext后面的运行

如ConfigurationClassPostProcessor处理器,用于解析我们的配置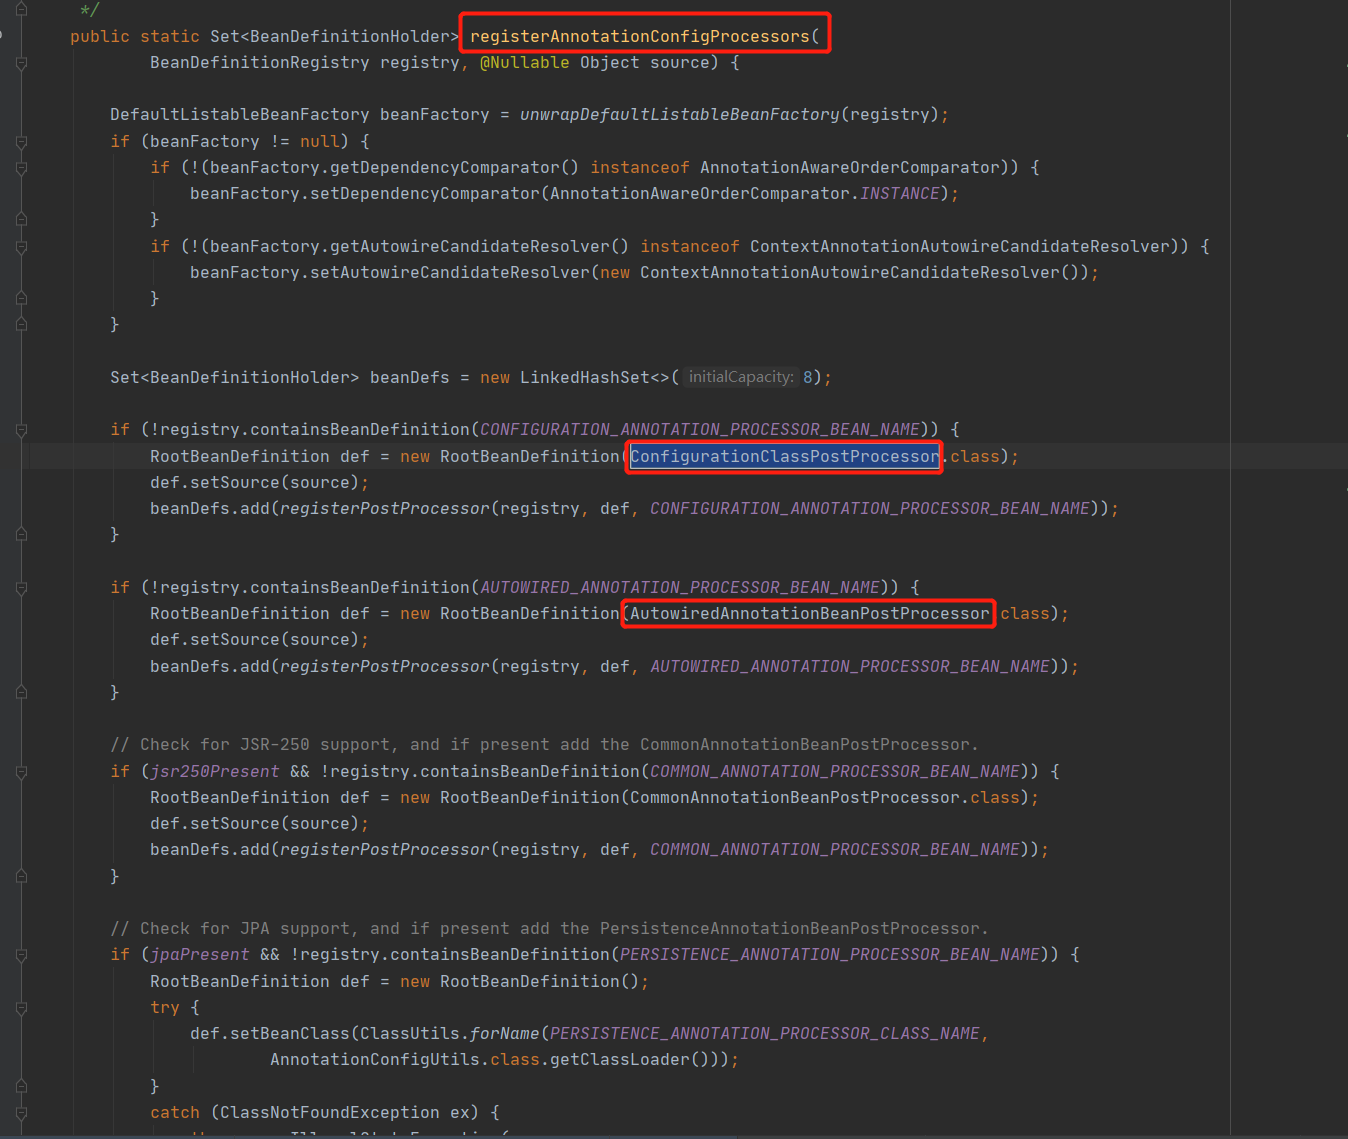
2.2.5 注册我们的Bean配置类


2.2.6 refresh

@Overridepublic void refresh() throws BeansException, IllegalStateException {synchronized (this.startupShutdownMonitor) {StartupStep contextRefresh = this.applicationStartup.start("spring.context.refresh");// 1.准备刷新上下文环境prepareRefresh();// 2.告诉子类初始化beanFactoryConfigurableListableBeanFactory beanFactory = obtainFreshBeanFactory();// 3.对beanFactory进行填充属性prepareBeanFactory(beanFactory);try {// 留个子类去实现接口postProcessBeanFactory(beanFactory);StartupStep beanPostProcess = this.applicationStartup.start("spring.context.beans.post-process");// 调用beanFactory的后置处理器,会在此将class扫描解析成bean定义invokeBeanFactoryPostProcessors(beanFactory);// 注册我们的bean后置处理器registerBeanPostProcessors(beanFactory);beanPostProcess.end();// 初始国际化资源处理器initMessageSource();// 创建事件多播器initApplicationEventMulticaster();// 这里也是留个子类实现,springboot也是从这里启动tomcat的onRefresh();// 把我们的事件监听器注册到多播器上registerListeners();// 实例化我们剩余的单实例beanfinishBeanFactoryInitialization(beanFactory);// 最后容器刷新,发布刷新事件,像springcloud也是从这里启动的finishRefresh();}catch (BeansException ex) {if (logger.isWarnEnabled()) {logger.warn("Exception encountered during context initialization - " +"cancelling refresh attempt: " + ex);}// Destroy already created singletons to avoid dangling resources.destroyBeans();// Reset 'active' flag.cancelRefresh(ex);// Propagate exception to caller.throw ex;}finally {// Reset common introspection caches in Spring's core, since we// might not ever need metadata for singleton beans anymore...resetCommonCaches();contextRefresh.end();}}}
二、IOC加载过程总结:
1.new一个AnnotationConfigApplicationContext
2.在AnnotationConfigApplicationContext父类的无参构造函数中初始了一个BeanFactory
3.在AnnotationConfigApplicationContext的无参构造函数中创建了配置类的reader和scanner
4.在创建reader的同时也注册了很多处理器,如配置类解析处理器
5.在AnnotationConfigApplicationContext的构造函数中进行Bean注册
6.由bean工厂进行bean实例的创建

若有收获,就点个赞吧
0 人点赞
