- 一、AOP的作用
- 二、AOP 术语解释
- 三、Spring Aop与AspectJ
- 四、用两个demo快速理解AOP到底能做些什么
- 五、spring aop源码解析
一、AOP的作用
二、AOP 术语解释
https://www.processon.com/view/link/5ecca5ebe0b34d5f262eae3a

三、Spring Aop与AspectJ
Spring Aop:
- 它基于动态代理来实现。默认地,如果使用接口的,用 JDK 提供的动态代理实现,如果没有接口,使用 CGLIB 实现。大家一定要明白背后的意思,包括什么时候会不用 JDK 提供的动态代理,而用 CGLIB 实现。
- Spring 3.2 以后,spring-core 直接就把 CGLIB 和 ASM 的源码包括进来了,这也是为什么我们不需要显式引入这两个依赖
- Spring 的 IOC 容器和 AOP 都很重要,Spring AOP 需要依赖于 IOC 容器来管理。
- Spring AOP 只能作用于 Spring 容器中的 Bean,它是使用纯粹的 Java 代码实现的,只能作用于 bean 的方法。
- Spring 提供了 AspectJ 的支持,但只用到的AspectJ的切点解析和匹配。
- 很多人会对比 Spring AOP 和 AspectJ 的性能,Spring AOP 是基于代理实现的,在容器启动的时候需要生成代理实例,在方法调用上也会增加栈的深度,使得 Spring AOP 的性能不如 AspectJ 那么好。
AspectJ:
- AspectJ 出身也是名门,来自于 Eclipse 基金会,link:https://www.eclipse.org/aspectj
- 属于静态织入,它是通过修改代码来实现的,它的织入时机可以是:
- Compile-time weaving:编译期织入,如类 A 使用 AspectJ 添加了一个属性,类 B 引用了它,这个场景就需要编译期的时候就进行织入,否则没法编译类 B。
- Post-compile weaving:编译后织入,也就是已经生成了 .class 文件,或已经打成 jar 包了,这种情况我们需要增强处理的话,就要用到编译后织入。
- Load-time weaving:指的是在加载类的时候进行织入,要实现这个时期的织入,有几种常见的方法。1、自定义类加载器来干这个,这个应该是最容易想到的办法,在被织入类加载到 JVM 前去对它进行加载,这样就可以在加载的时候定义行为了。2、在 JVM 启动的时候指定 AspectJ 提供的 agent:-javaagent:xxx/xxx/aspectjweaver.jar。
- AspectJ 能干很多 Spring AOP 干不了的事情,它是 AOP 编程的完全解决方案。Spring AOP 致力于解决的是企业级开发中最普遍的 AOP 需求(方法织入),而不是力求成为一个像 AspectJ 一样的 AOP 编程完全解决方案。
因为 AspectJ 在实际代码运行前完成了织入,所以大家会说它生成的类是没有额外运行时开销的。
四、用两个demo快速理解AOP到底能做些什么
我们有一个简单的计算器demo,目前只有最简单的加减乘除功能,代码如下:
1.接口类
public interface Calculate {/*** 加法*/int add(int numA, int numB);/*** 减法*/int sub(int numA, int numB);/*** 乘法*/int multi(int numA, int numB);/*** 除法*/int div(int numA, int numB);}
2.接口实现类
import org.springframework.aop.framework.AopContext;import org.springframework.stereotype.Component;@Componentpublic class CalculateImpl implements Calculate {/*** 加法*/public int add(int numA, int numB) {return numA+numB;}/*** 减法*/public int sub(int numA, int numB) {return numA-numB;}/*** 乘法*/public int multi(int numA, int numB) {return numA*numB;}/*** 除法*/public int div(int numA, int numB) {return numA/numB;//((Calculate) AopContext.currentProxy()).add(numA,numB);}}
假设我现在我想在项目功能上加一个函数调用日志打印的功能,但我又不想去改动CalculateImpl代码了,我们都知道一些基础的类尽量是不要做过多的功能改动的除非是bug要修正。下面我们来看看用AOP是如何实现的:
1.定义一个切面类
import org.aspectj.lang.JoinPoint;import org.aspectj.lang.annotation.*;import org.springframework.core.annotation.Order;import org.springframework.stereotype.Component;@Aspect@Order@Component/**** 定义一个切面类,用来增强加减乘除时做日志打印功能*/public class CalculateLogAspect {//定义切点,定义那些方法需要增强@Pointcut("execution(* com.bean.aop.CalculateImpl.*(..))")public void pointCut(){};@Before(value = "pointCut()")public void before(JoinPoint joinpoint) throws Throwable {String methodName = joinpoint.getSignature().getName();System.out.println("--------before--------");System.out.println("执行目标方法:"+methodName);}@After(value = "pointCut()")public void after(JoinPoint joinpoint) throws Throwable {String methodName = joinpoint.getSignature().getName();System.out.println("--------after--------");System.out.println("执行目标方法:"+methodName);}@AfterReturning(value = "pointCut()")public void afterReturning(JoinPoint joinpoint) throws Throwable {String methodName = joinpoint.getSignature().getName();System.out.println("--------afterReturning--------");System.out.println("执行目标方法:"+methodName);}@AfterThrowing(value = "pointCut()")public void afterThrowing(JoinPoint joinpoint) throws Throwable {String methodName = joinpoint.getSignature().getName();System.out.println("--------afterThrowing--------");System.out.println("执行目标方法:"+methodName);}}
2.调用测试:
import org.springframework.context.ApplicationContext;import org.springframework.context.annotation.AnnotationConfigApplicationContext;import org.springframework.context.annotation.ComponentScan;import org.springframework.context.annotation.Configuration;import org.springframework.context.annotation.EnableAspectJAutoProxy;@Configuration@EnableAspectJAutoProxy(proxyTargetClass = true) /*<aop:aspectj-autoproxy/> <aop:config proxy-target-class="true"/>*/@ComponentScan("com.bean.aop")public class AopApplication {public static void main(String[] args) {ApplicationContext context = new AnnotationConfigApplicationContext(AopApplication.class);CalculateImpl calculate = context.getBean(CalculateImpl.class);calculate.add(1,2);}}
3.运行结果:
可以看出,我们并没有对原有的接口实现类CalculateImpl做任何的代码修改,通过Pointcut的方式就实现了日志打印的功能

我们还是继续上面的例子,假如我现在不是在原有功能上做增强,我是想增加新的功能,如我想给程序加一个取模的计算功能,还是不想修改到CalculateLogAspect类,用AOP又如何实现呢?
1.我们先添加一个取模的接口和接口实现
public interface CalculateQM {/*** 取模*/int mod(int numA, int numB);}public class CalculateQMImpl implements CalculateQM {/*** 取模*/public int mod(int numA,int numB){return numA%numB;}}
2.我们再添加一个Aspect切面类来引入新增加的取模功能
@Aspect@Order@Component/**** 定义一个切面类,用来新增取模计算功能*/public class CalculateQMAspect {/*引入:*/@DeclareParents(value="com.bean.aop.CalculateImpl", // 动态实现的类,即指定要给那一个类引入新功能defaultImpl = CalculateQMImpl.class) // 引入的接口的默认实现,即指定新增加的功能接口的实现类public static CalculateQM calculateQM; // 引入的接口,即指定新增加的功能接口}
3.测试
@Configuration@EnableAspectJAutoProxy(proxyTargetClass = true) /*<aop:aspectj-autoproxy/> <aop:config proxy-target-class="true"/>*/@ComponentScan("com.bean.aop")public class AopApplication {public static void main(String[] args) {ApplicationContext context = new AnnotationConfigApplicationContext(AopApplication.class);CalculateImpl calculate = context.getBean(CalculateImpl.class);calculate.add(1,2);//CalculateQM接口功能已经引入到了calculateImpl,这里已经可以直接从calculateImpl这个bean中拿到CalculateQM对象并使用取模功能了。CalculateQM pcalculate = (CalculateQM) context.getBean("calculateImpl");System.out.println(pcalculate.mod(100,200));}}
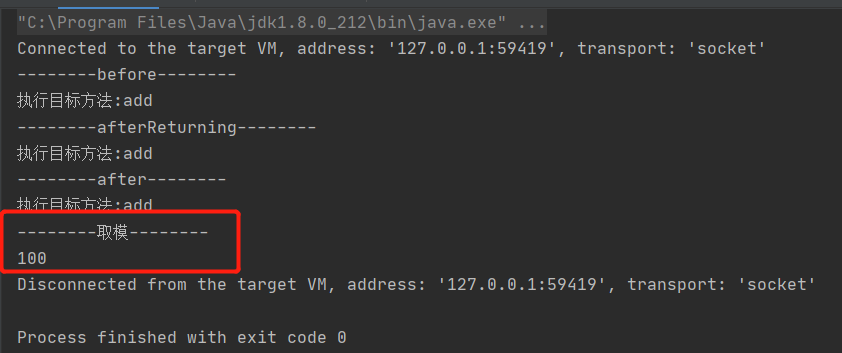
4.运行结果
从下图可以看出,在没有修改任何一行calculateImpl代码的前提下,我们给calculateImpl引入了新的取模计算功能。
五、spring aop源码解析
上面做了作用、原理以及案例的演示,原理和使用还是很简单的。
我们知道,spring中的aop是通过动态代理实现的,那么他底层具体是如何实现的呢?
spring通过一个切面类,在他的类上加入@Aspect注解,定义一个Pointcut方法,最后定义一系列的增强方法。这样就完成一个对象的切面操作。
通过上面的例子,我们可以思考一下,要实现我们的aop,大致有以下思路:
1.找到所有的切面类
2.解析出所有的advice并保存
3.创建一个动态代理类
4.调用被代理类的方法时,找到他的所有增强器,并增强当前的方法
那么下面通过源码验证一下我们的猜测:
5.1、切面类的解析
spring通过@EnableAspectJAutoProxy开启aop切面,在注解类上面发现@Import(AspectJAutoProxyRegistrar.class),AspectJAutoProxyRegistrar实现了ImportBeanDefinitionRegistrar,所以他会通过registerBeanDefinitions方法为我们容器导入beanDefinition。

进入解析切面的过程:
postProcessBeforeInstantiation是在任意bean创建的时候就调用了
org.springframework.beans.factory.support.AbstractAutowireCapableBeanFactory#resolveBeforeInstantiation
org.springframework.beans.factory.support.AbstractAutowireCapableBeanFactory#applyBeanPostProcessorsBeforeInstantiation
org.springframework.beans.factory.config.InstantiationAwareBeanPostProcessor#postProcessBeforeInstantiation
org.springframework.aop.framework.autoproxy.AbstractAutoProxyCreator#postProcessBeforeInstantiation
详细流程图:
https://www.processon.com/view/link/5f1958a35653bb7fd24d0aad
追踪一下源码可以看到最终导入AnnotationAwareAspectJAutoProxyCreator,我们看一下他的类继承关系图,发现它实现了两个重要的接口,BeanPostProcessor和InstantiationAwareBeanPostProcessor
首先看InstantiationAwareBeanPostProcessor的postProcessBeforeInstantiation方法
Object postProcessBeforeInstantiation(Class beanClass, String beanName)(InstantiationAwareBeanPostProcessor)
org.springframework.aop.framework.autoproxy.AbstractAutoProxyCreator#postProcessBeforeInstantiation
org.springframework.aop.aspectj.autoproxy.AspectJAwareAdvisorAutoProxyCreator#shouldSkip
org.springframework.aop.aspectj.annotation.AnnotationAwareAspectJAutoProxyCreator#findCandidateAdvisors
org.springframework.aop.aspectj.annotation.BeanFactoryAspectJAdvisorsBuilder#buildAspectJAdvisorspublic List<Advisor> buildAspectJAdvisors() {//获取缓存中的aspectBeanNamesList<String> aspectNames = this.aspectBeanNames;if (aspectNames == null) {synchronized (this) {aspectNames = this.aspectBeanNames;if (aspectNames == null) {List<Advisor> advisors = new ArrayList<>();aspectNames = new ArrayList<>();//获取beanFactory中所有的beanNamesString[] beanNames = BeanFactoryUtils.beanNamesForTypeIncludingAncestors(this.beanFactory, Object.class, true, false);for (String beanName : beanNames) {if (!isEligibleBean(beanName)) {continue;}// We must be careful not to instantiate beans eagerly as in this case they// would be cached by the Spring container but would not have been weaved.Class<?> beanType = this.beanFactory.getType(beanName);if (beanType == null) {continue;}//找出所有类上面含@Aspect注解的beanNameif (this.advisorFactory.isAspect(beanType)) {//将找到的beanName放入aspectNames集合aspectNames.add(beanName);AspectMetadata amd = new AspectMetadata(beanType, beanName);if (amd.getAjType().getPerClause().getKind() == PerClauseKind.SINGLETON) {MetadataAwareAspectInstanceFactory factory =new BeanFactoryAspectInstanceFactory(this.beanFactory, beanName);//1.找到切面类的所有但是不包括@Pointcut注解的方法//2.筛选出来包含@Around, @Before, @After,@ AfterReturning, @AfterThrowing注解的方法//3.封装为List<Advisor>返回List<Advisor> classAdvisors = this.advisorFactory.getAdvisors(factory);if (this.beanFactory.isSingleton(beanName)) {//将上面找出来的Advisor按照key为beanName,value为List<Advisor>的形式存入advisorsCachethis.advisorsCache.put(beanName, classAdvisors);}else {this.aspectFactoryCache.put(beanName, factory);}advisors.addAll(classAdvisors);}else {// Per target or per this.if (this.beanFactory.isSingleton(beanName)) {throw new IllegalArgumentException("Bean with name '" + beanName +"' is a singleton, but aspect instantiation model is not singleton");}MetadataAwareAspectInstanceFactory factory =new PrototypeAspectInstanceFactory(this.beanFactory, beanName);this.aspectFactoryCache.put(beanName, factory);advisors.addAll(this.advisorFactory.getAdvisors(factory));}}}this.aspectBeanNames = aspectNames;return advisors;}}}if (aspectNames.isEmpty()) {return Collections.emptyList();}List<Advisor> advisors = new ArrayList<>();for (String aspectName : aspectNames) {//当再次进入该方法,会直接从advisorsCache缓存中获取List<Advisor> cachedAdvisors = this.advisorsCache.get(aspectName);if (cachedAdvisors != null) {advisors.addAll(cachedAdvisors);}else {MetadataAwareAspectInstanceFactory factory = this.aspectFactoryCache.get(aspectName);advisors.addAll(this.advisorFactory.getAdvisors(factory));}}return advisors;}
流程图:

解析的步骤: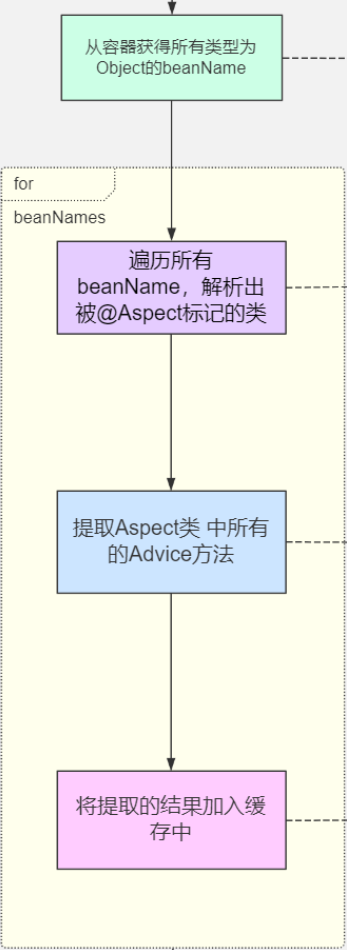
最终将解析出来的advisor放入缓存,这里思考清楚 advisor和advise的区别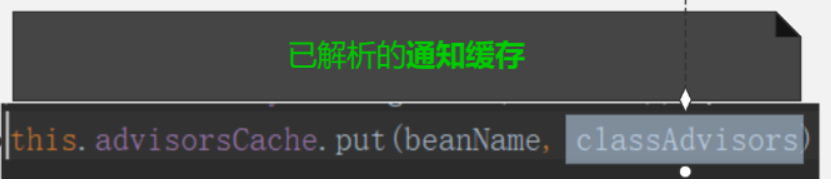
其实就是我们切面中的通知方法:
5.2、创建代理
进入创建代理的过程:

postProcessAfterInitialization是在bean创建完成之后执行的
org.springframework.beans.factory.support.AbstractAutowireCapableBeanFactory#doCreateBean
org.springframework.beans.factory.support.AbstractAutowireCapableBeanFactory#initializeBean(java.lang.String, java.lang.Object, org.springframework.beans.factory.support.RootBeanDefinition)
org.springframework.beans.factory.support.AbstractAutowireCapableBeanFactory#applyBeanPostProcessorsAfterInitialization
org.springframework.beans.factory.config.BeanPostProcessor#postProcessAfterInitialization
org.springframework.aop.framework.autoproxy.AbstractAutoProxyCreator#postProcessAfterInitialization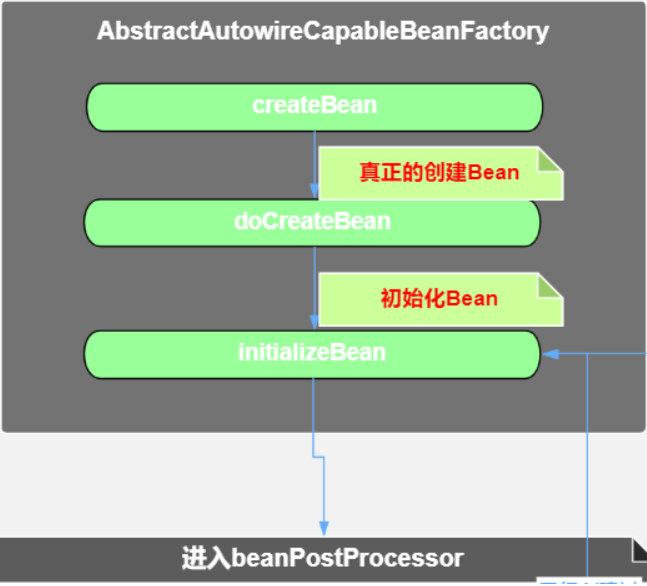
详细流程图:
https://www.processon.com/view/link/5f1e93f25653bb7fd2549b7c
1.获取advisors:创建代理之前首先要判断当前bean是否满足被代理, 所以需要将advisor从之前的缓存中拿出来和当前bean 根据表达式进行匹配:
Object postProcessAfterInitialization(@Nullable Object bean, String beanName)(BeanPostProcessor)
org.springframework.aop.framework.autoproxy.AbstractAutoProxyCreator#postProcessAfterInitialization
org.springframework.aop.framework.autoproxy.AbstractAutoProxyCreator#wrapIfNecessary
org.springframework.aop.framework.autoproxy.AbstractAdvisorAutoProxyCreator#getAdvicesAndAdvisorsForBean
org.springframework.aop.aspectj.annotation.AnnotationAwareAspectJAutoProxyCreator#findCandidateAdvisors
上述代码的链路最终到了findCandidateAdvisors,我们发现在postProcessBeforeInstantiation方法中对查找到的Advisors做了缓存,所以这里只需要从缓存中取就好了
最后创建代理类,并将Advisors赋予代理类,缓存当前的代理类
2.匹配:根据advisors和当前的bean根据切点表达式进行匹配,看是否符合。
org.springframework.aop.framework.autoproxy.AbstractAdvisorAutoProxyCreator#findAdvisorsThatCanApply
org.springframework.aop.support.AopUtils#findAdvisorsThatCanApply
org.springframework.aop.support.AopUtils#canApply(org.springframework.aop.Advisor, java.lang.Class, boolean) 拿到PointCut
org.springframework.aop.support.AopUtils#canApply(org.springframework.aop.Pointcut, java.lang.Class, boolean)
org.springframework.aop.ClassFilter#matches 粗筛
org.springframework.aop.IntroductionAwareMethodMatcher#matches 精筛
3.创建代理:找到了 和当前Bean匹配的advisor说明满足创建动态代理的条件: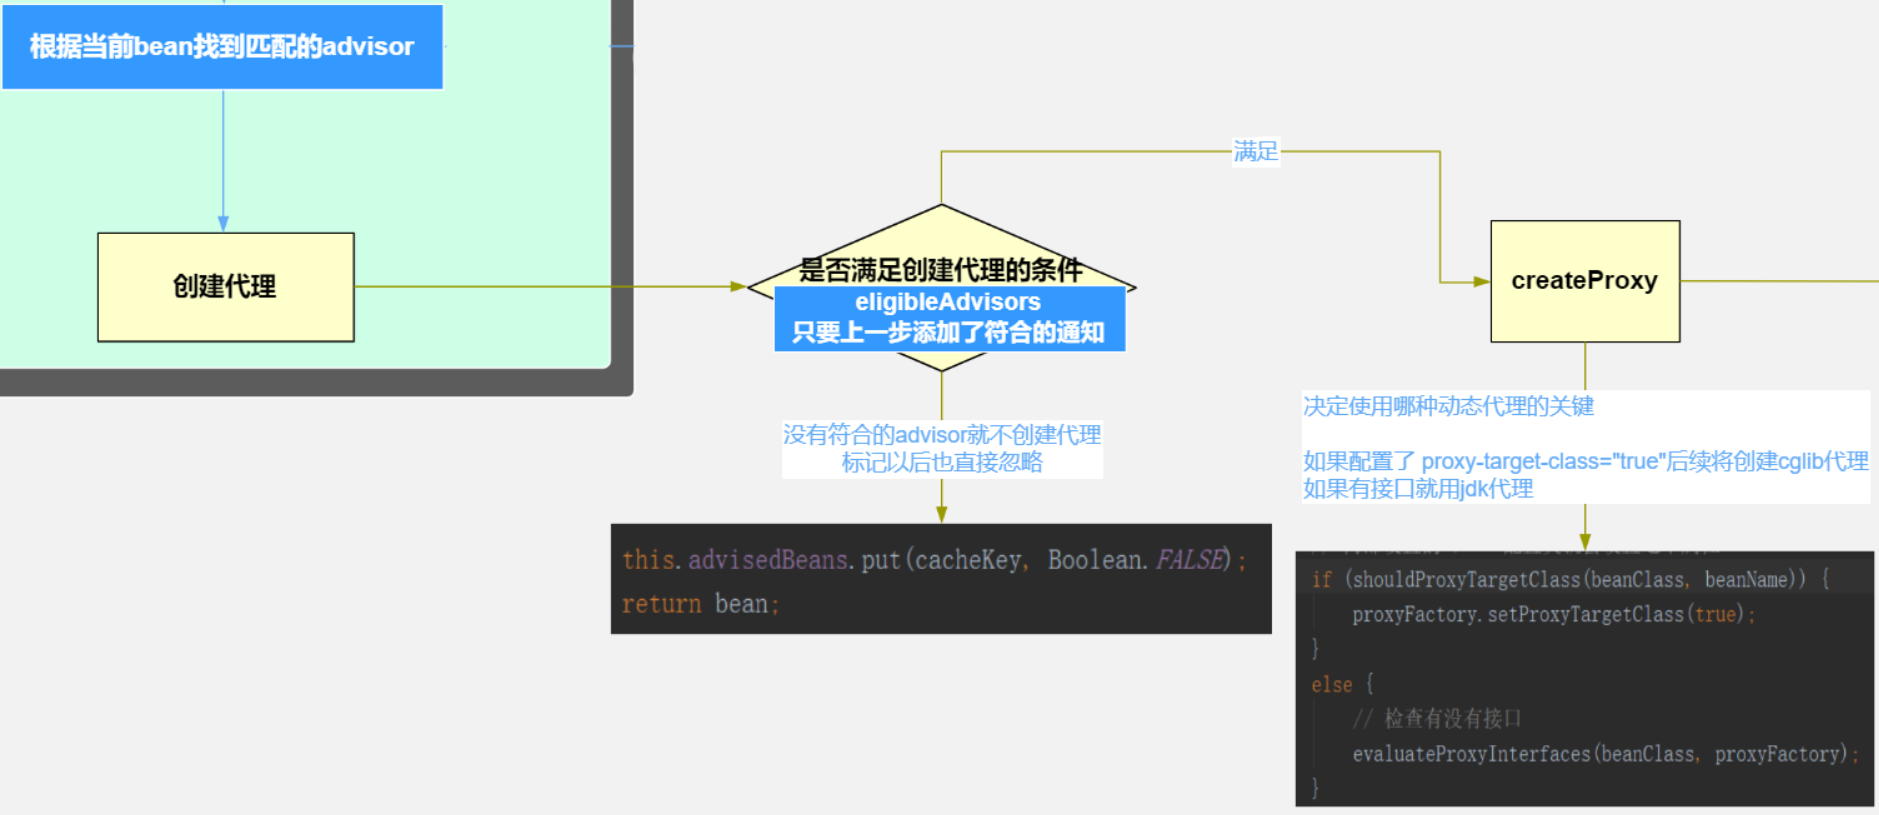
Object proxy = createProxy(bean.getClass(), beanName, specificInterceptors, new SingletonTargetSource(bean));this.proxyTypes.put(cacheKey, proxy.getClass());

理解了上面两个重要的方法,我们只需要将他与创建bean的流程联系起来就可以知道代理对象创建的整个流程了,在before和after方法分别放置断点,我们可以看到他的整个调用链路
5.3、代理类的调用
https://www.processon.com/view/link/5f4dd513e0b34d1abc735998
前面的分析可知,spring将找到的增强器Advisors赋予了代理类,那么在执行只要将这些增强器应用到被代理的类上面就可以了,那么spring具体是怎么实现的呢,下面我们以jdk代理为例分析一下源码:
public Object invoke(Object proxy, Method method, Object[] args) throws Throwable {MethodInvocation invocation;Object oldProxy = null;boolean setProxyContext = false;//获取当前被代理类TargetSource targetSource = this.advised.targetSource;Object target = null;// equals,hashcode等方法不做代理,直接调用try {if (!this.equalsDefined && AopUtils.isEqualsMethod(method)) {// The target does not implement the equals(Object) method itself.return equals(args[0]);}else if (!this.hashCodeDefined && AopUtils.isHashCodeMethod(method)) {// The target does not implement the hashCode() method itself.return hashCode();}else if (method.getDeclaringClass() == DecoratingProxy.class) {// There is only getDecoratedClass() declared -> dispatch to proxy config.return AopProxyUtils.ultimateTargetClass(this.advised);}else if (!this.advised.opaque && method.getDeclaringClass().isInterface() &&method.getDeclaringClass().isAssignableFrom(Advised.class)) {// Service invocations on ProxyConfig with the proxy config...return AopUtils.invokeJoinpointUsingReflection(this.advised, method, args);}Object retVal;// 将代理对象放到线程本地变量中if (this.advised.exposeProxy) {// Make invocation available if necessary.oldProxy = AopContext.setCurrentProxy(proxy);setProxyContext = true;}// Get as late as possible to minimize the time we "own" the target,// in case it comes from a pool.target = targetSource.getTarget();Class<?> targetClass = (target != null ? target.getClass() : null);//将增加器装换为方法执行拦截器链List<Object> chain = this.advised.getInterceptorsAndDynamicInterceptionAdvice(method, targetClass);// Check whether we have any advice. If we don't, we can fallback on direct// reflective invocation of the target, and avoid creating a MethodInvocation.if (chain.isEmpty()) {// We can skip creating a MethodInvocation: just invoke the target directly// Note that the final invoker must be an InvokerInterceptor so we know it does// nothing but a reflective operation on the target, and no hot swapping or fancy proxying.Object[] argsToUse = AopProxyUtils.adaptArgumentsIfNecessary(method, args);retVal = AopUtils.invokeJoinpointUsingReflection(target, method, argsToUse);}else {//将拦截器链包装为ReflectiveMethodInvocation并执行invocation = new ReflectiveMethodInvocation(proxy, target, method, args, targetClass, chain);retVal = invocation.proceed();}// Massage return value if necessary.Class<?> returnType = method.getReturnType();if (retVal != null && retVal == target &&returnType != Object.class && returnType.isInstance(proxy) &&!RawTargetAccess.class.isAssignableFrom(method.getDeclaringClass())) {// Special case: it returned "this" and the return type of the method// is type-compatible. Note that we can't help if the target sets// a reference to itself in another returned object.retVal = proxy;}else if (retVal == null && returnType != Void.TYPE && returnType.isPrimitive()) {throw new AopInvocationException("Null return value from advice does not match primitive return type for: " + method);}return retVal;}finally {if (target != null && !targetSource.isStatic()) {// Must have come from TargetSource.targetSource.releaseTarget(target);}if (setProxyContext) {// Restore old proxy.AopContext.setCurrentProxy(oldProxy);}}}
通过上面代码可知,将增强器装换为方法拦截器链,最终包装为ReflectiveMethodInvocation执行它的proceed方法,那么我们就来看下具体如果执行
public Object proceed() throws Throwable {// 当执行到最后一个拦截器的时候才会进入if (this.currentInterceptorIndex == this.interceptorsAndDynamicMethodMatchers.size() - 1) {return invokeJoinpoint();}//获取集合当前需要运行的拦截器Object interceptorOrInterceptionAdvice =this.interceptorsAndDynamicMethodMatchers.get(++this.currentInterceptorIndex);if (interceptorOrInterceptionAdvice instanceof InterceptorAndDynamicMethodMatcher) {// Evaluate dynamic method matcher here: static part will already have// been evaluated and found to match.InterceptorAndDynamicMethodMatcher dm =(InterceptorAndDynamicMethodMatcher) interceptorOrInterceptionAdvice;Class<?> targetClass = (this.targetClass != null ? this.targetClass : this.method.getDeclaringClass());if (dm.methodMatcher.matches(this.method, targetClass, this.arguments)) {return dm.interceptor.invoke(this);}else {// Dynamic matching failed.// Skip this interceptor and invoke the next in the chain.return proceed();}}else {// 执行拦截器方法return ((MethodInterceptor) interceptorOrInterceptionAdvice).invoke(this);}}
这样一看会感觉很蒙,其实追踪一下源码就很好理解了
org.springframework.aop.interceptor.ExposeInvocationInterceptor#invoke
public Object invoke(MethodInvocation mi) throws Throwable {MethodInvocation oldInvocation = invocation.get();invocation.set(mi);try {return mi.proceed();}finally {invocation.set(oldInvocation);}}
org.springframework.aop.aspectj.AspectJAfterThrowingAdvice#invoke
异常拦截器,当方法调用异常会被执行
public Object invoke(MethodInvocation mi) throws Throwable {try {return mi.proceed();}catch (Throwable ex) {if (shouldInvokeOnThrowing(ex)) {invokeAdviceMethod(getJoinPointMatch(), null, ex);}throw ex;}}
org.springframework.aop.framework.adapter.AfterReturningAdviceInterceptor#invoke
返回拦截器,方法执行失败,不会调用
public Object invoke(MethodInvocation mi) throws Throwable {Object retVal = mi.proceed();this.advice.afterReturning(retVal, mi.getMethod(), mi.getArguments(), mi.getThis());return retVal;}
org.springframework.aop.aspectj.AspectJAfterAdvice#invoke
后置拦截器,总是执行
public Object invoke(MethodInvocation mi) throws Throwable {try {return mi.proceed();}finally {invokeAdviceMethod(getJoinPointMatch(), null, null);}}
org.springframework.aop.framework.adapter.MethodBeforeAdviceInterceptor#invoke
前置拦截器
public Object invoke(MethodInvocation mi) throws Throwable {this.advice.before(mi.getMethod(), mi.getArguments(), mi.getThis());return mi.proceed();}
这里用了责任链的设计模式,递归调用排序好的拦截器链

若有收获,就点个赞吧
0 人点赞
