概述
官方文档:https://docs.spring.io/spring-boot/docs/current/reference/htmlsingle
Spring Boot 介绍
SpringBoot 提供了一种快速使用 Spring 的方式,基于约定优于配置的思想,可以让开发人员不必在配置与逻辑业务之间进行思维的切换,全身心的投入到逻辑业务的代码编写中,从而大大提高了开发的效率,一定程度上缩短了项目周期。2014 年 4 月,Spring Boot 1.0.0 发布。Spring 的顶级项目之一(https://spring.io)。
Spring 缺点
- 配置繁琐
虽然Spring的组件代码是轻量级的,但它的配置却是重量级的。一开始,Spring用XML配置,而且是很多XML配置。Spring 2.5引入了基于注解的组件扫描,这消除了大量针对应用程序自身组件的显式XML配置。Spring 3.0引入了基于Java的配置,这是一种类型安全的可重构配置方式,可以代替XML。所有这些配置都代表了开发时的损耗。因为在思考Spring特性配置和解决业务问题之间需要进行思维切换,所以编写配置挤占了编写应用程序逻辑的时间。和所有框架一样,Spring实用,但它要求的回报也不少。
- 依赖繁琐
项目的依赖管理也是一件耗时耗力的事情。在环境搭建时,需要分析要导入哪些库的坐标,而且还需要分析导入与之有依赖关系的其他库的坐标,一旦选错了依赖的版本,随之而来的不兼容问题就会严重阻碍项目的开发进度。
Spring Boot 功能
- 自动配置
Spring Boot的自动配置是一个运行时(更准确地说,是应用程序启动时)的过程,考虑了众多因素,才决定Spring配置应该用哪个,不该用哪个。该过程是SpringBoot自动完成的。
- 起步依赖
起步依赖本质上是一个Maven项目对象模型(Project Object Model,POM),定义了对其他库的传递依赖,这些东西加在一起即支持某项功能。
简单的说,起步依赖就是将具备某种功能的坐标打包到一起,并提供一些默认的功能。
- 辅助功能
提供了一些大型项目中常见的非功能性特性,如嵌入式服务器、安全、指标,健康检测、外部配置等。
Spring Boot 起步依赖原理分析
spring boot 项目要依赖一个父工程,父工程中定义了依赖管理 dependencyManagement,这样子我们在引入相关依赖的时候就不必写版本号了,有效的解决了版本冲突的问题。
<!-- spring boot项目依赖的父工程 --><parent><groupId>org.springframework.boot</groupId><artifactId>spring-boot-starter-parent</artifactId><version>2.5.1</version><relativePath/></parent>
spring boot 提许多起步依赖包,他利用了依赖传递的特性,使得开发者只需要引入起步依赖,就可以获得相关的 jar 包,并且因为父工程中有依赖管理,所以不需要写版本号,防止出现版本冲突问题。
<!-- spring boot start web --><dependency><groupId>org.springframework.boot</groupId><artifactId>spring-boot-starter-web</artifactId></dependency>
Spring Boot 配置文件
配置文件分类:application.properties、application.yml 、application.yaml
如何存在多个配置文件,优先级为application.properties > application.yml > application.yaml
Spring Boot 读取配置文件内容
配置文件内容
person:name: persionNameage: 18
@Value
在类上加上@Component注解,属性上增加@Value注解
@Componentpublic class Person {@Value("${person.name}")private String name;@Value("${person.age}")private Integer age;}
Environment
通过@Autowired 注入 Environment,再通过 getProperty 方法获取配置
@RestControllerpublic class HelloController {@AutowiredEnvironment environment;@GetMapping("hello03")public String hello03() {System.out.println(environment.getProperty("person.name"));System.out.println(environment.getProperty("person.age"));return "hello spring boot";}}
@ConfigurationProperties
在类上使用 @ConfigurationProperties,并声明配置的前缀,属性名称要求与配置文件对应
@Component@ConfigurationProperties(prefix = "person")public class Person {private String name;private Integer age;}
profile 多环境配置
使用多个 properties 文件配置多环境
创建多个环境的配置文件,文件名称规则 application-${自定义环境名称}.properties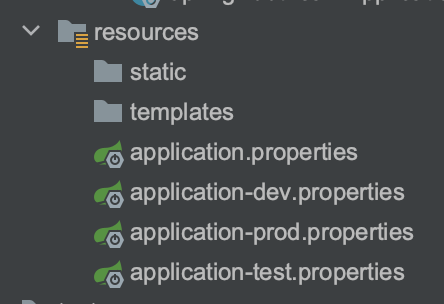
在主配置文件中启用,application.properties:
spring.profiles.active=dev
使用一个 yml 文件配置多环境
使用 --- 分隔环境与环境之间的配置,spring.config.activate.on-profile 指定环境名称,spring.profiles.active 指定启用的配置环境
---server:port: 8081spring:config:activate:on-profile: dev---server:port: 8081spring:config:activate:on-profile: prod---server:port: 8081spring:config:activate:on-profile: test---spring:profiles:active: dev
使用命令行参数指定环境
如果项目上线后要去修改配置文件的方式指定配置环境的话会比较麻烦,所以一般会在命令行启动的时候加上参数指定启用的配置环境
java -jar ${jar包路径} --spring.profiles.avtive=${环境名称}
整合 Junit
导入依赖:
<dependency><groupId>org.springframework.boot</groupId><artifactId>spring-boot-starter-test</artifactId><scope>test</scope></dependency><dependency><groupId>junit</groupId><artifactId>junit</artifactId><scope>test</scope></dependency>
测试类:
注意 @SpringBootTest(classes = 项目启动类.class)
@RunWith(SpringRunner.class)@SpringBootTest(classes = SpringBootLearnApplication.class)class SpringBootLearnApplicationTests {@Autowiredprivate HelloService helloService;@Testvoid test01() {helloService.test();}}
整合 Redis
引入依赖
<dependency><groupId>org.springframework.boot</groupId><artifactId>spring-boot-starter-data-redis</artifactId></dependency>
配置 Redis 主机、端口、密码等
spring:redis:host: 127.0.0.1port: 6379password:
注入 RedisTemplate 测试
@RunWith(SpringRunner.class)@SpringBootTest(classes = SpringBootLearnApplication.class)public class RedisTests {@AutowiredRedisTemplate redisTemplate;@Testpublic void testSet() {redisTemplate.boundValueOps("key01").set("value01");}@Testpublic void testGet() {Object value = redisTemplate.boundValueOps("key01").get();System.out.println(value);}}
Spring Boot 原理之 Condition
Condition 是 Spring 4.0 新增的条件判断功能,通过这个注解可以实现选择性的创建 Bean,Spring Boot 是如何知道要创建哪些 Bean 的?比如 Spring Boot 是如何知道要创建 RedisTemplate 的?org.springframework.boot:spring-boot-autoconfigure 包中有一些 ConditionalXxx 注解: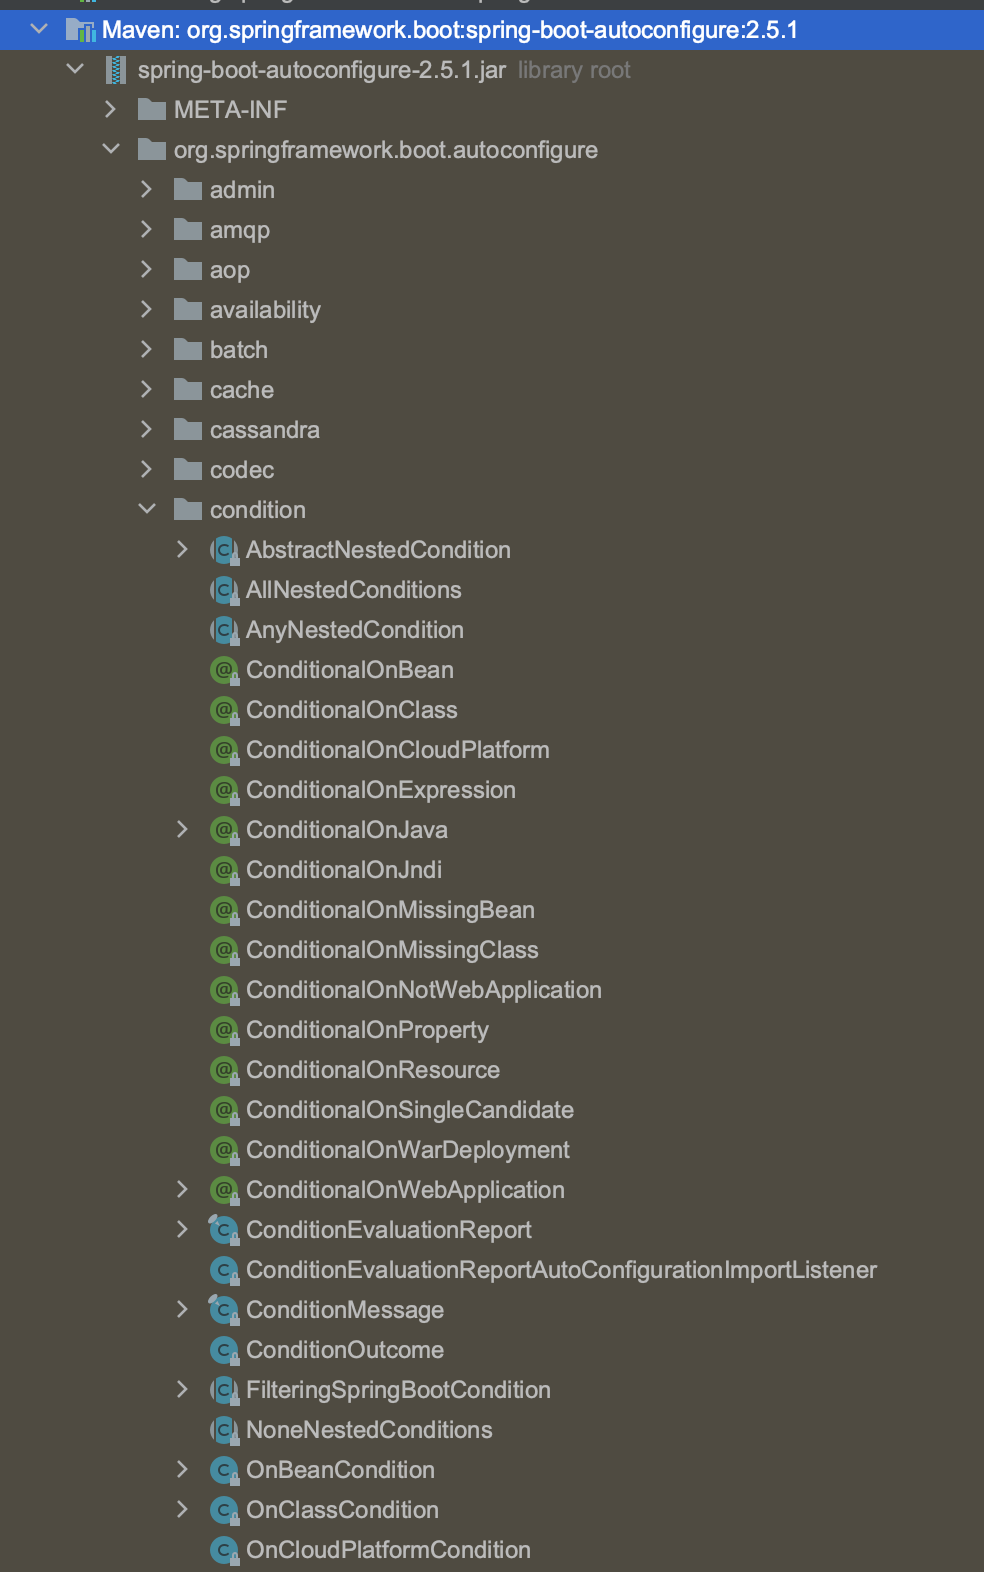
RedisTemplate 使用了 @CondisionalOnClass 和 @ConditionOnMissingBean注解: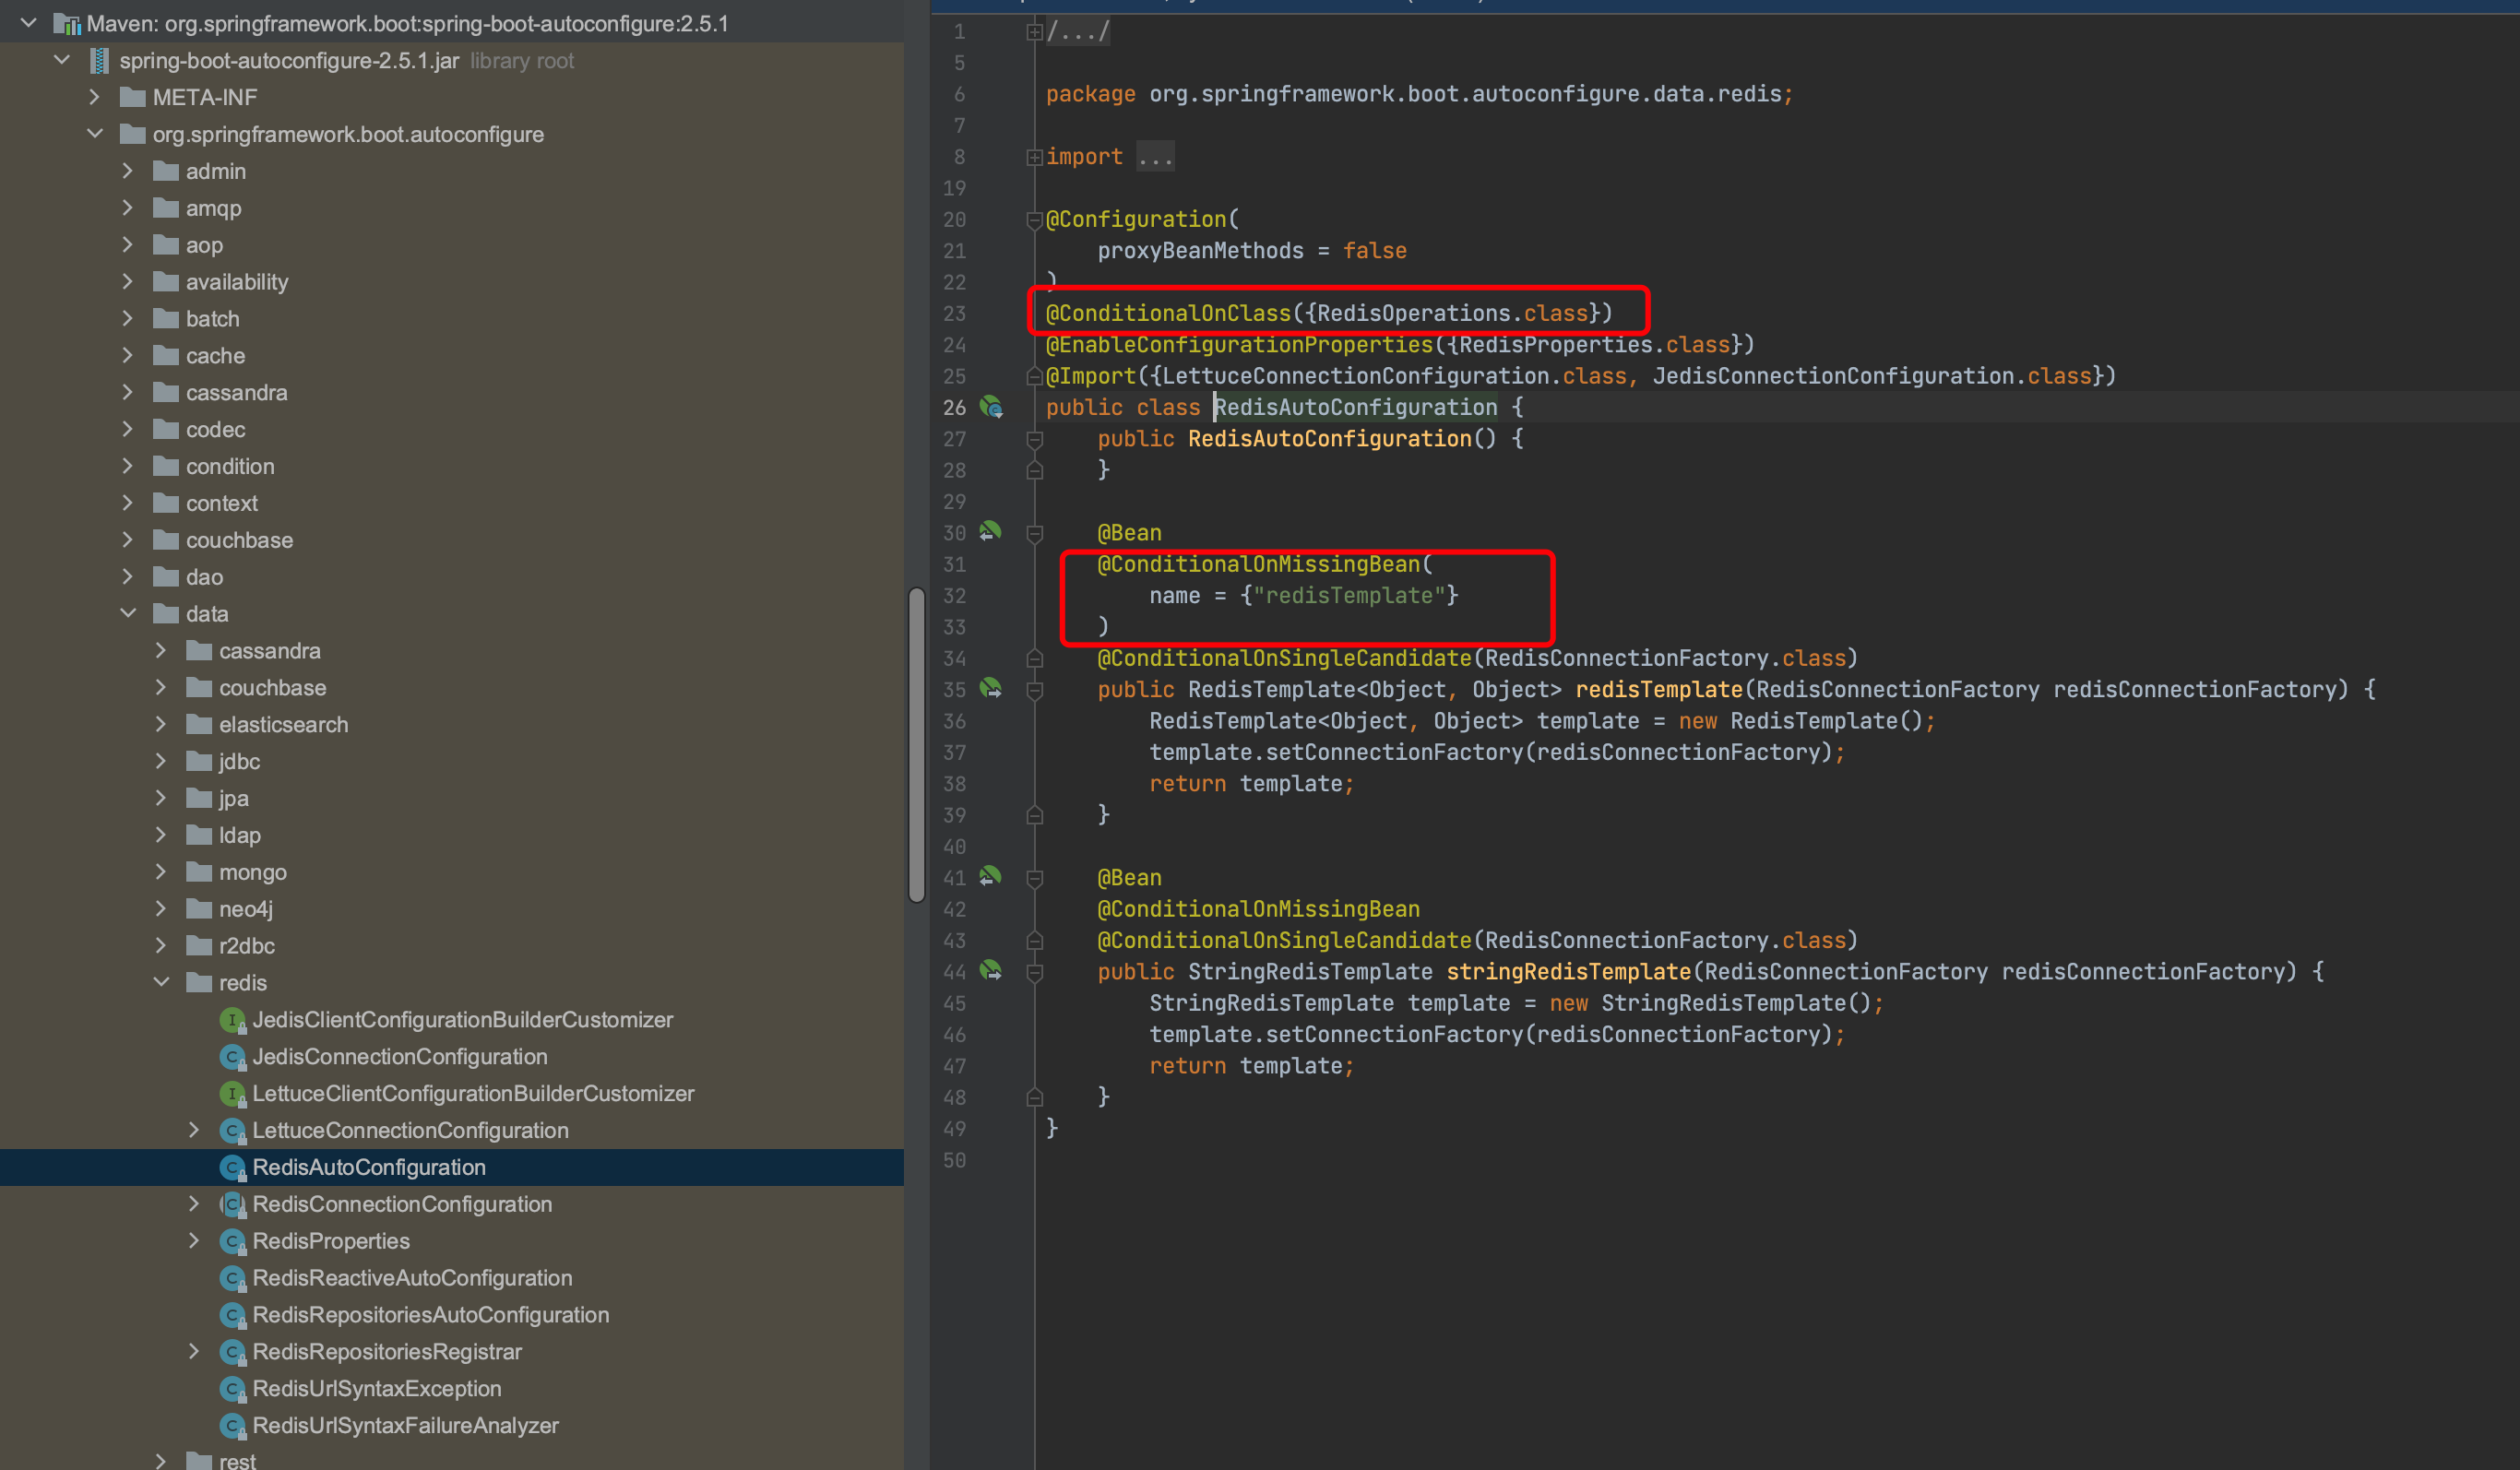
一些常见的 Condition 举例:
@ConditionalOnProperty:判断配置文件中是否有对应的属性与属性值
@ConditionalOnClass:判断环境中是否存在字节码文件
@ConditionalOnMissingBean:判断 IOC 容器中是否已存在该 Bean
切换内置 web 容器
原理
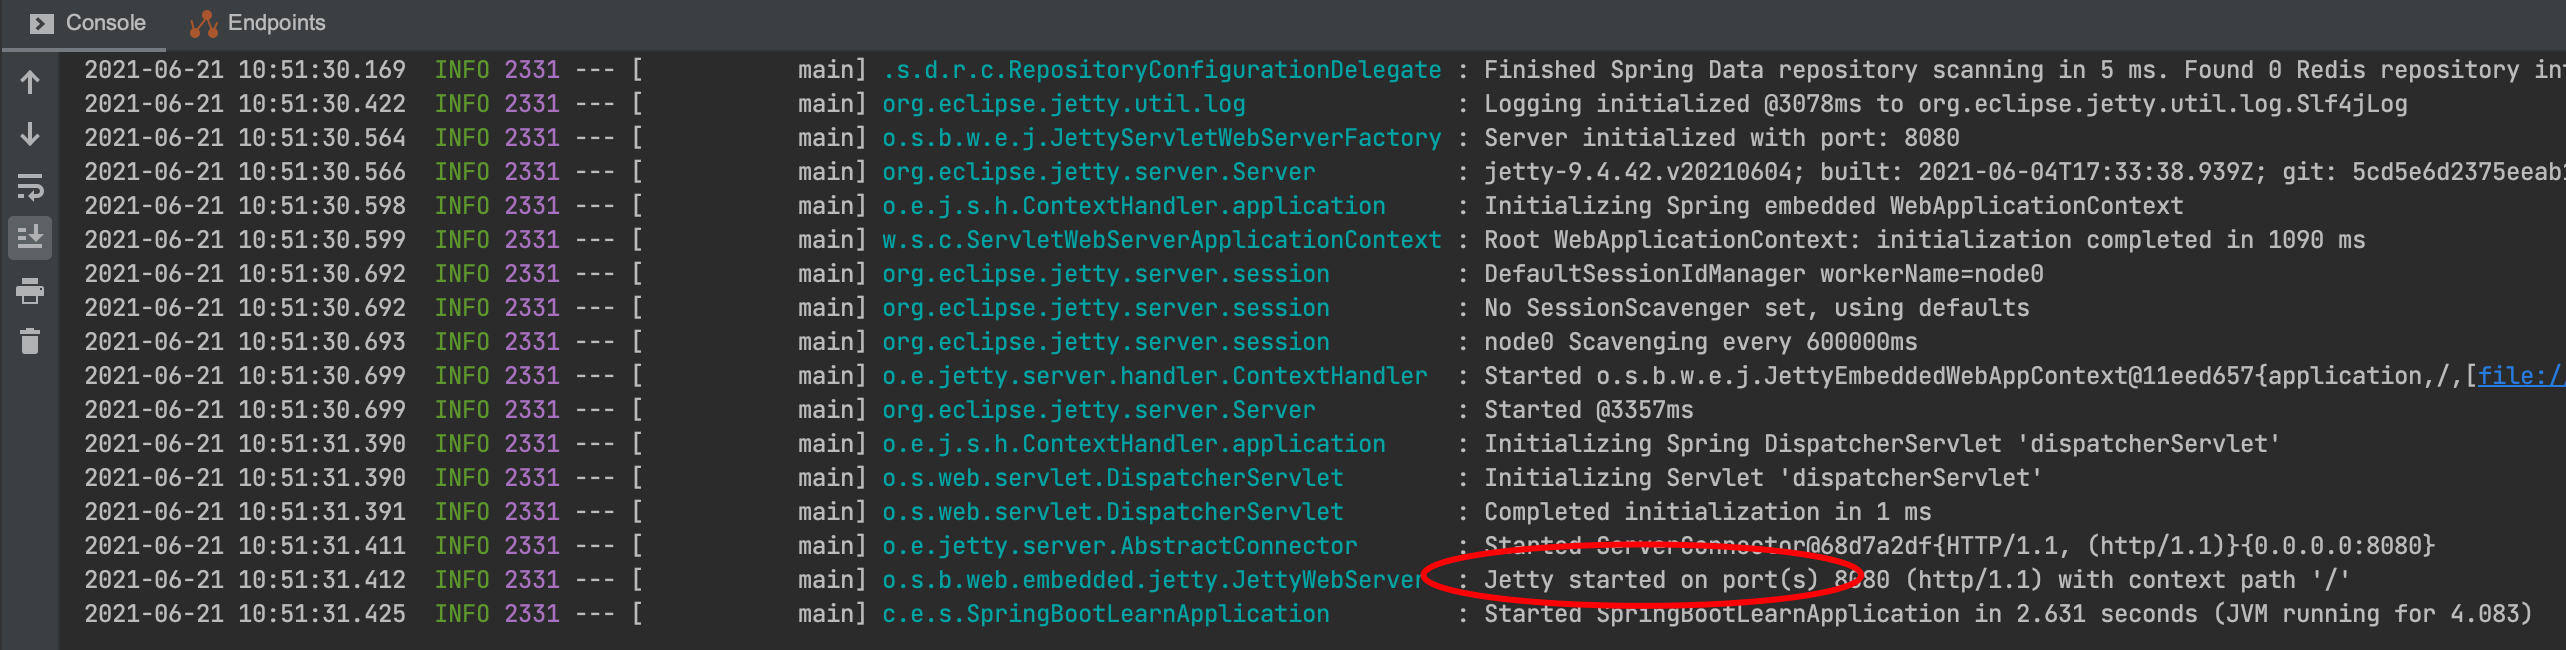
org.springframework.boot:spring-boot-autoconfigure 包下的 org.springframework.boot.autoconfigure.web.embedded.EmbeddedWebServerFactoryCustomizerAutoConfiguration 声明了多种 web 容器的配置,它使用了 @ConditionalXxx 实现动态创建 Bean,spring boot 支持四种 web 容器,分别为:Jetty、Netty、Tomcat、Undertow,默认为 Tomcat,如果要切换 web 容器可以通过排除依赖并引入新依赖的方式完成,可以很方便的切换。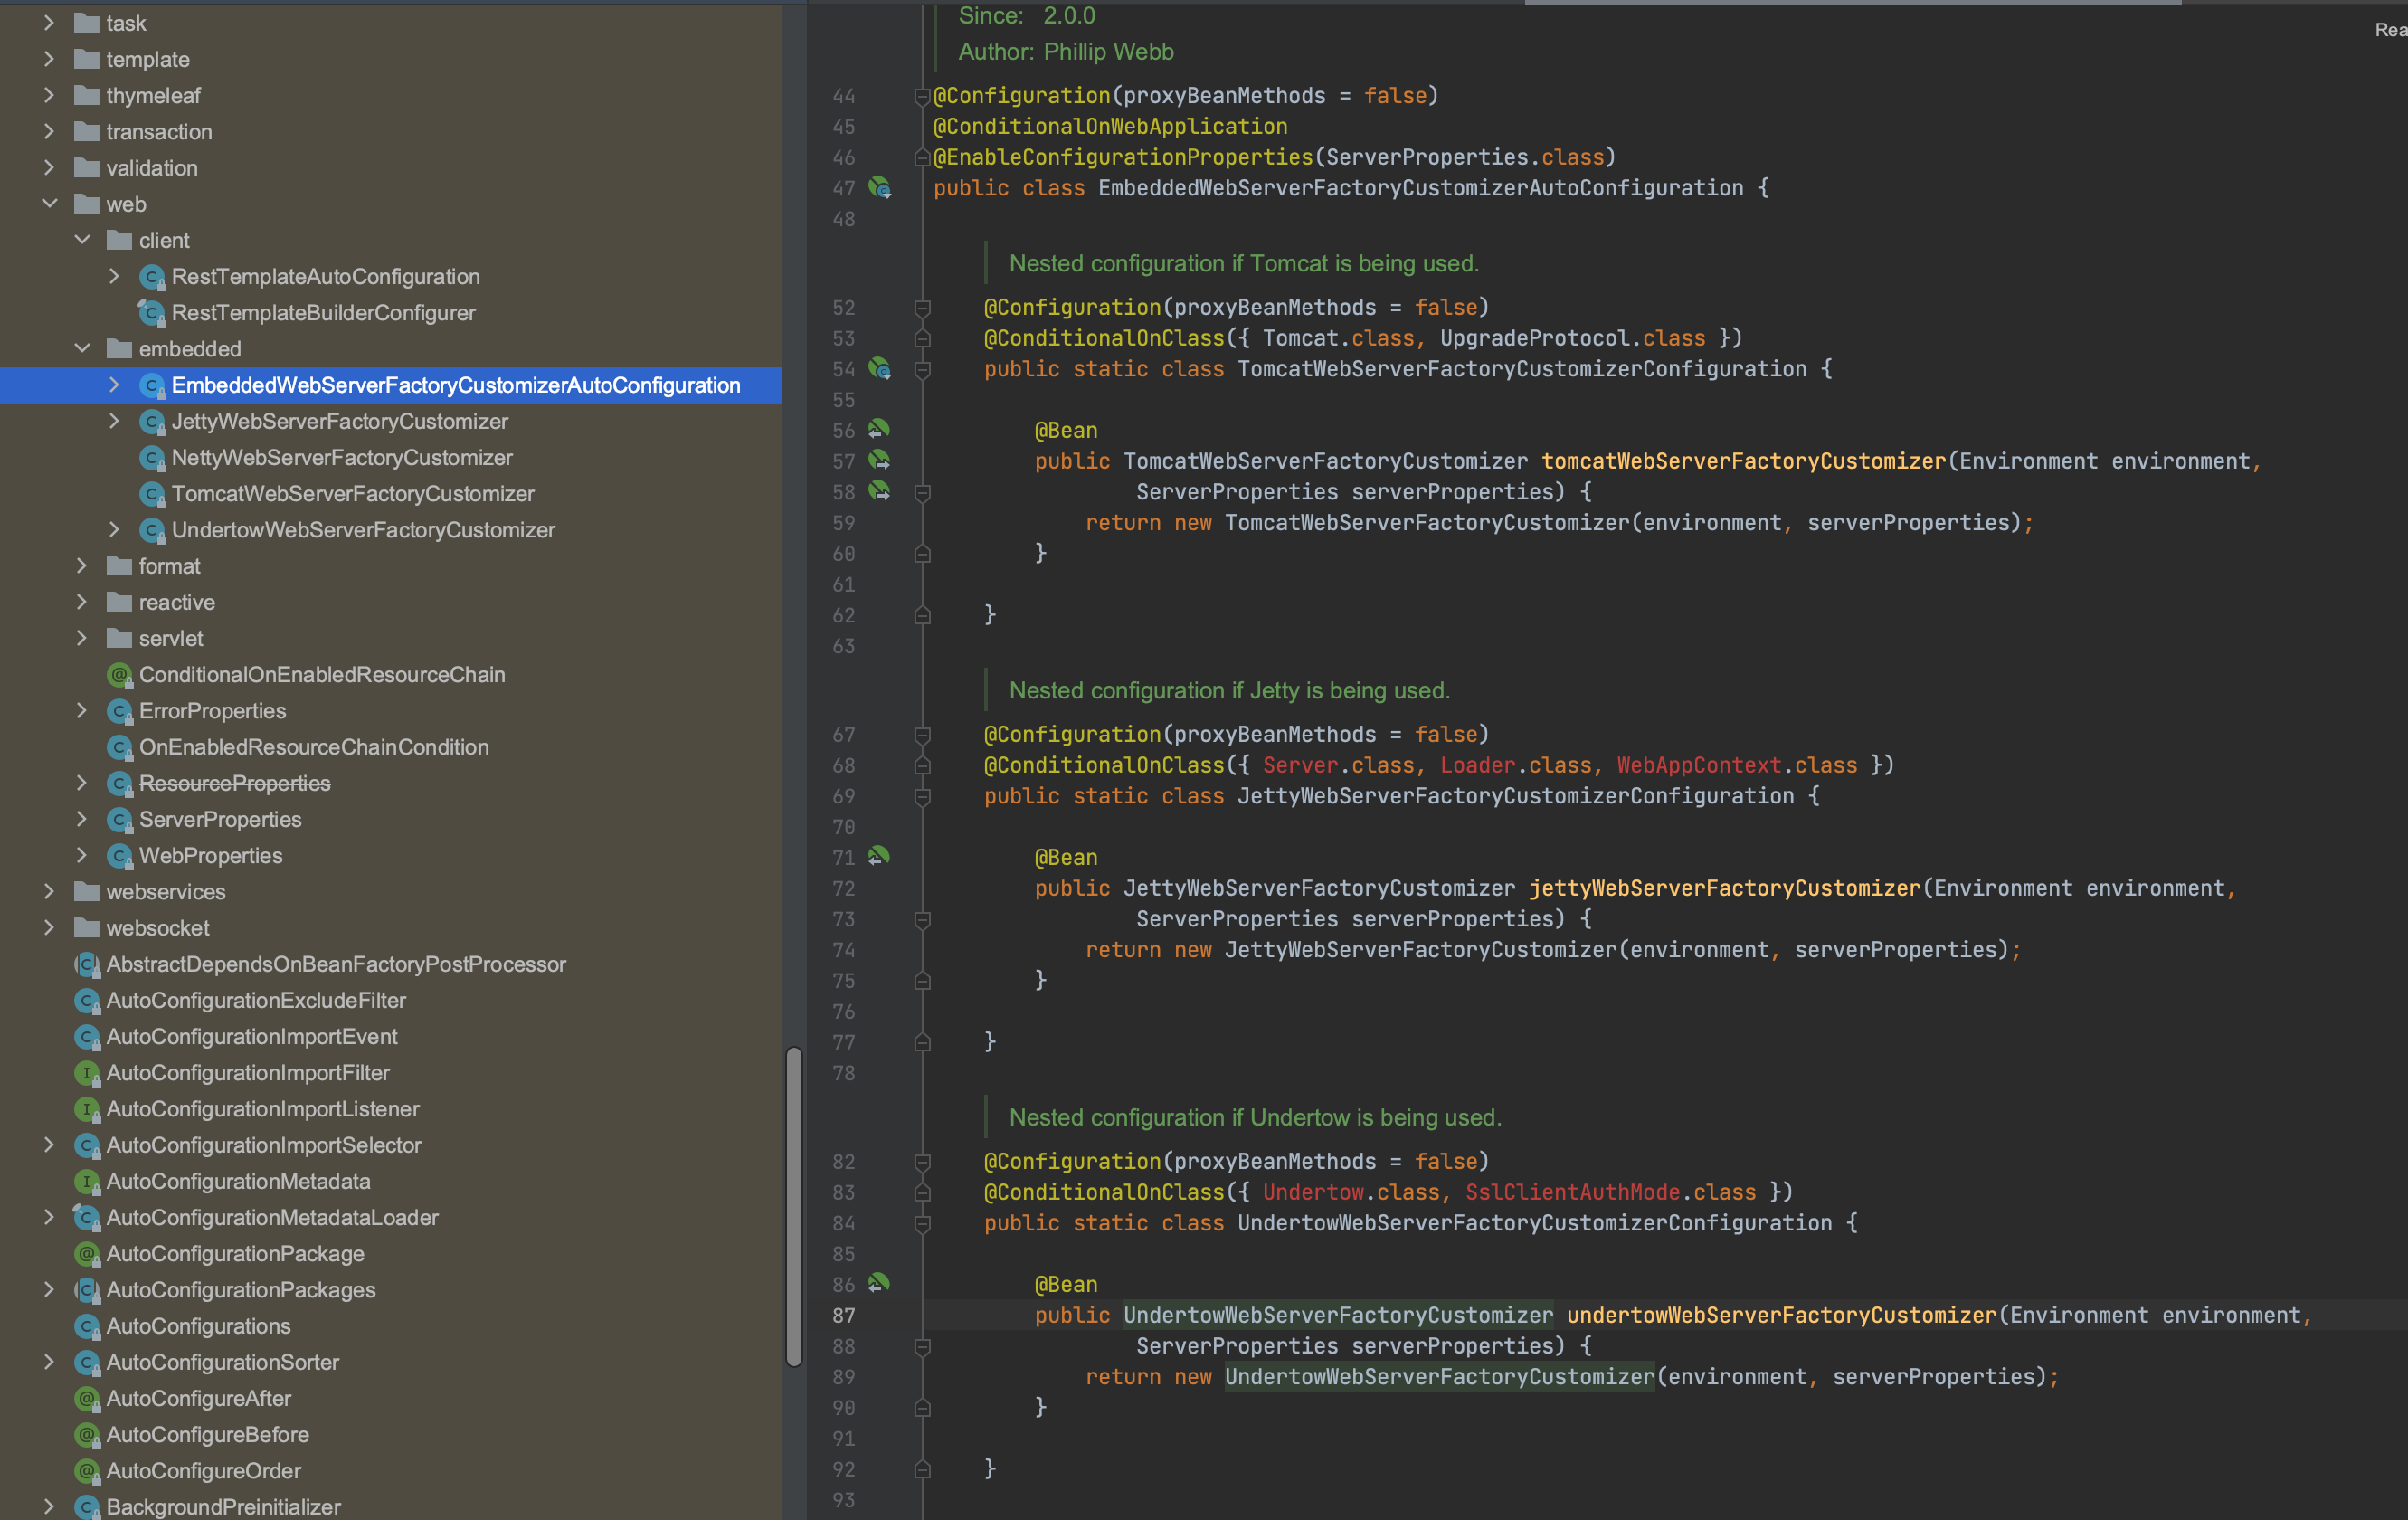
切换方法
排除 spring-boot-starter-web 的 tomcat 依赖:
<dependency><groupId>org.springframework.boot</groupId><artifactId>spring-boot-starter-web</artifactId><exclusions><exclusion><groupId>org.springframework.boot</groupId><artifactId>spring-boot-starter-tomcat</artifactId></exclusion></exclusions></dependency>
增加目标 web 容器依赖,这里以 jetty 为例:
<dependency><groupId>org.springframework.boot</groupId><artifactId>spring-boot-starter-jetty</artifactId></dependency>
Enable* 与 Import 注解
Spring Boot 不能直接获取其它 jar 包中定义的 Bean,原因是它们所在的包可能不被扫描,所以Spring Boot 中提供了很多 Enable 开头的注解,它的作用是用于动态开启某些功能,其底层原理是使用 @Import 注解导入一些配置类,实现动态加载 Bean。@SpringBootApplication 内封装了 @EnableAutoConfiguration: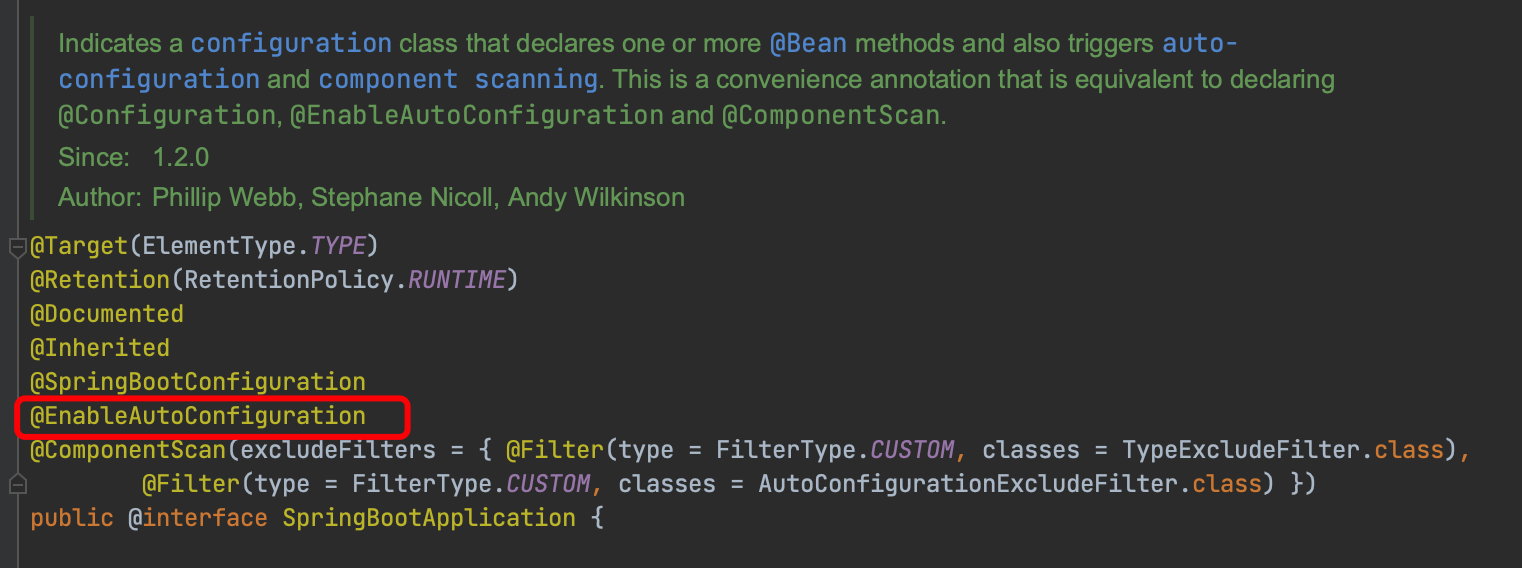
@EnableAutoConfiguration 内封装了 @Import: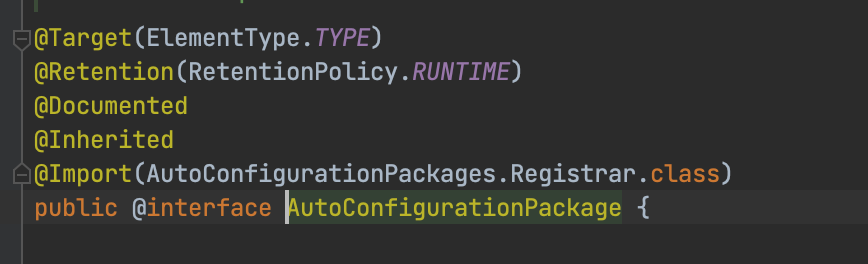
使用示例
定义一个 DemoConfig,com.example.springbootlearn.DemoConfig,始它不在包扫描范围内:
@Configurationpublic class DemoConfig {@Bean("demo")public Demo getDemo() {return new Demo();}public static class Demo {}}
启动类 com.example.springbootlearn.run.SpringBootLearnApplication:
@SpringBootApplicationpublic class SpringBootLearnApplication {public static void main(String[] args) {ConfigurableApplicationContext run = SpringApplication.run(SpringBootLearnApplication.class, args);// 尝试获取 Bean,结果是获取不到Object demo = run.getBean(DemoConfig.Demo.class);System.out.println(demo);}}
使用 @Import 注解导入配置类,则可以获取到 Bean:
@SpringBootApplication@Import(DemoConfig.class)public class SpringBootLearnApplication {public static void main(String[] args) {ConfigurableApplicationContext run = SpringApplication.run(SpringBootLearnApplication.class, args);// 尝试获取 Bean,成功Object demo = run.getBean(DemoConfig.Demo.class);System.out.println(demo);}}
但是用 @Import 比较麻烦,我们可以模仿 Spring Boot,将其封装成 @EnableDemo 注解:
@Target(ElementType.TYPE)@Retention(RetentionPolicy.RUNTIME)@Documented@Import(DemoConfig.class)public @interface EnableDemo {}
将 @Import 直接替换成 @EnableDemo:
@SpringBootApplication@EnableDemopublic class SpringBootLearnApplication {public static void main(String[] args) {ConfigurableApplicationContext run = SpringApplication.run(SpringBootLearnApplication.class, args);// 尝试获取 Bean,成功Object demo = run.getBean(DemoConfig.Demo.class);System.out.println(demo);}}
@Import 注解的四种使用方法
一、导入 Bean
@SpringBootApplication@Import(DemoConfig.Demo.class)public class SpringBootLearnApplication {public static void main(String[] args) {ConfigurableApplicationContext run = SpringApplication.run(SpringBootLearnApplication.class, args);// 尝试获取 Bean,成功Object demo = run.getBean(DemoConfig.Demo.class);System.out.println(demo);}}
二、导入配置类
@SpringBootApplication@Import(DemoConfig.class)public class SpringBootLearnApplication {public static void main(String[] args) {ConfigurableApplicationContext run = SpringApplication.run(SpringBootLearnApplication.class, args);// 尝试获取 Bean,成功Object demo = run.getBean(DemoConfig.Demo.class);System.out.println(demo);}}
三、导入 ImportSelector 实现类(一般用于加载配置文件中的类)
增加 DemoImportSelector 类,实现 ImportSelector 的 selectImports 方法,该方法返回字符数组,数组内容为需要导入类的全名:
public class DemoImportSelector implements ImportSelector {@Overridepublic String[] selectImports(AnnotationMetadata annotationMetadata) {return new String[] {"com.example.springbootlearn.DemoConfig"};}@Overridepublic Predicate<String> getExclusionFilter() {return ImportSelector.super.getExclusionFilter();}}
在启动类中导入ImportSelector实现类:
@SpringBootApplication@Import(DemoImportSelector.class)public class SpringBootLearnApplication {public static void main(String[] args) {ConfigurableApplicationContext run = SpringApplication.run(SpringBootLearnApplication.class, args);// 尝试获取 Bean,成功Object demo = run.getBean(DemoConfig.Demo.class);System.out.println(demo);}}
四、导入 ImportBeanDefinitionRegister 实现类
增加 DemoImportBeanDefinitionRegister 类,实现 ImportBeanDefinitionRegistrar 接口的 registerBeanDefinitions 方法:
public class DemoImportBeanDefinitionRegister implements ImportBeanDefinitionRegistrar {@Overridepublic void registerBeanDefinitions(AnnotationMetadata importingClassMetadata, BeanDefinitionRegistry registry, BeanNameGenerator importBeanNameGenerator) {AbstractBeanDefinition beanDefinition = BeanDefinitionBuilder.rootBeanDefinition(DemoConfig.Demo.class).getBeanDefinition();registry.registerBeanDefinition("demo", beanDefinition);}}
在启动类中导入实现类:
@SpringBootApplication@Import(DemoImportBeanDefinitionRegister.class)public class SpringBootLearnApplication {public static void main(String[] args) {ConfigurableApplicationContext run = SpringApplication.run(SpringBootLearnApplication.class, args);// 尝试获取 Bean,成功Object demo = run.getBean(DemoConfig.Demo.class);System.out.println(demo);}}
自定义 start

创建自定义 starter 包 redis-spring-boot-starter
pom 文件:
<?xml version="1.0" encoding="UTF-8"?><project xmlns="http://maven.apache.org/POM/4.0.0" xmlns:xsi="http://www.w3.org/2001/XMLSchema-instance"xsi:schemaLocation="http://maven.apache.org/POM/4.0.0 https://maven.apache.org/xsd/maven-4.0.0.xsd"><modelVersion>4.0.0</modelVersion><parent><groupId>org.springframework.boot</groupId><artifactId>spring-boot-starter-parent</artifactId><version>2.5.1</version><relativePath/></parent><groupId>com.example</groupId><artifactId>redis-spring-boot-starter</artifactId><version>0.0.1-SNAPSHOT</version><name>redis-spring-boot-starter</name><description>Demo project for Spring Boot</description><properties><java.version>11</java.version></properties><dependencies><dependency><groupId>org.springframework.boot</groupId><artifactId>spring-boot-starter</artifactId></dependency><!-- jedis客户端 --><dependency><groupId>redis.clients</groupId><artifactId>jedis</artifactId></dependency></dependencies></project>
创建配置类
redis ip 与端口配置类 com.example.config.RedisProperties:
package com.example.config;import org.springframework.boot.context.properties.ConfigurationProperties;@ConfigurationProperties(prefix = "redis")public class RedisProperties {private String host = "127.0.0.1";private int port = 6379;public String getHost() {return host;}public void setHost(String host) {this.host = host;}public int getPort() {return port;}public void setPort(int port) {this.port = port;}}
jedis 客户端配置类 com.example.config.RedisAutoConfigure:
package com.example.config;import org.springframework.boot.context.properties.EnableConfigurationProperties;import org.springframework.context.annotation.Bean;import org.springframework.context.annotation.Configuration;import redis.clients.jedis.Jedis;@EnableConfigurationProperties(RedisProperties.class)public class RedisAutoConfigure {@Beanpublic Jedis jedis(RedisProperties redisProperties) {return new Jedis(redisProperties.getHost(), redisProperties.getPort());}}
创建 spring.factories
在 resources 目录下创建 META-INF/spring.factories,让 spring boot 启动时加载配置类
org.springframework.boot.autoconfigure.EnableAutoConfiguration=com.example.config.RedisAutoConfigure
引入自定义 start 包测试
@SpringBootApplicationpublic class SpringBootTestApplication {public static void main(String[] args) {ConfigurableApplicationContext context = SpringApplication.run(SpringBootTestApplication.class, args);Jedis jedis = context.getBean(Jedis.class);jedis.set("name", UUID.randomUUID().toString());System.out.println("name = " +jedis.get("name"));}}
启动原理
spring-core包里定义了SpringFactoriesLoader类,这个类实现了检索META-INF/spring.factories文件,并获取指定接口的配置的功能。在这个类中定义了两个对外的方法:
- loadFactories 根据接口类获取其实现类的实例,这个方法返回的是对象列表。
- loadFactoryNames 根据接口获取其接口类的名称,这个方法返回的是类名的列表。
上面的两个方法的关键都是从指定的ClassLoader中获取spring.factories文件,并解析得到类名列表,具体代码如下:
private static Map<String, List<String>> loadSpringFactories(@Nullable ClassLoader classLoader) {MultiValueMap<String, String> result = cache.get(classLoader);if (result != null) {return result;}try {Enumeration<URL> urls = (classLoader != null ?classLoader.getResources(FACTORIES_RESOURCE_LOCATION) :ClassLoader.getSystemResources(FACTORIES_RESOURCE_LOCATION));result = new LinkedMultiValueMap<>();while (urls.hasMoreElements()) {URL url = urls.nextElement();UrlResource resource = new UrlResource(url);Properties properties = PropertiesLoaderUtils.loadProperties(resource);for (Map.Entry<?, ?> entry : properties.entrySet()) {String factoryClassName = ((String) entry.getKey()).trim();for (String factoryName : StringUtils.commaDelimitedListToStringArray((String) entry.getValue())) {result.add(factoryClassName, factoryName.trim());}}}cache.put(classLoader, result);return result;}catch (IOException ex) {throw new IllegalArgumentException("Unable to load factories from location [" +FACTORIES_RESOURCE_LOCATION + "]", ex);}}
从代码中我们可以知道,在这个方法中会遍历整个ClassLoader中所有jar包下的spring.factories文件。也就是说我们可以在自己的jar中配置spring.factories文件,不会影响到其它地方的配置,也不会被别人的配置覆盖。
spring.factories的是通过Properties解析得到的,所以我们在写文件中的内容都是安装下面这种方式配置的:com.xxx.interface=com.xxx.classname,如果一个接口希望配置多个实现类,可以使用’,’进行分割。
actuator 监控
增加 actuator 依赖:
<dependency><groupId>org.springframework.boot</groupId><artifactId>spring-boot-starter-actuator</artifactId></dependency>
application.properties 配置:
# 开启健康检查完整信息management.endpoint.health.show-details=always# 将所有监控endpoint暴露出来management.endpoints.web.exposure.include=*
启动项目,访问 /actuator,可以看到所有的监控访问路径: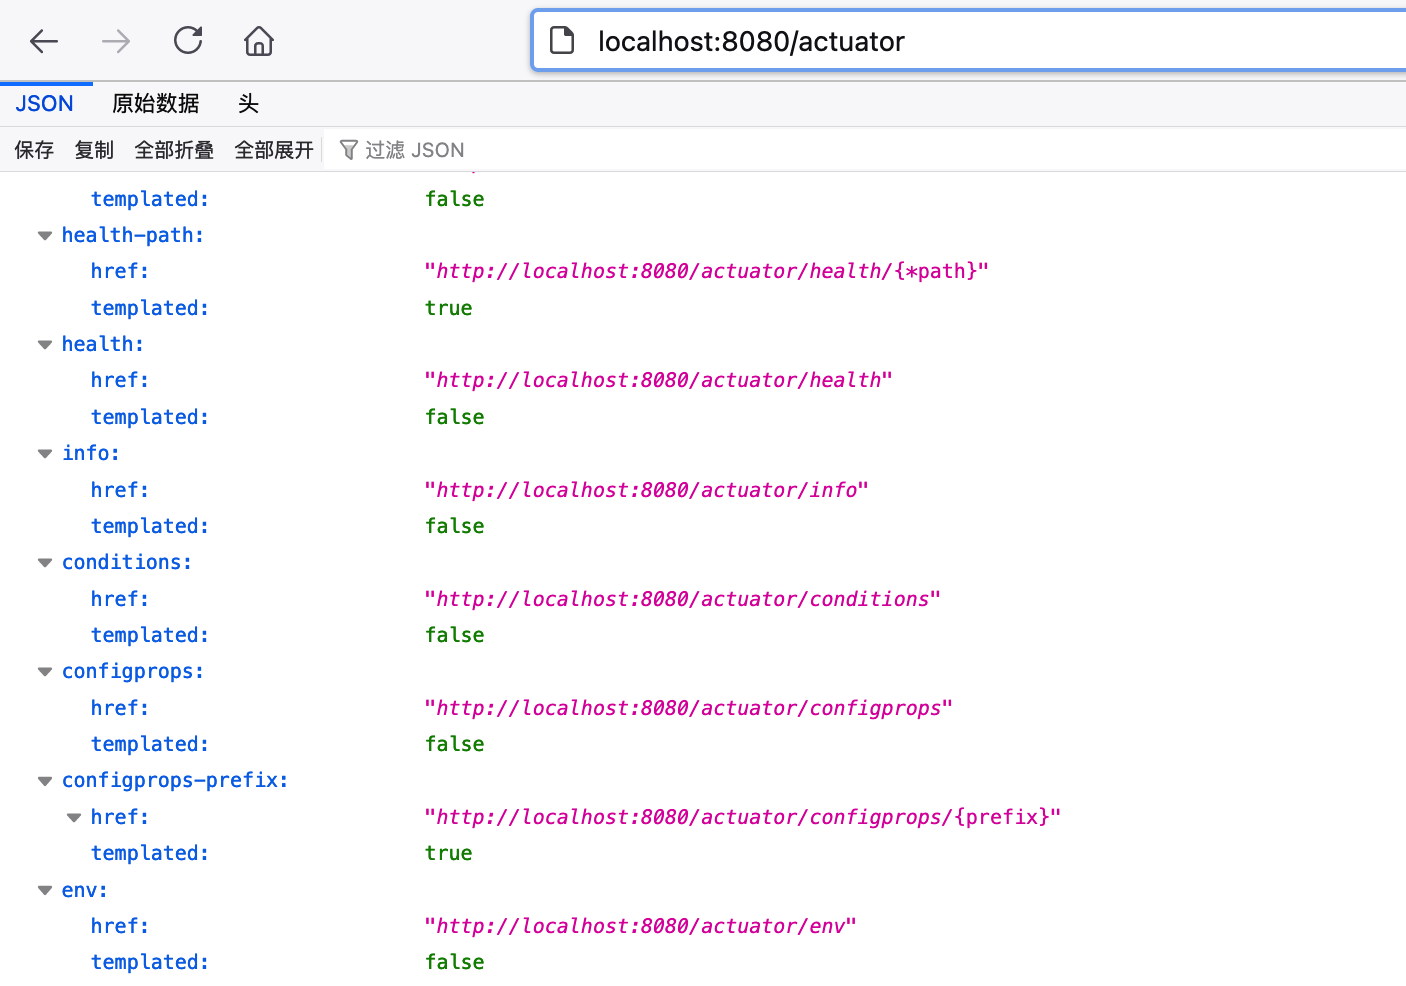
例如访问 /actuator/env 查看配置信息: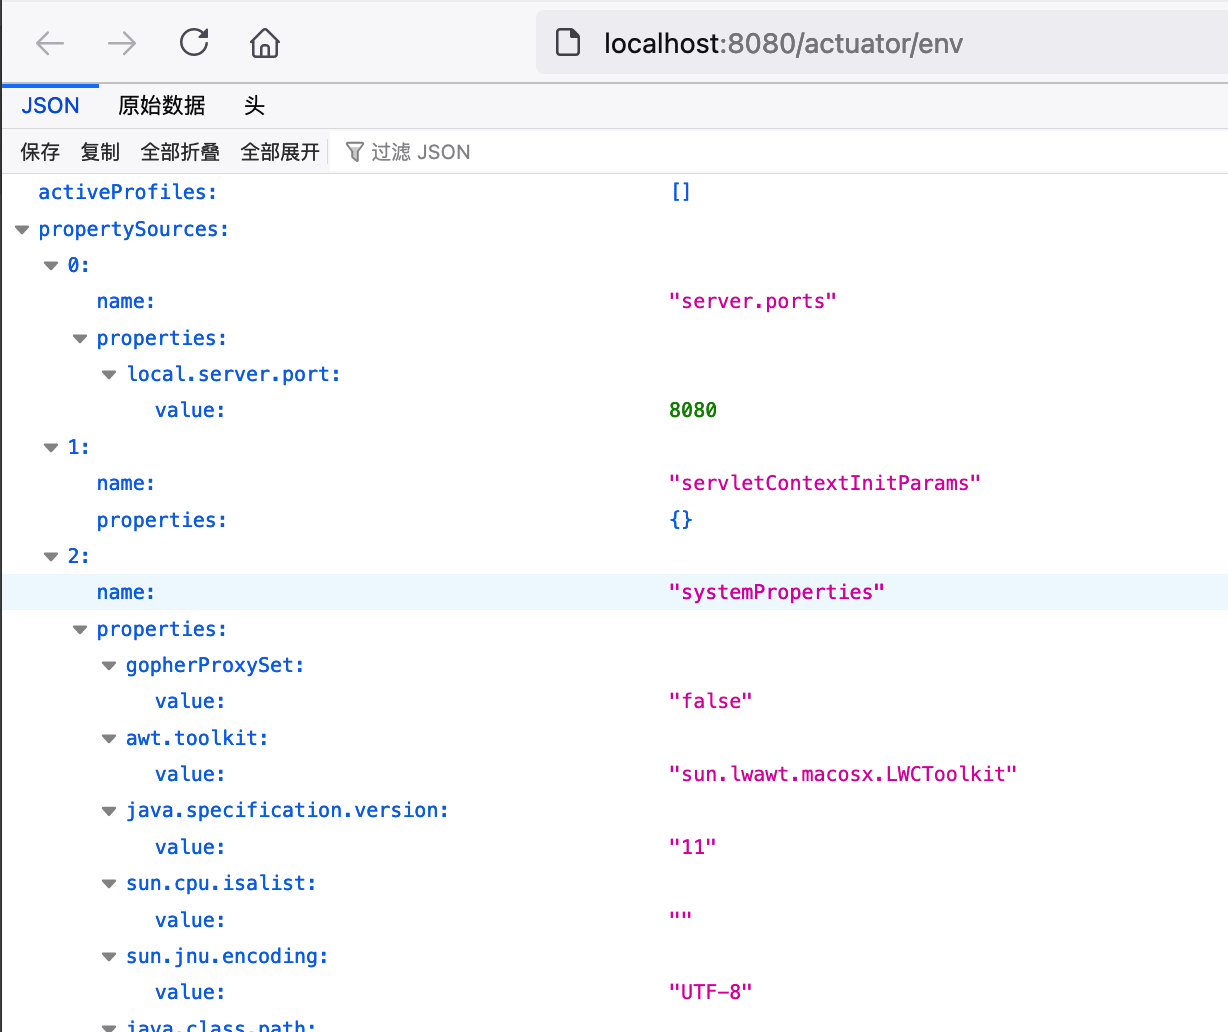
Spring Boot Admin 可视化监控
上小节说的 actuator 显然可以实现查看监控信息,但都是 json 数据,spring boot admin 是基于 actuator 的可视化版本,spring boot admin 有两个角色:Client 和 Server。spring boot 应用程序作为 Client 向 Server 注册。
admin-server 模块
创建 admin-server 模块,导入依赖:
<dependency><groupId>de.codecentric</groupId><artifactId>spring-boot-admin-starter-server</artifactId></dependency>
在启动类上增加 @EnableAdminServer 启用监控功能
@EnableAdminServer@SpringBootApplicationpublic class SpringBootAdminApplication {public static void main(String[] args) {SpringApplication.run(SpringBootAdminApplication.class, args);}}
将 server 端口号设置为 9000
server.port=9000
admin-client 模块
创建 admin-client 模块,导入依赖:
<dependency><groupId>de.codecentric</groupId><artifactId>spring-boot-admin-starter-client</artifactId></dependency>
注册到 server 中,开启健康检查
# 注册到 serverspring.boot.admin.client.url=http://localhost:9000# 开启健康检查完整信息management.endpoint.health.show-details=always# 将所有监控endpoint暴露出来management.endpoints.web.exposure.include=*
访问测试
访问 server 的 /applications: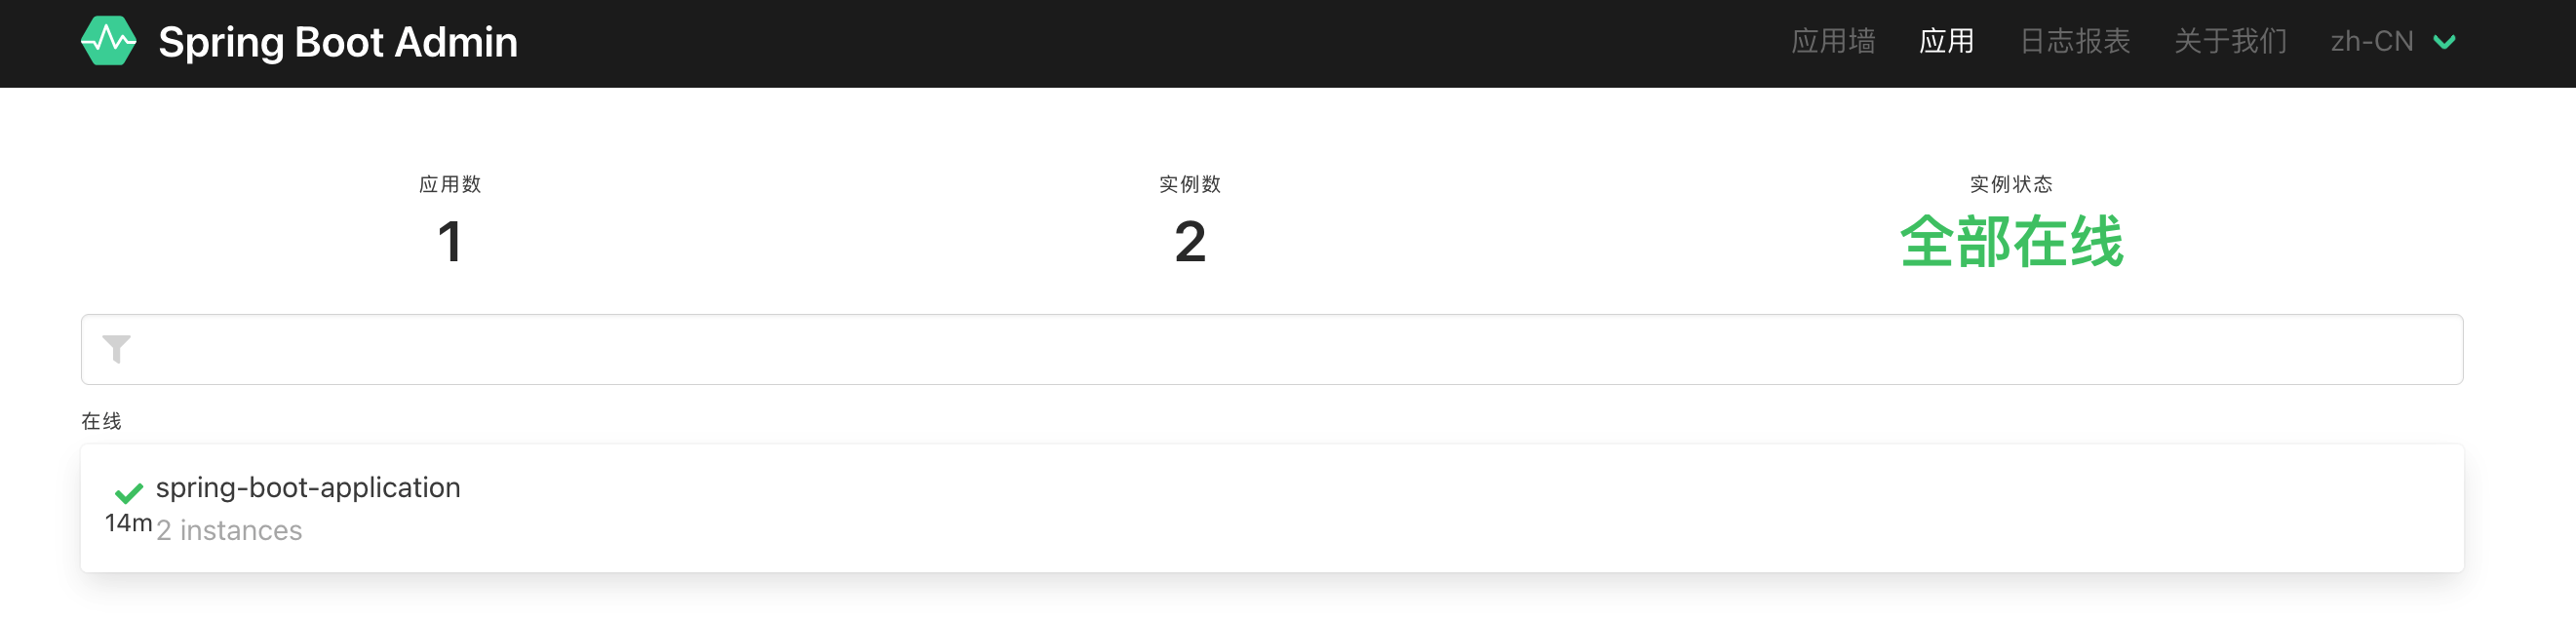
点击一个实例进入查看详情: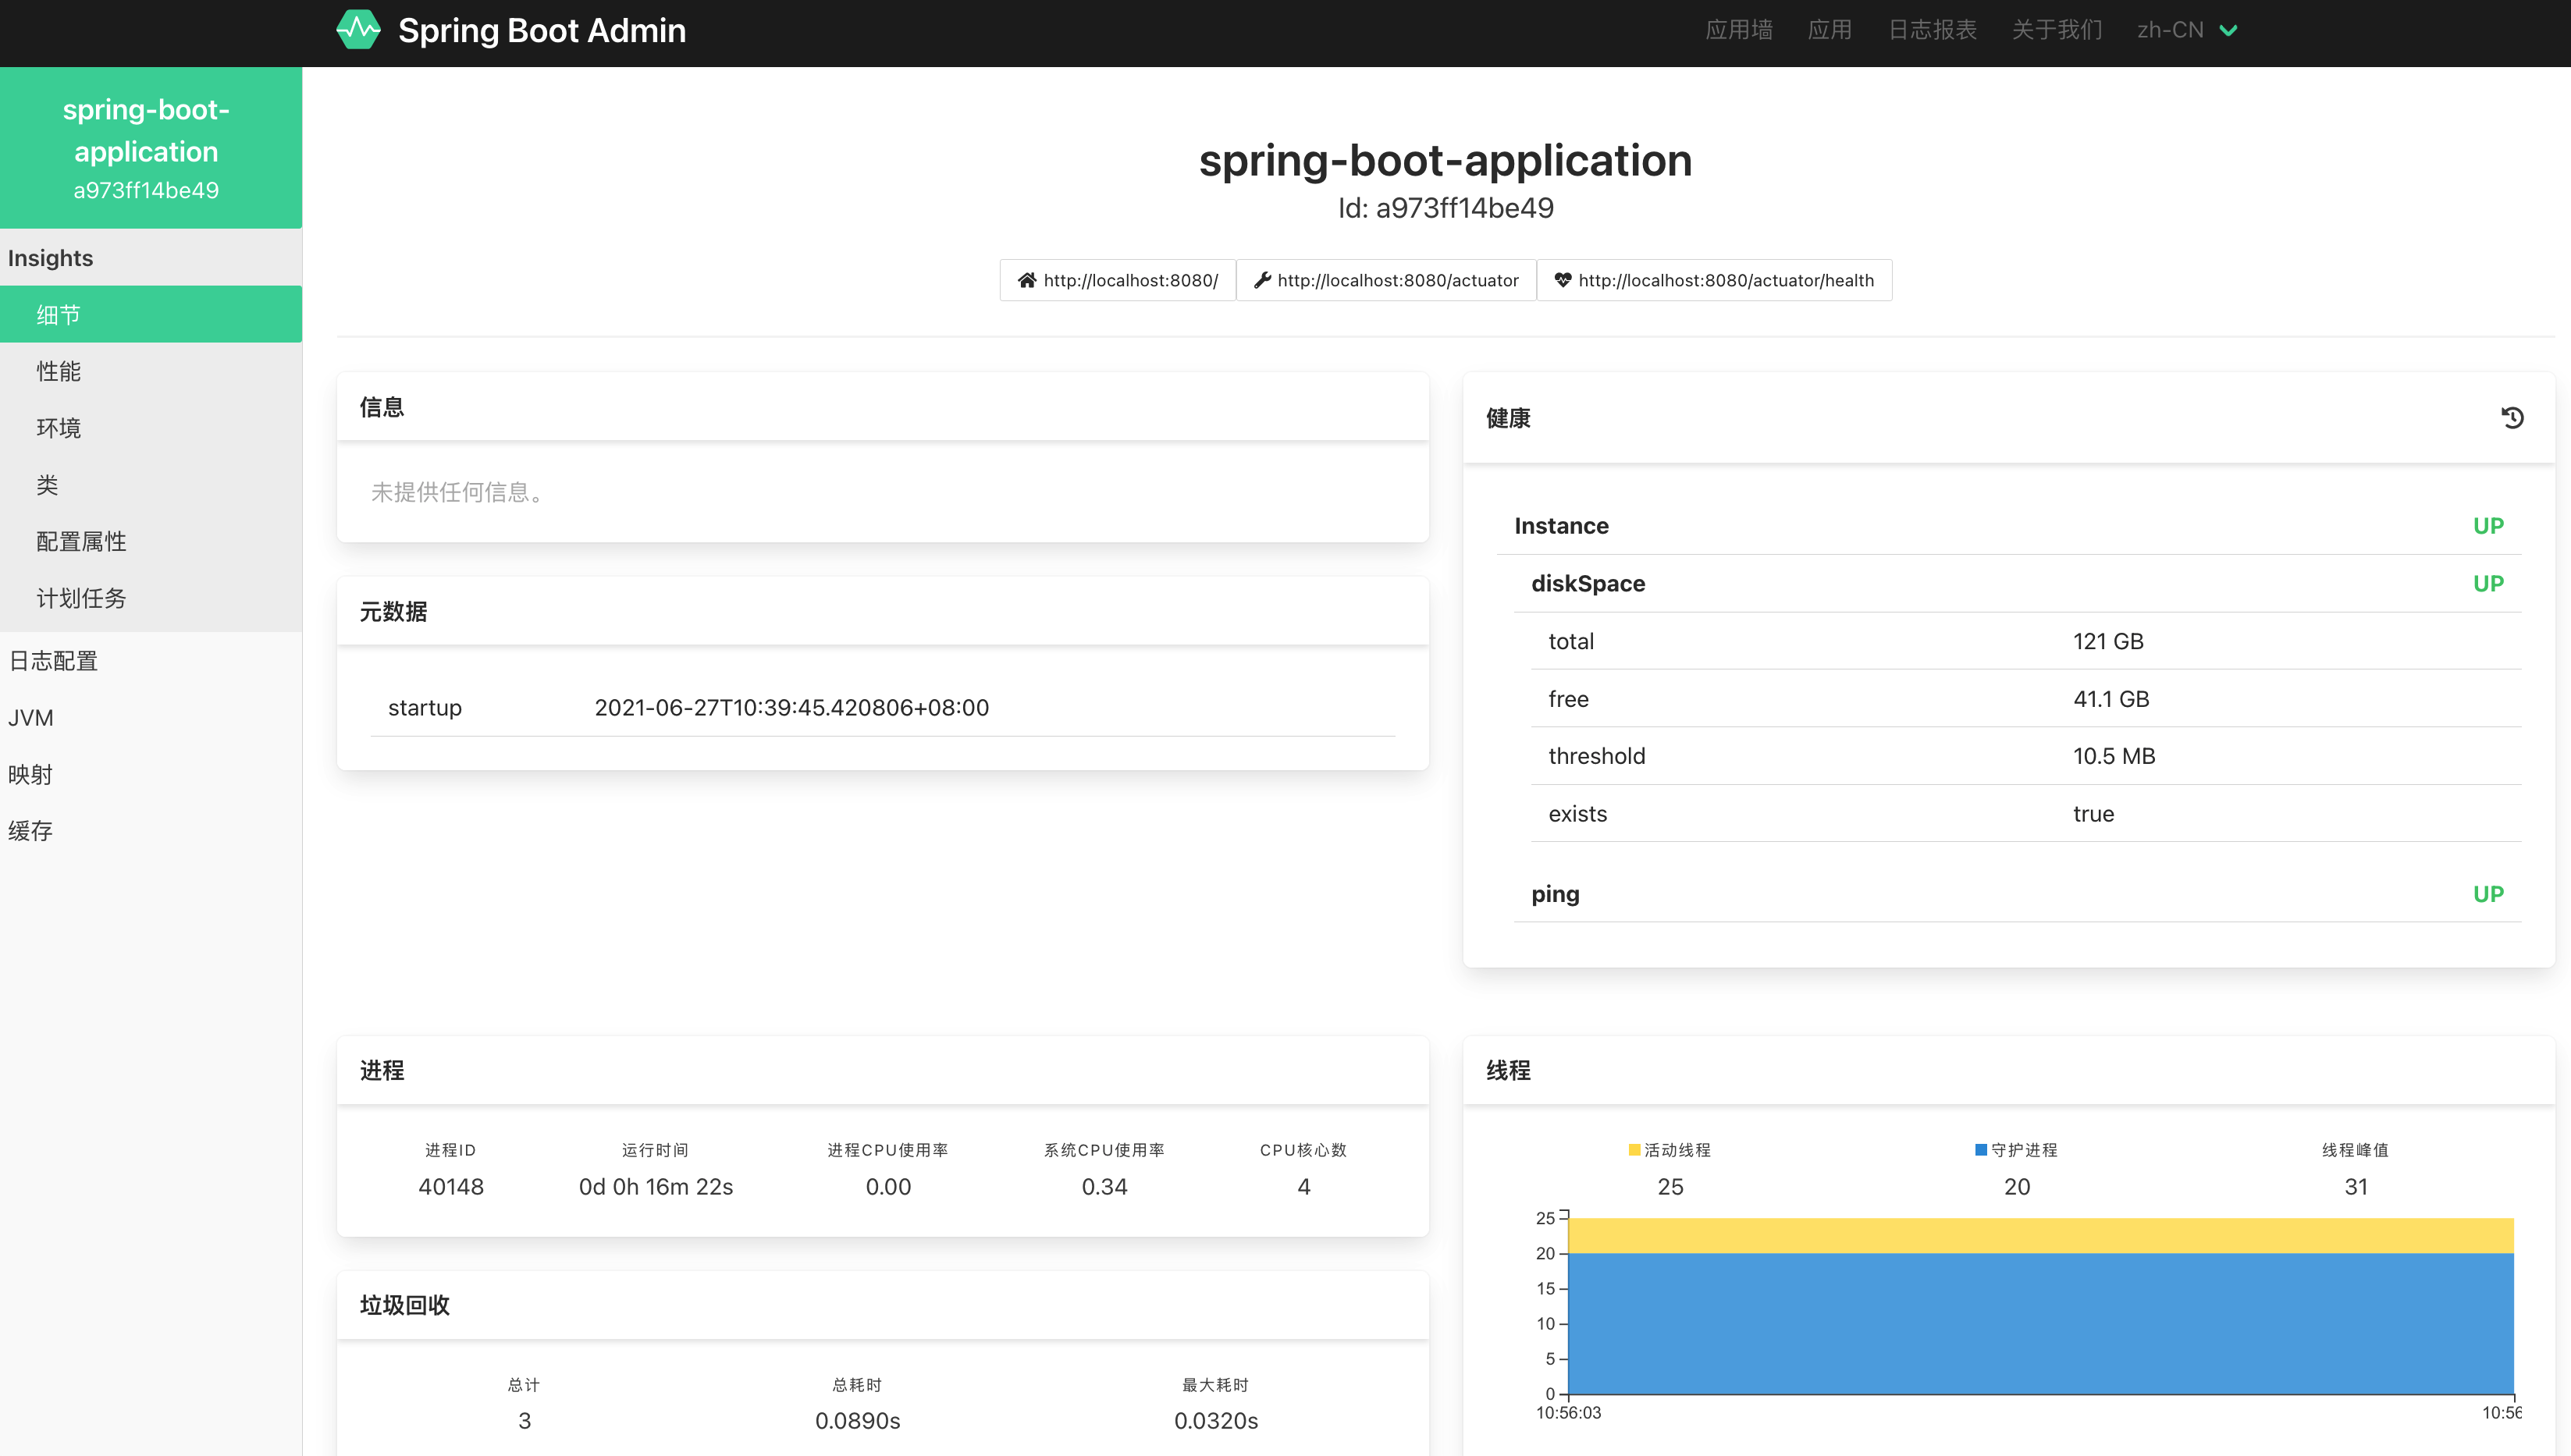

若有收获,就点个赞吧
0 人点赞
