Nginx网站服务
本章节主要目的是配置Nginx成为一个网站server
1、安装Nginx
YUM安装或者编译安装均可以
2、调整配置文件
在Nginx服务器的主配置文件/usr/local/nginx/conf/nginx.conf中,包括全局配置、 I/O事件配置和HTTP配置这三大块内容,配置语句的格式为”指令 值;”(末尾以分号表示结束),以“#”开始的部分表示注释。
2.1 全局配置
由各种配置语句组成,不使用特定的界定标记。全局配置部分包括Nginx服务的运行用户、工作进程数、错误日志、PID存放位置等基本设置。
user nginx nginx; #运行用户和组worker_processes auto; #工作进程数量worker_cpu_affinity auto; #工作进程自动绑定到特定CPUworker_rlimit_nofile 65535; #工作进程打开的最大文件数error_log /var/log/nginx/error.log warn; #错误日志位置pid /var/run/nginx.pid; #PID文件位置
2.2 I/O事件配置
使用“events { }” 界定标记,用来指定Nginx进程的I/O响应模型、每个进程的连接数等设置。对于2.6及以上版本的内核,建议使用epoll模型以提高性能;每个进程的连接数应根据实际需要来定,一般在10000以下(默认为1024)。
events {use epoll; #使用epoll模型worker_connections 8192; #每进程处理8192个连接}
若工作进程数为4,每个进程处理8192个连接,则允许Nginx正常提供服务的连接数已超过3万个(8192×4=32768),当然具体还要看服务器硬件、网络带宽等物理条件的性能表现。
2.3 HTTP配置
使用“http { }”界定标记,包括访问日志、HTTP端口、网页目录、默认字符集、连接保持,以及后面要讲到的虚拟Web主机、PHP解析等一系列设置,其中大部分配置语句都包含在子界定标记“server{ }”内。
http {include mime.types;default_type application/octet-stream;log_format main '$remote_addr - $remote_user [$time_local] "$request" ''$status $body_bytes_sent "$http_referer" ''"$http_user_agent" "$http_x_forwarded_for"';access_log logs/access.log main; #访问日志位置sendfile on; #静态服务器时,开启大大提升性能#tcp_nopush on;#keepalive_timeout 0;keepalive_timeout 65; #连接保持超时时间#gzip on;server {listen 80; #侦听地址server_name www.shengzhe.com; #网站域名charset utf-8; #网页的默认字符集location / { #根目录配置root html; #根目录位置index index.html index.htm; #默认首页}error_page 500 502 503 504 /50x.html; #内部错误的反馈页面location = /50x.html { #错误页面的配置root html;}}}
上述配置中,listen语句允许同时限定IP地址,采用“IP地址:端口”形式; root 语句用来设置特定访问位置(如“location /”表示根目录)的网页文档路径,默认为 Nginx 安装目录下的 html/子目录,根据需要可改为/var/www/html等其他路径。
3、访问状态统计
Nginx内置了HTTP_STUB_STATUS状态统计模块,用来反馈当前的Web访问情况,
配置编译参数时可添加–with-http_stub_status_module来启用此模块支持, 可以使用命令/usr/local/nginx/sbin/nginx –V 查看已安装的Nginx是否包含 HTTP_STUB_STATUS模块。
要使用Nginx的状态统计功能,除了启用内建模块以外,还需要修改nginx.conf配置文件,指定访问位置并添加stub_status配置代码。
server {listen 80;server_name www.shengzhe.com;charset utf-8;#access_log logs/host.access.log main;location / {root html;index index.html index.htm;}error_page 500 502 503 504 /50x.html;location = /50x.html {root html;}location /status { #访问位置为/statusstub_status; #打开状态统计功能access_log off; #关闭此位置的日志记录}}
新的配置生效以后,在浏览器中访问Nginx服务器的/status网站位置,可以看到当前的状态统计信息:

4、Nginx访问控制
4.1 基于授权的访问控制
Nginx可以实现基于用户授权的访问控制,当客户端想要访问相应网站或者目录时,要求用户输入用户名和密码才能正常访问,配置步骤如下:
- 生成用户密码认证文件。
- 修改主配置文件相对应目录,添加认证配置项。
- 重启服务,访问测试
- 使用htpasswd生成用户认证文件,如果没有该命令,可使用yum安装httpd-tools软件包。
[root@localhost ~]# yum install httpd-tools -y[root@localhost ~]# cd /usr/local/nginx1.16/conf/[root@localhost conf]# htpasswd -c passwd.db testNew password:Re-type new password:Adding password for user test[root@localhost conf]# cat passwd.dbtest:$apr1$//KTSBT3$FRgMmcNe.gPqvHMhdsqGy/
- 修改密码文件的权限为400,将所有者改为www,设置nginx的运行用户能够读取
[root@localhost conf]# chmod 400 passwd.db[root@localhost conf]# chown www passwd.db[root@localhost conf]# ls -l passwd.db-r-------- 1 www root 43 Jul 3 23:36 passwd.db
- 修改主配置文件nginx.conf,添加相应认证配置项
location /status {stub_status;access_log off;auth_basic "admin area";auth_basic_user_file /usr/local/nginx1.16/conf/passwd.db}
- 检查语法,重启服务
[root@localhost conf]# nginx -tnginx: the configuration file /usr/local/nginx1.16/conf/nginx.conf syntax is oknginx: configuration file /usr/local/nginx1.16/conf/nginx.conf test is successful[root@localhost conf]# systemctl restart nginx.service
- 用浏览器访问网址,检验控制效果,如图所示:

需要输入用户名和密码进行访问,验证通过才能访问到页面。
4.2 基于客户端的访问控制
基于客户端的访问控制是通过客户端IP地址,决定是否允许对页面访问。Nginx基于客户端的访问控制规则如下:
- denyIP/IP段:拒绝某个IP或IP段的客户端访问。
- allowIP/IP段:允许某个IP或IP段的客户端访问。
- 规则从上往下执行,如匹配则停止,不再往下匹配。
- 修改主配置文件nginx.conf,添加相应配置项
location = /basic_status {stub_status;deny 192.168.154.1; #拒绝这个地址allow 192.168.154.0/24; #允许这个网段deny all; #拒绝所有其它地址}
- 重启服务
[root@localhost conf]# nginx -tnginx: the configuration file /usr/local/nginx1.16/conf/nginx.conf syntax is oknginx: configuration file /usr/local/nginx1.16/conf/nginx.conf test is successful[root@localhost conf]# systemctl restart nginx.service
- 使用192.168.154.1地址访问,不能访问,其它地址可以

5、虚拟主机
利用虚拟主机,不用为每个要运行的网站提供一台单独的Nginx服务器或单独运行一组Nginx进程,虚拟主机提供了在同一台服务器,同一组Nginx进程上运行多个网站的功能。Nginx可以配置多种类型的虚拟主机,分别是基于IP的虚拟主机、基于域名的虚拟主机、基于端口的虚拟主机。
使用Nginx搭建虚拟主机服务器时,每个虚拟Web站点拥有独立的“server{}”配置段,各自监听的IP地址、端口号可以单独指定,当然网站名称也是不同的。
5.1 基于域名的虚拟主机(使用的最多)
配置文件案例:
server { #加入 www.bt.com 对应的站点listen 80;server_name www.bt.com; #监听域名charset utf-8;access_log logs/www.bt.access.log; #日志文件location / {root /var/www/html/btcom; #www.bt.com 的工作目录index index.html index.htm;}error_page 500 502 503 504 /50x.html;location = 50x.html{root html;}}server { #加入 www.test.com 对应的站点listen 80;server_name www.test.com; #监听域名charset utf-8;access_log logs/www.test.access.log; #日志文件location / {root /var/www/html/testcom; #www.test.com 的工作目录index index.html index.htm;}error_page 500 502 503 504 /50x.html;location = 50x.html{root html;}}
- 首先建立2个网站的根目录
- 修改配置文件如上
- 客户端使用域名访问验证即可
5.2 基于IP的虚拟主机
配置文件案例:
server {listen 192.168.9.158:80; #监听 192.168.9.158server_name 192.168.9.158:80;…………………………………….. #省略内容}server {listen 192.168.9.110:80; #监听 192.168.9.110server_name 192.168.9.110:80;…………………………………….. #省略内容}
- 首先给服务器配置2个不同的IP地址
- 修改配置文件如上
- 客户端访问测试即可
5.3 基于端口的虚拟主机
配置文件案例:
server {listen 192.168.9.158:6666; #监听 6666 端口server_name 192.168.9.158:6666; #域名也可…………………………………….. #省略内容}server {listen 192.168.9.158:8888; #监听 8888 端口server_name 192.168.9.158:8888; #域名也可…………………………………….. #省略内容}
- 修改配置文件
- 防火墙放行以上端口
- 客户端使用不同的端口进行测试即可
LNMP环境部署
LNMP是指一组通常一起使用来运行动态网站或者服务器的自由软件名称首字母缩写。L指Linux,N指Nginx,M一般指MySQL,也可以指MariaDB,P一般指PHP,也可以指Perl或Python。可以在独立主机上轻松的安装LNMP生产环境。本案例主要介绍LNMP框架安装方法以及部署Discuz社区论坛应用。
1. 安装操作系统
- 使用VMware workstation新建虚拟机
- 安装CentOS7.5系统,最小化安装,记得要选中“开发工具(development tools)”
安装bash-completion以便可以命令补全
yum install bash-completion -y
安装vim等基础包
yum install vim wget net-tools curl -y
2. 系统初始化配置
- Linux 系统资源调配
```linux /etc/security/limits.conf
- soft nofile 65535
- hard nofile 65535 ```
修改主机名字
[root@localhost ~]# hostnamectl set-hostname www.lnmp.com
配置网络。设置固定IP地址,网关及DNS服务器地址
[root@localhost ~]# nmcli connection modify ens32 ipv4.addresses 192.168.154.137/24 ipv4.gateway 192.168.154.2 ipv4.dns 192.168.154.2 autoconnect yes[root@localhost ~]# nmcli connection up ens32
关闭 Selinux
[root@localhost ~]# vim /etc/selinux/configSELINUX=disabled
yum源的配置,可以根据业务需求来安装 epel、 nginx、 remi 源, 且修改配置参数。
[root@localhost yum.repos.d]# yum install epel-release -y[root@localhost yum.repos.d]# rpm -ivh http://rpms.remirepo.net/enterprise/remi-release-7.rpm[root@localhost yum.repos.d]# vim remi.repo[epel]enabled=1
DNS 解析域名设置
vi /etc/resolve.confnameserver 192.168.154.2nameserver 202.106.0.20
3. 安装配置Nginx网站服务器
3.1 安装nginx服务
- 设置nginx YUM源
```linux [root@www ~]# yum install yum-utils -y [root@www ~]# cat /etc/yum.repos.d/nginx.repo [nginx-stable] name=nginx stable repo baseurl=http://nginx.org/packages/centos/$releasever/$basearch/ gpgcheck=1 enabled=1 gpgkey=https://nginx.org/keys/nginx_signing.key
[nginx-mainline] name=nginx mainline repo baseurl=http://nginx.org/packages/mainline/centos/$releasever/$basearch/ gpgcheck=1 enabled=0 gpgkey=https://nginx.org/keys/nginx_signing.key
- 安装nginx服务,会安装1.16.0版本```linux[root@www ~]# yum install nginx -y
- 设置nginx开机启动并开启nginx服务
```linux [root@www ~]# systemctl enable nginx.service [root@www ~]# systemctl start nginx.service [root@www ~]# systemctl status nginx.service ● nginx.service - nginx - high performance web server Loaded: loaded (/usr/lib/systemd/system/nginx.service; enabled; vendor preset: disabled) Active: active (running) since Mon 2019-05-20 18:11:58 CST; 4s ago Docs: http://nginx.org/en/docs/ Process: 1881 ExecStart=/usr/sbin/nginx -c /etc/nginx/nginx.conf (code=exited, status=0/SUCCESS) Main PID: 1882 (nginx) CGroup: /system.slice/nginx.service├─1882 nginx: master process /usr/sbin/nginx -c /etc/nginx/nginx.conf└─1883 nginx: worker process
May 20 18:11:58 www.lnmp.com systemd[1]: Starting nginx - high performance web server… May 20 18:11:58 www.lnmp.com systemd[1]: Started nginx - high performance web server.
- 防火墙放行http服务```linux[root@www ~]# firewall-cmd --add-service=http --permanent[root@www ~]# firewall-cmd --add-service=http
- 测试是否可以访问nginx
或者找个客户端,使用浏览器访问服务器地址[root@www ~]# curl http://192.168.154.137
3.2 调整nginx配置文件
[root@www ~]# vim /etc/nginx/nginx.confuser nginx nginx;worker_processes 4;worker_cpu_affinity 00000001 00000010 00000100 00001000;worker_rlimit_nofile 65535;error_log /var/log/nginx/error.log warn;pid /var/run/nginx.pid;events {use epoll;worker_connections 10240;}http {include /etc/nginx/mime.types;default_type application/octet-stream;server_names_hash_bucket_size 128;client_header_buffer_size 2k;large_client_header_buffers 4 4k;client_max_body_size 8m;log_format main '$remote_addr - $remote_user [$time_local] "$request" ''$status $body_bytes_sent "$http_referer" ''"$http_user_agent" "$http_x_forwarded_for"';access_log /var/log/nginx/access.log main;sendfile on;tcp_nopush on;tcp_nodelay on;keepalive_timeout 65;fastcgi_cache_path /etc/nginx/fastcgi_cache levels=1:2 keys_zone=TEST:10m inactive=5m;fastcgi_cache_key http://$host$request_uri;fastcgi_connect_timeout 300;fastcgi_send_timeout 300;fastcgi_read_timeout 300;fastcgi_buffer_size 4k;fastcgi_buffers 8 4k;fastcgi_busy_buffers_size 8k;fastcgi_temp_file_write_size 8k;fastcgi_cache TEST;fastcgi_cache_valid 200 302 1h;fastcgi_cache_valid 301 1d;fastcgi_cache_valid any 1m;fastcgi_cache_min_uses 1;fastcgi_cache_use_stale error timeout invalid_header http_500;open_file_cache max=204800 inactive=20s;open_file_cache_min_uses 1;open_file_cache_valid 30s;gzip on;gzip_min_length 1k;gzip_buffers 4 16k;gzip_http_version 1.0;gzip_comp_level 2;gzip_types text/plain application/x-javascript text/css application/xml;gzip_vary on;include /etc/nginx/conf.d/*.conf;}[root@www nginx]# vim /etc/nginx/conf.d/default.confserver {listen 80;server_name www.lnmp.com;#charset koi8-r;#access_log /var/log/nginx/host.access.log main;location / {root /opt/nginx/html;index index.html index.htm;}location /status{stub_status on;}#error_page 404 /404.html;# redirect server error pages to the static page /50x.html#error_page 500 502 503 504 /50x.html;location = /50x.html {root /opt/nginx/html;}location ~ .*/.(gif|jpg|jpeg|png|bmp|swf|js|css)${expires 30d;}# proxy the PHP scripts to Apache listening on 127.0.0.1:80##location ~ \.php$ {# proxy_pass http://127.0.0.1;#}# pass the PHP scripts to FastCGI server listening on 127.0.0.1:9000##location ~ \.php$ {# root html;# fastcgi_pass 127.0.0.1:9000;# fastcgi_index index.php;# fastcgi_param SCRIPT_FILENAME /scripts$fastcgi_script_name;# include fastcgi_params;#}# deny access to .htaccess files, if Apache's document root# concurs with nginx's one##location ~ /\.ht {# deny all;#}}
- 由于更改了根目录,所以需要创建新的根目录
[root@www nginx]# mkdir /opt/nginx/html -p[root@www nginx]# cp /usr/share/nginx/html/* /opt/nginx/html/[root@www nginx]# ll /opt/nginx/html/total 8-rw-r--r-- 1 root root 494 May 22 20:33 50x.html-rw-r--r-- 1 root root 612 May 22 20:33 index.html
- 改变了服务配置文件,所以需要重新启动服务
[root@www ~]# systemctl restart nginx.service[root@www ~]# systemctl status nginx.service
4. 安装配置MySQL数据库服务器
MySQL是目前使用最受信赖和广泛使用的开源数据库平台。全球十大最受欢迎和高流量的网站中有10个依赖于MySQL。MySQL 8.0通过提供全面的改进建立在这一势头上,旨在使创新的DBA和开发人员能够在最新一代的开发框架和硬件上创建和部署下一代Web,嵌入式,移动和云/ SaaS / PaaS / DBaaS应用程序平台。MySQL 8.0亮点包括:
- MySQL文档存储
- 交易数据字典
- SQL角色
- 默认为utf8mb4
- 公用表表达式
- 窗口功能
- 以及更多
4.1 安装mysql源
下载MySQL YUM仓库:
[root@www ~]# wget https://dev.mysql.com/get/mysql80-community-release-el7-2.noarch.rpm
安装MySQL YUM仓库:
[root@www ~]# rpm -Uvh mysql80-community-release-el7-2.noarch.rpm
4.2 安装mysql数据库
- 默认安装最新GA版MySQL
可以通过运行以下命令并检查其输出来验证是否已启用和禁用了正确的子存储库
[root@www ~]# yum repolist enabled | grep mysqlmysql-connectors-community/x86_64 MySQL Connectors Community 108mysql-tools-community/x86_64 MySQL Tools Community 90mysql80-community/x86_64 MySQL 8.0 Community Server 113
安装MySQL
```linux [root@www ~]# yum remove mariadb-libs -y [root@www ~]# yum install mysql-community-server [root@www ~]# systemctl start mysqld.service [root@www ~]# systemctl status mysqld.service ● mysqld.service - MySQL Server Loaded: loaded (/usr/lib/systemd/system/mysqld.service; enabled; vendor preset: disabled) Active: active (running) since Sat 2019-05-25 11:30:43 CST; 2s ago Docs: man:mysqld(8)http://dev.mysql.com/doc/refman/en/using-systemd.html
Process: 2671 ExecStartPre=/usr/bin/mysqld_pre_systemd (code=exited, status=0/SUCCESS) Main PID: 2746 (mysqld) Status: “SERVER_OPERATING” CGroup: /system.slice/mysqld.service
└─2746 /usr/sbin/mysqld
May 25 11:30:13 www.lnmp.com systemd[1]: Starting MySQL Server… May 25 11:30:43 www.lnmp.com systemd[1]: Started MySQL Server.
<a name="2ee98960"></a>#### 4.3 MySQL数据库初始化(从MySQL 5.7开始):在服务器初始启动时,如果服务器的数据目录为空,则会发生以下情况:- 服务器已初始化。- 在数据目录中生成SSL证书和密钥文件。- 该validate_password插件安装并启用。- 将’root’@‘localhost’ 创建一个超级用户帐户。设置超级用户的密码并将其存储在错误日志文件中。要显示它,请使用以下命令:```linux[root@www ~]# grep 'temporary password' /var/log/mysqld.log2019-05-25T03:30:25.989353Z 5 [Note] [MY-010454] [Server] A temporary password is generated for root@localhost: gw2yrdVKWy,g
- 通过使用生成的临时密码登录并为超级用户帐户设置自定义密码,尽快更改root密码:
[root@www ~]# mysql -u root -pgw2yrdVKWy,g#进入数据库后更改密码mysql> ALTER USER 'root'@'localhost' IDENTIFIED BY 'MyNewPass4!';#注意:MySQL的 validate_password 插件默认安装。这将要求密码包含至少一个大写字母,一个小写字母,一个数字和一个特殊字符,并且密码总长度至少为8个字符。
4.4 配置开机启动mysql服务
[root@www ~]# systemctl enable mysqld.service[root@www ~]# systemctl restart mysqld.service[root@www ~]# systemctl status mysqld.service● mysqld.service - MySQL ServerLoaded: loaded (/usr/lib/systemd/system/mysqld.service; enabled; vendor preset: disabled)Active: active (running) since Sat 2019-05-25 11:42:41 CST; 3s agoDocs: man:mysqld(8)http://dev.mysql.com/doc/refman/en/using-systemd.htmlProcess: 3018 ExecStartPre=/usr/bin/mysqld_pre_systemd (code=exited, status=0/SUCCESS)Main PID: 3042 (mysqld)Status: "SERVER_OPERATING"CGroup: /system.slice/mysqld.service└─3042 /usr/sbin/mysqldMay 25 11:42:39 www.lnmp.com systemd[1]: Starting MySQL Server...May 25 11:42:41 www.lnmp.com systemd[1]: Started MySQL Server.
5. 安装配置PHP环境
5.1 安装php7的YUM源
rpm -Uvh https://dl.fedoraproject.org/pub/epel/epel-release-latest-7.noarch.rpmrpm -Uvh https://mirror.webtatic.com/yum/el7/webtatic-release.rpm
5.2 安装PHP7.2
[root@www ~]# yum install php72w php72w-cli php72w-common php72w-gd php72w-ldap php72w-mbstring php72w-mcrypt php72w-mysql php72w-pdo
5.3 安装php-fpm并启动
[root@www ~]# yum install php72w-fpm php72w-opcache[root@www ~]# systemctl enable php-fpm.serviceCreated symlink from /etc/systemd/system/multi-user.target.wants/php-fpm.service to /usr/lib/systemd/system/php-fpm.service.[root@www ~]# systemctl start php-fpm.service[root@www ~]# systemctl status php-fpm.service● php-fpm.service - The PHP FastCGI Process ManagerLoaded: loaded (/usr/lib/systemd/system/php-fpm.service; enabled; vendor preset: disabled)Active: active (running) since Sat 2019-05-25 22:30:23 CST; 5s agoMain PID: 2368 (php-fpm)Status: "Ready to handle connections"CGroup: /system.slice/php-fpm.service├─2368 php-fpm: master process (/etc/php-fpm.conf)├─2369 php-fpm: pool www├─2370 php-fpm: pool www├─2371 php-fpm: pool www├─2372 php-fpm: pool www└─2373 php-fpm: pool wwwMay 25 22:30:22 www.lnmp.com systemd[1]: Starting The PHP FastCGI Process Manager...May 25 22:30:23 www.lnmp.com systemd[1]: Started The PHP FastCGI Process Manager.
5.4 调整php-fpm配置文件
[root@www ~]# vim /etc/php-fpm.d/www.conf[www]user = nginxgroup = nginx
5.5 调整nginx配置文件
[root@www ~]# vim /etc/nginx/conf.d/default.conflocation / {root /opt/nginx/html;index index.php index.html index.htm;}# pass the PHP scripts to FastCGI server listening on 127.0.0.1:9000#location ~ \.php$ {root /opt/nginx/html;fastcgi_pass 127.0.0.1:9000;fastcgi_index index.php;# fastcgi_param SCRIPT_FILENAME /scripts$fastcgi_script_name;fastcgi_param SCRIPT_FILENAME $document_root$fastcgi_script_name;include fastcgi_params;fastcgi_cache TEST;fastcgi_cache_valid 200 302 1h;fastcgi_cache_valid 301 1d;fastcgi_cache_valid any 1m;}
5.6 创建MySQL数据库管理员
- 认证机制必须是mysql_native_password;默认mysql8使用 caching_sha2_password的身份验证机制
mysql> create user 'dbadmin'@'%' identified with mysql_native_password by 'Com.123456';mysql> grant all on *.* to 'dbadmin'@'%';mysql> grant GRANT OPTION on *.* to 'dbadmin'@'%';
6. LNMP环境测试
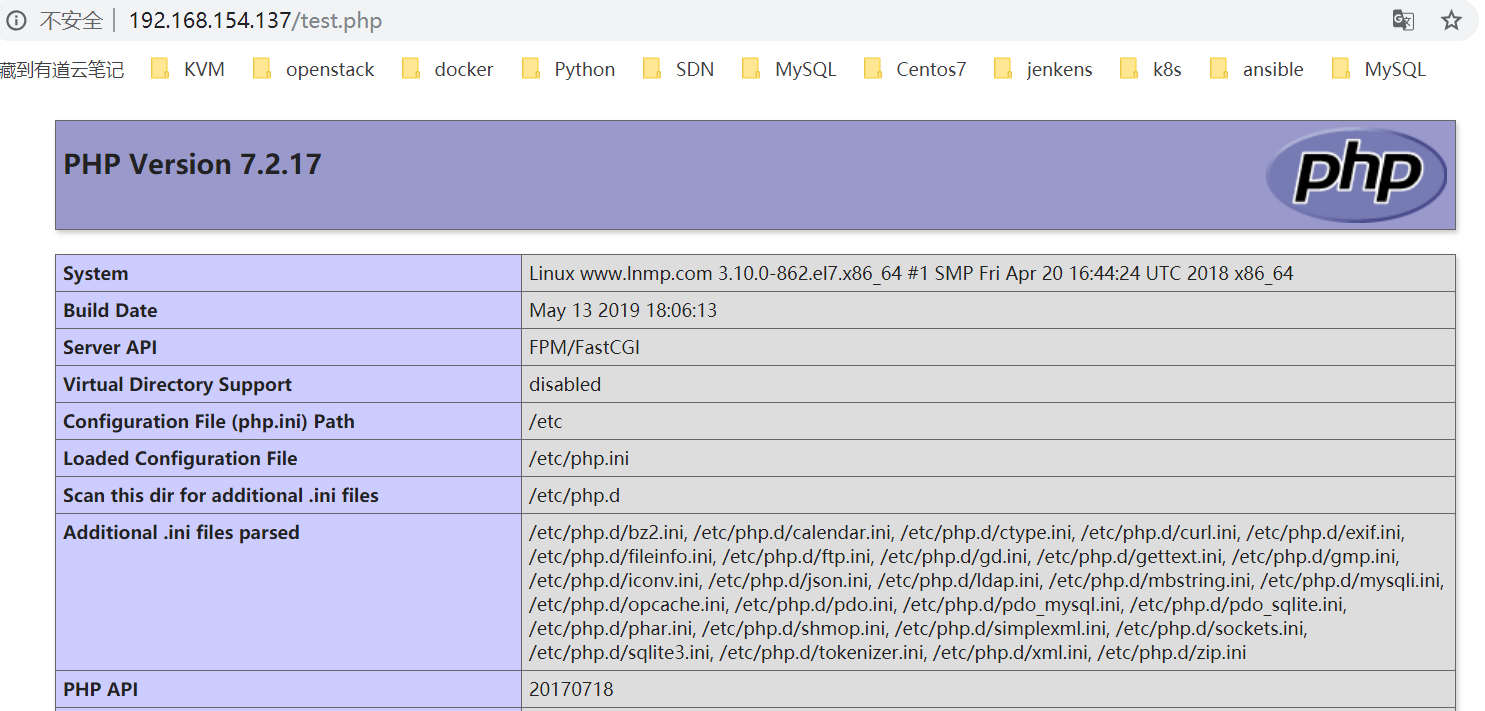
6.1 测试LNMP环境
[root@www html]# cat test.php<?phpphpinfo();?>
6.2 测试是否可以连接MySQL数据库文件
[root@www html]# cat mysql_test.php<?PHP$conn=mysqli_connect("localhost","dbadmin","your_dbpasswd");if($conn){echo"ok";}else{echo"error";}?>
- 在客户端访问
[root@www html]# curl http://192.168.154.137/mysql_test.phpok
7.部署开源论坛Discuz
7.1 下载Discuz论坛文件
Discuz现在在gitee.com进行维护,地址为:https://gitee.com/ComsenzDiscuz/DiscuzX
下载文件
[root@www test]# wget https://gitee.com/ComsenzDiscuz/DiscuzX/repository/archive/master.zip
解压并上传upload目录到网站根目录
[root@www test]# unzip master.zip[root@www test]# cd DiscuzX/[root@www DiscuzX]# lsreadme README.md upload utility[root@www DiscuzX]# mv upload/ /opt/nginx/html/
7.2 建立Discuz论坛所用数据库
[root@www ~]# mysql -u dbadmin -pEnter password:Welcome to the MySQL monitor. Commands end with ; or \g.Your MySQL connection id is 11Server version: 8.0.16 MySQL Community Server - GPLCopyright (c) 2000, 2019, Oracle and/or its affiliates. All rights reserved.Oracle is a registered trademark of Oracle Corporation and/or itsaffiliates. Other names may be trademarks of their respectiveowners.Type 'help;' or '\h' for help. Type '\c' to clear the current input statement.mysql> show databases;+--------------------+| Database |+--------------------+| information_schema || mysql || performance_schema || sys |+--------------------+4 rows in set (0.00 sec)mysql> create database discuz;Query OK, 1 row affected (0.03 sec)mysql> show databases;+--------------------+| Database |+--------------------+| discuz || information_schema || mysql || performance_schema || sys |+--------------------+5 rows in set (0.00 sec)mysql> exitBye
7.3 安装Discuz论坛
- 在客户端使用浏览器打开网站地址:http://192.168.154.137/upload/install/, 会显示以下安装界面:

- 点击我同意
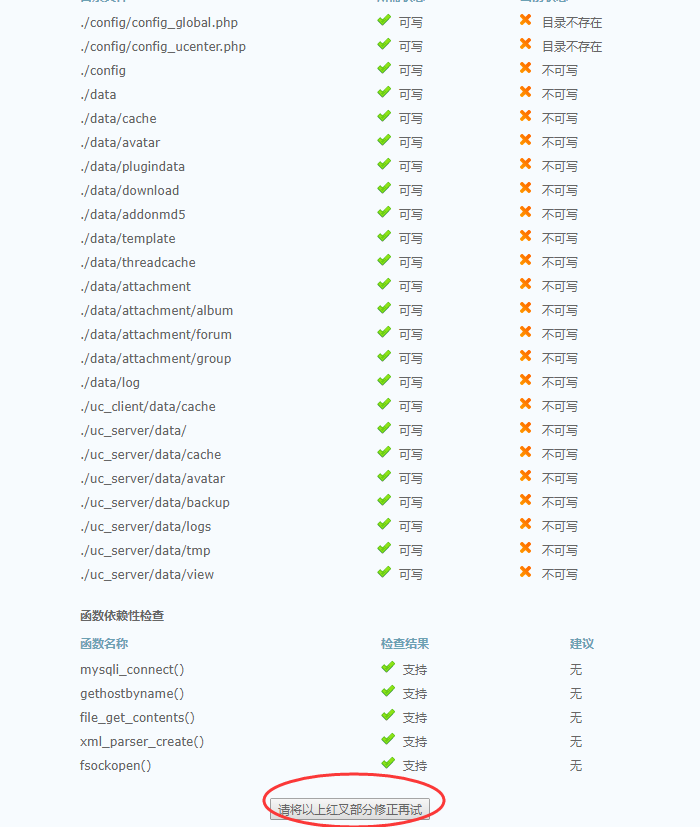
解决所有文件权限,需要可写权限
[root@www ~]# cd /opt/nginx/html/upload/[root@www upload]# chmod -R 777 ./config/ ./data/ ./uc_client/ ./uc_server/
然后刷新界面
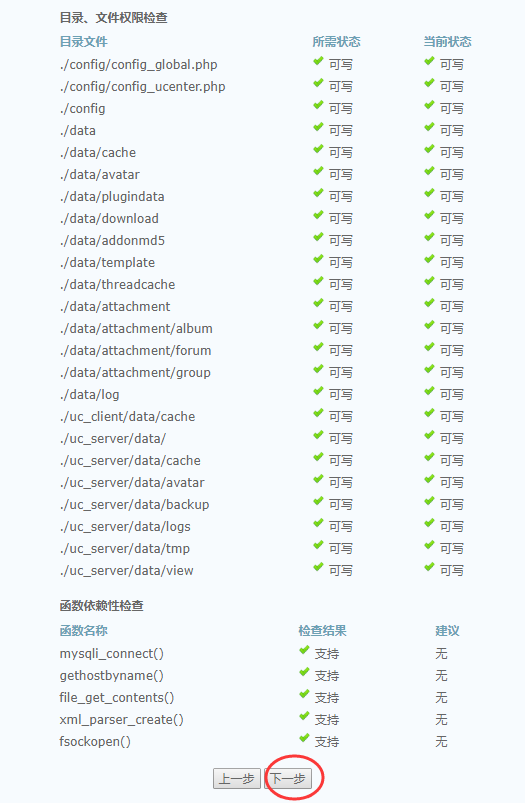
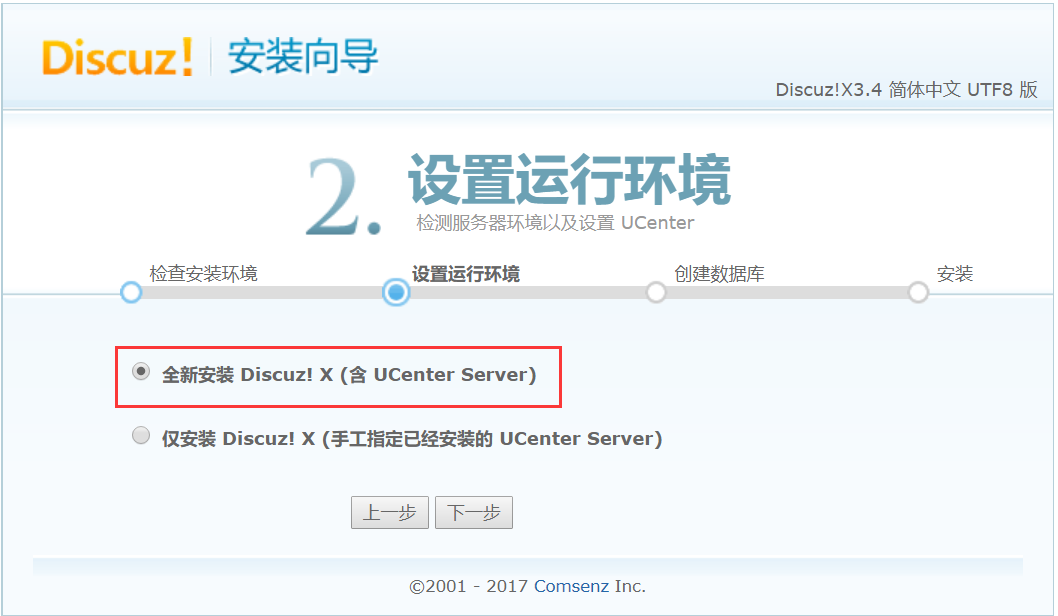
- 选择全新安装,点击下一步
- 添加安装数据库有关信息,必须要按照实际情况添加。

- 会开始安装论坛,安装完毕后就可以访问论坛了,可以把upload文件夹重命名
访问论坛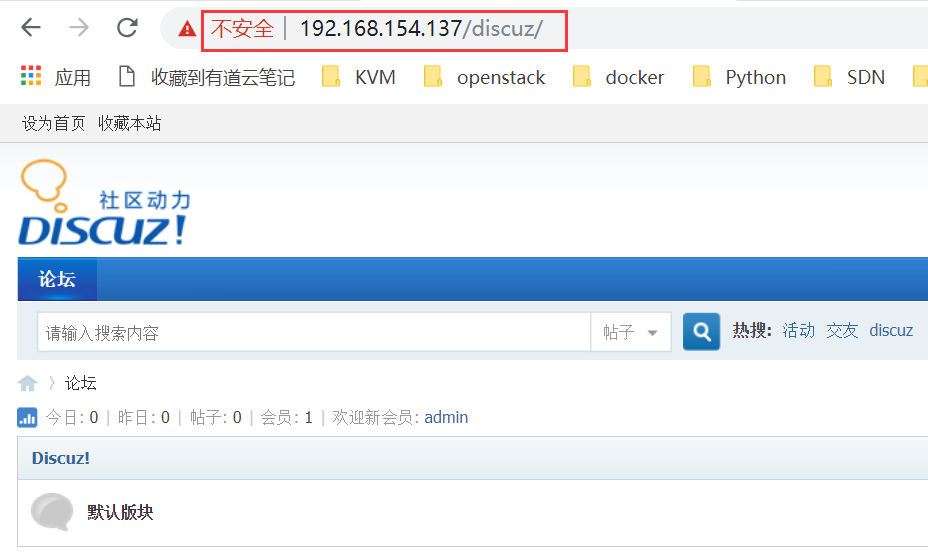
[root@www html]# mv upload/ discuz
7.4 可以使用论坛管理员admin用户做论坛管理
使用论坛管理员账号admin登录管理中心,就可以管理论坛了。

若有收获,就点个赞吧
0 人点赞
