我们编写项目的时候,很多时候都是在写重复代码,比如一个比较完整的框架,然后下面有很多代码都是重复的Copy,其实我们可以利用Visual Studio的模板替我们干这些活,我们只要关注项目具体的业务就可以了;
下面我们开始:
项目模板制作(一)(此处为原贴链接,下同)
1、模板类别
项目模板、项模板
其中,项目模板是创建项目用的,项模板是创建项用的
项目模板:
项模板: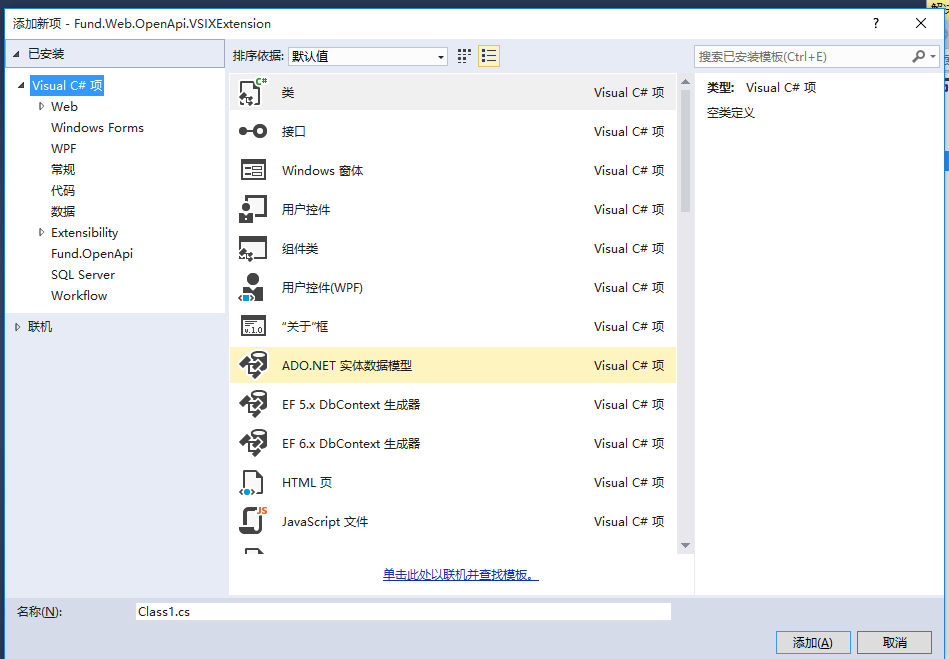
2、创建项目模板
首先,将要制作成模板的项目打开,选中项目,点击文件-》导出项目模板,弹出导出模板向导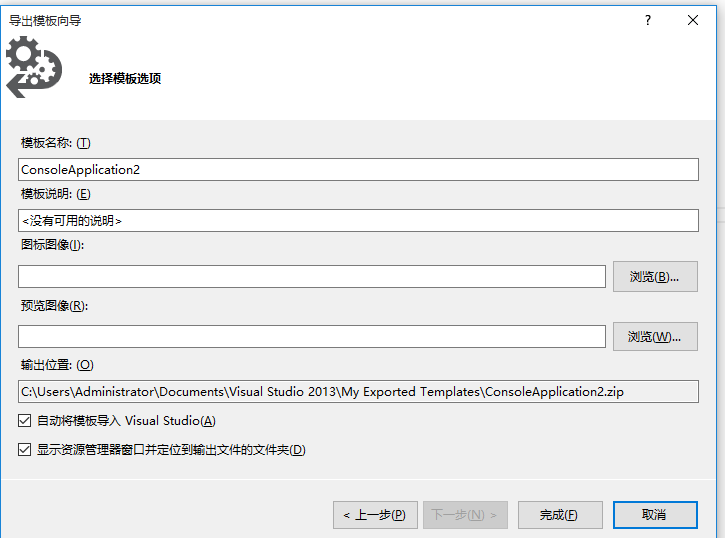
然后填写相关信息,点击完成,这样就导出模板成功了
现在,很关键的一步就是修改导出的模板
解压刚才导出zip文件
打开.vstemplate文件
<VSTemplate Version="3.0.0" xmlns="http://schemas.microsoft.com/developer/vstemplate/2005" Type="Project"><TemplateData><Name>ConsoleApplication2</Name><Description><没有可用的说明></Description><ProjectType>CSharp</ProjectType><ProjectSubType></ProjectSubType><SortOrder>1000</SortOrder><CreateNewFolder>true</CreateNewFolder><DefaultName>ConsoleApplication2</DefaultName><ProvideDefaultName>true</ProvideDefaultName><LocationField>Enabled</LocationField><EnableLocationBrowseButton>true</EnableLocationBrowseButton><Icon>__TemplateIcon.ico</Icon></TemplateData><TemplateContent><Project TargetFileName="ConsoleApplication2.csproj" File="ConsoleApplication2.csproj" ReplaceParameters="true"><ProjectItem ReplaceParameters="true" TargetFileName="CodeTimer.cs">CodeTimer.cs</ProjectItem><ProjectItem ReplaceParameters="true" TargetFileName="Program.cs">Program.cs</ProjectItem><Folder Name="Properties" TargetFolderName="Properties"><ProjectItem ReplaceParameters="true" TargetFileName="AssemblyInfo.cs">AssemblyInfo.cs</ProjectItem></Folder></Project></TemplateContent></VSTemplate>
TemplateData节点是模板的说明,Name:模板名称,Description:模板描述,ProjectType:项目类型,
修改TemplateContext节点
TargetFileName:模板生成的文件名称 (如:TargetFileName=”$safeprojectname$.csproj”)
File:模板文件
ReplaceParameters:是否替换占位符,微软定义的占位符见附录,当然还可以自定义占位符
修改完成之后
<VSTemplate Version="3.0.0" xmlns="http://schemas.microsoft.com/developer/vstemplate/2005" Type="Project"><TemplateData><Name>ConsoleApplication2</Name><Description><没有可用的说明></Description><ProjectType>CSharp</ProjectType><ProjectSubType></ProjectSubType><SortOrder>1000</SortOrder><CreateNewFolder>true</CreateNewFolder><DefaultName>ConsoleApplication2</DefaultName><ProvideDefaultName>true</ProvideDefaultName><LocationField>Enabled</LocationField><EnableLocationBrowseButton>true</EnableLocationBrowseButton><Icon>__TemplateIcon.ico</Icon></TemplateData><TemplateContent><Project TargetFileName="$safeprojectname$.csproj" File="ConsoleApplication2.csproj" ReplaceParameters="true"><ProjectItem ReplaceParameters="true" TargetFileName="$safeprojectname$CodeTimer.cs">CodeTimer.cs</ProjectItem><ProjectItem ReplaceParameters="true" TargetFileName="Program.cs">Program.cs</ProjectItem><Folder Name="Properties" TargetFolderName="Properties"><ProjectItem ReplaceParameters="true" TargetFileName="AssemblyInfo.cs">AssemblyInfo.cs</ProjectItem></Folder></Project></TemplateContent></VSTemplate>
打开用记事本csproj项目文件
修改ItemGroup
<ItemGroup><Compile Include="$safeprojectname$CodeTimer.cs" /><Compile Include="Program.cs" /><Compile Include="Properties\AssemblyInfo.cs" /></ItemGroup>
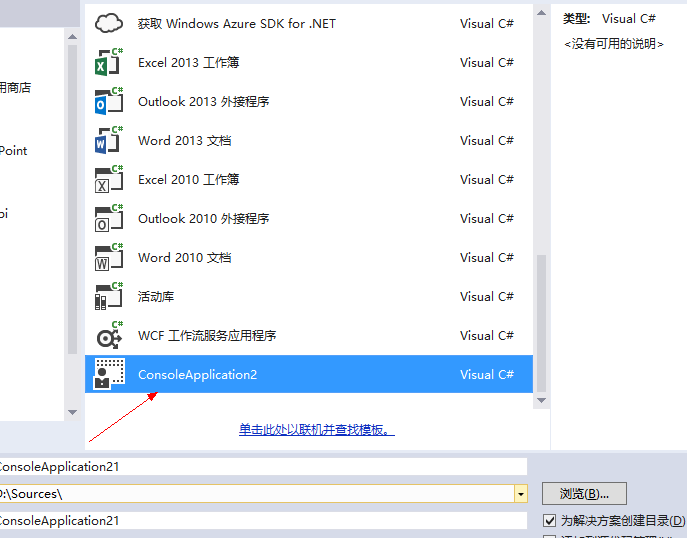
修改完成之后压缩成Zip文件,放到下面的目录,在vs里面就可以使用刚才创建的模板了
%USERPROFILE%\Documents\Visual Studio 2019\Templates\ProjectTemplates
附录:
| 参数 | 描述 |
|---|---|
| clrversion | 公共语言运行时 (CLR) 的当前版本。 |
| GUID [1-10] | 用于替换项目文件中的项目 GUID 的 GUID。 最多可以指定 10 个唯一的 GUID(例如,guid1))。 |
| itemname | 用户在添加新项对话框中提供的名称。 |
| machinename | 当前的计算机名称(例如,Computer01)。 |
| projectname | 用户在新建项目对话框中提供的名称。 |
| registeredorganization | HKLM\Software\Microsoft\Windows NT\CurrentVersion\RegisteredOrganization 中的注册表项值。 |
| rootnamespace | 当前项目的根命名空间。 此参数仅适用于项目模板。 |
| safeitemname | 用户在“添加新项”对话框中提供的名称,名称中移除了所有不安全的字符和空格。 |
| safeprojectname | 用户在“新建项目”对话框中提供的名称,名称中移除了所有不安全的字符和空格。 |
| time | 以 DD/MM/YYYY 00:00:00 格式表示的当前时间。 |
| SpecificSolutionName | 解决方案的名称。 当“创建解决方案的目录”被选中,SpecificSolutionName 具有解决方案的名称。当“创建解决方案的目录”没有被选中,SpecificSolutionName是空。 |
| userdomain | 当前的用户域。 |
| username | 当前的用户名。 |
| webnamespace | 当前网站的名称。 在 Web 窗体模板中使用此参数以确保类名称是唯一的。 如果网站位于 Web 服务器的根目录下,则此模板参数将解析为 Web 服务器的根目录。 |
| year | 以 YYYY 格式表示的当前年份。 |
项目模板制作(二)
上面,,我们制作了项目模板,本篇我制作项模板
首先,从我们需要导出模板的项目中,文件->导出模板,弹出 导出模板向导 对话框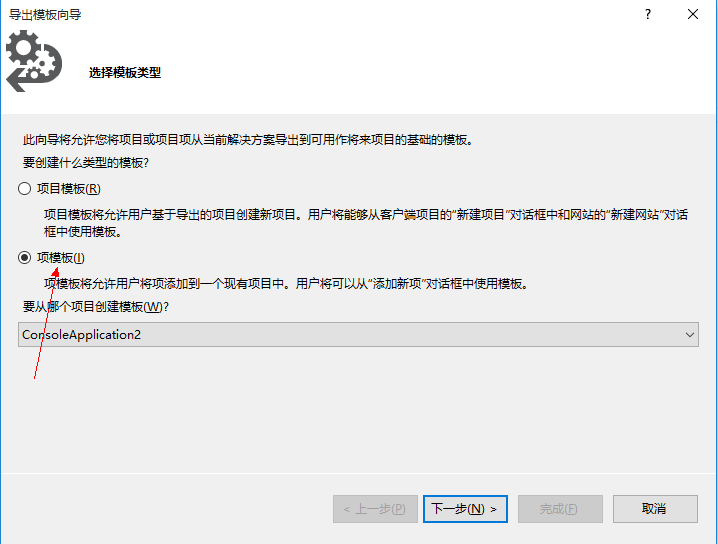
选择项模板,点击下一步
选择要导出的项,点击下一步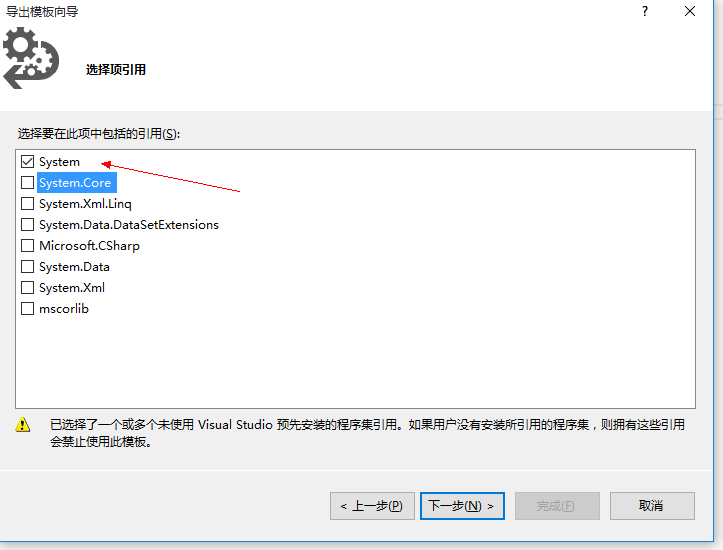
选择要Reference的类库
修改模板名称,点击完成
然后,解压生成的zip文件,如图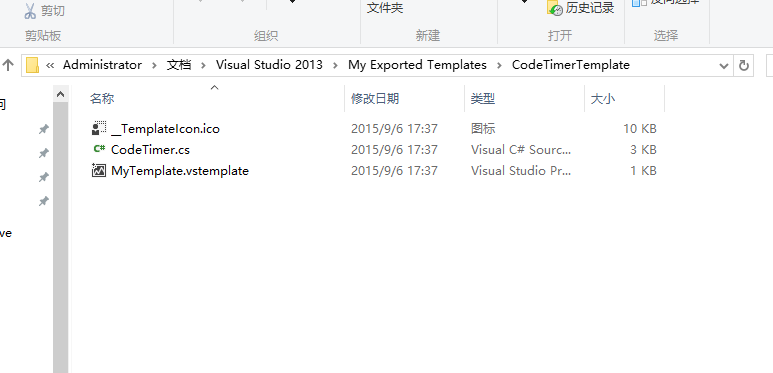
打开.vstemplate文件
<VSTemplate Version="3.0.0" xmlns="http://schemas.microsoft.com/developer/vstemplate/2005" Type="Item"><TemplateData><DefaultName>CodeTimerTemplate.cs</DefaultName><Name>CodeTimerTemplate</Name><Description><没有可用的说明></Description><ProjectType>CSharp</ProjectType><SortOrder>10</SortOrder><Icon>__TemplateIcon.ico</Icon></TemplateData><TemplateContent><References><Reference><Assembly>System</Assembly></Reference></References><ProjectItem SubType="Code" TargetFileName="$fileinputname$.cs" ReplaceParameters="true">CodeTimer.cs</ProjectItem></TemplateContent></VSTemplate>
修改TemplateData,修改模板的相关信息
修改 TemplateContent,将TargetFileName改成自己想要的
打开项文件CodeTimer.cs,做一些自己的修改
using System;using System.Diagnostics;using System.Runtime.InteropServices;using System.Threading;namespace $rootnamespace${public static class $safeitemname${public static void Initialize()}}
最后压缩成zip文件放到
%USERPROFILE%\Documents\Visual Studio 2019\Templates\ProjectTemplates
然后在Vs里面的新建项就可以看到自己的项模板了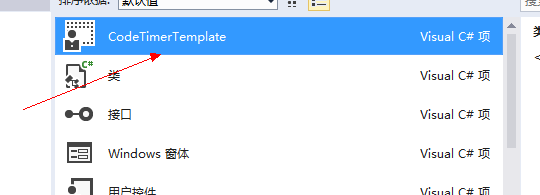
项目模板制作(三)
前面,我们已经制作好了模板,然后放到相应的Template目录就可以在Visual Studio中使用
现在,我们采用安装VSIX扩展的方式来安装模板,这种方式需要安装Visual Studio SDK
安装了SDK之后,可以在新建项目里面看到VSIX Project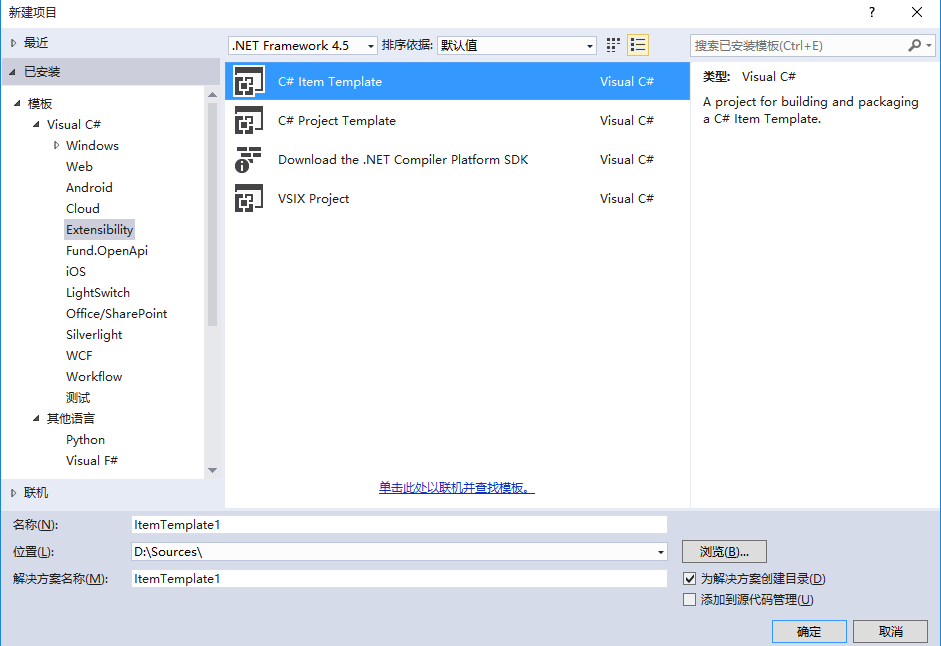
选择VSIX Project 然后设置一下名称,点击确定,项目就新建完成了
项目结构: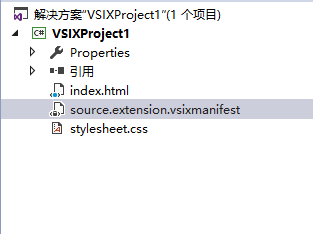
现在我们开始
首先,双击打开source.extension.vsixmanifest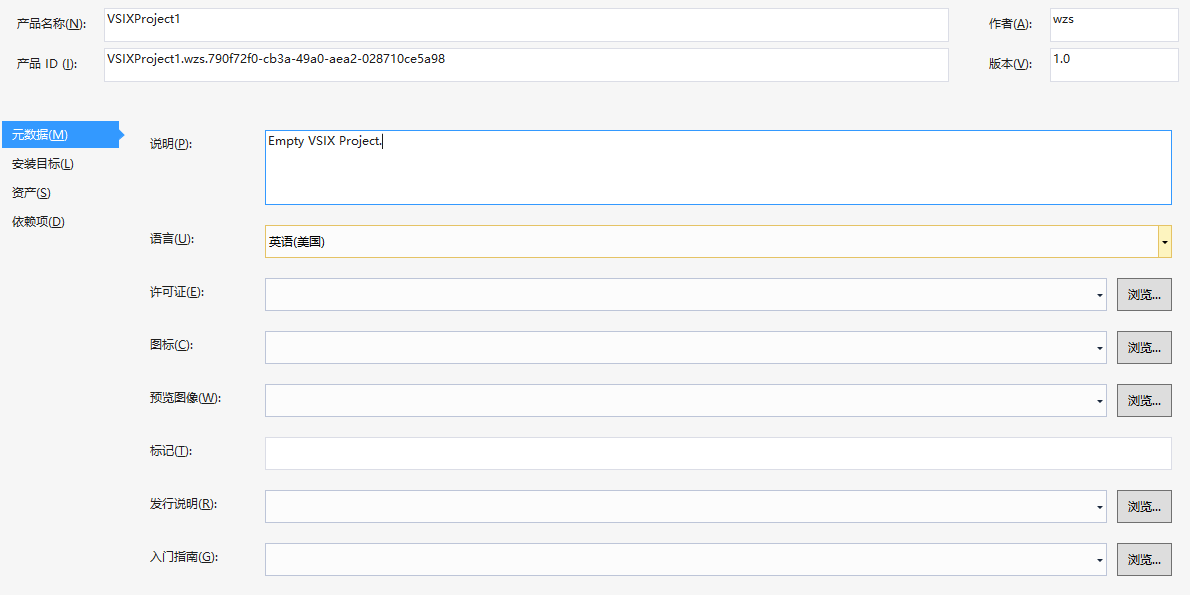
设置扩展的各种属性
然后,添加我们前面两篇制作的模板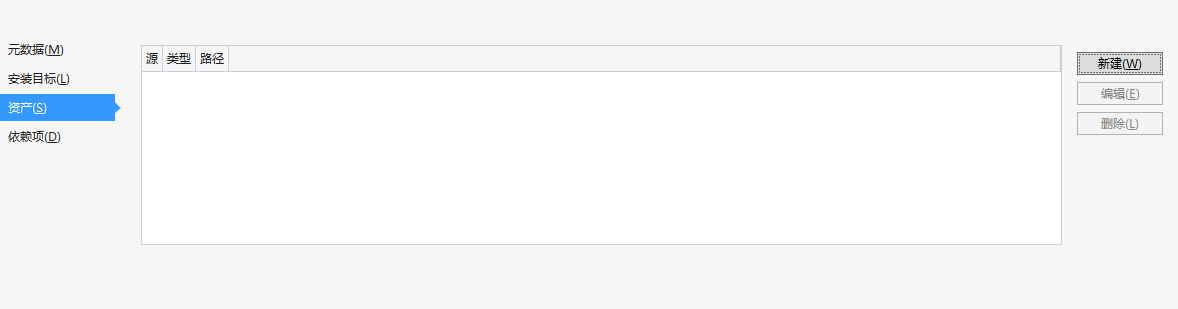
点击新建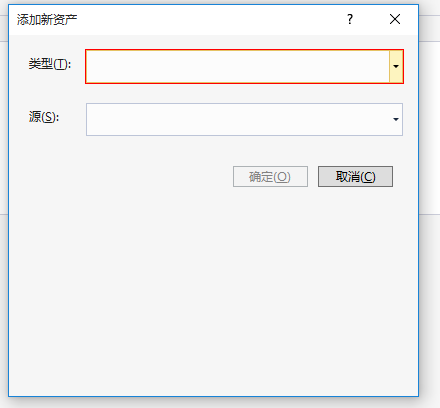
添加项模板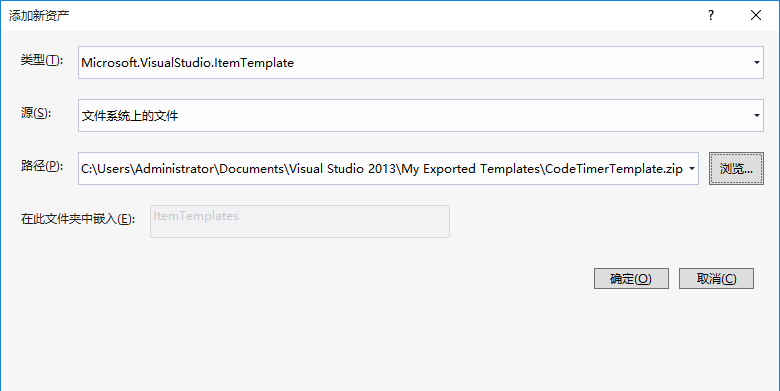
添加项目模板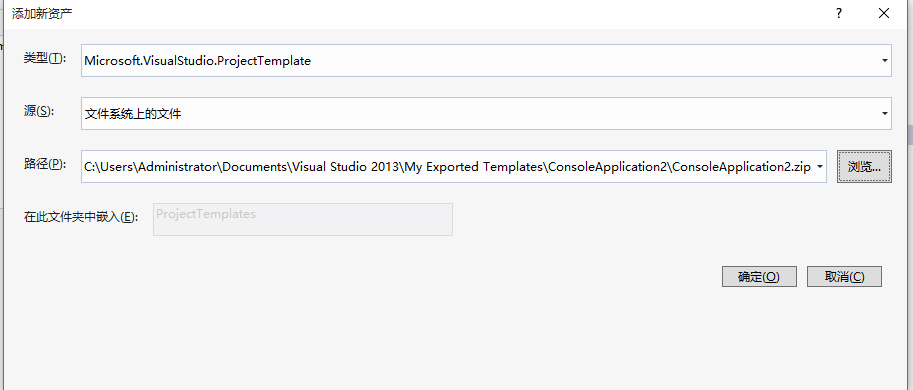
添加完成之后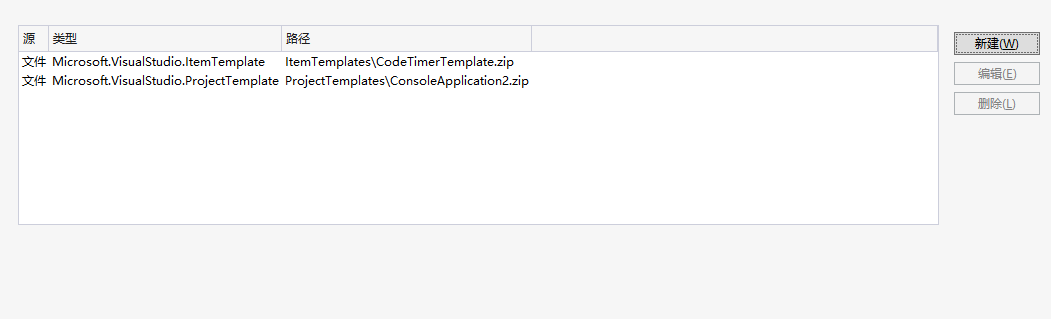
现在解决方案管理器里面可以看到新增的模板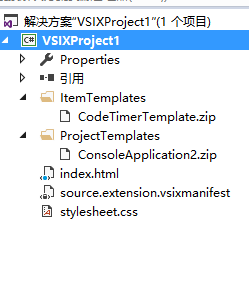
注意:
我们的模板如何放在一个我们自己定义的组里面呢,如图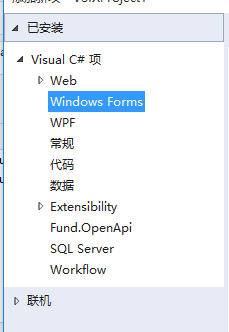
操作:
在ItemTemplate和ProjectTemplate中新建文件夹取一个自己的名字,然后把模板拖进去就行了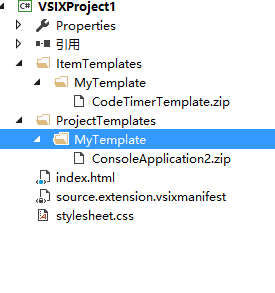
下面,我们设置安装目标,就是我们这个VSIX可以安装到哪几个版本的VS中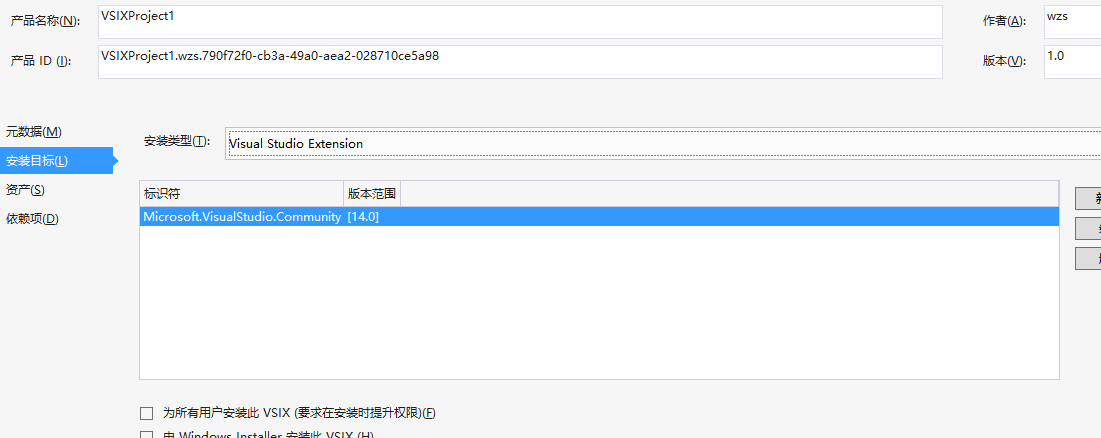
图中 14代表Visual Studio的版本号 14对应VS2015
我要让VS2013也可以用,这样既可[12.0.14.0]
VS2013以上都可以用:[12.0,)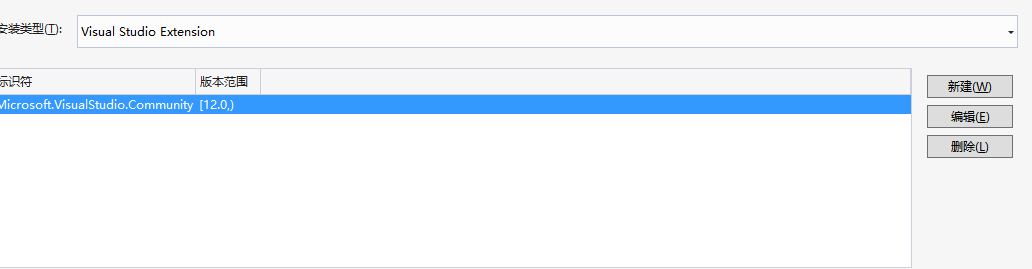
最后,我们生成项目,打开Debug目录,双击运行VSIX扩展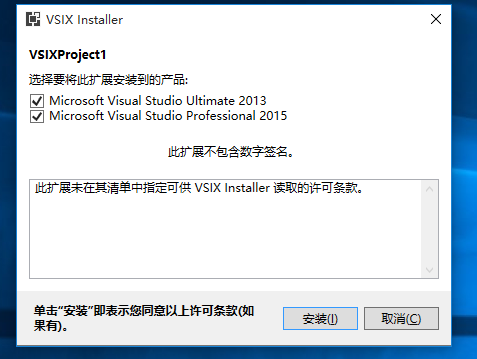
就可以安装我们制作的模板了
新建项目里面:
新建项:
注意:
这种方式安装的模板需要重启Visual Studio,模板才会显示
卸载模板:
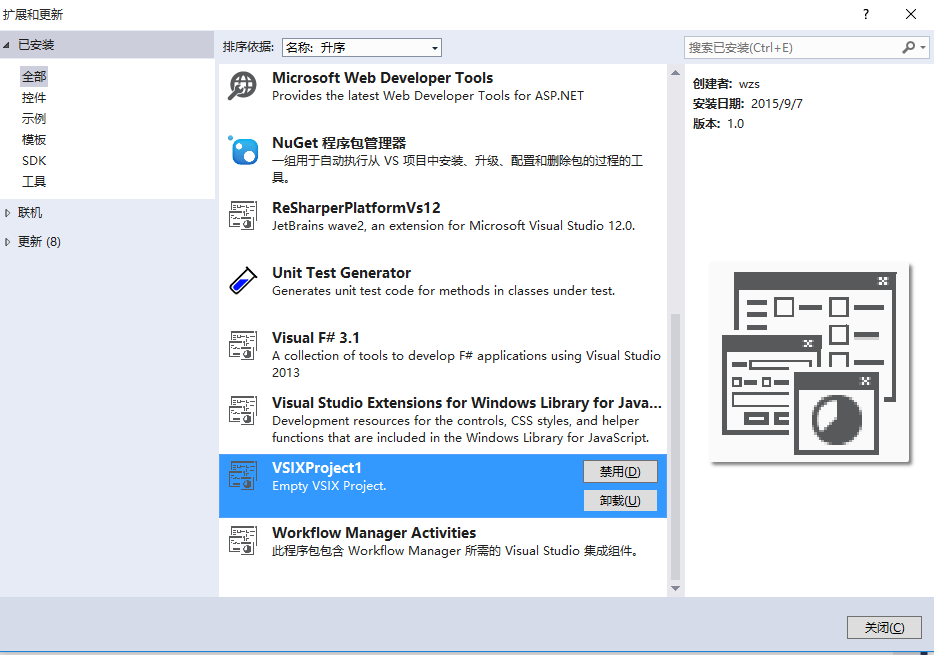
点击卸载,重启VS就行了
项目模板制作(四)
上一篇,介绍了VSIX安装模板的方法,那么,你是不是要问,为何有些项目模板却可以有向导,那是怎么做到的
今天这篇文章就是介绍如何为自己的模板添加向导,向导可以引导你完成项目中各种参数的设置,比如项目创建人,项目描述,公司等
下图创建Web项目时的向导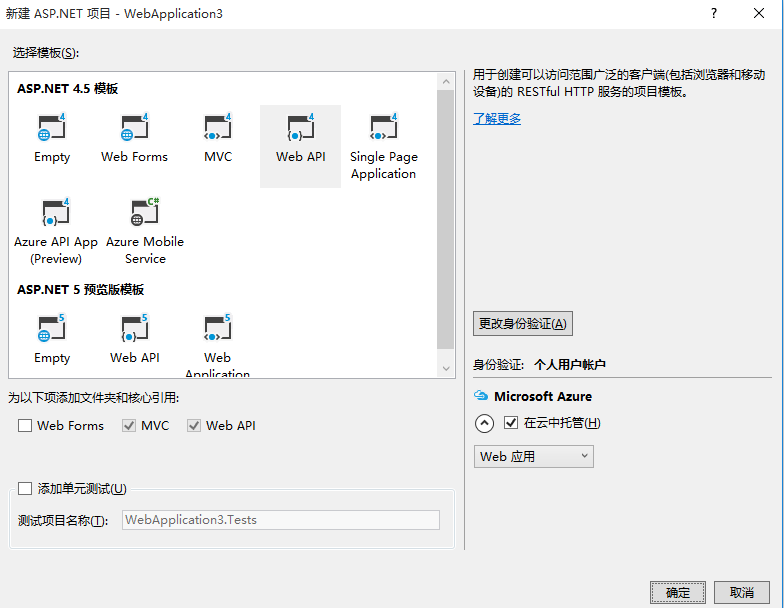
下面我们开始制作我们自己的项目向导
需要用到的两个类库: envdte , Microsoft.VisualStudio.TemplateWizardInterface
创建一个类库项目,引用上面两个类库
添加一个类,取名ProjectWizard继承IWizard接口实现 RunStarted 方法
using System;using System.Collections.Generic;using System.Linq;using System.Text;using System.Threading.Tasks;using System.Windows.Forms;using EnvDTE;using Microsoft.VisualStudio.TemplateWizard;namespace TemplateTestWizard{public class ProjectWizard:IWizard{private bool shouldAdd = true;public string Creator = "";public void RunStarted(object automationObject, Dictionary<string, string> replacementsDictionary, WizardRunKind runKind, object[] customParams){Creator = replacementsDictionary["$username$"];AssemblyWizard wizard=new AssemblyWizard(this);if (wizard.ShowDialog() == DialogResult.OK){replacementsDictionary["$username$"]=Creator;shouldAdd = true;}else{shouldAdd = false;}}public void ProjectFinishedGenerating(Project project){}public void ProjectItemFinishedGenerating(ProjectItem projectItem){}public bool ShouldAddProjectItem(string filePath){return shouldAdd;}public void BeforeOpeningFile(ProjectItem projectItem){}public void RunFinished(){}}}
下面为项目添加签名,由于制作的类库需要放到全局应用缓存中去,必须要添加签名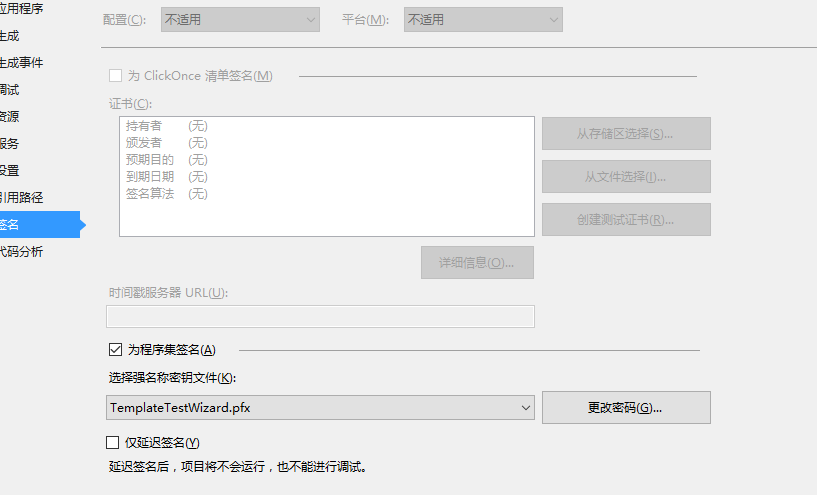
然后,打开Visual Studio命令提示符,以管理员运行,用 gacutil -i 注册生成的dll
gacutil -i path 注册程序集到全局应用程序缓存中gacutil -l name 查看相应的程序集gacutil -u name 卸载相应的程序集
下面,修改前面制作的Template,解压Template文件,打开 .vstemplate 文件,添加如下代码
<WizardExtension><Assembly>TemplateTestWizard, Version=1.0.0.0, Culture=neutral, PublicKeyToken=2be8376f02202422, processorArchitecture=MSIL</Assembly><FullClassName>TemplateTestWizard.ProjectWizard</FullClassName></WizardExtension>
其中 Assembly 节点写的是内容可以用 gacutil -l name 查看,然后复制出来
FullClassName 是项目中ProjectWizard的完全限定名称
修改完模板后,在VS中打开新建项目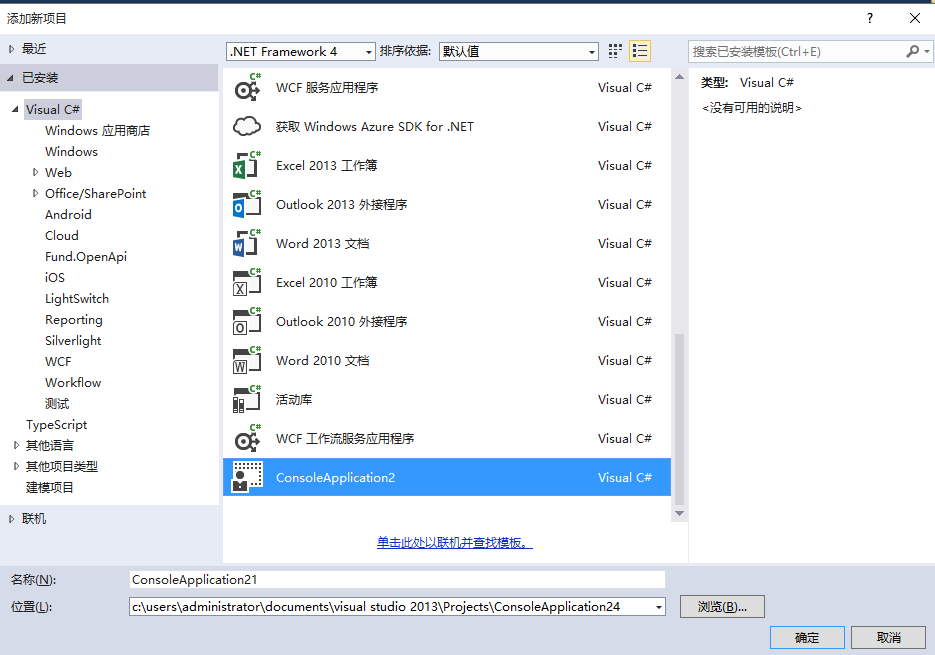
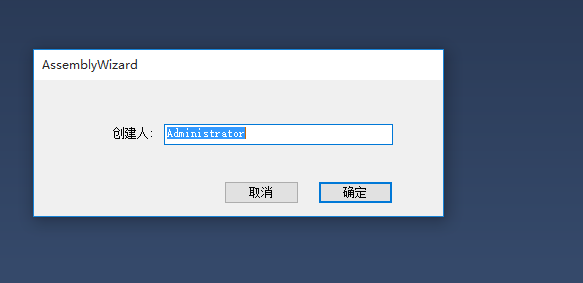
这个自定义向导就出来了,
如果模板里面有 $username$
using System;using System.Diagnostics;using System.Runtime.InteropServices;using System.Threading;namespace $safeprojectname${/// <summary>/// 创建人:$username$/// </summary>public static class CodeTimer{public static void Initialize(){Process.GetCurrentProcess().PriorityClass = ProcessPriorityClass.High;Thread.CurrentThread.Priority = ThreadPriority.Highest;Time("", 1, () => { });}public static void Time(string name, int iteration, Action action){if (String.IsNullOrEmpty(name)) return;// 1.ConsoleColor currentForeColor = Console.ForegroundColor;Console.ForegroundColor = ConsoleColor.Yellow;Console.WriteLine(name);// 2.GC.Collect(GC.MaxGeneration, GCCollectionMode.Forced);int[] gcCounts = new int[GC.MaxGeneration + 1];for (int i = 0; i <= GC.MaxGeneration; i++){gcCounts[i] = GC.CollectionCount(i);}// 3.Stopwatch watch = new Stopwatch();watch.Start();ulong cycleCount = GetCycleCount();for (int i = 0; i < iteration; i++) action();ulong cpuCycles = GetCycleCount() - cycleCount;watch.Stop();// 4.Console.ForegroundColor = currentForeColor;Console.WriteLine("\tTime Elapsed:\t" + watch.ElapsedMilliseconds.ToString("N0") + "ms");Console.WriteLine("\tCPU Cycles:\t" + cpuCycles.ToString("N0"));// 5.for (int i = 0; i <= GC.MaxGeneration; i++){int count = GC.CollectionCount(i) - gcCounts[i];Console.WriteLine("\tGen " + i + ": \t\t" + count);}Console.WriteLine();}private static ulong GetCycleCount(){ulong cycleCount = 0;QueryThreadCycleTime(GetCurrentThread(), ref cycleCount);return cycleCount;}[DllImport("kernel32.dll")][return: MarshalAs(UnmanagedType.Bool)]static extern bool QueryThreadCycleTime(IntPtr threadHandle, ref ulong cycleTime);[DllImport("kernel32.dll")]static extern IntPtr GetCurrentThread();}}
生成之后代码
using System;using System.Diagnostics;using System.Runtime.InteropServices;using System.Threading;namespace ConsoleApplication25{/// <summary>/// 创建人:Administrator/// </summary>public static class CodeTimer{public static void Initialize(){Process.GetCurrentProcess().PriorityClass = ProcessPriorityClass.High;Thread.CurrentThread.Priority = ThreadPriority.Highest;Time("", 1, () => { });}public static void Time(string name, int iteration, Action action){if (String.IsNullOrEmpty(name)) return;// 1.ConsoleColor currentForeColor = Console.ForegroundColor;Console.ForegroundColor = ConsoleColor.Yellow;Console.WriteLine(name);// 2.GC.Collect(GC.MaxGeneration, GCCollectionMode.Forced);int[] gcCounts = new int[GC.MaxGeneration + 1];for (int i = 0; i <= GC.MaxGeneration; i++){gcCounts[i] = GC.CollectionCount(i);}// 3.Stopwatch watch = new Stopwatch();watch.Start();ulong cycleCount = GetCycleCount();for (int i = 0; i < iteration; i++) action();ulong cpuCycles = GetCycleCount() - cycleCount;watch.Stop();// 4.Console.ForegroundColor = currentForeColor;Console.WriteLine("\tTime Elapsed:\t" + watch.ElapsedMilliseconds.ToString("N0") + "ms");Console.WriteLine("\tCPU Cycles:\t" + cpuCycles.ToString("N0"));// 5.for (int i = 0; i <= GC.MaxGeneration; i++){int count = GC.CollectionCount(i) - gcCounts[i];Console.WriteLine("\tGen " + i + ": \t\t" + count);}Console.WriteLine();}private static ulong GetCycleCount(){ulong cycleCount = 0;QueryThreadCycleTime(GetCurrentThread(), ref cycleCount);return cycleCount;}[DllImport("kernel32.dll")][return: MarshalAs(UnmanagedType.Bool)]static extern bool QueryThreadCycleTime(IntPtr threadHandle, ref ulong cycleTime);[DllImport("kernel32.dll")]static extern IntPtr GetCurrentThread();}}

若有收获,就点个赞吧
0 人点赞
