1、昨日复习
1.说明流的三种分类方式
流向:输入流、输出流
数据单位:字节流、字符流
流的角色:节点流、处理流
2.写出4个IO流中的抽象基类,4个文件流,4个缓冲流
InputStream FileXxx BufferedXxx
OutputStream
Reader
Writer
InputStreamReader:父类Reader
异常:XxxException XxxError
RandomAccessFile
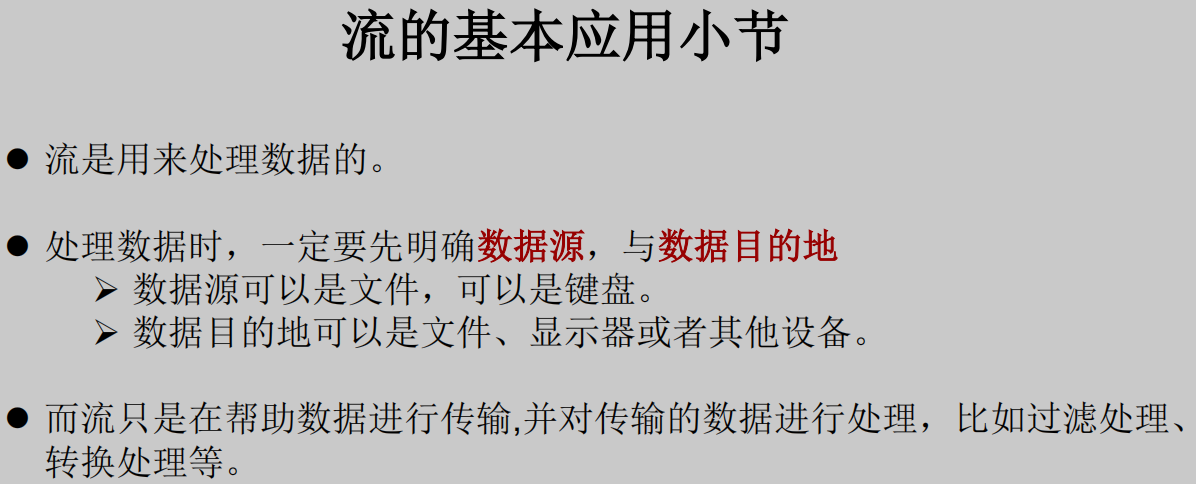
3.字节流与字符流的区别与使用情境
字节流:read(byte[] buffer) / read() 非文本文件
字符流:read(char[] cbuf) / read() 文本文件
4.使用缓冲流实现a.jpg文件复制为b.jpg文件的操作
BufferedInputStream bis = new BufferedInputStream(new FileInputStream(new File(“a.jpg”)));
BufferedOutputStream bos = new BufferedOutputStream(new FileOutputStream(new File(“b.jpg”)));
byte[] buffer = new byte[1024];
int len;
while((len = bis.read(buffer))!= -1){
bos.write(buffer,0,len);
}
bos.close();
bis.close();
//此时的异常应该使用try-catch-finally处理。
5.转换流是哪两个类,分别的作用是什么?请分别创建两个类的对象。
InputStreamReader:将输入的字节流转换为输入的字符流。解码
OutputStreamWriter:将输出的字符流转换为输出的字节流。编码
InputStreamReader isr = new InputStreamReader(new FileInputStream(“a.txt”),”utf-8”);
OutputStreamWriter osw = new OutputStreamWriter(new FileOutputStream(“b.txt”),”gbk”);
对后面学习的启示:
客户端/浏览器 <—————->后台(java、go、Python、node.js、PHP)<—————->数据库
要求前前后后使用的字符集都统一为:UTF-8
2、对象流
ObjectInputStream和OjbectOutputSteam
用于存储和读取基本数据类型数据或对象的处理流。它的强大之处就是可以把Java中的对象写入到数据源中,也能把对象从数据源中还原回来。
序列化:用ObjectOutputStream类保存基本类型数据或对象的机制
反序列化:用ObjectInputStream类读取基本类型数据或对象的机制
ObjectOutputStream和ObjectInputStream不能序列化static和transient修饰的成员变量
对象序列化机制允许把内存中的Java对象转换成平台无关的二进制流,从而允许把这种二进制流持久地保存在磁盘上,或通过网络将这种二进制流传输到另一个网络节点。//当其它程序获取了这种二进制流,就可以恢复成原来的Java对象
序列化的好处在于可将任何实现了Serializable接口的对象转化为字节数据,使其在保存和传输时可被还原
序列化是 RMI(Remote Method Invoke – 远程方法调用)过程的参数和返回值都必须实现的机制,而 RMI 是 JavaEE 的基础。因此序列化机制是JavaEE 平台的基础
如果需要让某个对象支持序列化机制,则必须让对象所属的类及其属性是可序列化的,为了让某个类是可序列化的,该类必须实现如下两个接口之一。否则,会抛出NotSerializableException异常
Serializable
Externalizable
package com.atguigu.java1;import org.junit.Test;import java.io.*;/*对象留的使用:1、ObjectInputStream和ObjectOutputStream2、作用:用于存储和读取基本数据类型数据或对象的处理流。它的强大之处就是可以把Java中的对象写入到数据源中,也能把对象从数据源中还原回来。3、要想一个java对象是可序列化的,需要满足相应的要求。①需要实现接口:Serializable②凡是实现Serializable接口的类都有一个表示序列化版本标识符的全局常量,具体的值没有要求:private static final long serialVersionUID;4、除了当前类需要实现Serializable接口之外,还必须保证其内部所有的属性也必须是可序列化的。(默认情况下,基本数据类型也可以序列化)补充:ObjectOutputStream和ObjectInputStream不能序列化static和transient修饰的成员变量*/public class ObjectInputStreamTest {/*序列化过程:将内存中的java对象保存到磁盘中或通过网络传输出去使用ObjectOutputStream实现*/@Testpublic void test1() {ObjectOutputStream oos = null;try {oos = new ObjectOutputStream(new FileOutputStream("object.dat"));oos.writeObject(new String("我爱北京天安门"));oos.flush();//刷新操作oos.writeObject(new Person("Tom",23));oos.flush();} catch (IOException e) {e.printStackTrace();}finally {try {oos.close();} catch (IOException e) {e.printStackTrace();}}}/*反序列化:将磁盘文件中的对象还原为内存中的一个java对象使用ObjectInputStream来实现*/@Testpublic void test2(){ObjectInputStream ois = null;try {ois = new ObjectInputStream(new FileInputStream("object.dat"));Object obj = ois.readObject();String str = (String) obj;Person p = (Person) ois.readObject();System.out.println(str);System.out.println(p);} catch (IOException e) {e.printStackTrace();} catch (ClassNotFoundException e) {e.printStackTrace();}finally {if (ois!=null) {try {ois.close();} catch (IOException e) {e.printStackTrace();}}}}}
3、随机存取文件流
package com.atguigu.java1;import org.junit.Test;import java.io.File;import java.io.FileNotFoundException;import java.io.IOException;import java.io.RandomAccessFile;/*RandomAccessFile的使用:1、RandomAccessFile直接继承于java.lang.Object类,实现了DataInput和DataOutput接口2、RandomAccessFile既可以作为一个输入流,又可以作为一个输出流3、如果RandomAccessFile作为输出流时,写出到的文件如果不存在,则在执行过程中自动创建如果写出到的文件存在,则会对原有文件内容进行覆盖。(默认情况下,从头覆盖)4、可以通过相关的操作,实现RandomAccessFile“插入”数据的效果*/public class RandomAccessFileTest {@Testpublic void test1() {RandomAccessFile raf1 = null;RandomAccessFile raf2 = null;try {raf1 = new RandomAccessFile(new File("大家好.png"), "r");raf2 = new RandomAccessFile(new File("大家好1.png"), "rw");byte[] buffer = new byte[1024];int len;while ((len = raf1.read(buffer)) != -1) {raf2.write(buffer, 0, len);}} catch (IOException e) {e.printStackTrace();} finally {if (raf1 != null) {try {raf1.close();} catch (IOException e) {e.printStackTrace();}}if (raf2 != null) {try {raf2.close();} catch (IOException e) {e.printStackTrace();}}}}@Testpublic void test2() {RandomAccessFile raf1 = null;try {raf1 = new RandomAccessFile("hello.txt", "rw");raf1.seek(new File("hello.txt").length());//指针调到脚标为3的位置raf1.write("xyz".getBytes());} catch (IOException e) {e.printStackTrace();} finally {if (raf1 != null) {try {raf1.close();} catch (IOException e) {e.printStackTrace();}}}}@Testpublic void test3() throws IOException {RandomAccessFile raf1 = new RandomAccessFile("hello.txt","rw");raf1.seek(3);//保存指针3后面的数据StringBuilder builder = new StringBuilder((int) new File("hello.txt").length());byte[] buffer = new byte[20];int len;while ((len=raf1.read(buffer))!=-1){builder.append(new String(buffer,0,len));}//调回指针,写入:“xyz”raf1.seek(3);raf1.write("xyz".getBytes());raf1.write(builder.toString().getBytes());raf1.close();}}
RandomAccessFile类为用户提供了两种构造方法:
1、RandomAccessFile(File file, String mode)
2、RandomAccessFile(String name, String mode)
其实第二种构造方法也是new一个File出来再调用第一种构造方法,建议使用第一种构造方法,因为第一篇文章就说了File是IO的基础,有一个File不仅仅可以通过RandomAccessFile对文件进行操作,也可以通过File对象对文件进行操作。至于mode,Java给开发者提供了四种mode:
| 模 式 | 作 用 |
|---|---|
| r | 表示以只读方式打开,调用结果对象的任何write方法都将导致抛出IOException |
| rw | 打开以便读取和写入,如果该文件尚不存在,则尝试创建该文件 |
| rws | 打开以便读取和写入,相对于”rw”,还要求对文件内容或元数据的每个更新都同步写入到底层存储设备 |
| rwd | 打开以便读取和写入,相对于”rw”,还要求对文件内容的每个更新都同步写入到底层存储设备 |
注意第二点”rw”模式,对rw模式的解释意味着Java并不强求指定的路径下一定存在某个文件,假如文件不存在,会自动创建
RandomAccessFile中的方法
RandomAccessFile中有如下一些常用方法:
| 方 法 | 作 用 |
|---|---|
| void close() | 重要,关闭此随机访问文件流并释放与该流关联的所有系统资源 |
| FileChannel getChannel() | 返回与此文件关联的唯一FileChannel对象,NIO用到 |
| long getFilePointer() | 返回此文件中的当前偏移量 |
| long length() | 返回此文件的长度 |
| int read() | 从此文件中读取一个数据字节 |
| int read(byte[] b) | 将最多b.length个数据字节从此文件读入byte数组,返回读入的总字节数,如果由于已经达到文件末尾而不再有数据,则返回-1。在至少一个输入字节可用前,此方法一直阻塞 |
| int read(byte[] b, int off, int len) | 将最多len个数据字节从此文件的指定初始偏移量off读入byte数组 |
| boolean readBoolean() | 从此文件读取一个boolean,其余readByte()、readChar()、readDouble()等类似 |
| String readLine() | 从此文件读取文本的下一行 |
| void seek(long pos) | 重要,设置到此文件开头测量到的文件指针偏移量,在该位置发生下一个读取或写入操作 |
| int skipBytes(int n) | 重要,尝试跳过输入的n个字节以丢弃跳过的字节,返回跳过的字节数 |
| void write(byte[] b) | 将b.length个字节从指定byte数组写入到此文件中 |
| void write(byte[] b, int off, int len) | 将len个字节从指定byte数组写入到此文件,并从偏移量off处开始 |
| void write(int b) | 向此文件写入指定的字节 |
| void writeBoolean(boolean v) | 按单字节值将boolean写入该文件,其余writeByte(int v)、writeBytes(String s)、writeChar(int v)等都类似 |
4、网络编程
网络基础
计算机网络:
把分布在不同地理区域的计算机与专门的外部设备用通信线路互连成一个规模大、功能强的网络系统,从而使众多的计算机可以方便地互相传递信息、共享硬件、软件、数据信息等资源。
网络编程的目的:
直接或间接地通过网络协议与其它计算机实现数据交换,进行通讯。
网络编程中有两个主要的问题:
如何准确地定位网络上一台或多台主机;定位主机上的特定的应用
找到主机后如何可靠高效地进行数据传输
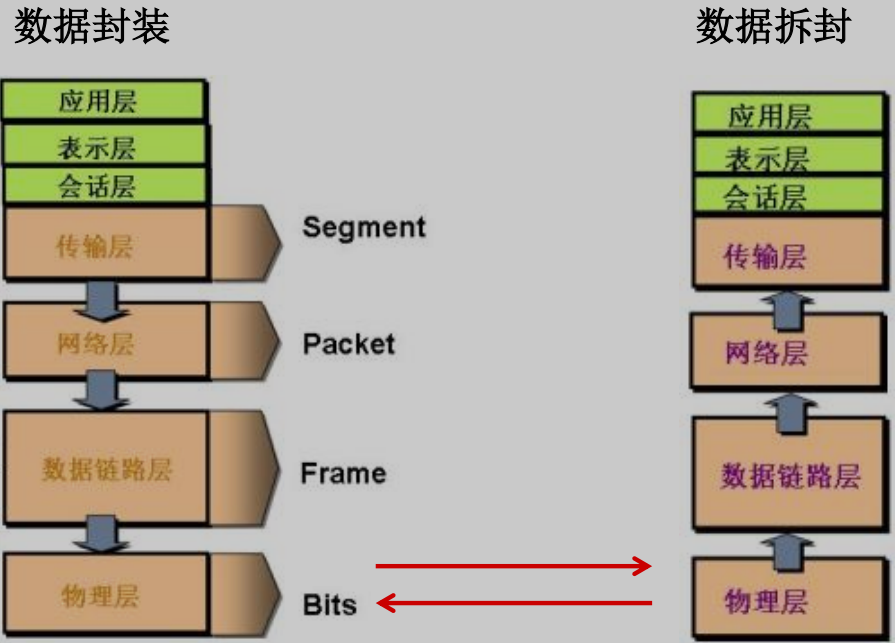
如何实现网络中的主机互相通信
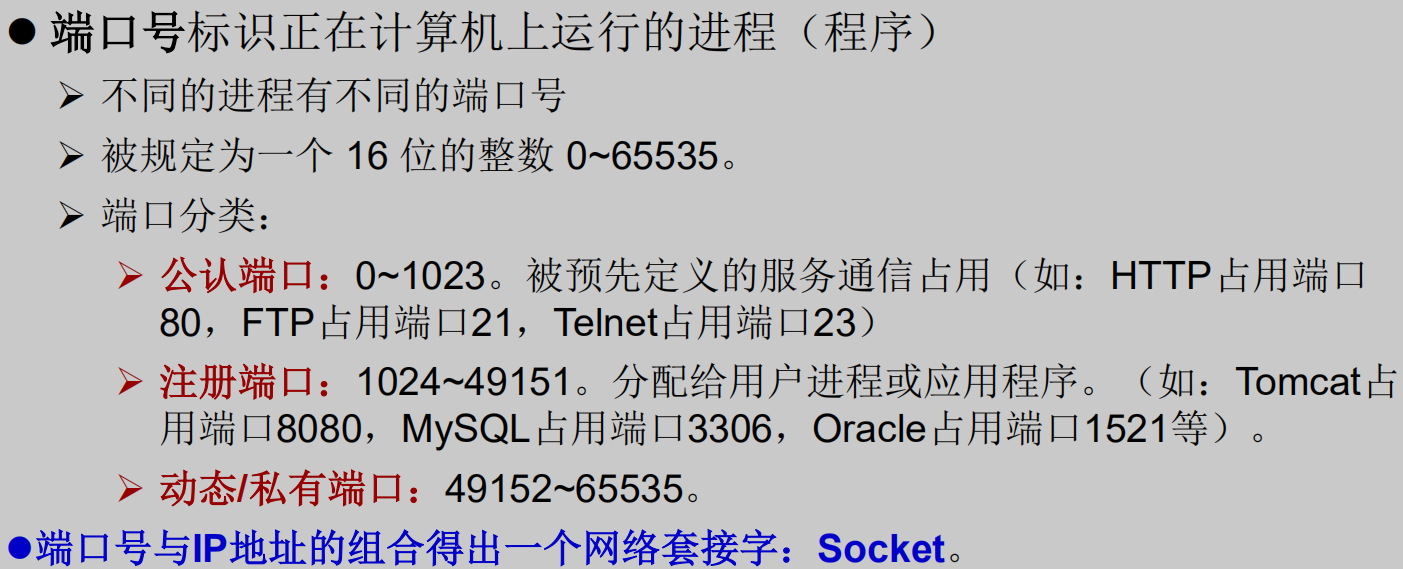
通信双方地址
IP
端口号
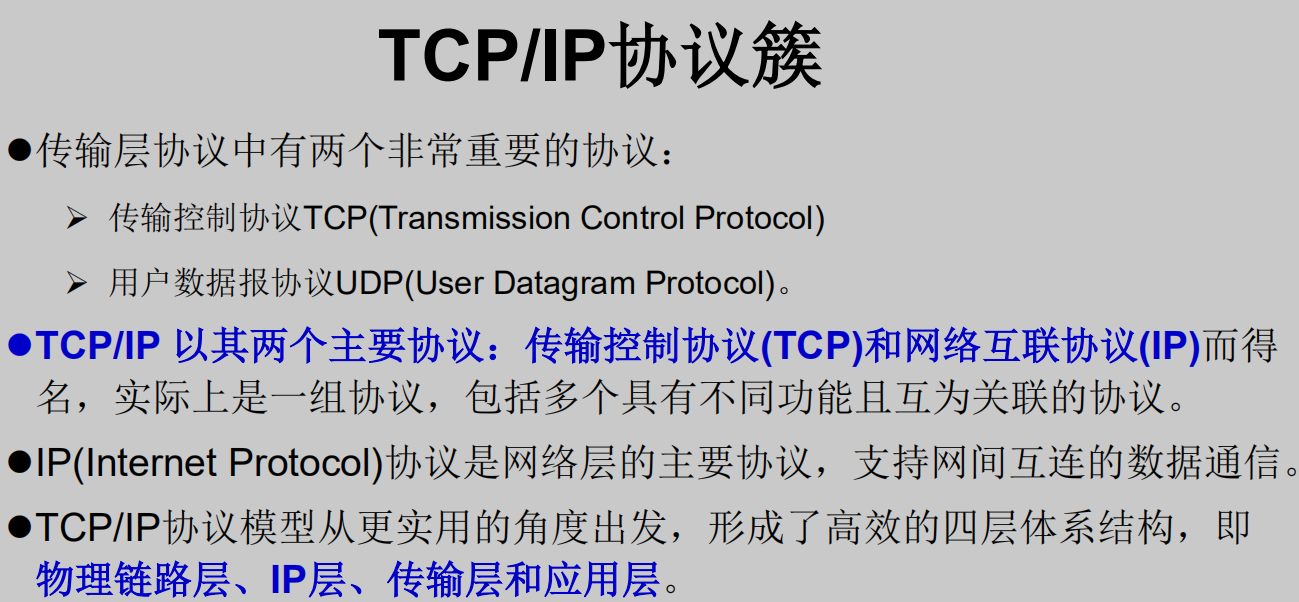
一定的规则(即:网络通信协议。有两套参考模型)
OSI参考模型:模型过于理想化,未能在因特网上进行广泛推广
TCP/IP参考模型(或TCP/IP协议):事实上的国际标准。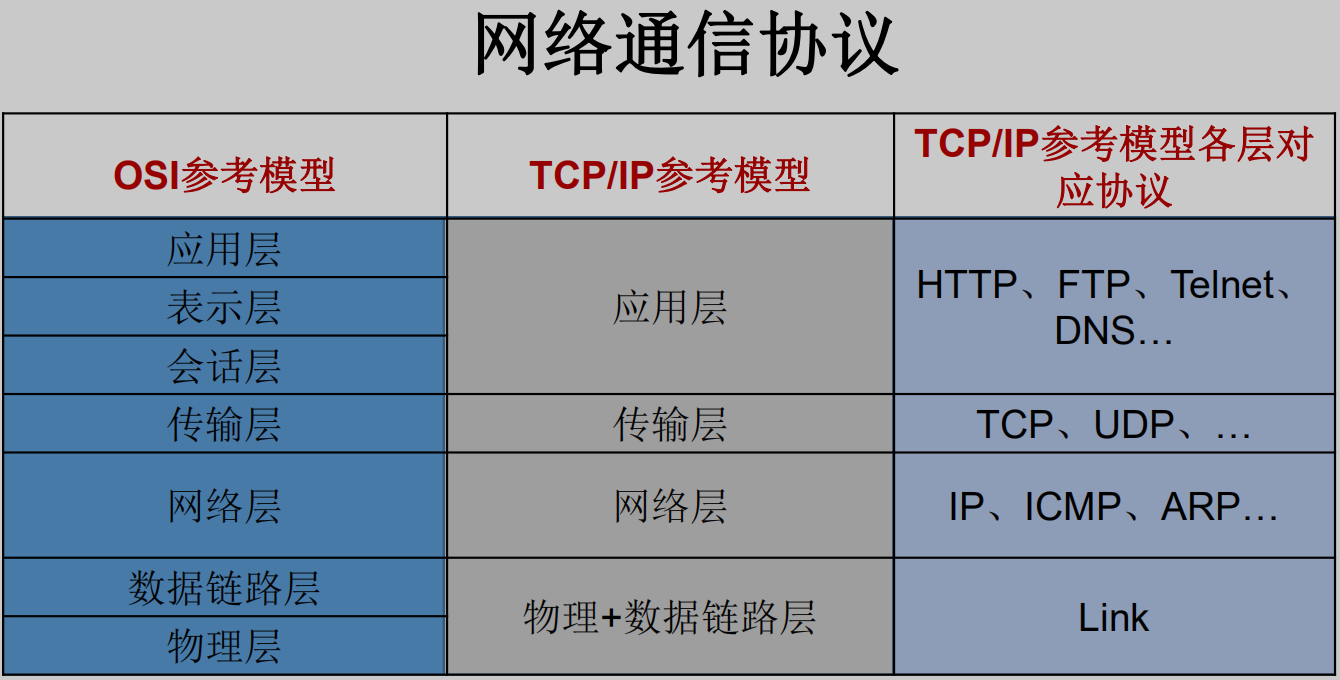
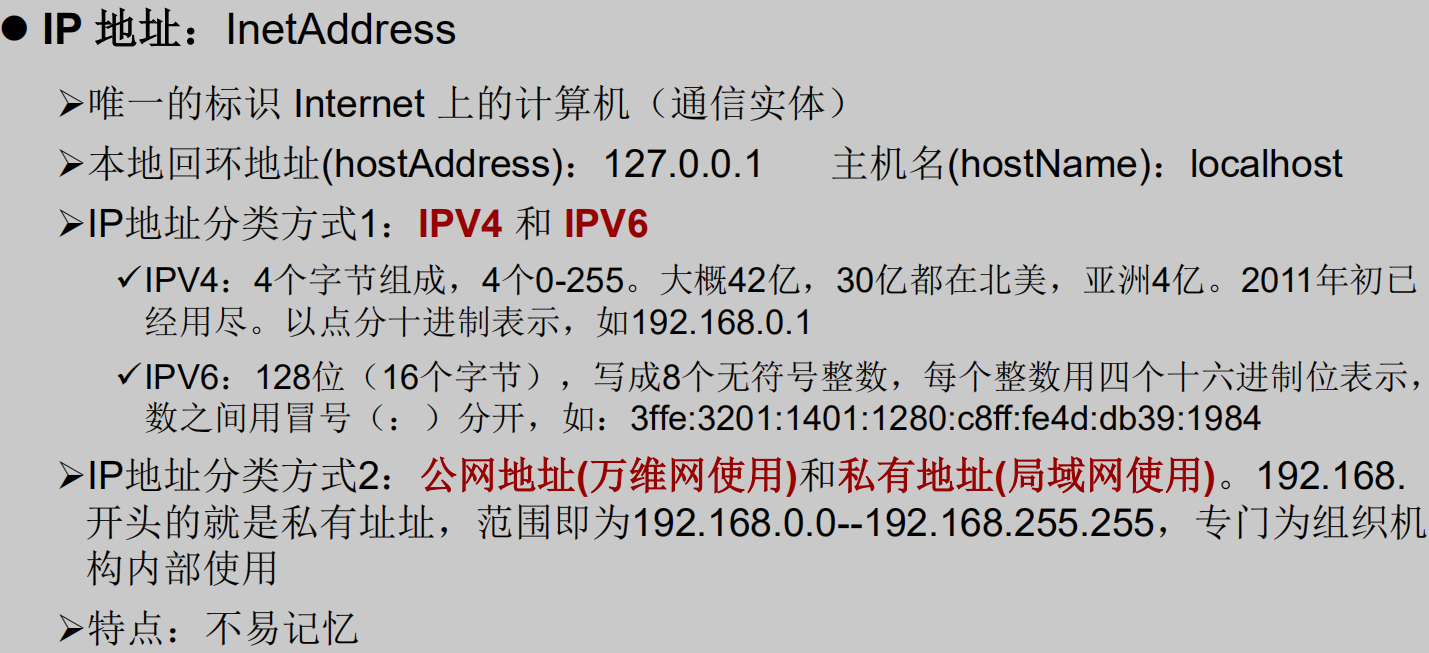
本地回路地址:127.0.0.1 对应着:localhost
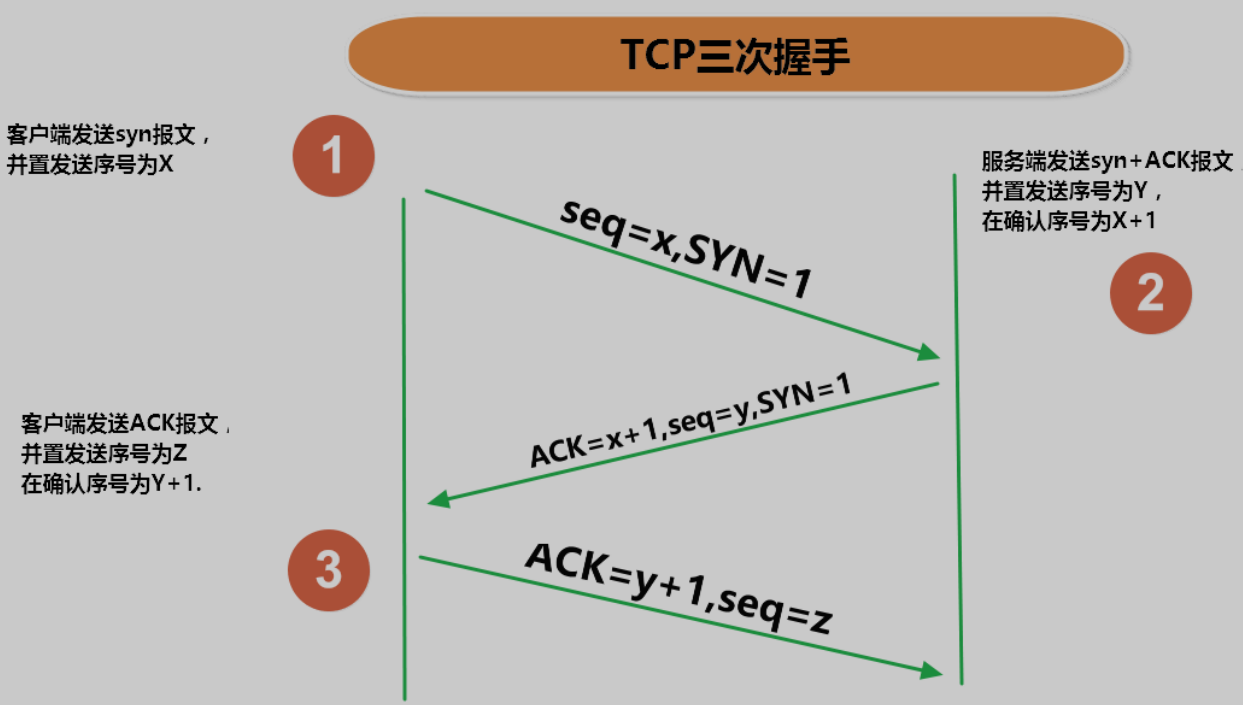
什么是Socket
Socket的概念很简单,它是网络上运行的两个程序间双向通讯的一端,既可以接收请求,也可以发送请求,利用它可以较为方便地编写网络上数据的传递。
所以简而言之,Socket就是进程通信的端点,Socket之间的连接过程可以分为几步:
1、服务器监听
服务器端Socket并不定位具体的客户端Socket,而是处于等待连接的状态,实时监控网络状态
2、客户端请求
客户端Socket发出连接请求,要连接的目标是服务端Socket。为此,客户端Socket必须首先描述它要连接的服务端Socket,指出服务端Socket的地址和端口号,然后就向服务端Socket提出连接请求
3、连接确认
当服务端Socket监听到或者说是接收到客户端Socket的连接请求,它就响应客户端Socket的请求,建立一个新的线程,把服务端Socket的描述发给客户端,一旦客户端确认了此描述,连接就好了。而服务端Socket继续处于监听状态,继续接收其他客户端套接字的连接请求
package com.atguigu.java2;import org.junit.Test;import java.io.*;import java.net.InetAddress;import java.net.ServerSocket;import java.net.Socket;/*实现TCP的网络编程例子1:客户端发送信息给服务端,服务端将数据显示在控制台上*/public class TCPTest1 {//客户端@Testpublic void client() {Socket socket = null;OutputStream os = null;try {//1、创建Socket对象,指明服务器短的IP和端口号InetAddress inet = InetAddress.getByName("127.0.0.1");socket = new Socket(inet, 9900);//2、获取一个输出流,用于输出数据os = socket.getOutputStream();//3、写出数据的操作os.write("你好,我是客户端mm".getBytes());} catch (IOException e) {e.printStackTrace();} finally {//4、资源关闭if (os != null) {try {os.close();} catch (IOException e) {e.printStackTrace();}}if (socket != null) {try {socket.close();} catch (IOException e) {e.printStackTrace();}}}}//服务端@Testpublic void server() {ServerSocket ss = null;Socket socket = null;InputStream is = null;ByteArrayOutputStream baos = null;try {//1、创建服务器端的ServerSocket,指明自己的端口号ss = new ServerSocket(9900);//2、调用accept表明接收来自客户端的socketsocket = ss.accept();//3、获取输入流is = socket.getInputStream();//不建议这样写,可能会有乱码/*byte[] buffer = new byte[20];int len;while ((len=is.read())!=-1){String str = new String(buffer,0,len);System.out.println(str);}*///4、读取输入流中的数据baos = new ByteArrayOutputStream();byte[] buffer = new byte[100];int len;while ((len = is.read(buffer)) != -1) {baos.write(buffer, 0, len);}System.out.println(baos.toString());System.out.println("收到了来自于:"+socket.getInetAddress().getHostAddress()+"的数据");} catch (IOException e) {e.printStackTrace();} finally {if (baos != null) {try {baos.close();} catch (IOException e) {e.printStackTrace();}}if (is != null) {try {is.close();} catch (IOException e) {e.printStackTrace();}}if (socket != null) {try {socket.close();} catch (IOException e) {e.printStackTrace();}}if (ss != null) {try {ss.close();} catch (IOException e) {e.printStackTrace();}}}}}
package com.atguigu.java2;import org.junit.Test;import java.io.*;import java.net.InetAddress;import java.net.ServerSocket;import java.net.Socket;import java.net.UnknownHostException;/*实现TCP的网络编程例子2:客户端发送文件给服务端,服务端将文件保存在本地。*/public class TCPTest2 {@Testpublic void client(){Socket socket = null;OutputStream os = null;FileInputStream fis = null;try {//1、socket = new Socket(InetAddress.getByName("127.0.0.1"), 9090);//2、os = socket.getOutputStream();//3、fis = new FileInputStream(new File("java学习路线图.png"));//4、byte[] buffer = new byte[1024];int len;while ((len = fis.read(buffer)) != -1) {os.write(buffer, 0, len);}} catch (IOException e) {e.printStackTrace();} finally {if (fis!=null){try {fis.close();} catch (IOException e) {e.printStackTrace();}}if (os!=null){try {os.close();} catch (IOException e) {e.printStackTrace();}}if (socket!=null){try {socket.close();} catch (IOException e) {e.printStackTrace();}}}}@Testpublic void server(){ServerSocket ss = null;Socket socket = null;InputStream is = null;FileOutputStream fos = null;try {ss = new ServerSocket(9090);socket = ss.accept();is = socket.getInputStream();fos = new FileOutputStream(new File("java学习路线图1.png"));byte[] buffer = new byte[1024];int len;while ((len = is.read(buffer))!=-1){fos.write(buffer,0,len);}} catch (IOException e) {e.printStackTrace();}finally {if (fos!=null){try {fos.close();} catch (IOException e) {e.printStackTrace();}}if (is!=null){try {is.close();} catch (IOException e) {e.printStackTrace();}}if (socket!=null){try {socket.close();} catch (IOException e) {e.printStackTrace();}}if (ss!=null){try {ss.close();} catch (IOException e) {e.printStackTrace();}}}}}
package com.atguigu.java2;import org.junit.Test;import java.io.*;import java.net.InetAddress;import java.net.ServerSocket;import java.net.Socket;/*例题3:从客户端发送文件给服务端,服务端保存到本地。并返回“发送成功”给客户端。并关闭相应的连接。*/public class TCPTest3 {@Testpublic void client() {Socket socket = null;OutputStream os = null;FileInputStream fis = null;InputStream is = null;ByteArrayOutputStream baos = null;try {//1、socket = new Socket(InetAddress.getByName("127.0.0.1"), 9090);//2、os = socket.getOutputStream();//3、fis = new FileInputStream(new File("java学习路线图.png"));//4、byte[] buffer = new byte[1024];int len;while ((len = fis.read(buffer)) != -1) {os.write(buffer, 0, len);}//关闭数据的输出socket.shutdownOutput();//接收来自服务器端的数据,并显示到控制台上is = socket.getInputStream();baos = new ByteArrayOutputStream();byte[] buffer2 = new byte[20];int len2;while ((len2 = is.read(buffer2)) != -1) {baos.write(buffer2, 0, len2);}System.out.println(baos.toString());} catch (IOException e) {e.printStackTrace();} finally {if (fis != null) {try {fis.close();} catch (IOException e) {e.printStackTrace();}}if (os != null) {try {os.close();} catch (IOException e) {e.printStackTrace();}}if (socket != null) {try {socket.close();} catch (IOException e) {e.printStackTrace();}}if (is != null) {try {is.close();} catch (IOException e) {e.printStackTrace();}}if (baos != null) {try {baos.close();} catch (IOException e) {e.printStackTrace();}}}}@Testpublic void server() {ServerSocket ss = null;Socket socket = null;InputStream is = null;FileOutputStream fos = null;OutputStream os = null;try {ss = new ServerSocket(9090);socket = ss.accept();is = socket.getInputStream();fos = new FileOutputStream(new File("java学习路线图2.png"));byte[] buffer = new byte[1024];int len;while ((len = is.read(buffer)) != -1) {fos.write(buffer, 0, len);}System.out.println("图片传输完成");//服务器端给客户端反馈os = socket.getOutputStream();os.write("你好,客户,照片我已经收到了,非常漂亮".getBytes());} catch (IOException e) {e.printStackTrace();} finally {if (fos != null) {try {fos.close();} catch (IOException e) {e.printStackTrace();}}if (is != null) {try {is.close();} catch (IOException e) {e.printStackTrace();}}if (socket != null) {try {socket.close();} catch (IOException e) {e.printStackTrace();}}if (ss != null) {try {ss.close();} catch (IOException e) {e.printStackTrace();}}if (os != null) {try {os.close();} catch (IOException e) {e.printStackTrace();}}}}}
PPT36页,练习题可以试试。
package com.atguigu.java2;import org.junit.Test;import java.io.IOException;import java.net.*;/*UDPd协议的网络编程*/public class UDPTest {//发送端@Testpublic void test1() throws IOException {DatagramSocket socket = new DatagramSocket();String str = "我是UDP方式发送的导弹";byte[] data = str.getBytes();InetAddress inet = InetAddress.getLocalHost();DatagramPacket packet = new DatagramPacket(data,data.length,inet,9090);socket.send(packet);socket.close();}//接收端@Testpublic void test2() throws IOException {DatagramSocket socket = new DatagramSocket(9090);byte[] buffer = new byte[100];DatagramPacket packet = new DatagramPacket(buffer,0,buffer.length);socket.receive(packet);System.out.println(new String(packet.getData(),0,packet.getLength()));socket.close();}}
package com.atguigu.java2;import java.net.MalformedURLException;import java.net.URL;/*URL网络编程1、URL(Uniform Resource Locator):统一资源定位符,它表示 Internet 上某一资源的地址。2、格式:http://localhost:8080/example/beauty.jpg?username=Tom协议 主机名 端口号 资源地址 参数列表*/public class URLTest {public static void main(String[] args){try {URL url = new URL("http://localhost:8080/example/beauty.jpg?username=Tom");// public String getProtocol( ) 获取该URL的协议名System.out.println(url.getProtocol());//http// public String getHost( ) 获取该URL的主机名System.out.println(url.getHost());//localhost// public String getPort( ) 获取该URL的端口号System.out.println(url.getPort());//8080// public String getPath( ) 获取该URL的文件路径System.out.println(url.getPath());///example/beauty.jpg// public String getFile( ) 获取该URL的文件名System.out.println(url.getFile());///example/beauty.jpg?username=Tom// public String getQuery( ) 获取该URL的查询名System.out.println(url.getQuery());//username=Tom} catch (MalformedURLException e) {e.printStackTrace();}}}
package com.atguigu.java2;import java.io.FileOutputStream;import java.io.IOException;import java.io.InputStream;import java.net.HttpURLConnection;import java.net.MalformedURLException;import java.net.URL;import java.net.URLConnection;public class URLTest1 {public static void main(String[] args){HttpURLConnection urlConnection = null;InputStream is = null;FileOutputStream fos = null;try {// URL url = new URL("http://localhost:8080/example/beauty.jpg");URL url = new URL("https://cn.bing.com/images/search?view=detailV2&ccid=JQ%2bVhVrs&id=FCAE6777DDD995B9CF11C3FEF6D5D753230E0706&thid=OIP.JQ-VhVrsScl0rLNrPtMlcQHaE8&mediaurl=https%3a%2f%2ftse1-mm.cn.bing.net%2fth%2fid%2fR-C.250f95855aec49c974acb36b3ed32571%3frik%3dBgcOI1PX1fb%252bww%26riu%3dhttp%253a%252f%252fwww.desktx.com%252fd%252ffile%252fwallpaper%252fscenery%252f20170120%252f387b1a5181ebeddbec90fd5f19e606ce.jpg%26ehk%3dFeb%252bz1leZKOVuTS20av3z7LKELRP0HH277cc6aSrAeI%253d%26risl%3d%26pid%3dImgRaw%26r%3d0&exph=1334&expw=2000&q=%e5%9b%be%e7%89%87&simid=608018209402674333&FORM=IRPRST&ck=77D525DA175DD85099F2804D96188A98&selectedIndex=0&ajaxhist=0&ajaxserp=0");urlConnection = (HttpURLConnection) url.openConnection();urlConnection.connect();is = urlConnection.getInputStream();fos = new FileOutputStream("Day26\\beauty2.jpg");byte[] buffer = new byte[1024];int len;while ((len = is.read(buffer))!=-1){fos.write(buffer,0,len);}System.out.println("下载完成");} catch (IOException e) {e.printStackTrace();} finally {if (fos!=null){try {fos.close();} catch (IOException e) {e.printStackTrace();}}if (is!=null){try {is.close();} catch (IOException e) {e.printStackTrace();}}if (urlConnection!=null){urlConnection.disconnect();}}}}

若有收获,就点个赞吧
0 人点赞
