1 python 2和 3异同
python 2 | python3
str | bytes
unicode | str
python2.x:写入文件前对Unicode编码,读入文件后对字节解码;
python3.x:open函数指定 ‘t’ 的文本模式,endcoding指定编码格式;
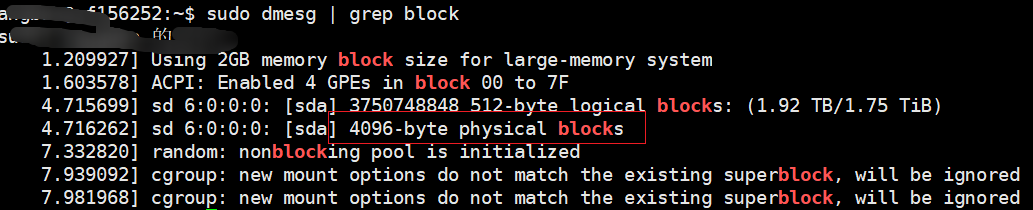
2 读取二进制文件
比如读取wav格式文件,wav格式如下所示:
wav 文件由头部信息和音频采样数据构成,前面为头部信息,包括声道数,采样频率,编码位宽等,后面为采样数据:
inf = f.read(44)inf#b'RIFF\xe4\xb2n\x03WAVEfmt \x10\x00\x00\x00\x01\x00\x02\x00D\xac\x00\x00\x10\xb1\x02\x00\x04\x00\x10\x00data\xc0\xb2n\x03'
inf[22:24] #b'\x02\x00'struct.unpack('h',inf[22:24]) #(2,)struct.unpack('i',inf[24:28])inf.find(b'data') # 36 表示从36 是data数据。
读文件函数
def find_subchunk(f, name):f.seek(12)while True:chunk_name = f.read(4)chunk_size, = struct.unpack('i', f.read(4))if chunk_name == name:return f.tell(), chunk_sizef.seek(chunk_size, 1)
offset, size = find_subchunk(f, b'data')offset, size #(44, 57586368)44 + 57586368 #57586412!ls -l 01.wav # -rwxrw-rw- 1 root root 57586412 Oct 17 11:49 01.wav
文件大小和原来一样,下面进行(数值除以8,音量会减弱)处理并输出
import numpy as npbuf = np.zeros(size//2, dtype=np.short)f.readinto(buf) #57586368buf //=8f2 = open('out.wav', 'wb')info = f.read(offset) # 读到头文件位置f2.write(info) # 写入头文件buf.tofile(f2) # 写入数据f2.close()

小结:
- open函数打开二进制文件,要指定 b
- 二进制数据可以用readinto,读入提前分配好的buffer中;
- 解析二进制数据可以是用标准库中的struct 模块 unpack方法。
3 缓冲功能
将文件写入硬件设备,并不是一致输入到磁盘中,需要经过一个缓冲区,有足够多,才会调用I/o操作,以减少其次数。文件的缓冲行为,分为全缓冲,行缓冲,无缓冲。二进制缓冲
测试二进制缓冲大小
f = open('a.bin', 'wb')f.write(b'abcefg') #6
基本默认是4096个字节的缓冲。若是没有可以看这个:
这里猜测是 4096import ioio.DEFAULT_BUFFER_SIZE #8192
运行完两个,这里还是0字节f.write(b'+'*(4096-6))

再运行下下面的f.write(b'a') # 增加一个,当然最后这个a不会出现在下面,因为开始写入缓冲区。

修改二进制缓冲大小
如下:将其大小修改 为 8192,缓冲区将积累到8192才会写入磁盘。f = open('a.bin', 'wb', buffering=8192)
修改为无缓冲
以下两种方法 都会立马将数据输入缓冲区。法1:f = open('a.bin', 'wb', buffering=0)法2:f.raw.write(b'abc')
文本文件缓冲
f #<_io.BufferedWriter name='a.bin'>ftxt #<_io.TextIOWrapper name='b.txt' mode='w' encoding='UTF-8'>
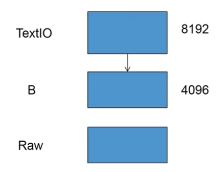
文本有两级缓冲,默认情况下,写入达到8192才会输入磁盘。行缓冲

例如,上面的就是行缓冲文件。遇到换行将会输出;
输入下面没反应ftty = open('/dev/pts/10', 'w')ftty.isatty() #True!ls -lh /dev/pts/10 #crw--w---- 1 root tty 136, 10 Oct 17 13:08 /dev/pts/10
输入下面的会显示ftty.write('avc')ftty.write('ef')
ftty.write('\n')

小结
全缓冲:open函数设置 buffering大于1的整数n(n为缓冲区大小)
行缓冲:open函数设置 buffering等于1
无缓冲:open函数设置 buffering等于0
4 如何将文件映射到内存
需求
- 访问某些二进制文件时,希望文件映射到内存,可以实现随机访问(framebuffer设备文件)
- 某些嵌入设备,寄存器被编制到内存地址空间,可以映射/dev/mem 某范围去访问这些寄存器
- 如果多个进程映射同一个文件,还能实现进程通信的目的。
实验
先创建对应的demo.bin文件,如下所示,通过od -x demo.bin查看: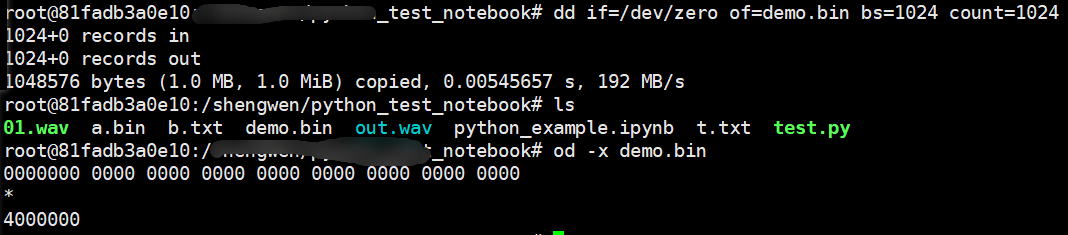
import mmaphelp(mmap)
其中有对应的使用方法:Unix: mmap(fileno, length[, flags[, prot[, access[, offset]]]])
fileno 是对应的文件号,需要查询得到 offset 必须时整数个大小,通过以下查询得到,
f = open('demo.bin', 'r+b')f.fileno() # 61mmap.PAGESIZE #4096
m = mmap.mmap(f.fileno(), 0)m.write(b'abc')
输入上面内容,查看对应变化:
m[0] # 97m[6] # 0m[8:16] = b'\xff'*8

5 查询文件状态
用途
- 文件类型
- 文件访问权限
- 文件访问、修改、节点状态改变的时间
- 普通文件的大小
实验
Linux下shell查看:
```python root@81fadb3a0e10:# ls -lh total 111M -rwxrw-rw- 1 root root 55M Oct 17 11:49 01.wav -rw-r—r— 1 root root 4.1K Oct 17 13:16 a.bin -rw-r—r— 1 root root 13K Oct 17 13:16 b.txt -rw-r—r— 1 root root 1.0M Oct 17 14:01 demo.bin -rw-r—r— 1 root root 55M Oct 17 12:14 out.wav -rw-r—r— 1 root root 76K Oct 17 14:05 python_example.ipynb -rw-r—r— 1 root root 80 Oct 17 09:20 t.txt -rwxr—r— 1 root root 0 Oct 17 03:29 test.py
<a name="fX0w5"></a>## python下调用<a name="iM0HR"></a>### 方法1:系统调用 os模块```pythons.st_mode & stat.S_IFBLK #0s.st_mode & stat.S_IFREG #32768import timetime.localtime(s.st_atime) #(tm_year=2021, tm_mon=10, tm_mday=17, tm_hour=14, tm_min=35, tm_sec=43, tm_wday=6, tm_yday=290, tm_isdst=0)!ls -lh b.txt #-rw-r--r-- 1 root root 13K Oct 17 13:16 b.txt
方法2:快捷函数 os.path
os.path.isdir('b.txt')  #False
os.path.isfile('b.txt') #True

os.path.getsize('b.txt') #12294
os.path.getatime('b.txt')  #1634481343.2378957
time.localtime(os.path.getatime('b.txt'))  #(tm_year=2021, tm_mon=10, tm_mday=17, tm_hour=14, tm_min=35, tm_sec=43, tm_wday=6, tm_yday=290, tm_isdst=0)
6 如何使用临时文件
1 场景
采集数据,没收集1G数据后做数据分析,分析后只要结果,这样会有大量数据占用内存,我们可以使用临时文件存储这个些。
临时文件不用命名,且关闭后自动删除(这个是默认设置,也可以根据续期需求更改)
2 使用方法
使用标准库中的TemporaryFile 以及NamedTemporaryFile
TemporaryFile
from tempfile import TemporaryFile, NamedTemporaryFile
help(TemporaryFile)
#TemporaryFile(mode='w+b', buffering=-1, encoding=None, newline=None, suffix=None, prefix=None, dir=None)
# 写入2G数据
tf = TemporaryFile()
tf.write(b'a'*1024*1024*1024*2)
tf.name  #65  不会落盘

tf.seek(0) #0    回到文件首
tf.read(24) #b'aaaaaaaaaaaaaaaaaaaaaaaa'
内存使用前后的差异:
ls不能看到磁盘上有该文件,但是可以看到磁盘空间的变化。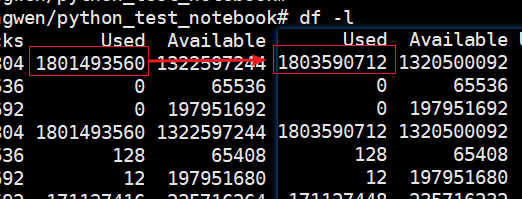
tf.close()
NamedTemporaryFile
这种形式再磁盘上可查,位置在/tmp/下面
ntf = NamedTemporaryFile()
help(NamedTemporaryFile)
#NamedTemporaryFile(mode='w+b', buffering=-1, encoding=None, newline=None, suffix=None, prefix=None, dir=None, delete=True)

ntf.name  #'/tmp/tmp2jy5tz3v'   显示

import tempfile
tempfile.gettempdir()   #'/tmp'
tempfile.gettempprefix()  #'/tmp'
close会删除掉临时文件
ls -lh /tmp/tmp2jy5tz3v  #-rw------- 1 root root 0 Oct 18 00:46 /tmp/tmp2jy5tz3v

ntf.close()
ls -lh /tmp/tmp2jy5tz3v  #ls: cannot access '/tmp/tmp2jy5tz3v': No such file or directory
可控制close不删除
ntf = NamedTemporaryFile(delete=False)
ntf.name

ls -lh '/tmp/tmp7hp75v7k' # -rw------- 1 root root 0 Oct 18 01:00 /tmp/tmp7hp75v7k
ntf.close()
ls -lh '/tmp/tmp7hp75v7k' # -rw------- 1 root root 0 Oct 18 01:00 /tmp/tmp7hp75v7k
3 建议
一般使用TemporaryFile,用完就删除,不过偶尔会使用 NamedTemporaryFile(当多个进程或线程共享资源的时候)
7 xls,xlsx文件
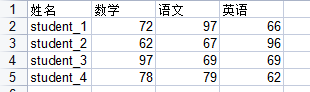
使用第三方库xlrd,xlwt,用于读写excel表格,先来写个表格吧,要不玩不了:
import random
import xlwt
wbook = xlwt.Workbook()
wsheet = wbook.add_sheet('test')
wsheet.write(0, 0, '姓名')
wsheet.write(0, 1, '数学')
wsheet.write(0, 2, '语文')
wsheet.write(0, 3, '英语')
for i in range(1,5):
    wsheet.write(i, 0, f'student_{i}')
    for j in range(1,4):
        wsheet.write(i, j, random.randint(60,100))
wbook.save('report.xlsx')
基础知识
根据上面表格,做一些属性探究,不知道的函数参数,可以使用 ? 打印下。
import xlrd
rb = xlrd.open_workbook('report.xlsx')
rb                             #<xlrd.book.Book at 0x200e7e72f10>
sheet = rb.sheet_by_index(0)
sheet                          #<xlrd.sheet.Sheet at 0x200e4f89790>
sheet.nrows   # 5  行的数量
sheet.ncols   # 4  列的数量

# 按照行读取
sheet.row(0)  #[text:'姓名', text:'数学', text:'语文', text:'英语']
sheet.row_values(0)  #['姓名', '数学', '语文', '英语']
sheet.row_values(1)  # ['student_1', 72.0, 97.0, 66.0]
sheet.row_values(1)  #[72.0, 97.0, 66.0]
# 写入数据
sheet.put_cell(0, sheet.ncols, xlrd.XL_CELL_TEXT, '总分', None)

#不知道的,可以调用查看
sheet.row_values?
# Signature: sheet.row_values(rowx, start_colx=0, end_colx=None)
# Docstring: Returns a slice of the values of the cells in the given row.
# File:      c:\programdata\anaconda3\lib\site-packages\xlrd\sheet.py
# Type:      method


# 按照单元格读取
c00 = sheet.cell(0, 0)
c00  #text:'姓名'
c00.ctype  #1  和 xlrd.XL_CELL_TEXT 一样,数值为xlrd.XL_CELL_NUMBER
c00.value  #'姓名'
实例
# 读写实例
import xlrd,xlwt
rbook = xlrd.open_workbook('report.xlsx')
rsheet = rbook.sheet_by_index(0)  #读取第一个sheet

k = rsheet.ncols
rsheet.put_cell(0, k, xlrd.XL_CELL_TEXT, '总分', None)
#总分列数据相加
for i in range(1, rsheet.nrows):
    t = sum(rsheet.row_values(i,1))
    rsheet.put_cell(i, k, xlrd.XL_CELL_NUMBER, t, None)

wbook = xlwt.Workbook()
wsheet = wbook.add_sheet(rsheet.name)

for i in range(rsheet.nrows):
    for j in range(rsheet.ncols):
        wsheet.write(i, j, rsheet.cell_value(i, j))
wbook.save('report_out.xlsx')
结果: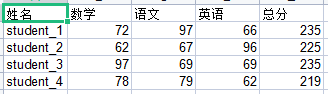

若有收获,就点个赞吧
0 人点赞
