Maven高级
1.maven基础知识回顾
1.1 maven介绍
maven 是一个项目管理工具,主要作用是在项目开发阶段对Java项目进行依赖管理和项目构建。
依赖管理:就是对jar包的管理。通过导入maven坐标,就相当于将仓库中的jar包导入了当前项目中。
项目构建:通过maven的一个命令就可以完成项目从清理、编译、测试、报告、打包,部署整个过程。
1.2 maven的仓库类型
1.本地仓库
2.远程仓库
①maven中央仓库(地址:http://repo2.maven.org/maven2/)
②maven私服(公司局域网内的仓库,需要自己搭建)
③其他公共远程仓库(例如apache提供的远程仓库,地址:http://repo.maven.apache.org/maven2/)
1.3 maven常用命令
clean: 清理
compile:编译
test: 测试
package:打包
install: 安装
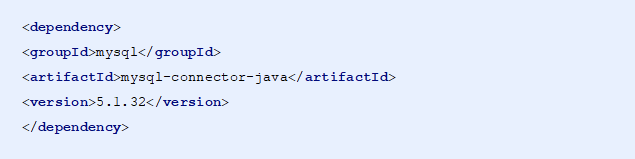
1.4 maven坐标书写规范
1.5 maven的依赖范围
| 依赖范围 | 对于编译classpath有效 | 对于测试classpath有效 | 对于运行时classpath有效 | 例子 |
|---|---|---|---|---|
| compile | Y | Y | Y | spring-core |
| test | - | Y | - | Junit |
| provided | Y | Y | - | servlet-api |
| runtime | - | Y | Y | JDBC驱动 |
| system | Y | Y | - | 本地的,maven仓库之外的类库 |
2. maven的依赖传递
2.1 什么是依赖传递
在maven中,依赖是可以传递的,假设存在三个项目,分别是项目A,项目B以及项目C。假设C依赖B,B依赖A,那么我们可以根据maven项目依赖的特征不难推出项目C也依赖A。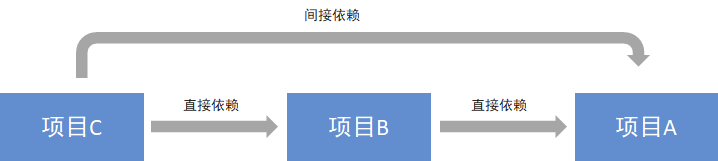
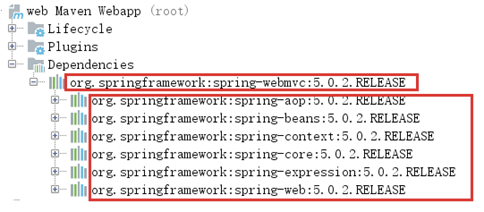
通过上面的图可以看到,我们的web项目直接依赖了spring-webmvc,而spring-webmvc依赖了sping-aop、spring-beans等。最终的结果就是在我们的web项目中间接依赖了spring-aop、spring-beans等。
2.2 什么是依赖冲突
由于依赖传递现象的存在, spring-webmvc 依赖 spirng-beans-4.2.4,spring-aop 依赖 spring-beans-5.0.2,但是发现 spirng-beans-4.2.4 加入到了工程中,而我们希望 spring-beans-5.0.2 加入工程。这就造成了依赖冲突。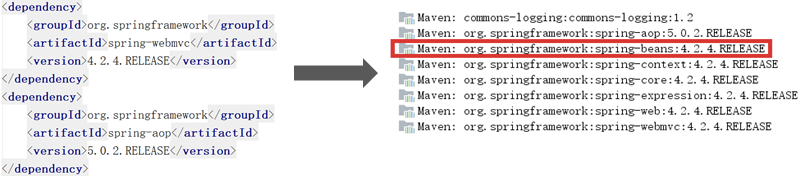
2.3 如何解决依赖冲突
1.使用maven提供的依赖调解原则
第一声明者优先原则
2.4 依赖调节原则——第一声明者优先原则
在 pom 文件中定义依赖,以先声明的依赖为准。其实就是根据坐标导入的顺序来确定最终使用哪个传递过来的依赖。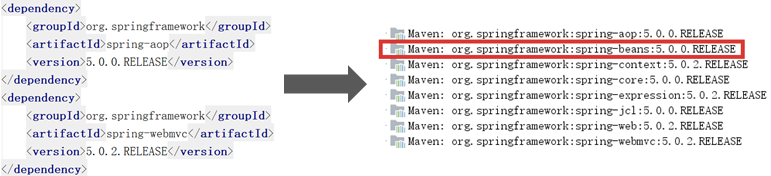
结论:通过上图可以看到,spring-aop和spring-webmvc都传递过来了spring-beans,但是因为spring-aop在前面,所以最终使用的spring-beans是由spring-aop传递过来的,而spring-webmvc传递过来的spring-beans则被忽略了。
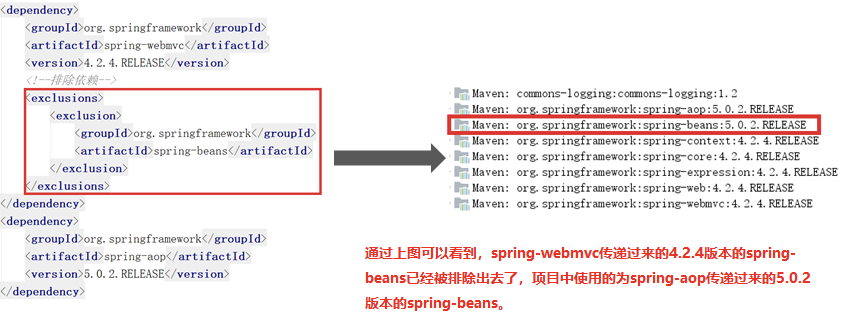
2.5 排除依赖
2.6 版本锁定
采用直接锁定版本的方法确定依赖jar包的版本,版本锁定后则不考虑依赖的声明顺序或依赖的路径,以锁定的版本为准添加到工程中,此方法在企业开发中经常使用。
版本锁定的使用方式:
第一步:在dependencyManagement标签中锁定依赖的版本
第二步:在dependencies标签中声明需要导入的maven坐标
①在dependencyManagement标签中锁定依赖的版本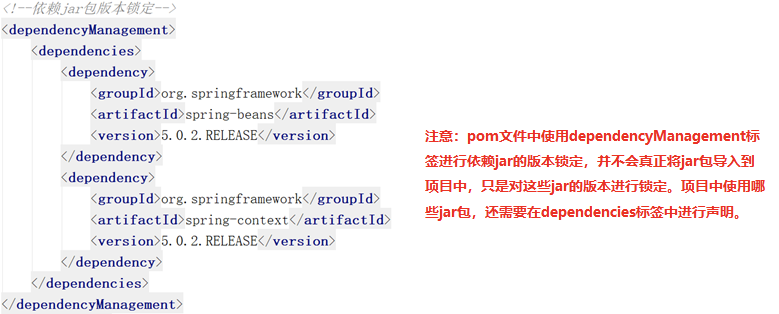
②在dependencies标签中声明需要导入的maven坐标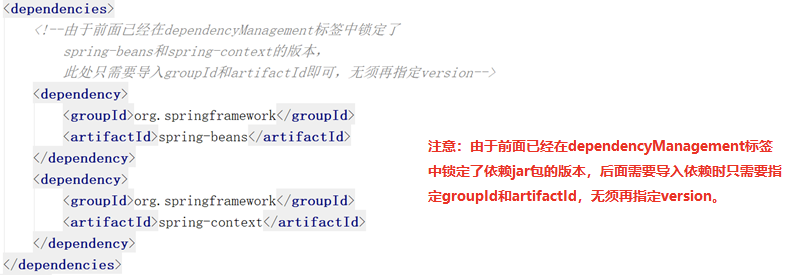
3.基于maven构建SSM工程案例
3.1 需求描述
本案例基于maven构建 SSM(Spring+SpringMVC+Mybatis)工程,通过maven坐标进行依赖管理。最终实现根据 id 查询商品信息的功能。
3.2 构建maven工程
1.数据库环境搭建
①创建数据库ssmtest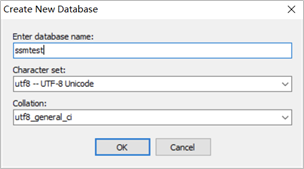
②创建商品表item
CREATE TABLE `item` (`id` int(11) NOT NULL auto_increment,`name` varchar(255) default NULL,`price` float default NULL,`createtime` datetime default NULL,`detail` varchar(255) default NULL,PRIMARY KEY (`id`)) ENGINE=InnoDB DEFAULT CHARSET=utf8
2.maven项目构建
①创建maven web项目
②配置pom.xml文件
③实现spring+mybatis整合
创建POJO类
public class Item {private Integer id;private String name;private Float price;private Date createtime;private String detail;//省略setter、getter}
持久层DAO接口编写
public interface ItemMapper {public Item findById(int id);}
Mapper映射文件编写
<?xml version="1.0" encoding="UTF-8" ?><!DOCTYPE mapper PUBLIC "-//mybatis.org//DTD Mapper 3.0//EN""http://mybatis.org/dtd/mybatis-3-mapper.dtd"><mapper namespace="com.itheima.ssm.dao.ItemMapper"><select id="findById" parameterType="int" resultType="item">select * from item where id=#{id}</select></mapper>
业务层Service编写
package com.itheima.ssm.service;import com.itheima.ssm.pojo.Item;public interface ItemService {public Items findById(int id);}
@Service@Transactionalpublic class ItemServiceImpl implements ItemService {@Autowiredprivate ItemMapper itemMapper;public Item findById(int id) {return itemMapper.findById(id);}}
spring配置文件applicationContext-dao.xml编写
<?xml version="1.0" encoding="UTF-8"?><beans xmlns="http://www.springframework.org/schema/beans" xmlns:context="http://www.springframework.org/schema/context" xmlns:p="http://www.springframework.org/schema/p" xmlns:aop="http://www.springframework.org/schema/aop" xmlns:tx="http://www.springframework.org/schema/tx" xmlns:xsi="http://www.w3.org/2001/XMLSchema-instance" xsi:schemaLocation="http://www.springframework.org/schema/bean http://www.springframework.org/schema/beans/spring-beans-4.0.xsd http://www.springframework.org/schema/context http://www.springframework.org/schema/context/spring-context-4.0.xsd http://www.springframework.org/schema/aop http://www.springframework.org/schema/aop/spring-aop-4.0.xsd http://www.springframework.org/schema/tx http://www.springframework.org/schema/tx/spring-tx-4.0.xsd http://www.springframework.org/schema/util http://www.springframework.org/schema/util/spring-util-4.0.xsd"><!-- 数据库连接池 --><bean id="dataSource" class="com.alibaba.druid.pool.DruidDataSource"><!-- 驱动 --><property name="driverClassName" value="com.mysql.jdbc.Driver"/><!-- url --><property name="url" value="jdbc:mysql://localhost:3306/ssmtest"/><!-- 用户名 --><property name="username" value="root"/><!-- 密码 --><property name="password" value="root"/></bean><!-- mapper配置 --> <!-- 让spring管理sqlsessionfactory 使用mybatis和spring整合包中的 --> <bean id="sqlSessionFactory" class="org.mybatis.spring.SqlSessionFactoryBean"> <!-- 数据库连接池 --><property name="dataSource" ref="dataSource"/><!--为指定包下的所有实体类创建别名--><property name="typeAliasesPackage" value="com.itheima.ssm.pojo"/></bean><!-- mapper扫描器 :用来产生代理对象--><bean class="org.mybatis.spring.mapper.MapperScannerConfigurer"><property name="basePackage" value="com.itheima.ssm.dao"></property></bean></beans>
spring配置文件applicationContext-service.xml编写
④加入springmvc相关配置
表现层Controller编写
@Controller@RequestMapping("/item")public class ItemController {@Autowiredprivate ItemService itemService;@RequestMapping("/showItem/{id}")public String showItem(@PathVariable("id") int id, Model model){Item item = itemService.findById(id);model.addAttribute("item",item);return "item";}}
springmvc.xml文件编写
<?xml version="1.0" encoding="UTF-8"?><beans xmlns="http://www.springframework.org/schema/beans" xmlns:context="http://www.springframework.org/schema/context" xmlns:xsi="http://www.w3.org/2001/XMLSchema-instance" xsi:schemaLocation="http://www.springframework.org/schema/beans http://www.springframework.org/schema/beans/spring-beans-4.0.xsd http://www.springframework.org/schema/context http://www.springframework.org/schema/context/spring-context-4.0.xsd"> <context:component-scan base-package="com.itheima.ssm.controller"/><!-- 配置视图解析器的前缀和后缀 --><bean class="org.springframework.web.servlet.view.InternalResourceViewResolver"> <property name="prefix“ value="/WEB-INF/jsp/"></property><property name="suffix" value=".jsp"></property></bean></beans>
4.分模块构建maven工程
4.1 分模块构建maven工程分析
在现实生活中,汽车厂家进行汽车生产时,由于整个生产过程非常复杂和繁琐,工作量非常大,所以车场都会将整个汽车的部件分开生产,最终再将生产好的部件进行组装,形成一台完整的汽车。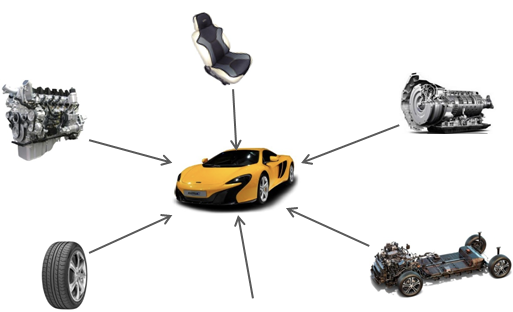
4.2 maven工程的继承
在Java语言中,类之间是可以继承的,通过继承,子类就可以引用父类中非private的属性和方法。同样,在maven工程之间也可以继承,子工程继承父工程后,就可以使用在父工程中引入的依赖。继承的目的是为了消除重复代码。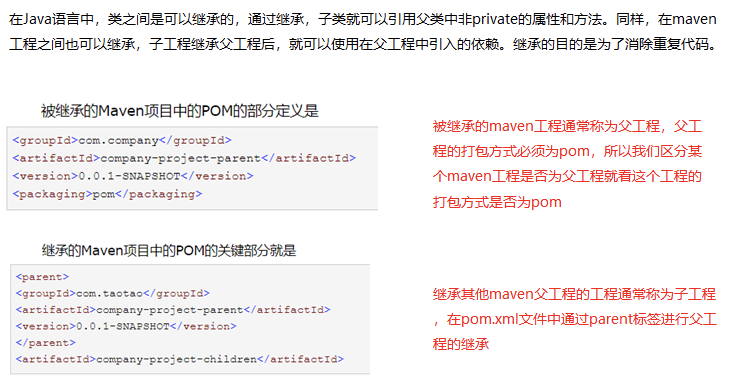
4.3 maven工程的聚合
在maven工程的pom.xml文件中可以使用标签将其他maven工程聚合到一起,聚合的目的是为了进行统一操作。
例如拆分后的maven工程有多个,如果要进行打包,就需要针对每个工程分别执行打包命令,操作起来非常繁琐。这时就可以使用标签将这些工程统一聚合到maven工程中,需要打包的时候,只需要在此工程中执行一次打包命令,其下被聚合的工程就都会被打包了。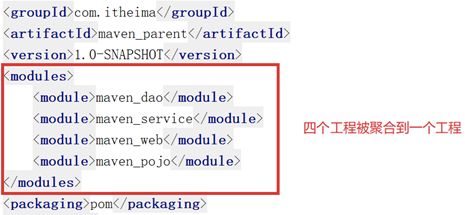
4.4 分模块构建maven工程具体实现
①父工程maven_parent构建
<properties><spring.version>5.0.5.RELEASE</spring.version><springmvc.version>5.0.5.RELEASE</springmvc.version><mybatis.version>3.4.5</mybatis.version></properties><!--锁定jar版本--><dependencyManagement><dependencies><!-- Mybatis --><dependency><groupId>org.mybatis</groupId><artifactId>mybatis</artifactId><version>${mybatis.version}</version></dependency><!-- springMVC --><dependency><groupId>org.springframework</groupId><artifactId>spring-webmvc</artifactId><version>${springmvc.version}</version></dependency><!-- spring --><dependency><groupId>org.springframework</groupId><artifactId>spring-context</artifactId><version>${spring.version}</version></dependency><dependency><groupId>org.springframework</groupId><artifactId>spring-core</artifactId><version>${spring.version}</version></dependency><dependency><groupId>org.springframework</groupId><artifactId>spring-aop</artifactId><version>${spring.version}</version></dependency><dependency><groupId>org.springframework</groupId><artifactId>spring-web</artifactId><version>${spring.version}</version></dependency><dependency><groupId>org.springframework</groupId><artifactId>spring-expression</artifactId><version>${spring.version}</version></dependency><dependency><groupId>org.springframework</groupId><artifactId>spring-beans</artifactId><version>${spring.version}</version></dependency><dependency><groupId>org.springframework</groupId><artifactId>spring-aspects</artifactId><version>${spring.version}</version></dependency><dependency><groupId>org.springframework</groupId><artifactId>spring-context-support</artifactId><version>${spring.version}</version></dependency><dependency><groupId>org.springframework</groupId><artifactId>spring-test</artifactId><version>${spring.version}</version></dependency><dependency><groupId>org.springframework</groupId><artifactId>spring-jdbc</artifactId><version>${spring.version}</version></dependency><dependency><groupId>org.springframework</groupId><artifactId>spring-tx</artifactId><version>${spring.version}</version></dependency></dependencies></dependencyManagement><build><plugins><plugin><groupId>org.apache.maven.plugins</groupId><artifactId>maven-compiler-plugin</artifactId><version>3.1</version><configuration><source>1.8</source><target>1.8</target><encoding>UTF-8</encoding></configuration></plugin></plugins></build>
②子工程maven_pojo构建
pom.xml
<dependencies><dependency><groupId>log4j</groupId><artifactId>log4j</artifactId><version>1.2.12</version></dependency><dependency><groupId>c3p0</groupId><artifactId>c3p0</artifactId><version>0.9.1.2</version></dependency></dependencies>
③3.1子工程maven_dao构建
3.2 配置maven_dao工程的pom.xml文件
<dependencies><dependency><groupId>com.itheima</groupId><artifactId>maven_pojo</artifactId><version>1.0-SNAPSHOT</version></dependency><!-- Mybatis和mybatis与spring的整合 --><dependency><groupId>org.mybatis</groupId><artifactId>mybatis</artifactId></dependency><dependency><groupId>org.mybatis</groupId><artifactId>mybatis-spring</artifactId><version>1.3.1</version></dependency><!-- MySql驱动 --><dependency><groupId>mysql</groupId><artifactId>mysql-connector-java</artifactId><version>5.1.32</version></dependency><!-- druid数据库连接池 --><dependency><groupId>com.alibaba</groupId><artifactId>druid</artifactId><version>1.0.9</version></dependency><!-- spring相关 --><dependency><groupId>org.springframework</groupId><artifactId>spring-context</artifactId></dependency><dependency><groupId>org.springframework</groupId><artifactId>spring-core</artifactId></dependency><dependency><groupId>org.springframework</groupId><artifactId>spring-aop</artifactId></dependency><dependency><groupId>org.springframework</groupId><artifactId>spring-expression</artifactId></dependency><dependency><groupId>org.springframework</groupId><artifactId>spring-beans</artifactId></dependency><dependency><groupId>org.springframework</groupId><artifactId>spring-aspects</artifactId></dependency><dependency><groupId>org.springframework</groupId><artifactId>spring-context-support</artifactId></dependency><dependency><groupId>org.springframework</groupId><artifactId>spring-test</artifactId></dependency><dependency><groupId>org.springframework</groupId><artifactId>spring-jdbc</artifactId></dependency><dependency><groupId>org.springframework</groupId><artifactId>spring-tx</artifactId></dependency><!-- junit测试 --><dependency><groupId>junit</groupId><artifactId>junit</artifactId><version>4.12</version></dependency></dependencies>
3.3 创建DAO接口和Mapper映射文件
package com.itheima.ssm.dao;import com.itheima.ssm.pojo.Item;public interface ItemMapper {public Item findById(int id);}
<?xml version="1.0" encoding="UTF-8" ?><!DOCTYPE mapper PUBLIC "-//mybatis.org//DTD Mapper 3.0//EN""http://mybatis.org/dtd/mybatis-3-mapper.dtd"><mapper namespace="com.itheima.ssm.dao.ItemMapper"><select id="findById" parameterType="int" resultType="Item">select * from item where id = #{id}</select></mapper>
3.4 在resources目录下创建spring配置文件applicationContext-dao.xml
<?xml version="1.0" encoding="UTF-8"?><beans xmlns="http://www.springframework.org/schema/beans"xmlns:context="http://www.springframework.org/schema/context"xmlns:p="http://www.springframework.org/schema/p"xmlns:aop="http://www.springframework.org/schema/aop"xmlns:tx="http://www.springframework.org/schema/tx"xmlns:xsi="http://www.w3.org/2001/XMLSchema-instance"xsi:schemaLocation="http://www.springframework.org/schema/beanshttp://www.springframework.org/schema/beans/spring-beans.xsdhttp://www.springframework.org/schema/contexthttp://www.springframework.org/schema/context/spring-context.xsdhttp://www.springframework.org/schema/aophttp://www.springframework.org/schema/aop/spring-aop.xsdhttp://www.springframework.org/schema/txhttp://www.springframework.org/schema/tx/spring-tx.xsd"><!--配置数据源信息,使用druid连接池--><bean id="dataSource" class="com.alibaba.druid.pool.DruidDataSource"><property name="driverClassName" value="com.mysql.jdbc.Driver"/><property name="url" value="jdbc:mysql://localhost:3306/ssmtest"/><property name="username" value="root"/><property name="password" value="root"/></bean><!--配置spring整合mybatis框架的SQLSessionFactoryBean--><bean id="sqlSessionFactory" class="org.mybatis.spring.SqlSessionFactoryBean"><property name="dataSource" ref="dataSource"/><!--扫描pojo包,为实体类创建别名--><property name="typeAliasesPackage" value="com.itheima.ssm.pojo"/></bean><!--mapper扫描器,用于产生代理对象--><bean class="org.mybatis.spring.mapper.MapperScannerConfigurer"><property name="basePackage" value="com.itheima.ssm.dao"/></bean></bean
④子工程maven_service构建
第一步:创建maven_service工程
第二步:配置maven_service工程的pom.xml文件
<dependencies><dependency><groupId>com.itheima</groupId><artifactId>maven_dao</artifactId><version>1.0-SNAPSHOT</version></dependency></dependencies>
第三步:创建Service接口和实现类
package com.itheima.ssm.service;import com.itheima.ssm.pojo.Item;public interface ItemService {public Item findById(int id);}
package com.itheima.ssm.service;import com.itheima.ssm.dao.ItemMapper;import com.itheima.ssm.pojo.Item;import org.springframework.beans.factory.annotation.Autowired;import org.springframework.stereotype.Service;import org.springframework.transaction.annotation.Transactional;@Service@Transactionalpublic class ItemServiceImpl implements ItemService {@Autowiredprivate ItemMapper itemMapper;public Item findById(int id) {return itemMapper.findById(id);}}
第四步:创建spring配置文件applicationContext-service.xml
<?xml version="1.0" encoding="UTF-8"?><beans xmlns="http://www.springframework.org/schema/beans"xmlns:context="http://www.springframework.org/schema/context"xmlns:p="http://www.springframework.org/schema/p"xmlns:aop="http://www.springframework.org/schema/aop"xmlns:tx="http://www.springframework.org/schema/tx"xmlns:xsi="http://www.w3.org/2001/XMLSchema-instance"xsi:schemaLocation="http://www.springframework.org/schema/beanshttp://www.springframework.org/schema/beans/spring-beans.xsdhttp://www.springframework.org/schema/contexthttp://www.springframework.org/schema/context/spring-context.xsdhttp://www.springframework.org/schema/aophttp://www.springframework.org/schema/aop/spring-aop.xsdhttp://www.springframework.org/schema/txhttp://www.springframework.org/schema/tx/spring-tx.xsd"><!--配置扫描器,扫描Service--><context:component-scan base-package="com.itheima.ssm.service"/><!--事务管理器--><bean id="transactionManager" class="org.springframework.jdbc.datasource.DataSourceTransactionManager"><property name="dataSource" ref="dataSource"/></bean><!--事物注解驱动--><tx:annotation-driven transaction-manager="transactionManager"/></beans>
⑤子工程maven_web构建
第一步:创建maven_web工程,注意打包方式为war
第二步:配置maven_web工程的pom.xml文件
UTF-8 1.8 1.8
<dependencies><dependency><groupId>com.itheima</groupId><artifactId>maven_service</artifactId><version>1.0-SNAPSHOT</version></dependency><dependency><groupId>org.springframework</groupId><artifactId>spring-webmvc</artifactId></dependency></dependencies><build><finalName>maven_web</finalName><pluginManagement><!-- lock down plugins versions to avoid using Maven defaults (may be moved to parent pom) --><plugins><plugin><artifactId>maven-clean-plugin</artifactId><version>3.1.0</version></plugin><!-- see http://maven.apache.org/ref/current/maven-core/default-bindings.html#Plugin_bindings_for_war_packaging --><plugin><artifactId>maven-resources-plugin</artifactId><version>3.0.2</version></plugin><plugin><artifactId>maven-compiler-plugin</artifactId><version>3.8.0</version></plugin><plugin><artifactId>maven-surefire-plugin</artifactId><version>2.22.1</version></plugin><plugin><artifactId>maven-war-plugin</artifactId><version>3.2.2</version></plugin><plugin><artifactId>maven-install-plugin</artifactId><version>2.5.2</version></plugin><plugin><artifactId>maven-deploy-plugin</artifactId><version>2.8.2</version></plugin></plugins></pluginManagement></build>
第三步:创建Controller
package com.itheima.ssm.controller;import com.itheima.ssm.pojo.Item;import com.itheima.ssm.service.ItemService;import org.springframework.beans.factory.annotation.Autowired;import org.springframework.stereotype.Controller;import org.springframework.ui.Model;import org.springframework.web.bind.annotation.PathVariable;import org.springframework.web.bind.annotation.RequestMapping;@Controller@RequestMapping("/item")public class ItemController {@Autowiredprivate ItemService itemService;@RequestMapping("/showItem/{id}")public String findById(@PathVariable("id") int id, Model model){Item item = itemService.findById(id);model.addAttribute("item",item);return "item";}}
第四步:创建jsp页面
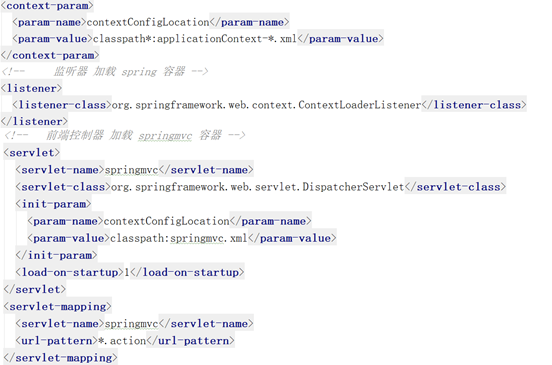
第五步:配置web.xml
<!--指定Spring配置文件位置--><context-param><param-name>contextConfigLocation</param-name><param-value>classpath*:applicationContext*.xml</param-value></context-param><!--配置Spring框架启动时使用的监听器--><listener><listener-class>org.springframework.web.context.ContextLoaderListener</listener-class></listener><!--配置SpringMVC的前端控制器--><servlet><servlet-name>springmvc</servlet-name><servlet-class>org.springframework.web.servlet.DispatcherServlet</servlet-class><init-param><param-name>contextConfigLocation</param-name><param-value>classpath:springmvc.xml</param-value></init-param></servlet><servlet-mapping><servlet-name>springmvc</servlet-name><url-pattern>*.do</url-pattern></servlet-mapping>
第六步:创建springmvc配置文件springmvc.xml
<?xml version="1.0" encoding="UTF-8"?><beans xmlns="http://www.springframework.org/schema/beans"xmlns:context="http://www.springframework.org/schema/context"xmlns:p="http://www.springframework.org/schema/p"xmlns:aop="http://www.springframework.org/schema/aop"xmlns:tx="http://www.springframework.org/schema/tx"xmlns:xsi="http://www.w3.org/2001/XMLSchema-instance"xsi:schemaLocation="http://www.springframework.org/schema/beanshttp://www.springframework.org/schema/beans/spring-beans.xsdhttp://www.springframework.org/schema/contexthttp://www.springframework.org/schema/context/spring-context.xsdhttp://www.springframework.org/schema/aophttp://www.springframework.org/schema/aop/spring-aop.xsdhttp://www.springframework.org/schema/txhttp://www.springframework.org/schema/tx/spring-tx.xsd"><!--配置扫描器,扫描Controller--><context:component-scan base-package="com.itheima.ssm.controller"/><!--视图解析器--><bean class="org.springframework.web.servlet.view.InternalResourceViewResolver"><property name="prefix" value="/WEB-INF/jsp/"/><property name="suffix" value=".jsp"/></bean></beans>
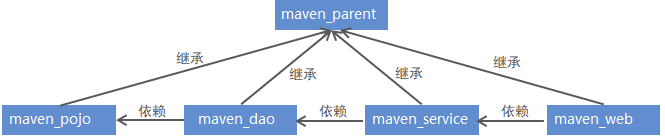
项目整体结构如下:
1)maven_parent为父工程,其余工程为子工程,都继承父工程maven_parent
2)maven_parent工程将其子工程都进行了聚合
3)子工程之间存在依赖关系,比如maven_dao依赖, maven_pojo、maven_service依赖maven_dao、 maven_web依赖maven_service
5. maven私服
5.1 私服说明
maven仓库分为本地仓库和远程仓库,而远程仓库又分为maven中央仓库、其他远程仓库和私服(私有服务器)。其中,中央仓库是由maven官方提供的,而私服就需要我们自己搭建了。
maven私服就是公司局域网内的maven远程仓库,每个员工的电脑上安装maven软件并且连接maven私服,程序员可以将自己开发的项目打成jar并发布到私服,其它项目组成员就可以从私服下载所依赖的jar。私服还充当一个代理服务器的角色,当私服上没有jar包时会从maven中央仓库自动下载。
nexus 是一个maven仓库管理器(其实就是一个软件),nexus可以充当maven私服,同时nexus还提供强大的仓库管理、构件搜索等功能。
5.2 搭建maven私服
①下载nexus
https://help.sonatype.com/repomanager2/download/download-archives—-repository-manager-oss
②安装nexus
将下载的压缩包进行解压,进入bin目录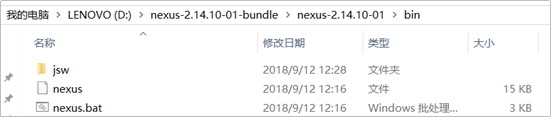
打开cmd窗口并进入上面bin目录下,执行nexus.bat install命令安装服务(注意需要以管理员身份运行cmd命令)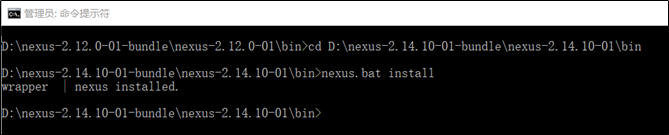
③启动nexus
经过前面命令已经完成nexus的安装,可以通过如下两种方式启动nexus服务:
在Windows系统服务中启动nexus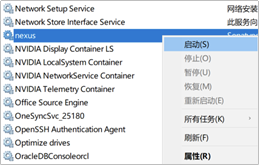
在命令行执行nexus.bat start命令启动nexus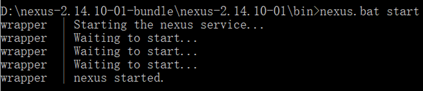
④访问nexus
启动nexus服务后,访问http://localhost:8081/nexus
点击右上角LogIn按钮,进行登录。使用默认用户名admin和密码admin123登录系统
登录成功后点击左侧菜单Repositories可以看到nexus内置的仓库列表(如下图)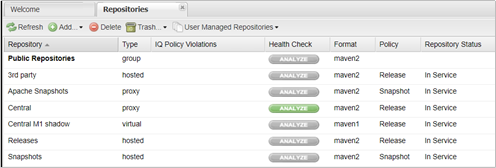
nexus仓库类型
通过前面的仓库列表可以看到,nexus默认内置了很多仓库,这些仓库可以划分为4种类型,每种类型的仓库用于存放特定的jar包,具体说明如下:
①hosted,宿主仓库,部署自己的jar到这个类型的仓库,包括Releases和Snapshots两部分,Releases为公司内部发布版本仓库、 Snapshots为公司内部测试版本仓库
②proxy,代理仓库,用于代理远程的公共仓库,如maven中央仓库,用户连接私服,私服自动去中央仓库下载jar包或者插件
③group,仓库组,用来合并多个hosted/proxy仓库,通常我们配置自己的maven连接仓库组
④virtual(虚拟):兼容Maven1版本的jar或者插件
nexus仓库类型与安装目录对应关系
5.3 将项目发布到maven私服
maven私服是搭建在公司局域网内的maven仓库,公司内的所有开发团队都可以使用。例如技术研发团队开发了一个基础组件,就可以将这个基础组件打成jar包发布到私服,其他团队成员就可以从私服下载这个jar包到本地仓库并在项目中使用。
将项目发布到maven私服操作步骤如下:
配置maven的settings.xml文件
<server><id>releases</id><username>admin</username><password>admin123</password></server><server><id>snapshots</id><username>admin</username><password>admin123</password></server>
注意:一定要在idea工具中引入的maven的settings.xml文件中配置
配置项目的pom.xml文件
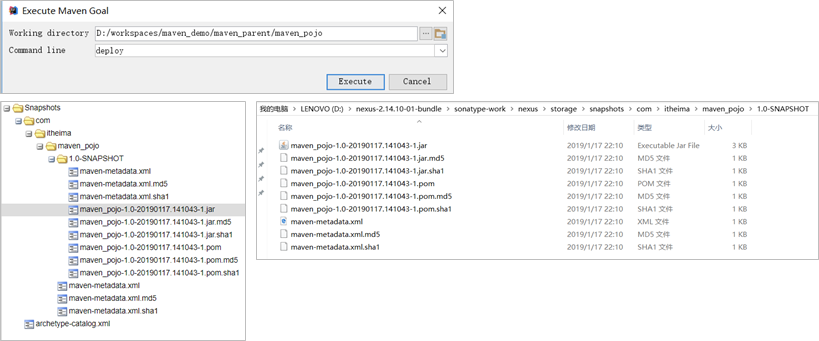
<distributionManagement><repository><id>releases</id><url>http://localhost:8081/nexus/content/repositories/releases/</url></repository><snapshotRepository><id>snapshots</id> <url>http://localhost:8081/nexus/content/repositories/snapshots/</url> </snapshotRepository></distributionManagement>
执行mvn deploy命令
5.4 从私服下载jar到本地仓库
前面我们已经完成了将本地项目打成jar包发布到maven私服,下面我们就需要从maven私服下载jar包到本地仓库。
具体操作步骤如下:
在maven的settings.xml文件中配置下载模板
<profile><id>dev</id><repositories><repository><id>nexus</id><!--仓库地址,即nexus仓库组的地址--><url>http://localhost:8081/nexus/content/groups/public/</url><!--是否下载releases构件--><releases><enabled>true</enabled></releases><!--是否下载snapshots构件--><snapshots><enabled>true</enabled></snapshots></repository></repositories><pluginRepositories><!-- 插件仓库,maven的运行依赖插件,也需要从私服下载插件 --><pluginRepository><id>public</id><name>Public Repositories</name><url>http://localhost:8081/nexus/content/groups/public/</url></pluginRepository></pluginRepositories></profile>
在maven的settings.xml文件中配置激活下载模板
<activeProfiles><activeProfile>dev</activeProfile></activeProfiles>
6. 将第三方jar安装到本地仓库和maven私服
在maven工程的pom.xml文件中配置某个jar包的坐标后,如果本地的maven仓库不存在这个jar包,maven工具会自动到配置的maven私服下载,如果私服中也不存在,maven私服就会从maven中央仓库进行下载。
但是并不是所有的jar包都可以从中央仓库下载到,比如常用的Oracle数据库驱动的jar包在中央仓库就不存在。此时需要到Oracle的官网下载驱动jar包,然后将此jar包通过maven命令安装到我们本地的maven仓库或者maven私服中,这样在maven项目中就可以使用maven坐标引用到此jar包了。
6.1 将第三方jar安装到本地仓库
①下载Oracle的jar包(略)
②mvn install命令进行安装
mvn install:install-file -Dfile=ojdbc14-10.2.0.4.0.jar -DgroupId=com.oracle -DartifactId=ojdbc14 –
Dversion=10.2.0.4.0 -Dpackaging=jar
③查看本地maven仓库,确认安装是否成功
6.2 将第三方jar安装到maven私服
①下载Oracle的jar包(略)
②在maven的settings.xml配置文件中配置第三方仓库的server信息
<server><id>thirdparty</id><username>admin</username><password>admin123</password></server>
③执行mvn deploy命令进行安装
mvn deploy:deploy-file -Dfile=ojdbc14-10.2.0.4.0.jar -DgroupId=com.oracle -DartifactId=ojdbc14 –
Dversion=10.2.0.4.0 -Dpackaging=jar –
Durl=http://localhost:8081/nexus/content/repositories/thirdparty/ -DrepositoryId=thirdparty
参考#

若有收获,就点个赞吧
0 人点赞
