1 Java API实现文档管理
1.1 ES的技术特点
 ES技术比较特殊,不像其他分布式、大数据方便的技术,比如Hadoop、Spark和Habase等。ES代码层面很好写,难的是概念的理解。
 ES最重要的是它的REST API,是跨语言的。在真实的生产中,探查数据、分析数据,使用REST更方便。
1.2 Java客户端简单获取数据
1.2.1 Java API文档
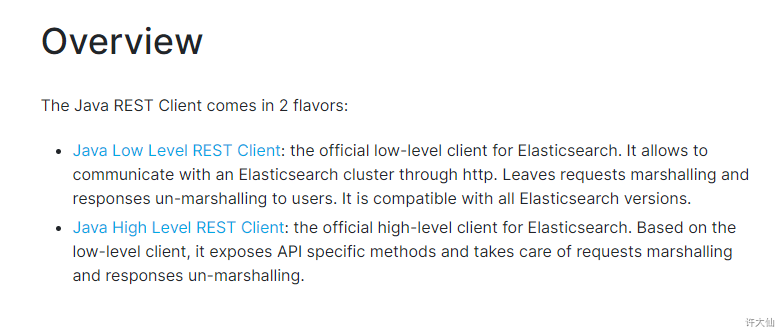
Java Low Level REST Client:底层客户端,偏向底层。 Java High Level REST Client:高级客户端,高级封装。
1.2.2 准备工作
- 导入ES相关的jar包:
<dependency><groupId>org.elasticsearch.client</groupId><artifactId>elasticsearch-rest-high-level-client</artifactId><version>7.10.1</version><exclusions><exclusion><groupId>org.elasticsearch</groupId><artifactId>elasticsearch</artifactId></exclusion></exclusions></dependency><dependency><groupId>org.elasticsearch</groupId><artifactId>elasticsearch</artifactId><version>7.10.1</version></dependency>
1.2.3 使用Java客户端操作ES
- 开发步骤:
- 获取连接客户端。
- 构建请求。
 执行。
执行。 获取结果。
获取结果。- 示例:
package com.sunxaiping.elk;import org.apache.http.HttpHost;import org.elasticsearch.action.get.GetRequest;import org.elasticsearch.action.get.GetResponse;import org.elasticsearch.client.RequestOptions;import org.elasticsearch.client.RestClient;import org.elasticsearch.client.RestHighLevelClient;import org.junit.jupiter.api.Test;import java.io.IOException;import java.util.List;import java.util.Map;public class ElkApplicationTests {@Testpublic void test() throws IOException {//获取连接客户端List<HttpHost> httpHostList = List.of(new HttpHost("localhost", 9200, "http"));RestHighLevelClient client = new RestHighLevelClient(RestClient.builder(httpHostList.toArray(HttpHost[]::new)));//构建请求GetRequest getRequest = new GetRequest("demo", "1");//发送请求GetResponse response = client.get(getRequest, RequestOptions.DEFAULT);//获取结果if(response.isExists()){String id = response.getId();System.out.println("id = " + id);String sourceAsString = response.getSourceAsString();System.out.println("sourceAsString = " + sourceAsString);Map<String, Object> source = response.getSource();System.out.println("source = " + source);}}}
1.3 结合Spring-boot-test测试文档
1.3.1 准备工作
- 导入SpringBoot相关的jar包:
<parent><groupId>org.springframework.boot</groupId><artifactId>spring-boot-starter-parent</artifactId><version>2.3.6.RELEASE</version><relativePath/> <!-- lookup parent from repository --></parent><properties><!-- 这边使用的JDK11 --><java.version>11</java.version></properties><dependencies><dependency><groupId>org.springframework.boot</groupId><artifactId>spring-boot-starter</artifactId></dependency><dependency><groupId>org.springframework.boot</groupId><artifactId>spring-boot-devtools</artifactId><scope>runtime</scope><optional>true</optional></dependency><dependency><groupId>org.springframework.boot</groupId><artifactId>spring-boot-configuration-processor</artifactId><optional>true</optional></dependency><dependency><groupId>org.projectlombok</groupId><artifactId>lombok</artifactId><optional>true</optional></dependency><dependency><groupId>org.springframework.boot</groupId><artifactId>spring-boot-starter-test</artifactId><scope>test</scope><exclusions><exclusion><groupId>org.junit.vintage</groupId><artifactId>junit-vintage-engine</artifactId></exclusion></exclusions></dependency><dependency><groupId>org.elasticsearch.client</groupId><artifactId>elasticsearch-rest-high-level-client</artifactId><version>7.10.1</version><exclusions><exclusion><groupId>org.elasticsearch</groupId><artifactId>elasticsearch</artifactId></exclusion></exclusions></dependency><dependency><groupId>org.elasticsearch</groupId><artifactId>elasticsearch</artifactId><version>7.10.1</version></dependency></dependencies><build><plugins><plugin><groupId>org.springframework.boot</groupId><artifactId>spring-boot-maven-plugin</artifactId></plugin></plugins></build>
- 修改配置文件application.yml:
server:port: 8088spring:application:name: elk# ES配置es:hostlist: 127.0.0.1:9200 # 多个节点之间使用,分隔
- 编写启动类:
package com.sunxaiping.elk;import org.springframework.boot.SpringApplication;import org.springframework.boot.autoconfigure.SpringBootApplication;@SpringBootApplicationpublic class ElkApplication {public static void main(String[] args) {SpringApplication.run(ElkApplication.class, args);}}
- 编写配置类:
package com.sunxaiping.elk.config;import org.apache.http.HttpHost;import org.elasticsearch.client.RestClient;import org.elasticsearch.client.RestHighLevelClient;import org.springframework.beans.factory.annotation.Value;import org.springframework.context.annotation.Bean;import org.springframework.context.annotation.Configuration;import java.util.Arrays;import java.util.List;import java.util.stream.Collectors;/*** @author 许大仙* @version 1.0* @since 2020-12-11 09:44*/@Configurationpublic class ESConfig {@Value("${es.hostlist}")private String esHostList;/*** 配置RestHighLevelClient** @return*/@Bean(destroyMethod = "close")public RestHighLevelClient restHighLevelClient() {List<HttpHost> httpHostList = Arrays.stream(esHostList.split(",")).map(s -> new HttpHost(s.split(":")[0], Integer.valueOf(s.split(":")[1]), "http")).collect(Collectors.toList());return new RestHighLevelClient(RestClient.builder(httpHostList.toArray(HttpHost[]::new)));}}
1.3.2 查询
- 示例:查询指定的字段,类似于
select id,name from book,而不是类似于select * from book
package com.sunxaiping.elk;import org.elasticsearch.action.get.GetRequest;import org.elasticsearch.action.get.GetResponse;import org.elasticsearch.client.RequestOptions;import org.elasticsearch.client.RestHighLevelClient;import org.elasticsearch.common.Strings;import org.elasticsearch.search.fetch.subphase.FetchSourceContext;import org.junit.jupiter.api.Test;import org.springframework.beans.factory.annotation.Autowired;import org.springframework.boot.test.context.SpringBootTest;import java.io.IOException;import java.util.List;import java.util.Map;/*** ES的开发步骤:* ①获取连接客户端* ②构建请求* ③发送请求,获取响应* ④从响应中拿出结果*/@SpringBootTestpublic class ElkApplicationTests {@Autowiredprivate RestHighLevelClient restHighLevelClient;/*** 查询指定的字段:GET /demo/_doc/1?_source_includes=name,age** @throws IOException*/@Testpublic void test() throws IOException {GetRequest getRequest = new GetRequest("demo", "1");//指定要查询的字段String[] includes = List.of("name", "age").toArray(String[]::new);//指定排除查询的字段为空数组String[] excludes = Strings.EMPTY_ARRAY;FetchSourceContext fetchSourceContext = new FetchSourceContext(true, includes, excludes);getRequest.fetchSourceContext(fetchSourceContext);GetResponse response = restHighLevelClient.get(getRequest, RequestOptions.DEFAULT);if (response.isExists()) {String id = response.getId();System.out.println("id = " + id);String sourceAsString = response.getSourceAsString();System.out.println("sourceAsString = " + sourceAsString);Map<String, Object> source = response.getSource();System.out.println("source = " + source);}}}
- 示例:同步查询
package com.sunxaiping.elk;import org.elasticsearch.action.get.GetRequest;import org.elasticsearch.action.get.GetResponse;import org.elasticsearch.client.RequestOptions;import org.elasticsearch.client.RestHighLevelClient;import org.junit.jupiter.api.Test;import org.springframework.beans.factory.annotation.Autowired;import org.springframework.boot.test.context.SpringBootTest;import java.io.IOException;import java.util.Map;/*** ES的开发步骤:* ①获取连接客户端* ②构建请求* ③发送请求,获取响应* ④从响应中拿出结果*/@SpringBootTestpublic class ElkApplicationTests {@Autowiredprivate RestHighLevelClient restHighLevelClient;/*** 同步查询** @throws IOException*/@Testpublic void test() throws IOException {GetRequest getRequest = new GetRequest("demo", "1");//同步查询GetResponse response = restHighLevelClient.get(getRequest, RequestOptions.DEFAULT);if (response.isExists()) {String id = response.getId();System.out.println("id = " + id);String sourceAsString = response.getSourceAsString();System.out.println("sourceAsString = " + sourceAsString);Map<String, Object> source = response.getSource();System.out.println("source = " + source);}}}
- 示例:异步查询
package com.sunxaiping.elk;import org.elasticsearch.action.ActionListener;import org.elasticsearch.action.get.GetRequest;import org.elasticsearch.action.get.GetResponse;import org.elasticsearch.client.RequestOptions;import org.elasticsearch.client.RestHighLevelClient;import org.junit.jupiter.api.Test;import org.springframework.beans.factory.annotation.Autowired;import org.springframework.boot.test.context.SpringBootTest;import java.io.IOException;import java.util.Map;/*** ES的开发步骤:* ①获取连接客户端* ②构建请求* ③发送请求,获取响应* ④从响应中拿出结果*/@SpringBootTestpublic class ElkApplicationTests {@Autowiredprivate RestHighLevelClient restHighLevelClient;/*** 异步查询** @throws IOException*/@Testpublic void test() {GetRequest getRequest = new GetRequest("demo", "1");restHighLevelClient.getAsync(getRequest, RequestOptions.DEFAULT, new ActionListener<>() {@Overridepublic void onResponse(GetResponse response) {if (response.isExists()) {String id = response.getId();System.out.println("id = " + id);String sourceAsString = response.getSourceAsString();System.out.println("sourceAsString = " + sourceAsString);Map<String, Object> source = response.getSource();System.out.println("source = " + source);}}@Overridepublic void onFailure(Exception e) {System.out.println("失败" + e);}});try {Thread.sleep(5000);} catch (InterruptedException e) {e.printStackTrace();}}}
1.3.3 新增
- REST API形式新增数据:
PUT /test_post/_doc/2{"user":"tomas","postDate":"2019-07-18","message":"trying out es1"}
- 示例:以JSON字符串的格式新增数据
package com.sunxaiping.elk;import org.elasticsearch.action.DocWriteResponse;import org.elasticsearch.action.index.IndexRequest;import org.elasticsearch.action.index.IndexResponse;import org.elasticsearch.client.RequestOptions;import org.elasticsearch.client.RestHighLevelClient;import org.elasticsearch.common.unit.TimeValue;import org.elasticsearch.common.xcontent.XContentType;import org.elasticsearch.index.VersionType;import org.junit.jupiter.api.Test;import org.springframework.beans.factory.annotation.Autowired;import org.springframework.boot.test.context.SpringBootTest;import java.io.IOException;/*** ES的开发步骤:* ①获取连接客户端* ②构建请求* ③发送请求,获取响应* ④从响应中拿出结果*/@SpringBootTestpublic class ElkApplicationTests {@Autowiredprivate RestHighLevelClient client;/*** 插入数据** @throws IOException*/@Testpublic void test() throws IOException {IndexRequest indexRequest = new IndexRequest("test_post");indexRequest.id("1");//构建文档数据//以json串的格式String jsonString = "{\n" +" \"user\":\"tomas\",\n" +" \"postDate\":\"2019-07-18\",\n" +" \"message\":\"trying out es1\"\n" +"}";// XContentType.JSON 指定插入的数据是JSON格式indexRequest.source(jsonString, XContentType.JSON);//可选参数//设置超时时间// indexRequest.timeout("1s");indexRequest.timeout(TimeValue.timeValueSeconds(1)); //超时时间//手动维护版本号indexRequest.version(2);indexRequest.versionType(VersionType.EXTERNAL);//发送请求IndexResponse response = client.index(indexRequest, RequestOptions.DEFAULT);//获取结果String index = response.getIndex();System.out.println("index = " + index);String id = response.getId();System.out.println("id = " + id);DocWriteResponse.Result result = response.getResult();System.out.println("result = " + result);long version = response.getVersion();System.out.println("version = " + version);}}
- 示例:以Map格式新增数据
package com.sunxaiping.elk;import org.elasticsearch.action.DocWriteResponse;import org.elasticsearch.action.index.IndexRequest;import org.elasticsearch.action.index.IndexResponse;import org.elasticsearch.client.RequestOptions;import org.elasticsearch.client.RestHighLevelClient;import org.elasticsearch.common.unit.TimeValue;import org.junit.jupiter.api.Test;import org.springframework.beans.factory.annotation.Autowired;import org.springframework.boot.test.context.SpringBootTest;import java.io.IOException;import java.util.Map;/*** ES的开发步骤:* ①获取连接客户端* ②构建请求* ③发送请求,获取响应* ④从响应中拿出结果*/@SpringBootTestpublic class ElkApplicationTests {@Autowiredprivate RestHighLevelClient client;/*** 插入数据** @throws IOException*/@Testpublic void test() throws IOException {IndexRequest indexRequest = new IndexRequest("test_post");indexRequest.id("1");//构建文档数据//方法:以Map的格式Map<String, String> jsonMap = Map.of("user", "tomas", "postDate", "2019-07-18", "message", "trying out es1");indexRequest.source(jsonMap);//可选参数//设置超时时间// indexRequest.timeout("1s");indexRequest.timeout(TimeValue.timeValueSeconds(1)); //超时时间//手动维护版本号// indexRequest.version(2);// indexRequest.versionType(VersionType.EXTERNAL);//发送请求IndexResponse response = client.index(indexRequest, RequestOptions.DEFAULT);//获取结果String index = response.getIndex();System.out.println("index = " + index);String id = response.getId();System.out.println("id = " + id);DocWriteResponse.Result result = response.getResult();System.out.println("result = " + result);long version = response.getVersion();System.out.println("version = " + version);}}
- 示例:以XContentBuilder格式新增数据
package com.sunxaiping.elk;import org.elasticsearch.action.DocWriteResponse;import org.elasticsearch.action.index.IndexRequest;import org.elasticsearch.action.index.IndexResponse;import org.elasticsearch.client.RequestOptions;import org.elasticsearch.client.RestHighLevelClient;import org.elasticsearch.common.unit.TimeValue;import org.elasticsearch.common.xcontent.XContentBuilder;import org.elasticsearch.common.xcontent.XContentFactory;import org.junit.jupiter.api.Test;import org.springframework.beans.factory.annotation.Autowired;import org.springframework.boot.test.context.SpringBootTest;import java.io.IOException;/*** ES的开发步骤:* ①获取连接客户端* ②构建请求* ③发送请求,获取响应* ④从响应中拿出结果*/@SpringBootTestpublic class ElkApplicationTests {@Autowiredprivate RestHighLevelClient client;/*** 插入数据** @throws IOException*/@Testpublic void test() throws IOException {IndexRequest indexRequest = new IndexRequest("test_post");indexRequest.id("1");//构建文档数据//以XContentBuilder插入数据XContentBuilder builder = XContentFactory.jsonBuilder();builder.startObject();{builder.field("user", "tomas");builder.timeField("postDate", "2019-07-18");builder.field("message", "trying out es1");}builder.endObject();indexRequest.source(builder);//可选参数//设置超时时间// indexRequest.timeout("1s");indexRequest.timeout(TimeValue.timeValueSeconds(1)); //超时时间//手动维护版本号// indexRequest.version(2);// indexRequest.versionType(VersionType.EXTERNAL);//发送请求IndexResponse response = client.index(indexRequest, RequestOptions.DEFAULT);//获取结果String index = response.getIndex();System.out.println("index = " + index);String id = response.getId();System.out.println("id = " + id);DocWriteResponse.Result result = response.getResult();System.out.println("result = " + result);long version = response.getVersion();System.out.println("version = " + version);}}
- 示例:直接新增数据,类似于JSON字符串的格式新增数据
package com.sunxaiping.elk;import org.elasticsearch.action.DocWriteResponse;import org.elasticsearch.action.index.IndexRequest;import org.elasticsearch.action.index.IndexResponse;import org.elasticsearch.action.support.replication.ReplicationResponse;import org.elasticsearch.client.RequestOptions;import org.elasticsearch.client.RestHighLevelClient;import org.elasticsearch.common.unit.TimeValue;import org.junit.jupiter.api.Test;import org.springframework.beans.factory.annotation.Autowired;import org.springframework.boot.test.context.SpringBootTest;import java.io.IOException;/*** ES的开发步骤:* ①获取连接客户端* ②构建请求* ③发送请求,获取响应* ④从响应中拿出结果*/@SpringBootTestpublic class ElkApplicationTests {@Autowiredprivate RestHighLevelClient client;/*** 插入数据** @throws IOException*/@Testpublic void test() throws IOException {IndexRequest indexRequest = new IndexRequest("test_post");indexRequest.id("1");//构建文档数据//直接插入数据indexRequest.source("user", "tomas", "postDate", "2019-07-18", "message", "trying out es1");//可选参数//设置超时时间// indexRequest.timeout("1s");indexRequest.timeout(TimeValue.timeValueSeconds(1)); //超时时间//手动维护版本号// indexRequest.version(2);// indexRequest.versionType(VersionType.EXTERNAL);//发送请求IndexResponse response = client.index(indexRequest, RequestOptions.DEFAULT);//获取结果String index = response.getIndex();System.out.println("index = " + index);String id = response.getId();System.out.println("id = " + id);DocWriteResponse.Result result = response.getResult();if (result == DocWriteResponse.Result.CREATED) {System.out.println("是新增操作");} else {System.out.println("是更新操作");}System.out.println("result = " + result);long version = response.getVersion();System.out.println("version = " + version);//获取分片信息/**{"_index" : "test_post","_type" : "_doc","_id" : "2","_version" : 1,"result" : "created","_shards" : {"total" : 2,"successful" : 1,"failed" : 0},"_seq_no" : 9,"_primary_term" : 1}* */ReplicationResponse.ShardInfo shardInfo = response.getShardInfo();if (shardInfo.getTotal() != shardInfo.getSuccessful()) {System.out.println("处理成功的分片数小于总分片,请运维人员调查原因");}if (shardInfo.getFailed() > 0) {ReplicationResponse.ShardInfo.Failure[] failures = shardInfo.getFailures();for (ReplicationResponse.ShardInfo.Failure failure : failures) {String reason = failure.reason();System.out.println("错误的原因 = " + reason);}}}}
1.3.4 修改
- 局部更新的REST API形式:
POST /test_post/_update/2{"doc":{"user":"呵呵哒"}}
- 示例:
package com.sunxaiping.elk;import org.elasticsearch.action.DocWriteResponse;import org.elasticsearch.action.update.UpdateRequest;import org.elasticsearch.action.update.UpdateResponse;import org.elasticsearch.client.RequestOptions;import org.elasticsearch.client.RestHighLevelClient;import org.elasticsearch.common.unit.TimeValue;import org.junit.jupiter.api.Test;import org.springframework.beans.factory.annotation.Autowired;import org.springframework.boot.test.context.SpringBootTest;import java.io.IOException;import java.util.Map;/*** ES的开发步骤:* ①获取连接客户端* ②构建请求* ③发送请求,获取响应* ④从响应中拿出结果*/@SpringBootTestpublic class ElkApplicationTests {@Autowiredprivate RestHighLevelClient client;/*** 局部更新* POST /test_post/_update/2* {* "doc":{* "user":"呵呵哒"* }* }** @throws IOException*/@Testpublic void test() throws IOException {//构建请求UpdateRequest request = new UpdateRequest("test_post", "1");//请求体request.doc(Map.of("user", "呵呵哒"));//可选参数request.timeout(TimeValue.timeValueSeconds(3)); //超时时间request.retryOnConflict(3); //重试次数//发送请求UpdateResponse response = client.update(request, RequestOptions.DEFAULT);//获取结果if (response.getResult() == DocWriteResponse.Result.UPDATED) {System.out.println("数据更新啦");} else if (response.getResult() == DocWriteResponse.Result.CREATED) {System.out.println("数据新增了");} else if (response.getResult() == DocWriteResponse.Result.DELETED) {System.out.println("数据删除了");} else if (response.getResult() == DocWriteResponse.Result.NOOP) {System.out.println("没有操作");}}}
1.3.5 删除
- 删除的REST API形式:
DELETE /test_post/_doc/2
- 示例:
package com.sunxaiping.elk;import org.elasticsearch.action.DocWriteResponse;import org.elasticsearch.action.delete.DeleteRequest;import org.elasticsearch.action.delete.DeleteResponse;import org.elasticsearch.client.RequestOptions;import org.elasticsearch.client.RestHighLevelClient;import org.junit.jupiter.api.Test;import org.springframework.beans.factory.annotation.Autowired;import org.springframework.boot.test.context.SpringBootTest;import java.io.IOException;/*** ES的开发步骤:* ①获取连接客户端* ②构建请求* ③发送请求,获取响应* ④从响应中拿出结果*/@SpringBootTestpublic class ElkApplicationTests {@Autowiredprivate RestHighLevelClient client;@Testpublic void test() throws IOException {//构建请求DeleteRequest Request = new DeleteRequest("test_post");Request.id("1");//发送数据DeleteResponse response = client.delete(Request, RequestOptions.DEFAULT);//获取结果if (response.getResult() == DocWriteResponse.Result.UPDATED) {System.out.println("数据更新啦");} else if (response.getResult() == DocWriteResponse.Result.CREATED) {System.out.println("数据新增了");} else if (response.getResult() == DocWriteResponse.Result.DELETED) {System.out.println("数据删除了");} else if (response.getResult() == DocWriteResponse.Result.NOOP) {System.out.println("没有操作");}}}
1.3.6 批量增删改bulk
- 批量增删改bulk的REST API形式:
POST /_bulk{"action": {"metadata"}}{"data"}
- 示例:
package com.sunxaiping.elk;import org.elasticsearch.action.DocWriteRequest;import org.elasticsearch.action.bulk.BulkItemResponse;import org.elasticsearch.action.bulk.BulkRequest;import org.elasticsearch.action.bulk.BulkResponse;import org.elasticsearch.action.delete.DeleteRequest;import org.elasticsearch.action.index.IndexRequest;import org.elasticsearch.action.update.UpdateRequest;import org.elasticsearch.client.RequestOptions;import org.elasticsearch.client.RestHighLevelClient;import org.junit.jupiter.api.Test;import org.springframework.beans.factory.annotation.Autowired;import org.springframework.boot.test.context.SpringBootTest;import java.io.IOException;import java.util.Map;/*** ES的开发步骤:* ①获取连接客户端* ②构建请求* ③发送请求,获取响应* ④从响应中拿出结果*/@SpringBootTestpublic class ElkApplicationTests {@Autowiredprivate RestHighLevelClient client;@Testpublic void test() throws IOException {//创建请求BulkRequest bulkRequest = new BulkRequest();bulkRequest.add(new IndexRequest("bulk_add1").id("1").source(Map.of("bulk_add_key", "bulk_add_value")));bulkRequest.add(new IndexRequest("bulk_add2").id("1").source(Map.of("bulk_add_key", "bulk_add_value")));bulkRequest.add(new UpdateRequest("bulk_add1", "1").doc(Map.of("bulk_add_key", "bulk_update_value")));bulkRequest.add(new DeleteRequest("bulk_add2", "1"));//执行BulkResponse bulkResponse = client.bulk(bulkRequest, RequestOptions.DEFAULT);//获取结果BulkItemResponse[] items = bulkResponse.getItems();for (BulkItemResponse response : items) {if (response.getOpType() == DocWriteRequest.OpType.CREATE) {System.out.println("强制新增数据成功啦");} else if (response.getOpType() == DocWriteRequest.OpType.DELETE) {System.out.println("删除数据成功啦");} else if (response.getOpType() == DocWriteRequest.OpType.UPDATE) {System.out.println("更新数据成功啦");}else if (response.getOpType() == DocWriteRequest.OpType.INDEX) {System.out.println("新增数据成功啦");}}}}
2 ES内部机制
2.1 ES分布式基础
2.1.1 ES对复杂分布式机制的透明隐藏特性
- 分布式机制:分布式数据存储和共享。
- 分片机制:数据存储到那个分片、副本数据写入。
- 集群发现机制:新启动ES实例,自动加入到集群中。
- shard负载均衡:大量数据写入和查询,ES会将数据平均分配。
- shard副本:新增副本数,分片重分配。
2.1.2 ES的垂直扩容和水平扩容
- 垂直扩容:使用更加强大的服务器替换老服务器,但是单机存储和运算能力有上限,且成本直线上升,比如IT服务器要1万,但是单个10T的服务器可能要20万。
- 水平扩容:采购更多的服务器,加入集群。
2.1.3 增加和减少节点,数据重新分配
- 新增或减少ES实例的时候,ES集群会将数据重新分配。
2.1.4 master节点
- 功能:
- 管理ES集群的元数据:创建删除索引,维护索引的元数据,节点的增加和减少。
- 默认情况下,ES会自动选择一台机器作为master。
2.1.5 节点对等的分布式架构
- 节点对等,每个节点都能接受所有的请求。
- 自动请求路由。
- 响应收集。
2.2 分片shard、副本replica机制
- 每个index包含一个或多个shard。
- 每个shard都是一个最小的工作单元,承载部分数据,Lucene实例,完整的简历索引和处理请求的能力。
- 增减节点的时候,shard会自动在节点中负载均衡。
- primary shard(主分片)和replica shard(副本分片),每个文档肯定只存在于一个primary shard以及其对应的replica shard中,不可能存在于多个primary shard。
 replica shard是primary shard的副本,负责容错,以及承担读请求负载。
 primary shard的数量在创建爱你索引的时候就固定了,replica shard的数量可以随时修改。
 primary shard的默认数量是1,replica 默认是1,即默认共有2个shard(1个是primary shard,另一个是replica shard)。注意:ES7之前的primary shard的默认数量是5,replica 默认是1,即默认共有10个shard(5个primary shard,5个replica shard)
 primary shard不能和自己的replica shard放在同一个节点上(否则节点宕机,primary shard和replica shard都丢失,起不到容错的作用),但是可以和其他的primary shard的replica shard放在同一个节点上。
2.3 单Node(节点)环境下创建index
- 单Node环境下,创建一个index,有3个primary shard,3个replica shard。
PUT /test_index1{"settings" : {"number_of_shards" : 3,"number_of_replicas" : 1}}
- 会发现集群的status是yellow。因为这个时候3个primary shard分配到仅有的一个node上去,另外3个replica shard是无法分配的。集群可以正常工作,但是一旦出现节点宕机,数据全部丢失,并且集群出现不可用状态,无法承接任何请求。
2.4 两个Node(节点)环境下replica shard是如何分配的
- replica shard分配:一个节点上强制分配3个primary shard,另一个节点强制分配3个replica shard。
- 写请求的时候,发送到primary shard,ES会自动同步到replica shard。
- 读请求的时候,无论primary shard和replica shard都可以,因为数据是一致的。
2.5 横向扩容
- 分片自动负载均衡,分片向空闲机器转移。
- 每个节点存储更少的分片,系统资源给予每个分片的资源更多,整体集群性能提高。
- 扩容极限:节点数大于整体分片数,则必有空间机器。
- 超出扩容极限,可以增加副本数,如主分片为3,设置副本数为2,总共3*3=9个分片。9台机器同时运行,存储和搜索性能更强,容错性更好。
- 容错性:只要一个索引的所有主分片都在,集群就可以正常运行。
2.6 ES容错机制:master选举,replica容错,数据恢复
- 以3个分片,2副本数,3个节点为例。
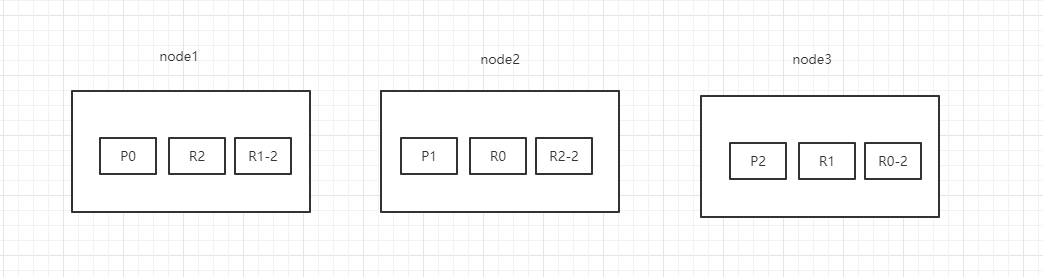
- 情景设计:
- ①背景:集群初始化的时候,node1是master节点。突然,node1宕机了,那么P0分片没有了,所有主分片不是active,集群状态是red。
- ②容错:
- 重新选举master节点,拾起承担master的相关功能,假设此时node2选举为master节点。
- 新的master节点,即node2,选择将丢失的主分片P0的某个副本(假设为R0)提升为主分片,那么此时R0我们可以看成是一个新的P0分片。此时集群状态为yellow,因为缺少了副本分片。
- 重启故障的节点,即node1,新的master(node2)会感知到新节点加入,将缺失的副本分片复制到新机器上(增量的复制),并将P0降级为R0,P2这期间的增量数据复制到R2,P1这段期间的数据复制到R1-2上,集群状态变为green。
3 文档存储机制
3.1 数据路由
3.1.1 什么是数据路由
- 前置知识:
- 一个索引数据量太大,分片会存储在多个ES的node中。
- 一个文档,只会存储在一个主分片和其副本分片中。
- 一个文档,最终会落在主分片的一个分片上,到底应该在哪一个分片上?这就是数据路由。
3.1.2 路由算法
- 路由算法公式:
shard = hash(routing) % number_of_parimary_shards
哈希值对主分片数取模
- 举例:
- 对一个文档的CRUD的时候,都会带一个routing number。默认为文档
_id(可能是手动指定,也可能是自动生成的)。 - 存储1号文档,经过哈希计算,哈希值为2,此时有3个主分片(假设分别为p0、p1和p2),那么计算2%3=2,就算出此文档在p2分片上。
- 决定一个文档到底在哪个分片上,最重要的一个值就是routing number,默认是
_id,可以手动指定,也可以自动生成,相同的routing number,每次进行hash函数求值,产出的hash值一定是相同的。 - 无论hash值是什么数字,对number_of_parimary_shards求余数,结果一定是在0和number_of_parimary_shards-1之间的这个范围内。
3.1.3 手动指定routing
PUT /test_index/_doc/15?routing=tom{"username":"tom"}
- 场景:在程序中,架构师可以手动指定已有数据的一个属性为路由值。好处是可以定制一类文档数据存储到一个分片中。缺点是设计不好,会造成数据的倾斜。
- 所以,不同文档尽量放到不同的索引中,剩下的事情就交给ES集群自己处理。
3.1.4 主分片数量不可变
- 涉及到以往数据的查询时,一旦建立索引,主分片数不可变(参考路由算法)。
3.2 文档增删改内部机制
- 增删改可以看做是Update,都是对数据的修改。一个修改请求发送到ES集群,会经历以下的步骤:
- 客户端选择一个node发送请求过去,这个node就是coordinating node(协调节点)。
- coordinating node,对document进行路由计算,将请求转发给对应的node(有primary shard)。
- 实际的node上的primary shard处理请求,然后将数据同步到replica shard。
- coordinating node如果发现primary shard和所有的replica shard都搞定之后,就返回响应结果给客户端。
3.3 文档查询内部机制
- 一个查询请求发送的ES集群,会经历以下的步骤:
- 客户端发送请求到任意一个node,该node就是coordinating node(协调节点)。
- coordinating node(协调节点)对document进行路由计算,将请求转发到对应的node,此时会使用round-robin随机轮询算法,在primary shard以及其所有的replica shard中随机选择一个,让读请求负载均衡。
- 接收请求的node返回document给coordinating node(协调节点)。
- coordinating node(协调节点)返回document给客户端。
- 特殊情况:document如果还在建立索引过程中,可能只有primary shard上有,任何一个replica shard都没有,此时可能会导致无法读取到document,但是document完成索引建立之后,primary shard和replica shard就都有了。
3.4 bulk API奇特的JSON格式
- 目前bulk的REST API格式如下:
POST /_bulk{"action":"metadata"}{"data"}
- 为什么不是下面的这种格式?
POST /_bulk[{"action":{"method":"create"},"data":{"id":1,"field1":"java","field1":"spring",}},{"action":{"method":"create"},"data":{"id":2,"field1":"java","field1":"spring",}}]
- bulk中的每个操作都可能要转发到不同的node上的shard去执行。
- 如果采用比较良好的JSON格式:允许任意的换行,整个可读性非常棒,ES拿到这种标准格式的JSON以后,需要按照以下的流程进行处理。
- ①将JSON数组解析成JSONArray对象,这个是偶,这个数据就会在内存中出现一模一样的复制,一份数据是json文本,一份数据是JSONArray对象。
- ②解析JSON数组里的每个JSON,对每个请求中的document进行路由。
- ③为路由到同一个shard上的多个请求,创建一个请求数组。比如100个请求中有10个是转发到P1。
- ④将这个请求数组序列化。
- ⑤将序列后的请求数组发送到对应的节点上去。
- 耗费更多的内存,更多的JVM GC开销。
- ①bulk一般建议在几千条左右,大小在10MB左右。如果现在100个bulk请求发送到了一个节点上去,每个请求是10MB,100个请求就是1000MB = 1GB,然后每个请求的JOSN都会复制一份为JSONArray对象,此时内存中的占用就会翻倍,就会占用2GB的内存,甚至还不止。因为弄成JSONArray之后,可能还会搞一些其他的数据结构,会造成2GB+的内存占用。
- ②占用更多的请求可能就会积压其他请求的内存使用量,比如说最重要的搜素请求、分析请求等,此时就可能导致其他请求的性能急速下降。
- ③占用内存越多,就会导致Java虚拟机的垃圾回收次数更多,更频繁,每次要回收的垃圾对象更多,耗时也更长,导致ES的Java虚拟机停止工作线程的时间更多。
- 现在的奇特格式:
POST /_bulk{ "delete": { "_index": "test_index", "_id": "5" }} \n{ "create": { "_index": "test_index", "_id": "14" }}\n{ "test_field": "test14" }\n{ "update": { "_index": "test_index", "_id": "2"} }\n{ "doc" : {"test_field" : "bulk test"} }\n
- ①不用将其装换为JSON对象,不会在内存中出现相同的数据复制,直接按照换行符切割JSON。
- ②对每两个一组的JSON,读取meta,进行document路由。
- ③直接将对应的JSON发送到node上去。
- 最大的优势在于,不需要将JSON数组解析为一个JSONArray对象,形成一个大数据的拷贝,浪费内存空间,尽可能的保证性能。
4 Mapping映射入门
4.1 什么是Mapping映射?
- 概念:自动或手动为index中的_doc建立的一种数据结构和相关配置,称为Mapping映射。
- 示例:插入几条数据,让ES自动为我们建立一条索引
PUT /website/_doc/1{"post_date": "2019-01-01","title": "my first article","content": "this is my first article in this website","author_id": 11400}PUT /website/_doc/2{"post_date": "2019-01-02","title": "my second article","content": "this is my second article in this website","author_id": 11400}PUT /website/_doc/3{"post_date": "2019-01-03","title": "my third article","content": "this is my third article in this website","author_id": 11400}
- 相当于数据库建表语句:
create table website(post_date date,title varchar(50),content varchar(100),author_id int(11));
- 动态映射(dynamic mapping):自动为我们建立index,以及对应的mapping,mapping中包含了每个field对应的数据类型以及如何分词等设置。
- 当然,我们也可以手动在创建数据之前,先建立index,以及对应的Mapping。
- 查看动态映射语法
GET /index/_mapping
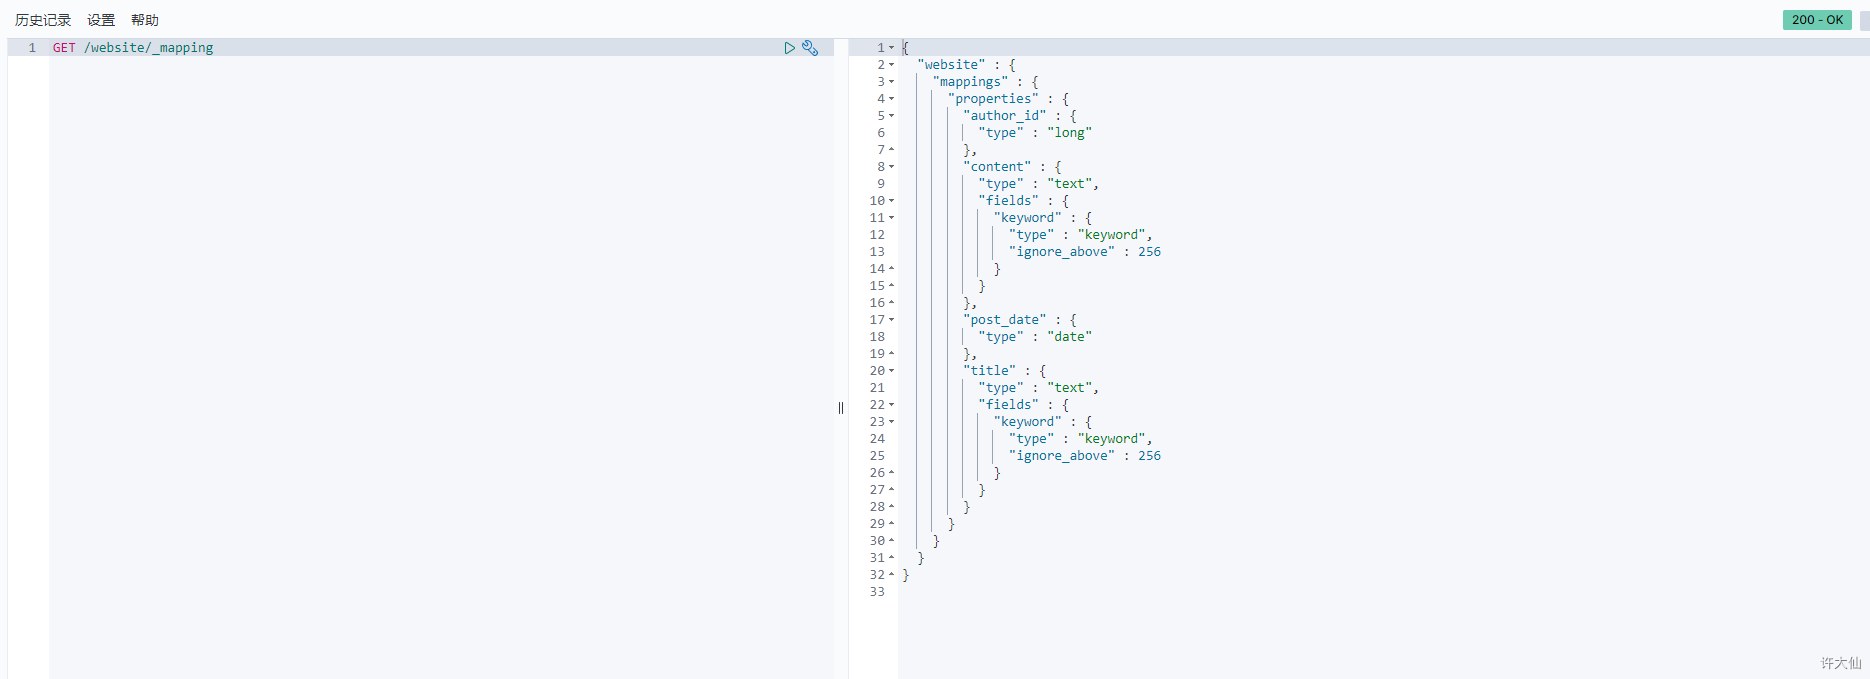
- 示例:查看ES自动会我们创建的动态映射
GET /website/_mapping

- 搜索语法:
- ①搜索所有的字段:
GET /index/_search?q=xxx
- ②搜索指定的字段:
GET /index/_search?q=field:xxx
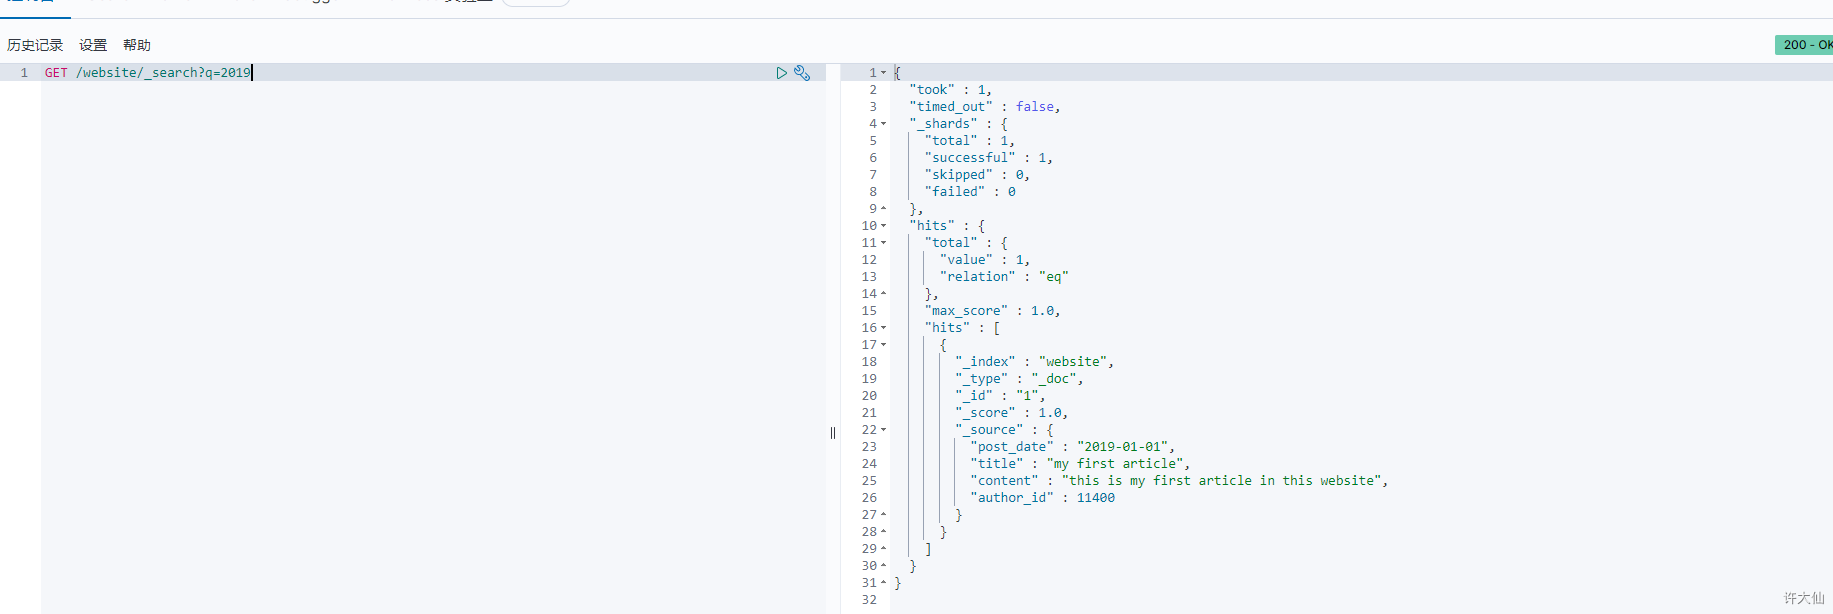
- 示例:查询2019
GET /website/_search?q=2019
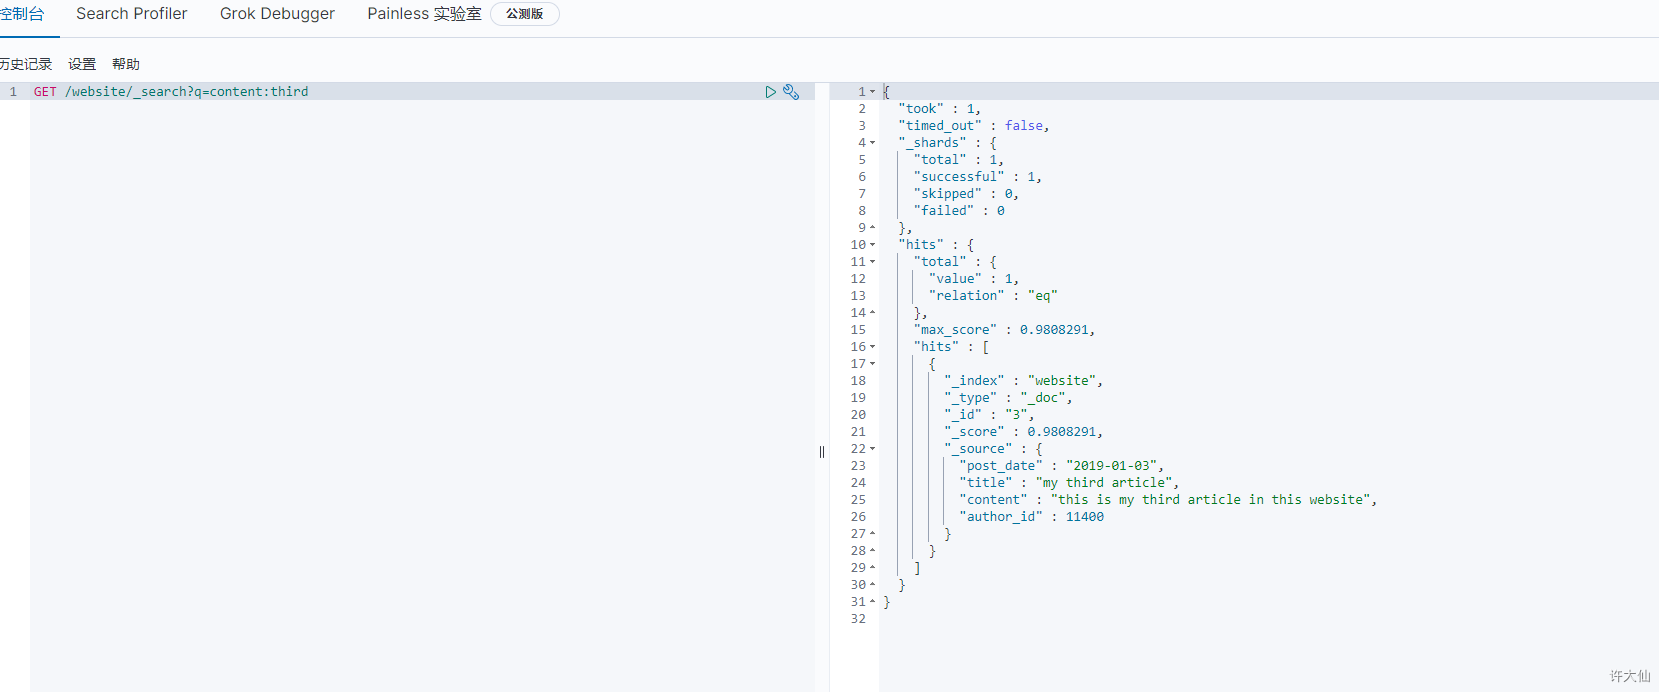
- 示例:查询content
GET /website/_search?q=content:third
4.2 精确匹配和全文检索的对比分析
4.2.1 精确匹配(exact value)
- 搜索的时候,必须输入准确的值,才能返回结果,类似于
select * from book where publish_date = '2019-01-01'。
4.2.2 全文检索(full text)
- 搜索的时候,只要输入关键词,就能返回结果。
- 全文检索不是单纯的只是匹配完整的一个值,而是可以对值进行拆分词语后(分词)进行匹配,也可以通过缩写、时态、大小写、同义词等进行匹配。
4.3 全文检索下倒排索引核心原理
4.3.1 准备工作
- doc1:
I really liked my small dogs, and I think my mom also liked them.
- doc2:
He never liked any dogs, so I hope that my mom will not expect me to liked him.
4.3.2 应用示例
- 示例:演示倒排索引最简单的一个建立过程
- ①分词,初步的倒排索引建立: | term | doc1 | doc2 | | —- | —- | —- | | I | | | | really | | | | liked | | | | my | | | | small | | | | dogs | | | | and | | | | think | | | | mom | | | | also | | | | them | | | | He | | | | never | | | | any | | | | so | | | | hope | | | | that | | | | will | | | | not | | | | expect | | | | me | | | | to | | | | him | | * |
- ②如果搜索:mother like little dog,是不会有结果的。因为会将这一句拆分为mother 、like 、little 、dog四个词,但是,在倒排索引中是没有这些词的,这不是我们想要的结果,因为mom和mother在我们看来是一样的,需要进行标准化操作。
- ③重建倒排索引:normalization(标准化),建立倒排索引的时候,会执行一个操作,对拆分处的各个单词进行相应的处理,以提升后面搜索的时候能够搜索到相关联的文档的概率。
- 时态的转换:liked—>like。
- 单复数的转换:dogs—>dog。
- 同义词的转换:mom—>mother、small—>little。
- 大小写的转换。 | word | doc1 | doc2 | normalization | | —- | —- | —- | —- | | I | | | | | really | | | | | like | | | liked ―> like | | my | | | | | little | | | small ―> little | | dog | | | dogs ―> dog | | and | | | | | think | | | | | mother | | | mom ―> mother | | also | | | | | them | | | | | He | | | | | never | | | | | any | | | | | so | | | | | hope | | | | | that | | | | | will | | | | | not | | | | | expect | | | | | me | | | | | to | | | | | him | | * | |
- 此时,使用mother liked little dog进行搜索,就可以搜索出doc1和doc2文档了,因为mother 、liked 、little 、dog等都会进行标准化分词。
4.4 分词器analyzer
4.4.1 什么是分词器?
- 分词器的作用:切分词语,进行标准化(normalization),提高召回率(recall)。换言之,给ES一段文本,然后将这段文本拆分成一个一个的单词,同时对每个单词进行标准化(normalization,如时态转换、单复数转换等),以便提高召回率(recall,搜索的时候,增加能够搜索到结果的数量)。
- 分词器的步骤:
- ①character filter:在一段文本进行分词之前,先进行预处理,比如:过滤html标签等。
- ②tokenizer:分词,比如:hello you and me —> hello、you、and、me。
- ③token filter:lowercase、stop word(停用词:了、的、呢)、synonymom、dogs—>dog、liked—>like、Tom—>tom、a/the/an—>去掉、mom—>mother、small—>little。
- 分词器很重要,将一段文本进行各种处理之后,才能拿去建立倒排索引。
4.4.2 内置分词器
- 例句:Set the shape to semi-transparent by calling set_trans(5)。
- 标准分词器(standard analyzer,默认):set, the, shape, to, semi, transparent, by, calling, set_trans, 5(默认的是standard)。
- 简单分词器(simple analyzer):set, the, shape, to, semi, transparent, by, calling, set, trans。
- 空格分词器(whitespace analyzer):Set, the, shape, to, semi-transparent, by, calling, set_trans(5)。
- 特定的语言的分词器(language analyzer,比如英语分词器):set, shape, semi, transpar, call, set_tran, 5。
4.5 query string根据字段分词策略
4.5.1 query string分词
- query string必须以和index建立相同的analyzer进行分词。
4.5.2 测试分词器
- 语法:
GET /_analyze{"analyzer": "standard","text": "xxxx"}
- 示例:
GET /_analyze{"analyzer": "standard","text": "Text to analyze 80"}

- token:实际存储的term关键词。
- position:此词条在原文本中的位置。
- start_offset/end_offset:字符在原始字符中的位置。
4.6 mapping的核心数据类型以及dynamic mapping
4.6.1 数据类型
- 详见。
4.6.2 dynamic mapping推测规则
- true/false —> boolean。
- 123 —> long。
- 123.45 —> double。
- 2019-11-11 —> date。
- “hello world” —> text/keyword。
4.6.3 查看mapping
- 语法:
GET /index/_mapping
- 示例:查看ES自动会我们创建的动态映射
GET /website/_mapping
4.7 手动管理mapping
映射,只能新增,不能修改。删除映射,是通过删除索引来间接达到的。
4.7.1 文本类型
- 创建索引后,应该立即手动创建mapping映射。
put /book
PUT /book/_mapping{"properties": {"name": {"type": "text"},"description": {"type": "text","analyzer": "english","search_analyzer": "english"},"pic": {"type": "text","index": false},"studymodel": {"type": "text"}}}
当type的值为text,即文本类型。
- analyzer:指定在索引和搜索的时候使用的分词器。如果单独想定义搜索的时候使用分词器,可以使用search_analyzer属性。
- index:指定是否索引,默认为true。只有为true的时候,才能被索引库搜索到。有一些内容不需要索引,比如商品图片的地址,不需要进行搜索,这时可以设置为false。
- store:是否在source之外存储,每个文档索引后会在ES中保存一份原始文档,存放在”source”中,一般情况下,不需要设置设置此属性为true,因为在source中已经有一份原始文档了。
- 测试:插入文档
PUT /book/_doc/1{"name":"Bootstrap开发框架","description":"Bootstrap是由Twitter推出的一个前台页面开发框架,在行业之中使用较为广泛。此开发框架包含了大量的CSS、JS程序代码,可以帮助开发者(尤其是不擅长页面开发的程序人员)轻松的实现一个不受浏览器限制的精美界面效果。","pic":"group1/M00/00/01/wKhlQFqO4MmAOP53AAAcwDwm6SU490.jpg","studymodel":"201002"}
- 测试查询:
# 支持全文检索GET /book/_search?q=name:Bootstrap
# 支持全文检索GET /book/_search?q=description:开发
# 不支持全文检索GET /book/_search?q=pic:group1/M00/00/01/wKhlQFqO4MmAOP53AAAcwDwm6SU490.jpg
# 支持全文检索GET /book/_search?q=studymodel:201002
4.7.2 关键字类型
- 创建索引后,应该立即手动创建mapping映射。
put /book
PUT /book/_mapping{"properties": {"name": {"type": "text"},"description": {"type": "text","analyzer": "english","search_analyzer": "english"},"pic": {"type": "keyword"},"studymodel": {"type": "text"}}}
当type的值是keyword,即关键字类型。就相当于上面的文本类型,并且设置index为false。关键字类型通常是按照整体搜索的,不需要进行分词,比如:邮政编码、手机号码、身份证号码等。关键字字段通常用于过滤、排序和聚合等。
4.7.3 日期类型
- 创建索引后,应该立即手动创建mapping映射。
put /book
PUT /book/_mapping{"properties": {"name": {"type": "text"},"description": {"type": "text","analyzer": "english","search_analyzer": "english"},"pic": {"type": "keyword"},"studymodel": {"type": "text"},"timestamp": {"type": "date","format": "yyyy-MM-dd HH:mm:ss||yyyy-MM-dd"}}}
当type的值是keyword,即日期类型。
- 日期类型不用设置分词器。
- 通常日期类型的字段用于排序。
- 可以通过format设置日期格式。
- 测试:插入文档
PUT /book/_doc/3{"name": "spring开发基础","description": "spring 在java领域非常流行,java程序员都在用。","studymodel": "201001","pic": "group1/M00/00/01/wKhlQFqO4MmAOP53AAAcwDwm6SU490.jpg","timestamp": "2018-07-04 18:28:58"}
4.7.4 数值类型
- 创建索引后,应该立即手动创建mapping映射。
put /book
PUT /book/_mapping{"properties": {"name": {"type": "text"},"description": {"type": "text","analyzer": "english","search_analyzer": "english"},"pic": {"type": "keyword"},"studymodel": {"type": "text"},"timestamp": {"type": "date","format": "yyyy-MM-dd HH:mm:ss||yyyy-MM-dd"},"price": {"type": "scaled_float","scaling_factor": 100}}}
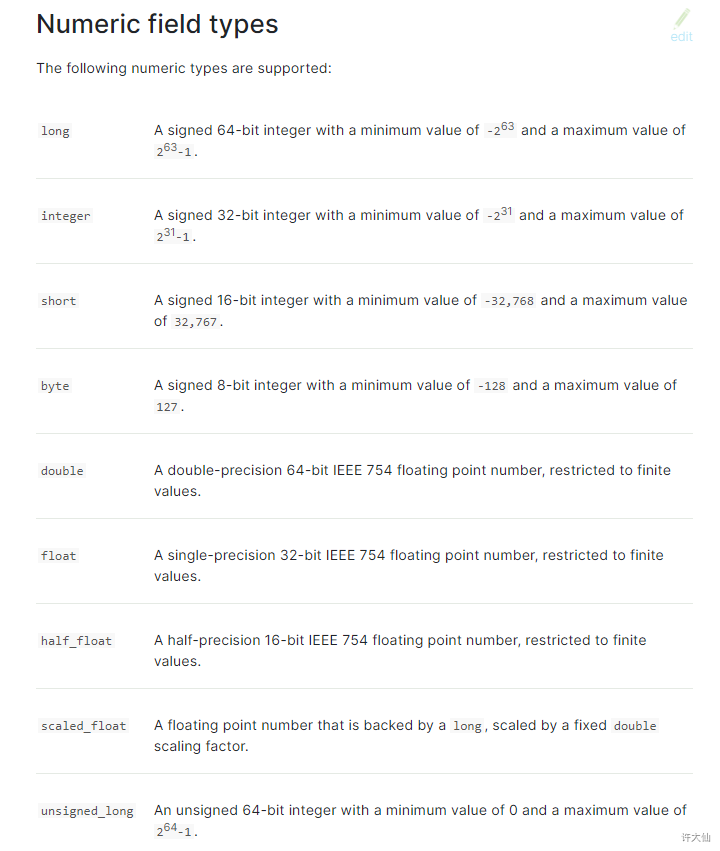
当type的值,是上图中的类型的时候,即为数值类型。
- 尽量选择范围小的类型,提高搜索效率。
- 对于浮点数尽量用比例因子,比如一个价格字段,单位为元,我们将比例因子设置为100,这样在ES中会按分存储,映射如下:
"price": {"type": "scaled_float","scaling_factor": 100}
- 由于比例因子为100,如果我们输入的价格是23.45,那么ES中会以23.45100存储到ES中。如果我们输入的价格是23.456,ES会将23.456``100再去一个接近原始值的数,得出2346。
- 使用比例因子的好处是整型比浮点型更容易压缩,节省磁盘空间。
- 测试:插入文档
PUT /book/_doc/3{"name": "spring开发基础","description": "spring 在java领域非常流行,java程序员都在用。","studymodel": "201001","pic": "group1/M00/00/01/wKhlQFqO4MmAOP53AAAcwDwm6SU490.jpg","timestamp": "2018-07-04 18:28:58","price": 38.6}
4.8 复杂数据类型
4.8.1 multivalue field多值字段
- 类似
{tags:["tag1","tag2"]}这样的数组,建立映射的时候和文本类型是一样的,当然,数据类型不能混用。
4.8.2 empty field空值字段
- 如果是文本类型或关键字类型的,可以设置空值字段为null。
- 如果是多值字段,类似于数组,可以设置空值字段为[]或[null]。
4.8.3 object field对象字段
- 存储对象字段:
PUT /company/_doc/1{"address": {"country": "china","province": "guangdong","city": "guangzhou"},"name": "jack","age": 27,"join_date": "2019-01-01"}
- 查看映射:
GET /company/_mapping
- 返回:
{"company" : {"mappings" : {"properties" : {"address" : {"properties" : {"city" : {"type" : "text","fields" : {"keyword" : {"type" : "keyword","ignore_above" : 256}}},"country" : {"type" : "text","fields" : {"keyword" : {"type" : "keyword","ignore_above" : 256}}},"province" : {"type" : "text","fields" : {"keyword" : {"type" : "keyword","ignore_above" : 256}}}}},"age" : {"type" : "long"},"join_date" : {"type" : "date"},"name" : {"type" : "text","fields" : {"keyword" : {"type" : "keyword","ignore_above" : 256}}}}}}}
- 底层存储机制:
- ①如果是Object:
{"address": {"country": "china","province": "guangdong","city": "guangzhou"},"name": "jack","age": 27,"join_date": "2017-01-01"}
- 底层存储:
{"name": [jack],"age": [27],"join_date": [2017-01-01],"address.country": [china],"address.province": [guangdong],"address.city": [guangzhou]}
- ②如果是对象数组:
{"authors": [{ "age": 26, "name": "Jack White"},{ "age": 55, "name": "Tom Jones"},{ "age": 39, "name": "Kitty Smith"}]}
- 底层存储:
{"authors.age": [26, 55, 39],"authors.name": [jack, white, tom, jones, kitty, smith]}

若有收获,就点个赞吧
0 人点赞
