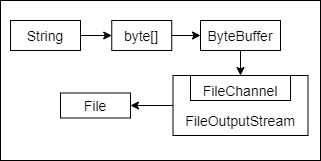
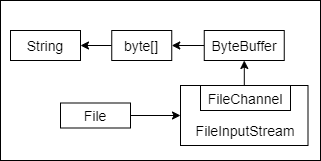
通道与流:
- 通道可以同时进行读和写,而流只能读或者写
- 通道可以实现异步读写数据
- 通道可以从缓冲读数据,也可以写数据到缓冲
- Buffer <—> Channel
java.nio.channels 接口:
public interface Channel extends Closeable {public boolean isOpen();public void close() throws IOException;}
- isOpen():检查一个通道是否打开
- close():关闭一个打开的通道
InterruptibleChannel 是一个标记接口,当被通道使用时可以标示该通道是可以中断的(Interruptible)。
打开通道
通道是访问 IO 服务的导管,IO 可以分为广义的两大类别:
- File IO :文件(file)通道
- FileChannel 类:用于文件数据读写
- Stream IO:套接字(socket)通道
- SocketChannel 类:用于 TCP 客户端数据的读写
- ServerSocketChannel 类:用于 TCP 服务端数据的读写
- DatagramChannel 类:用于 UDP 数据的读写
FileChannel
FileChannel 主要使用来对本地文件进行 IO 操作,常见的方法有:
- int read(ByteBuffer dst):从通道中读取数据并放到缓冲区中国
- int write(ByteBuffer src):把缓冲区的数据写到通道中
- long transferFrom(ReadableByteChannel src , long position , long count):从目标通道中复制数据到当前通道
- long transferTo(long position , long count , WritableByteChannel target):把数据从当前通道复制给目标通道
示例一、本地文件写数据:
public static void main(String[] args) throws Exception {String str = "世界,你好";// 1.创建一个输出流FileOutputStream fos = new FileOutputStream("demo.txt");// 2.通过 fos 获取对应的 FileChannel// 注意:FileChannel 的真实类型为其实现类 FileChannelImplFileChannel channel = fos.getChannel();// 3.创建一个缓冲区:ByteBufferByteBuffer buffer = ByteBuffer.allocate(1024);// 4.将str转换成的字节数组写入缓冲区buffer.put(str.getBytes());// 5.缓冲区读写切换buffer.flip();// 6.将缓冲区的数据写入通道channel.write(buffer);// 7.关闭文件输出流channel.close();fos.close();}
示例二、本地文件读数据:
public static void main(String[] args) throws Exception {// 1.创建文件输入流File file = new File("demo.txt");FileInputStream fis = new FileInputStream(file);// 2.获取 FileChannelFileChannel channel = fis.getChannel();// 3.创建缓冲区 ByteBuffer// file.length() 获取文件大小ByteBuffer buffer = ByteBuffer.allocate((int) file.length());// 4.将数据从通道中写入缓冲区channel.read(buffer);// 5.直接通过 buffer.array() 获取缓冲区中的数组String str = new String(buffer.array());System.out.println(str);// 6.关闭文件输入流channel.close();fis.close();}
示例三:使用一个 Buffer 完成文件的读取
public static void main(String[] args) throws Exception {// 1.创建输入、输出流File source = new File("source.txt");FileInputStream fis = new FileInputStream(source);File target = new File("target.txt");FileOutputStream fos = new FileOutputStream(target);// 2.获取 ChannelFileChannel fisChannel = fis.getChannel();FileChannel fosChannel = fos.getChannel();// 3.创建缓冲区ByteBuffer buffer = ByteBuffer.allocate(1024);// 4.循环读取source中的数据,并放入target中int read;// 输入管道中读取数据,read为读取的数据量while ((read = fisChannel.read(buffer)) != -1) {// 缓冲区切换到读模式buffer.flip();// 将 buffer 中的数据写入输出管道 fosChannelfosChannel.write(buffer);// 清空缓冲区buffer.clear();}// 5.关闭流fisChannel.close();fis.close();fosChannel.close();fos.close();}
示例四:使用 transferFrom 方法实现文件拷贝
public static void main(String[] args) throws Exception {// 1.创建输入、输出流File source = new File("source.txt");FileInputStream fis = new FileInputStream(source);File target = new File("target.txt");FileOutputStream fos = new FileOutputStream(target);// 2.获取 ChannelFileChannel fisChannel = fis.getChannel();FileChannel fosChannel = fos.getChannel();// 3.使用 transferFrom 方法从通道中直接读取数据fosChannel.transferFrom(fisChannel, 0, source.length());// 4.关闭通道和流fisChannel.close();fis.close();fosChannel.close();fos.close();}
Buffer 和 Channel 使用细节:
1、ByteBuffer 支持类型化的 put 和 get,put 放入的是什么数据类型,get 就应该使用相同的数据类型来取出,否则抛出 BufferUnderflowException 异常
public static void main(String[] args) {ByteBuffer buffer = ByteBuffer.allocate(1024);// 1.往缓冲区中存放带类型的值buffer.putInt(12);buffer.putFloat(12.02f);buffer.putDouble(12.03);buffer.putChar('f');// 2.从缓冲区获取带类型的参数// 当获取的类型与存放的类型不一致时,抛出BufferUnderflowException异常buffer.flip();System.out.println(buffer.getInt());System.out.println(buffer.getFloat());System.out.println(buffer.getDouble());System.out.println(buffer.getChar());}
2、可以将一个普通的 Buffer 转成只读 Buffer: Buffer.asReadOnlyBuffer()
public static void main(String[] args) {ByteBuffer buffer = ByteBuffer.allocate(64);// 数据填充for (int i = 0; i < 64; i++) {buffer.put((byte) i);}// 读取buffer.flip();// 得到一个只读的 BufferByteBuffer readOnlyBuffer = buffer.asReadOnlyBuffer();System.out.println(readOnlyBuffer.getClass());// 读取while (readOnlyBuffer.hasRemaining()) {System.out.println(readOnlyBuffer.get());}}
3、NIO 还提供了 MappedByteBuffer,可以让文件直接在内存(堆外的内存)中进行修改,而如何同步到文件由 NIO 来完成
public static void main(String[] args) throws Exception {// MappedByteBuffer 可让文件直接在堆外内存修改,操作系统不需要拷贝一次File file = new File("source.txt");RandomAccessFile randomAccessFile = new RandomAccessFile(file, "rw");// 获取对应的通道FileChannel channel = randomAccessFile.getChannel();/*** 实际类型 DirectByteBuffer,在操作数据时如果超出范围,抛出 IndexOutOfBoundsException异常* 参数1:FileChannel.MapMode.READ_WRITE 使用的读写模式* 参数2:0 可以直接修改的起始位置* 参数3:file.length() 映射到内存的大小(不是索引位置),即 source.txt 的多少个字节映射到内存,可以直接修改的范围就是 0 - file.length()*/MappedByteBuffer map = channel.map(FileChannel.MapMode.READ_WRITE, 0, file.length());map.put(0,(byte)'H');map.put(1,(byte)'E');// 关闭流randomAccessFile.close();}
4、NIO 支持通过多个 Buffer (即 Buffer 数组)完成读写操作,即 Scattering 和 Gatering
public static void main(String[] args) throws Exception {// Scattering:将数据写入到 buffer,可以采用 buffer 数组,依次写入[分散]// Gathering:从 buffer 读取数据时,可以采用 buffer 数组,依次读// 使用 ServerSocketChannel 和 SocketChannel 网络ServerSocketChannel serverSocketChannel = ServerSocketChannel.open();InetSocketAddress inetSocketAddress = new InetSocketAddress(8888);// 绑定端口到socket,并启动serverSocketChannel.socket().bind(inetSocketAddress);// 创建buffer数组ByteBuffer[] buffers = new ByteBuffer[2];buffers[0] = ByteBuffer.allocate(5);buffers[1] = ByteBuffer.allocate(5);// 等待客户端连接SocketChannel socketChannel = serverSocketChannel.accept();int messageLength = 10; // 假定从客户端接受10个字节while (true) {int read = 0;while (read < messageLength) {long l = socketChannel.read(buffers);read += l; // 累计读取的字符数// 打印当前buffer的position和limitArrays.stream(buffers).map(buffer -> "position=" + buffer.position() + ",limit=" + buffer.limit()).forEach(System.out::println);}Arrays.asList(buffers).forEach(Buffer::flip);// 将数据回显到客户端long byteWrite = 0;while (byteWrite < messageLength) {long l = socketChannel.write(buffers);byteWrite += l;}// 将所有的buffers进行clearArrays.asList(buffers).forEach(Buffer::clear);}}

