官网:https://spring.io/projects/spring-cloud
查看版本依赖信息:https://start.spring.io/actuator/info
发布计划:
- BUILD-XXX:开发版,团队内部使用
- M:里程碑版,同时标注 PRE,表示预览版
- RC:候选发布版,正式发布版的前一个观察期
- SR:正式发布版
- GA:稳定版
Spring Cloud:一套微服务解决方案
Eureka
注册中心:
- 目的:用于完成服务的注册与发现
- 常见的注册中心:
- Netflix Eureka
- Alibaba Nacos
- HashiCorp Consul
- Apache Zookeeper
Eureka 文档:
- https://docs.spring.io/spring-cloud-netflix/docs/current/reference/html/
- https://github.com/Netflix/eureka
Eureka 工作流程: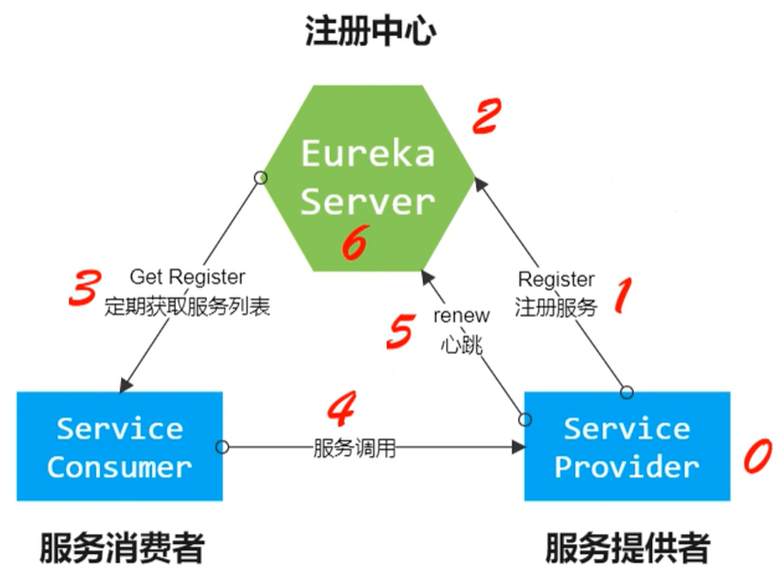
单实例注册中心 eureka-server
1、创建Maven父项目:
<parent><groupId>org.springframework.boot</groupId><artifactId>spring-boot-starter-parent</artifactId><version>2.2.4.RELEASE</version></parent><packaging>pom</packaging><dependencyManagement><dependencies><dependency><groupId>org.springframework.cloud</groupId><artifactId>spring-cloud-dependencies</artifactId><version>Hoxton.SR1</version><type>pom</type><scope>import</scope></dependency></dependencies></dependencyManagement>
2、创建Eureka服务端:
<dependencies><!-- netflix eureka server 依赖 --><dependency><groupId>org.springframework.cloud</groupId><artifactId>spring-cloud-starter-netflix-eureka-server</artifactId></dependency><!-- SpringWeb --><dependency><groupId>org.springframework.boot</groupId><artifactId>spring-boot-starter-web</artifactId></dependency><!-- spring actuator --><dependency><groupId>org.springframework.boot</groupId><artifactId>spring-boot-starter-actuator</artifactId></dependency><!-- springboot测试 --><dependency><groupId>org.springframework.boot</groupId><artifactId>spring-boot-starter-test</artifactId><exclusions><exclusion><groupId>org.junit.vintage</groupId><artifactId>junit-vintage-engine</artifactId></exclusion></exclusions></dependency></dependencies>
3、创建启动类:
@SpringBootApplication@EnableEurekaServerpublic class EurekaServerApp {public static void main(String[] args) {SpringApplication.run(EurekaServerApp.class, args);}}
4、创建配置文件 application.yml:
server:port: 8761spring:application:name: eureka-server #应用名称# 配置eureka,单节点配置eureka:instance:hostname: localhost #主机名,不配置则根据操作系统的主机名来获取client:register-with-eureka: false #是否将自身注册到注册中心,默认truefetch-registry: false #是否从注册中心获取服务注册信息,默认为trueservice-url: #注册中心对外暴露的注册地址defaultZone: http://${eureka.instance.hostname}:${server.port}/eureka/
5、点击运行后,访问:http://localhost:8761/
Eureka-server 注册中心集群
创建多个 Eureka 服务端并相互注册:
- 同一个集群中,应用名称应保持一致 spring.application.name 属性一致
- 在同一个集群 n 个服务端中,每个 server 都注册到其他的 n-1 个server
服务端一:
server:port: 8760spring:application:name: eureka-server #应用名称(同一集群下相同)# 配置eureka,集群配置eureka:instance:hostname: eureka00 #主机名,不配置则根据操作系统的主机名来获取client:#设置服务注册中心,指向另一个注册中心service-url:defaultZone: http://localhost:8762/eureka/,http://localhost:8761/eureka/
服务端二:
server:port: 8761spring:application:name: eureka-server #应用名称# 配置eureka,集群配置eureka:instance:hostname: eureka01 #主机名,不配置则根据操作系统的主机名来获取client:#设置服务注册中心,指向另一个注册中心service-url:defaultZone: http://localhost:8760/eureka/,http://localhost:8761/eureka/
服务端三:
server:port: 8762spring:application:name: eureka-server #应用名称# 配置eureka,集群配置eureka:instance:hostname: eureka02 #主机名,不配置则根据操作系统的主机名来获取client:#设置服务注册中心,指向另一个注册中心service-url:defaultZone: http://localhost:8760/eureka/,http://localhost:8761/eureka/
其他属性设置
显示 IP + 端口:一个普通的 Netflix Eureka 实例注册的 ID 等于其主机名(即每个主机仅提供一项服务)
- Spring Cloud Eureka 提供了默认值,${spring.cloud.client.hostname}:${spring.application.name}:${spring.application.instance_id}:${server.port},即 主机名:应用名:应用端口
- 也可以进行自定义:
eureka:instance:prefer-ip-address: true #是否使用ip地址注册instance-id: ${spring.cloud.client.ip-address}:${server.port} #ip:port
服务提供者 service-provider
1、创建项目,导入依赖:
<dependencies><!-- netflix eureka client 依赖 --><dependency><groupId>org.springframework.cloud</groupId><artifactId>spring-cloud-starter-netflix-eureka-client</artifactId></dependency><!-- SpringWeb --><dependency><groupId>org.springframework.boot</groupId><artifactId>spring-boot-starter-web</artifactId></dependency><!-- spring actuator --><dependency><groupId>org.springframework.boot</groupId><artifactId>spring-boot-starter-actuator</artifactId></dependency><dependency><groupId>org.projectlombok</groupId><artifactId>lombok</artifactId><version>1.18.16</version></dependency><!-- springboot测试 --><dependency><groupId>org.springframework.boot</groupId><artifactId>spring-boot-starter-test</artifactId><exclusions><exclusion><groupId>org.junit.vintage</groupId><artifactId>junit-vintage-engine</artifactId></exclusion></exclusions></dependency></dependencies>
2、创建启动类
@SpringBootApplication// 开启EurekaClient注解,当前版本如果配置Eureka注册中心,默认会开启该注解//@EnableEurekaClientpublic class ServiceProviderApp {public static void main(String[] args) {SpringApplication.run(ServiceProviderApp.class, args);}}
3、创建配置文件
server:port: 7000spring:application:name: service-provider #应用名称(集群下相同)eureka:instance:prefer-ip-address: true #是否使用ip地址注册instance-id: ${spring.cloud.client.ip-address}:${server.port}client:service-url: #设置服务注册中心地址defaultZone: http://localhost:8760/eureka/,http://localhost:8761/eureka/,http://localhost:8761/eureka/
4、创建实体类
@Data@NoArgsConstructor@AllArgsConstructorpublic class ProductDto implements Serializable {private Integer id;private String productName;private Integer productNum;private Double productPrice;}
5、编写服务
@Servicepublic class ProductService {public List<ProductDto> selectProductList() {return Arrays.asList(new ProductDto(1, "华为手机", 2, 5888D),new ProductDto(2, "联想笔记本", 1, 6888D),new ProductDto(3, "小米平板", 5, 2666D));}}
6、编写控制器
@RestController@RequestMapping("/product")public class ProductController {@Autowiredprivate ProductService productService;@GetMapping("/list")public List<ProductDto> selectProductList(){return productService.selectProductList();}}
创建服务消费者 service-consumer
1、创建项目,引入依赖,与服务提供者 Service-Provider 一致
2、创建启动类
3、创建配置项
server:port: 8000spring:application:name: service-consumer #应用名称(集群下相同)eureka:instance:prefer-ip-address: true #是否使用ip地址注册instance-id: ${spring.cloud.client.ip-address}:${server.port}client:registry-fetch-interval-seconds: 10 #每隔多久去服务器拉取注册信息,默认30sservice-url: #设置服务注册中心地址defaultZone: http://localhost:8760/eureka/,http://localhost:8761/eureka/,http://localhost:8761/eureka/
4、创建实体类
@Data@AllArgsConstructor@NoArgsConstructorpublic class Order implements Serializable {private Integer id;private String orderNo;private String orderAddress;private Double totalPrice;private List<ProductDto> productDtoList;}@Data@AllArgsConstructor@NoArgsConstructorpublic class ProductDto implements Serializable {private Integer id;private String productName;private Integer productNum;private Double productPrice;}
5、创建服务接口:
public interface OrderService {Order selectOrderById(Integer id);}
对于服务的消费有三种实现方式:
- DiscoveryClient:通过元数据获取服务信息
- LoadBanlancerClient:Ribbon负载均衡
- @LoadBalanced:通过注解开启Ribbon的负载均衡
使用 DiscoveryClient:
SpringBoot不提供任何自动配置的 RestTemplate bean,所以需要在启动类中注入 RestTemplate
@SpringBootApplicationpublic class ServiceConsumer01 {public static void main(String[] args) {SpringApplication.run(ServiceConsumer01.class, args);}@Beanpublic RestTemplate restTemplate(){return new RestTemplate();}}
创建服务实现类 ```java import org.springframework.cloud.client.discovery.DiscoveryClient; //导入Spring提供的DiscoveryClient,而不是Eureka自带的
@Service public class OrderServiceImpl implements OrderService {
@Autowiredprivate RestTemplate restTemplate;@Autowiredprivate DiscoveryClient discoveryClient;@Overridepublic Order selectOrderById(Integer id) {return new Order(id, "order-001", "中国", 123357D,selectProductListByDiscoveryClient());}private List<ProductDto> selectProductListByDiscoveryClient() {StringBuffer sb = null;// 获取服务列表List<String> services = discoveryClient.getServices();if (CollectionUtils.isEmpty(services)) {return null;}// 根据服务名称获取服务List<ServiceInstance> instances = discoveryClient.getInstances("service-provider");if (CollectionUtils.isEmpty(instances)) {return null;}ServiceInstance si = instances.get(0);sb = new StringBuffer();sb.append("http://").append(si.getHost()).append(":").append(si.getPort()).append("/product/list");// 使用RestTemplate进行请求ResponseEntity<List<ProductDto>> response = restTemplate.exchange(sb.toString(),HttpMethod.GET,null,new ParameterizedTypeReference<List<ProductDto>>() {});return response.getBody();}
}
使用LoadBanlancerClient:Ribbon负载均衡```javaimport org.springframework.cloud.client.loadbalancer.LoadBalancerClient;@Servicepublic class OrderServiceImpl implements OrderService {@Autowiredprivate RestTemplate restTemplate;@Autowiredprivate LoadBalancerClient loadBalancerClient; // Ribbon负载均衡@Overridepublic Order selectOrderById(Integer id) {return new Order(id, "order-001", "中国", 123357D,selectProductListByDiscoveryClient());}private List<ProductDto> selectProductListByDiscoveryClient() {StringBuffer sb = null;// 根据服务名称获取一个服务ServiceInstance si = loadBalancerClient.choose("service-provider");if (null == si) {return null;}// 请求地址sb = new StringBuffer();sb.append("http://").append(si.getHost()).append(":").append(si.getPort()).append("/product/list");// 封装了返回数据ResponseEntity<List<ProductDto>> response = restTemplate.exchange(sb.toString(),HttpMethod.GET,null,new ParameterizedTypeReference<List<ProductDto>>() {});return response.getBody();}}
@LoadBalanced:通过注解开启Ribbon的负载均衡
启动类注入RestTemplate时添加@LoadBalanced负载均衡注解,表示这个RestTemplate在请求时拥有负载均衡的能力
@SpringBootApplicationpublic class ServiceConsumer01 {public static void main(String[] args) {SpringApplication.run(ServiceConsumer01.class, args);}@Bean// 负载均衡注解@LoadBalancedpublic RestTemplate restTemplate(){return new RestTemplate();}}
直接通过应用名称调用:
@Servicepublic class OrderServiceImpl implements OrderService {@Autowiredprivate RestTemplate restTemplate;@Overridepublic Order selectOrderById(Integer id) {return new Order(id, "order-001", "中国", 123357D,selectProductListByDiscoveryClient());}private List<ProductDto> selectProductListByDiscoveryClient() {// 封装了返回数据ResponseEntity<List<ProductDto>> response = restTemplate.exchange(// 通过服务名称进行调用"http://service-provider/product/list",HttpMethod.GET,null,new ParameterizedTypeReference<List<ProductDto>>() {});return response.getBody();}}
6、控制器
@RestControllerpublic class OrderController {@Autowiredprivate OrderService orderService;@GetMapping("/{id}")public Order selectOrderById(@PathVariable("id") Integer id) {return orderService.selectOrderById(id);}}
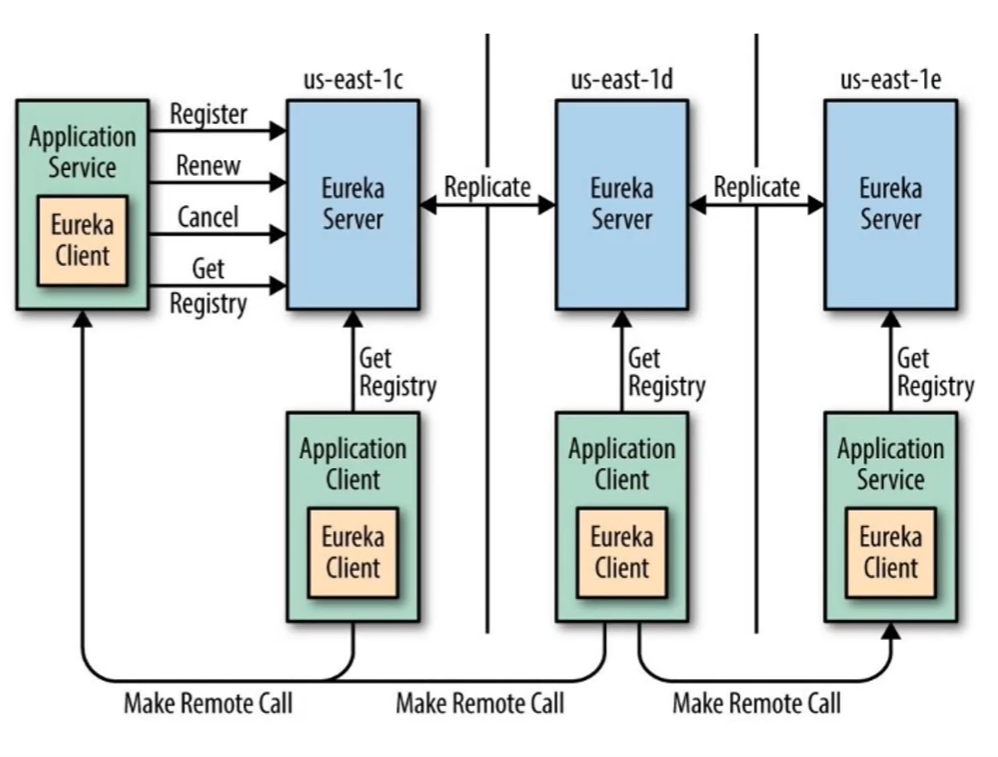
Eureka 架构原理
- Register:服务注册,将自身的 IP 和端口注册给 Eureka
- Renew:服务续约,发送心跳包,每 30 秒一次,告诉 Eureka 自身存活,如果超过 90s 还没有发送心跳,则宕机
- Cancel:服务下线,当 Provider 关闭时会向 Eureka 发送消息,把自己从服务列表中删除,防止 Consumer 调用到不存在的服务
- Get Register:获取服务注册列表,用于获取其他服务列表
- Replicate:集群中数据同步,Eureka 集群中的数据复制和同步
- Make Remote Call:远程调用,完成服务的远程调用过程
CAP 原则
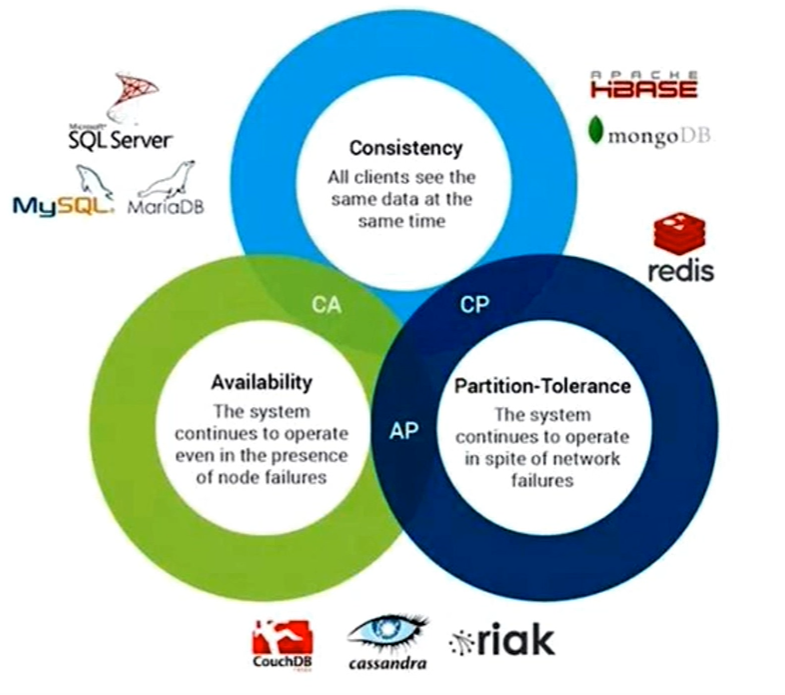
CAP 原则:指的是在一个分布式系统中,一致性(Consistency)、可用性(Availability)、分区容错性(Partition tolerance),这三个要素最多只能同时实现两点,不可能三者兼顾
- 一致性(C):在分布式系统中的所有数据备份,在同一时刻是否同样的值。(等同于所有节点访问同一份最新的数据副本)
- 可用性(A):保证每个请求不管成功或者失败都有响应
- 分区容忍性(P):系统中任意信息的丢失或失败不会影响系统的继续运作
取舍策略:
- CA:放弃了分区容错性,即每份数据只保存一份,则可以保证强一致性和可用性,如单体应用的 mysql
- CP:不要求可用,要求分区数据的强一致性是可能的,即在数据同步完成之前用户不能正常访问,如 Redis、HBase等,对这些分布式数据库来说,数据一致性是基本要求
- AP:要高可用和分区容错,则会放弃强一致性,一旦分区发生节点之间的故障,为了该可用,每个节点只能用本地数据提供服务,会造成全局数据的不一致
Eureka 自我保护
一般情况下,服务在 Eureka 上注册后,会每 30 秒发送心跳包,Eureka通过心跳来判断服务是否健康,同时会定期删除超过 90 s 没有发送心跳的服务。
自我保护模式:Eureka Server 在运行期间会去统计心跳失败比例在 15 分钟之内是否低于 85%,如果低于 85%,Eureka Server则会将这些实例保护起来,让这些实例不会过期,同时提示一个警告,这种算法叫做 Eureka Server 的自我保护模式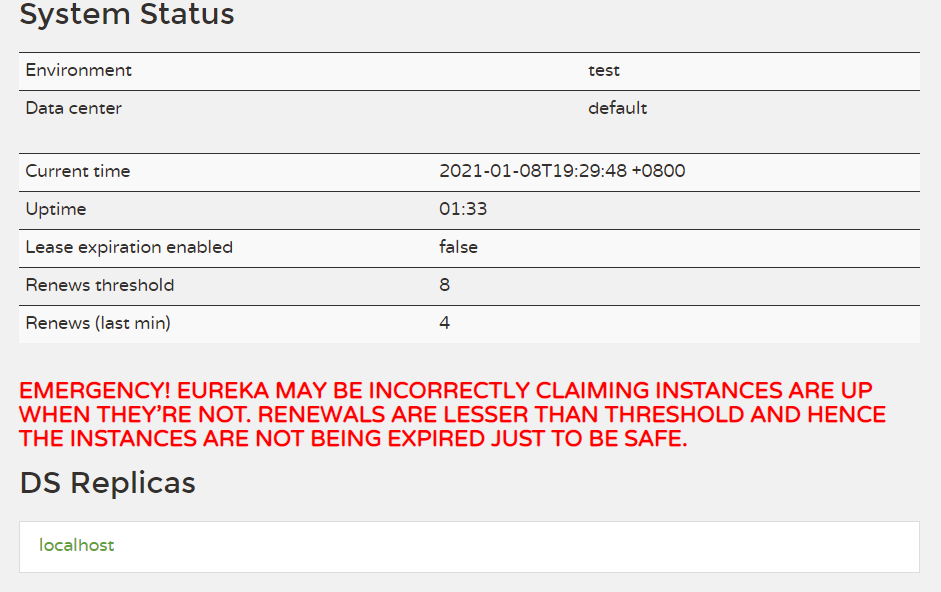
原因:
- 因为同时保留“好数据”与“坏数据”总比丢掉任何数据好,当网络故障恢复后,这个节点会退出“自我保护模式”
- Eureka 还有客户端缓存功能(也就是微服务的缓存功能),即使 Eureka 集群中所有节点都宕机失效,微服务的 Provider 和 Consumer 都能正常通信
- 微服务的负载均衡策略会自动提出死亡的微服务节点
关闭自我保护:
eureka:server:enable-self-preservation: false #false:关闭自我保护模式;true:开启自我保护模式eviction-interval-timer-in-ms: 60000 #清理间隔(单位:毫秒,默认60*1000)
Eureka 优雅停服
配置了优雅停服以后,将不需要 Eureka Server 中配置关闭自我保护
1、添加依赖:
<!-- spring actuator --><dependency><groupId>org.springframework.boot</groupId><artifactId>spring-boot-starter-actuator</artifactId></dependency>
2、配置文件:服务提供者配置度量指标监控与健康检查
# 度量指标监控与健康检查management:endpoints:web:exposure:include: shutdown #开启shutdown端点访问endpoint:shutdown:enabled: true #开启shutdown实现优雅停服
3、使用 POST 请求访问: http://localhost:8000/actuator/shutdown,就能停止服务
Eureka 安全认证
1、添加依赖:在三个Eureka Server中添加Spring Security依赖
<!-- spring-boot-security --><dependency><groupId>org.springframework.boot</groupId><artifactId>spring-boot-starter-security</artifactId></dependency>
2、配置文件:注册中心配置安全认证
spring:#安全认证security:user:name: rootpassword: 123456
3、修改访问集群节点的url:即在主机前使用 username:password@ 标注访问账号密码
# 配置eureka,集群配置eureka:instance:hostname: eureka00 #主机名,不配置则根据操作系统的主机名来获取prefer-ip-address: true #是否使用ip地址注册instance-id: ${spring.cloud.client.ip-address}:${server.port}client:#设置服务注册中心,指向另一个注册中心service-url:defaultZone: http://root:123456@localhost:8762/eureka/,http://root:123456@localhost:8761/eureka/
4、过滤CSRF:Eureka 会自动化配置 CSRF 防御机制,Spring Security 认为 POST、PUT、DELETE http methods 都是有风险的,如果这些方法在发送是没有带上 CSRF token 的话,会被直接拦截并返回 403 forbidden
解决办法:
首先注册中心配置一个 @EnableWebSecurity 配置类,继承 org.springframework.security.config.annotation.web.configuration.WebSecurityConfigurationAdapter ,然后重写 configure 方法
方案一:使CSRF忽略 /eureka/** 的所有请求
@EnableWebSecuritypublic class WebSecurityConfig extends WebSecurityConfigurerAdapter {@Overrideprotected void configure(HttpSecurity http) throws Exception {// 访问eureka控制台和/actuator时能作安全控制super.configure(http);// 忽略/eureka/**的所有请求http.csrf().ignoringAntMatchers("/eureka/**");}}
方案二:保持密码验证的同时禁用CSRF防御机制
@EnableWebSecuritypublic class WebSecurityConfig extends WebSecurityConfigurerAdapter {@Overrideprotected void configure(HttpSecurity http) throws Exception {// 直接disable的话会把安全验证也禁掉http.csrf().disable().authorizeRequests().anyRequest().authenticated().and().httpBasic();}}

若有收获,就点个赞吧
0 人点赞
