IOC:Inverse Of Controller,控制反转
- 反转了依赖关系的满足方式,由之前的自己创建依赖对象,变为由工厂推送,(由主动创建变为被动获取,即所谓的反转),解决了具有依赖关系的组件之间的强耦合
DI:依赖注入
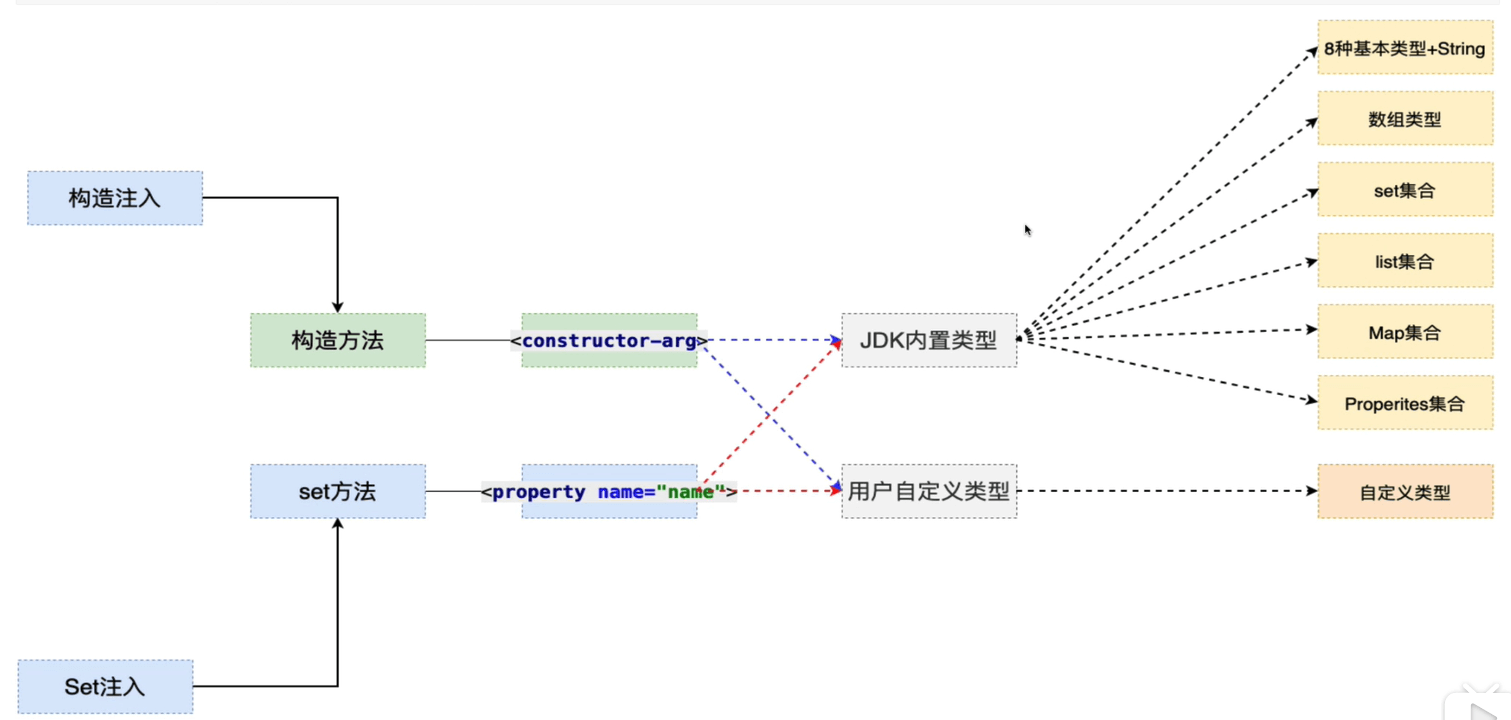
依赖注入:在Spring创建对象的同时,为其属性赋值,称之为依赖注入。 依赖注入的三种方式:
- Set注入
- 构造方法注入
- 自动查找
在Spring XML配置中,只有一种声明bean的方式,即使用 <bean> 标签并指定 class 属性
Set注入
创建对象时,Spring工厂会通过Set方法为对象的属性赋值
使用set注入有两种方法:
1、使用<property>标签
bean标签指定创建一个实例,property指使用set方法对相应的属性进行注入:
| 注入类型 | 实现 |
|---|---|
| 注入直接量 | 使用<value>标签,特殊字符需要转义 |
| 引用bean | 使用<ref>标签实现,注意 bean 属性和 local 属性的区别 |
| 使用内部bean | 使用<property name="inner"><bean class="内部类路径"/></property> |
| 注入集合类型的属性 | 分别使用<list>、<set>、<map>、<props>标签实现 |
| 注入null和空字符串值 | 使用<null/>注入null值,使用<value></value>注入空字符串 |
2、使用 p- 命名空间:p- 命名空间是 bean 的一个属性,使用
- 在
<beans>标签中引入xmlns:p="http://www.springframework.org/schema/p"命名空间 - 基本语法:
p:属性名称[-ref]="属性值"
属性名称可以使用arg0,...或者具体的属性名 - p-命名空间无法直接导入集合,需要使用 utils 工具
使用<property>标签
1、创建一个目标 Bean 类型:
// Address实体@Data@AllArgsConstructorpublic class Address {private String name;private Integer passport;}// User实体@Datapublic class User {private Integer id;private String name;private Date birthday;private String[] hobbies;private Set<String> phone;private List<String> friends;private Map<String,Integer> scores;private Properties files;// 自建对象private Address address;private Map<Integer,Address> map;// 内部beanprivate InnerClass inner;@Dataprivate static class InnerClass{private String name;}}
2、配置spring-context.xml文件:
<?xml version="1.0" encoding="UTF-8"?><beans xmlns="http://www.springframework.org/schema/beans"xmlns:xsi="http://www.w3.org/2001/XMLSchema-instance"xsi:schemaLocation="http://www.springframework.org/schema/beanshttps://www.springframework.org/schema/beans/spring-beans.xsd"><!-- bean对象配置 --><bean id="address" class="top.songfang.entity.Address"><constructor-arg name="name" value="北京"/><constructor-arg name="passport" value="18"/></bean><bean id="address1" class="top.songfang.entity.Address"><constructor-arg name="name" value="上海"/><constructor-arg name="passport" value="20"/></bean><bean id="user" class="top.songfang.entity.User"><!-- set方法注入 --><!-- 简单数据类型注入 --><property name="id" value="1"/><property name="name" value="张"/><property name="birthday" value="2002/12/23 12:20:30"/><!-- 复杂属性注入 --><!-- 数组注入 --><property name="hobbies"><array><value>篮球</value><value>足球</value><value>排球</value></array></property><!-- List注入 --><property name="phone"><list><value>135468</value><value>135588</value></list></property><!-- set注入--><property name="friends"><set><value>扎根</value><value>木哦</value></set></property><!-- map注入 --><property name="scores"><map><entry key="数学" value="78"/><entry key="英语" value="88"/></map></property><!-- properties --><property name="files"><props><prop key="英语">98</prop><prop key="数学">77</prop></props></property><!-- 自建对象 --><property name="address" ref="address"/><!-- map+自建对象 --><property name="map"><map><entry key="1" value-ref="address"/><entry key="2" value-ref="address1"/></map></property><!-- 内部类注入 --><property name="inner"><bean class="top.songfang.entity.User.InnerClass"><property name="name" value="内部类属性"/></bean></property></bean></beans>
使用 p- 命名空间
1、引入 p- 命名空间:在beans标签中新增xmlns:p="http://www.springframework.org/schema/p"
2、单靠 p- 命名空间无法实现集合属性的注入,因此如果需要使用 p- 命名空间注入集合属性,需要使用 util 工具,使用方法:
在
<beans>中引入 utils :<?xml version="1.0" encoding="UTF-8"?><beans xmlns="http://www.springframework.org/schema/beans"xmlns:xsi="http://www.w3.org/2001/XMLSchema-instance"xmlns:p="http://www.springframework.org/schema/p"xmlns:util="http://www.springframework.org/schema/util"xsi:schemaLocation="http://www.springframework.org/schema/beanshttps://www.springframework.org/schema/beans/spring-beans.xsdhttp://www.springframework.org/schema/utilhttps://www.springframework.org/schema/util/spring-util.xsd"></beans>
使用 utils 标签定义list、set、map等,再使用 p:xx-ref=”” 进行引入
| 元素 | 描述 |
|---|---|
<util:constant> |
引用某个类型的 public static域,并将其暴露为bean |
<util:list> |
创建一个 java.util.List类型的bean,其中包含值或引用 |
<util:map> |
创建一个 java.util.Map类型的bean,其中包含值或引用 |
<util:properties> |
创建一个 java.util.Properties类型的bean |
<util:property-path> |
引用一个 bean的属性(或内嵌属性),并将其暴露为bean |
<util:set> |
创建一个 java.util.Set类型的bean,其中包含值或引用 |
3、使用示例:
<util:list id="hobbies"><value>篮球</value><value>足球</value></util:list><bean id="user" class="top.songfang.entity.User"p:id="10"p:name="zhan"p:hobbies-ref="hobbies"/>
构造函数注入
在XML中使用构造器注入时,有两种基本的配置方案:
1、<constructor-arg>元素:
注意事项:
- 构造参数存个数不一样时,通过控制
<constructor-arg>标签的数量进行区分 - 构造参数个数一致时,通过在标签中引入 type 属性,进行类型的区分
<constructor-arg type="java.lang.String">
对上述User对象进行使用<constructor-arg>元素注入:
<?xml version="1.0" encoding="UTF-8"?><beans xmlns="http://www.springframework.org/schema/beans"xmlns:xsi="http://www.w3.org/2001/XMLSchema-instance"xsi:schemaLocation="http://www.springframework.org/schema/beanshttps://www.springframework.org/schema/beans/spring-beans.xsd"><!-- bean对象配置 --><bean id="address" class="top.songfang.entity.Address"><constructor-arg name="name" value="北京"/><constructor-arg name="passport" value="18"/></bean><bean id="address1" class="top.songfang.entity.Address"><constructor-arg name="name" value="上海"/><constructor-arg name="passport" value="20"/></bean><bean id="user" class="top.songfang.entity.User"><!-- 简单元素构造器注入 --><constructor-arg name="id" value="18"/><constructor-arg name="name" value="中"/><constructor-arg name="birthday" value="2002/12/23 12:20:30"/><!-- 复杂元素构造器注入 --><!-- 数组注入 --><constructor-arg name="hobbies"><array><value>篮球</value><value>足球</value><value>排球</value></array></constructor-arg><!-- List注入 --><constructor-arg name="phone"><list><value>135468</value><value>135588</value></list></constructor-arg><!-- set注入--><constructor-arg name="friends"><set><value>扎根</value><value>木哦</value></set></constructor-arg><!-- map注入 --><constructor-arg name="scores"><map><entry key="数学" value="78"/><entry key="英语" value="88"/></map></constructor-arg><!-- properties --><constructor-arg name="files"><props><prop key="英语">98</prop><prop key="数学">77</prop></props></constructor-arg><!-- 自建对象 --><constructor-arg name="address" ref="address"/><!-- map+自建对象 --><constructor-arg name="map"><map><entry key="1" value-ref="address"/><entry key="2" value-ref="address1"/></map></constructor-arg></bean></beans>
**
2、使用 c- 命名空间,c- 命令空间是<bean> 元素的一个属性:
- 引入 c- 命名空间:在
<beans>标签中新增xmlns:c="http://www.springframework.org/schema/c" - 使用:
注意事项:<!-- c:构造器参数名[-ref]="要注入的bean" --><bean id="address1" class="top.songfang.entity.Address"c:name="上海"c:passport="20"/>
参数名其他写法:
_n:n为参数,指参数在构造方法中的位置_:在构造方法只有一个参数时,可以不用标识参数<bean id="address1" class="top.songfang.entity.Address" c:_="上海"/>
c- 命名空间不支持集合的注入,如果需要注入集合需要使用 util 工具
自动化装配 bean
Spring从两个角度来实现自动化装配:
- 组件扫描(component scanning):Spring会自动发现应用上下文中所创建的bean
- 自动装配(autowiring):Spring自动满足bean之间的依赖
在spring-context.xml中开启组件扫描:<context:component-scan base-package="包名"/>
bean标签中有一个 autowire 属性,支持通过 type 和 name 的自动注入

若有收获,就点个赞吧
0 人点赞
