Servlet 是基于 Java 技术的 web 组件,容器托管的,用于生成动态内容。客户端通过 Servlet 容器实现的请求/应答模型。
java.servlet.Servlet 接口的源码:
public interface Servlet {public void init(ServletConfig config) throws ServletException;public ServletConfig getServletConfig();public void service(ServletRequest req, ServletResponse res)throws ServletException, IOException;public String getServletInfo();public void destroy();}
Servlet 基本使用
1、导入 Maven 依赖:Servlet 有两个版本,一个是3.0版本之前,为 servlet-api;一个是3.0版本之后,为 javax.servlet-api,使用时根据需求进行导入
<!-- Servlet3.0之前的版本为servlet-api --><dependency><groupId>javax.servlet</groupId><artifactId>servlet-api</artifactId><version>2.5</version><scope>provided</scope></dependency><!-- Servlet3.0之后的版本为javax.servlet-api --><dependency><groupId>javax.servlet</groupId><artifactId>javax.servlet-api</artifactId><version>4.0.1</version><scope>provided</scope></dependency>
2、编写一个自定义类,实现 Servlet 接口:
public class MyServlet implements Servlet {@Overridepublic void init(ServletConfig servletConfig) throws ServletException {System.out.println("Servlet init!");}@Overridepublic ServletConfig getServletConfig() {return null;}@Overridepublic void service(ServletRequest servletRequest, ServletResponse servletResponse) throws ServletException, IOException {servletResponse.getWriter().write("Hello World!");}@Overridepublic String getServletInfo() {return null;}@Overridepublic void destroy() {System.out.println("servlet destroy!");}}
3、在 web.xml 中配置这个 Servlet,idea可以自动生成 web.xml:
在项目文件夹上右击,选择 Add Framework Support
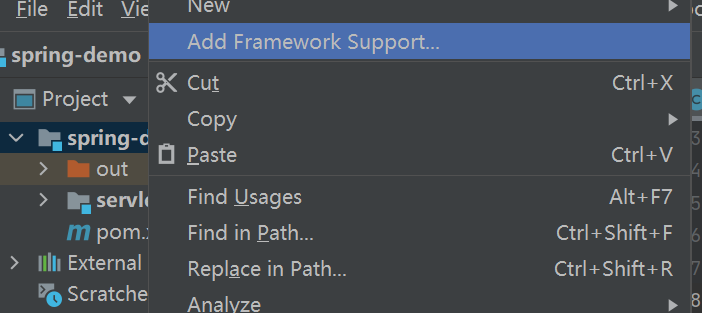
然后勾选 Web Application,idea会自动生成 web.xml 文件

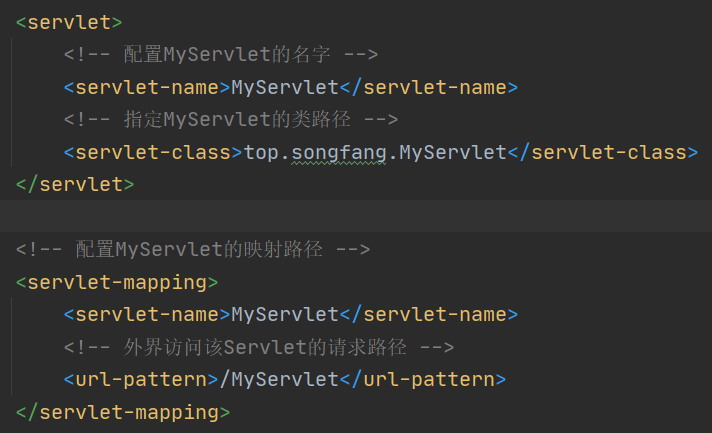
在生成的 web.xml 中配置自定义的 Servlet:
启动 tomcat,在浏览器中访问:localhost:8080/myServlet,能够看到返回值 Hello World!

若有收获,就点个赞吧
0 人点赞
