Virtual-DOM
Virtual-DOM 其实就是一颗对象树,没有什么特别的,这个对象树最终要映射到图形对象. Virtual-DOM 比较核心的是它的diff算法.
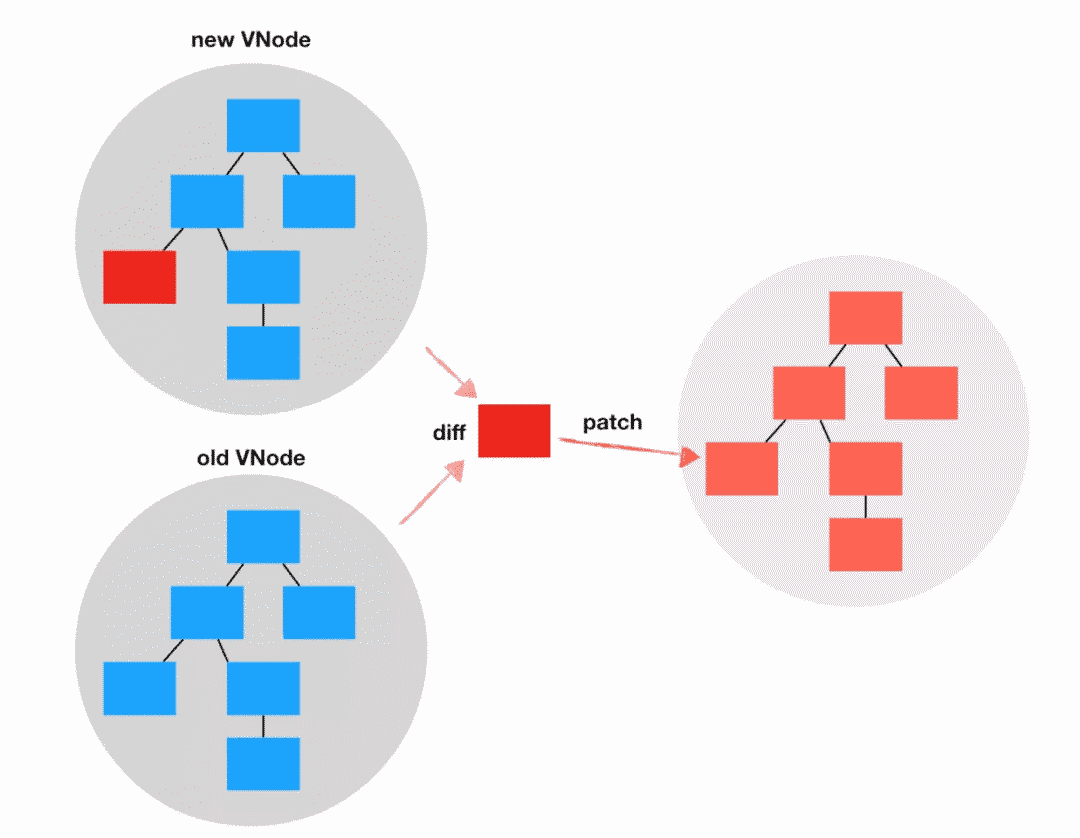
可以想象这里有一个DOM映射器,见名知义,这个‘DOM 映射器’的工作就是将 Virtual-DOM 对象树映射浏览器页面的 DOM,只不过为了提高 DOM 的’操作性能’. 它不是每一次都全量渲染整个 Virtual-DOM 树,而是支持接收两颗 Virtual-DOM 对象树(一个更新前,一个更新后), 通过 diff 算法计算出两颗 Virtual-DOM 树差异的地方,然后只应用这些差异的地方到实际的 DOM 树, 从而减少 DOM 变更的成本.
Virtual-DOM 是比较有争议性 。切记永远都不要离开场景去评判一个技术的好坏。
从性能上看, 框架再怎么牛逼它也是需要操作原生 DOM 的,而且它未必有使用 JQuery 手动操作 DOM 来得’精细’。框架不合理使用也可能出现修改一个小状态,导致渲染雪崩(大范围重新渲染)的情况; 同理 JQuery 虽然可以精细化操作 DOM,但是不合理的 DOM 更新策略可能也会成为应用的性能瓶颈。所以关键还得看怎么用。
那为什么需要 Virtual-DOM?
现如今硬件的性能越来越好,web 应用也越来越复杂,生产力也是要跟上的。尽管手动操作 DOM 可能可以达到更高的性能和灵活性,但是这样对大部分开发者来说太低效了,可以接受牺牲一点性能换取更高的开发效率的。
所以说 Virtual-DOM 更大的意义在于开发方式的改变: 声明式、 数据驱动,让开发者不需要关心 DOM 的操作细节(属性操作、事件绑定、DOM 节点变更),也就是说应用的开发方式变成了view=f(state), 这对生产力的解放是有很大推动作用的。
当然 Virtual-DOM 不是唯一,也不是第一个的这样解决方案。比如 AngularJS,Vue1.x 这些基于模板的实现方式,也可以说实现这种开发方式转变的。那相对于他们 Virtual-DOM 的买点可能就是更高的性能了,另外 Virtual-DOM 在渲染层上面的抽象更加彻底,不再耦合于 DOM 本身,比如可以渲染为 ReactNative,PDF,终端 UI 等等。
从 createElement 开始
很多初学者将 JSX 等价为 Virtual-DOM,其实这两者并没有直接的关系,JSX 不过是一个语法糖.
例如<a href="/"><span>Home</span></a>最终会转换为h('a', { href:'/' }, h('span', null, 'Home'))这种形式, h是 JSX Element 工厂方法.h 在 React 下约定是React.createElement, 而大部分 Virtual-DOM 框架则使用h。h 是 createElement 的别名,Vue 生态系统也是使用这个惯例。
可以使用@jsx注解或 babel 配置项来配置 JSX 工厂:
/*** @jsx h*/render(<div>hello jsx</div>, el);
现在来看看createElement, createElement 不过就是构造一个对象(VNode):
// ⚛️type 节点的类型,有DOM元素(string)和自定义组件,以及Fragment, 为null时表示文本节点exportfunctioncreateElement(type, props, children) {props.children = children;// ⚛️应用defaultPropsif (type != null && type.defaultProps != null)for (let i in type.defaultProps)if (props[i] === undefined) props[i] = type.defaultProps[i];let ref = props.ref;let key = props.key;// ...// ⚛️构建VNode对象return createVNode(type, props, key, ref);}exportfunctioncreateVNode(type, props, key, ref) {return { type, props, key, ref, /* ... 忽略部分内置字段 */constructor: undefined };}
通过 JSX 和组件,可以构造复杂的对象树:
render(<divclassName="container"><SideBar /><Body /></div>,root,);
Component 的实现
对于一个视图框架来说,组件就是它的灵魂, 就像函数之于函数式语言,类之于面向对象语言, 没有组件则无法组成复杂的应用.
组件化的思维推荐将一个应用分而治之, 拆分和组合不同级别的组件,这样可以简化应用的开发和维护,让程序更好理解。从技术上看组件是一个自定义的元素类型,可以声明组件的输入(props)、有自己的生命周期和状态以及方法、最终输出 Virtual-DOM 对象树, 作为应用 Virtual-DOM 树的一个分支存在.
Preact 的自定义组件是基于 Component 类实现的。对组件来说最基本的就是状态的维护,这个通过 setState 来实现:
functionComponent(props, context) {}// ⚛️setState实现Component.prototype.setState = function(update, callback) {// 克隆下一次渲染的State, _nextState会在一些生命周期方式中用到(例如shouldComponentUpdate)let s = (this._nextState !== this.state && this._nextState) ||(this._nextState = assign({}, this.state));// state更新if (typeof update !== 'function' || (update = update(s, this.props)))assign(s, update);if (this._vnode) { // 已挂载// 推入渲染回调队列, 在渲染完成后批量调用if (callback) this._renderCallbacks.push(callback);// 放入异步调度队列enqueueRender(this);}};
enqueueRender 将组件放进一个异步的批执行队列中,这样可以归并频繁的 setState 调用,实现也非常简单:
let q = [];// 异步调度器,用于异步执行一个回调const defer = typeofPromise == 'function'? Promise.prototype.then.bind(Promise.resolve()) // micro task: setTimeout; // 回调到setTimeoutfunctionenqueueRender(c) {// 不需要重复推入已经在队列的Componentif (!c._dirty && (c._dirty = true) && q.push(c) === 1)defer(process); // 当队列从空变为非空时,开始调度}// 批量清空队列, 调用Component的forceUpdatefunctionprocess() {let p;// 排序队列,从低层的组件优先更新?q.sort((a, b) => b._depth - a._depth);while ((p = q.pop()))if (p._dirty) p.forceUpdate(false); // false表示不要强制更新,即不要忽略shouldComponentUpdate}
上面的代码可以看出 setState 本质上是调用 forceUpdate 进行组件重新渲染的,来往下挖一挖 forceUpdate 的实现.
这里暂且忽略 diff, 将 diff 视作一个黑盒,他就是一个 DOM 映射器, 像上面说的 diff 接收两棵 VNode 树, 以及一个 DOM 挂载点, 在比对的过程中它可以会创建、移除或更新组件和 DOM 元素,触发对应的生命周期方法.
Component.prototype.forceUpdate = function(callback) { // callback放置渲染完成后的回调let vnode = this._vnode, dom = this._vnode._dom, parentDom = this._parentDom;if (parentDom) { // 已挂载过const force = callback !== false;let mounts = [];// 调用diff对当前组件进行重新渲染和Virtual-DOM比对// ⚛️暂且忽略这些参数, 将diff视作一个黑盒,他就是一个DOM映射器,dom = diff(parentDom, vnode, vnode, mounts, this._ancestorComponent, force, dom);if (dom != null && dom.parentNode !== parentDom)parentDom.appendChild(dom);commitRoot(mounts, vnode);}if (callback) callback();};
再看看 render 方法, 实现跟 forceUpdate 差不多,都是调用 diff 算法来执行 DOM 更新,只不过由外部指定一个 DOM 容器:
// 简化版export functionrender(vnode, parentDom) {vnode = createElement(Fragment, null, [vnode]);parentDom.childNodes.forEach(i => i.remove())let mounts = [];diffChildren(parentDom, null oldVNode, mounts, vnode, EMPTY_OBJ);commitRoot(mounts, vnode);}
梳理一下上面的流程: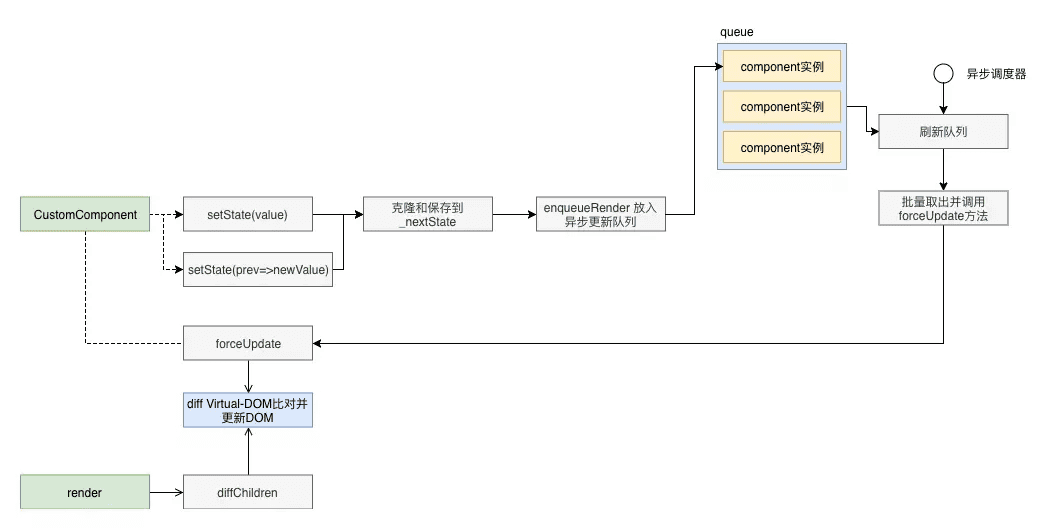 到目前为止没有看到组件的其他功能,如初始化、生命周期函数。这些特性在 diff 函数中定义,也就是说在组件挂载或更新的过程中被调用。
diff 算法
千呼万唤始出来,通过上文可以看出,createElement 和 Component 逻辑都很薄, 主要的逻辑还是集中在 diff 函数中. React 将这个过程称为 Reconciliation,在 Preact 中称为 Differantiate。
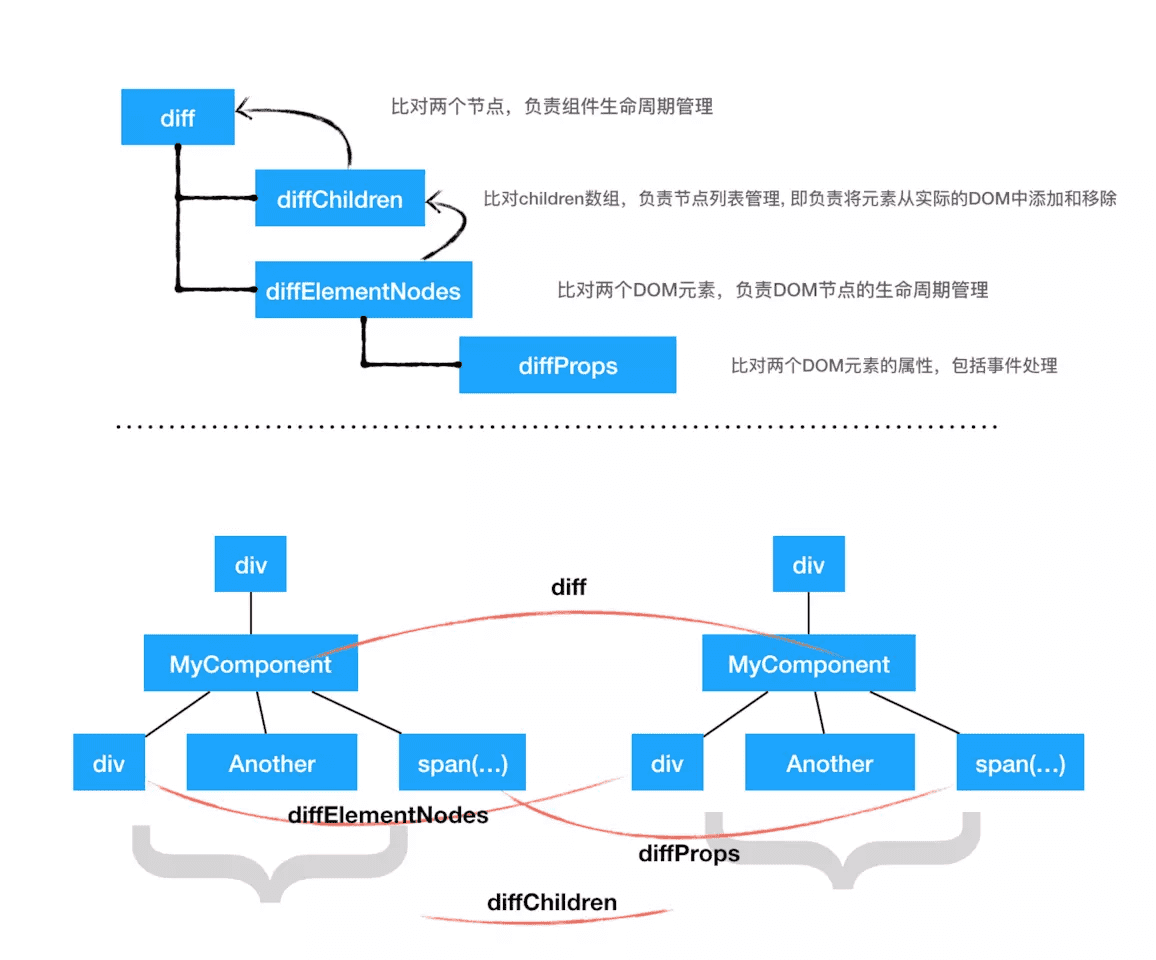
为了简化程序 Preact 的实现将 diff 和 DOM 杂糅在一起,但逻辑还是很清晰,看下目录结构就知道了:
src/diff├── children.js # 比对children数组├── index.js # 比对两个节点└── props.js # 比对两个DOM节点的props
```在深入 diff 程序之前,先看一下基本的对象结构, 方便后面理解程序流程. 先来看下 VNode 的外形:
type ComponentFactory
= preact.ComponentClass
| FunctionalComponent
;
interface VNode
{ // 节点类型, 内置DOM元素为string类型,而自定义组件则是Component类型,Preact中函数组件只是特殊的Component类型 type: string | ComponentFactory
| null;
props: P & { children: ComponentChildren } | string | number | null;
key: Key
ref: Ref
/**
* 内部缓存信息*/// VNode子节点
_children: Array
<a name="kesAy"></a>### `diffChildren`先从最简单的开始, 上面已经猜出 `diffChildren` 用于比对两个 VNode 列表.<br />如上图, 首先这里需要维护一个表示当前插入位置的变量 oldDOM, 它一开始指向 DOM childrenNode 的第一个元素, 后面每次插入更新或插入 newDOM,都会指向 newDOM 的下一个兄弟元素.<br />在遍历 newChildren 列表过程中,会尝试找出相同 key 的旧 VNode,和它进行 diff。如果新 VNode 和旧 VNode 位置不一样,这就需要移动它们;对于新增的 DOM,如果插入位置(oldDOM)已经到了结尾,则直接追加到父节点, 否则插入到 oldDOM 之前。<br />最后卸载旧 VNode 列表中未使用的 VNode.<br />来详细看看源码:```javascriptexportfunctiondiffChildren(parentDom, // children的父DOM元素newParentVNode, // children的新父VNodeoldParentVNode, // children的旧父VNode,diffChildren主要比对这两个Vnode的childrenmounts, // 保存在这次比对过程中被挂载的组件实例,在比对后,会触发这些组件的componentDidMount生命周期函数ancestorComponent, // children的直接父'组件', 即渲染(render)VNode的组件实例oldDom, // 当前挂载的DOM,对于diffChildren来说,oldDom一开始指向第一个子节点) {let newChildren = newParentVNode._children || toChildArray(newParentVNode.props.children, (newParentVNode._children = []), coerceToVNode, true,);let oldChildren = (oldParentVNode && oldParentVNode._children) || EMPTY_ARR;// ...// ⚛️遍历新childrenfor (i = 0; i < newChildren.length; i++) {childVNode = newChildren[i] = coerceToVNode(newChildren[i]); // 规范化VNodeif (childVNode == null) continue// ⚛️查找oldChildren中是否有对应的元素,如果找到则通过设置为undefined,从oldChildren中移除// 如果没有找到则保持为nulloldVNode = oldChildren[i];for (j = 0; j < oldChildrenLength; j++) {oldVNode = oldChildren[j];if (oldVNode && childVNode.key == oldVNode.key && childVNode.type === oldVNode.type) {oldChildren[j] = undefined;break;}oldVNode = null; // 没有找到任何旧node,表示是一个新的}// ⚛️ 递归比对VNodenewDom = diff(parentDom, childVNode, oldVNode, mounts, ancestorComponent, null, oldDom);// vnode没有被diff卸载掉if (newDom != null) {if (childVNode._lastDomChild != null) {// ⚛️当前VNode是Fragment类型// 只有Fragment或组件返回Fragment的Vnode会有非null的_lastDomChild, 从Fragment的结尾的DOM树开始比对:// <A> <A>// <> <> 👈 Fragment类型,diff会递归比对它的children,所以最后我们只需要将newDom指向比对后的最后一个子节点即可// <a>a</a> <- diff -> <b>b</b>// <b>b</b> <a>a</a> ----+// </> </> \// <div>x</div> 👈oldDom会指向这里// </A> </A>newDom = childVNode._lastDomChild;} elseif (oldVNode == null || newDom != oldDom || newDom.parentNode == null) {// ⚛️ newDom和当前oldDom不匹配,尝试新增或修改位置outer: if (oldDom == null || oldDom.parentNode !== parentDom) {// ⚛️oldDom指向了结尾, 即后面没有更多元素了,直接插入即可; 首次渲染一般会调用到这里parentDom.appendChild(newDom);} else {// 这里是一个优化措施,去掉也不会影响正常程序. 为了便于理解可以忽略这段代码// 尝试向后查找oldChildLength/2个元素,如果找到则不需要调用insertBefore. 这段代码可以减少insertBefore的调用频率for (sibDom = oldDom, j = 0; (sibDom = sibDom.nextSibling) && j < oldChildrenLength; j += 2) {if (sibDom == newDom)break outer;}// ⚛️insertBefore() 将newDom移动到oldDom之前parentDom.insertBefore(newDom, oldDom);}}// ⚛️其他情况,newDom === oldDOM不需要处理// ⚛️ oldDom指向下一个DOM节点oldDom = newDom.nextSibling;}}// ⚛️ 卸载掉没有被置为undefined的元素for (i = oldChildrenLength; i--; )if (oldChildren[i] != null) unmount(oldChildren[i], ancestorComponent);}
配图理解一下 diffChilrend 的调用过程: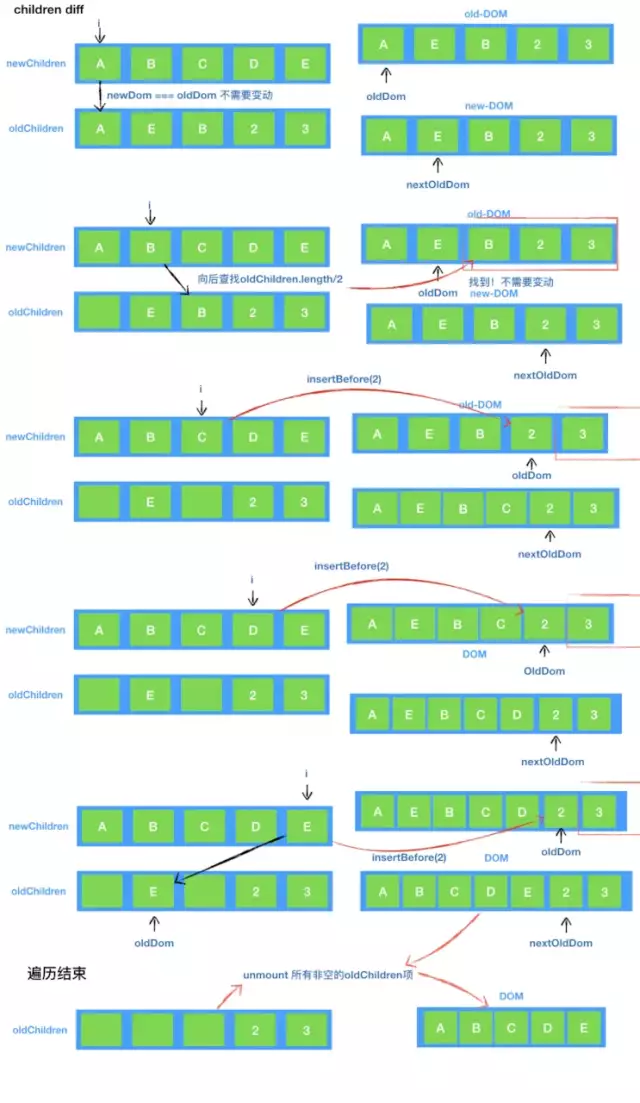
总结一下流程图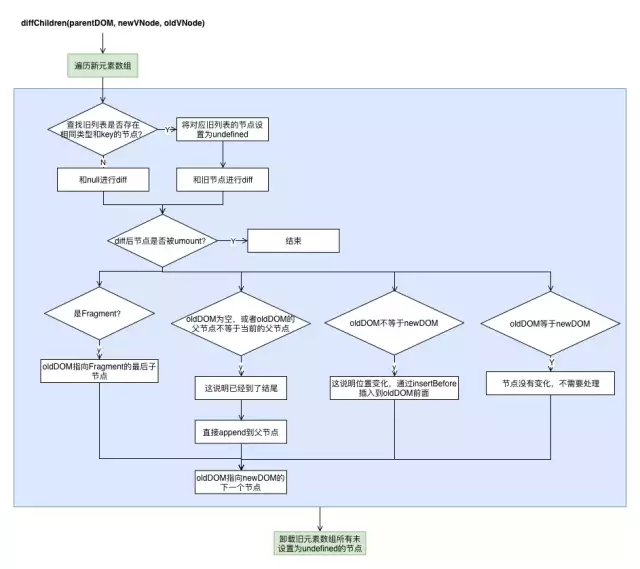
diff
diff 用于比对两个 VNode 节点. diff 函数比较冗长,但是这里面并没有特别复杂逻辑,主要是一些自定义组件生命周期的处理。所以先上流程图,代码不感兴趣可以跳过。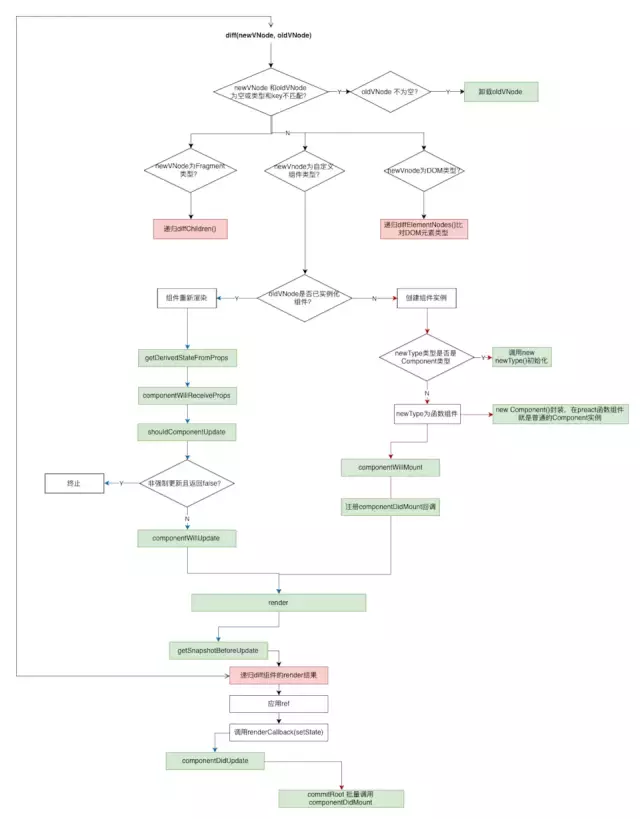
源代码解析:
exportfunctiondiff(parentDom, // 父DOM节点newVNode, // 新VNodeoldVNode, // 旧VNodemounts, // 存放已挂载的组件, 将在diff结束后批量处理ancestorComponent, // 直接父组件force, // 是否强制更新, 为true将忽略掉shouldComponentUpdateoldDom, // 当前挂载的DOM节点) {//...try {outer: if (oldVNode.type === Fragment || newType === Fragment) {// ⚛️ Fragment类型,使用diffChildren进行比对diffChildren(parentDom, newVNode, oldVNode, mounts, ancestorComponent, oldDom);// ⚛️记录Fragment的起始DOM和结束DOMlet i = newVNode._children.length;if (i && (tmp = newVNode._children[0]) != null) {newVNode._dom = tmp._dom;while (i--) {tmp = newVNode._children[i];if (newVNode._lastDomChild = tmp && (tmp._lastDomChild || tmp._dom))break;}}} elseif (typeof newType === 'function') {// ⚛️自定义组件类型if (oldVNode._component) {// ⚛️ ️已经存在组件实例c = newVNode._component = oldVNode._component;newVNode._dom = oldVNode._dom;} else {// ⚛️初始化组件实例if (newType.prototype && newType.prototype.render) {// ⚛️类组件newVNode._component = c = new newType(newVNode.props, cctx); // eslint-disable-line new-cap} else {// ⚛️函数组件newVNode._component = c = new Component(newVNode.props, cctx);c.constructor = newType;c.render = doRender;}c._ancestorComponent = ancestorComponent;c.props = newVNode.props;if (!c.state) c.state = {};isNew = c._dirty = true;c._renderCallbacks = [];}c._vnode = newVNode;if (c._nextState == null) c._nextState = c.state;// ⚛️getDerivedStateFromProps 生命周期方法if (newType.getDerivedStateFromProps != null)assign(c._nextState == c.state? (c._nextState = assign({}, c._nextState)) // 惰性拷贝: c._nextState,newType.getDerivedStateFromProps(newVNode.props, c._nextState),);if (isNew) {// ⚛️ 调用挂载前的一些生命周期方法// ⚛️ componentWillMountif (newType.getDerivedStateFromProps == null && c.componentWillMount != null) c.componentWillMount();// ⚛️ componentDidMount// 将组件推入mounts数组,在整个组件树diff完成后批量调用, 他们在commitRoot方法中被调用// 按照先进后出(栈)的顺序调用, 即子组件的componentDidMount会先调用if (c.componentDidMount != null) mounts.push(c);} else {// ⚛️ 调用重新渲染相关的一些生命周期方法// ⚛️ componentWillReceivePropsif (newType.getDerivedStateFromProps == null && force == null && c.componentWillReceiveProps != null)c.componentWillReceiveProps(newVNode.props, cctx);// ⚛️ shouldComponentUpdateif (!force && c.shouldComponentUpdate != null && c.shouldComponentUpdate(newVNode.props, c._nextState, cctx) === false) {// shouldComponentUpdate返回false,取消渲染更新c.props = newVNode.props;c.state = c._nextState;c._dirty = false;newVNode._lastDomChild = oldVNode._lastDomChild;break outer;}// ⚛️ componentWillUpdateif (c.componentWillUpdate != null) c.componentWillUpdate(newVNode.props, c._nextState, cctx);}// ⚛️至此props和state已经确定下来,缓存和更新props和state准备渲染oldProps = c.props;oldState = c.state;c.props = newVNode.props;c.state = c._nextState;let prev = c._prevVNode || null;c._dirty = false;// ⚛️渲染let vnode = (c._prevVNode = coerceToVNode(c.render(c.props, c.state)));// ⚛️getSnapshotBeforeUpdateif (!isNew && c.getSnapshotBeforeUpdate != null) snapshot = c.getSnapshotBeforeUpdate(oldProps, oldState);// ⚛️组件层级,会影响更新的优先级c._depth = ancestorComponent ? (ancestorComponent._depth || 0) + 1 : 0;// ⚛️递归diff渲染结果c.base = newVNode._dom = diff(parentDom, vnode, prev, mounts, c, null, oldDom);if (vnode != null) {newVNode._lastDomChild = vnode._lastDomChild;}c._parentDom = parentDom;// ⚛️应用refif ((tmp = newVNode.ref)) applyRef(tmp, c, ancestorComponent);// ⚛️调用renderCallbacks,即setState的回调while ((tmp = c._renderCallbacks.pop())) tmp.call(c);// ⚛️componentDidUpdateif (!isNew && oldProps != null && c.componentDidUpdate != null) c.componentDidUpdate(oldProps, oldState, snapshot);} else {// ⚛️比对两个DOM元素newVNode._dom = diffElementNodes(oldVNode._dom, newVNode, oldVNode, mounts, ancestorComponent);if ((tmp = newVNode.ref) && oldVNode.ref !== tmp) applyRef(tmp, newVNode._dom, ancestorComponent);}} catch (e) {// ⚛️捕获渲染错误,传递给上级组件的didCatch生命周期方法catchErrorInComponent(e, ancestorComponent);}return newVNode._dom;}
diffElementNodes
比对两个 DOM 元素, 流程非常简单: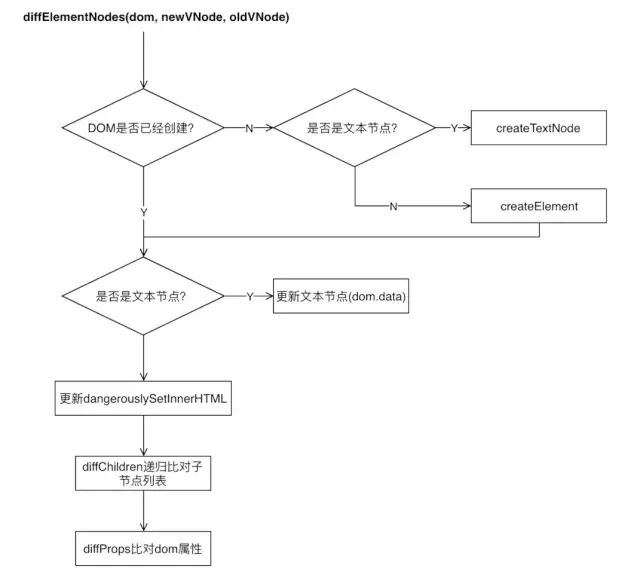
functiondiffElementNodes(dom, newVNode, oldVNode, mounts, ancestorComponent) {// ...// ⚛️创建DOM节点if (dom == null) {if (newVNode.type === null) {// ⚛️文本节点, 没有属性和子级,直接返回returndocument.createTextNode(newProps);}dom = document.createElement(newVNode.type);}if (newVNode.type === null) {// ⚛️文本节点更新if (oldProps !== newProps) dom.data = newProps;} else {if (newVNode !== oldVNode) {// newVNode !== oldVNode 这说明是一个静态节点let oldProps = oldVNode.props || EMPTY_OBJ;let newProps = newVNode.props;// ⚛️ dangerouslySetInnerHTML处理let oldHtml = oldProps.dangerouslySetInnerHTML;let newHtml = newProps.dangerouslySetInnerHTML;if (newHtml || oldHtml)if (!newHtml || !oldHtml || newHtml.__html != oldHtml.__html)dom.innerHTML = (newHtml && newHtml.__html) || '';// ⚛️递归比对子元素diffChildren(dom, newVNode, oldVNode, context, mounts, ancestorComponent, EMPTY_OBJ);// ⚛️递归比对DOM属性diffProps(dom, newProps, oldProps, isSvg);}}return dom;}
diffProps
diffProps 用于更新 DOM 元素的属性
exportfunctiondiffProps(dom, newProps, oldProps, isSvg) {let i;const keys = Object.keys(newProps).sort();// ⚛️比较并设置属性for (i = 0; i < keys.length; i++) {const k = keys[i];if (k !== 'children' && k !== 'key' &&(!oldProps || (k === 'value' || k === 'checked' ? dom : oldProps)[k] !== newProps[k]))setProperty(dom, k, newProps[k], oldProps[k], isSvg);}// ⚛️清空属性for (i in oldProps)if (i !== 'children' && i !== 'key' && !(i in newProps))setProperty(dom, i, null, oldProps[i], isSvg);}```js`diffProps` 实现比较简单,就是遍历一下属性有没有变动,有变动则通过`setProperty` 设置属性。对于失效的 `props` 也会通过 `setProperty` 置空。这里面稍微有点复杂的是 `setProperty`. 这里涉及到事件的处理, 命名的转换等等:```jsfunctionsetProperty(dom, name, value, oldValue, isSvg) {if (name === 'style') {// ⚛️样式设置const set = assign(assign({}, oldValue), value);for (let i inset) {// 样式属性没有变动if ((value || EMPTY_OBJ)[i] === (oldValue || EMPTY_OBJ)[i]) continue;dom.style.setProperty(i[0] === '-' && i[1] === '-' ? i : i.replace(CAMEL_REG, '-$&'),value && i in value? typeofset[i] === 'number' && IS_NON_DIMENSIONAL.test(i) === false? set[i] + 'px': set[i]: '', // 清空);}} elseif (name[0] === 'o' && name[1] === 'n') {// ⚛️事件绑定let useCapture = name !== (name = name.replace(/Capture$/, ''));let nameLower = name.toLowerCase();name = (nameLower in dom ? nameLower : name).slice(2);if (value) {// ⚛️首次添加事件, 注意这里是eventProxy为事件处理器// preact统一将所有事件处理器收集在dom._listeners对象中,统一进行分发// function eventProxy(e) {// return this._listeners[e.type](options.event ? options.event(e) : e);// }if (!oldValue) dom.addEventListener(name, eventProxy, useCapture);} else {// 移除事件dom.removeEventListener(name, eventProxy, useCapture);}// 保存事件队列(dom._listeners || (dom._listeners = {}))[name] = value;} elseif (name !== 'list' && name !== 'tagName' && name in dom) {// ⚛️DOM对象属性dom[name] = value == null ? '' : value;} elseif (typeof value !== 'function' &&name !== 'dangerouslySetInnerHTML') {// ⚛️DOM元素属性if (value == null || value === false) {dom.removeAttribute(name);} else {dom.setAttribute(name, value);}}}
至此 Diff 算法介绍完毕,其实这里面的逻辑并不是特别复杂。当然 Preact 只是一个极度精简的框架,React 复杂度要高得多,尤其 React Fiber 重构之后。也可以把 Preact 当做 React 的历史回顾,有兴趣再深入了解 React 的最新架构。
Hooks 的实现
React16.8 正式引入的 hooks,这玩意带来了全新的 React 组件开发方式,让代码变得更加简洁。React hooks: not magic, just arrays这篇文章已经揭示了 hooks 的基本实现原理, 它不过是基于数组实现的。preact 也实现了 hooks 机制,实现代码也就百来行,让来体会体会.
hooks 功能本身是没有集成在 Preact 代码库内部的,而是通过preact/hooks导入
import { h } from'preact';import { useEffect } from'preact/hooks';functionFoo() {useEffect(() => {console.log('mounted');}, []);return<div>hello hooks</div>;}
那 Preact 是如何扩展 diff 算法来实现 hooks 的呢?实际上 Preact 提供了options对象来对 Preact diff 进行扩展,options 类似于 Preact 生命周期钩子,在 diff 过程中被调用(为了行文简洁,上面的代码忽略掉了)。例如:
exportfunctiondiff(/*...*/) {// ...// ⚛️开始diffif ((tmp = options.diff)) tmp(newVNode);try {outer: if (oldVNode.type === Fragment || newType === Fragment) {// Fragment diff} elseif (typeof newType === 'function') {// 自定义组件diff// ⚛️开始渲染if ((tmp = options.render)) tmp(newVNode);try {// ..c.render(c.props, c.state, c.context),} catch (e) {// ⚛️捕获异常if ((tmp = options.catchRender) && tmp(e, c)) return;throw e;}} else {// DOM element diff}// ⚛️diff结束if ((tmp = options.diffed)) tmp(newVNode);} catch (e) {catchErrorInComponent(e, ancestorComponent);}return newVNode._dom;}// ...
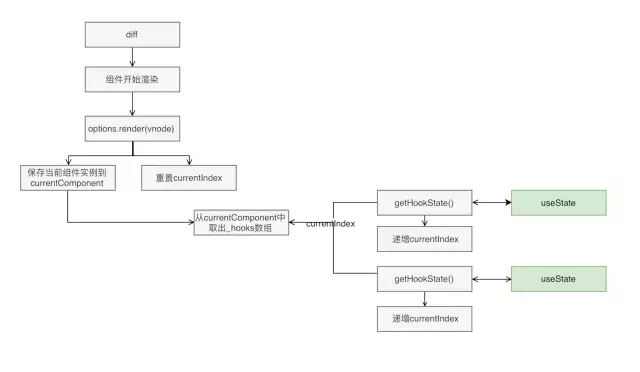
useState
先从最常用的 useState 开始:
exportfunctionuseState(initialState) {// ⚛️OK只是数组,没有Magic,每个hooks调用都会递增currenIndex, 从当前组件中取出状态const hookState = getHookState(currentIndex++);// ⚛️ 初始化if (!hookState._component) {hookState._component = currentComponent; // 当前组件实例hookState._value = [// ⚛️state, 初始化statetypeof initialState === 'function' ? initialState() : initialState,// ⚛️dispatchvalue => {const nextValue = typeof value === 'function' ? value(hookState._value[0]) : value;if (hookState._value[0] !== nextValue) {// ⚛️ 保存状态并调用setState强制更新hookState._value[0] = nextValue;hookState._component.setState({});}},];}return hookState._value; // [state, dispatch]}
从代码可以看到,关键在于getHookState的实现
import { options } from'preact';let currentIndex; // 保存当前hook的索引let currentComponent;// ⚛️render 钩子, 在组件开始渲染之前调用// 因为Preact是同步递归向下渲染的,而且Javascript是单线程的,所以可以安全地引用当前正在渲染的组件实例options.render = vnode => {currentComponent = vnode._component; // 保存当前正在渲染的组件currentIndex = 0; // 开始渲染时index重置为0// 暂时忽略,下面讲到useEffect就能理解// 清空上次渲染未处理的Effect(useEffect),只有在快速重新渲染时才会出现这种情况,一般在异步队列中被处理if (currentComponent.__hooks) {currentComponent.__hooks._pendingEffects = handleEffects(currentComponent.__hooks._pendingEffects,);}};// ⚛️no magic!, 只是一个数组, 状态保存在组件实例的_list数组中functiongetHookState(index) {// 获取或初始化列表const hooks = currentComponent.__hooks ||(currentComponent.__hooks = {_list: [], // 放置状态_pendingEffects: [], // 放置待处理的effect,由useEffect保存_pendingLayoutEffects: [], // 放置待处理的layoutEffect,有useLayoutEffect保存});// 新建状态if (index >= hooks._list.length) {hooks._list.push({});}return hooks._list[index];}
useEffect
再看看 useEffect 和 useLayoutEffect.useEffect 和 useLayouteEffect 差不多, 只是触发 effect 的时机不一样,useEffect 在完成渲染后绘制触发,而 useLayoutEffect 在 diff 完成后触发:
exportfunctionuseEffect(callback, args) {const state = getHookState(currentIndex++);if (argsChanged(state._args, args)) {// ⚛️状态变化state._value = callback;state._args = args;currentComponent.__hooks._pendingEffects.push(state); // ⚛️推进_pendingEffects队列afterPaint(currentComponent);}}exportfunctionuseLayoutEffect(callback, args) {const state = getHookState(currentIndex++);if (argsChanged(state._args, args)) {// ⚛️状态变化state._value = callback;state._args = args;currentComponent.__hooks._pendingLayoutEffects.push(state); // ⚛️推进_pendingLayoutEffects队列}}
看看如何触发 effect.useEffect 和上面看到的enqueueRender差不多,放进一个异步队列中,由requestAnimationFrame进行调度,批量处理:
// 这是一个类似于上面提到的异步队列afterPaint = component => {if (!component._afterPaintQueued && // 避免组件重复推入(component._afterPaintQueued = true) &&afterPaintEffects.push(component) === 1// 开始调度)requestAnimationFrame(scheduleFlushAfterPaint); // 由requestAnimationFrame调度};functionscheduleFlushAfterPaint() {setTimeout(flushAfterPaintEffects);}functionflushAfterPaintEffects() {afterPaintEffects.some(component => {component._afterPaintQueued = false;if (component._parentDom)// 清空_pendingEffects队列component.__hooks._pendingEffects = handleEffects(component.__hooks._pendingEffects);});afterPaintEffects = [];}functionhandleEffects(effects) {// 先清除后调用effecteffects.forEach(invokeCleanup); // 请调用清理effects.forEach(invokeEffect); // 再调用effectreturn [];}functioninvokeCleanup(hook) {if (hook._cleanup) hook._cleanup();}functioninvokeEffect(hook) {const result = hook._value();if (typeof result === 'function') hook._cleanup = result;}
再看看如何触发 LayoutEffect, 很简单,在 diff 完成后触发, 这个过程是同步的.
options.diffed = vnode => {const c = vnode._component;if (!c) return;const hooks = c.__hooks;if (hooks) {hooks._pendingLayoutEffects = handleEffects(hooks._pendingLayoutEffects);}};
hooks 基本原理基本了解完毕, 最后还是用一张图来总结。

若有收获,就点个赞吧
0 人点赞
