CLI
开源项目: ink它的作用就是将 React 组件渲染在终端窗口中,呈现出最后的命令行界面。
上手初体验
刚开始上手时,推荐使用官方的脚手架创建项目,省时省心。
npx create-ink-app --typescript
然后运行这样一段代码:
import React, { useState, useEffect } from 'react'import { render, Text} from 'ink'const Counter = () => {const [count, setCount] = useState(0)useEffect(() => {const timer = setInterval(() => {setCount(count => ++count)}, 100)return () => {clearInterval(timer)}})return (<Text color="green">{count} tests passed</Text>)}render(<Counter />);
会出现如下的界面:
并且数字一直递增:
- 首先,这些文本输出都不是直接 console 出来的,而是通过
React 组件渲染出来的。 - React 组件的
状态管理以及hooks 逻辑放到命令行的 GUI 当中仍然是生效的。
也就是说,前端的能力以及扩展到了命令行窗口当中了,这无疑是一项非常可怕的能力。著名的文档生成工具Gatsby,包管理工具yarn2都使用了这项能力来完成终端 GUI 的搭建。
命令行工具项目实战
项目背景
首先说一说项目的产生背景,在一个 TS 的业务项目当中,碰到了一个问题:由于production模式下面,是采用先 tsc,拿到 js 产物代码,再用webpack打包这些产物。
但构建的时候直接报错了,原因就是 tsc 无法将 ts(x) 以外的资源文件移动到产物目录,以至于 webpack 在对于产物进行打包的时候,发现有些资源文件根本找不到!比如以前有这样一张图片的路径是这样—— src/asset/1.png,但这些在产物目录dist却没还有,因此 webpack 在打包 dist 目录下的代码时,会发现这张图片不存在,于是报错了。
解决思路
很显然,自己很难去扩展 tsc 的能力,现在最好的方式就是写个脚本手动将src下面的所有资源文件一一拷贝到dist目录,这样就能解决资源无法找到的问题。
一、拷贝文件逻辑
确定了解决思路之后,写下这样一段 ts 代码:
import { join, parse } from "path";import { fdir } from 'fdir';import fse from 'fs-extra'const staticFiles = await new fdir().withFullPaths()// 过滤掉 node_modules、ts、tsx.filter((p) =>!p.includes('node_modules') &&!p.endsWith('.ts') &&!p.endsWith('.tsx'))// 搜索 src 目录.crawl(srcPath).withPromise() as string[]await Promise.all(staticFiles.map(file => {const targetFilePath = file.replace(srcPath, distPath);// 创建目录并拷贝文件return fse.mkdirp(parse(targetFilePath).dir).then(() => fse.copyFile(file, distPath)));}))
代码使用了fdir这个库才搜索文件,非常好用的一个库,写法上也很优雅,推荐使用。
执行这段逻辑,成功将资源文件转移到到了产物目录中。
问题是解决掉了,但能不能封装一下这个逻辑,让它能够更方便地在其它项目当中复用,甚至直接提供给其他人复用呢?
二、命令行 GUI 搭建
接着使用 ink,也就是用 React 组件的方式来搭建命令行 GUI,根组件代码如下:
// index.tsx 引入代码省略interface AppProps {fileConsumer: FileCopyConsumer}const ACTIVE_TAB_NAME = {STATE: "执行状态",LOG: "执行日志"}const App: FC<AppProps> = ({ fileConsumer }) => {const [activeTab, setActiveTab] = useState<string>(ACTIVE_TAB_NAME.STATE);const handleTabChange = (name) => {setActiveTab(name)}const WELCOME_TEXT = dedent`欢迎来到 \`ink-copy\` 控制台!功能概览如下(按 **Tab** 切换):`return <><FullScreen><Box><Markdown>{WELCOME_TEXT}</Markdown></Box><Tabs onChange={handleTabChange}><Tab name={ACTIVE_TAB_NAME.STATE}>{ACTIVE_TAB_NAME.STATE}</Tab><Tab name={ACTIVE_TAB_NAME.LOG}>{ACTIVE_TAB_NAME.LOG}</Tab></Tabs><Box><Box display={ activeTab === ACTIVE_TAB_NAME.STATE ? 'flex': 'none'}><State /></Box><Box display={ activeTab === ACTIVE_TAB_NAME.LOG ? 'flex': 'none'}><Log /></Box></Box></FullScreen></>};export default App;
可以看到,主要包含两大组件: State和Log,分别对应两个 Tab 栏。
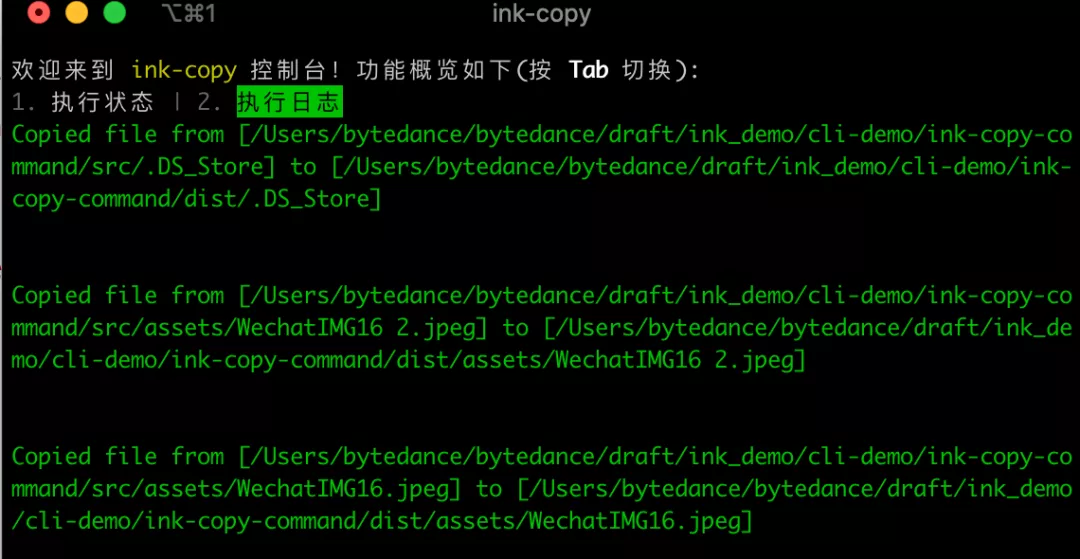
3. GUI 如何实时展示业务状态?
文件操作的逻辑开发完了,GUI 界面也搭建好了。那么现在如何将两者结合起来呢,也就是 GUI 如何实时地展示文件操作的状态呢?
对此,需要引入第三方,来进行这两个模块的通信。具体来讲,在文件操作的逻辑中维护一个 EventBus 对象,然后在 React 组件当中,通过 Context 的方式传入这个 EventBus。从而完成 UI 和文件操作模块的通信。
现在开发一下这个 EventBus 对象,也就是下面的FileCopyConsumer:
export interface EventData {kind: string;payload: any;}export class FileCopyConsumer {private callbacks: Function[];constructor() {this.callbacks = []}// 供 React 组件绑定回调onEvent(fn: Function) {this.callbacks.push(fn);}// 文件操作完成后调用onDone(event: EventData) {this.callbacks.forEach(callback => callback(event))}}
接着在文件操作模块和 UI 模块当中,都需要做响应的适配,首先看看文件操作模块,做一下封装。
export class FileOperator {fileConsumer: FileCopyConsumer;srcPath: string;targetPath: string;constructor(srcPath ?: string, targetPath ?: string) {// 初始化 EventBus 对象this.fileConsumer = new FileCopyConsumer();this.srcPath = srcPath ?? join(process.cwd(), 'src');this.targetPath = targetPath ?? join(process.cwd(), 'dist');}async copyFiles() {// 存储 log 信息const stats = [];// 在 src 中搜索文件const staticFiles = ...await Promise.all(staticFiles.map(file => {// ...// 存储 log.then(() => stats.push(`Copied file from [${file}] to [${targetFilePath}]`));}))// 调用 onDonethis.fileConsumer.onDone({kind: "finish",payload: stats})}}
然后在初始化 FileOperator之后,将 fileConsumer通过 React Context 传入到组件当中,这样组件就能访问到fileConsumer,进而可以进行回调函数的绑定,代码演示如下:
// 组件当中拿到 fileConsumer & 绑定回调export const State: FC<{}> = () => {const context = useContext(Context);const [finish, setFinish] = useState(false);context?.fileConsumer.onEvent((data: EventData) => {// 下面的逻辑在文件拷贝完成后执行if (data.kind === 'finish') {setTimeout(() => {setFinish(true)}, 2000)}})return//(JSX代码)}
这样就成功地将 UI 和文件操作逻辑串联了起来。

若有收获,就点个赞吧
0 人点赞
