前言
- 任务:用户定义的函数,用于实现用户的功能,比如执行一个耗时很长的任务,任务的本质就是类中实现了一个什么功能的方法,常见的任务有异步任务,定时任务和发邮件;
本篇主要是针对 springboot 的 三种“任务”的实战学习;
1.异步任务
2.1 使用
创建一个 AsyncService,注意在想要异步的方法上加一个注解 @Async
@Servicepublic class AsyncService {//告诉 spring 这是一个异步方法@Asyncpublic void hello(){try {Thread.sleep(3000);} catch (InterruptedException e) {e.printStackTrace();}System.out.println("处理数据中...");}}
创建一个 AsyncController 来调用异步方法
@RestController
public class AsyncController {
  @Autowired
  AsyncService asyncService;

  @RequestMapping("/hello")
  public String hello(){
      asyncService.hello();
      return "success";
  }
}
重点是在 springboot 的主启动程序里开启异步注解功能 ```java @EnableAsync //开启异步注解功能 @SpringBootApplication public class SpringBoot10TaskApplication {
public static void main(String[] args) {
SpringApplication.run(SpringBoot10TaskApplication.class, args);}
}
<a name="0PWfJ"></a>
# 2.定时任务
- 项目开发中经常需要执行一些定时任务,比如需要在每天凌晨的时候分析一次一天的日志信息,Spring 为我们提供了异步执行任务调度的方式,提供了 TaskExcutor、TaskScheduler 接口;
- 两个注解:@EnableScheduling、@Scheduled
<a name="hic2L"></a>
## 2.1 cron 表达式
- cron 表达式 [在线生成工具 ](https://www.pppet.net/)
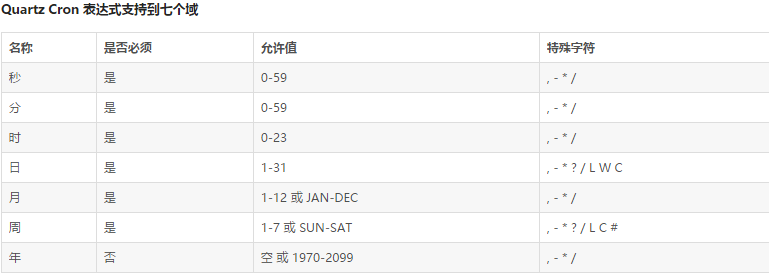
- * - , / 普遍适用,L 可用于一周的最后一天或一个月的最后一天,W 只能用在月份里表示某个指定的工作日;
| 特殊字符 | 含义 |
| :---: | :---: |
| * | 任意 |
| - | 区间 |
| , | 枚举 |
| / | 步长 |
| ? | 日/星期冲突匹配 |
| L | 表示 last,例如星期中表示7或SAT,月份中表示最后一天31或30; |
| W | 只能用在月份中,表示最接近指定天的工作日 |
| # | 只能用在星期中,表示这个月的第几个周几,例如6#3表示这个月的第3个周五 |
- 举例
> 【0 0/5 14,`18 * * ?】每天14点整合18点整,每隔五分钟执行一次;
> 【0 15 10 ? * 1-6】每个月的周一至周六 10:15分执行一次
> 【0 0 2 ? * 6L】每个月的最后一个周六凌晨2点执行一次
> 【0 0 2 LW * ?】每个月的最后一个工作日凌晨2点执行一次
> 【0 0 2-4 ? * 1#1】每个月的第一个周一的凌晨2点至4点期间,每个整点执行一次;
<a name="u2r4w"></a>
## 2.2 使用
- 创建一个 ScheduledService,注意方法上的注解 @Scheduled 可搭配 cron 表达式使用;
```java
@Service
public class ScheduledService {
// @Scheduled(cron="0 * * * * MON-SAT") //只在周一至周六的 0 秒 打印
// @Scheduled(cron="0,1,2,3,4 * * * * MON-SAT") //只在周一至周六的 0到4 秒 打印
// @Scheduled(cron="0-10 * * * * MON-SAT")//只在周一至周六的 0到10 秒 打印
@Scheduled(cron="0/4 * * * * MON-SAT") //只在周一至周六的 0到10 秒 打印
public void schedule(){
System.out.println("test for scheduledTask...");
}
}
在 springboot 主运行程序中开启定时任务 ```java @EnableScheduling //开启基于注解的定时任务 @SpringBootApplication public class SpringBoot10TaskApplication {
public static void main(String[] args) {
SpringApplication.run(SpringBoot10TaskApplication.class, args);}
}
<a name="VFfsf"></a>
# 3.邮件任务
<a name="u9uu7"></a>
## 3.1 准备<br />

- 在 pom.xml 中引入 spring-boot-starter-mail ,springboot 启动时自动配置 MailSenderAutoConfiguration;
```java
        <dependency>
            <groupId>org.springframework.boot</groupId>
            <artifactId>spring-boot-starter-mail</artifactId>
        </dependency>
在 application.yml 中配置 MailProperties 内容;
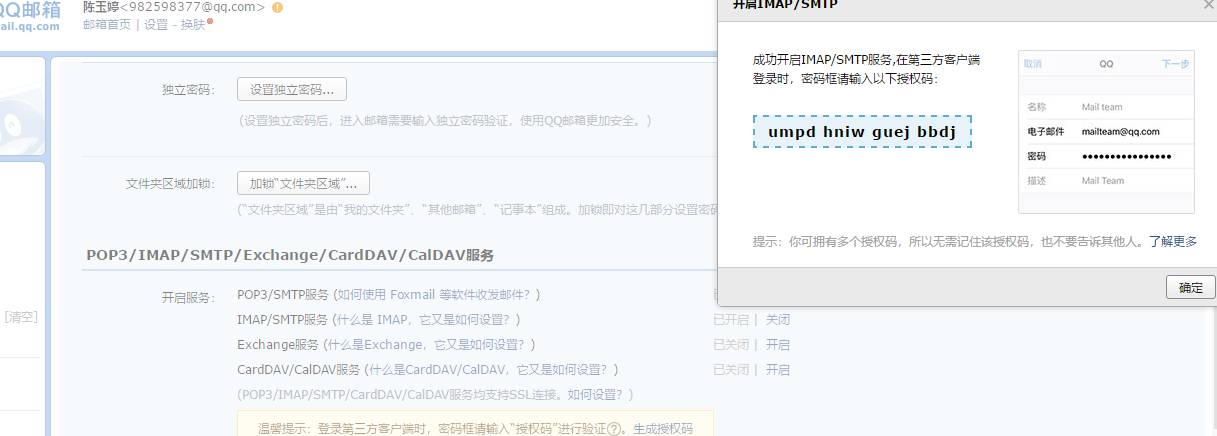
spring:
mail:
  host: smtp.qq.com
  username: 982598377@qq.com
  password: umpdhniwguejbbdj
  properties:
    mail:
      smtp:
        ssl:
          enable: true
application.yml 中的 password 为 qq 邮件客户端生成的授权码,可登陆邮箱,点击:设置-账户-开启 SMTP 服务,发送短信验证以获取授权码;
springboot 项目启动时会自动通过配置类 MailSenderAutoConfiguration 获取配置文件中定义的 mailProperties,然后来装配 JavaMailSender 对象;
3.2 测试邮件发送
代码:主要是通过 JavaMailSenderImpl 这样一个实现类来发送某种类型的 MailMessage; ```java @RunWith(SpringRunner.class) @SpringBootTest public class SpringBoot10TaskApplicationTests {
@Autowired JavaMailSenderImpl mailSender;
@Test public void contextLoads() {
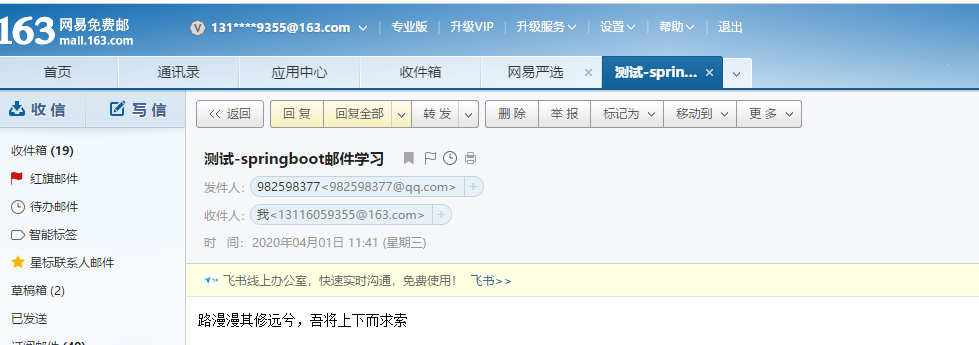
  SimpleMailMessage message = new SimpleMailMessage();
  message.setSubject("测试-springboot邮件学习");
  message.setText("路漫漫其修远兮,吾将上下而求索");
  message.setFrom("982598377@qq.com");
  message.setTo("13116059355@163.com");
  mailSender.send(message);
}
@Test public void test02() throws MessagingException {
  //创建一个复杂的邮件消息
  MimeMessage mimeMessage = mailSender.createMimeMessage();
  MimeMessageHelper helper = new MimeMessageHelper(mimeMessage, true);

  //邮件设置
  helper.setSubject("测试-带附件的复杂邮件");
  helper.setText("<b style='color:red'> goog good study, day day up</br>", true);
  helper.setFrom("982598377@qq.com");
  helper.setTo("13116059355@163.com");

  //上传附件
  helper.addAttachment("2.jpg", new File("E:\\小芋头的工作\\零碎小整理\\2.jpg"));
  helper.addAttachment("3.jpg", new File("E:\\小芋头的工作\\零碎小整理\\3.jpg"));
  mailSender.send(mimeMessage);
}
} ```
- 结果


若有收获,就点个赞吧
0 人点赞
