3.1 对静态资源的映射规则
WebMvcAutoConfiguration 类的 addResourceHandlers 方法:(添加资源映射)
public void addResourceHandlers(ResourceHandlerRegistry registry) {if (!this.resourceProperties.isAddMappings()) {logger.debug("Default resource handling disabled");} else {Duration cachePeriod = this.resourceProperties.getCache().getPeriod();CacheControl cacheControl = this.resourceProperties.getCache().getCachecontrol().toHttpCacheControl();if (!registry.hasMappingForPattern("/webjars/**")) {this.customizeResourceHandlerRegistration(registry.addResourceHandler(new String[]{"/webjars/**"}).addResourceLocations(new String[]{"classpath:/META-INF/resources/webjars/"}).setCachePeriod(this.getSeconds(cachePeriod)).setCacheControl(cacheControl));}String staticPathPattern = this.mvcProperties.getStaticPathPattern();if (!registry.hasMappingForPattern(staticPathPattern)) {this.customizeResourceHandlerRegistration(registry.addResourceHandler(new String[]{staticPathPattern}).addResourceLocations(WebMvcAutoConfiguration.getResourceLocations(this.resourceProperties.getStaticLocations())).setCachePeriod(this.getSeconds(cachePeriod)).setCacheControl(cacheControl));}}}
以 jar 包方式引入静态资源,有关 jar 包获取可参考 webjars官网
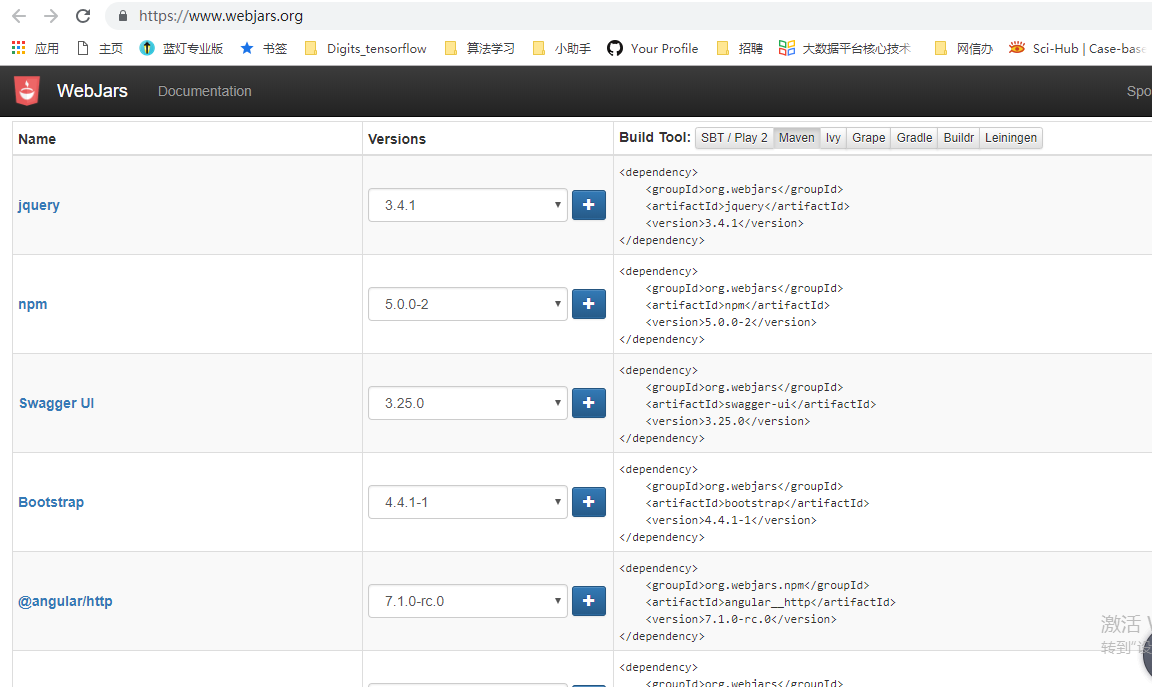
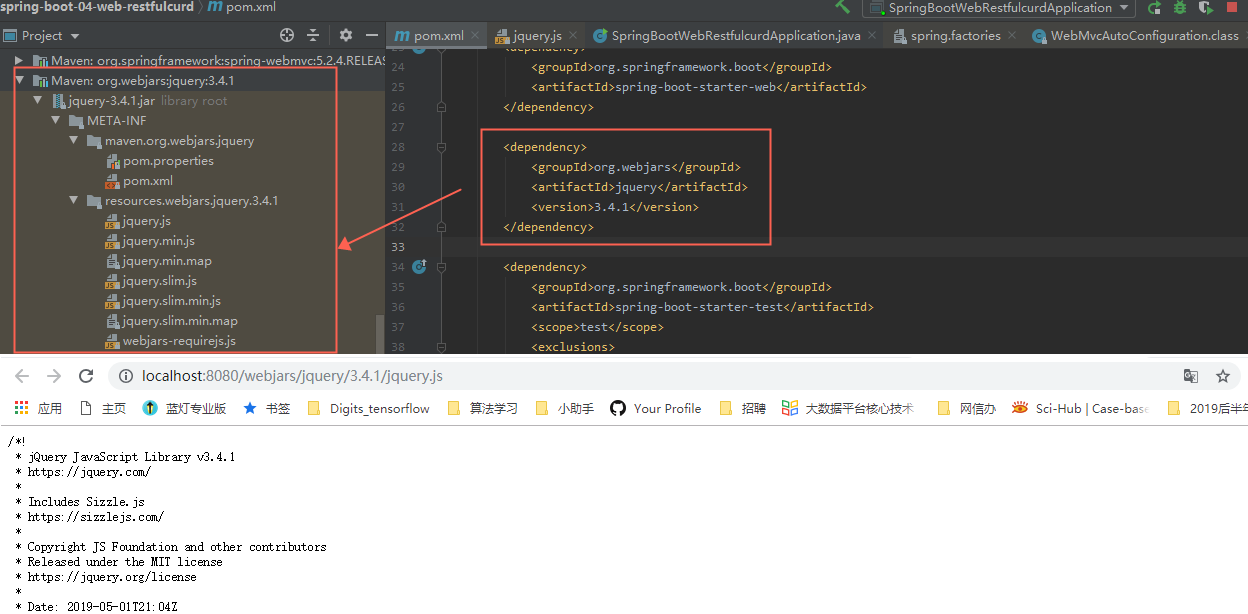
从官网对应资源版本和 maven 模板在 pom.xml 导入 webjars 包 ,例如导入 jquery;
<dependency><groupId>org.webjars</groupId><artifactId>jquery</artifactId><version>3.4.1</version></dependency>
3.1.2 自定义静态资源
自定义非 webjars 静态资源,映射访问路径可在 ResourceProperties 中找到,也可在 application.properties 中配置,如 spring.resources.static-locations = classpath:/hello/,classpath:/cyt/ 等,会覆盖默认配置;
@ConfigurationProperties(    //说明可以在配置文件中配置相关参数
    prefix = "spring.resources",
    ignoreUnknownFields = false
)
public class ResourceProperties {
    private static final String[] CLASSPATH_RESOURCE_LOCATIONS = new String[]{"classpath:/META-INF/resources/", "classpath:/resources/", "classpath:/static/", "classpath:/public/"};
    private String[] staticLocations;
    private boolean addMappings;
    private final ResourceProperties.Chain chain;
    private final ResourceProperties.Cache cache;
    public ResourceProperties() {
        this.staticLocations = CLASSPATH_RESOURCE_LOCATIONS;
        this.addMappings = true;
        this.chain = new ResourceProperties.Chain();
        this.cache = new ResourceProperties.Cache();
    }
- ResourceProperties 中的 CLASSPATH_RESOURCE_LOCATIONS 数组保存着存储静态资源的文件夹名称:
- 如 localhost:8080/abc —-> 去静态资源文件夹里面找abc; | 数组中的值 | 在项目中的位置 | | —- | —- | | classpath:/META-INF/resources/ | src/main/resources/META-INF/resources/ | | classpath:/resources/ | src/main/resources/resources/ | | classpath:/static/ | src/main/resources/static/ | | classpath:/public/ | src/main/resources/public/ |
3.1.3 其他
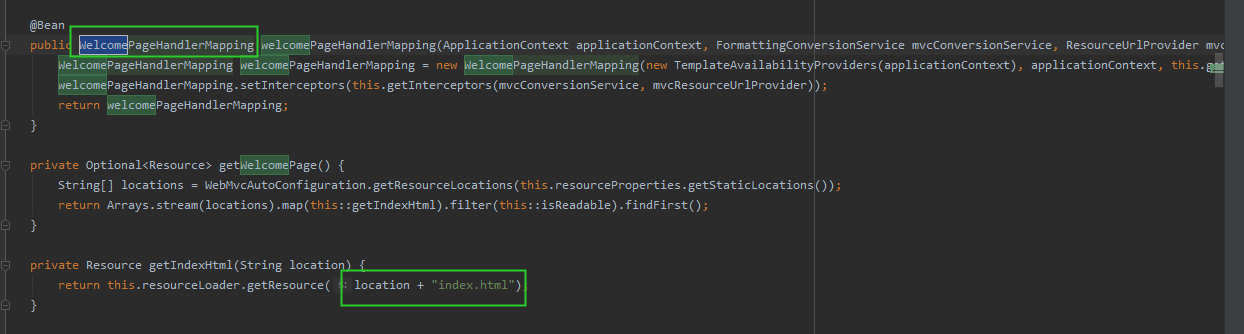
- 欢迎页
- location 就是静态资源路径,欢迎页的页面就是静态资源下的 index.html,被 /** 映射,因此直接访问项目就是访问欢迎页;
网站图标映射:所有的 favicon.ico 都是在静态资源文件下找;
3.2 模板引擎 thymeleaf
3.2.1 thymeleaf 与 springmvc
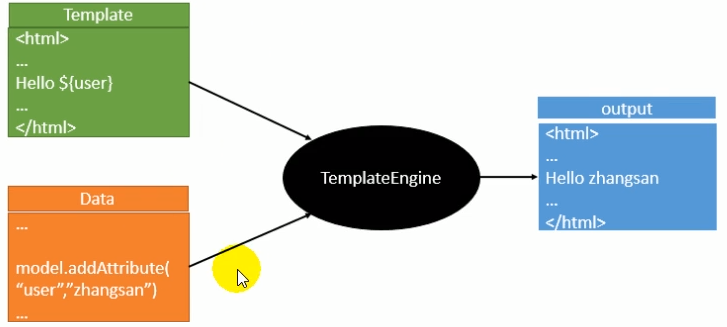
常见的模板引擎有 JSP、Velocity、Freemarker、Thymeleaf 等,SpringBoot 推荐使用 Thymeleaf;
springmvc 整合 thymeleaf(在 spring-mvc.xml 中配置)
  <!-- 1. spring 框架自带的视图解析器-->
  <bean id="internalResourceViewResolver" class="org.springframework.web.servlet.view.InternalResourceViewResolver">
      <property name="prefix" value="/WEB-INF/pages/"></property>
      <property name="suffix" value=".jsp"></property>
  </bean>
      <!-- 2. thymeleaf 框架的视图解析器 -->
  <bean id="viewResolver" class="org.thymeleaf.spring4.view.ThymeleafViewResolver">
      <property name="characterEncoding" value="UTF-8" />
      <property name="templateEngine" ref="templateEngine" />
  </bean>
  <!-- 2.1 模板引擎 -->
  <bean id="templateEngine" class="org.thymeleaf.spring4.SpringTemplateEngine">
      <property name="templateResolver" ref="templateResolver" />
  </bean>
  <!-- 2.2 模板解析器 -->
  <bean id="templateResolver" class="org.thymeleaf.templateresolver.ServletContextTemplateResolver">
      <constructor-arg ref="servletContext"/>
      <property name="prefix" value="/view/" />
      <property name="suffix" value=".html"/>
      <property name="templateMode" value="HTML5"/>
      <property name="cacheable" value="false"/>
      <property name="characterEncoding" value="UTF-8" />
  </bean>
3.2.2 spring boot 的 thymeleaf
- 在 pom.xml 中导入 thymeleaf 包,如需切换版本,在
标签中做如下配置 <-- 切换 thymeleaf 版本,布局功能的支持程序,thymeleaf3 主程序对应 layout2以上版本 --> <properties> <springboot-thymeleaf.version>3.0.9.RELEASE</springboot-thymeleaf.version> <thymeleaf-layout-dialect.version>2.2.2</thymeleaf-layout-dialect.version> </properties> <-- 导入 thymeleaf 包 --> <dependencies> <dependency> <groupId>org.springframework.boot</groupId> <artifactId>spring-boot-starter-thymeleaf</artifactId> </dependency> <dependencies>
- 在 pom.xml 中导入 thymeleaf 包,如需切换版本,在
- thymeleaf 的配置参数,默认把 HTML 页面放在 classpath:/templates/ 下 thymeleaf 就能自动渲染;
@ConfigurationProperties(
prefix = "spring.thymeleaf"
)
public class ThymeleafProperties {
private static final Charset DEFAULT_ENCODING;
public static final String DEFAULT_PREFIX = "classpath:/templates/";
public static final String DEFAULT_SUFFIX = ".html";
private boolean checkTemplate = true;
private boolean checkTemplateLocation = true;
private String prefix = "classpath:/templates/";
private String suffix = ".html";
private String mode = "HTML";
- thymeleaf 的配置参数,默认把 HTML 页面放在 classpath:/templates/ 下 thymeleaf 就能自动渲染;
- 代码
```java
// 1. 在 /templates 下创建 success.html
<!DOCTYPE html>
成功
兜圈兜圈
[[${user}]]
- 代码
```java
// 1. 在 /templates 下创建 success.html
<!DOCTYPE html>
// 2. 在 controller 中指定返回的页面,注意不能在类上使用 @RestController,会返回默认的页面,只显示 success;
@Controller
public class HelloController {
@RequestMapping(“/success”)
public String success(Map
想见你
“); map.put(“users”, Arrays.asList(“陈韵如”, “莫俊杰”,”黄雨萱”)); return “success”; }}
- 4. 运行结果

<a name="Ujtog"></a>
### 3.2.3 thymeleaf 的语法规则及配置
- th:任意html属性 --> 来替换原生属性的值,如 th:text --> 改变当前元素里面的文本内容;

- thymeleaf_3.0.5中文参考手册下载 [百度网盘]() 提取码:dmvf
<a name="0UYhU"></a>
## 3.3 有关 springmvc 的自动配置
<a name="hmZ4f"></a>
### 3.3.1 spring boot 的自动配置机制
- Spring Boot 为 Spring MVC 提供了默认的自动配置
- org.springframework.boot.autoconfigure.web.servlet.WebMvcAutoConfiguration
- 自动配置在 Spring 的默认值之上添加了以下部分功能:
- 包含 ContentNegotiatingViewResolver 和 BeanNameViewResolver--> 视图解析器
- 支持服务静态资源,包括对WebJars的支持([官方文档中有介绍](https://docs.spring.io/spring-boot/docs/2.2.1.RELEASE/reference/html/spring-boot-features.html#boot-features-spring-mvc-static-content))--> 静态资源文件夹路径
- 自动注册 Converter,GenericConverter 和 Formatterbeans --> 转换器,格式化器
- 支持 HttpMessageConverters([官方文档中有介绍](https://docs.spring.io/spring-boot/docs/2.2.1.RELEASE/reference/html/spring-boot-features.html#boot-features-spring-mvc-message-converters))--> 来转换Http请求和响应,如 User---Json;
- 自动注册 MessageCodesResolver([官方文档中有介绍](https://docs.spring.io/spring-boot/docs/2.2.1.RELEASE/reference/html/spring-boot-features.html#boot-features-spring-message-codes))--> 定义错误代码生成规则
- 静态 index.html 支持 --> 静态首页访问
- 定制 favicon 支持([官方文档中有介绍](https://docs.spring.io/spring-boot/docs/2.2.1.RELEASE/reference/html/spring-boot-features.html#boot-features-spring-mvc-favicon))--> 网站图标
- 自动使用 ConfigurableWebBindingInitializer bean([官方文档中有介绍](https://docs.spring.io/spring-boot/docs/2.2.1.RELEASE/reference/html/spring-boot-features.html#boot-features-spring-mvc-web-binding-initializer))
- Spring Boot 自动配置机制
- 自动配置组件时,先看容器中有无用户自定义的配置(@Bean、@Component),如果有就使用用户配置的,如果没有,才自动配置;
- spring boot 可自动将用户自定义的配置和 spring boot 的默认配置组合起来;
- 在 SpringBoot 中可基于 xxxConfigurer 进行扩展配置,基于 xxxCustomizer 进行定制配置;
<a name="CQSXn"></a>
### 3.3.2 【案例】如何修改 mvc 默认配置
- 需求:浏览器发送 /cyt 请求来到 success 页面;
- spring mvc 实现 springmvc.xml
```xml
<mvc:view-controller path="/cyt" view-name="success"/>
spring boot 实现 MyMvcConfig 配置类,使用 WebMvcConfiguter来扩展 SpingMVC 的功能;
注:如果仅实现 spring mvc 的扩展不能使用 @EnableWebMvc,若想重写 spring boot 的 mvc,则添加有 @EnableWebMvc 注解的配置类;
//@EnableWebMvc
@Configuration
public class MyMvcConfig  implements WebMvcConfigurer {

@Override
public void addViewControllers(ViewControllerRegistry registry){
   registry.addViewController("/cyt").setViewName("success");
}
}
3.3.3 原理分析(基于上述案例)
问题1:为什么通过 @Configuration + 实现 WebMvcConfigurer 接口就可以将自定义的视图解析生效

- 问题2:为什么加 @EnableWebMvc 会使默认配置失效
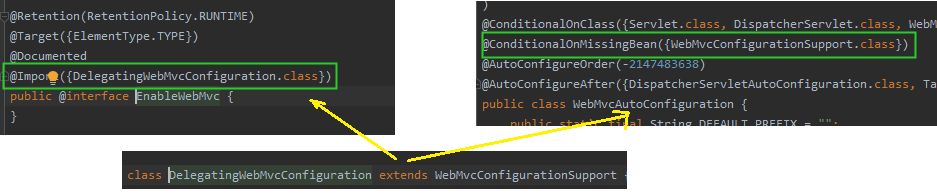
- 总结
- 视图解析器的配置都是在 DelegatingWebMvcConfiguration 中完成的,包括 spring boot 默认配置及开发者自定义的配置;
- @EnableWebMvc 有引用 DelegatingWebMvcConfiguration 配置,而 DelegatingWebMvcConfiguration 继承自 WebMvcConfigurationSupport

若有收获,就点个赞吧
0 人点赞
