前言
基础知识
- 缓存是什么
- 概念一:缓存就是数据交换的缓冲区(称作:Cache),当要读取数据时,会首先从缓存汇总查询数据,有则直接执行返回,被运用在计算机领域的各个方面,如用在操作系统磁盘来减少磁盘机械操作,用在 Web 服务器中来减少应用服务器请求,用在客户端浏览器中来减少对网站的访问,用在应用程序缓存中来减少对数据库的查询,用在数据库中来减少文件系统 IO;
- 概念二:缓存是个概念,本质上只是存放数据的容器,程序运行中,在内存保持一定时间不变的数据就是缓存,简单到写一个 Map ,里面存放着一些key,value 数据,就已经是个缓存;
- 为什么要用缓存
- 缓存一般作为“中间者”来缓解交互双方的数据访问压力,应用场景主要有:一是数据被经常访问,二是一次数据访问会造成较大的资源和性能消耗,三是交互双方的数据处理能力存在较大差异;
缓存策略三要素
- 缓存命中率:缓存中的数据被读取的次数/总读取次数,命中率越高越好;
- 缓存更新策略:
- FIFO(First In First Out) 队列,先进先出,典型应用:MySQL的 query cache;
- LFU(Least Frequently Used):最近最少使用算法,一定时间段内使用次数(频率)最少的那个被移除,借助计数器实现;
- LRU(Least Recently Used):最久未使用算法,使用时间距离现在最久的那个被移除,借助计数器和队列实现;
- TTL(Time To Live ):存活期,即从缓存中创建时间点开始直到它到期的一个时间段(不管在这个时间段内有没有访问都将过期);
- TTI(Time To Idle):空闲期,即一个数据多久没被访问将从缓存中移除的时间;
- 最大缓存容量:大容量的缓存需要更为有效率的算法,否则性能会大大折扣;
研究背景
设计一个缓存,最基本的功能就是存取数据,但并不局限于此,比如在取数据时应判断数据是否存在,如果不存在是不是要从数据库取,如果是过期的内容是否要更新,如果有多个缓存的话是否需要搞个缓存管理器?
- 在 springboot 的 web 应用程序开发中也使用缓存来减少对数据库的查询,且延续了 Spring 框架一贯的规约式的设计风格,甚至使用注解就能实现缓存功能,极大简化了代码的开发;
本文首先介绍 JSR107 的缓存抽象 JCache 的概念和设计,然后重点介绍 Spring 对缓存的抽象,之后以实例说明如何整合 redis 作为缓存管理器;
7.1 JSR-107 缓存抽象 JCache
Spring Cache 缓存抽象已经成了业界实际的标准(几乎所有产品都支持),JSR107仅仅只是官方的标准而已(支持的产品并不多);
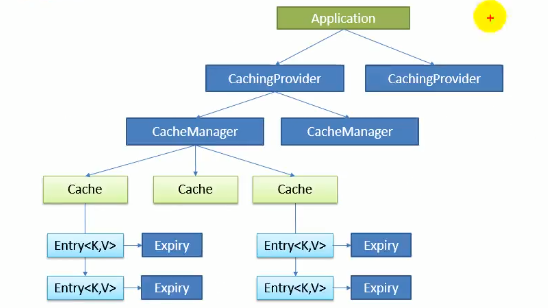
- Java Caching 定义了 5 个核心接口,分别是 CachingProvider、CacheManager、Cache、Entry 和 Expiry;
- CachingProvider:定义了创建、配置、获取、管理和控制多个 CacheManage,一个应用可以在运行期访问多个 CachingProvider;
- CacheManager:定义了创建、配置、获取、管理和控制多个唯一命名的 Cache,这些 Cache 存在于 CacheManager 的上下文中,一个 CacheManager 仅被一个 CachingProvider 所有;
- Cache :一个类似于 Map 的数据结构并临时存储以 key 为索引的值,一个 Cache 仅被一个 CacheManager 所有;
- Entry:一个存储在 Cache 中的 key-value 对;
- Expiry:每一个存储在 Cache 中的条目有一个定义的有效期,一旦超过这个时间,条目为过期的状态,一旦过期,条目将不可访问、更新和删除,缓存有效期可通过 ExpiryPolicy 设置;
7.2 Spring 缓存抽象
7.2.1 基本介绍
- spring 从 3.1 开始定义了 org.springframework.cache.Cache 和 org.springframework.cache.CacheManager 接口来统一不同的缓存技术,并支持使用 JCache(JSR-107)注解来简化开发;
- 将方法的运行结果进行缓存,以后再要有相同的数据,直接从缓存中获取,不用调用方法;
- SpringCache 包含两个顶级接口,Cache(缓存)和 CacheManager(缓存管理器)。CacheManager 管理多个 Cache 组件,对缓存的真正 CRUD 操作在 Cache 组件中,每一个缓存组件都有自己唯一一个名字;
- CacheManager 接口为缓存管理器的组件规范定义,默认使用 SimpleCacheManager;
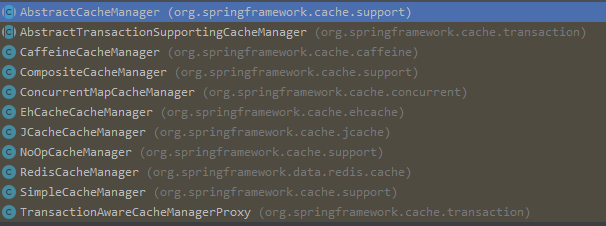
- Cache 接口为缓存的组件规范定义,包含缓存的各种操作集合,Cache 接口下 Spring 提供了各种 xxxCache 的实现,如 RedisCache、EhCacheCache、ConcurrentMapCache 等;
SpringCache 基本注解 | @Cacheable | 主要针对方法配置,能够根据方法的请求参数对其结果进行缓存 | | :—- | —- | | @CacheEvict | 清空缓存 | | @CachePut | 保证方法被调用,而且修改的结果与缓存同步更新 | | @EnableCaching | 开启基于注解的缓存,用于Config文件 |
cache 注解的几个属性:
- cacheName/value:指定缓存组件的名字;将方法的返回结果放在哪个缓存中,是数组的方式,可以指定多个缓存;
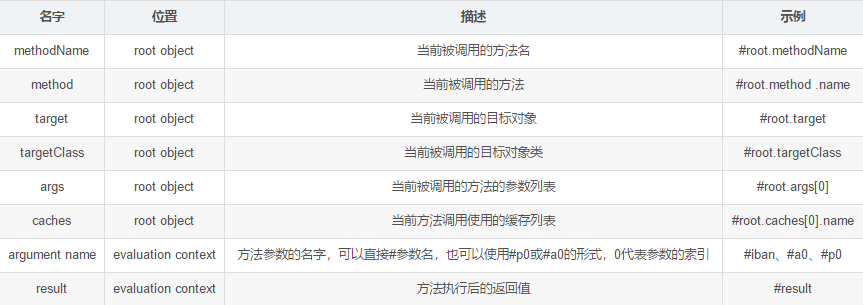
- key:缓存数据使用的 key,默认是使用方法参数的值,可使用 SpEL ,如 #id,#root.args[0] 等,默认情况下 key 的生成格式为: 参数值-方法的返回值;
- keyGenerator:自定义 key 的生成器来定义 key 的格式,注意:**key/keyGenerator 二选一使用**;
- cacheManager:指定缓存管理器或者 cacheResolver 指定获取解析器;
- condition:指定符合条件的情况下才缓存,注意:condition 和 unless 可以结合使用;
- unless:否定缓存,当 unless 为 true 时方法的返回值不会被缓存,可以获取到结果进行判断;
- sync:是否使用异步
- 运行流程:以 @Cacheable 为例
- 方法运行之前,先去查询 Cache(缓存组件),按照 cacheName 指定的名字获取,(cacheManager 先获取相应的缓存),第一次获取缓存如果没有 Cache 组件会自动创建;
- 去 Cache 中查找缓存的内容,使用一个 key,默认是方法的参数,key 是按照某种策略生成的,默认是使用使用 SimpleKeyGenerator 生成key;
- SimpleKeyGenerator 生成 key 的默认策略:如果没有参数:key=new Simple( ),如果有一个参数:key=参数的值,如果有多个参数:key=new SimpleKey(params);
- 去 Cache 中查找缓存的内容,使用一个 key,默认是方法的参数,key 是按照某种策略生成的,默认是使用使用 SimpleKeyGenerator 生成key;
- 没有查到缓存就调用目标方法;
- 将目标方法返回的结果放进缓存中;
- 小结:@Cacheable 标注的方法执行了之前先来检查缓存中有没有这个数据,默认按照参数的值作为 key 去查询缓存,如果没有就运行方法并将结果放入缓存,以后再来调用就可以直接使用缓存中的数据;
@CachePut 与 @Cacheable 的调用时机不同,其先调用目标方法,再将目标方法的结果缓存起来;
7.2.2 【案例】使用 SpringCache 注解
知识准备:SpEL 表达式可基于上下文并通过使用缓存抽象,提供与 root 独享相关联的缓存特定的内置参数;
- 环境准备:参考 springboot 系列学习第四节 springboot 数据访问-整合 mybatis ,来搭建一个可实现从 mysql 数据库读取数据的应用程序,依赖的模块有:在创建向导中选择 web、jdbc、mysql、mybatis;
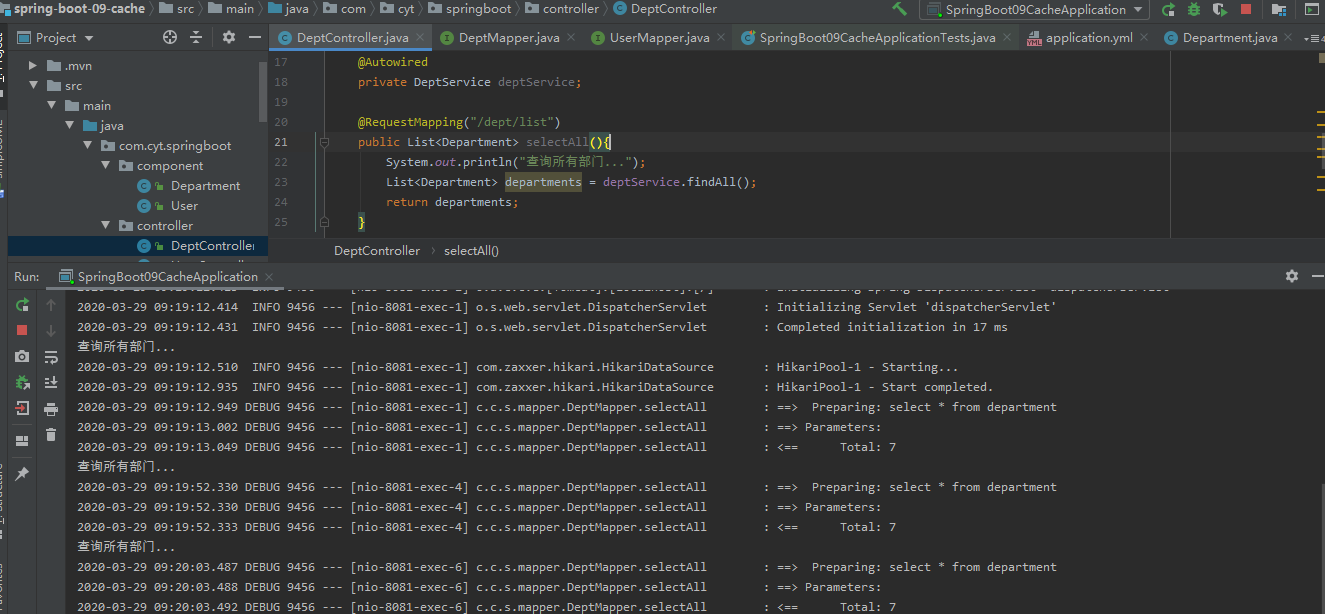
- 如果不开启缓存注解,则页面每次进行数据访问都要查询数据库;
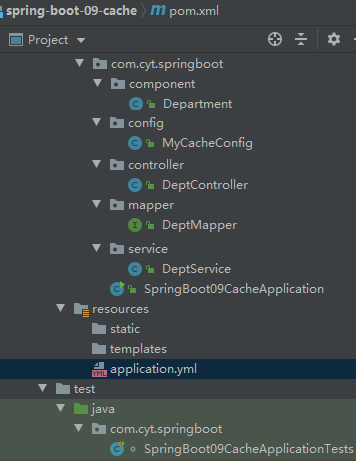
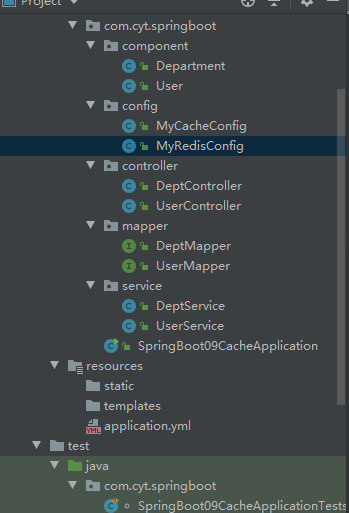
- 目录结构
- 主配置文件 application.yml 连接 mysql 数据库 ```java server: port: 8081 spring: datasource: url: jdbc:mysql://localhost:3306/test_jdbc?serverTimezone=UTC username: root password: 1234
mybatis: configuration: map-underscore-to-camel-case: true logging: level: com.cyt.springboot.mapper: debug
<a name="PQjnA"></a>#### 7.2.2.1 【代码】application + component + mapper + service + controller- 主运行程序 SpringBootApplication```java@EnableCaching@MapperScan("com.cyt.springboot.mapper")@SpringBootApplicationpublic class SpringBoot09CacheApplication {public static void main(String[] args) {SpringApplication.run(SpringBoot09CacheApplication.class, args);}}
【component】Department
注意:为了实现缓存功能,一定要将**component 组件可序列化,即实现 **Serializable 接口;
public class Department implements Serializable {
private Integer id;
private String departmentName;

public Integer getId() {
   return id;
}

public void setId(Integer id) {
   this.id = id;
}

public String getDepartmentName() {
   return departmentName;
}

public void setDepartmentName(String departmentName) {
   this.departmentName = departmentName;
}

@Override
public String toString() {
   return "Department{" +
           "id=" + id +
           ", departmentName='" + departmentName + '\'' +
           '}';
}
}
【mapper】DeptMapper
@Mapper
public interface DeptMapper {

  @Select("select * from department")
  public List<Department> selectAll();

  @Select("select * from department where id=#{id}")
  public Department selectById(Integer id);

  @Select("select * from department where departmentName=#{departmentName}")
  public Department selectByName(String departmentName);

  @Options(useGeneratedKeys = true, keyProperty = "id")
  @Insert("insert into department(departmentName) values(#{departmentName})")
  public int save(Department department);

  @Update("update department set departmentName=#{departmentName} where id=#{id}")
  public int update(Department department);

  @Delete("delete from department where id =#{id}")
  public int delete(Integer id);
}
【service】DeptService
@CacheConfig(cacheNames = "dept")
@Service
public class DeptService {

  @Autowired
  DeptMapper deptMapper;

  @Cacheable(cacheNames = {"dept"})
  public List<Department> findAll(){
      System.out.println("查询所有部门...");
      return deptMapper.selectAll();
  }

  @Cacheable(cacheNames = {"dept"},key="#id")
//    @Cacheable(cacheNames = {"dept"}, keyGenerator = "myKeyGenerator",condition = "#id>1",unless = "#a0==2")
  public Department findById(Integer id){
      System.out.println("查询"+ id + "号部门...");
      return deptMapper.selectById(id);
  }

  @CachePut(value={"dept"}, key="#result.id")
  public Department updateDept(Department department){
      System.out.println("更新"+department.getId()+"号部门...");
      deptMapper.update(department);
      return department;
  }

  @Caching(
      cacheable={
           @Cacheable(value = "dept", key = "#departmentName")
      },
      put={
           @CachePut(value = "dept", key = "#result.id")
      }
  )
  public Department findByName(String departmentName){
      System.out.println("查询"+ departmentName + "部门...");
      return deptMapper.selectByName(departmentName);
  }

  /**
   * 缓存清除
   * key:指定要清除的数据
   * allEntries=true,指定清除这个缓存中的所有数据
   * beforeInvocation=true,缓存的清除在方法之前执行,即无论方法是否出现异常,缓存都会清除,默认为false
   * @param id
   */
//    @CacheEvict(value = "dept", key="#id")
  @CacheEvict(value = "dept", allEntries=true, beforeInvocation = true)
  public void deleteDept(Integer id){
     System.out.println("删除"+ id +"号部门...");
      int i = 10/0;
//        deptMapper.delete(id);
  }
}
【controller】DeptController
@RestController
public class DeptController {

  @Autowired
  private DeptService deptService;

  @RequestMapping("/dept/list")
  public List<Department> selectAll(){
      List<Department> departments = deptService.findAll();
      return departments;
  }

  @RequestMapping("/dept/{id}")
  public Department selectById(@PathVariable("id")Integer id){
      return deptService.findById(id);
  }

  @RequestMapping("/findByName/{departmentName}")
  public Department selectByName(@PathVariable("departmentName")String departmentName){
      return deptService.findByName(departmentName);
  }

  @GetMapping("/dept")
  public Department updateDept(Department department){
      deptService.updateDept(department);
      return department;
  }

  @GetMapping("/delDept/{id}")
  public String deleteDept(@PathVariable("id")Integer id){
      deptService.deleteDept(id);
      return "success";
  }
}
7.2.2.2 自定义 keyGenerator
在 config 目录下自定义一个 keyGenerator;
@Configuration
public class MyCacheConfig {
  //key 的格式为:注解所在的方法名[参数值]
  @Bean("myKeyGenerator")
  public KeyGenerator keyGenerator(){
      return new KeyGenerator(){
          @Override
          public Object generate(Object o, Method method, Object... objects) {
              return method.getName()+"["+ Arrays.asList(objects).toString()+"]";
          }
      };
  }
}
在 DeptService 的方法 findById 中使用自定义的 keyGenerator;
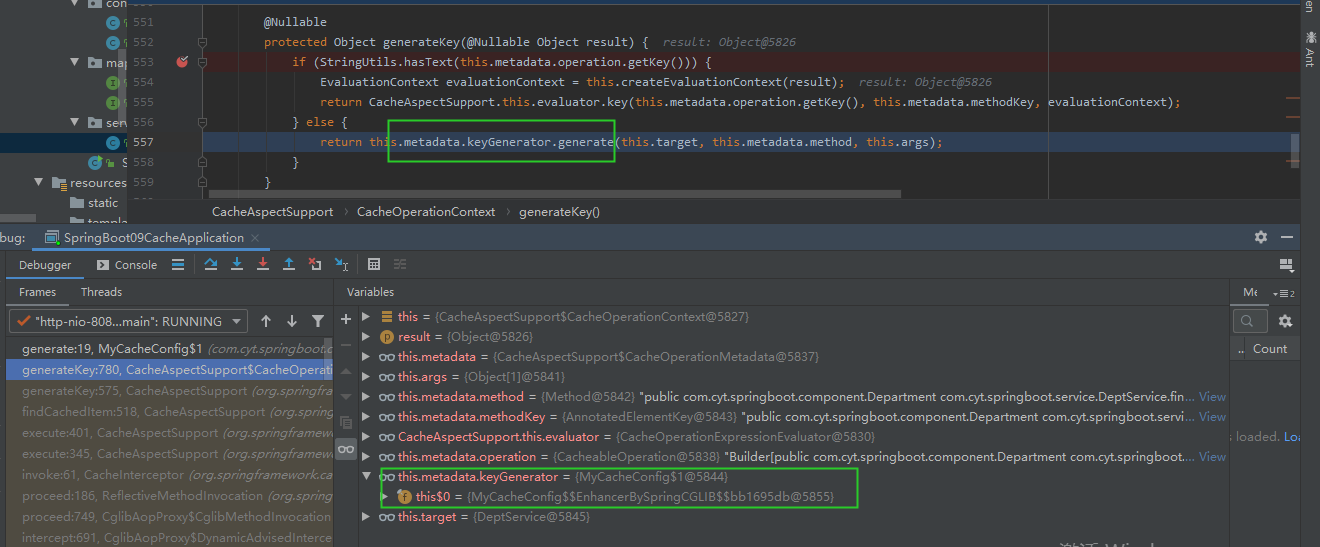
@Cacheable(cacheNames = {"dept"},keyGenerator = "myKeyGenerator",condition = "#id>1",unless = "#a0==2")
//myKeyGenerator 等同于key="#root.methodName"+"["+"#id"+"]")
public Department findById(Integer id){
  System.out.println("查询"+ id + "号部门...");
  return deptMapper.selectById(id);
}
在页面访问 localhost:8081/dept/1
- 自定义的 myKeyGenerator 替代默认的 SimpleKeyGenerator;
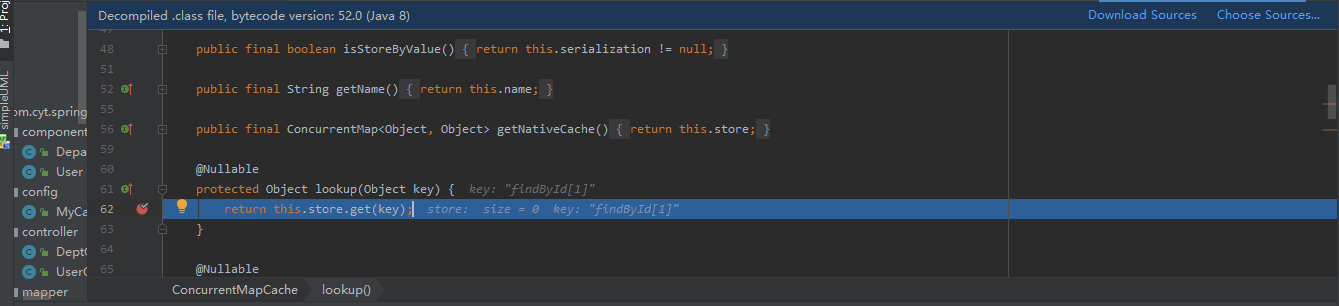
- store 中存储的 key 为 findById[1];
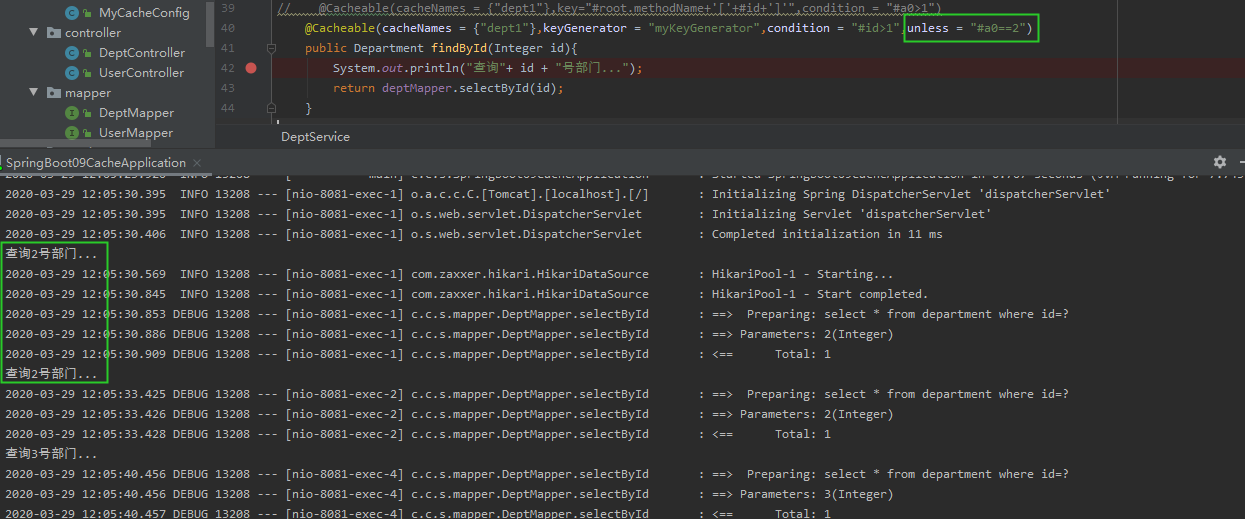
- 补充: condition 和 unless 的使用效果
- @Cacheable(condition = “#id>1”):只有当 id 大于 1 才能被缓存;
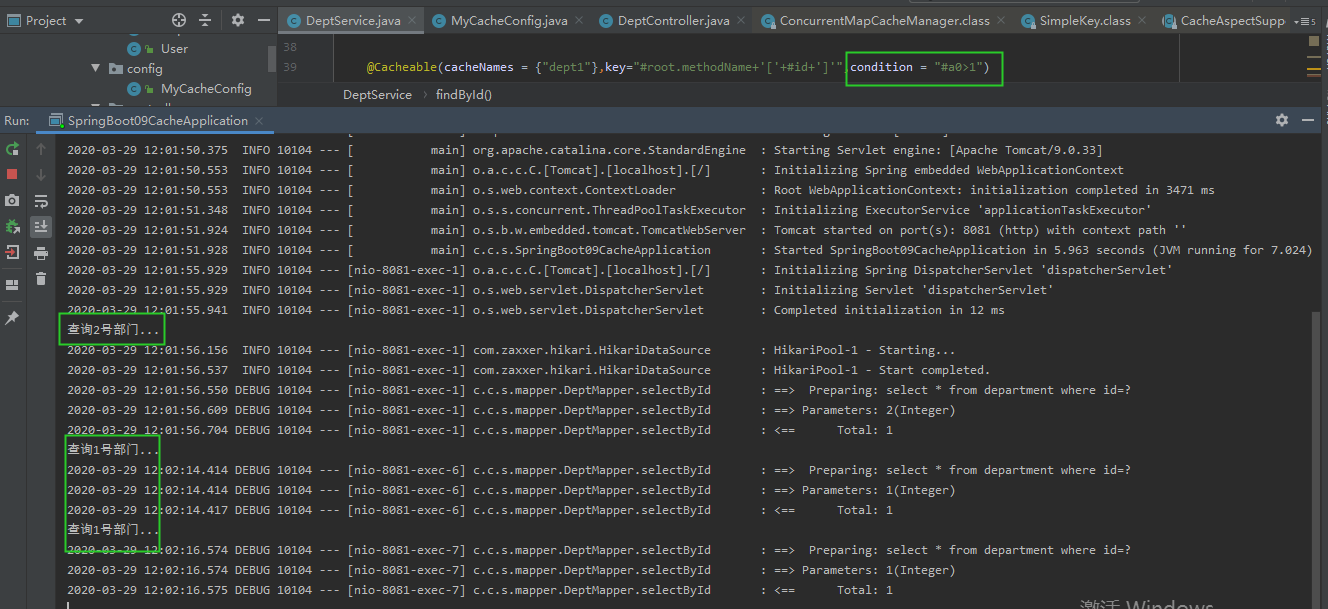
- @Cacheable(condition = “#id>1”,unless = “#a0==2”):只有当 id 大于 1 且不等于 2 时才能被缓存;
7.2.2.3 数据修改后同步更新缓存
- 流程:
- 先在页面访问 localhost:8081/dept/1,可以获得 {“id”:1,”departmentName”:”tjufe”};
- 然后另开一个页面访问 localhost:8081/dept?id=1&departmentName=”cache”,将 id 为 1 的部门的名称改成 cache;
- 刷新之前访问 localhost:8081/dept/1 的页面,应该获得同步更新的缓存结果 {“id”:1,”departmentName”:”cache”};
注意事项:
- 保证同步更新的数据是在同一 cache 下,即 cacheNames 一致;
- 保证 key 的生成策略相同,否则通过 #result.id 找到 store 中对应的同一部门 id 的 key;
- 由于 CachePut 的运行机制是先调用方法再缓存结果,所以其 key 一定是基于方法调用之后的返回结果,所以不能直接使用 #id,否则会保错;
@Cacheable(cacheNames = {"dept"},key="#id")
public Department findById(Integer id){
System.out.println("查询"+ id + "号部门...");
return deptMapper.selectById(id);
}
//通过 key="#result.id" 同步更新缓存结果,注意 result.id 也可为 department.id
@CachePut(value={"dept"}, key="#result.id")
public Department updateDept(Department department){
System.out.println("更新"+department.getId()+"号部门...");
deptMapper.update(department);
return department;
}
7.3 整合 redis
7.3.1 基本介绍
- 由于 CachePut 的运行机制是先调用方法再缓存结果,所以其 key 一定是基于方法调用之后的返回结果,所以不能直接使用 #id,否则会保错;
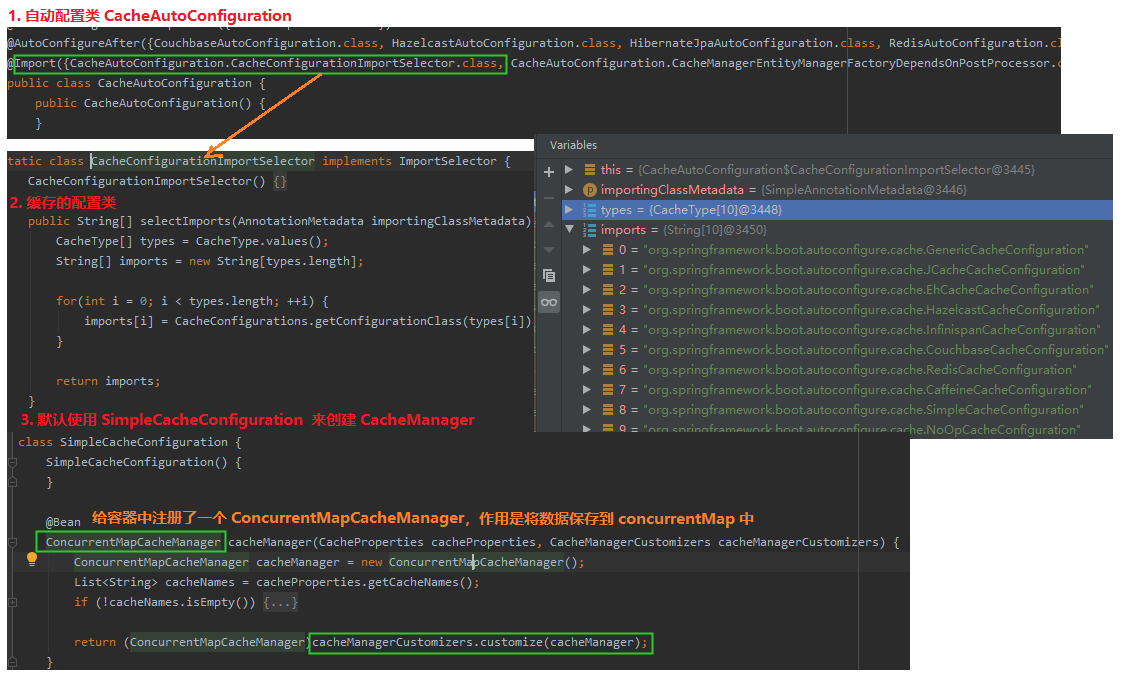
从 7.2.1.1 中可以了解到 springboot 默认用 SimpleCacheConfiguration 创建 ConcurrentMapCacheManager 来管理 cache,且数据存储在 concurrentMap 这个简单的 map 中,缓存效果仅作用于程序运行期间;
- 为了实现一种持久化的缓存机制,在开发中常使用缓存中间件,如 redis、memcached、ehcache 等;
Redis 是一个开源(BSD 许可)的,内存中的数据结构存储系统,它可以用作数据库、缓存和消息中间件;
7.3.1.1 redis 的安装与使用
redis 的基本使用可参考之前写的笔记 redis 学习
7.3.1.2 RedisCacheManager 的原理
参考 7.2.1.2 ,来理解 RedisCacheManager 的原理
- CacheManager 只是用于管理 Cache 组件的,实际上通过 cache 组件在缓存中存取数据;
- 引入 redis 的 stater,容器中会先创建 RedisCacheManager,一旦有了 RedisCacheManager 就不会去创建默认的 CacheManager;
- RedisCacheManager 会创建 RedisCache 来作为缓存组件,RedisCache 通过使用 RedisTemplate
- RedisTemplate
7.3.2 【案例】springboot 与 redis 整合
7.3.2.1 准备工作
目录结构
在 7.2 案例的基础上引入 redis 的 stater
      <dependency>
          <groupId>org.springframework.boot</groupId>
          <artifactId>spring-boot-starter-data-redis</artifactId>
          <version>2.2.6.RELEASE</version>
      </dependency>
在 application.yml 中添加与 redis 相关的配置,主要是 host 和 password(如果设置密码的话);
spring:
redis:
  host: 127.0.0.1 # Redis服务器地址
  database: 0 #默认为0
  port: 6379 # Redis服务器连接端口
  password: # Redis服务器连接密码(默认为空)
  pool.max-active: 8 # 连接池最大连接数(使用负值表示没有限制)
  pool.max-wait: -1 # 连接池最大阻塞等待时间(使用负值表示没有限制)
  max-idle: 8 # 连接池中的最大空闲连接
  pool.min-idle: 0 # 连接池中的最小空闲连接
  timeout: 0 # 连接超时时间(毫秒)
7.3.2.2 【代码】component + mapper + service + controller
【component】User
public class User implements Serializable {
  private Integer userId;
  private String userName;
  private Integer age;

  public Integer getUserId() {
      return userId;
  }

  public void setUserId(Integer userId) {
      this.userId = userId;
  }

  public String getUserName() {
      return userName;
  }

  public void setUserName(String userName) {
      this.userName = userName;
  }

  public Integer getAge() {
      return age;
  }

  public void setAge(Integer age) {
      this.age = age;
  }

  @Override
  public String toString() {
      return "User{" +
              "userId=" + userId +
              ", userName='" + userName + '\'' +
              ", age=" + age +
              '}';
  }
}
【mapper】UserMapper
注意: @Results 必须在某个接口方法上,不能独立在接口之中,否则会报错: org.apache.ibatis.builder.IncompleteElementException: Could not find result map com.xxx.xxx with root cause;
@Mapper
public interface UserMapper {

@Select("select * from user")
@Results(id="user_map", value = {
       @Result(column = "id", property = "userId"),
       @Result(column = "name", property = "userName"),
       @Result(column = "age", property = "age"),
})
public List<User> findAll();

@Select("select * from user where id=#{userId}")
@ResultMap(value = "user_map")
public User findUserByID(Integer id);
}
【service】UserService
@CacheConfig(cacheNames = "user", cacheManager = "myRedisCacheManager")
@Service
public class UserService {

  @Autowired
  UserMapper userMapper;

  @Cacheable
  public List<User> findAll(){
      System.out.println("查询所有用户...");
      return userMapper.findAll();
  }

  @Cacheable(key="#id")
  public User findById(Integer id){
      System.out.println("查询"+ id + "号用户...");
      return userMapper.findUserByID(id);
  }
}
7.3.2.3 自定义 RedisCacheManager
在 config 目录下再新建一个 MyRedisConfig 来专门进行 redis 的相关配置;
@Configuration
public class MyRedisConfig {
  //1. 针对某个实体类实现数据以 json 而非序列化的形式缓存到 redis 数据库;
  @Bean
  public RedisTemplate<Object, Department> deptRedisTemplate(RedisConnectionFactory redisConnectionFactory) throws UnknownHostException {
      RedisTemplate<Object, Department> template = new RedisTemplate();
      template.setConnectionFactory(redisConnectionFactory);
      Jackson2JsonRedisSerializer ser = new Jackson2JsonRedisSerializer<Department>(Department.class);
      template.setDefaultSerializer(ser);
      return template;
  }
  /**
   * 2. 基于SpringBoot2 对 RedisCacheManager 的自定义配置
   * @param redisConnectionFactory
   * @return
   */
  @Bean
  public RedisCacheManager myRedisCacheManager(RedisConnectionFactory redisConnectionFactory) {
      RedisCacheConfiguration cacheConfiguration =
              RedisCacheConfiguration.defaultCacheConfig()
                      .entryTtl(Duration.ofDays(1))   // 设置缓存过期时间为一天
                      .disableCachingNullValues()     // 禁用缓存空值,不缓存null校验
                      .serializeValuesWith(RedisSerializationContext.SerializationPair.fromSerializer(new
                              GenericJackson2JsonRedisSerializer()));     // 设置CacheManager的值序列化方式为json序列化,可加入@Class属性
      return RedisCacheManager.builder(redisConnectionFactory).cacheDefaults(cacheConfiguration).build();     // 设置默认的cache组件
  }
}
测试代码
@SpringBootTest
class SpringBoot09CacheApplicationTests {

  @Autowired
  StringRedisTemplate stringRedisTemplate;
  @Autowired
  RedisTemplate redisTemplate;
  @Autowired
  RedisTemplate<Object, Department> deptTemplate;
  @Autowired
  RedisCacheManager myRedisCacheManager;

  @Autowired
  DeptService deptService;

  @Test
  void contextLoads() {
//        stringRedisTemplate.opsForValue().append("msg","redis_cache");
      stringRedisTemplate.opsForList().leftPush("mylist","a");
      stringRedisTemplate.opsForList().leftPush("mylist","b");
      stringRedisTemplate.opsForList().leftPush("mylist","c");
      System.out.println(stringRedisTemplate.opsForValue().get("msg"));
  }

  @Test
  void testSaveDept(){
      //保存对象时默认使用 jdk 序列化机制,将序列化后的数据保存到 redis 中
      Department department = deptService.findById(1);
      deptTemplate.opsForValue().set("dept-01",department);
      System.out.println(deptTemplate.opsForValue().get("dept-01"));

  }

  @Test
  void testRedisCacheManager(){
      Cache cache = myRedisCacheManager.getCache("user");
      cache.put("user-01", "tingya");
  }
}
结果

参考
SpringBoot - 缓存注解详细介绍
spring 缓存注解
Springboot中的cache(一)
聊聊Spring Cache的缓存抽象与JSR107缓存抽象JCache,并使用API方式使用Spring Cache【享学Spring】
SpringBoot @Cacheable注解的属性使用
Springboot中的缓存Cache和CacheManager原理介绍
spring boot中的cache使用
springboot2.x 的 RedisCacheManager

若有收获,就点个赞吧
0 人点赞
