前言
- springboot 相较 springmvc 最明显的改变就是有一个自己的启动类,本篇将从这个启动类入手,围绕类上注解 @SpringBootApplication 和 类内调用方法 SpringApplication.run() 来学习 springboot 的一些特性,比如配置类是如何加载和调用的,他们之间的关系是什么,springboot 是如何调用和实现内置 tomcat 的?
SpringBoot 的启动主要是通过实例化 SpringApplication 来启动的,启动过程主要做了以下几件事情:配置属性、获取监听器,发布应用开始启动事件、初始化输入参数、配置环境,输出 banner、创建上下文、预处理上下文、刷新上下文、再刷新上下文、发布应用已经启动事件、发布应用启动完成事件;
- 其中 配置属性、获取监听器,发布应用开始启动事件、初始化输入参数、配置环境,通过 @SpringBootApplication 完成;
- 其中 输出 banner、创建上下文、预处理上下文、刷新上下文、再刷新上下文、发布应用已经启动事件、发布应用启动完成事件,通过 SpringApplication.run() 实现;
@SpringBootApplicationpublic class Application {public static void main(String[] args) {SpringApplication.run(Application.class, args);}}
知识准备
- springboot 充分发挥了 spring 的注解功能,有关 spring 从 xml 向注解的演进可参考 博文
- spring 常用注解
- tomcat 系统学习
- tomcat、servlet 与 jsp
- 重点:tomcat 与 springmvc
1. 注解 @SpringBootApplication
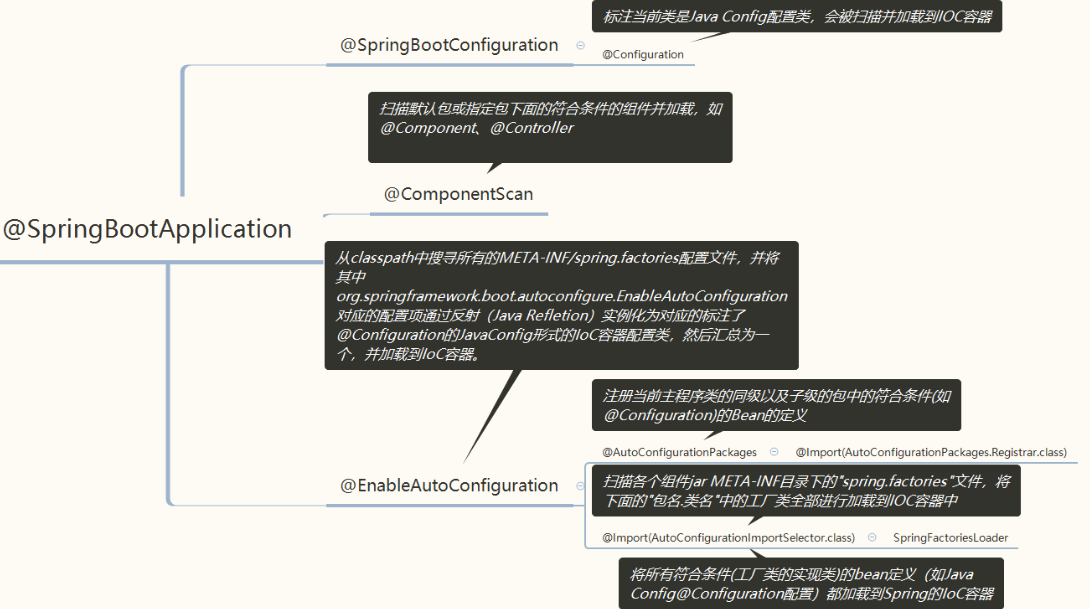
@SpringBootApplication 有三个重要的子注解:@SpringBootConfiguration、@EnableAutoConfiguration、@ComponentScan;
@Target(ElementType.TYPE) // 注解的适用范围,其中TYPE用于描述类、接口(包括包注解类型)或enum声明@Retention(RetentionPolicy.RUNTIME) // 注解的生命周期,保留到class文件中(三个生命周期)@Documented // 表明这个注解应该被javadoc记录@Inherited // 子类可以继承该注解@SpringBootConfiguration // 继承了Configuration,表示当前是注解类@EnableAutoConfiguration // 开启springboot的注解功能,springboot的四大神器之一,其借助@import的帮助@ComponentScan(excludeFilters = { // 扫描路径设置(具体使用待确认)@Filter(type = FilterType.CUSTOM, classes = TypeExcludeFilter.class),@Filter(type = FilterType.CUSTOM, classes = AutoConfigurationExcludeFilter.class) })public @interface SpringBootApplication {...}
1.1 三个子注解
1.1.1 @Configuration
bean 之间的依赖关系通过直接调用对应的类中创建方法;
注:已经使用 @Bean 注解的 dao 类不能在原 dao 类上再使用 @Component 等注解;
@Configurationpublic class MockConfiguration{@Beanpublic MockService mockService(){return new MockServiceImpl(dependencyService());}@Beanpublic DependencyService dependencyService(){return new DependencyServiceImpl();}}
1.1.2 @ComponentScan
从指定的配置文件或 Config 类中自动扫描并加载符合条件的组件(@Component 等),并将这些组件加载到 IOC 容器中;
- 可以通过 basePackages 等属性来定制 @ComponentScan 自动扫描的范围,如果不指定,则默认 Spring 框架实现会从声明 @ComponentScan 所在类的 package 进行扫描;
- SpringBoot 的启动类最好是放在 root package 下,因为默认不指定 basePackages;
使用:将不在默认扫描范围的新包也纳入扫描的范围
在 spring 框架中以 @Enable 开头的注解基本功能是借助 @Import 的支持,收集和注册特定场景相关的bean 定义;
- @EnableAutoConfiguration 的主要作用就是将(内外部)指定范围内的 bean 导入 register 容器,其中
- 通过 @AutoConfigurationPackage 导入 @SpringBootApplication 所在类的包下的所有组件;
- 通过 @Import(AutoConfigurationImportSelector.class) 导入外部 jar 包的组件; ```java @SuppressWarnings(“deprecation”) @Target(ElementType.TYPE) @Retention(RetentionPolicy.RUNTIME) @Documented @Inherited //以下两个注解重点! @AutoConfigurationPackage @Import(AutoConfigurationImportSelector.class) public @interface EnableAutoConfiguration { … }
//1. @AutoConfigurationPackage 注解
@Target({ElementType.TYPE})
@Retention(RetentionPolicy.RUNTIME)
@Documented
@Inherited
@Import({Registrar.class})
public @interface AutoConfigurationPackage {
}
…..1.1 进一步看 @Import({Registrar.class})
static class Registrar implements ImportBeanDefinitionRegistrar, DeterminableImports {
Registrar() {
}
//注册当前主程序类的同级以及子级的包中的符合条件的Bean的定义
public void registerBeanDefinitions(AnnotationMetadata metadata, BeanDefinitionRegistry registry) {
AutoConfigurationPackages.register(registry, (new AutoConfigurationPackages.PackageImport(metadata)).getPackageName());
}
…
}
….1.2 Registrar 类的 registerBeanDefinitions 方法实现 bean 的 register
public static void register(BeanDefinitionRegistry registry, String… packageNames) {
if (registry.containsBeanDefinition(BEAN)) {
BeanDefinition beanDefinition = registry.getBeanDefinition(BEAN);
ConstructorArgumentValues constructorArguments = beanDefinition.getConstructorArgumentValues();
constructorArguments.addIndexedArgumentValue(0, addBasePackages(constructorArguments, packageNames));
} else {
GenericBeanDefinition beanDefinition = new GenericBeanDefinition();
beanDefinition.setBeanClass(AutoConfigurationPackages.BasePackages.class);
beanDefinition.getConstructorArgumentValues().addIndexedArgumentValue(0, packageNames);
beanDefinition.setRole(2);
registry.registerBeanDefinition(BEAN, beanDefinition);
}
}
//2. Import(AutoConfigurationImportSelector.class)
2.1 AutoConfigurationImportSelector implates DeferredImportSelector(extends ImportSelector)
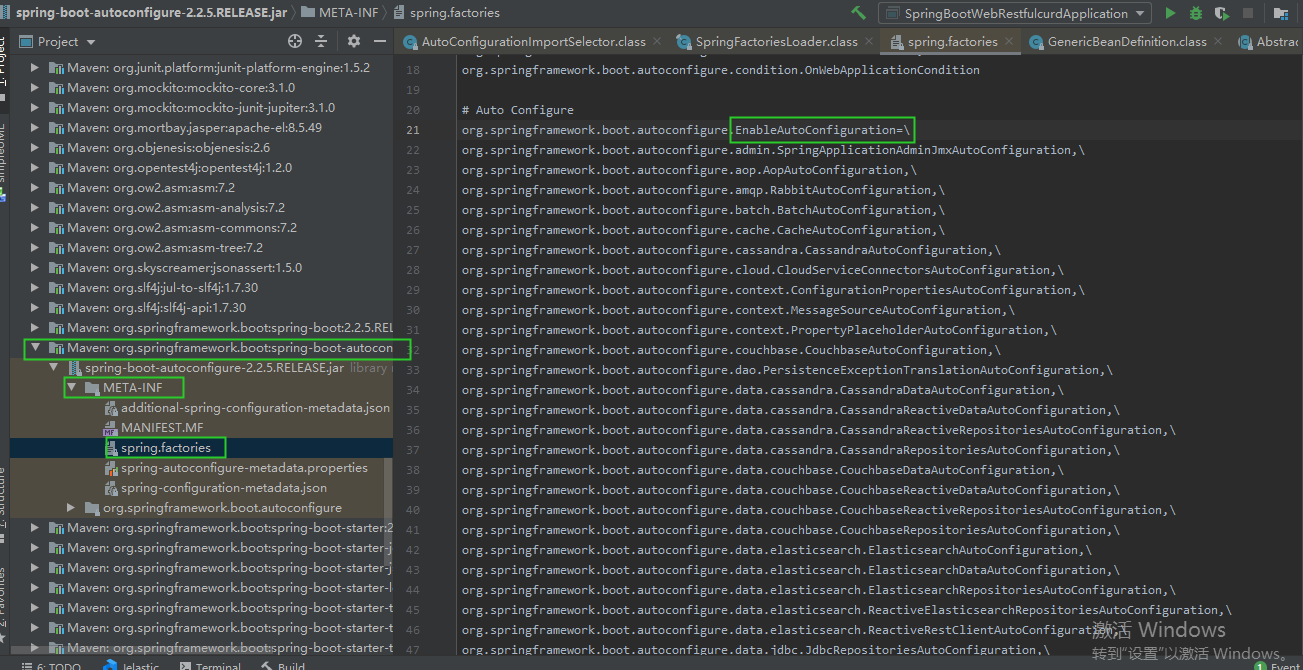
2.2 selectImports(): 从 “META-INF/spring.factories 路径下导入外部 jar 包
public String[] selectImports(AnnotationMetadata annotationMetadata) {
…
List
private static Map<String, List<String>> loadSpringFactories(@Nullable ClassLoader classLoader) {Enumeration<URL> urls = classLoader != null ? classLoader.getResources("META-INF/spring.factories") : ClassLoader.getSystemResources("META-INF/spring.factories");LinkedMultiValueMap result = new LinkedMultiValueMap();....
} }
- loadSpringFactories 函数中外部 jar 包的加载类路径
<a name="0XJW4"></a>
### 1.1.4 springboot 启动原理图
<br />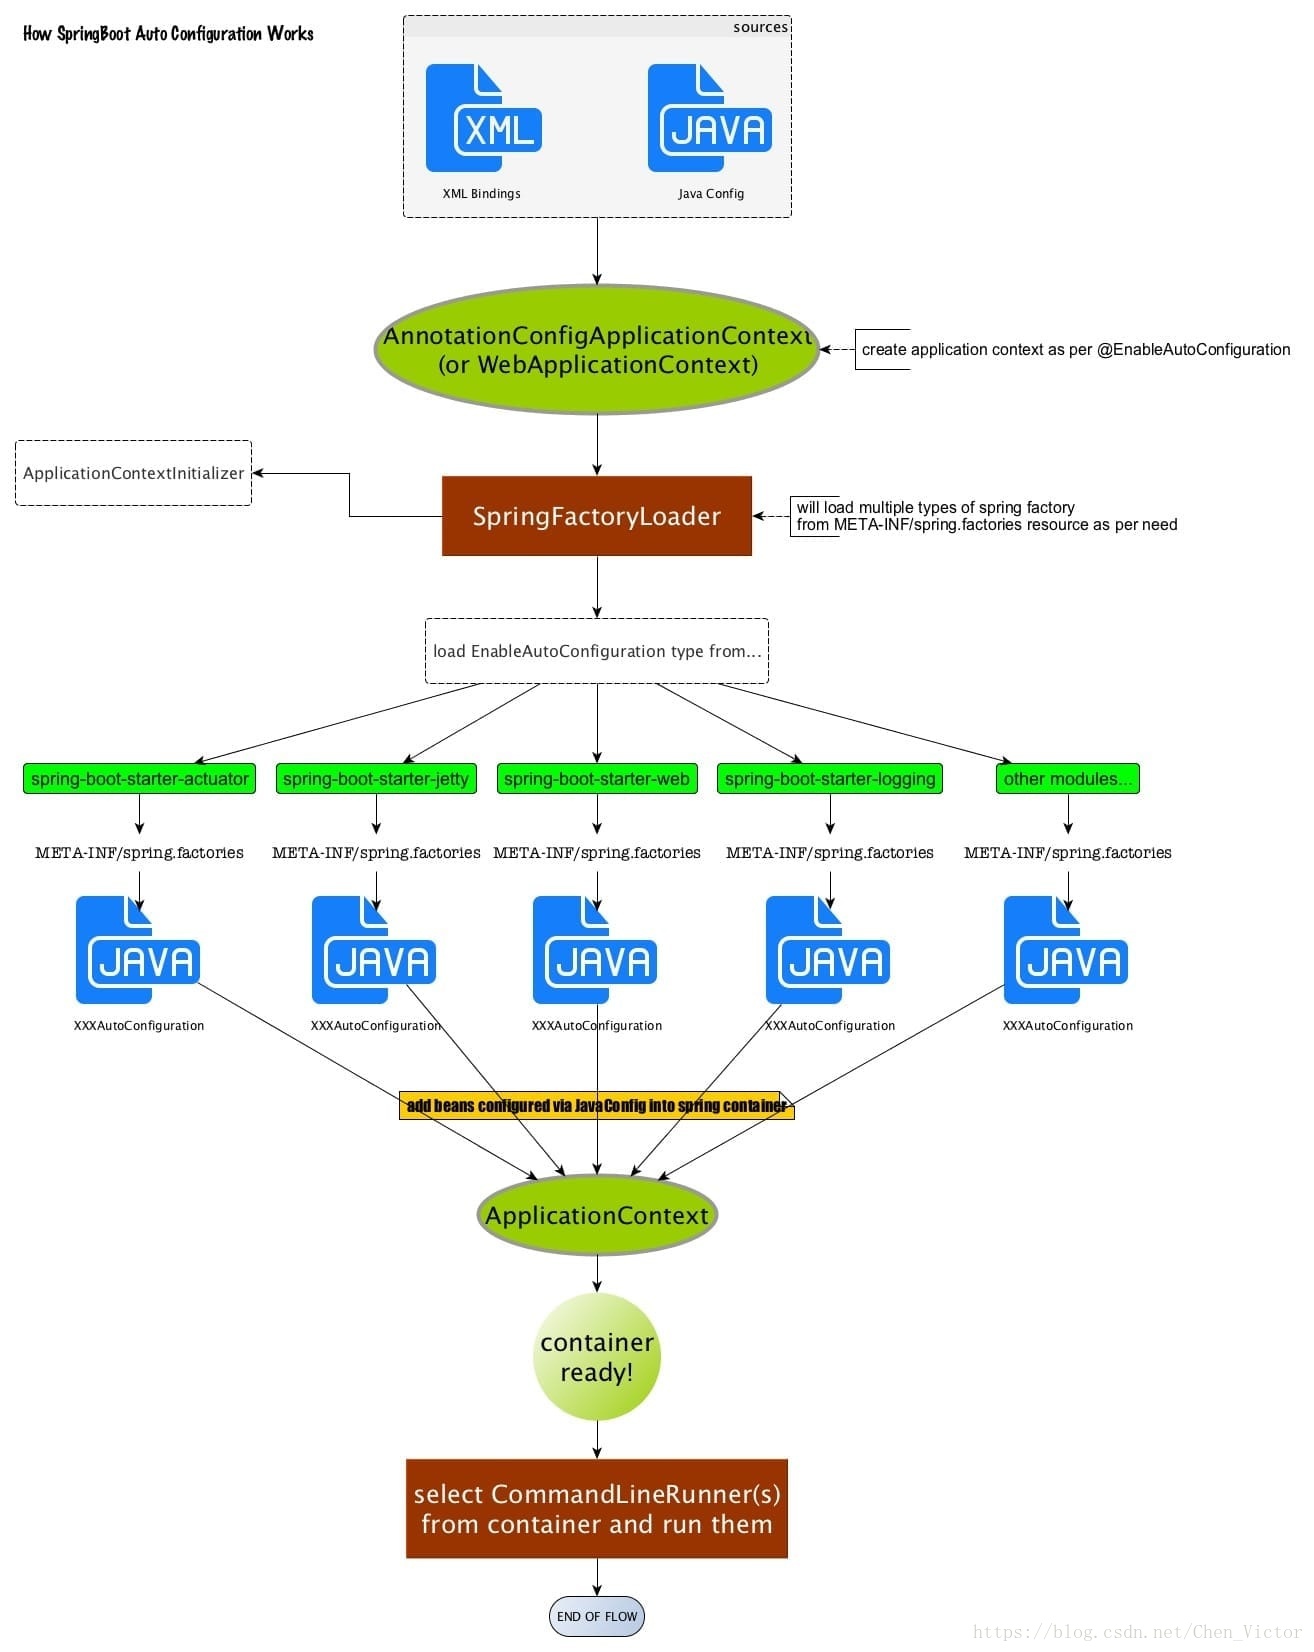
<a name="lvAtR"></a>
# 2. SpringApplication.run( )
- 通过深入 SpringApplication.run( ) 方法来看 tomcat 在 springboot 中是怎么启动的,在 run 方法中,重点应关注创建应用上下文(createApplicationContext)和刷新上下文(refreshContext);
- 在SpringBoot中启动tomcat的工作在刷新上下这一步。而tomcat的启动主要是实例化两个组件:Connector、Container,一个tomcat实例就是一个Server,一个Server包含多个Service,也就是多个应用程序,每个Service包含多个Connector和一个Container,而一个Container下又包含多个子容器。
```java
//1. SpringApplication.run(SpringBootWebRestfulcurdApplication.class, args);
//2. 在 SpringApplication.class 中调用对应的 run 函数
public static ConfigurableApplicationContext run(Class<?> primarySource, String... args) {
return run(new Class[]{primarySource}, args);
}
public static ConfigurableApplicationContext run(Class<?>[] primarySources, String[] args) {
return (new SpringApplication(primarySources)).run(args);
}
//3.
public ConfigurableApplicationContext run(String... args) {
...
try {
ApplicationArguments applicationArguments = new DefaultApplicationArguments(args);
ConfigurableEnvironment environment = this.prepareEnvironment(listeners, applicationArguments);
this.configureIgnoreBeanInfo(environment);
//打印banner,这里你可以自己涂鸦一下,换成自己项目的logo
Banner printedBanner = this.printBanner(environment);
//创建应用上下文
context = this.createApplicationContext();
exceptionReporters = this.getSpringFactoriesInstances(SpringBootExceptionReporter.class, new Class[]{ConfigurableApplicationContext.class}, context);
//预处理上下文
this.prepareContext(context, environment, listeners, applicationArguments, printedBanner);
//刷新上下文
this.refreshContext(context);
//再刷新上下文
this.afterRefresh(context, applicationArguments);
listeners.started(context);
...
}
2.1 创建应用上下文(createApplicationContext)
//创建的 AnnotationConfigServletWebServerApplicationContext 类继承了 ServletWebServerApplicationContext,而这个类是最终集成了AbstractApplicationContext。
protected ConfigurableApplicationContext createApplicationContext() {
    Class<?> contextClass = this.applicationContextClass;
    if (contextClass == null) {
        try {
            switch(this.webApplicationType) {
                case SERVLET:
                    //创建AnnotationConfigServletWebServerApplicationContext
                    contextClass = Class.forName("org.springframework.boot.web.servlet.context.AnnotationConfigServletWebServerApplicationContext");
                    break;
                case REACTIVE:
                    contextClass = Class.forName("org.springframework.boot.web.reactive.context.AnnotationConfigReactiveWebServerApplicationContext");
                    break;
                default:
                    contextClass = Class.forName("org.springframework.context.annotation.AnnotationConfigApplicationContext");
            }
        } catch (ClassNotFoundException var3) {
            throw new IllegalStateException("Unable create a default ApplicationContext, please specify an ApplicationContextClass", var3);
        }
    }
    return (ConfigurableApplicationContext)BeanUtils.instantiateClass(contextClass);
}
2.2 刷新上下文(refreshContext)
//1. SpringApplication.java
private void refreshContext(ConfigurableApplicationContext context) {
    this.refresh(context);
    if (this.registerShutdownHook) {
        try {
            context.registerShutdownHook();
        } catch (AccessControlException var3) {
        }
    }
}
    //这里直接调用最终父类 AbstractApplicationContext.refresh()方法
    protected void refresh(ApplicationContext applicationContext) {
        ((AbstractApplicationContext)applicationContext).refresh();
    }

//2. AbstractApplicationContext.java
public void refresh() throws BeansException, IllegalStateException {
    synchronized(this.startupShutdownMonitor) {
        this.prepareRefresh();
        ConfigurableListableBeanFactory beanFactory = this.obtainFreshBeanFactory();
        this.prepareBeanFactory(beanFactory);
        try {
            this.postProcessBeanFactory(beanFactory);
            this.invokeBeanFactoryPostProcessors(beanFactory);
            this.registerBeanPostProcessors(beanFactory);
            this.initMessageSource();
            this.initApplicationEventMulticaster();
            //调用各个子类的onRefresh()方法,也就说这里要回到子类:ServletWebServerApplicationContext,调用该类的onRefresh()方法
            this.onRefresh();
            this.registerListeners();
            this.finishBeanFactoryInitialization(beanFactory);
            this.finishRefresh();
        } catch (BeansException var9) {
            this.destroyBeans();
            this.cancelRefresh(var9);
            throw var9;
        } finally {
            this.resetCommonCaches();
        }
    }
}
//3. ServletWebServerApplicationContext.java
protected void onRefresh() {
    super.onRefresh();
    try {
        this.createWebServer();
    } catch (Throwable var2) {

    }
}
    //这里是创建webServer,但是还没有启动tomcat,这里是通过ServletWebServerFactory创建,那么接着看下ServletWebServerFactory
    private void createWebServer() {
        ...
        if (webServer == null && servletContext == null) {
            ServletWebServerFactory factory = this.getWebServerFactory();
            this.webServer = factory.getWebServer(new ServletContextInitializer[]{this.getSelfInitializer()});
        }
        ...
        this.initPropertySources();
    }
        //接口
        public interface ServletWebServerFactory {
            WebServer getWebServer(ServletContextInitializer... initializers);
        }
        //实现
        AbstractServletWebServerFactory
        JettyServletWebServerFactory
        TomcatServletWebServerFactory //这里我们使用的tomcat,所以我们查看TomcatServletWebServerFactory
        UndertowServletWebServerFactory

//4. TomcatServletWebServerFactory.java
public WebServer getWebServer(ServletContextInitializer... initializers) {
    Tomcat tomcat = new Tomcat();
    File baseDir = (this.baseDirectory != null) ? this.baseDirectory : createTempDir("tomcat");
    tomcat.setBaseDir(baseDir.getAbsolutePath());
    //创建Connector对象
    Connector connector = new Connector(this.protocol);
    tomcat.getService().addConnector(connector);
    customizeConnector(connector);
    tomcat.setConnector(connector);
    tomcat.getHost().setAutoDeploy(false);
    //4.1 创建 Engine 容器
    configureEngine(tomcat.getEngine());
    for (Connector additionalConnector : this.additionalTomcatConnectors) {
        tomcat.getService().addConnector(additionalConnector);
    }
    prepareContext(tomcat.getHost(), initializers);
    //4.2 启动 tomcat
    return getTomcatWebServer(tomcat);
}
protected TomcatWebServer getTomcatWebServer(Tomcat tomcat) {
    return new TomcatWebServer(tomcat, getPort() >= 0);
}

    //4.1 Tomcat.java,返回 Engine 容器,Engine是最高级别容器,Host是Engine的子容器,Context是Host的子容器,Wrapper是Context的子容器
    public Engine getEngine() {
        Service service = getServer().findServices()[0];
        if (service.getContainer() != null) {
            return service.getContainer();
        }
        Engine engine = new StandardEngine();
        engine.setName( "Tomcat" );
        engine.setDefaultHost(hostname);
        engine.setRealm(createDefaultRealm());
        service.setContainer(engine);
        return engine;
    }

    //4.2 TomcatWebServer.java 调用构造函数实例化TomcatWebServer
    public TomcatWebServer(Tomcat tomcat, boolean autoStart) {
        Assert.notNull(tomcat, "Tomcat Server must not be null");
        this.tomcat = tomcat;
        this.autoStart = autoStart;
        initialize();
    }
    private void initialize() throws WebServerException {
        //在控制台会看到这句日志
        logger.info("Tomcat initialized with port(s): " + getPortsDescription(false));
        synchronized (this.monitor) {
            ...
            this.tomcat.start();//===启动tomcat服务===
            ...
        }
    }
2.3 补充
2.3.1 getWebServer 与 ServletContextInitializer
- 在初始化 servletContext 容器的过程中,可将 springboot 默认或自定义实现的 ServletContextInitializer 组件,如 servlet、filter、listener 等加入容器;
```java
//TomcatServletWebServerFactory.java —配置 tomcat 的各种容器
public WebServer getWebServer(ServletContextInitializer… initializers) {
prepareContext(tomcat.getHost(), initializers);
return getTomcatWebServer(tomcat);
}
// 1. tomcat 的 prepareContext
protected void prepareContext(Host host, ServletContextInitializer[] initializers) {
}... //添加的默认的 defaultServlet 和 jspServlet if (this.isRegisterDefaultServlet()) { this.addDefaultServlet(context); } if (this.shouldRegisterJspServlet()) { this.addJspServlet(context); this.addJasperInitializer(context); } context.addLifecycleListener(new TomcatServletWebServerFactory.StaticResourceConfigurer(context)); //处理 ServletContextInitializer ServletContextInitializer[] initializersToUse = this.mergeInitializers(initializers); host.addChild(context); this.configureContext(context, initializersToUse); this.postProcessContext(context);
- 通过接口 ServletContextInitializer 往 ServletContext 容器中注册 Servlet, Filter 或者 EventListener
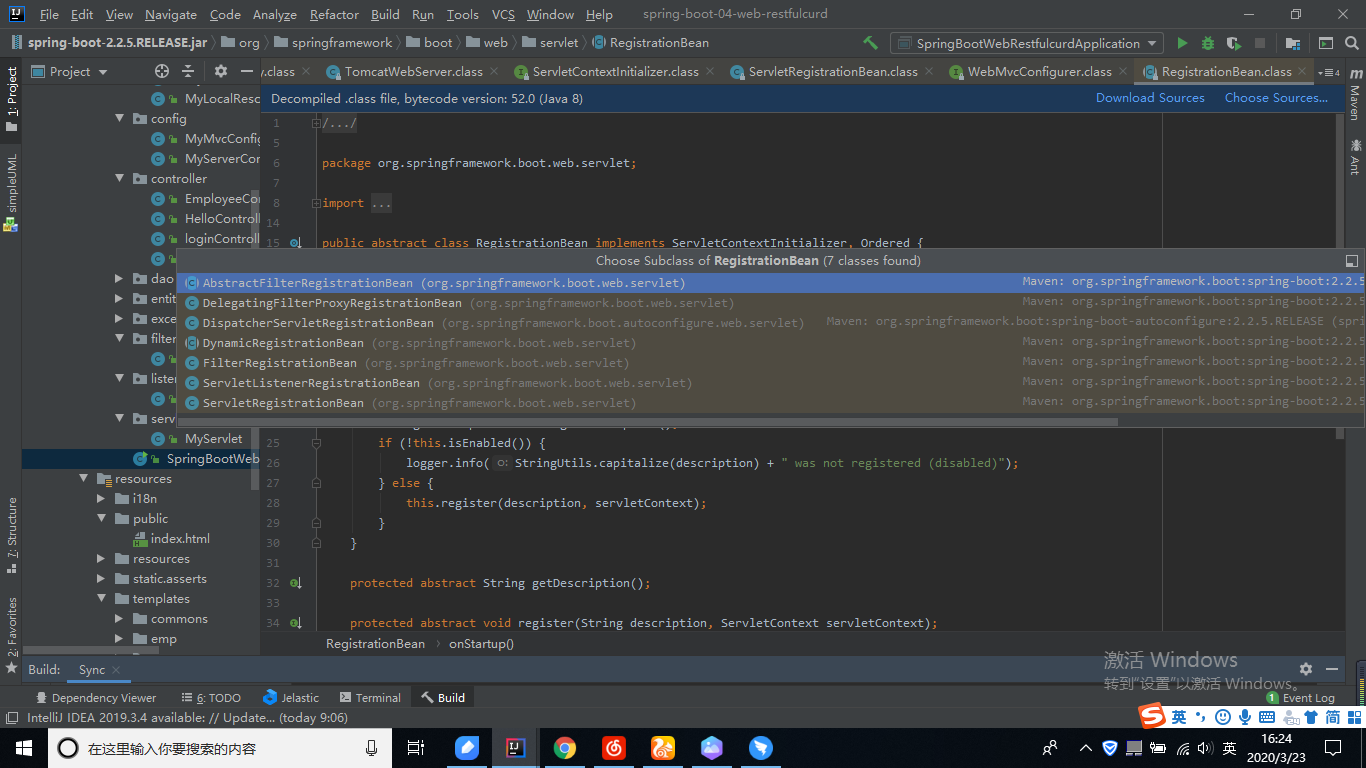
// ServletContextInitializer 主要被 RegistrationBean 实现
public abstract class RegistrationBean implements ServletContextInitializer, Ordered {
…
}
//RegistrationBean 有四个继承子类,是 ServletContext 容器中的抽象组件
AbstractFilterRegistrationBean
DelegatingFilterProxyRegistrationBean
DispatcherServletRegistrationBean
DynamicRegistrationBean
FilterRegistrationBean
ServletListenerRegistrationBean
ServletRegistrationBean
```
总结与思考
参考

若有收获,就点个赞吧
0 人点赞
